By Rishit Dagli
When you're starting a new project, you might have to add multiple linting tools to beautify your code and prevent simple errors.
You will often use multiple linters – one of them might support an npm installation and other one might have a PyPI installation and so on. You will also want to set up some automation in your CI to run these linters, but this process is quite tedious 😫.
In this article, I will show you how you can use GitHub Super Linter, a single linter to solve all these problems. Most of my personal projects use GitHub Super Linter as well, and I have personally found it be a huge lifesaver.
Why is Linting Necessary?
Linting is essentially a form of static code analysis. It analyzes the code you wrote against some rules for stylistic or programmatic errors. Think of it as a tool that flags suspicious usage in software.
A linter can help you save a lot of time by:
- Preventing broken code from being pushed
- Helping establish coding best practices
- Building guidelines for code layout and format
- Helping code reviews be a lot smoother
- Flagging bugs in your code from syntax errors
Given the useful nature of linting tools, you would ideally want to run a linter before any code reviews happen on every single piece of code that is pushed to your repository. This definitely helps you write better, more readable, and more stable code.
Here is an example of using Black, a linting tool for Python focusing on code formatting.
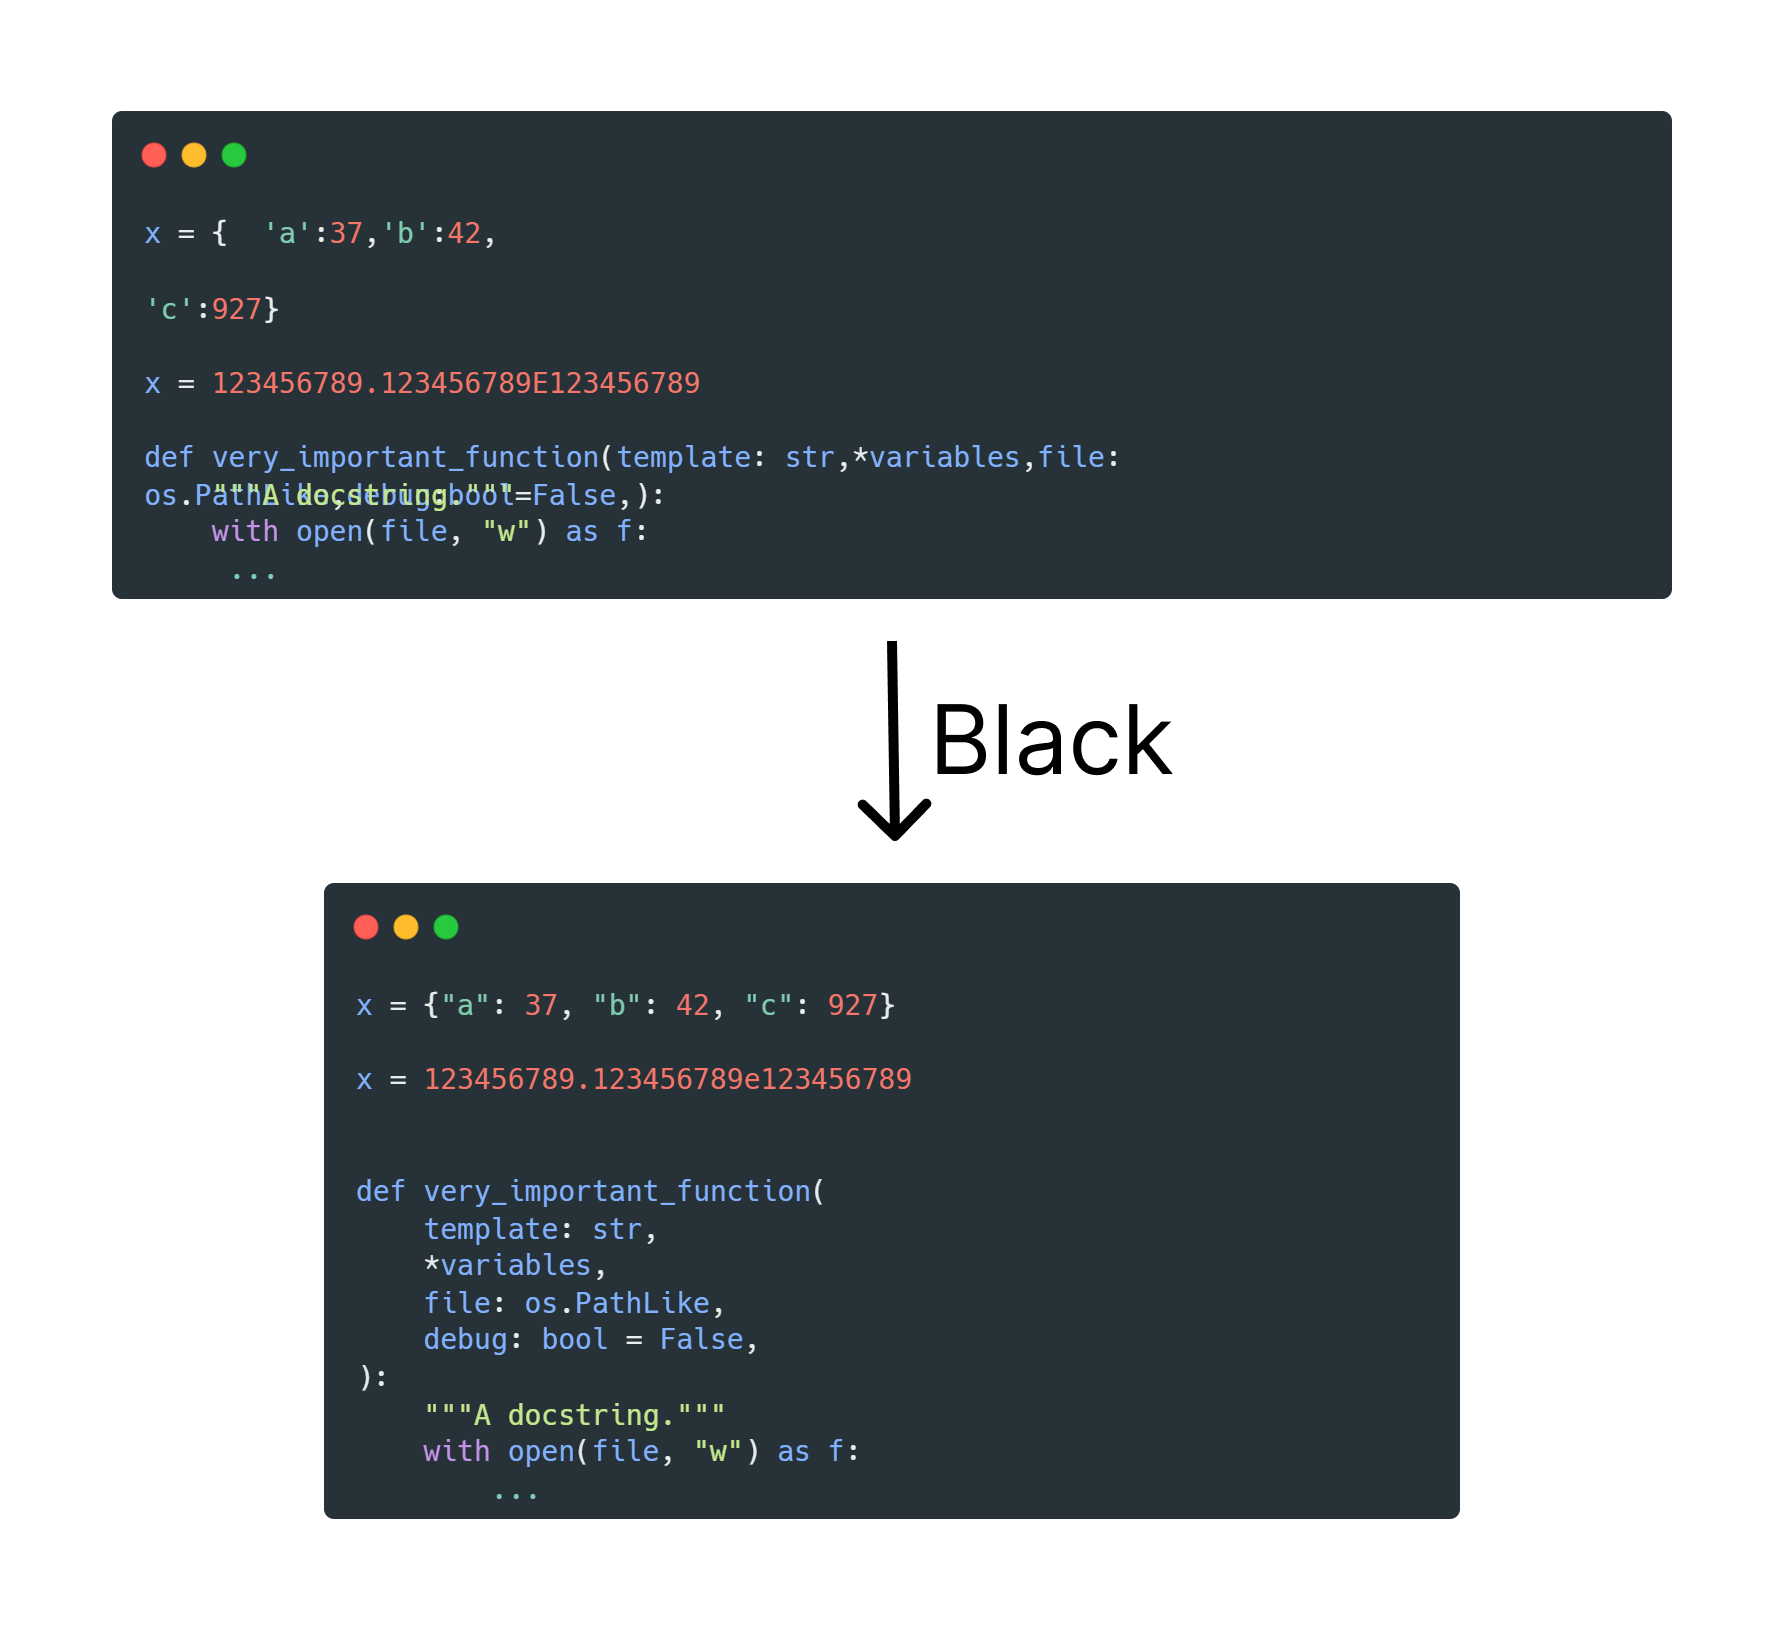 Formatting changes made by Black
GitHub Super Linter can help you quite a lot in bringing these capabilities to your projects easily and efficiently. GitHub Super Linter is a combination of multiple commonly used linters which you can use very easily. It lets you set up automated runs for these linters, as well as manage multiple linters in a single project!
There is also a ton of customization capabilities with environment variables that can help you customize the Super Linter to your individual repository.
How to Use GitHub Super Linter in GitHub Actions
Super Linter is primarily designed to be run inside a GitHub Action, which is also how I have been using it for quite some time. We will talk about this first. To follow along you should create a new GitHub Action in your repository. Let us create a new file at .github/workflows/linter.yml.
Going forward, I will assume you know about the basic syntax for GitHub Actions. But in case you do not or need a quick refresher, I would suggest going through this Quick Start Guide.
How to Create an Action
We already have a blank file .github/workflows/linter.yml, which we will now populate with an action you can use to lint your project.
We will start by giving our action a name. This is what appears under the GitHub Action Status Check:
name: Lint Code Base
Next up, let's specify triggers for our action. This answers the question of when you should lint your codebase. Here we tell it to run the lint on every push and on every pull request.
name: Lint Code Base

on: [push, pull_request]
This is another very commonly used configuration for the triggers. This only runs when you make a pull request to main or master branches and not on pushes to these branches.
on:
  push:
    branches-ignore: [master, main]
  pull_request:
    branches: [master, main]
Next up, we want to set up a job. All the components you put in a single job will run sequentially. Here, think of it as the steps and in which order we want them to run whenever the trigger is satisfied.
We will name this job "Lint Code Base" and ask GitHub to run our job on a runner with the last version of Ubuntu supported by GitHub.
name: Lint Code Base

on: [push, pull_request]

jobs:
  build:
    name: Lint Code Base
    runs-on: ubuntu-latest
You are not bound to using a single kind of runner (ubuntu-latest), like we do here. It's a common practice to have a matrix of agent kinds, but in this case it will run the same way on all kinds of runners. You often you use a matrix of runners to test that your code works well on all kinds of platforms.
GitHub Super Linter doesn't work any differently on other machine types so we just use a single machine type.
Next up, we will start defining the steps we want this workflow to have. We essentially have two steps:
- Checkout the code
- Run the super linter
On to checking out the code. To do this, we will use the official checkout action by GitHub.
We will set fetch-depth: 0 to fetch all history for all branches and tags which is required for Super linter to get a proper list of changed files. If you hadn't done this, only a single commit would be fetched.
We also give our step a name and tell it we want to use the action present in the GitHub repository at actions/checkout@v3 .
name: Lint Code Base

on: [push, pull_request]

jobs:
  build:
    name: Lint Code Base
    runs-on: ubuntu-latest

    steps:

      - name: Checkout Code
        uses: actions/checkout@v3
        with:
          fetch-depth: 0
This piece of code checks out your repository under $GITHUB_WORKSPACE which allows the rest of the workflow to access this repository. The repository we are checking out is the one where your code resides, ideally the same repository.
How to Run the Linter
Now we'll add the step to run the linter since we have our code checked out. You can customize GitHub Super Linter using environment variables when running the action.
name: Lint Code Base

on: [push, pull_request]

jobs:
  build:
    name: Lint Code Base
    runs-on: ubuntu-latest

    steps:

      - name: Checkout Code
        uses: actions/checkout@v3
        with:
          fetch-depth: 0

      - name: Lint Code Base
        uses: github/super-linter@v4
We will now talk about the environment variables which you will often be using with GitHub Super Linter as well as some examples.
VALIDATE_ALL_CODEBASE: this decides whether Super Linter should lint the whole codebase or just the changes introduced with that commit. These changes are found out usinggit diff, but you can also change the search algorithm (but we will not be looking into this in this article). Example:VALIDATE_ALL_CODEBASE: true.GITHUB_TOKEN: As the name suggests, this is the value of the GitHub token. If you use this, GitHub will show up each of the linters you use (we will see how to do that soon) as separate checks on the UI. Example: In GitHub Actions you can useGITHUB_TOKEN: ${{ secrets.GITHUB_TOKEN }}.DEFAULT_BRANCH: The name of the repository default branch. Example:DEFAULT_BRANCH: main.IGNORE_GENERATED_FILES: In case you have any files which are generated by tools, you could mark them as@generated. If this environment variable is set to true, Super Linter ignores these files. Example:IGNORE_GENERATED_FILES: true.IGNORE_GITIGNORED_FILES: Excludes the files which are in .gitignore from linting. Example:IGNORE_GITIGNORED_FILES: true.LINTER_RULES_PATH: A custom path where any linter customization files should be. By default your files are expected to be at.github/linters/. Example:LINTER_RULES_PATH: /.
These are some of the environment variables you will use the most often, but none of the ones we've discussed yet talk about language-specific linting.
If you do not use any of the environment variables we talk about, Super Linter automatically finds and uses all the applicable linters for your codebase.
How to Add Specific Linters to Super Linter
You will often only be interested in using specific linters for your projects. You can use the following environment variable pattern to add any linters you want:
VALIDATE_{LANGUAGE}_{LINTER}
You can find the naming conventions for these in the list of Supported Linters.
Here are a couple of examples, where we specify we want to use Black to lint all Python files, ESLint for JavaScript files, and HTMLHint for HTML files.
name: Lint Code Base

on: [push, pull_request]

jobs:
  build:
    name: Lint Code Base
    runs-on: ubuntu-latest

    steps:

      - name: Checkout Code
        uses: actions/checkout@v3
        with:
          fetch-depth: 0

      - name: Lint Code Base
        uses: github/super-linter@v4
        env:
          VALIDATE_ALL_CODEBASE: true
          VALIDATE_JAVASCRIPT_ES: true
          VALIDATE_PYTHON_BLACK: true
          VALIDATE_HTML: true
          GITHUB_TOKEN: ${{ secrets.GITHUB_TOKEN }}
Once you set one of the linters to true, all the other linters will not run. In the above snippet, none of the linters except ESLint, Black, or HTMLHint will run.
However, in this example, we set a single linter to false so every linter except ESLint will run here:
name: Lint Code Base

on: [push, pull_request]

jobs:
  build:
    name: Lint Code Base
    runs-on: ubuntu-latest

    steps:

      - name: Checkout Code
        uses: actions/checkout@v3
        with:
          fetch-depth: 0

      - name: Lint Code Base
        uses: github/super-linter@v4
        env:
          VALIDATE_ALL_CODEBASE: true
          VALIDATE_JAVASCRIPT_ES: false
          GITHUB_TOKEN: ${{ secrets.GITHUB_TOKEN }}
How to Customize Lint Checks
Linters often use configuration files so you can modify the rules the linter uses. In the above two full length examples I showed, Super Linter will try to find any configuration files under .github/linters/.
These could be your .eslintrc.yml file used to configure ESLint, .htmlhintrc for configuring HTMLHint, and so on.
Here is an example of the configuration file if you use the Flake8 linter for Python:
[flake8]
max-line-length = 120
You save this at .github/linters/.flake8. You'll then use it while running the Flake8 linter. You can find an example of template configuration files you can use here.
However, here are two examples of how you can modify this path:
- All your linter configuration files are in some other directory
Add the directory path as an environment variable like this:
LINTER_RULES_PATH: configs/
- Add path for a configuration file
You can also hardcode a path for a specific linter as an environment variable. Here is an example:
JAVASCRIPT_ES_CONFIG_FILE: configs/linters/.eslintrc.yml
How to Run Super Linter Outside GitHub Actions
GitHub Super Linter was built to be run inside GitHub Actions. But running it locally or on other CI platforms can be particularly helpful. You will essentially be running Super Linter as you were locally in any other CI platforms.
How to Run Super Linter Locally
You first want to pull the latest Docker container down from DockerHub with this command:
docker pull github/super-linter:latest
To run this container you then run the following:
docker run -e RUN_LOCAL=true -e USE_FIND_ALGORITHM=true VALIDATE_PYTHON_BLACK=true -v /project/directory:/tmp/lint github/super-linter
Notice a couple of things here:
- We run it with the
RUN_LOCALflag to bypass some of the GitHub Actions checks. This automatically setsVALIDATE_ALL_CODEBASEto true. - We map our local codebase to
/tmp/lintso that the linter can pick up the code. - The way we set environment variables is of course different, but the overall process of running the GitHub Super Linter remains the same.
How to Run Super Linter on Other CI Platforms
Running GitHub Super Linter on other CI platform is pretty similar to locally running it. Here is an example of running it in Azure Pipelines by Tao Yang.
- job: lint_tests
  displayName: Lint Tests
  pool:
    vmImage: ubuntu-latest
  steps:
  - script: |
      docker pull github/super-linter:latest
      docker run -e RUN_LOCAL=true -v $(System.DefaultWorkingDirectory):/tmp/lint github/super-linter
    displayName: 'Code Scan using GitHub Super-Linter'
This just runs the commands we would have for locally running the Super Linter as a script. You could run it in the exact same way on other CI platforms.
Conclusion
Thank you for sticking with me until the end. I hope that you've taken away a thing or two about linting and using GitHub Super Linter. It has most certainly been one of my favorite open source projects.
If you learned something new or enjoyed reading this article, please share it so that others can see it. Until then, see you in the next post!
You can also find me on Twitter @rishit_dagli, where I tweet about open source and machine learning.