
By Chandrabhan Singh
Importance of aesthetics, its impact, and tool to achieve it.
I remember as a child, every time I’d walk up to a bakery, I’d choose the pastries with the most beautiful toppings. Only after having the first bite would I know if it was the one I was longing for.
A well-plated dish can trump taste at times. The tendency to pick on appearance has a significant impact on our choices. This inclination towards plating is not only confined to food. Trendy clothes, a decorated apartment, and a well-designed car are a few examples.
A master chef understands the importance of presentation for a successful restaurant. The art of garnishing can differentiate a culinary masterpiece from a novice’s plate. Moreover, a creative plating would add pleasure and taste, encouraging customers to pay frequent visits. The web is no different from any gourmet meal in this sense. Visual impact has had a crucial role in all successful web applications, too.
You need to make significant efforts to make web applications look pleasant. This is where Cascade Style Sheets (CSS) come in.
As the web evolves, applications grow bigger and bigger. To match our needs, we need more from CSS out of the box. But CSS has some limitations.
Since you’re reading this article, you’ve already finished the toppings, and now is the time to taste the rest of the cake. Let’s see what limitations CSS has and how we can overcome them. The goal is to take your plating technique to the next level.
Prerequisites
You need to have a fair understanding of CSS and CSS selectors. You’ll also need Node.js and npm installed.
CSS Limitations
Identifying limitations is subjective, though I would like to mention a few.
- Programming mechanism: Features like variables, functions, classes, and operators are missing in CSS3 itself.
- Lengthy CSS file: In rich user interface applications, style sheets may grow overnight. Large files can be a nightmare for maintenance.
- Absent math operators: Math operators like
+,-,*,/can be very handy at times.
To overcome such limitations, we have preprocessor scripting languages.
The preprocessor
A Preprocessor is a piece of software which takes an input file written in some programming language and processes it to produce a file following syntax of another language. It is used to extend the syntax of an existing programming language by adding new functionality to it.
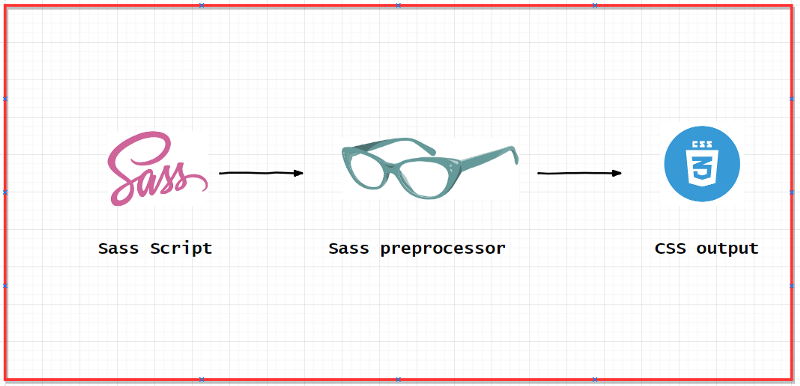
A CSS preprocessor extends the CSS syntax by adding a programming mechanism to it. SassScript is a superset of CSS. When compiled, it creates valid CSS blocks for your web applications.
There are a few CSS preprocessors available like Less, Stylus, and Sass. Our focus will be on Sass ( Syntactically-awesome style sheets). But the concept is more or less the same for other preprocessors.
We will go through the installation of a Node.js Sass compiler, and later we’ll see various Sass features in action. So, get ready to garnish your delicious web recipes ?.
Preparing Sass
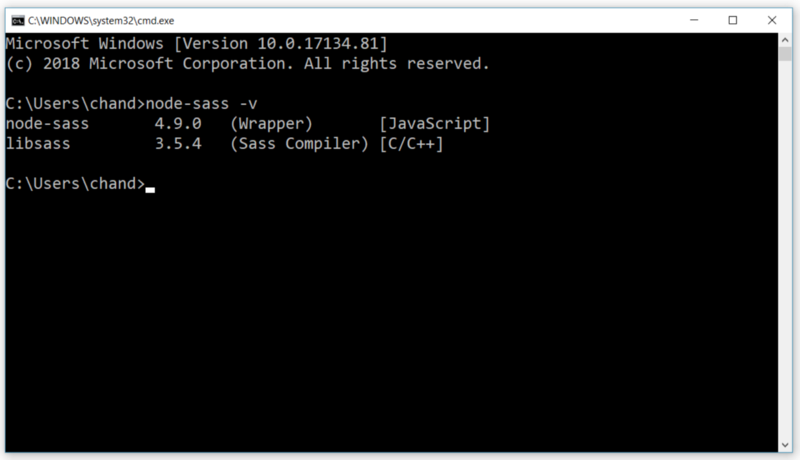
Sass was first written in Ruby and then in other languages. You can choose from many available implementations. For this article, we will stick to a Node.js package — node-sass. This package uses high-performance Sass implementation in C called libSassSass.
First things first: Let’s install node-sass. Then we will set up a sample application to see various Sass features in action. Open a terminal on your machine and execute the below command.
npm install node-sass -g
Here we are asking node package manager to install node-sass for us. With flag -g, we installed the package globally. Great! Once it finishes, make sure everything is in place.
node-sass -v
Okay! We have all the ingredients we may need. Let’s see what flavors Sass comes with, and afterward we will start our journey to explore Sass.
Various flavors of Sass
There are two ways of creating a Sass file. You can use either of these two syntaxes.
- Sass style: This syntax uses indentation to separate code blocks and new lines.
- SCSS style: This syntax uses blocks like a programming language. We’ll use SCSS syntax in this article.
Note: It’s possible to convert from one syntax to another by a simple Sass convert command. Feel free to adopt the one you like.
Preparing the main dish
As we are Sass-ready on our machine, we can start playing around to see what great features it can bring to us. Follow along with me to set up a sample application.
Here I am using Visual Studio Code. You can use any code editor of your choice. I have been using it for a long time and I would recommend it. It has some cool productivity plugins that can be of great help.
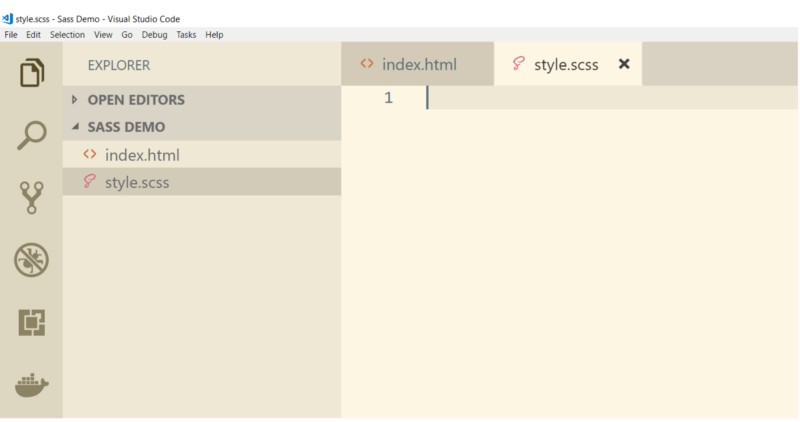
So far, we have created a folder and two files.
- index.html: an HTML file.
- style.scss: root (or main) Sass script file.
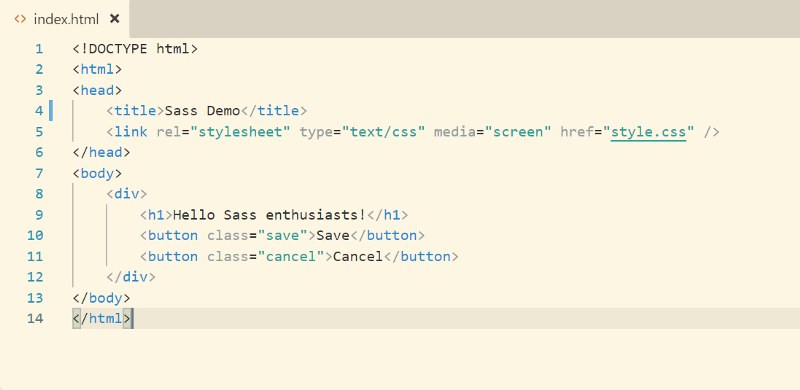
To start, let’s create a div, an h1, and two buttons in the HTML file.
Let’s iterate through the most used Sass features. On the way, we will also see the compiled CSS blocks.
Variables
Variables help you centralize CSS properties. You can assign them once at the top of a file and use them throughout the file. These variables are like placeholders for a CSS property’s value. In Sass, a variable name must start with a $ sign.
We are going to create two variables: $h1-color and $h1-height. Then we will use these variables to assign color and height properties to an h1 element. Below is the Sass snippet.
$h1-color     : blue;
$h1-height    : 50px;
h1{
   color  : $h1-color;
   height : $h1-height;
}
All right! We have an HTML file and a Sass file so far. What about the CSS file? It hasn’t appeared yet.
Well, we are almost there. Open your terminal to go to the folder we created and execute the command below:
node-sass style.scss style.css
The parameters for the node-sass compiler are input and output file path. Now if you open the HTML we created during project setup in a browser, you should see the following.
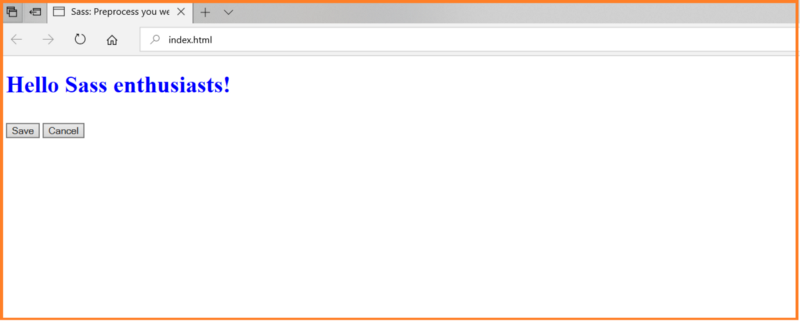
Notice that the CSS file is already included in the HTML’s headsection.
Operators
Mathematical operators were always missed in CSS. Sass provides basic math operators like addition +, subtraction -, multiplication * and division/.
You can use variables and operators together to manipulate CSS properties. Let’s take an example. We can use operators to calculate padding for an h1 element depending upon the width of its parent div. We will use the divide operator / for this example.
$h1-color   : blue;
$h1-font    : 50px;
$div-width  : 500px;
div{
   width: $div-width;
}
h1{
   color       :  $h1-color;
   height      :  $h1-font;
   padding     :  $div-width / 10;
}
Mixins
Mixins are like abstract base classes. Mixins are handy to group related properties. Once created, these mixins can be reused in the rest of the style blocks. Moreover, you can even pass variables. Confusing? Let’s take an example.
You must have noticed that creating a style for border-radius is always quite messy. For cross-browser support, we must use vendor-specific properties. However, with mixins, it can be super easy. Let’s see it happen.
@mixin border-radius($radius){
   -webkit-border-radius   : $radius;
   -moz-border-radius      : $radius;
   -ms-border-radius       : $radius;
   border-radius           : $radius;
}
div{
   width    : $div-width;
   border   : 2px solid grey;
   @include border-radius(20px);
}
Here we used the @mixin directive to define a mixin named border-radius. This mixin contains all the possible properties to set the radius of a border. We also passed a parameter to this mixin. Whenever you need to set the radius of an element, include this mixin with the @include keyword.
Compile the script once again to generate the CSS. How does it look now?
//Processed CSS output
div {
   width: 500px;
   border: 2px solid grey;
   -webkit-border-radius: 20px;
   -moz-border-radius: 20px;
   -ms-border-radius: 20px;
   border-radius: 20px;
}
Nesting
HTML elements have a logical tree-like structure with nested elements. To write structured CSS selectors, CSS should also follow some logical nesting. Yet, CSS does not support nesting.
Since you have Sass on your machine, writing nested CSS selectors is a piece of cake.
div{
   >h1{
      color: blue;
      &:hover{
         color: greenyellow;
      }
   }
}
Here we used two combinators, > and &. The purpose of a combinator is to explain the relationship between the elements. Our example will apply blue color to all h1 children of a div element. Another selector is the parent selector &. Use this selector for pseudo-classes like hover, focus, and active.
Compile once again to see the generated CSS blocks.
//Processed CSS output
div h1 {
   color: blue;
}
div h1:hover {
   color: greenyellow;
}
Inheritance:
Yes — you can use the most popular OOP feature in Sass as well. Accruing the properties of one’s parent is Inheritance. But does it make any sense in CSS? And can we use them? We can! Believe me, and, I am sure you will adore this feature.
Consider an application where you have various types of buttons. Save, Cancel, and Discard to name a few. You realize they share most of their characteristics. For example padding, font-size, margin. The only difference is the background color.
Does it smell like inheritance? Yeah— You guessed it right! We can create a parent style for all these common properties and use them in child blocks.
%common-button{
   padding: 16px 8px;
   border: none;
   font-size: 18px;
}
.save{
   @extend %common-button;
   background-color: blue;
   color: white;
}
.cancel{
   @extend %common-button;
   background-color: goldenrod;
   color: white;
}
Here, the save and cancel buttons inherited their common properties from the common-button class. To declare a parent style, use the % sign. Use the @extend directive to inherit a child block.
Import
We have seen many amazing features that Sass provides. We were able to make styles more readable and structured. Still, it can grow and become hard to maintain.
Sass has a solution to this problem as well: a partial file. A partial file is a way to create small modular Sass files. The root Sass file can then import these modular files altogether. The naming convention for partial files is to prefix the file name with an underscore _.
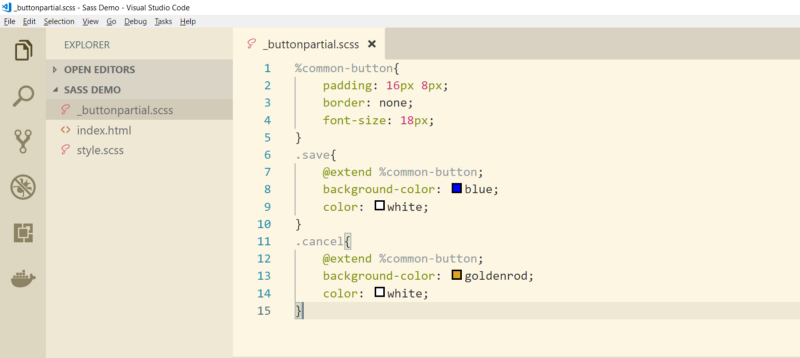
@import '_buttonpartial';
h1{
   color:blue;
}
Use the @import directive to include a partial file in the root Sass script.
Loop
Iteration is one of the most frequently used programming mechanisms. Sass script allows you to iterate over variables. You can use various directives like @for, @each and @while.
$totalButton: 2;
@for $i from 1 through $totalButton{
   .button-#{$i} {
      width: 50px * $i;
      height: 120px / $i;
   }
}
The generated CSS block will have two classes with different styles.
//Processed CSS output
.button-1 {
  width: 50px;
  height: 120px; }
.button-2 {
  width: 100px;
  height: 60px; }
Avoid repeating — use a food processor
A food processor is a kitchen appliance used to facilitate repetitive tasks in the preparation of food.
We have used a Node.js package for compiling Sass files. It can be very annoying if you have to compile every time you make a change in the Sass script.
There is a fancy way to avoid repetitive compiling: a task runner. Visual Studio Code has a built-in task runner, but you can use any task runner of your choice. Gulp is another popular task runner. For compiling Sass script with Gulp, you would need gulp sass compiler instead.
Warning! Sass is only a development tool. Avoid shipping any library or file associated with Sass. You would never need them on a production server.
What’s next
We’ve learned how to use preprocessors to create efficient and maintainable CSS blocks. We have seen various Sass features with examples. For more in-depth knowledge, jump to the official website.
I have also created a sample project. Go ahead, clone the project and start playing.