
By Amazing Enyichi Agu
JavaScript has the ability to carry out asynchronous (or async) instructions. These instructions run in the background until they have finished processing.
Asynchronous instructions do not stop the JavaScript engine from actively accepting and processing more instructions. This is why JavaScript is non-blocking in nature.
There are a few asynchronous features in JavaScript, and one of them is Promises. To work with promises, you must adopt a special syntax that makes writing async instructions a lot more organized. Working with promises is a very useful skill every JavaScript developer should learn.
This article is an in-depth guide to promises in JavaScript. You are going to learn why JavaScript has promises, what a promise is, and how to work with it. You are also going to learn how to use async/await—a feature derived from promises—and what a job queue is.
Here are the topics we will cover:
- Why should you care about promises?
- What is a promise?
- How to create a promise in JavaScript
- How to attach a callback to a promise
- How to handle errors in a promise
- How to handle many promises at once
- What is the async/await syntax?
- How to create an async function in JavaScript
- How to use the await keyword
- How to handle errors in async/await
- What is a job queue?
This guide promises to be an interesting and insightful read. :) It is meant for anyone looking to be better at writing JavaScript async instructions, thereby properly utilizing what the language has to offer. With all that out of the way, let's get started.
Prerequisites
In order to follow along with the material and grasp it, here are a few things you should have:
Knowing these topics will help you properly understand what you are about to learn. If you do not have the prerequisites, you can go learn them and return. The article will use some concepts from those topics here.
Why Should You Care about Promises?
Promises were not always part of JavaScript. Callbacks worked together with asynchronous functions to produce desired results in the past. A callback is any function that is a parameter of an async function, which the async function invokes to complete its operation.
To call an async function, you had to pass a callback as an argument like this:
function callback(result) {
  // Use the result from the Async operation
}

randomAsyncOperation((response) => callback(response));
But callbacks had a huge problem. Demonstrating the problem makes understanding it easier.
Assume you had an asynchronous function that fetched data somewhere on the internet. This function should accept two callbacks, successCallback and failureCallback.
The successCallback would run if the operation was successful and the program found the appropriate resource. But the failureCallback would run if the operation was unsuccessful and could not find the resource.
function SuccessCallback(result) {
  console.log("Resource found", result);
}

function failureCallback(error) {
  console.error("Ooops. Something went wrong", error);
}
To run the async function, you had to pass the two callback functions as arguments:
fetchResource(url, successCallback, failureCallback)
Here, url is a variable that represents the location of the resource.
This code will run smoothly for now. You've taken care of both possible scenarios the function could run into. You have a callback for a successful operation and a callback for a failed operation.
Now assume you want to perform many other fetch operations, but each operation must be successful for the next one to run. This is useful if the data you need must come in a certain order and cannot be scattered.
For example, you might run into this situation if the result of the next operation depends on the result of the previous one.
In this case, your success callbacks would have their own success callbacks, which is important because you need to use the results if they come in.
fetchResource(
  url,
  function (result) {
    // Do something with the result
    fetchResource(
      newUrl,
      function (result) {
        // Do something with the new result
        fetchResource(
          anotherUrl,
          function (result) {
            // Do something with the new result
          },
          failureCallback
        );
      },
      failureCallback
    );
  },
  failureCallback
);
From the example, you may notice a complication developing. You would have to keep nesting your success callbacks while repeating the failureCallback every time you call the async function.
These nested callbacks led to the ‘Callback Pyramid of Doom’ or callback hell, which can quickly become a nightmare. Could there be a more efficient way of handling situations like this?
JavaScript introduced Promises as part of ES6 (ES2015) to solve this problem. It simplified working with callbacks and made for better syntax as you'll see shortly. Promises are now the foundation for most modern asynchronous operations developers use in JavaScript today.
What is a Promise?
 Image Credit: https://gifer.com
A promise is an assurance or guarantee that something will happen in the future. A person can promise another person a specific outcome or result. Promises are not limited to individuals, governments and organizations can also make promises. You have probably made a promise before.
With this assurance (promise) comes two possible outcomes–either fulfillment or failure. A promise is tied to an outcome that will show it is fulfilled. If that outcome does not happen, then the promise failed. A promise at the end must have one of these results.
In JavaScript, a Promise is an object that will produce a single value some time in the future. If the promise is successful, it will produce a resolved value, but if something goes wrong then it will produce a reason why the promise failed. The possible outcomes here are similar to that of promises in real life.
JavaScript promises can be in one of three possible states. These states indicate the progress of the promise. They are:
- pending: This is the default state of a defined promise
- fulfilled: This is the state of a successful promise
- rejected: This is the state of a failed promise
A promise goes from pending to fulfilled, or from pending to rejected—‘fulfilled’ and ‘rejected’ indicate the end of a promise.
From now on, this article will refer to a 'promise' as the JavaScript object.
How to Create a Promise in JavaScript
To create a promise, you need to create an instance object using the Promise constructor function. The Promise constructor function takes in one parameter. That parameter is a function that defines when to resolve the new promise, and optionally when to reject it.
const promise = new Promise((resolve, reject) => {
  // Condition to resolve or reject the promise
});
For example, assume you want a promise to resolve after a timeout of two seconds. You can achieve this by writing it into the parameter of the constructor function.
const promise = new Promise((resolve, reject) => {
  setTimeout(() => resolve("Done!"), 2000);
});
In promises, resolve is a function with an optional parameter representing the resolved value. Also, reject is a function with an optional parameter representing the reason why the promise failed. In the example above, the resolved value of the promise is the string 'Done!'.
Here is yet another example showing how you can resolve or reject a promise based on the conditions you set. In this example, the outcome of the promise is based on a random number the program generates.
const promise = new Promise((resolve, reject) => {
  const num = Math.random();
  if (num >= 0.5) {
    resolve("Promise is fulfilled!");
  } else {
    reject("Promise failed!");
  }
});
From these examples, you can see that you have control over when to resolve or reject your promise and can tie it to a certain condition. With that, you have learned how to create a promise in JavaScript.
How to Attach a Callback to a Promise
To create a callback for a promise, you need to use the .then() method. This method takes in two callback functions. The first function runs if the promise is resolved, while the second function runs if the promise is rejected.
const promise = new Promise((resolve, reject) => {
  const num = Math.random();
  if (num >= 0.5) {
    resolve("Promise is fulfilled!");
  } else {
    reject("Promise failed!");
  }
});

function handleResolve(value) {
  console.log(value);
}

function handleReject(reason) {
  console.error(reason);
}

promise.then(handleResolve, handleReject);
// Promise is fulfilled!
// or
// Promise failed!
That is the way to handle the possible outcomes of your promise. Any unhandled errors in your promise will keep them in a rejected state at the end but handled errors makes the operation return a fulfilled promise.
It is possible to create an immediately resolved promise, and then attach a callback with the .then() method. You can also create an immediately rejected promise in the same way too.
Promise.resolve("Successful").then((result) => console.log(result));
// Successful

Promise.reject("Not successful").then((result) => console.log(result));
// Error: Uncaught (in promise)
The error in the rejected promise is because you need to define a separate callback to handle a rejected promise.
Promise.reject("Not successful").then(
  () => {
    /*Empty Callback if Promise is fulfilled*/
  },
  (reason) => console.error(reason)
);
// Not Successful
Now you have properly handled a rejected outcome.
Promises make it incredibly easy to chain asynchronous instructions. When you handle a promise with the .then() method, the operation always returns another promise. By employing this approach, you can eliminate the previously mentioned 'Callback Pyramid of Doom'.
Consider the code that previously caused the pyramid structure:
fetchResource(
  url,
  function (result) {
    // Do something with the result
    fetchResource(
      newUrl,
      function (result) {
        // Do something with the new result
        fetchResource(
          anotherUrl,
          function (result) {
            // Do something with the new result
          },
          failureCallback
        );
      },
      failureCallback
    );
  },
  failureCallback
);
However, because .then() returns another promise, this is how to write the same instructions above with promises:
fetchResource(url)
  .then(handleResult, failureCallback)
  .then(handleNewResult, failureCallback)
  .then(handleAnotherResult, failureCallback);
As you can see, calling promises does not require a nested syntax. You can even eliminate the repeated failureCallback to make the code a lot neater, which is something the upcoming section of the article will explore.
How to Handle Errors in a Promise
To handle errors in Promises, use the .catch() method. If anything goes wrong with any of your promises, this method can catch the reason for that error.
Promise.reject(new Error()).catch((reason) => console.error(reason));
// Error
This time in our example, the error output is no longer ‘uncaught’ because of .catch().
You can also use the .catch() method in a chain of promises. It catches the first error it encounters in the chain.
For instance, refactoring the chain of promises following the fetchResource() function from the example of the previous section. This how you can stop error callback repetition in your code.
fetchResource(url)
  .then(handleResult)
  .then(handleNewResult)
  .then(handleAnotherResult)
  .catch(failureCallback);
You can also use .catch() to check for errors in a group of promises before proceeding with further asynchronous operations.
fetchResource(url)
  .then(handleResult)
  .then(handleNewResult)
  .catch(failureCallback)
  // Check for Errors in the above group of promises before proceeding
  .then(handleAnotherResult);
The .catch() method addresses any errors in a promise without requiring the nesting of error callback functions.
To chain an asynchronous operation to a promise regardless of if the promise is resolved or not, use the .finally() method. The .then() method is how you handle the results of a promise writing individual conditions for both resolved and rejected. .catch() runs only when there is an error. But sometimes you might want an operation to run no matter what happens to earlier promises.
Using finally() helps prevent possible code repetition in .then() and .catch(). It is for operations you must run whether there is an error or not.
fetchResource(url)
  .then(handleResult)
  .then(handleNewResult)
  .finally(onFinallyHandle);
The finally() method has a few use cases in real-world applications. It is important if you want to perform cleanup operations for activities the promise initiated. Another use case—on Front-End Web Applications—is making user interface updates like stopping a loading spinner.
How to Handle Many Promises at Once
It is possible to run more than one promise at a time. All the examples you have seen so far are for promises that run one after the other.
In the previous examples, promises run similarly to synchronous code in the sense that they wait for the previous one to be resolved or rejected. But you could have multiple promises that run in parallel.
Here are the available methods that can help us achieve this:
Promise.all()Promise.race()Promise.any()Promise.allSettled()
In this section of the article, we'll review these methods.
The Promise.all() method
Promise.all() accepts an array of promises as an argument but returns a single promise as the output. The single promise it returns resolves with an array of values if all the promises in the input array are fulfilled. The array Promise.all() resolves with will contain the resolve values of individual promises in the input array.
const promise1 = Promise.resolve(`First Promise's Value`);
const promise2 = new Promise((resolve) =>
  setTimeout(resolve, 3000, `Second Promise's Value`)
);
const promise3 = new Promise((resolve) =>
  setTimeout(resolve, 2000, `Third Promise's Value`)
);

Promise.all([promise1, promise2, promise3]);

// Output on the console

// *Promise {<fulfilled>: Array(3)}*

Promise.all([promise1, promise2, promise3]).then((values) => {
  values.forEach((value) => console.log(value));
});

// Output on the console

// First Promise's Value
// Second Promise's Value
// Third Promise's Value
If at least one promise in the input array does not resolve, Promise.all() will return a rejected promise with a reason. The reason for the rejection will be the same as that of the first rejected promise in the input array.
const promise1 = Promise.resolve(`First Promise's Value`);
const promise2 = new Promise((resolve, reject) =>
  setTimeout(reject, 2000, `First reason for rejection`)
);
const promise3 = new Promise((resolve, reject) =>
  setTimeout(reject, 3000, `Second reason for rejection`)
);

Promise.all([promise1, promise2, promise3]);

// Output on the console

// *Promise {<rejected>: "First reason for rejection"}*
Promise.all() will run all the input promises before it returns a value. But it does not run the promises one after the other–instead it runs them at the same time.
This is why the total time it would take Promise.all() to return a value is roughly the time it would take the longest promise in the array to finish.
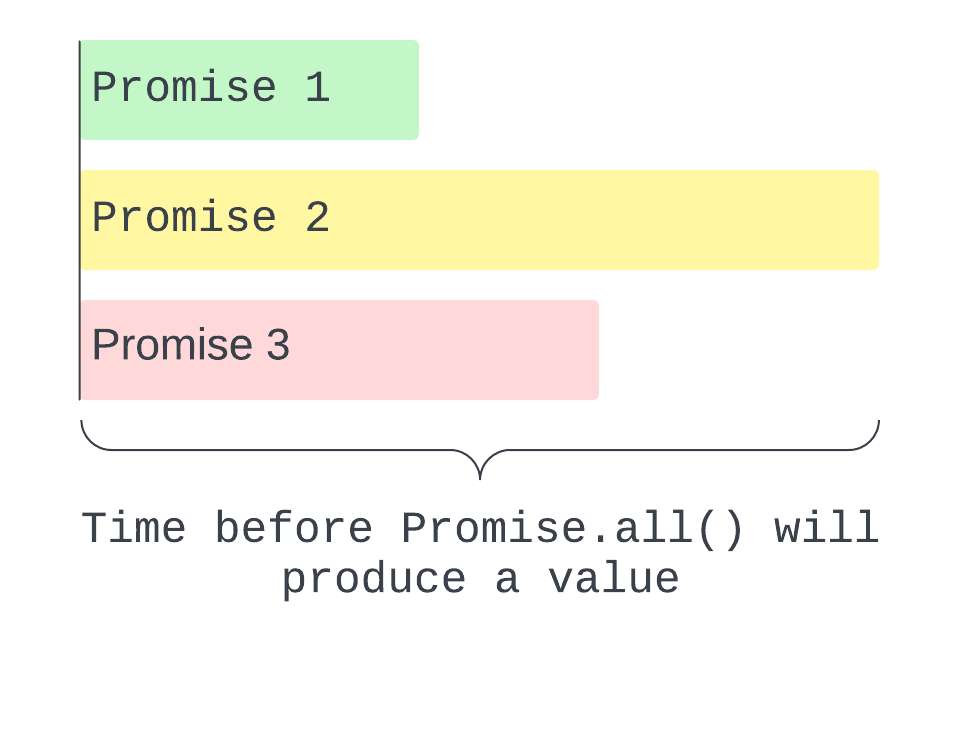
Despite that, it has to finish running all the promises before it returns anything.
The Promise.race() method
Promise.race() accepts an array of promises as an argument and returns a single promise as an output. The single promise it returns is the fastest promise to finish running—resolved or not. This means Promise.race() will return the promise with the shortest execution time in an array of promises.
const promise1 = new Promise((resolve) =>
  setTimeout(resolve, 3000, `First Promise's Value`)
);
const promise2 = new Promise((resolve) =>
  setTimeout(resolve, 2000, `Second Promise's Value`)
);
const promise3 = Promise.resolve(`Third Promise's Value`);

Promise.race([promise1, promise2, promise3]);

// Output on the console

// *Promise {<fulfilled>: "Third Promise's Value"}*
In the example above, because promise3 is a promise that resolves on being created, Promise.race() returns it as the fastest. Just like other Promise methods the article discusses in this section, it runs the promises in parallel and not one after the other.
If the promise with the shortest execution time happens to be rejected with a reason, Promise.race() returns a rejected promise and the reason why the fastest promise was rejected.
const promise1 = Promise.reject(`Reason for rejection`);
const promise2 = new Promise((resolve) =>
  setTimeout(resolve, 3000, `First resolved Promise`)
);
const promise3 = new Promise((resolve) =>
  setTimeout(resolve, 2000, `Second resolved Promise`)
);

Promise.race([promise1, promise2, promise3]);

// Output on the console

// *Promise {<rejected>: "Reason for rejection"}*
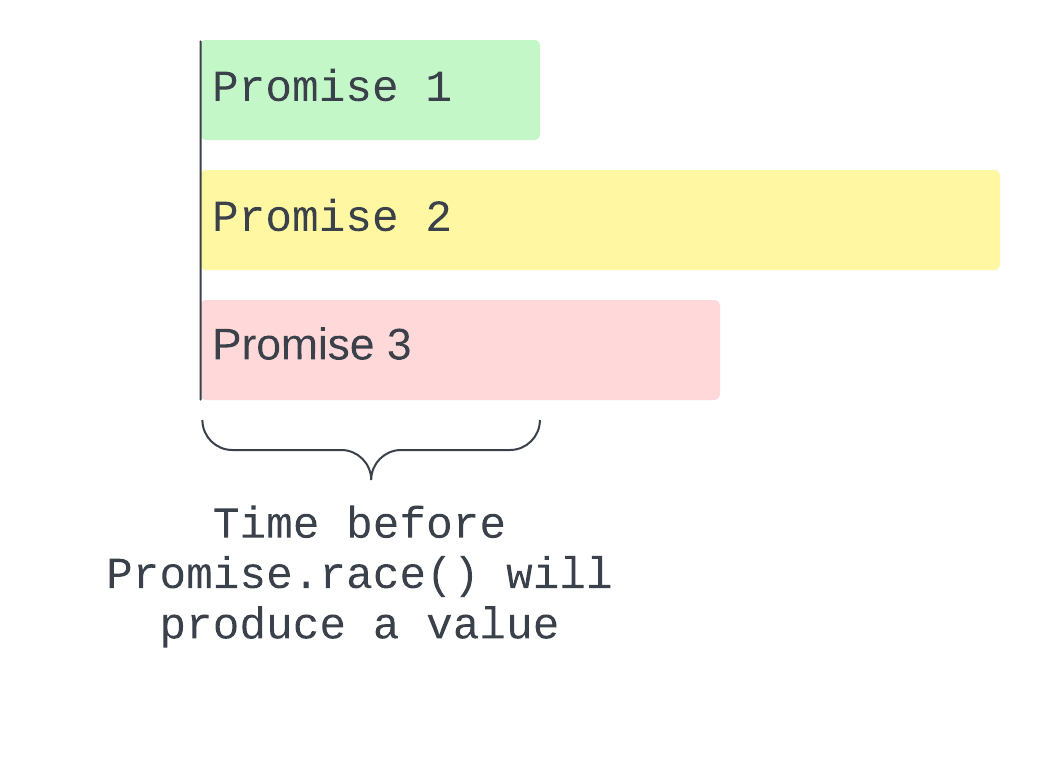
Promise.race() is useful for running a list of asynchronous operations but only needing the result of the fastest executed operation.
The Promise.any() method
Promise.any() accepts an array of Promises as an argument but returns a single Promise as the output. The single promise it returns is the first resolved promise in the input array. This method waits for any promise in the array to be resolved and would immediately return it as the output.
const promise1 = new Promise((resolve) =>
  setTimeout(resolve, 3000, `First Promise's Value`)
);
const promise2 = new Promise((resolve) =>
  setTimeout(resolve, 2000, `Second Promise's Value`)
);
const promise3 = Promise.reject(`Third Promise's Value`);

Promise.any([promise1, promise2, promise3]);

// Output on the console

// *Promise {<fulfilled>: "Second Promise's Value"}*
From the above example, promise1 will resolve after 3 seconds, promise2 will resolve after 2 seconds, and promise3 immediately rejects. Because Promise.any() is looking for the first successful promise, it returns promise2. promise1 is a little bit late and so it's left behind.
If none of the promises in the array are resolved, Promise.any() returns a rejected promise. This rejected promise contains a JavaScript array of reasons, where each reason corresponds with that of a promise from the input array.
const promise1 = new Promise((resolve, reject) =>
  setTimeout(reject, 3000, `First rejection reason`)
);
const promise2 = new Promise((resolve, reject) =>
  setTimeout(reject, 2000, `Second rejection reason`)
);
const promise3 = Promise.reject(`Third rejection reason`);

Promise.any([promise1, promise2, promise3]);

// Output on the console

// *Promise {<rejected>: Aggregate Error: All Promises were rejected}*

Promise.any([promise1, promise2, promise3]).catch(({ errors }) =>
  console.log(errors)
);

// Output on the console

// *(3) ["First* rejection reason*", "Second* rejection reason*", "Third* rejection reason*"]*
This method is useful for asynchronous operations where the fastest successful promise is all you need. Promise.any() and Promise.race() are similar, except that Promise.any() will return the fastest promise to complete and be resolved, while Promise.race() will return the fastest promise to complete and does not care if it is resolved or not.

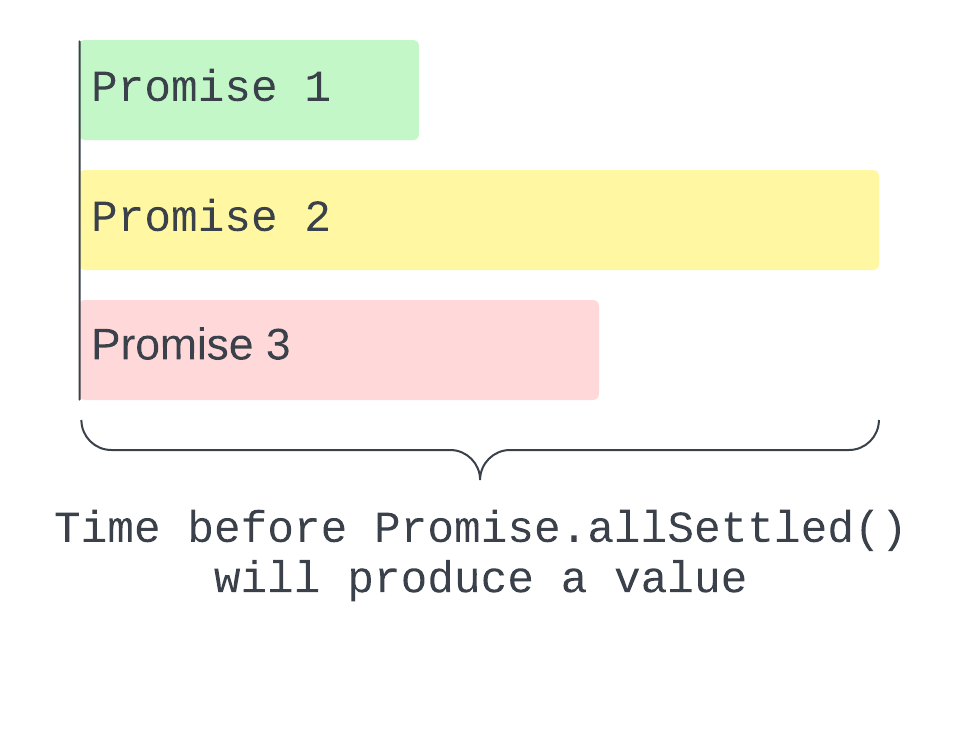
The Promise.allSettled() method
Promise.allSettled() became a feature of JavaScript promises with the release of ES2020. It handles promises in parallel just like the other promise methods the article discusses in this section.
Promise.allSettled() helps to write more efficient asynchronous code as it shows the outcome of all the promises in the array regardless of the status—resolved or rejected.
Promise.allSettled() accepts an array of promises as an argument and returns a single promise as the output.
The single promise it returns will always resolve or enter the state ‘fulfilled’ after all the input promises are settled. It does not care if any individual promise in the input array rejected. The array Promise.all() resolves with will contain the resolve values or rejection reasons of promises in the input array.
const promise1 = new Promise((resolve) =>
  setTimeout(resolve, 3000, `First Promise's Value`)
);
const promise2 = new Promise((resolve) =>
  setTimeout(resolve, 2000, `Second Promise's Value`)
);
const promise3 = Promise.reject(`Third Promise's Value`);

Promise.allSettled([promise1, promise2, promise3]);

// Output on the console

// *Promise {<fulfilled>: Array(3)}*

Promise.allSettled([promise1, promise2, promise3]).then(console.log);

// Output on the console

/*
(3) [{…}, {…}, {…}]
0: {status: 'fulfilled', value: "First Promise's Value"}
1: {status: 'fulfilled', value: "Second Promise's Value"}
2: {status: 'rejected', reason: "Third Promise's Value"}
*/
From the example above, you can see that even though promise3 rejects on creation, Promise.allSettled() still returned a ‘fulfilled’ promise. It does this even if all the promises in the input array reject.
Promise.allSettled() is similar to Promise.all() in that all their input promises must settle before the promise they return has a settled state—fulfilled or rejected.
The difference is Promise.all() can only be successful if all the promises in the input are resolved, while Promise.allSettled() does not care about the status of the input promises.
Using this method will give you an overview of how all your promises did, the ones that were resolved and the ones that were rejected. It gives complete information on all the promises you pass into it and allows you to examine them independently—the outcome of one does not affect the state of the promise the method returns.
What is the Async/Await Syntax?
Async/await syntax became a feature of JavaScript with the release of ES8(ES2017). It is built on top of promises, and you can see it as an alternative syntax to promises.
async/await eliminates the chaining that is common with the promises syntax, and ends up making asynchronous code look a lot more synchronous.
Promises are an excellent way to avoid the previously discussed ‘Callback Pyramid of Doom’, but async/await takes asynchronous code further. With async/await, code is easier to follow and maintain. It came about as a way to improve code readability for asynchronous operations. It is the modern way of using promises.
How to Create an Async Function in JavaScript
async is a JavaScript keyword used to create a function. The function this keyword helps create will always return a promise. To use it, place async before the function keyword when declaring the function.
async function example() {
    // Return a value
}

example()

// Output on the console

// *Promise {<fulfilled>: undefined}*
From the code example, you can see that the function returns a promise with a value undefined. This is because anything the async function returns will be the resolved value of the resulting promise. In this case, the function does not return anything, hence undefined.
async function example() {
  return "Feels good to be an async function";
}

example();

// Output on the console

// *Promise {<fulfilled>: "Feels good to be an async function"}*
In the above example, the function returns a string, which becomes the resolved value of the resulting promise. That is the way to create an async function.
How to Use the Await Keyword
To use the await keyword, place it before a promise. It is an indicator for the async function to pause execution until that promise is settled.
It is similar to the .then() method which makes sure a promise is ‘fulfilled’ or ‘rejected’ before it continues. Note that you can only use the await keyword inside an async function.
Instead of chaining promises with .then() as the article earlier teaches, you can repeatedly await the asynchronous operations making your code cleaner and easier to read.
const timerPromise = (message) =>
  new Promise((resolve) => setTimeout(resolve, 3000, message));

async function asyncFunc() {
  const result = await timerPromise("promise finished!");
  console.log(result);
}

// Output on the Console after 3 seconds

// promise finished!
Using the await keyword before a promise will produce the resolved value of that promise. It is evident from the line const result = await promise('promise finished!') where result becomes a string and not a new promise. This is different from .then() which always returns a new promise.
With await, you can break up any chain of promises, and grab their resolve values. The following example uses the fetch() function—which is a promise—to show eliminating chaining with async/await.
// With chaining
fetch("https://jsonplaceholder.typicode.com/users")
  .then((response) => response.json())
  .then((result) => console.log(result));

// Output on the console

// Array(10) [...]

// Without chaining
async function fetchResource(url) {
  const response = await fetch(url);
  const result = await response.json();
  console.log(result);
}
fetchResource("https://jsonplaceholder.typicode.com/users");

// Output on the console

// Array(10) [...]
In the end, it boils down to preference and choice. If you prefer the chaining syntax, then go for it. If you prefer your code to look synchronous and want to use async/await, then that is fine too.
You can also use both syntaxes together, chaining promises inside an async function. It all depends on what you want to achieve and the style you prefer.
How to Handle Errors in Async/Await
Just like with the normal promise syntax, you can catch errors properly using async/await. Properly handling errors in async calls is extremely important to track bugs. Use try/catch blocks to do this.
try is a JavaScript keyword that wraps a block of code. As that block of code runs, try checks for errors. No error can escape a try block. Use try inside an async function.
The first error inside the try block stops the other instructions in that block from executing, try then passes the error value to the catch block. The catch block is similar to .catch() in promises. Just like the promise method, it is a function of an error.
async function fetchResource(url) {
  try {
    const response = await fetch(url);
    const result = await response.json();
    console.log(result);
  } catch (error) {
    console.error(error);
  }
}
In this example, the catch keyword has an error, which logs to the console. A settled promise with an uncaught error results in a rejected promise. Make sure you wrap your code in try/catch blocks to have more control over failures and faults in your program.
Also, just like the .finally() method for promises, you can use a finally block inside an async function. Braces that follow this keyword wrap around a block of code that would run regardless of if there is an error or not.
async function fetchResource(url) {
  try {
    const response = await fetch(url);
    const result = await response.json();
    console.log(result);
  } catch (error) {
    console.error(error);
  } finally {
    console.log("Operation finished!");
  }
}
The use of the finally block is similar to the use of the .finally() method. This just proves that using an async function is a recent way to work with promises.
What is a Job Queue?
The Job Queue—also known as the Microtask Queue—is an important concept to be aware of in JavaScript. It was not originally a component of the JavaScript runtime, but the need for it came when promises became a part of JavaScript.
Consider the following code sample:
Promise.resolve("This is a resolved value").then(console.log);
setTimeout(console.log, 0, "This is a value after the timeout");
console.log("This is a normal log");
Here the first line is a promise that automatically resolves, then logs the value on the console. The second line is a timeout set to 0 milliseconds which means it is supposed to be instant. The timeout takes in a callback function that logs a value to the console. The third line is a normal console log.
When you run the program, can you guess the order in which these logs would appear? Let's find out.
// Output on the console
/*
This is a normal log
This is a resolved value
--
undefined
--
This is a value after the timeout
*/
This is an interesting output. The first log is from console.log. It is not so confusing because console.log() is not an async operation. The JavaScript engine will actively run every synchronous instruction immediately after the program starts.
The second line might be a little puzzling. It logs the resolved value of the promise. Why does the output from the promise come next? Well, the simple answer is that a promise is faster than any other async implementation in JavaScript. But that is not the full story.
In the JavaScript runtime, the event loop handles async operations. It can only call the callback functions of async instructions when the call stack is empty. Resolving a promise is an asynchronous operation, and it is understandable that it comes after a normal log. But why does it come before the setTimeout() instruction?
The JavaScript Runtime actually has these two queues—the Callback (or Macrotask) Queue and the Job (or Microtask) Queue. Shortly before the event loop starts calling the functions in the Callback Queue, it calls all the instructions on the Job Queue. The callback of a promise stays in the Job Queue so the event loop calls it first. This is why promises return values faster than any other async implementation.
The Job Queue is useful for some other instructions apart from promises. However, that is beyond the scope of this material. If you are curious, then you can read more about the Job Queue here.
A program returns immediately after taking care of the Job Queue. From the above code example, it returns with undefined. After that, the event loop moves over to the Callback Queue and executes the instructions there.
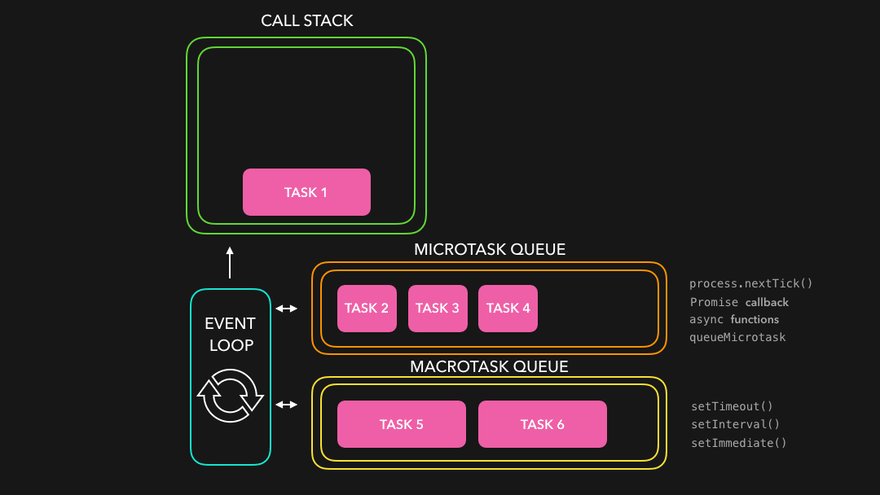 Image Credit: [Medium](https://medium.com/@saravanaeswari22/microtasks-and-macro-tasks-in-event-loop-7b408b2949e0">Saravanakumar on <a href="https://medium.com)
The callback in setTimeout()will always move to the Callback Queue no matter how short the timer is. In the example, it logged last even though the timer was set to 0 milliseconds.
With that, I hope you understand why the example code produced that output, and the difference between the Callback Queue and the Microtask Queue.
Conclusion
This has been a deep dive into promises and async operations. In this article, you have learned how promises came about in JavaScript, what they are, and how to create them.
You have also learned how to attach callbacks to a promise, how to catch errors in a promise, and how to run many promises simultaneously.
We also looked into the async/await syntax which is built on top of promises. You learned when they became a feature of JavaScript, how to create an async function, and how to use the await keyword.
You also learned how to handle errors using the syntax. Finally, the article explained what a Job Queue is.
Feel free to come back if you did not understand everything at once. JavaScript promises can take time to learn and master, but any JavaScript developer would benefit immensely from knowing how promises work. It gives you more control while writing professional async code for your applications.
Good luck building your next project.