

Netlify is a popular web development platform that makes it easier to build, deploy, and manage websites.
You can use Netlify to host websites, and it helps you update and release new changes. It also provides additional features such as security, user authentication and authorization services, and more.
This guide focuses on showing you how to set up a Netlify serverless function to hide Application Programming Interface (API) keys in a client-side application.
For this lesson, you will create a stock photo search engine web application, deploy it on Netlify, and make an API call to the Pixabay API using Netlify serverless functions.
This is the same process for front-end applications built with ReactJS, NextJS, VueJS, Angular, or other JavaScript frameworks.
Prerequisites
To follow along with this tutorial, you should have the following:
Netlify account (you can sign up here)
Basic understanding of RESTful APIs, Lambda functions, and async/await concepts.
The final demo app lives in the main branch on GitHub: https://netlify-func-demo.netlify.app
What is a Netlify function?
Netlify functions are serverless or lambda functions provided by Netlify. You use them to deploy server-side code or backend logic without the need for a dedicated server.
The purpose of this Netlify function is to manage serverless event-driven code and send HTTP requests that return a JSON response.
"Serverless functions, branded as Netlify Functions when running on Netlify, are a way to deploy server-side code as API endpoints" - Netlify Docs
It securely accesses environment variables behind the scenes via the Amazon Web Services (AWS) lambda function.
Secret credentials such as access tokens or API keys, hidden solely using environment variables, are less secure. This is because they can be easily retrieved from the Developer Tools through the API fetch request in the browser.
The API keys, if hijacked, can be misused by malicious actors, which might affect your app build threshold or cost you more if it's a paid API service.
Other serverless functions used for running code without having to manage servers include AWS Lambda functions, Azure functions, and Google cloud functions.
How to Set Up a Client-side Application
How to Clone the Demo App
To get started with this tutorial, you can clone the stock photo search engine app GitHub repository. See the live preview on Netlify at https://netlify-func-demo.netlify.app.
The first step is to clone the repository:
git clone https://github.com/frankiefab100/netlify-serverless-functions-demo.git
Next, change to the netlify-serverless-functions-demo directory.
cd netlify-serverless-functions-demo
Then you'll need to install dependencies.
npm install
#OR
yarn add
Now run the development server. Run the following command to start the app on the server:
netlify dev
The app will be ready on https://localhost:8888.
Alternatively, you can skip the above steps if you wish to follow along by building the app from scratch. In the next step, you will build a stock photo search engine JavaScript application.
How to Build the Demo App using JavaScript
The first step is to set up a front-end app. Open your favorite code editor, such as VS Code.
Then, create a dist directory and inside it create an index.html file. Populate it with the following code:
<!DOCTYPE html>
<html lang="en">
  <head>
    <meta charset="UTF-8" />
    <meta http-equiv="X-UA-Compatible" content="IE=edge" />
    <meta name="viewport" content="width=device-width, initial-scale=1.0" />
    <link rel="stylesheet" href="style.css" />
    <title>Stock Photos Search Engine</title>
  </head>
  <body>
    <div class="container">
      <header>
        <h1>Search For Stock Photos</h1>
        <div class="search-section">
          <input
            type="text"
            name="search"
            class="search"
            placeholder="Enter a keyword"
          />
          <input
            id="searchBtn"
            class="search-btn"
            type="submit"
            value="Search"
          />
        </div>
      </header>

      <div class="photo-wrapper">
        <img src="" alt="" class="photo" />
      </div>
    </div>

    <script src="./script.js" type="module"></script>
  </body>
</html>
In the same dist directory, add the following styling to style.css:
/* dist/style.css */
* {
  box-sizing: border-box;
  margin: 0;
  padding: 0;
}

body {
  color: #222;
  font-family: "Roboto", sans-serif;
  font-size: 1rem;
  margin: 0 auto;
  width: 100vw;
  height: 100vh;
}

.container {
  display: flex;
  flex-direction: column;
  justify-content: center;
  align-items: center;
  text-align: center;
  min-height: 100vh;
  min-width: 100vw;
  width: 100%;
  height: 100%;
}

h1 {
  padding-bottom: 20px;
}

.search-section {
  display: inline;
  text-align: center;
  min-width: 310px;
}

.search,
.search-btn {
  border: none;
  border-radius: 5px;
  font-size: 1rem;
  padding: 15px;
  height: 50px;
}

.search {
  background-color: #d1f3bf;
  color: #222;
  min-width: 225px;
}

.search-btn {
  background-color: #04ab04;
  color: #f6f6f6;
  cursor: pointer;
  margin-left: 5px;
  min-width: 80px;
  transition: all 0.3s ease-in-out;
}

.search-btn:hover {
  background-color: #2dc22d;
}

.photo-wrapper {
  display: flex;
  gap: 15px;
  margin: 30px;
}

.photo-wrapper img {
  width: 200px;
}
Sign Up for a Free Account on Pixabay
The first step to using the Pixabay API is to sign up for an account with your email.
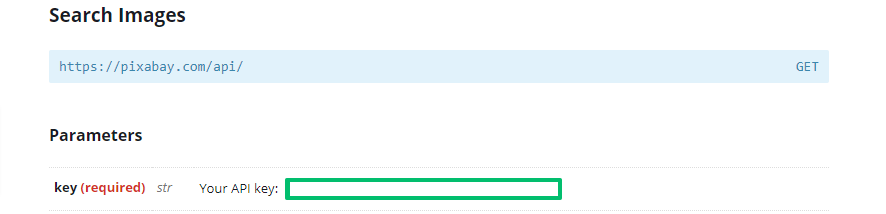
Pixabay API key section
As shown in the image above, your API key can be found below the parameters section in the Pixabay API Docs website.
Create an environment variable
Environment variables (commonly known as "env") are combinations of key/value pairs that can affect the behavior and processes of an operating system or application.
Using environment variables is recommended to configure third-party services and their credentials during development.
Install dotenv
Once you complete the account creation on Pixabay, open your terminal and install dotenv as a package. This will enable your app to read environment variables saved in the .env file.
npm install dotenv
#OR
yarn add -D dotenv
In the next step, you will save the API key in a .env file.
Create the .env file
In the root directory of your app, create a .env file and store the API keys copied from your Pixabay Profile.
PIXABAY_API_KEY=123456-7890
Where PIXABAY_API_KEY=123456-7890 represents the API key value.
Note: Replace this key/value pair with the appropriate value.
Create a .gitignore file
To avoid committing sensitive files and values such as node_modules and secret keys to a public repository, create a .gitignore file in the same project root directory and add the following to it:
node_modules
.env
.netlify
The .netlify folder which contains compiled serverless functions together with other files listed will be excluded when the project is pushed to GitHub or any other version control system.
Create a get request function
Now, you should add the fetch request logic in the script.js. You will adjust the API logic later using Netlify functions.
/* dist/script.js */
const dotenv = require("dotenv").config();

const searchbar = document.querySelector(".search");
const submitBtn = document.querySelector(".search-btn");
const photoWrapper = document.querySelector(".photo-wrapper");

submitBtn.addEventListener("click", () => {
  getPhoto(searchbar.value);
  searchbar.value = "";
});

window.addEventListener("keydown", (e) => {
  if (e.keyCode === 13) {
    getPhoto(searchbar.value);
    searchbar.value = "";
  }
});

async function getPhoto(keyword) {
  const apiKey = PIXABAY_API_KEY;
  let apiURL = `https://pixabay.com/api/?key=${apiKey}&q=${keyword}&image_type=photo&safesearch=true&per_page=3`;

  try {
    const response = await fetch(apiURL, {
      method: "GET",
      headers: { accept: "application/json" },
    });
    const data = await response.json();

    let imageURL = data.hits;

    imageURL.forEach((result) => {
      let imageElement = document.createElement("img");
      imageElement.setAttribute("src", `${result.webformatURL}`);
      photoWrapper.appendChild(imageElement);
    });
  } catch (error) {
    alert(error);
  }
}
Note: As mentioned earlier, if the codebase of this app is published on GitHub. The API key will still be accessible from the client side on a browser, although the .env file that contains the secret key was excluded.
To illustrate this, select the testing branch of this app repository. The Live site preview will display the following Reference Errors in your browser console:
Uncaught ReferenceError: require is not defined
Uncaught ReferenceError: require is not defined at getPhotos
Uncaught ReferenceError: process is not defined at getPhotos
This is because there is no way to reference the environment variables specified in the .env file, since they weren't committed to the public repository on GitHub.
In the next step, select and clone the [testing](https://github.com/frankiefab100/netlify-serverless-functions-demo/tree/testing) branch on your local machine with the following commands:
git clone https://github.com/frankiefab100/netlify-serverless-functions-demo.git
cd netlify-serveless-functions-demo
npm install
netlify dev
The app should launch on your browser via localhost:8888.
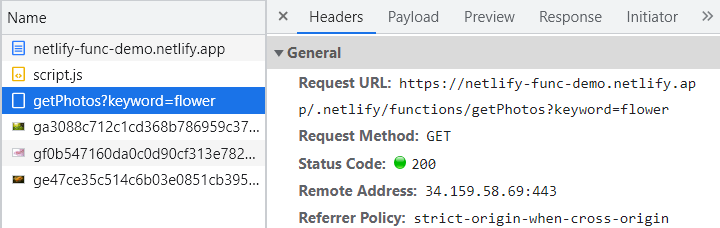
Now, go to the Developer tools, right-click and select Inspect. Alternatively, press the F12 key. Then, navigate to Network tab and tab on the getPhotos.js request URL.
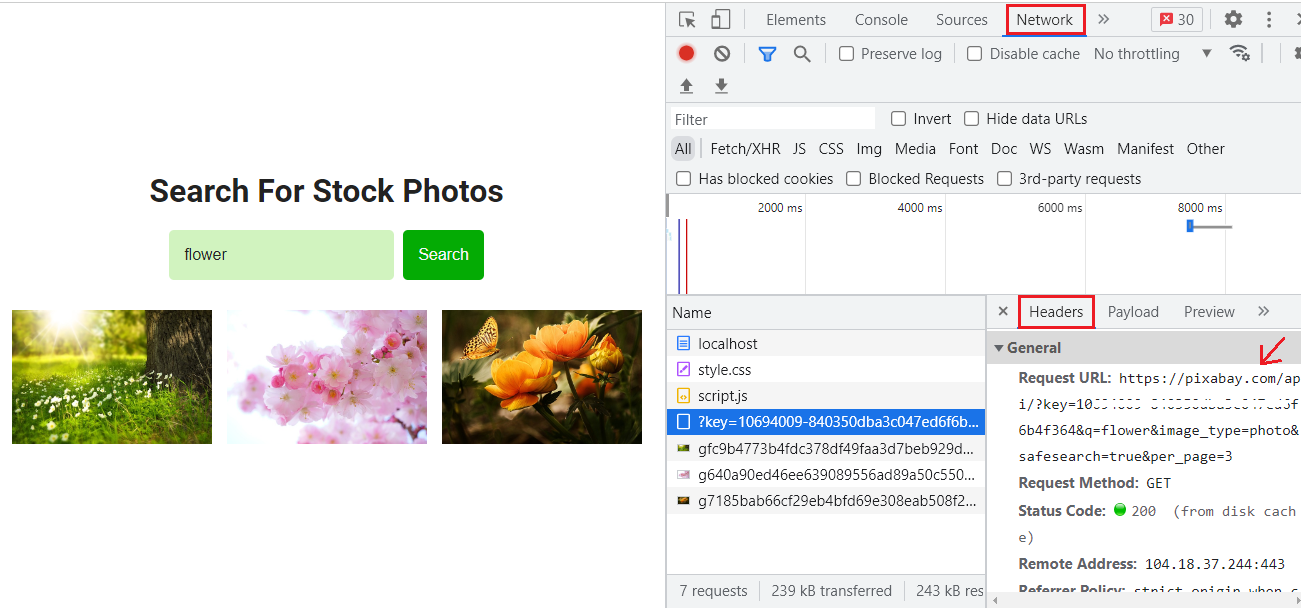
API key displayed in the Network tab in Developer tools
You should see the API key publicly exposed in the Network tab's Headers section and return as a response data in your browser.
This is a security issue since the Network tab in the Developer tools is typically responsible to display informations such as the request URL, response status, and response data.
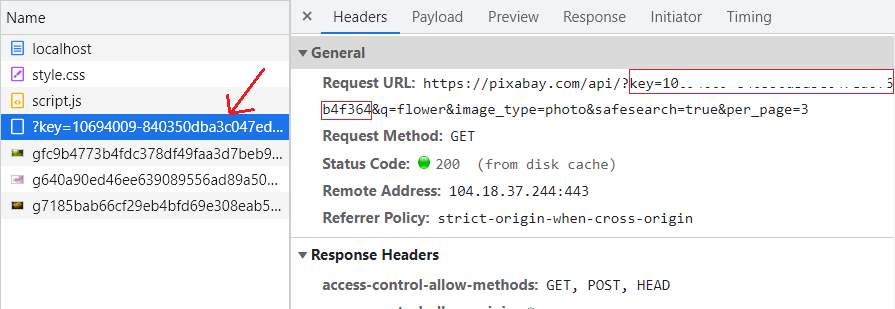
API key returned as a response data and exposed in the URL of the request
In the next section, you will find a way to secure the API key using Netlify functions.
How to Get Started with Netlify Functions
First, you'll need to go into your terminal and install Netlify CLI and Lambda as Devdependencies. You can do that by running this command:
npm install -g netlify-cli netlify-lambda
#OR
yarn add -D netlify-cli netlify-lambda --save-dev
Add custom build and development commands in package.json
These commands build and start the app in the server and also launch the app on your web browser. Here's an example of how you might add these script commands in the package.json file:
"scripts": {
   "build": "npm run-script",
   "dev": "netlify dev"
 }
Install Axios
You will use the axios.get method, because it is a node function unlike the fetch method that is intended for browser runtime.
To install Axios, open your terminal and enter the command:
npm install axios
#OR
yarn add -D axios
In this case, you are working with a vanilla JavaScript app, so you should import Axios in the getPhotos.js file as:
const axios = require("axios");
For JavaScript libraries, like React, import it as follows:
import axios from "axios";
Create a serverless function
In the root of the project, create a folder named netlify,and inside it create another folder functions. In this functions directory, create a file named getPhotos.js.
You will create a serverless function in the getPhotos. This will completely hide the API keys while fetching images from the Pixabay API.
//netlify/functions/getPhotos.js
require("dotenv").config();

const axios = require("axios");

exports.handler = async (event, context) => {
  try {
    const { keyword } = event.queryStringParameters;
    let response = await axios.get(
      `https://pixabay.com/api/?key=${process.env.PIXABAY_API_KEY}&q=${keyword}&image_type=photo&safesearch=true&per_page=3`,
      {
        headers: { Accept: "application/json", "Accept-Encoding": "identity" },
        params: { trophies: true },
      }
    );

    let imageURL = response.data.hits;

    return {
      statusCode: 200,
      body: JSON.stringify({ imageURL }),
    };
  } catch (error) {
    return {
      statusCode: 500,
      body: JSON.stringify({ error }),
    };
  }
};
Here, the process.env.PIXABAY_API_KEY references API key environment configuration specified in the .env file for development mode.
The keyword parameter accepts a string accessible in the queryStringParameters property and returns a response data stored in the variable imageURL. This will get passed to the script.js as request response (we'll discuss this later).
If the GET request is successful, it returns a response of statusCode 200 with the corresponding response as a JSON object. For errors, we will get an alert with the error message and status code.
Due to changes in version, Axios might return Buffer as a response in your terminal window, that looks like this:
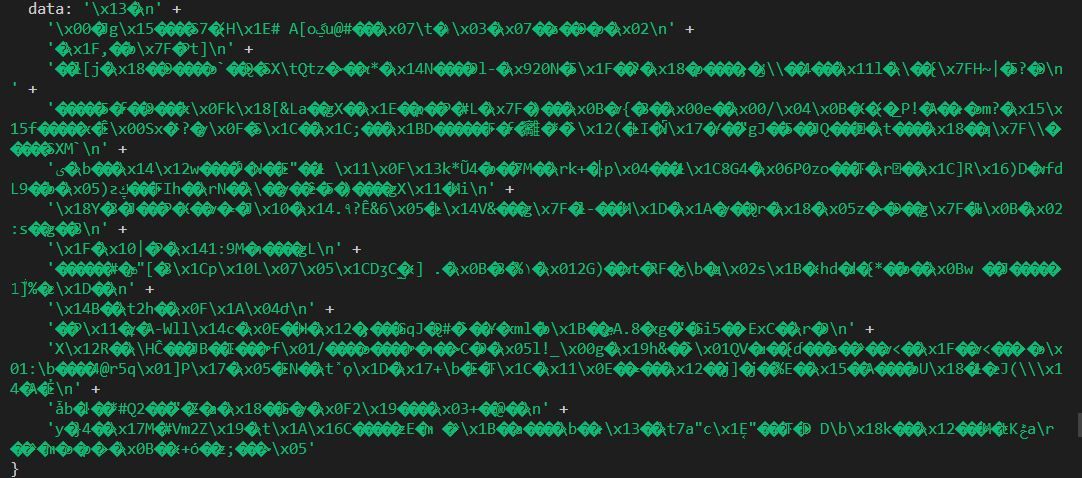
Buffer response from Axios in Terminal
To prevent this, you should attach the following to the GET request:
 let response = await axios.get(
      `https://pixabay.com/api/?key=${process.env.PIXABAY_API_KEY}&q=${keyword}&image_type=photo&safesearch=true&per_page=3`,
      {
        headers: { Accept: "application/json", "Accept-Encoding": "identity" },
        params: { trophies: true },
      }
    );
Create a Netlify configuration file
In the project root directory, create a netlify.toml file. This file specifies how Netlify builds and deploys your app.
Now, add the following build configurations in netlify.toml:
[build]
  command = "npm run build"
  functions = "netlify/functions"
  publish = "dist"
Note:
command = "npm run build"triggers the Netlify CLI to build the app from the functions.functions = "netlify/functions"indicates that thegetPhotosfunctions exist in thenetlify/functionsdirectory.publish = "dist"identifiesdistas the directory where the file will be served from.
Update the script.js file with the Netlify functions request URL
Next, update the apiURL from this:
let apiURL = `https://pixabay.com/api/?key=${apiKey}&q=${keyword}&image_type=photo&safesearch=true&per_page=3`;
to the functions HTTP request endpoint:
let apiURL = `/.netlify/functions/getPhotos?keyword=${keyword}`;
This serverless function will get queried to the client-side of your app through the endpoint: /.netlify/functions/getPhotos. Once a fetch request is sent, the getphotos function will be invoked and accessed in the script.js.
The getPhotos Netlify functions' response imageURL will be passed and the data accessed as the value of the keyword parameter in the query string of function. It will get loop through to return three images from the Pixabay API to the client-side.
The script.js file should look like this:
/* dist/script.js */
const searchbar = document.querySelector(".search");
const submitBtn = document.querySelector(".search-btn");
const photoWrapper = document.querySelector(".photo-wrapper");

submitBtn.addEventListener("click", () => {
  getPhoto(searchbar.value);
  searchbar.value = "";
  photoWrapper.innerHTML = "";
});

window.addEventListener("keydown", (e) => {
  if (e.keyCode === 13) {
    getPhoto(searchbar.value);
    searchbar.value = "";
    photoWrapper.innerHTML = "";
  }
});

async function getPhoto(keyword) {
  let apiURL = `/.netlify/functions/getPhotos?keyword=${keyword}`;

  try {
    const response = await fetch(apiURL, {
      method: "GET",
      headers: { accept: "application/json" },
    });
    const data = await response.json();

    for (let i = 0; i < data.imageURL.length; i++) {
      let imageElement = document.createElement("img");
      imageElement.setAttribute("src", `${data.imageURL[i].webformatURL}`);
      photoWrapper.appendChild(imageElement);
    }
  } catch (error) {
    alert(error);
  }
}
Note: From the codebase above, your environment variable is secure since it is accessed from the serverless function.
Run the development server
Now, execute your app by running the command:
netlify dev
This will load the getPhotos function via https://localhost:8888/.netlify/functions/getPhotos.
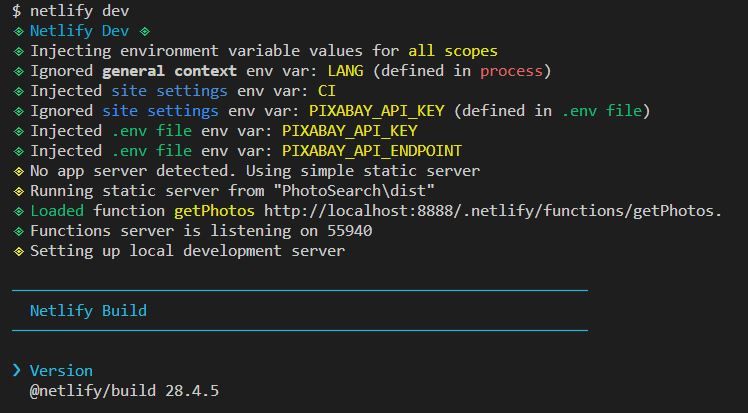
netlify build terminal output
Then, start the development server and launch the application in your default web browser on localhost:8888.
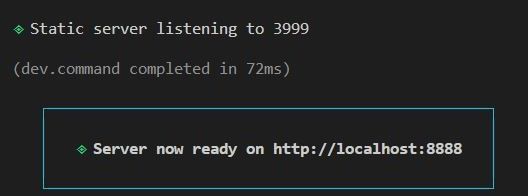
netlify function ready on https://localhost:8888
At this point, the Netlify function is fully setup, and you can now proceed to make GET HTTP requests.
How to Send Fetch Requests
Now that you already have the web app served, go ahead and send a fetch request. Enter some text in the search input field and hit Enter or click the button to fetch images from the Pixabay API.
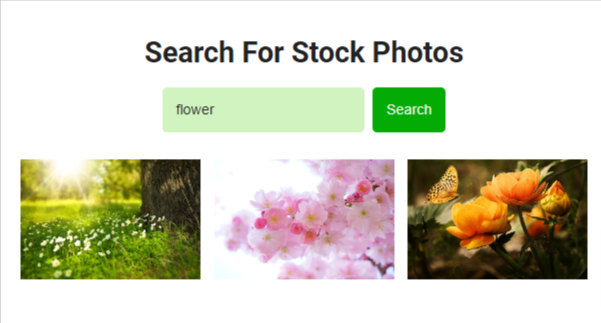
flower images fetched from Pixabay API
For more information about the Pixabay API, see the Pixabay documentation.
The preceding command will send a request to the serverless function and then return six responses. Here's what the response looks like in your terminal windows:
Request from ::1: GET /.netlify/functions/getPhotos?keyword=flower
Response with status 200 in 4895 ms.
You can also use Developer tools through the Network tab to validate the request.
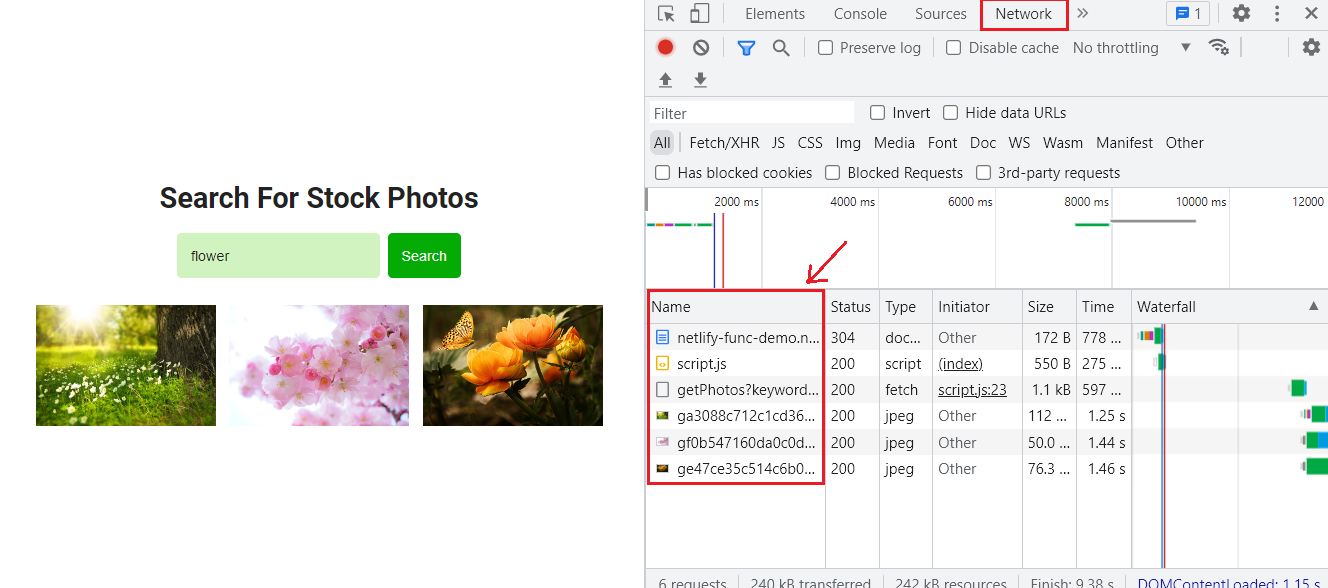
serverless function API response data
The fetch request returns our app URL, the getPhotos Netlify function, script.js and the images from Pixabay.
Netlify function fetch response from Network tab's header section in the browser
How to Host the App on the Remote Repository
Now, you should push your project to GitHub version control.
git add .
git commit -m"initial commit"
git push origin -u main
How to Deploy the App and Serverless Function on Netlify
Once you have published the project on GitHub, log in to Netlify and connect your GitHub account by granting authorization.
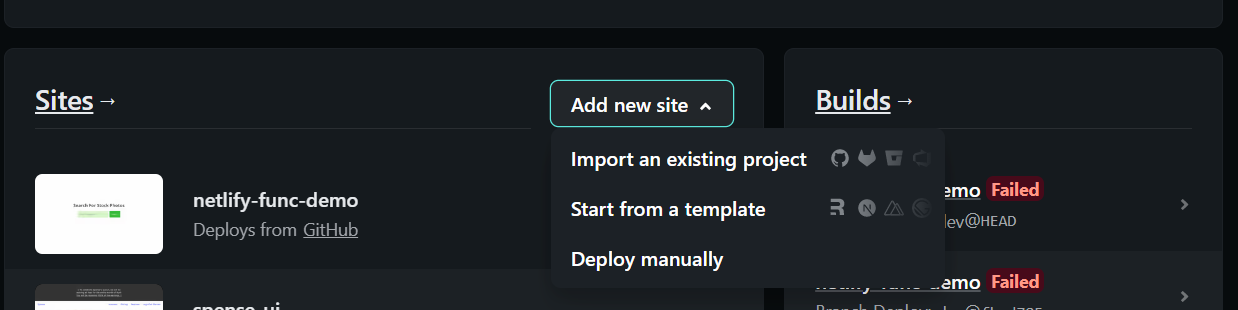
Import project for deployment on Netlify
As shown in the image above, click the Add A New Project and then search for the app repository from the list. Next, click on Build Your Site. This will take a few minutes to complete.
You just deployed the app from the Netlify UI. Your app is now ready at: https://netlify-func-demo.netlify.app..
The fetch request URL should look like this: https://netlify-func-demo.netlify.app/.netlify/functions/getPhotos.
Optional - How to Configure the Netlify App from the Dashboard
Alternatively, you can configure the Netlify command from the Netlify Dashboard. If these settings are already specified in netlify.toml, it will override any corresponding configuration.
First, select the project directory's Site settings.
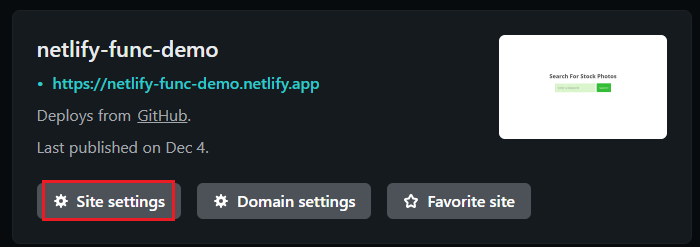
Site settings for project directory on Netlify
Set the Build command and Publish directory
Navigate to Site settings > Deploy > Build & deploy and edit the following commands and then save the changes:
Build command: npm run build
Publish directory: dist
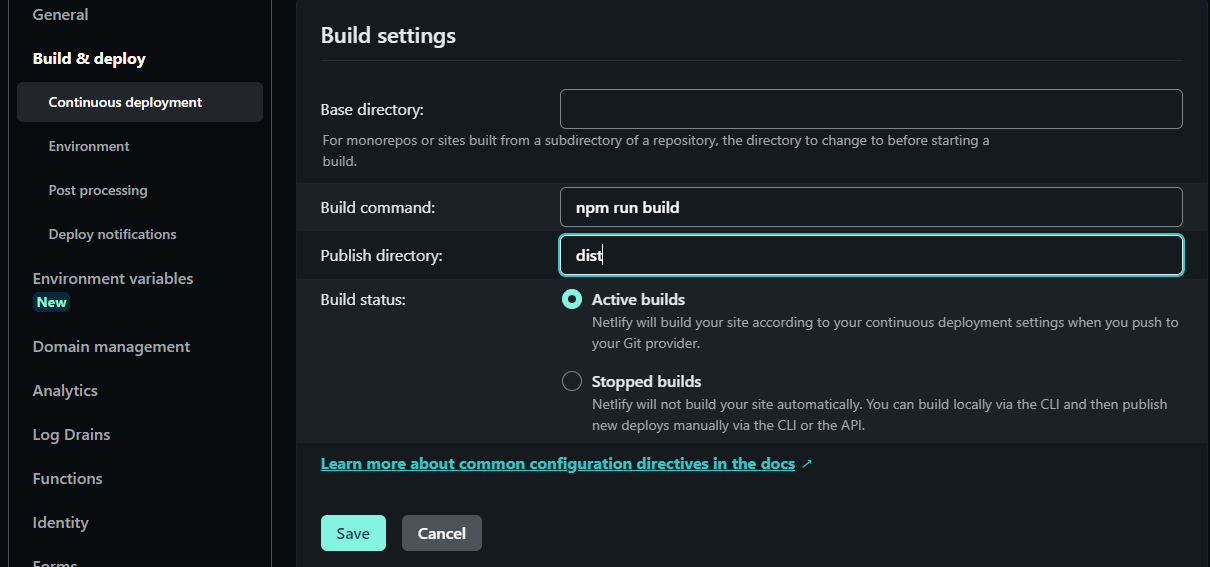
Build and deploy section on Netlify
Set the Functions directory
By default, Netlify uses netlify/functions as the directory to find the functions to deploy them. In our case, our serverless function getPhotos can be found in the netlify/functions directory.
Now we'll set a custom functions directory so Netlify can find your compiled functions. Go to Site settings > Functions and enter the directory path where the functions are stored in your repository.
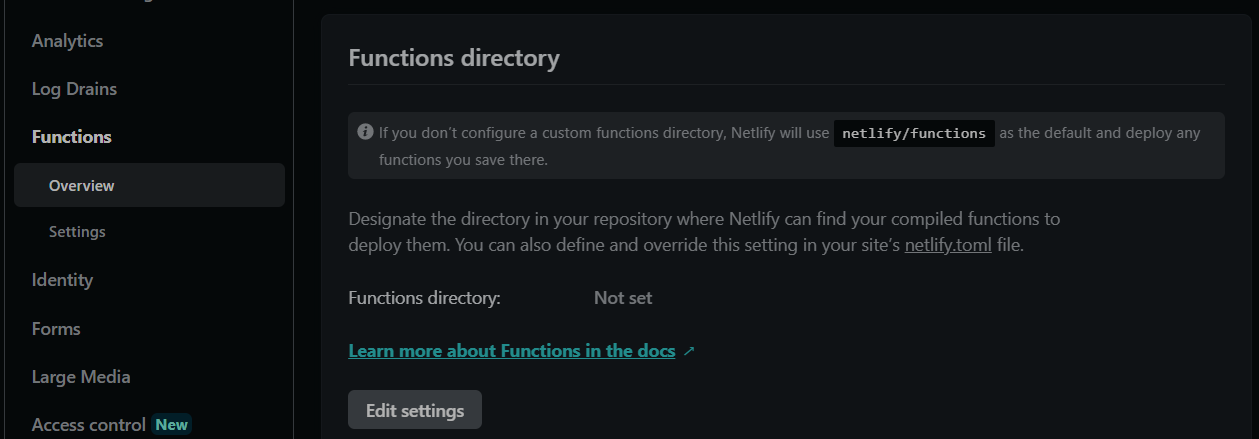
Functions directory section on Netlify
How to Set Environment Variables for Production
In the Netlify Dashboard, click on Site settings > Build & deploy > Environment > Environment variables and then configure KEY/VALUE pairs as follows:
PIXABAY_API_KEY=your-api-key-here
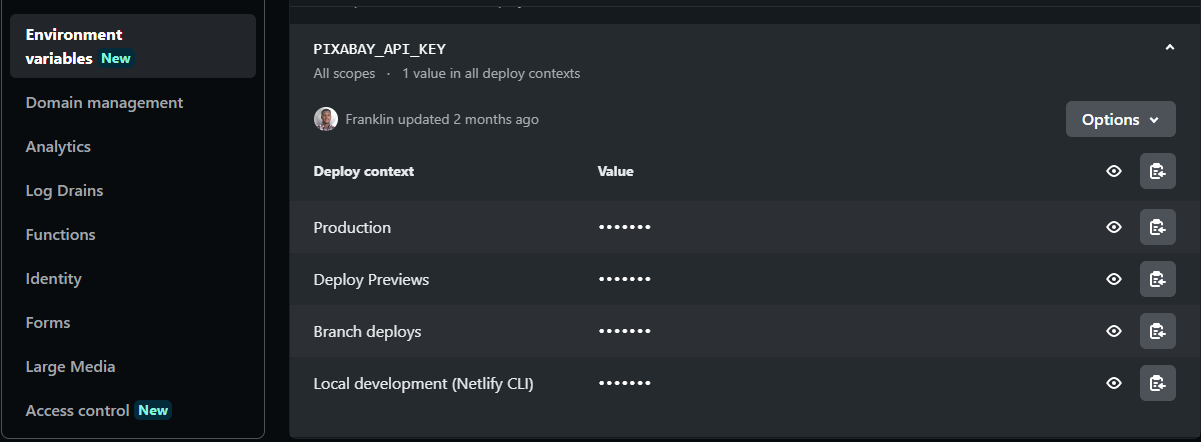
Environment variables section on Netlify
Click on Save, and then redeploy your app so the changes can be added.
To redeploy the app on Netlify, navigate to Deploys > Trigger deploy. Next, select Clear cache and redeploy site.
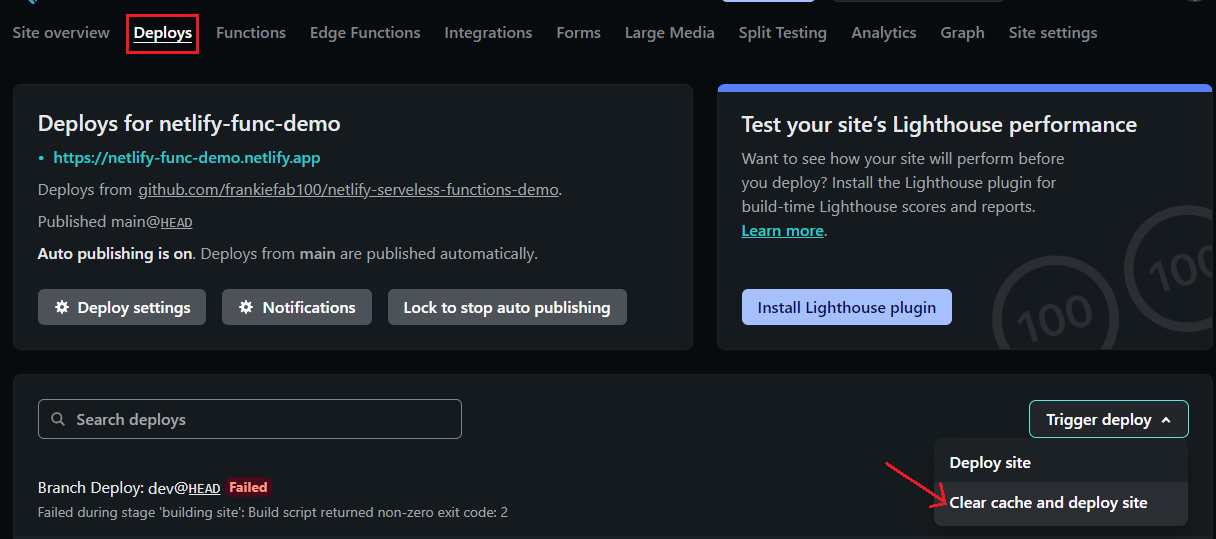
Trigger redeployment tab on Netlify
Note: The environment variable (PIXABAY_API_KEY) name should match the one mentioned in the getPhotos codebase.
For a React application, prepend the API environment variable with the prefix REACT_APP so they can be read from the .env file.
REACT_APP_PIXABAY_API_KEY=your-api-key-here
How to Initialize the Serverless Function to the Remote App
To connect your project directory to the existing web app deployed on Netlify, login to your Netlify account from the terminal:
netlify login
Next, initialize the app on Netlify by running the command in your terminal:
netlify init
Your app is now configured for continuous deployment via Netlify.
How to Build the Netlify Serverless Function
You need to link your app to site ID on Netlify before running the build command on your terminal. To connect your local project folder to its site ID on Netlify, enter the command in your terminal:
netlify link
This will prompt you to link the folder to a site through any of the following options:
Search by full or partial site name
Choose from a list of your recently updated sites
Enter a site ID
Once you select your preferred option, it will connect the project folder to the hosted site on Netlify. This allows you run Netlify CLI commands and also automatically deploy the project repository once there are any changes in the codebase.
In the next step, you will build a serverless function while it is running on the server. To activate the build command defined in netlify.toml file, run the following command:
netlify build
This runs the npm run-script command under the hood as specified in the package.json. Now, your serverless function in netlify/functions directory is packaged and bundled successfully!
How to Test the Application
To test and confirm that the Netlify function is working fine, run this command on your terminal:
netlify functions:serve
This injects your project environment variables from the .env file and runs the serverless function.
How to Confirm API Keys Security
To inspect your app and confirm that the API keys are hidden from the public, follow the steps below:
Click on your hosted app URL, and navigate to Developer tools by pressing the F12 key or right-clicking and selecting Inspect. Navigate to Network tab, where you should see the fetched data from the Pixabay API.
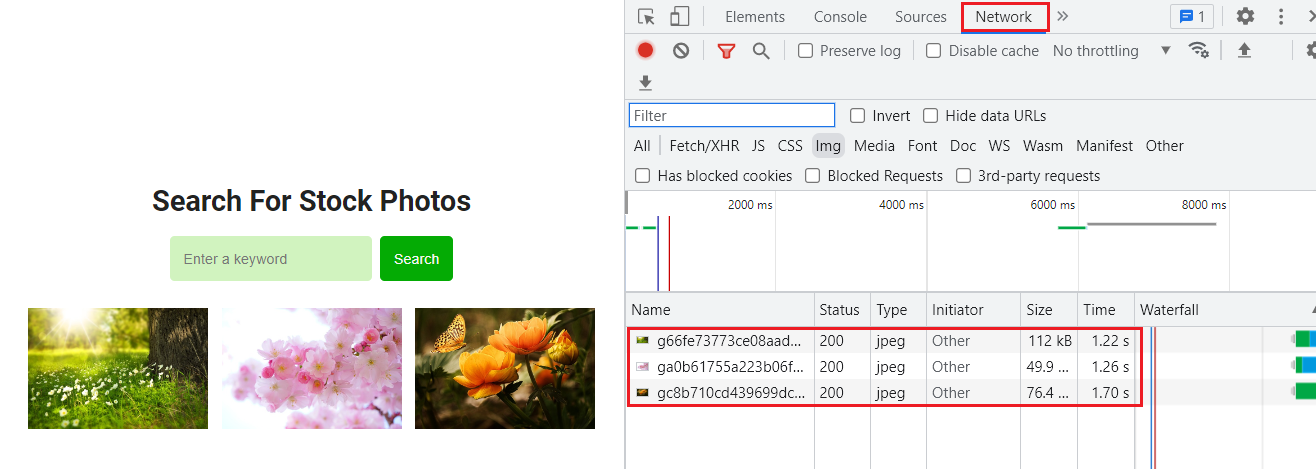
API key hidden from the public and unauthorized parties after inspection through the Developer tools
Now you've confirmed that you've successfully configured a serverless function and have it deployed on Netlify.
Conclusion
This tutorial introduced serverless functions, asynchronous JavaScript, and Restful API concepts.
Hopefully you now know how to create a serverless/lambda function and secure any sensitive value such as API keys in your frontend JavaScript application.
If you got stuck with anything, you can access the complete source code in this GitHub repository.
Thank you for reading! If you have any questions, feel free to reach out to me via Twitter.