

Beginners often get confused when configuring Zsh shell on a Mac.
Zsh shell offers four configuration files with no discernible differences. Particularly, ~/.zshrc and ~/.zprofile appear to be identical, leaving us wondering which one to use.
In this article, you'll learn the difference and a simple guideline for your shell configuration.
Why Do you Need Configuration?
For programming on a Mac, the Terminal application is an essential tool in your development environment. The Terminal is a command-line interface (CLI) that allows you to interact with the operating system and run commands.
The Terminal or console gives you access to the Unix command line, or shell.
Zsh, also known as Z shell, is a program that runs in the Terminal, interprets Unix commands, and interacts with the operating system. Zsh is the default shell program on MacOS.
Before you get started with programming on the Mac, you'll need to configure the shell. There are optional and convenient settings, such as aliases for hard-to-remember commands and a custom prompt that can display the directory you're in, among other things.
There are also some critical environment variables that make programs available or alter shell behavior. The EDITOR environment variable, for example, can set your preferred text editor. Oftentimes, when installing a programming language or software utilities, you need to set the PATH environment variable..
Where to Start
Zsh configuration files are kept in the user's home directory and are named with a dot as the first character to keep them hidden by default.
Zsh recognizes four different configuration files in the user's home directory: ~/.zshenv, ~/.zprofile, ~/.zshrc, and ~/.zlogin.
This is where Zsh configuration becomes puzzling, even for experienced developers. Tutorials rarely explain the differences, especially between the zprofile and zshrc files, leaving curious developers scratching their heads and blindly following instructions.
How is the Shell Used?
To understand the differences among Zsh configuration files, consider various shell uses, which can be classified as interactive or non-interactive, login or non-login sessions.
- On macOS, each new terminal session is treated as a login shell, so opening any terminal window starts an interactive login session. Also, a system administrator who connects to a remote server via SSH initiates an interactive login session.
- If a terminal window is already open and you run the command
zshto start a subshell, it will be interactive and non-login. Beginners rarely use subshells. - Automated shell scripts run without login or any user prompting. These are non-interactive and non-login.
- Few people ever encounter a non-interactive login shell session. It requires starting a script with a special flag or piping output of a command into an SSH connection.
How do the Configuration Files Work?
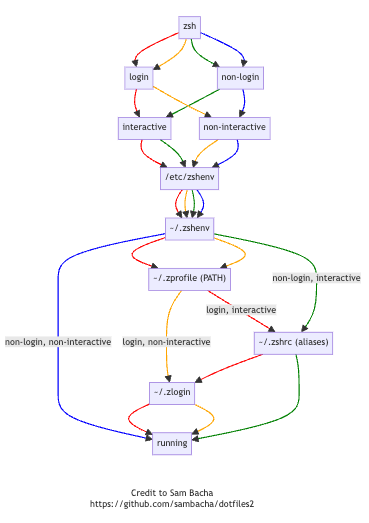
These use cases necessitate different shell configurations, which explains why Zsh supports four different configuration files. Here's how the configuration files are used:
~/.zshenv: This is loaded universally for all types of shell sessions (interactive or non-interactive, login or non-login). It is the only configuration file that gets loaded for non-interactive and non-login scripts like cron jobs. However, macOS overrides this forPATHsettings for interactive shells.~/.zprofile: Loaded for login shells (both interactive and the rare non-interactive sessions). MacOS uses this to set up the shell for any new terminal window. Subshells that start within the terminal window inherit settings but don't load~/.zprofileagain.~/.zshrc: Loaded only for interactive shell sessions. It is loaded whenever you open a new terminal window or launch a subshell from a terminal window.~/.zlogin: Only used for login shell configurations, loaded after.zprofile. This is loaded whenever you open a new terminal window.
How to Use Each File
With that in mind, let's consider which configuration files you should use.
~/.zshenv: It is universally loaded, so you could use it to configure the shell for automated processes like cron jobs. However, it is best to explicitly set up environmental variables for automated processes in scripts and leave nothing to chance. As a beginner, you will not use this configuration file. In fact, few experienced macOS developers use it.~/.zprofile: Homebrew recommends setting thePATHvariable here. There's a reasonPATHshould be set in~/.zprofileand not the universal~/.zshenvfile: the macOS runs a utilitypath_helper(from/etc/zprofile) that sets thePATHorder before~/.zprofileis loaded.~/.zshrc: This is the configuration file that most developers use. Use it to set aliases and a custom prompt for the terminal window. You can also use it to set thePATH(which many people do) but~/.zprofileis preferred.~/.zlogin: This is rarely used. Only important in managing the order of initialization tasks for login shells in complex environments. It can be used to display messages or system data.
How to Avoid Complications
These configurations may appear complicated. It made sense in the early days of computing to start time-consuming processes at login and not have them repeat when a new terminal was launched.
MacOS now launches any new terminal window as a login shell, loading both ~/.zprofile and ~/.zshrc files without concern for the shell startup time. So why not use one Zsh configuration file? A bow to history, plus configuration customization for the experts.
The key advantage of the ~/.zprofile file (versus ~/.zshenv) is that it sets environment variables such as PATH without override from macOS. The ~/.zshrc file could be used for the same but, by convention and design, is intended for customizing the look and feel of the interactive terminal.
Keep It Simple
If you're looking for simple guidelines, here's the current best practice.
- Use
~/.zprofileto set thePATHandEDITORenvironment variables. - Use
~/.zshrcfor aliases and a custom prompt, tweaking the appearance and behavior of the terminal. - If you write automated shell scripts, check and set environment variables in the script.
More Information
I've written other guides that go into detail about the following:
If you're just getting started, you'll need to know How to Open Mac Terminal and Install Xcode Command Line Tools.
Configuring the Zsh shell is a critical step in preparing your Mac development environment. With your development environment set up, you'll be prepared for any tutorial you'll find on freeCodeCamp.