
By Peter Mbanugo
We’re all familiar with instant messaging and using it to chat to people in realtime. Sometimes, though, we might want an app which allows us to send messages anonymously to friends, or to chat anonymously with strangers in close proximity. An example of such an app is Truth, which lets you talk with people on your contact list without disclosing your identity.
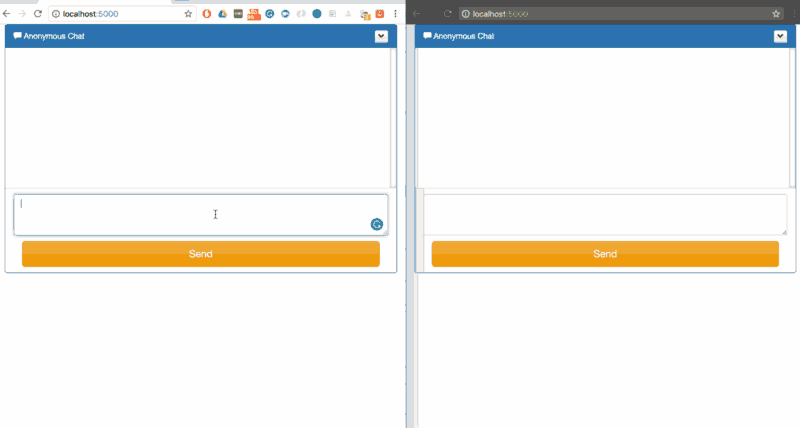
In this tutorial, I’ll be showing you how to build a public anonymous chat app in JavaScript (using NodeJS and Express on the server, and VanillaJS on the client) and Pusher. Pusher allows us to build scalable and reliable realtime applications. Since we need realtime delivery of chat messages, this is a key component of the chat app. The image below depicts what we will be building:
Getting Started
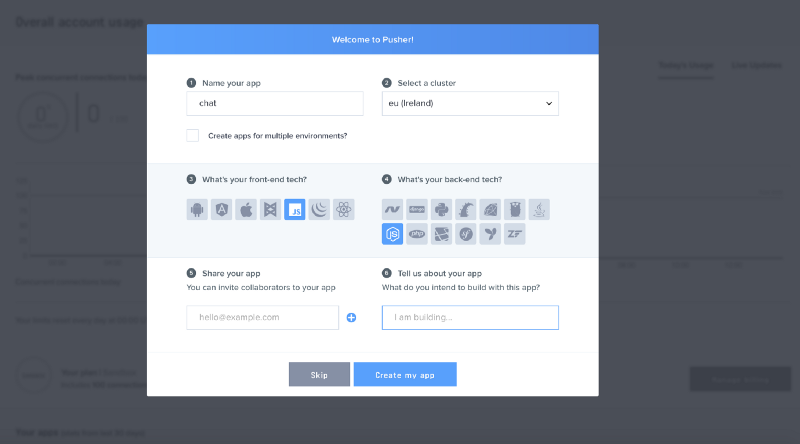
Let’s kick off by signing up for a free Pusher account (or logging in if you already have one). Once you’re logged in, create a new Pusher app from the dashboard and make a note of your App ID, Key, and Secret, which are unique to an app.
To create a new Pusher app, click the Your apps side menu, then click the Create a new app button below the drawer. This brings up the setup wizard.
- Enter a name for the application. In this case, I’ll call it “chat”.
- Select a cluster.
- Select the option “Create app for multiple environments” if you want to have different instances for development, staging, and production.
- Select Vanilla JS as the frontend and NodeJS as the backend.
- Complete the process by clicking the
Create my appbutton to set up your app instance.
Code-up the server
We need a backend which will serve our static files and also accept messages from a client and then broadcast to other connected clients through Pusher. Our backend will be written in NodeJS, so we need to set it up.
We need a package.json file, and I’ll add it by running the command below. I’ll use the defaults provided by hitting enter for every prompt.
$ npm init
With the package.json file added, I’ll install Express, body-parser, and Pusher npm packages. Run the following command:
$ npm install –save pusher express body-parser
With these packages installed, let’s add a new file called server.js with the following content:
var express = require('express');var bodyParser = require('body-parser');var Pusher = require('pusher');
var app = express();app.use(bodyParser.json());app.use(bodyParser.urlencoded({ extended: false }));
var pusher = new Pusher({ appId: "APP_ID", key: "APP_KEY", secret: "APP_SECRET", cluster: "APP_CLUSTER" });
app.post('/message', function(req, res) { var message = req.body.message; pusher.trigger( 'public-chat', 'message-added', { message }); res.sendStatus(200);});
app.get('/',function(req,res){ res.sendFile('/public/index.html', {root: __dirname });});
app.use(express.static(__dirname + '/public'));
var port = process.env.PORT || 5000;app.listen(port, function () { console.log(`app listening on port ${port}!`)});
With the code above, we have defined an end-point /message which will be used by one client to send a message to another through Pusher. The other routes are used to serve the static files which we will add later.
Replace the placeholder strings App ID, Secret, and Key with the values from your Pusher dashboard. Add this statement "start": "node server.js" in the script property of our package.json file. This will allow us to start the server when we run npm start.
Building the frontend
Moving on to the frontend, let’s add a new folder called public. This folder will contain our page and JavaScript files. Add a new file called style.css with the content below, which will hold our style definition for the page.
@import url("http://netdna.bootstrapcdn.com/font-awesome/4.0.3/css/font-awesome.css");.chat{ list-style: none; margin: 0; padding: 0;}
.chat li{ margin-bottom: 10px; padding-bottom: 5px; border-bottom: 1px dotted #B3A9A9;}
.chat li.left .chat-body{ margin-left: 60px;}
.chat li.right .chat-body{ margin-right: 60px;}
.chat li .chat-body p{ margin: 0; color: #777777;}
.panel .slidedown .glyphicon, .chat .glyphicon{ margin-right: 5px;}
.body-panel{ overflow-y: scroll; height: 250px;}
::-webkit-scrollbar-track{ -webkit-box-shadow: inset 0 0 6px rgba(0,0,0,0.3); background-color: #F5F5F5;}
::-webkit-scrollbar{ width: 12px; background-color: #F5F5F5;}
::-webkit-scrollbar-thumb{ -webkit-box-shadow: inset 0 0 6px rgba(0,0,0,.3); background-color: #555;}
Add another file called index.html with the markup below.
<!DOCTYPE html><html><head> <!-- Latest compiled and minified CSS --> <link rel="stylesheet" href="https://maxcdn.bootstrapcdn.com/bootstrap/3.3.7/css/bootstrap.min.css" integrity="sha384-BVYiiSIFeK1dGmJRAkycuHAHRg32OmUcww7on3RYdg4Va+PmSTsz/K68vbdEjh4u" crossorigin="anonymous">
<!-- Optional theme --> <link rel="stylesheet" href="https://maxcdn.bootstrapcdn.com/bootstrap/3.3.7/css/bootstrap-theme.min.css" integrity="sha384-rHyoN1iRsVXV4nD0JutlnGaslCJuC7uwjduW9SVrLvRYooPp2bWYgmgJQIXwl/Sp" crossorigin="anonymous">
<script src="https://code.jquery.com/jquery-2.2.4.min.js" integrity="sha256-BbhdlvQf/xTY9gja0Dq3HiwQF8LaCRTXxZKRutelT44=" crossorigin="anonymous"><;/script>
<!-- Latest compiled and minified JavaScript --> <script src="https://maxcdn.bootstrapcdn.com/bootstrap/3.3.7/js/bootstrap.min.js" integrity="sha384-Tc5IQib027qvyjSMfHjOMaLkfuWVxZxUPnCJA7l2mCWNIpG9mGCD8wGNIcPD7Txa" crossorigin="anonymous"></script>
<link rel="stylesheet" href="style.css"> <script src="https://js.pusher.com/4.0/pusher.min.js"></script> <script src="index.js"></script></head><body> <div class="container"> <div class="row form-group"> <div class="col-xs-12 col-md-offset-2 col-md-8 col-lg-8 col-lg-offset-2"> <div class="panel panel-primary"> <div class="panel-heading"> <span class="glyphicon glyphicon-comment"></span> Anonymous Chat <div class="btn-group pull-right"> <button type="button" class="btn btn-default btn-xs dropdown-toggle" data-toggle="dropdown"> <span class="glyphicon glyphicon-chevron-down"></span> </button> <ul class="dropdown-menu slidedown"> <li><a href="http://www.jquery2dotnet.com"><span class="glyphicon glyphicon-refresh"> </span>Refresh</a></li> <li><a href="http://www.jquery2dotnet.com"><span class="glyphicon glyphicon-ok-sign"> </span>Available</a></li> <li><a href="http://www.jquery2dotnet.com"><span class="glyphicon glyphicon-remove"> </span>Busy</a></li> <li><a href="http://www.jquery2dotnet.com"><span class="glyphicon glyphicon-time"></span> Away</a></li> <li class="divider"></li> <li><a href="http://www.jquery2dotnet.com"><span class="glyphicon glyphicon-off"></span> Sign Out</a></li> </ul> </div> </div> <div class="panel-body body-panel"> <ul class="chat">
</ul> </div> <div class="panel-footer clearfix"> <textarea id="message" class="form-control" rows="3"></textarea> <span class="col-lg-6 col-lg-offset-3 col-md-6 col-md-offset-3 col-xs-12" style="margin-top: 10px"> <button class="btn btn-warning btn-lg btn-block" id="btn-chat">Send</button> </span> </div> </div> </div> </div></div>
<script id="new-message-other" type="text/template"> <li class="left clearfix"> <span class="chat-img pull-left"> <img src="http://placehold.it/50/55C1E7/fff&text=U" alt="User Avatar" class="img-circle" /> </span> <div class="chat-body clearfix"> <p> {{body}} </p> </div> </li></script>
<script id="new-message" type="text/template"> <li id="{{id}}" class="right clearfix"> <div class="chat-body clearfix"> <p> {{body}} </p> </div> </li></script>
</body></html>
I’m using a template from bootsnipp which has been slightly modified to display just the name and message.
Add a new file called index.js with the content below. Remember to add the Pusher app details:
$(document).ready(function(){ var pusher = new Pusher('APP_KEY', { cluster: 'APP_CLUSTER', encrypted: false });
let channel = pusher.subscribe('public-chat'); channel.bind('message-added', onMessageAdded);
$('#btn-chat').click(function(){ const message = $("#message").val(); $("#message").val("");
//send message $.post( "http://localhost:5000/message", { message } ); });
function onMessageAdded(data) { let template = $("#new-message").html(); template = template.replace("{{body}}", data.message);
$(".chat").append(template); }});
With the code in this file, we get the message to be sent and then call the server with the message. After that, we connect to Pusher by creating a new Pusher object with the App Key and the Cluster that you set earlier.
We subscribe to a channel and an event named message-added. The channel is a public channel so it can be named any way you like. I’ve chosen to prefix mine with public- but that’s just my own personal naming convention as there are no rules for a public channel. The difference between a public channel and a private or presence channel is that a public channel does not require a client to be authenticated and can be subscribed to by anyone that knows the name of the channel. You can read more about Pusher channels here.
We bind to the click event of the chat button on the page, retrieve the message from the textbox on the page, and then send it to the server with the username. With all we have setup, we can start the app by running npm start. Here’s a glimpse of how it works on my computer.

Wrap Up
This is a app to show how you can use Pusher to send messages in real-time. We built a public anonymous chat app that allows your website visitors to send anonymous messages to each other in real-time. You can find the code here on GitHub
This was originally published on Pusher