By Ritvik Khanna
A step by step Python tutorial to build a login bot
 _Photo by [Unsplash](https://unsplash.com/photos/wbu4q8xk2Kc?utm_source=unsplash&utm_medium=referral&utm_content=creditCopyText" rel="noopener" target="_blank" title="">rawpixel on <a href="https://unsplash.com/search/photos/bot?utm_source=unsplash&utm_medium=referral&utm_content=creditCopyText" rel="noopener" target="blank" title=")
Nowadays the Internet is not a privilege, it’s a necessity. Wherever we go, we require a constant connection to the Internet using either a Wi-Fi or mobile data based network.
Imagine we join a new university or an organisation, which provides us with Internet through Wi-Fi. The organisation might implement a very common login page for authentication of their users called a Captive Portal (also known as a Walled Garden).
A Captive Portal is used for a number of reasons.
- They are used by universities and organisations to restrict the number of devices that are connected to the Wi-Fi network from one account/person.
- They are implemented to provide access to services that require authentication, payment, or other valid credentials that both the service provider and user agree to adhere by.
There are a number of reasons and benefits to use a captive portal, but that’s not what this post is about.
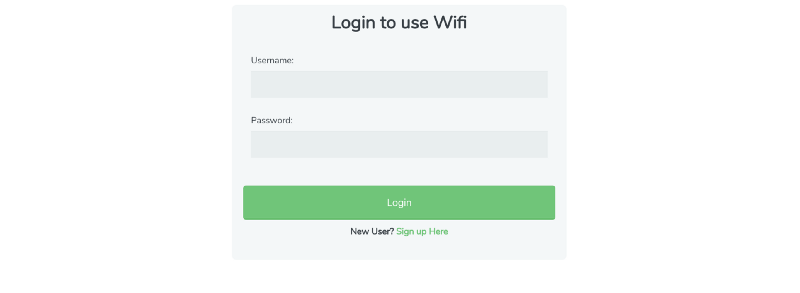 Example of a Captive Portal
My company had implemented a captive portal that users needed to log into to be able to access the internet. Right after I connected to the wireless network, my browser used to open up the captive portal page and I needed to enter my username and password after which I was able to access the Internet. But there was a problem.
Though implementing a Captive portal is good for protection against unauthorised Internet access, traffic identification and user management, it has a controlled connection to each device to ensure that all users have adequate access. A captive portal can,
- Control the number of terminals per user
- Control the bandwidth consumption and/or per-session download speed
- Restrict the type of traffic permitted and even specify the session timeout duration
Due to these restrictions, if I put my system to sleep or stayed idle for longer than a few minutes, my system got logged out from the network. Therefore, after exceeding the idle time, I had to re-login.
Being a software developer who requires constant, on-the-go connectivity to the Internet on my system, I had to enter my username and password again and again which made it very cumbersome.
What if, after getting logged out, I could login into the captive portal with just a click of a button / icon on my system?
It should be doable! No need of entering a username and then a password that in most cases should be 8 characters long and should have at least one capital letter blah blah blah. Let’s see how we can do that.
Implementation
Even if you are a novice in programming it should be pretty easy. I have coded this in the Python programming language. Python can be downloaded here, and we also require Selenium which can be downloaded here. You can also pip install selenium (recommended).
Now let’s have a look at the code .
After importing the necessary libraries, we need to specify the following variables within the code.
Let me explain this now,
- website link is nothing but the login page link or the captive portal link against which a user would authenticate
- username and password is what you enter to login
- _element_for_username, element_for_password, element_forsubmit are the names of the element in the HTML code of the login page
Let me show you how to find these.
As in the figure above,
- Open Inspect Element depending on your browser.
- Search for the HTML element and copy the name of the input tag (in the above example its _username).
- Do the same to find out the HTML element for the password and submit button as well.
- These strings will be the value for your _element_for_username, element_for_password, element_forsubmit.
Most of the work is done!
Note: I work on macOS so I’ll be implementing the bot for Safari. For Chrome and others, use Chrome via chromedriver.
Copy this code with the rest of the code and save it as a Python (.py file). Run the file using python script.py. You will see the browser automatically opens up the login page and enters the details and submits it. You don’t even have to type the username and password anymore. Isn’t it cool?
Note: The complete code is available on GitHub.
Using Automator in macOS for creating an Application (Optional)

In macOS you can create an application that can follow a specific set of workflows for any task which is done repeatedly.
In this section I’ll explain how to make the above Python script into a automator app. This will enable the user to log into the captive portal and simply click the automator app file.
Now let’s look at the steps for implementing this:
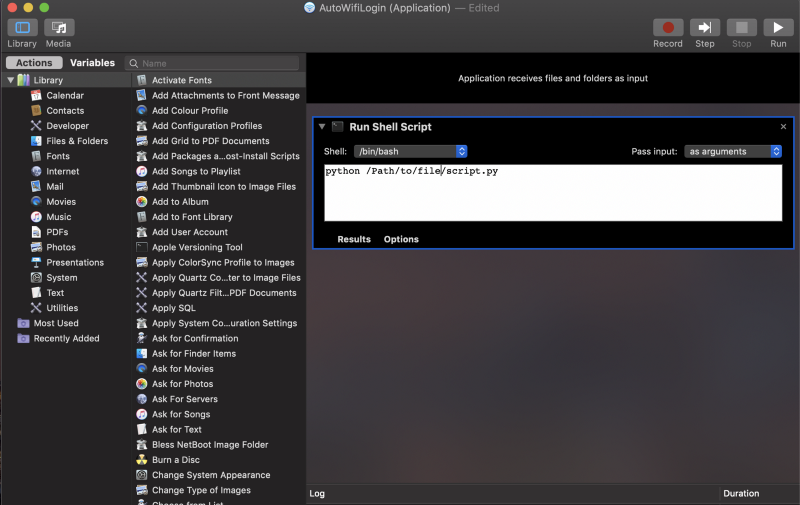
Step 1: Open Automator. Create a new service or File > New > Service
Step 2: Add a “Run Shell Script” action, setting Shell: to /bin/bash and Pass input: to as arguments.
Step 3: Now add the bash code as under. Save the file on the desktop.
Step 4: Click the file and Voilà!
Finding a solution to a problem as simple as typing something like login credentials repeatedly can be done easily. Once you know what the problem statement is, finding the solution is easier. I hope this post gave you an idea of how Selenium and Python works and how creating a Python bot is easy.