by Max Goh
How I integrated CSS Modules with SCSS into my React application

I recently started on an Isomorphic React project. I wanted to use this opportunity to utilize tools that were on my “potential to use” list, and CSS Modules was one of them.
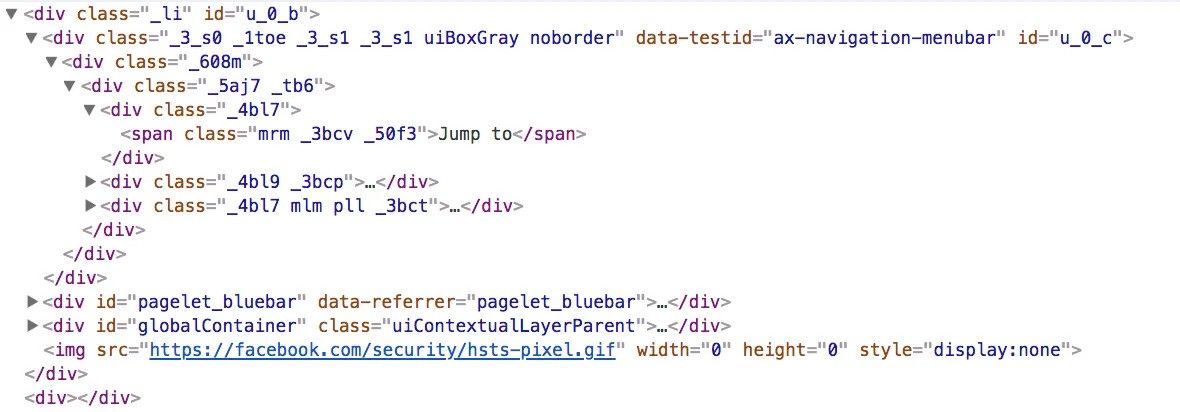
Take a look at this image, do you notice something different?

The class names look like some random gibberish hash. This is what CSS Modules looks like in production. It enables you to have unique class names, preventing conflicts between common class names in your application.
Here’s an example of how a CSS Module is used:
/** App.scss */
.app {
  background: red;
}
/** App.jsx */
import React, { Component } from 'react'
import ReactDOM from 'react-dom'
import styles from './App.scss'
class App extends Component {
  render() {
    return (
      <div className={styles.app}>Hello App!</div>
    )
  }
}
Why CSS Modules with SCSS
CSS Modules allow you to have modular styling in your components. This means no more conflicts of classNames within your application. Meanwhile, SCSS is a CSS Pre-processor that enables you with capabilities such as mix-ins, global variables, nesting and so on.
Integration with SCSS
As an SCSS user myself, I wanted the power of both CSS Modules and SCSS combined in my application. After much Googling, there didn’t seem to be many resources out there for integrating SCSS and CSS Modules.
Facebook added CSS Modules support in Create React App v2.
Are you interested to find out how you can use CSS modules with SCSS in your own project? Ok then — let’s begin!
Getting started
I’ll be using Facebook’s create-react-app starter-kit as the base project.
# Installing the create-react-app package in your system
$ npm install --global create-react-app

# Creating the project
$ create-react-app scss-module-react

# Changing into the application’s directory
$ cd ./scss-module-react
As we need to make changes to the webpack configuration, we will have to eject from the default configuration that Create React App provides.
$ yarn eject  # This command ejects your application from the default configurations, allowing you access to the scripts and webpack configurations.

$ yarn add -D sass-loader node-sass
Implementation
Now that we have set up our root application, we can begin with tweaking the webpack configurations provided. After you have ejected, you will notice that you have access to a new folder named config . This is where the application’s webpack configurations are stored.
Development
We can start by tweaking for the development environment.
/** webpack.config.dev.js */
// Add this snippet in after line 12

const CSSModuleLoader = {
  loader: 'css-loader',
  options: {
    modules: true,
    sourceMap: true,
    localIdentName: '[local]__[hash:base64:5]',
    minimize: true
  }
}

const CSSLoader = {
  loader: 'css-loader',
  options: {
    modules: false,
    sourceMap: true,
    minimize: true
  }
}

const postCSSLoader = {
  loader: 'postcss-loader',
  options: {
    ident: 'postcss',
    sourceMap: true,
    plugins: () => [
      autoprefixer({
        browsers: ['>1%', 'last 4 versions', 'Firefox ESR', 'not ie < 9']
      })
    ]
  }
}
Add this after line 180
{
  test: /\.scss$/,
  exclude: /\.module\.scss$/,
  use: ['style-loader', CSSLoader, postCSSLoader, 'sass-loader']
},
{
  test: /\.module\.scss$/,
  use: [
    'style-loader',
    CSSModuleLoader,
    postCSSLoader,
    'sass-loader',
  ]
},
What we are doing here is setting up webpack to read and import both .scss and .module.scss files.
This allows us to use both import styles from './app.module.scss' and import './app.scss' in our application.
Also, localIndentName allow us to configure how the compiled SCSS classNames will be formatted. For example, an element whose className is button will then be compiled into button__1mDap, which follows the structure that we have provided to the localIndentName.
Production
Setting up for production would be similar, except that we probably do not want to show the local classNames, and instead just the hashes. We can do the same changes in webpack.config.prod.js, with just one tiny difference to use localIdentName: '[hash:base64:5]' .
That’s it!
Now that our configuration and application are ready, try creating some test SCSS files and give it a whirl. You can run the CRA application with these commands:
$ yarn add -g serve
$ serve -s build
Wrapping Up
With CSS modules, you are now able to isolate styling for each unique component, thus making each component absolutely modularized.
Find the code in the GitHub repository here.
Thanks for reading, feedback is very welcome!
I mainly write about Technology & Programming. Feel free to visit my website at maxgoh.xyz.
Given the opportunity, I would love to engage with the readers. You can follow me on Twitter or LinkedIn.
