

In this article, you will learn how to securely access secret API keys using Netlify functions in a React app.
Netlify provides rich features that help you easily deploy Single Page Applications built using frameworks like React, Vue and Angular among others. This takes away the burden of coding and maintaining server-side code.
In some cases, a front-end app needs to communicate with an external third-party API. Some of the third-party APIs require secret API keys to access.
Let's imagine a situation where you want to include weather alerts on your front-end app. As a result, you sign up for open weather map API's paid plan which requires a secret API key to access.
In such situations, you'll need to take care to ensure that you don't expose the secret API key on the front end.
Netlify provides functionality on its web user interface which you can use to hide API keys. But the API key can be accessed from the client side if the environment variable in which it is stored is accessed from the front-end code.
What You'll Learn in This Article
In this article, you are going to hide the secret API key on the Netlify UI and securely access it using Netlify functions in a React app created using create-react-app(CRA). Using Netlify functions makes sure that the API key is not exposed on the client-side.
The process should be similar for other frameworks, though we are using React in this article.
By the end of this article, you will be able to do the following:
Add a Netlify function to a React app
Use Netlify functions to securely access secret API keys
Use the netlify-cli tool to test your Netlify functions
Prerequisites
Outlined below are some of the prerequisites for this article. It is worth pointing out that you can still follow along even if you don't check off every one.
You can Google if there is something you don't understand or post a question on the freeCodeCamp forum. We shall be happy to help.
Have at least a basic understanding of JavaScript, the React framework, and a version control system like Git.
Have Node installed on your machine. If you don't have it installed, you can download it for your system from the Node downloads page.
Have Git installed on your machine. If you don't have it installed, you can do so from the Git downloads page.
Have a Netlify account. If you don't have one, you can sign up at no cost using your email address.
Have a basic knowledge of Netlify's continuous deployment feature. You will use it to deploy your React app to Netlify from GitHub.
Have a GitHub account because we'll be using Netlify's continuous deployment feature. If you don't have an account, you can sign up using your email address.
How to Use Environment Variables in a React App Created using create-react-app
In this section, you will learn how to use environment variables in a React app created using CRA. If you are already familiar with how to do this, then you can skip to the next section.
React apps created using CRA come configured so you can create custom environment variables in .env file and then access them in your codebase using process.env.
To use this feature, you can follow the steps below. These steps assume you have already created a React app using CRA.
Step 1 - Create a .env file at the root of the project directory
Start by creating a .env file at the root of the project directory. You can then add your environment variables in the .env file so that they look like the below.
REACT_APP_FIRST_SECRET=12345678
REACT_APP_SECOND_SECRET=123456789
In the above .env file, the environment variables are REACT_APP_FIRST_SECRET and REACT_APP_SECOND_SECRET. Their corresponding values are on the right-hand side. You need to take note of a few things when using environment variables with CRA:
The environment variable should always start with
REACT_APPand then be followed by the variable name for it to work. For example, you can name the variable containing your API keyREACT_APP_API_KEY.There should be no spacing before and after the
=.
Step 2 - Access the environment variable in your app using process.env
You can then access those environment variables in your React app using process.env.REACT_APP_FIRST_SECRET and proces.env.REACT_APP_SECOND_SECRET. These variables are added to your codebase at build time, so you should restart your development server if you are running the app on localhost for the changes to take effect.
Accessing the environment variable like that prevents you from pushing your secret API key to a remote Git hosting service like GitHub.
CRA adds the .gitignore file by default. You just need to add .env file to it so that Git will ignore your .env file when you commit your changes.
What you have just learned about environment variables will keep your secrets safe in development.
But what will happen if you do the same thing in production since the environment variables are added to your codebase at build time? The next section will answer that question.
Accessing environment variables from a React app created using creat-react-app exposes your API keys
Yes, indeed it does. Unfortunately, some absolute beginners think otherwise. That included me when I was just starting. But even the create-react-app documentation states that:
Environment variables are embedded into the build, meaning anyone can view them by inspecting your app's files - create-react-app documentation
To illustrate this, I have built a simple demo app and deployed it to Netlify. This is a simple React app created using CRA. If you are interested, you can fork the project repository and deploy the app to Netlify under your account.
In this app, I am fetching a placeholder todo item from the JSON placeholder API and then displaying it to the user.
The JSON placeholder API does not need an API key to access. But for this illustration, I am using the base URL as the "secret" which I don't want to expose.
Most web-based APIs require passing the API key as a query parameter when authorizing users. While deploying the app, I have set the value of REACT_APP_TODO_BASE_URL to https://jsonplaceholder.typicode.com/todos on Netlify's web interface.
There are two ways you can access the value which I have hidden in the environment variable from the front-end:
By inspecting the app's codebase
By inspecting the Network tab in the Chrome DevTools
How to inspect the app's codebase
To inspect the app's codebase, follow the steps below:
Navigate to the deployed demo app.
Open the browser developer tools. You can open them by pressing the key combination
CTRL + SHIFT + Ion Chrome or right-clicking and then selecting the Inspect option in Chrome. Click theSourcestab. This is what it looks like for me in Chrome if theSourcestab is active. It might look different in other browsers though.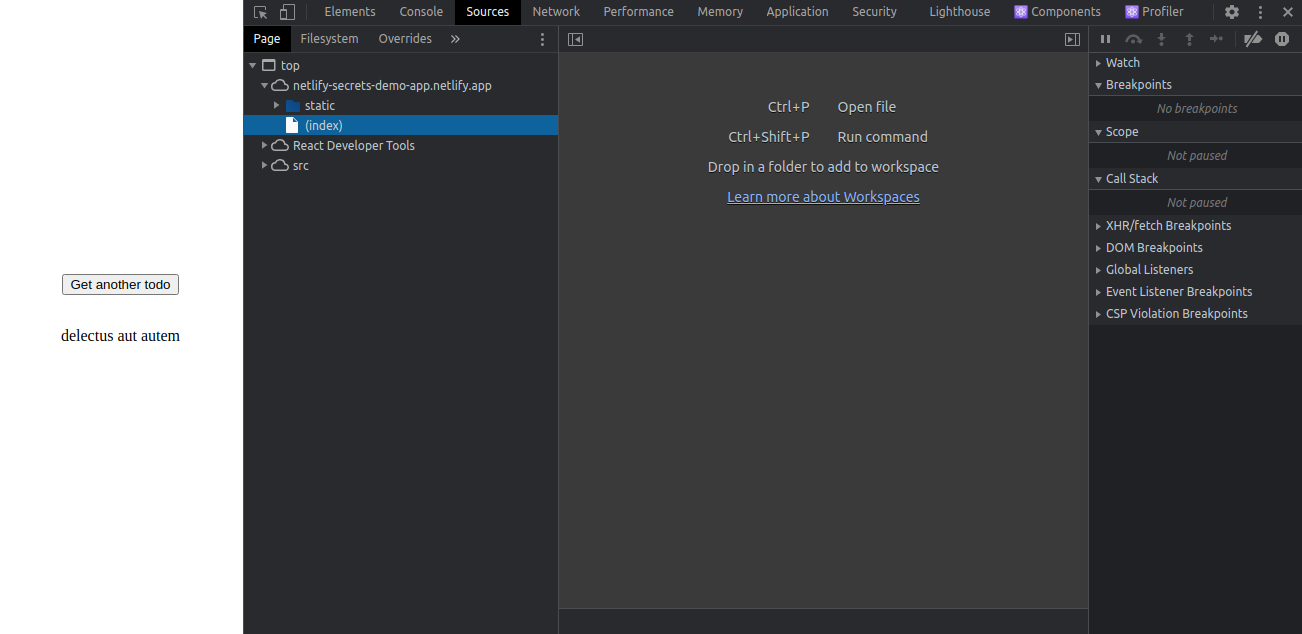
In the
Sourcestab, you should seetopfolder under thePagetab. Then navigate from thetopfolder tomain.e54a1b49.chunk.jsby following the pathtop/netlify-secrets-demo-app.netlify.app/static/js/main.e54a1b49.chunk.js.main.e54a1b49.chunk.jsis a one-line minifed file that is not readable.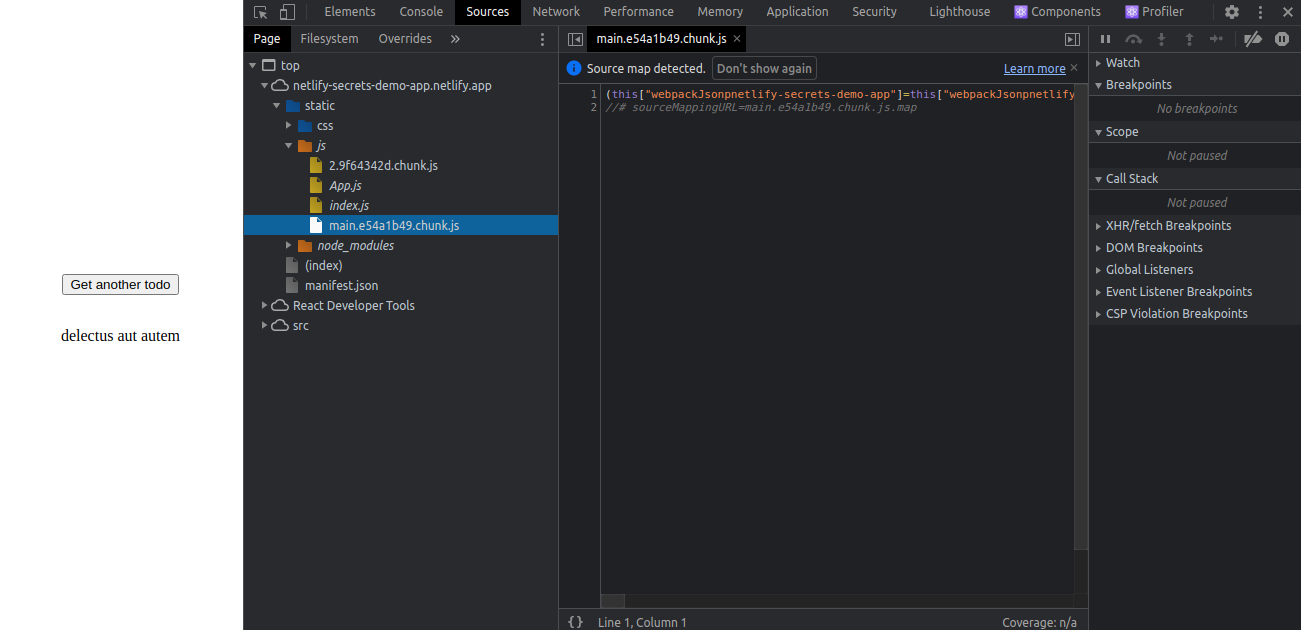
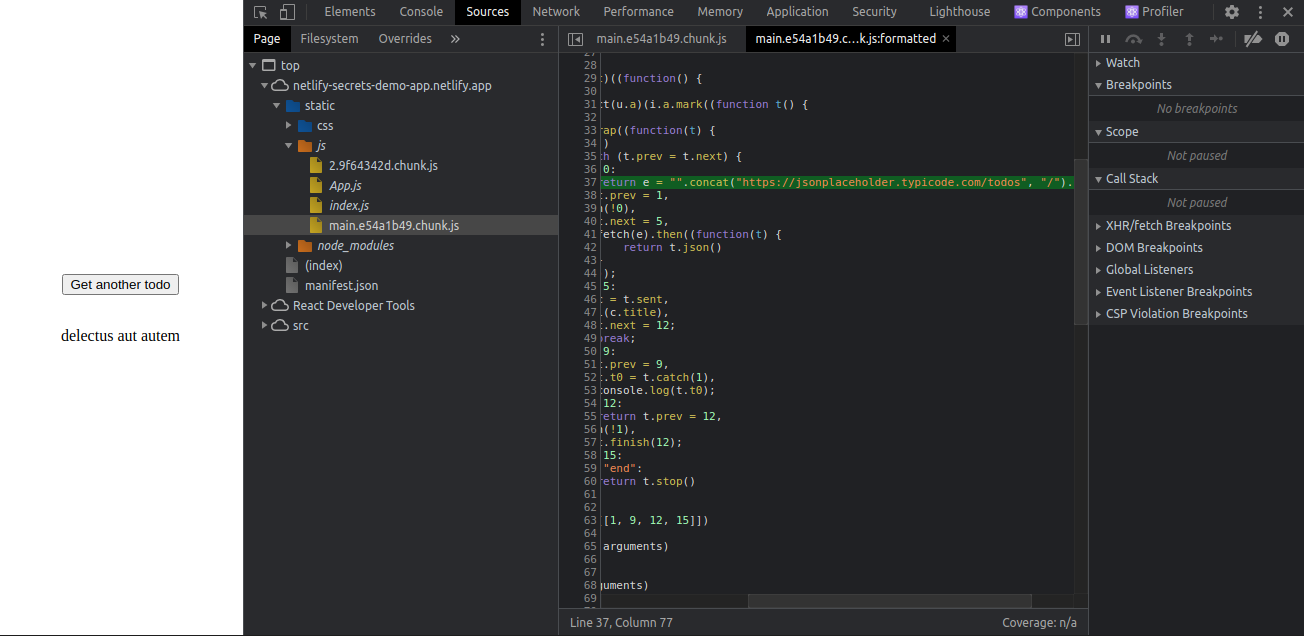
Click the
{}symbol at the bottom left of the panel to pretty-print the code in a readable format.The secret that we hid in the environment variable is right there in the codebase on line 37 as shown in the image below.
How to inspect the Newtwork tab in the Devtools
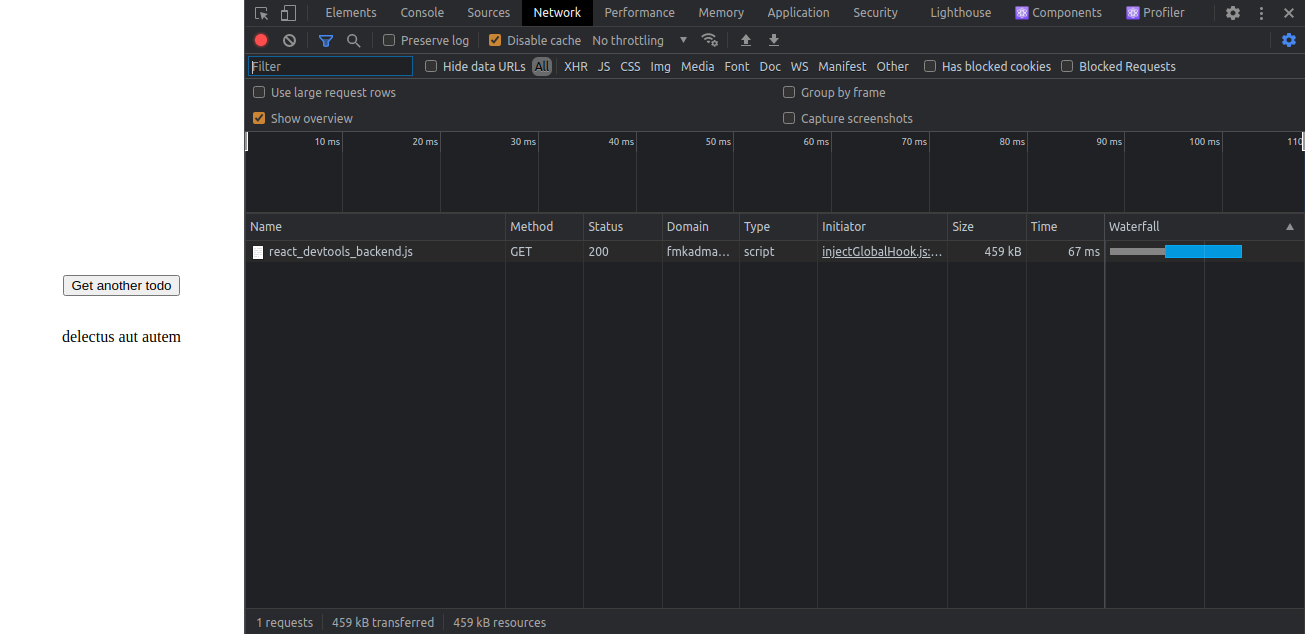
Navigate to the deployed demo app
Open the browser developer tool and then open the Network Tab. The network Tab should look like in the image below in chrome. It might look different in other browsers.
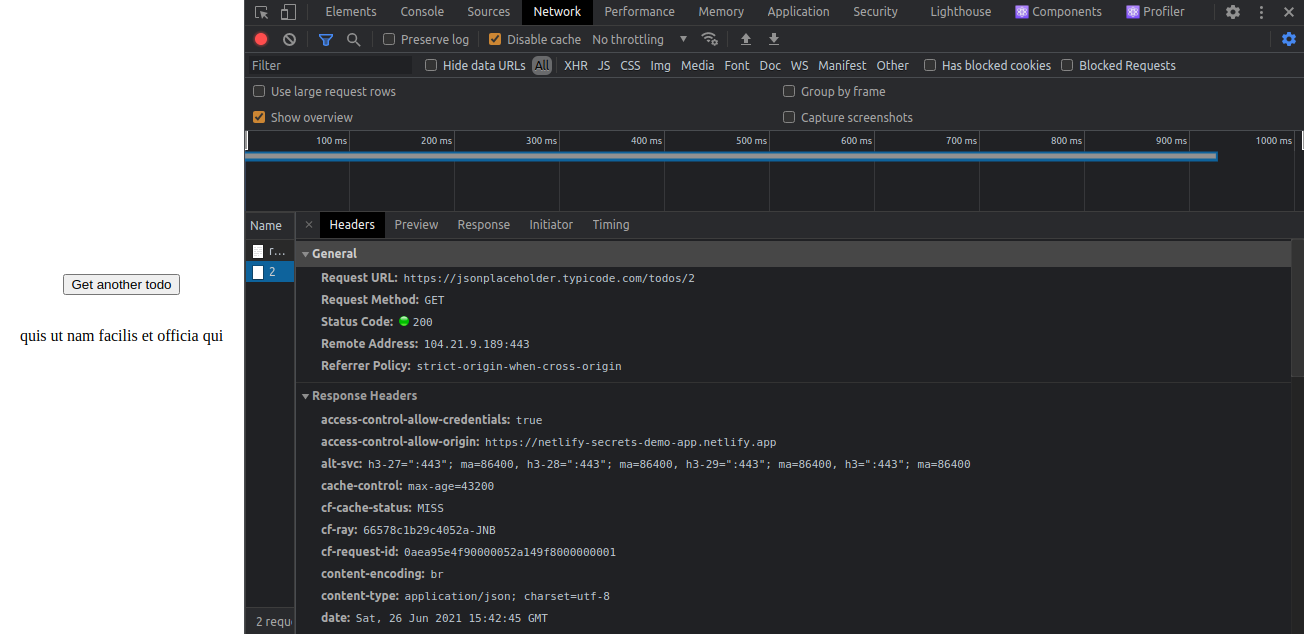
Click the
Get another todobutton in the browser. You should be able to see another row in the open panel indicating that another request has been made. Mine looks like in the image below.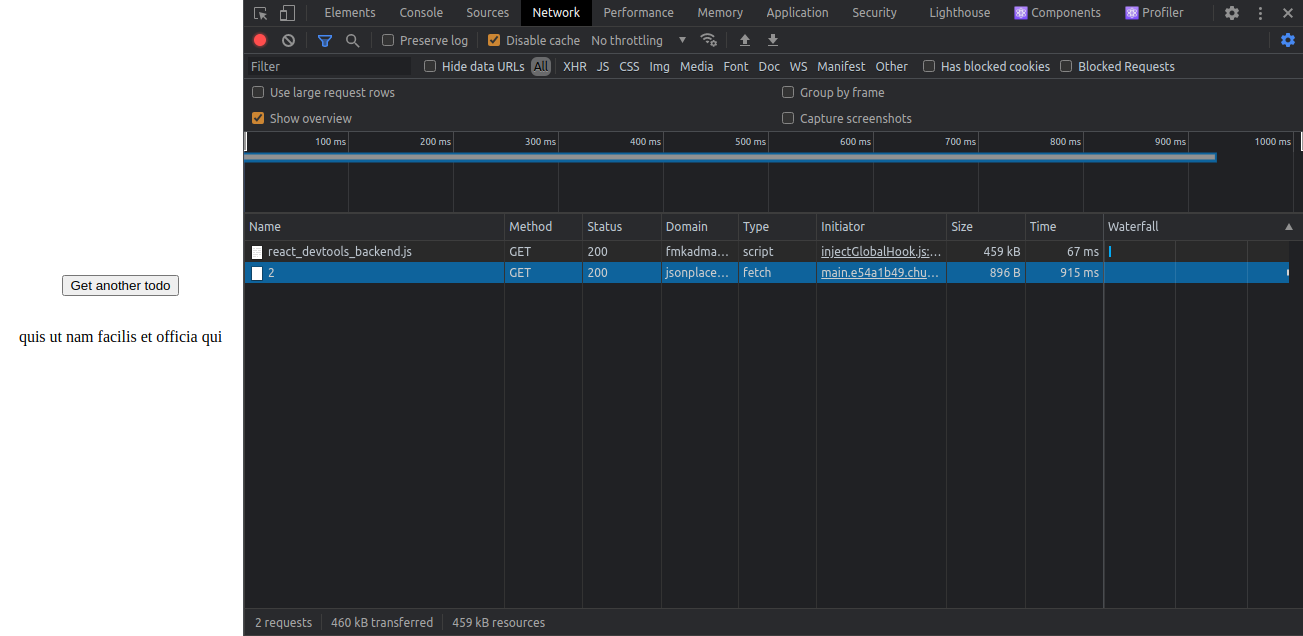
Click the last row. Another panel will open showing the request and response headers. Again our "secret" has been exposed.
As you can see from the above, your API key may not be visible in the codebase that has been committed to GitHub but it is still accessible on the client-side. Now you know what would happen if your key is for a paid plan.
To keep your secret key secret, you need to access your environment variable using Netlify functions.
In the next section, you will learn how to securely access environment variables using Netlify functions. You will do that by adding Netlify functions to a React app and then deploying it to Netlify.
How to Securely Access Environment Variables with Netlify Functions
In this section, you will fork a simple React app which was created using CRA and then add a Netlify function to it. You will then use your function to access the environment variable instead of accessing it from your front-end code.
This will ensure that you don't expose your secret API key as illustrated in the section above. You will then deploy the app to Netlify using Netlify's continuous deployment feature.
What is a Netlify function?
This is a function that you can use for executing server-side code without having to deploy your own server.
According to the documentation, if you use Netlify functions, you are indirectly using AWS’s serverless Lambda functions which are used for running on-demand, server-side code without having to run a dedicated server.
Below are some of the reasons why you might need to use Netlify functions.
Fetch live data from an API
Return dynamic images
Send automated emails
To start using Netlify functions, create a folder at the root of the project directory and name it netlify.
Inside the Netlify folder, you have to create another folder called functions. In the functions folder, you can create a file that contains a function that executes your code. As a result, the path to the files containing your functions should be netlify/functions.
This is the default location where Netlify will look for your functions. If you want to change the directory where your functions are located inside netlify folder, then you need to add that information to a netlify.toml configuration file at the root of the project directory so that Netlify knows where to look for them.
Using netlify.toml is outside the scope of this article. We shall be using the default configuration.
Below is what a Netlify function looks like. Let's assume that I have created a todo.js file in netlify/functions and added the code below to it.
const axios = require("axios");

exports.handler = async function (event, context) {
  //Securely access environment variables here
};
You will notice that the function has two parameters, event and context. If the function needs a dependency, make sure you add it to your project's package.json file.
In this case, I have added axios as a dependency. This function is executed whenever we hit the netlify/functions/todo endpoint.
There are other ways of triggering Netlify functions, but for this article let's focus on the simplest use case.
Data that have been passed from the front-end can be accessed in the event parameter. In the body of the function, you can do whatever you want including securely accessing your API key and sending data back to the front-end.
That is what you need to know to start using Netlify functions. If you want to dive deeper and explore what else you can do with them, take a look at the documentation.
Now that you understand the basics of Netlify functions, follow the steps below to learn how to implement them in a codebase.
You will fork this demo app and then add Netlify functions to it. It is a simple React project created using CRA.
Step 1 - How to fork the project under your own GitHub account
In this step, you are going to fork the demo app under your own GitHub account. It is necessary to fork the project under your account so that you will be able to deploy it to Netlify.
If you are not interested in forking the project but would like to implement Netlify functions to your project, then skip to step 6.
If you don't know how to fork a GitHub repository, you can follow the steps described in the how to fork a repo section of the GitHub documentation.
Step 2 - How to clone the project to your local machine
In this step, you are going to clone the project to your local machine by running the command below (assuming you forked the project under your accoun). Do not forget to replace GITHUB_USER_NAME with your GitHub username.
git clone git@github.com:GITHUB_USER_NAME/netlify-secrets-demo-app.git
or
git clone https://github.com/GITHUB_USER_NANE/netlify-secrets-demo-app.git
After successfully cloning the project to your machine, you should be able to see the netlify-secrets-demo-app folder containing your project in the directory where the project was cloned.
You can navigate to the project directory and open it in your favorite text editor.
In the next step, you will install dependencies.
Step 3 - How to install dependencies
In this step, you will install dependencies by running the command below on the terminal.
npm install
The above command will install the dependencies you need. The installation process might take a couple of minutes so you need to be patient.
In the next step, you will create a .env file and add environment variables to it.
Step 4 - How to create a .env file
In this step, you are going to create a .env file at the root of the project directory by running the command below on the terminal:
touch .env
You should be able to see the .env file created at the root of the project directory. Copy and paste the contents of the example.env file in it.
Since we'll be using Netlify functions to access environment variables, you don't need to prefix the variable name with REACT_APP as described at the beginning of the article. Change REACT_APP_TODO_BASE_URL environment variable to TODO_BASE_URL and set its value to https://jsonplaceholder.typicode.com/todos.
In the next step, you will add Netlify functions to your app.
Step 5 - How to add Netlify functions to your app
In this step, you will add a Netlify function to the app and use it to securely access your environment variables.
As I mentioned above, by default, Netlify will look for your functions inside the functions directory which must be located inside the netlify folder.
If you are keeping the functions in a different directory inside the netlify folder, then you need to provide additional information inside netlify.toml configuration file at the root of the project directory. This will make sure that Netlify knows where to locate your functions. But in this article, we'll be using the Netlify default configuration.
Create a folder at the root of the project directory and name it netlify. In the netlify folder create another folder and call it functions. In the functions folder, create todo.js file.
Copy and paste the code below in the todo.js file:
const axios = require("axios");

exports.handler = async function (event, context) {
  console.log(event);
  console.log(context);
  try {
    const { id } = event.queryStringParameters;
    const response = await axios.get(`${process.env.TODO_BASE_URL}/${id}`);
    return {
      statusCode: 200,
      body: JSON.stringify({ title: response.data.title }),
    };
  } catch (err) {
    return {
      statusCode: 404,
      body: err.toString(),
    };
  }
};
We'll send data from the front-end as the value of the id parameter in the query string. It is accessible in the queryStringParameters property of the event object.
You can also console.log the event and context parameters to see what their properties are.
We securely access the environment variable and use axios to fetch our todo. If it is successful, we send back a response object with a statusCode of 200 with the data in the body of the response object. If there is an error we return a statusCode of 404 and the error is sent back in the body of the response object.
The function you have added above will be exposed to your front-end code via /.netlify/functions/todo endpoint. It will be executed whenever you hit the /.netlify/functions/todo endpoint. Now let's execute the function from the front-end.
Navigate to the App.js component in the src folder. In the useEffect hook on line 15, instead of accessing process.env. on the front-end, we instead make a GET request to our endpoint exposed by the Netlify function we declared in the previous step.
So change line 15 from:
const url = `${process.env.REACT_APP_TODO_BASE_URL}/${todoId}`;
to:
const url = `/.netlify/functions/todo?id=${todoId}`;
Your App.js component should now look like this:
import { useEffect, useState } from "react";
import "./App.css";

function App() {
  const [todoId, setTodoId] = useState(1);
  const [todo, setTodo] = useState("");
  const [loading, setLoading] = useState(false);

  function getNewTodo() {
    setTodoId((todoId) => (todoId === 20 ? 1 : todoId + 1));
  }

  useEffect(() => {
    async function fetchTodo() {
      const url = `/.netlify/functions/todo?id=${todoId}`;
      try {
        setLoading(true);
        const todo = await fetch(url).then((res) => res.json());
        setTodo(todo.title);
      } catch (err) {
        console.log(err);
      } finally {
        setLoading(false);
      }
    }
    fetchTodo();
  }, [todoId]);

  return (
    <div className="App">
      <p>
        <button onClick={getNewTodo}> Get another todo </button>
      </p>
      <p>{loading ? "Loading..." : todo}</p>
    </div>
  );
}

export default App;
In the code above we are storing todo and todoId in state. Notice that the GET request we are making to the /.netlify/functions/todo endpoint in the useEffect hook. We are passing the todoId as the value of the query parameter id.
After making the fetch request, our todo.js function will be invoked. Inside todo.js as explained above, we'll access the environment variable and fetch the todo which is returned by the function for the front-end code to use. This keeps our environment variable safe since it is not accessible from the front-end. The front-end only consumes what the function returns.
In the next step, you will test whether the function you have just defined works as intended.
Step 6 - How to test your Netlify function
In this step, you will use netlify-cli to test whether the function you defined works as intended.
Run the command below to install netlify-cli globally. The installation will take a bit of time, so be patient:
npm install netlify-cli -g
After netlify-cli is installed globally, run this command to test your function:
netlify dev
Running the above command successfully will start a local development server on port 8888. You will also see the event and context parameters printed on the console when your function is invoked.
You can also test the function by running the command below on another terminal. Make sure the server is running before running the command below otherwise you will get an error.
netlify functions:invoke --querystring "id=1"
This command will invoke the function with the specified query string. You will be prompted to make some selections on the terminal. Just press enter.
Successfully running the above command will fetch our todo which will then be printed on the terminal.
{"title":"delectus aut autem"}
In the next step, you will deploy the project on your local machine to GitHub.
Step 7 - How to commit your changes and push to GitHub
In this step, you will commit the changes on your local machine and push them to GitHub using the commands below.
git commit -m "Add netlify functions"
git push origin master
In the next step, you will use netlify's continuous ceployment feature to deploy the app from GitHub.
Step 8 - How to deploy the app to Netlify from GitHub
In this step, you will use Netlify's continuous deployment feature to deploy from GitHub.
This step requires you to have a Netlify account. If you haven't signed up, you can do so from the signup page at no cost.
Log in to your Netlify account and follow the process for linking a GitHub repository to Netlify for continuous deployment as described in the documentation. Do not forget to add the environment variable TODO_BASE_URL and set its value to https://jsonplaceholder.typicode.com/todos under the advanced settings as you deploy the app to Netlify.
And there you have it! That is how you hide secret API keys using Netlify functions. I hope you enjoyed reading the article.
Conclusion
In this article we learned how to:
Add a Netlify function to a React app
Use Netlify functions to securely access secret API keys
Use the netlify-cli tool to test your Netlify functions
With netlify's serverless functions, you can send emails, fetch data from an API like we just did, and much more. It has equipped front-end developers with the tools to write back-end code without worrying about server maintenance.
You can explore more about what else you can do with Netlify functions in the functions section of the documentation.
Finally, if you have any questions about what we've covered in this article, feel free to ask on the freeCodeCamp forum or DM me on Twitter. You can also ask your question in the Netlify forum.
Thanks for reading!