
A table of contents (or TOC) is a list of chapters or section titles in an article. You'll usually find it at the beginning of an article, right after the introduction.
When you write a long blog post or an article with independent sections, consider adding a table of contents. It can help your readers understand your article's content and know what's coming. Providing hyperlinks to each title in the table of contents helps readers navigate between the sections they want to check out.
Having a table of contents in your articles also benefits you as a writer. First, you can easily see the flow of your article. Another benefit is that it can increase your blog's traffic. If your readers have a great experience reading your article, they will likely bookmark and return to it.
Some publications use Ghost to write and publish articles on their website, and freeCodeCamp is one of them. In this article, I will walk you through how to add a clickable table of contents to your article on Ghost.
Table of Contents
Understanding Headings
Before we jump into how to add a table of contents, let's take a moment to understand "headings" because I will use this term going forward.
Headings are titles of sections and subsections that are displayed on a website.
There are six levels of headings based on the importance of the section.
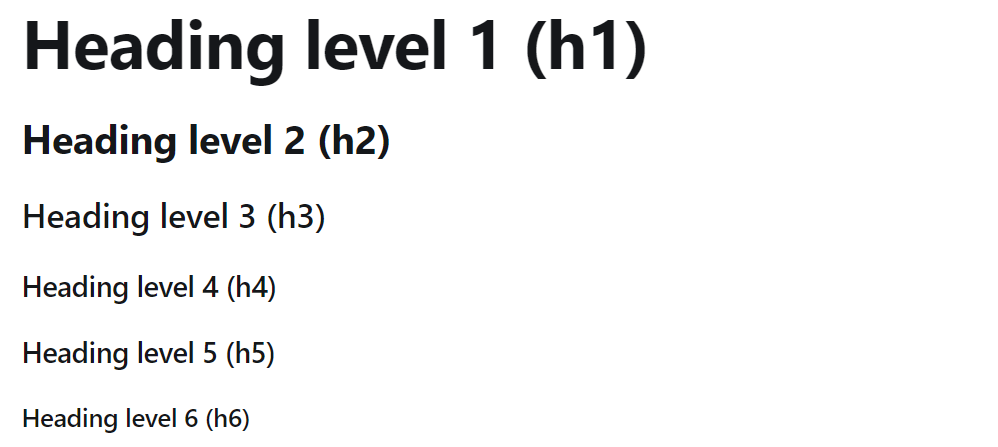 Levels of headings – H1 - H6
Following best practices, a page on a website should only have one heading level 1 (known as h1). It is the main title of the page. In your case, it'll be the main title of your article. (In this article, it's "How to Add a Table of Contents to Your Article on Ghost".)
So, writing an article on Ghost (or any other publication platform) leaves you with h2 to h6 for your section and subsection titles. And you can use as many of them as you need depending on the hierarchy and organization of your content.
How to Add a Table of Contents
You can create your table of contents whenever you want – before you write, during the process, or after you finish writing your article.
But you can only add the link to each chapter or section title after writing your article. This is because you'll need to know exactly how the text of the headings will appear in order to link to them properly, as you'll see below.
In this guide, I'll show you how to build a ToC in HTML, which allows you to add subheadings in addition to main headings/section titles.
Step #1 - Create a List of Headings
You can create a table of contents with a list of one-level headings (h2) or include the subheadings (h3 to h6) if you want to.
You can also choose how you want to format your list:
- Unordered List: A list with bullet points.
- Ordered List: A list with numbers.
Create a List of One-Level Headings
Follow these steps to create a one-level headings list:
- Insert a new line.
- Type a dash (
-) or an asterisk (*) for the unordered list. Or, type a number and add a period — for example,1.— for the ordered list. - Hit the spacebar.
- Add the title.
- Click enter to add a new item in the list.
 Add an unordered and an ordered list.
Note: You can skip the next section and go directly to "Step #2 - Inspect a Heading and Find the id" if you want.
Create a List with Subheadings
If you wish to create a list with subheadings (nested list), you must use HTML to format it manually, as Ghost doesn't have nested list options built into the editor.
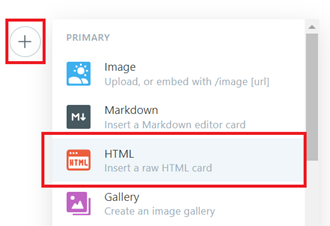
First, you need to add the HTML card:
- Start on a new line.
- When your cursor is on the new line, you will see a plus (
+) icon button in the circle on the left. Click this button. - Click the "HTML" option.
 A plus sign and an "HTML" option on Ghost.
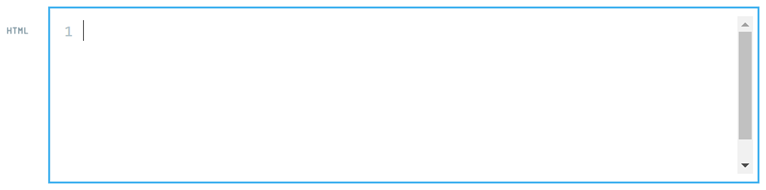
Afterward, you will see the HTML card, as shown in the image below.
 HTML card on Ghost.
Now, let's start adding the list of your headings and subheadings.
Add an HTML unordered list (<ul></ul>) or an ordered list (<ol></ol>) element.
<ul></ul>

or

<ol></ol>
To add the list of your headings, add a space between the ul or ol tags. Put the cursor between the tags and hit enter twice.
<ul>

</ul>
Then, add list elements (<li></li>) in the empty line between the opening and closing ul or ol tags. Add these list elements based on the number of your section titles.
<ul>
    <li></li>
    <li></li>
    <li></li>
</ul>
Afterward, put each of the titles between the li tags.
<ul>
    <li>Heading 2 - Part 1</li>
    <li>Heading 2 - Part 2</li>
    <li>Heading 2 - Part 3</li>
</ul>
To add subheadings, repeat all the steps. But now, you should put the ul or ol element inside the li element(s) that hold the section title. Here's how to do it:
- Place your cursor between the end of the section title and the
</li>tag, then click enter. - Click enter again to add a space and add an
ulorolelement for the subheadings. - Add an
ulorolelement in the new line, put the cursor between the tags, and hit enter twice to add a space. - Add
lielement(s) in the new line between theuloroltags. - Put the subsection title between the
litags.
 Creating a nested list in HTML.
Below is an example of a table of contents with subheadings in HTML.
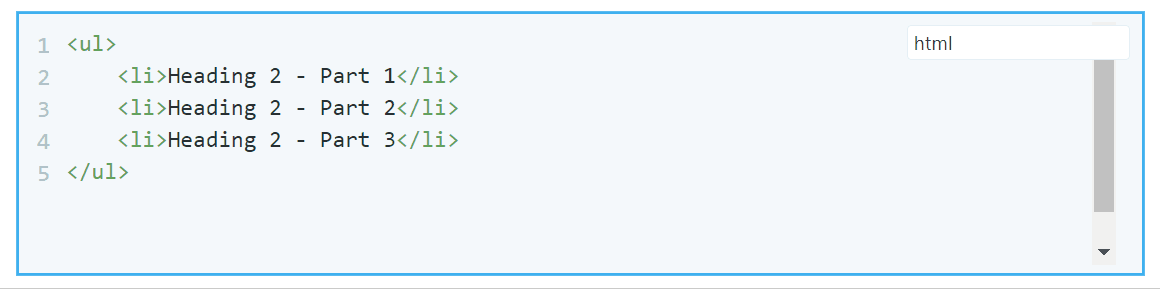
<ul>
    <li>Heading 2 - Part 1
        <ul>
            <li>Heading 3</li>
            <li>Heading 3</li>
        </ul>
    </li>
    <li>Heading 2 - Part 2
        <ul>
            <li>Heading 3
                <ul>
                    <li>Heading 4</li>
                </ul>
            </li>
        </ul>
    </li>
    <li>Heading 2 - Part 3</li>
</ul>
And the result will look like this:
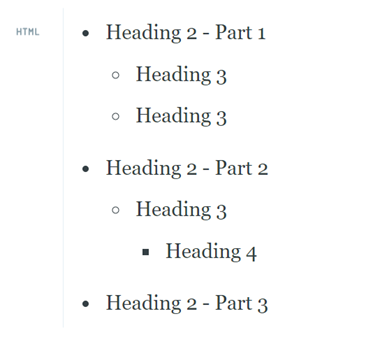 A list of section and subsection titles.
Step #2 - Inspect a Heading and Find the id
After creating the list, it's time to add the links to the titles in your table of contents.
But first, you need to find the id attribute of your heading using preview mode by inspecting the title with your browser's (Chrome or Firefox) developer tools.
So, let's open your preview mode:
- Click the gear icon on the top right of your Ghost editor.
- Click the "Preview" link beside the "Post URL" input.
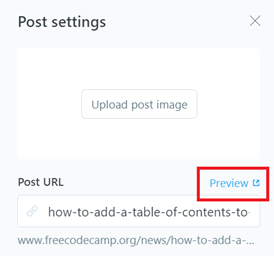 The "Preview" link is in the "Post settings" on Ghost.
Now that you are in the preview mode, right-click your mouse. You will see some options. Click the "Inspect" option to open the developer tools.
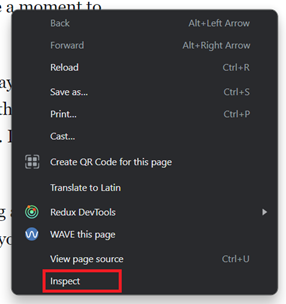 "Inspect" option on Chrome.
In the developer tools, let's click the button with a box and arrow icon on the top left to select a heading element on the page and inspect it.
 "Select an element in the page to inspect it" button in the developer tools on Chrome.
Hover over a title and click on it. It will highlight the element you want to inspect in the developer tools. Inside the heading element (h2 to h6), you will see an id (shown with a red line in the image below).
 Inspect a heading with developer tools on Chrome.
Double-click on the value inside the quote marks of the id and copy it. You will use it to add the link to the title in the table of contents.
Note:
- If you created a list of one-level headings, head to the "Add a Link to a Heading" section.
- If you made a list with subheadings, go to the "Add a Link to a Heading in HTML" section.
Step #3 - Add the Link
Add a Link to a Heading
To add the link, return to your table of contents in the Ghost editor. Then, follow these steps:
- Highlight the title that you want to add the link to.
- Click the chain icon.
- Type a hashtag (
#) in the input field and paste your copiedidvalue.
So, it will be like this:
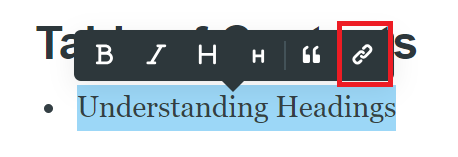 Highlighting a list and a chain icon on Ghost.
#understanding-headings
After you refresh the preview page, check if the link works. It should take you to the target section when you click the title's link. If not, read the "Why Does the Link Not Work?" section.
Add a Link to a Heading in HTML
First, let's return to your Ghost editor and go to the li element that holds the title in the table of contents.
Then, wrap the title inside an anchor element (<a></a>) and add href="" attribute in the opening tag.
<ul>
    <li><a href="">Understanding Headings</a></li>
</ul>
The anchor element creates a hyperlink, and the href attribute is the placeholder for the link's destination.
Now, you will add the link's destination. Type a hashtag (#) and paste the id value you've copied inside the double quotes of the href.
<ul>
    <li><a href="#understanding-headings">Understanding Headings</a></li>
</ul>
Repeat all the steps to add a link for each title.
Below is an example of section and subsection titles with links in HTML:
<ul>
    <li><a href="#understanding-headings">Understanding Headings</a></li>
    <li><a href="#adding-a-table-of-content">Adding a Table of Content</a>
        <ul>
            <li><a href="#step-1-create-a-list-of-titles">Step #1 - Create a List of Titles</a></li>
        </ul>
    </li>
</ul>
After refreshing the preview page, you can now check if the link works by clicking it. If it doesn't work, read the next section.
Why Does the Link Not Work?
If you click a link in your table of contents and it goes nowhere or redirects you to a "404 Page not found", return to the preview page. Refresh it, and try to click the link again.
If it still does the same, you need to check the link in the Ghost editor.
Sometimes, it can be a typo where you change the title but still need to update the link. Or there is a missing hashtag (#) in the link.
Final Words
If you liked and found this article helpful, please share it with others. You can find other works on my blog. Let's connect on X (formerly Twitter) or LinkedIn.