By Sampurna Chapagain
Creating a category page is essential for most web applications these days. Different kinds of applications like blogs, ecommerce sites, movie streaming platforms, and many others have category features.
This article will show how to add categories to Ruby on Rails applications.
This is a beginner-friendly tutorial, so you can follow along even if you have very basic Ruby on Rails knowledge.
How to Generate the Blog Scaffold
Let's first create a new Rails project. Here, we will be using Rails version 6.1.7 and Ruby version 3.0. You can create the new Rails project using the command below:
rails new blog_categories
Now, let's create the new blog scaffold using the following command:
rails g scaffold blogs title:string description:text
This command will create all the necessary files for us to work with the blog's CRUD operations with two database fields title and description. Here, the title is the string field and the description is the text field.
You now need to run the migration with the rails db:migrate command.
Now, head up to your terminal, start the server, and visit the /blogs page. You can see the following result on the browser.
 creating blogs
How to Generate the Categories Scaffold
Now, we have come to the main part of the tutorial which is to add categories to our blog articles.
For that, let's create the categories scaffold now with the command below:
rails g scaffold categories name:string
This command will create CRUD for the categories.
Also, you will need to run rails db:migrate to update the schema.
How to add an association between the blog and category models
Next, you need to add an association between the blog and category models.
In Blog.rb:
class Blog < ApplicationRecord
    belongs_to :category
end

And in `Category.rb`:

```ruby
class Category < ApplicationRecord
    has_many :blogs
end


Now, you need to add the `category_id` to the `blogs` table since each blog is associated with a category. You can go to your terminal and add the following migration:

```ruby
rails g migration add_category_id_to_blogs
This will create a new migration. You need to add the following code in this migration file:
add_column :blogs, :category_id, :integer
Rails has its own set of conventions and rules. And it's smart enough to recognize that this migration is to add a new database column named category_id to the blogs table.
You now need to pass category_id as a strong parameter in the blogs controller.
def blog_params
    params.require(:blog).permit(:title, :content, :category_id)
end
Now, let's create a few categories from the browser.
 creating categories from the browser
You could also add some validation while creating category. For that, you can update the category.rb file with the following code:
```ruby class Category < ApplicationRecord validates :name, presence: true, uniqueness: true has_many :blogs end
This will add few validations as shown in the GIF below:
 adding validations while creating categories
How to display categories as a dropdown in the new blogs page
Now that you can create both blogs and categories, you'll need to display all categories as a dropdown when someone visits the new blog page.
The code for that is shown below:
```ruby
The select tag creates the dropdown selection box. The options_for_select takes a few arguments.
First, it maps through all categories and returns an array of [c.category, c.id]. The category name gets displayed as a dropdown and the category id of any category the user selects gets passed to the controller. The controller then performs the database insertion for blogs.
You can go to the new blogs URL and create blogs with categories.
 creating blogs with categories
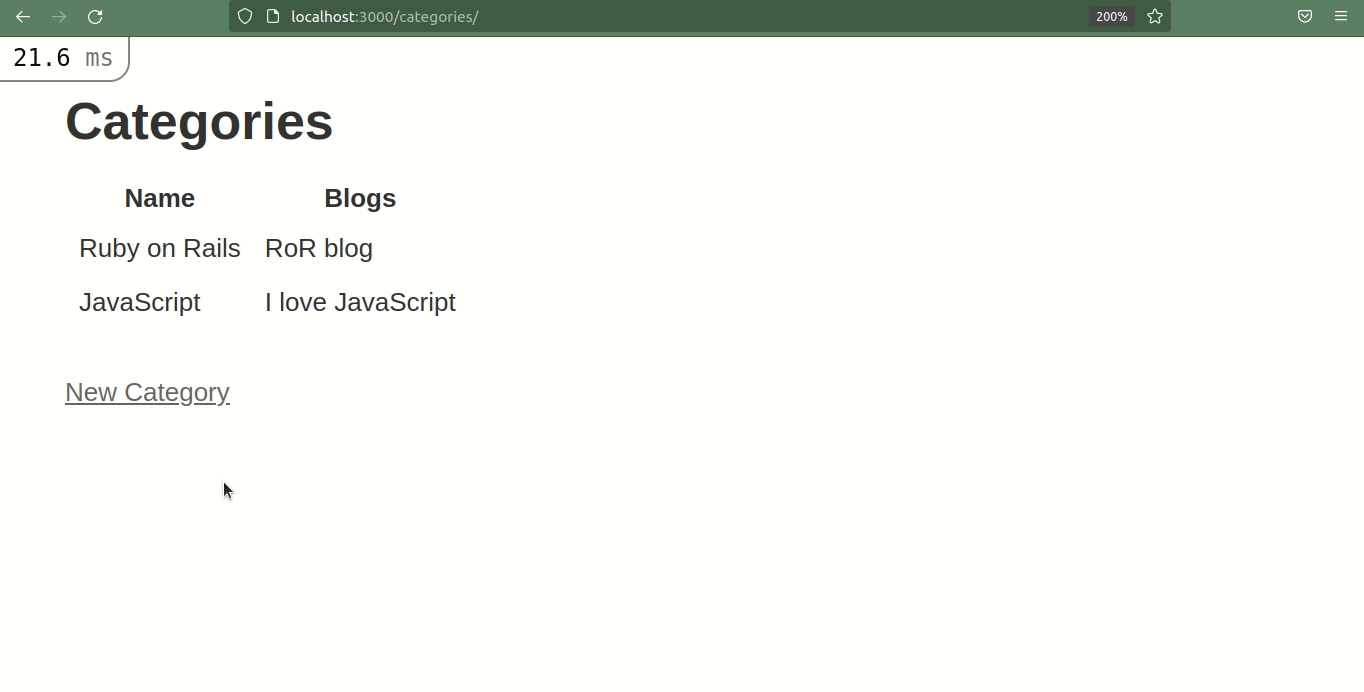
Listing each category's blogs
The next part of this tutorial will show you how to list all categories and all blogs associated with each category. We will be displaying this on the categories index page.
For that, you need to add some code in the categories index view.
```ruby
<%= notice %>
Categories
<% @categories.each do |category| %> <% category.blogs.each do |blog| %> <% end %> <% end %>| Name | Blogs | |
|---|---|---|
| <%= category.name %> | <%= blog.title %> |
<%= link_to 'New Category', new_category_path %>
Here, it's iterating through all categories in order to display each category's name. After we are done with displaying the category name, the next part is to display all blogs associated with each category. So, you can iterate through category.blogs from which you can get the blog records.
If you visit the /category route, you can see all categories with their blogs as displayed in the GIF below.
 listing each category with blogs
Conclusion
In this tutorial, you learned how you can add categories in your Ruby on Rails applications using one-to-many associations.
If you liked this article, please consider buying me a coffee ☕.
You can find me on Twitter for various content related to Web Development.
Thanks for reading.
Happy Coding.