

Drag and Drop is a common interaction technique added to allow people to intuitively move things around on a page. This could be reordering a list or even putting together a puzzle.
How can we add that interaction when building a React app with React Beautiful DnD?
- What is Drag and Drop?
- What is React Beautiful DnD?
- What are we going to build?
- Step 0: Creating a new React.js app
- Step 1: Installing React Beautiful DnD
- Step 2: Making a list draggable and droppable with React Beautiful DnD
- Step 3: Saving list order after reordering items with React Beautiful DnD
What is Drag and Drop?
Drag and drop is pretty much what it sounds like — it’s an interaction allowing someone to click and drag an item, then drop it somewhere else, often having a side effect within the app.
 Moving items on a board
This effect is pretty common in applications like to-do lists or project management dashboard, where you need to prioritize and create an order for how things should be done.
While drag and drop can have some advanced use cases, we’ll stick to basic list functionality for our walkthrough.
What is React Beautiful DnD?
React Beautiful DnD is an accessible drag and drop library from Atlassian. If you don’t know of Atlassian, they’re the team behind Jira. If you’re not familiar with Jira, it’s probably the biggest Agile tool on the internet right now.
The team’s goals were to provide drag and drop capabilities with accessibility in mind, in addition to keeping it night and performant with a powerful API.
What are we going to build?
We’re going to start off with a simple list and add the ability to drag and drop.
In this walkthrough, we won’t spend time building the list itself. The list that we’ll be using uses a standard unordered list (<ul>) and list items (<li>) to create a list with a little bit of CSS to make it look like cards.
We’ll be focusing on adding the ability to drag and drop to rearrange the list using React Beautiful DnD.
Step 0: Creating a new React.js app
To get started, we want a simple app that includes a list of items. This can be an existing project or a brand new project using your favorite framework like Create React App.
I started with a new app using Create React app and I added a simple list of Final Space characters.
 Final Space characters list
If you want to start from the same place, you can clone my demo repository at that branch and start right along with me.
This command will clone the specific branch to get started:
git clone --single-branch --branch part-0-starting-point git@github.com:colbyfayock/my-final-space-characters.git
Otherwise, you can clone the repository as normal and check out the branch part-0-starting-point.
If you want to follow along with just the code, I first created an array of objects:
const finalSpaceCharacters = [
  {
    id: 'gary',
    name: 'Gary Goodspeed',
    thumb: '/images/gary.png'
  },
  ...
And then I loop through them to create my list:
<ul className="characters">
  {finalSpaceCharacters.map(({id, name, thumb}) => {
    return (
      <li key={id}>
        <div className="characters-thumb">
          <img src={thumb} alt={`${name} Thumb`} />
        </div>
        <p>
          { name }
        </p>
      </li>
    );
  })}
</ul>
Step 1: Installing React Beautiful DnD
First step is to install the library via npm.
Inside of your project, run the following:
yarn add react-beautiful-dnd
# or
npm install react-beautiful-dnd --save
This will add the library to our project and we’ll be ready to use it in our app.
Step 2: Making a list draggable and droppable with React Beautiful DnD
With our library installed, we can give our list the ability to drag and drop.
Adding Drag and Drop context to our app
At the top of the file, import DragDropContext from the library with:
import { DragDropContext } from 'react-beautiful-dnd';
DragDropContext is going to give our app the ability to use the library. It works similarly to React’s Context API, where the library can now have access to the component tree.
Note: If you plan on adding drag and drop to more than one list, you need to make sure that your DragDropContext wraps all of those items, like at the root of your application. You can not nest DragDropContext.
We’ll want to wrap our list with DragDropContext:
<DragDropContext>
  <ul className="characters">
  ...
</DragDropContext>
At this point, nothing will have changed with the app and it should still load as it did before.
Making our list a Droppable area
Next, we want to create a Droppable area, meaning, this will allow us to provide a specific area where our items can be moved around inside.
First, add Droppable to our import at the top of the file:
import { DragDropContext, Droppable } from 'react-beautiful-dnd';
For our purpose, we want our entire unordered list (<ul>) to be our drop zone, so we’ll again want to wrap it with this component:
<DragDropContext>
  <Droppable droppableId="characters">
    {(provided) => (
      <ul className="characters">
        ...
      </ul>
    )}
  </Droppable>
</DragDropContext>
You’ll notice we wrapped it a bit differently this time though. First, we set a droppableId on our <Droppable> component. This allows the library to keep track of this specific instance between interactions.
We’re also creating a function immediately inside of that component that passes in the provided argument.
Note: This function can pass in two arguments including a snapshot argument, but we won’t be using it in this example.
The provided argument include information and references to code that the library needs to work properly.
To use it, on our list element, let’s add:
<ul className="characters" {...provided.droppableProps} ref={provided.innerRef}>
This is going to create a reference (provided.innerRef) for the library to access the list element’s HTML element. It also applies props to the element (provided.droppableProps) that allows the library to keep track of movements and positioning.
Again, at this point, there won’t be any noticeable functionality.
Making our items Draggable
Now for the fun part!
The final piece of making our list elements draggable and droppable is wrapping each list item with a component similar to what we just did with the entire list.
We’ll be using the Draggable component, which again, similar to the Droppable component, will include a function where we’ll pass through props to our list item components.
First, we need to import Draggable along with the rest of the components.
import { DragDropContext, Droppable, Draggable } from 'react-beautiful-dnd';
Next, inside of our loop, let’s wrap the returning list item with the <Draggable /> component and it’s top level function.
{finalSpaceCharacters.map(({id, name, thumb}) => {
  return (
    <Draggable>
      {(provided) => (
        <li key={id}>
          ...
        </li>
      )}
    </Draggable>
Because we now have a new top level component in our loop, let’s move the key prop from the list element to Draggable:
{finalSpaceCharacters.map(({id, name, thumb}) => {
  return (
    <Draggable key={id}>
      {(provided) => (
        <li>
We also need to set two addition props on <Draggable>, a draggableId and an index.
We’ll want to add index as an argument into our map function and then include those props on our component:
{finalSpaceCharacters.map(({id, name, thumb}, index) => {
  return (
    <Draggable key={id} draggableId={id} index={index}>
Finally, we need to set some props on the list element itself.
On our list element, add this ref and spread additional props from the provided argument:
<Draggable key={id} draggableId={id} index={index}>
  {(provided) => (
    <li ref={provided.innerRef} {...provided.draggableProps} {...provided.dragHandleProps}>
Now, if we refresh our page, and hover over our list items, we can now drag them around!
 Dragging items on a list
However, you’ll notice that when you start moving an item around, the bottom of the page appears to be a little messed up. There’s some overflow issues with our list items and our footer.
You’ll also notice that in the developer console, React Beautiful DnD is giving us a warning message that we’re missing something called a placeholder.
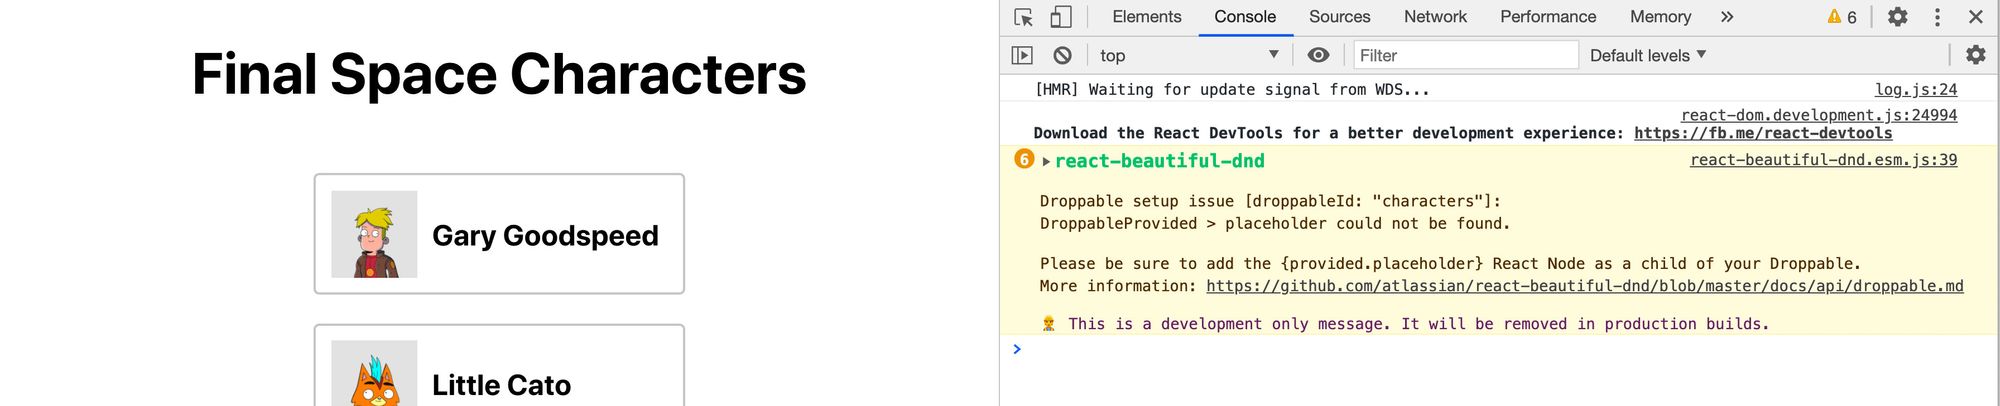 Console warning - placeholder could not be found
Adding a placeholder from React Beautiful DnD
Part of React Beautiful DnD’s requirements is that we additionally include a placeholder item.
This is something that they provide out of the box, but this is used to fill up the space that the item we’re dragging previously took.
To add that, we want to include provided.placeholder at the bottom of our Droppable top level list component, in our case at the bottom of the <ul>:
<Droppable droppableId="characters">
  {(provided) => (
    <ul className="characters" {...provided.droppableProps} ref={provided.innerRef}>
      ...
      {provided.placeholder}
    </ul>
  )}
</Droppable>
And if we start dragging things around in our browser, we can see that our page flow doesn’t have issues and the content stays where it should!
 Dragging items with fixed spacing
The last issue though, is when you move something around, it doesn’t stay, so how can we save the order of our items?
Step 3: Saving list order after reordering items with React Beautiful DnD
When we move our items, they stay where they land for a split second. But after React Beautiful DnD finishes doing its work, our component tree will rerender.
When the components rerender, our items go back to the same place that they were before, because we never saved that outside of DnD’s memory.
To resolve this, DragDropContext takes in an onDragEnd prop that will allow us to fire a function after dragging has complete. That function passes in arguments that includes the new order of our items so that we can update our state for the next render cycle.
Saving our list items in state
First, let’s store our items in state so that we’ll have something to update between cycles.
At the top of the file, add useState to the React import:
import React, { useState } from 'react';
Then, we’re going to create our state using our default list of items.
Add the following to the top of our App component:
const [characters, updateCharacters] = useState(finalSpaceCharacters);
Because we’ll be updating our new characters state to provide our list items and their order, we’ll now want to replace the array we’re mapping through to our new state:
<ul className="characters" {...provided.droppableProps} ref={provided.innerRef}>
  {characters(({id, name, thumb}, index) => {
And if we save and refresh our page, nothing should change!
Updating state when dragging items
Now that we have our state, we can update that state any time our list items are dragged.
The DragDropContext component that we added to our page takes in a prop onDragEnd. Like it sounds, that will fire a function whenever someone stops dragging an item in the list.
Let’s add a function handleOnDragEnd as our prop:
<DragDropContext onDragEnd={handleOnDragEnd}>
Next, we need that function to actually exist.
We can define a function under our state:
function handleOnDragEnd(result) {
}
Our function takes an argument called result.
If we add console.log(result) to the function and move an item in our list, we can see that it includes details about what should be the updated state after our move action.
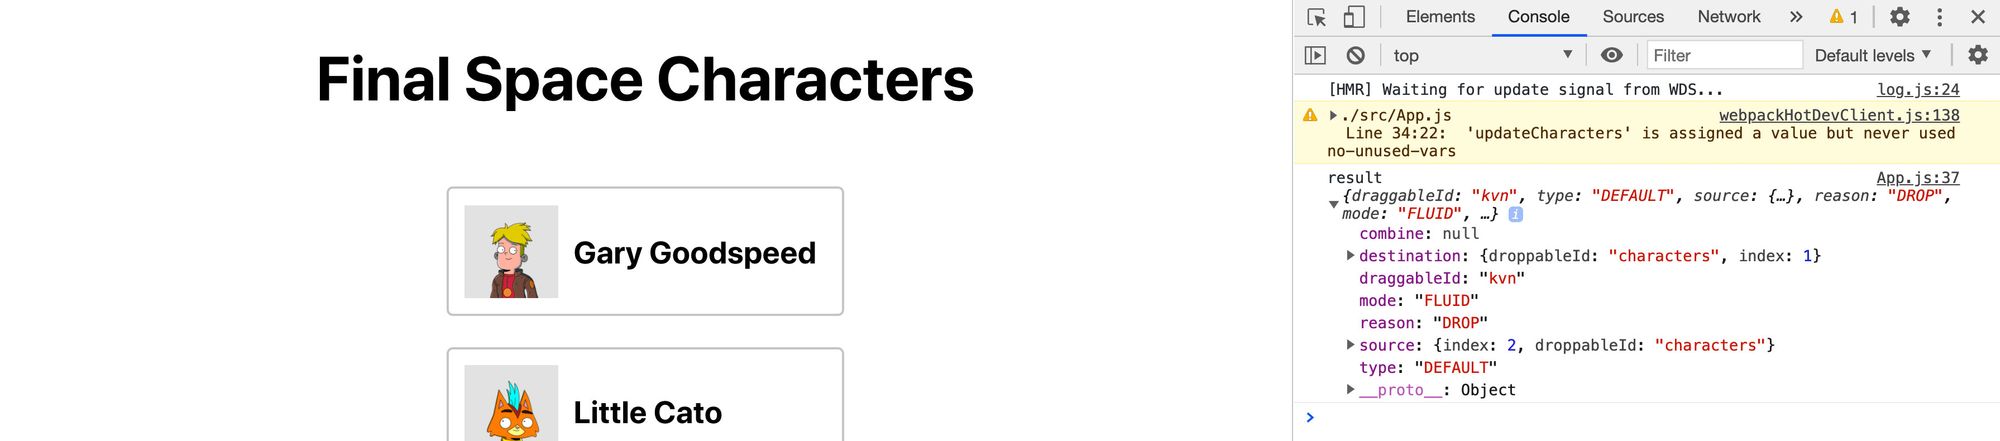 Dragged item result
Particularly, we want to use the index value in both the destination and source properties, which tell us the index of the item being moved and what the new index of that item should be in the array of items.
So using that, let’s add the following to our function:
const items = Array.from(characters);
const [reorderedItem] = items.splice(result.source.index, 1);
items.splice(result.destination.index, 0, reorderedItem);

updateCharacters(items);
Here’s what we’re doing:
- We create a new copy of our
charactersarray - We use the
source.indexvalue to find our item from our new array and remove it using thesplicemethod - That result is destructured, so we end up with a new object of
reorderedItemthat is our dragged item - We then use our
destination.inddexto add that item back into the array, but at it’s new location, again usingsplice - Finally, we update our
charactersstate using theupdateCharactersfunction
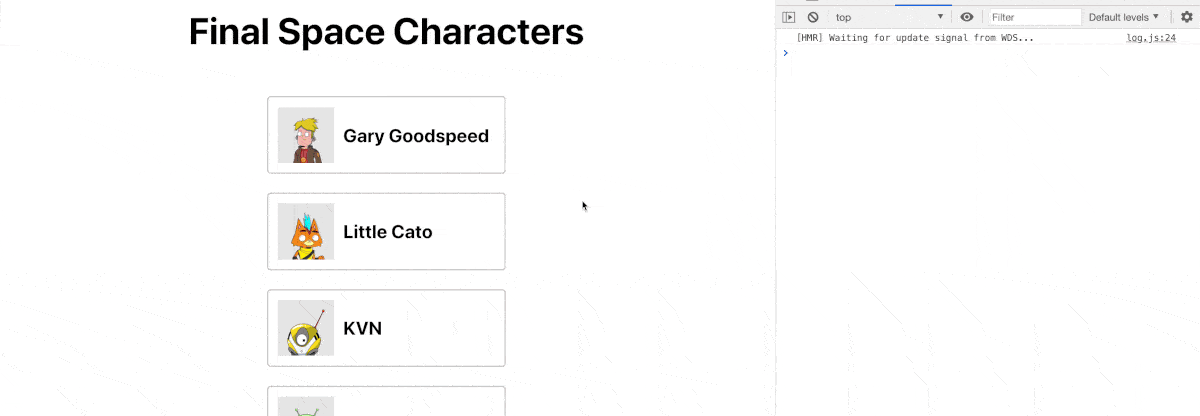
And now after saving our function, we can move our characters around, and they save their location!
 Drag item with saved state
Preventing errors from dragging out of bounds
One issue with our implementation, is if someone doesn’t drag the item exactly within our defined containers, we get an error.
 Error when dragging out of container
The issue is that when we drag it outside of the defined container, we don’t have a destination.
To avoid this, we can simply add a statement above the code that moves our item around that checks if the destination exists, and if it doesn’t, exits out of the function:
function handleOnDragEnd(result) {
  if (!result.destination) return;
And if we reload the page and try to drag our item out again, our item snaps back to the original location without an error!
 Snap back when dragged out of container
What else can we do with React Beautiful DnD?
Custom styles when dragging and dropping
When moving items, DnD will provide a snapshot of the given state. With this information, we can apply custom styles so that when we’re moving our items, we can show an active state for the list, the item we’re moving, or both!
https://react-beautiful-dnd.netlify.app/?path=/story/single-vertical-list--basic
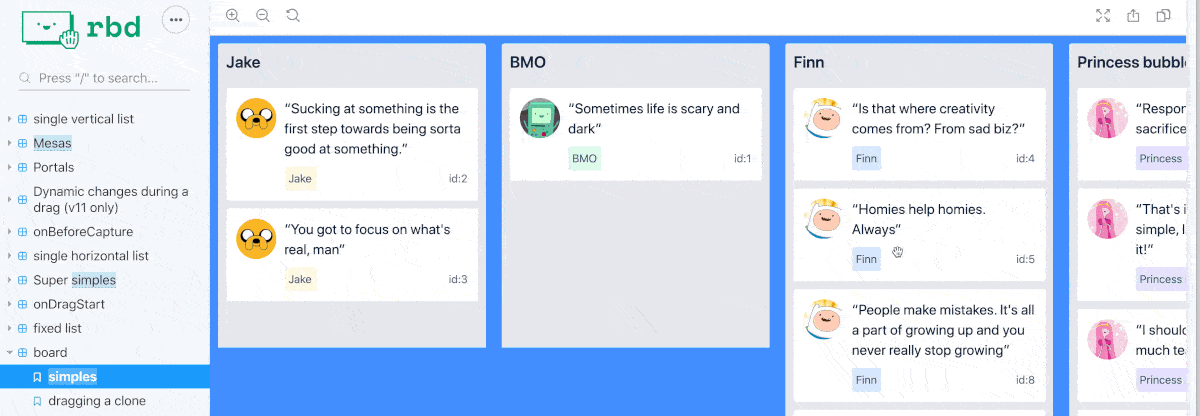
Dragging between different lists
If you’ve used Trello before or a tool like it, you should be familiar with the concept of different columns that you can drag cards between so that you can prioritize and organize your tasks and ideas.
This library allows you to do the same thing, providing the ability to drag and drop items from one draggable area to another.
https://react-beautiful-dnd.netlify.app/?path=/story/multiple-vertical-lists--stress-test
