
By Jacob Isah
As a React developer, maintaining code quality is essential for building robust and maintainable applications. Fortunately, there's a powerful tool called ESLint that can significantly improve the quality of your React projects.
In this article, we will explore how ESLint works and create a sign-up button component to demonstrate its benefits.
What is ESLint?
ESLint is a popular open-source JavaScript linting utility. It analyzes your code for potential errors, and enforces coding standards while improving code quality.
It can also help you as a developer to identify and fix common mistakes, use best practices, and maintain consistency across your codebase.
You can integrate ESLint seamlessly into your React projects, providing real-time feedback and improving your overall code quality.
How to Set Up Your Project
Let's start by setting up a new React project and installing ESLint. To demonstrate this, we will create a signup app in React.
Imagine that we want to store our project on the desktop, so first we will set up our file structure. Let's start by creating a root directory for our project on the desktop (eslintExample in this case).
mkdir eslintExample
cd eslintExample
Install the React app
Now we'll use create-react-app to set up our React app.
npx create-react-app signup-app
Install ESLint
And you can use the following command to set up ESLint:
npm install eslint eslint-plugin-react eslint-plugin-react-hooks --save-dev
Your directory structure should look like this:
eslintExample/
  └── signup-app/
      └── node_modules/
      └── public/
      └── src/
          └── App.css
          └── App.js
          └── App.test.js
          └── SignupButton.js
          └── index.css
          └── logo.svg
          └── reportWebVitals.js
          └── setupTests.js
      └── .eslintrc.json
      └── .gitignore
      └── package-lock.json
      └── package.json
      └── README.md
How to Configure ESLint in a React Project
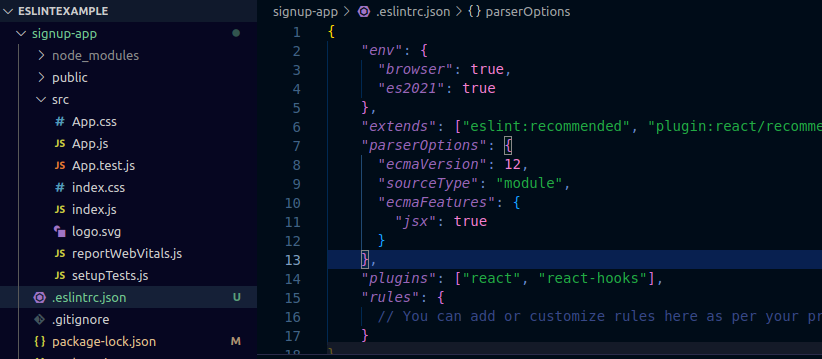
To work with ESLint in our React project, we need to configure it. To do this, the first step is to create a .eslintrc.json file in the project's root directory and add the following code:
{
    "env": {
      "browser": true,
      "es2021": true
    },
    "extends": ["eslint:recommended", "plugin:react/recommended", "plugin:react-hooks/recommended"],
    "parserOptions": {
      "ecmaVersion": 12,
      "sourceType": "module",
      "ecmaFeatures": {
        "jsx": true
      }
    },
    "plugins": ["react", "react-hooks"],
    "rules": {
      //add customize rules here as per your project's needs
    }
}
The above configuration sets up ESLint to work with React and React Hooks using the recommended configurations. You can add or customize rules according to your project's specific requirements.
How to Create the Signup Button Component
Now, let's create a simple Signup Button component (SignupButton.js) inside the "src" folder.
Inside the src file, create the SignupButton.js file. It should look like this: src/SignupButton.js. Inside your SignupButton.js, paste the following code:
import React from "react";

const SignupButton = () => {
  const handleSignup = () => {
    alert("Sign up successful!");
  };

  return (
    <button onClick={handleSignup} className="signup-button">
      Sign Up
    </button>
  );
};
The above component is a basic button that triggers an alert when clicked, simulating the signup process. Now you can run this command:
npm start
This will start our React app at the root of the project. Then you should see this error below:

This error might confuse you, because you may not know where it's coming from. We are seeing this error because we set up ESLint in our project, and it scans through our project to tell us that React needs to be imported in the app.js file.
But let’s run ESLint to see where the exact error is coming from.
How to Run ESLint
With ESLint configured, let's run it to analyze our SignupButton component for potential issues. Open your terminal and run the following command at the root of your project:
npx eslint src/SignupButton.js
ESLint will analyze the SignupButton.js file and display any problems it finds below.
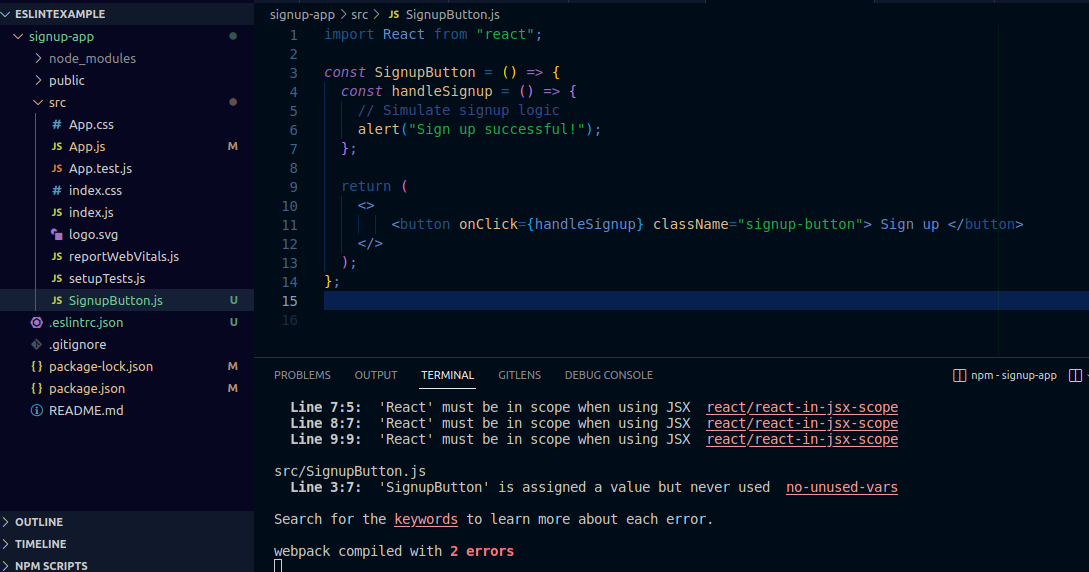 We run the
 eslint command to show us where we are having error: in the signup button and app.js
How to Fix the ESLint Issues
From the above, you can see that ESLint identifies where we are having errors. We did not import React in our App.js file, and we did not export our signup button component. Let’s fix that.
 We imported React in the app.js file and exported SignupButton component.
As you can see, our code was now built successfully.
We were able to export our SignupButton component and imported React in App.js component. This solves our problem.
If ESLint identifies any further issues in our SignupButton component, it will display them along with suggestions on how to fix them.
For example, ESLint might detect missing semicolons, unused variables, or violations of React best practices like the import React from “react” in the app.js file.
By addressing the issues highlighted by ESLint, we can ensure that our code adheres to best practices, is easier to read, and has fewer potential bugs.
Conclusion
ESLint is an indispensable tool for React developers to maintain code quality and improve productivity. By integrating ESLint into your React projects, you can catch errors early, follow coding standards, and foster collaboration within your team.
In this article, I have explained how to set up ESLint in a React project and demonstrate its benefits with a simple Signup Button component. By utilizing ESLint effectively, you can write cleaner, more consistent code and deliver higher-quality React applications.
So, why wait? Start using ESLint in your React projects and watch your code quality soar. Happy coding! 🚀
Your feedback is highly appreciated.
you can follow me on twitter and linkedIn