

Did you know that your React application that's deployed to production can crash any time because of unhandled errors?
Thankfully, React Error Boundaries are here to save the day!
Whenever any type of error happens during the rendering of a component or in lifecycle methods, React displays a blank page without showing any error message.
And getting a blank page on the production site is definitely not a good user experience.
So React Error Boundaries provide a powerful mechanism to catch and gracefully handle errors that occur during the rendering lifecycle of your components.
Want to watch the video version of this tutorial? You can check out the video below:
What are Error Boundaries in React?
Error boundaries are React components that catch JavaScript errors anywhere in their child component tree, log those errors, and display a fallback UI instead of the component tree that crashed.
Error boundaries catch errors during rendering, in lifecycle methods, and in the whole tree below them.
Why Do We Need Error Boundaries?
In your React application, there might be some edge cases that you might not have handled. Because of that you might get an error in production, and you will see a blank screen.
This is not a good user experience, so adding an error boundary helps to mitigate this issue.
To better understand it, you can clone this GitHub Repository which I have created in this video.
Once cloned, you can execute the npm install command from the project folder to install all the project dependencies and then execute the npm run dev command to start the application.
Now, you can access the application, by visiting http://localhost:5173/.
You will see the following screen:
 Initial Screen on the Example App
How the Application Works
Now, if you click on any of the courses, you will see the course details page.
Let's say you click on the Learn Food Recipes course. Then you will see the screen as shown below:
 Course Details Page
If you check the code, you will see that the details page content is coming from the CourseDetails component as shown below:
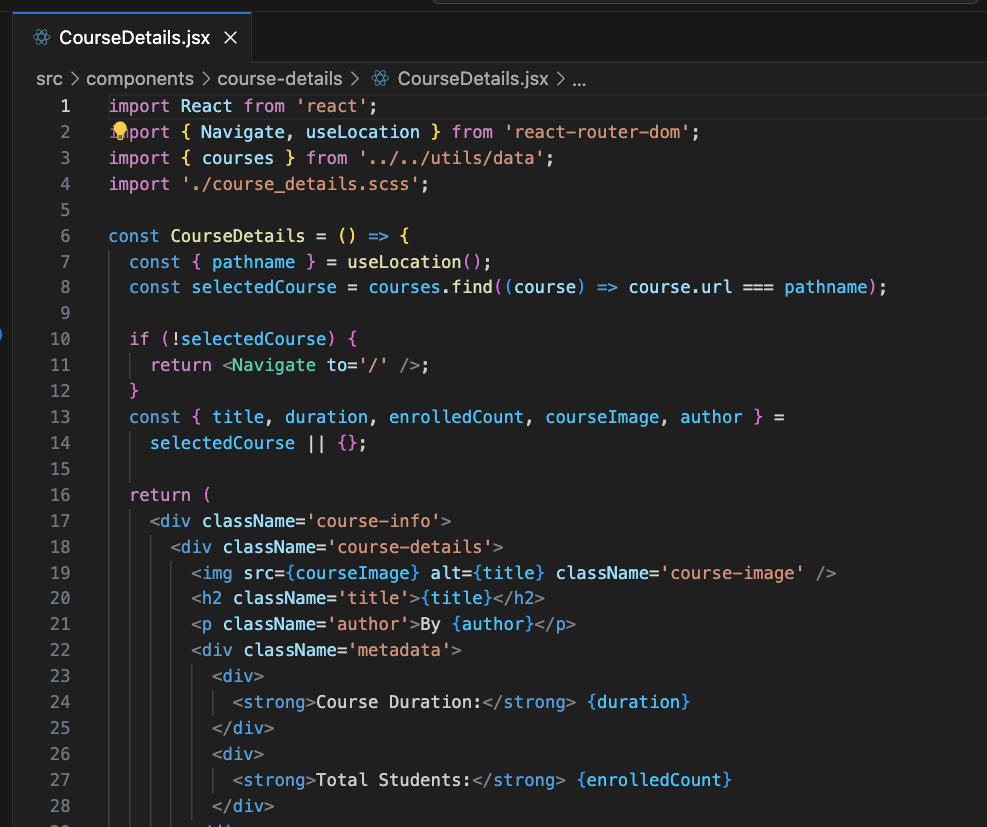 Course Details Component Code
As you can see above, we have static courses data imported from the utils/data file at line number 3. On line number 8, we're using the array find method to check if the page URL matches any of the course URLs.
If we find a match, then the find method will return the found course which we're storing in the selectedCourse variable.
And if there is no matching course, the find method will return undefined as the value.
So on line number 11, we're redirecting the user to the home page using the Navigate component of react-router-dom library if there is no matching course found.
To verify that, you can add some extra characters to the details page URL, and you will see that you're redirected to the home page as can be seen below:
 Automatic Redirection From Details Page
How to Generate an Error in the Application
Instead, let's say we don't have the condition of line number 11 for redirection, and also we don't have the fallback of an empty object {} specified.
So instead of this code:
const CourseDetails = () => {
  const { pathname } = useLocation();
  const selectedCourse = courses.find((course) => course.url === pathname);

  if (!selectedCourse) {
    return <Navigate to='/' />;
  }
  const { title, duration, enrolledCount, courseImage, author } =
    selectedCourse || {};
  ...
}
we have code like this:
const CourseDetails = () => {
  const { pathname } = useLocation();
  const selectedCourse = courses.find((course) => course.url === pathname);

  const { title, duration, enrolledCount, courseImage, author } =
    selectedCourse;
  ...
}
Now, with this code, if we don't find a course with a matching course URL, then the array find method will return undefined as the value.
So when we destructure the title, duration and other properties from the selectedCourse variable, JavaScript will throw an error.
To see it in action, open Chrome DevTools, and go to any of the course's details page, and add some random characters in the URL.
When you press the enter key, you will see a blank screen with an error in the console, as you can see below:
 Console Error With Broken Application
So as you can see, the application is broken and nothing is displayed on the screen. As I mentioned above, getting a blank screen without any text is not a good user experience. The user will not know what happened and what to do in such situations.
The error is happening because we're trying to destructure properties from undefined.
You can only destructure properties from objects and not undefined.
Forgetting to provide a default fallback of an empty object {} is a common thing when you have a large application.
So to avoid such scenarios of getting a black page, we can use the popular react-error-boundary npm library.
How to Use the react-error-boundary Library
To use this library, let's first install it by executing the following command from the terminal from inside the project folder:
npm install react-error-boundary
Once installed, restart the application by executing the npm run dev command.
Now, we can wrap our entire App component inside the ErrorBoundary component imported from the react-error-boundary library.
So open src/main.jsx file and change the below code:
import React from 'react';
import ReactDOM from 'react-dom/client';
import App from './App';
import './index.scss';

ReactDOM.createRoot(document.getElementById('root')).render(
  <React.StrictMode>
    <App />
  </React.StrictMode>
);
to this code:
import React from 'react';
import ReactDOM from 'react-dom/client';
import { ErrorBoundary } from 'react-error-boundary';
import App from './App';
import './index.scss';

ReactDOM.createRoot(document.getElementById('root')).render(
  <React.StrictMode>
    <ErrorBoundary fallback={<p>Something went wrong. Try again later.</p>}>
      <App />
    </ErrorBoundary>
  </React.StrictMode>
);
In the above code, we have wrapped the App component in between the opening and closing ErrorBoundary component and we have also imported the ErrorBoundary component from react-error-boundary.
For the ErrorBoundary component, we're providing the fallback prop with the text to be displayed in case any error occurs.
So now with this change, if you try to navigate to some invalid details page URL, you will see the fallback text displayed as you can see below:
 Displaying Fallback Error Message
But just displaying this simple text is not veru useful. So what else can we do?
How to Display a Proper Error Page
So instead of using the fallback prop, we will use FallbackComponent prop. As a value for the prop, we can provide either a class component or a functional component.
So inside the components folder create a new error-page folder. Inside it create an ErrorPage.jsx file with the following content:
import React from 'react';
import NotFoundImage from '../../assets/writer.svg';
import './error_page.scss';

const ErrorPage = ({ error }) => {
  console.log('Error occured', error);
  return (
    <div className='error-page'>
      <img src={NotFoundImage} alt='Page not found' />
      <p className='error-msg'>
        Something went wrong. Try clicking the refresh page button to reload the
        application.{' '}
        <button className='btn'>
          Refresh page
        </button>
      </p>
    </div>
  );
};

export default ErrorPage;
You can download the writer.svg image which is referenced in the above code from this repository and place it inside src/assets folder.
Also, create error_page.scss file inside the error-page folder and add the following content inside it:
.error-page {
  display: flex;
  flex-direction: column;
  justify-content: center;
  align-items: center;
  margin-top: 5rem;
  max-height: 100vh;

  img {
    width: 40%;
    height: auto;
    margin-bottom: 1rem;
  }
  p {
    margin-top: 1rem;
    font-size: 2rem;
    line-height: 130%;
  }
  .error-msg {
    display: flex;
    flex-direction: column;
    text-align: center;
    align-items: center;
    font-weight: bold;
    gap: 1rem;
  }
  .btn {
    width: fit-content;
    border: none;
    padding: 5px 10px;
    background: #bd1d3d;
    color: #fff;
    letter-spacing: 1px;
    border-radius: 5px;
    font-size: 18px;
    cursor: pointer;
  }
}
Now, open the src/main.jsx file and replace it with the following content:
import React from 'react';
import ReactDOM from 'react-dom/client';
import { ErrorBoundary } from 'react-error-boundary';
import App from './App';
import ErrorPage from './components/error-page/ErrorPage';
import './index.scss';

ReactDOM.createRoot(document.getElementById('root')).render(
  <React.StrictMode>
    <ErrorBoundary FallbackComponent={ErrorPage}>
      <App />
    </ErrorBoundary>
  </React.StrictMode>
);
In the above code, we have used FallbackComponent prop instead of fallback prop and we added the ErrorPage component as its value.
Also, note that we have added an import statement for the ErrorPage component.
So now, If you try going to some invalid details page URL, you will see a nicely designed error page with a Refresh page button displayed on the screen as can be seen below:
 Displaying Nice Error Page
So now with the error boundary added, the end user no longer sees a blank page when something goes wrong.
So even if there is an error in the console, we no longer see a blank page.
This is a great improvement to the application.
Note that the error page is displayed only if rendering fails like a blank page is displayed.
And when the error page is displayed, we automatically get the error prop inside the ErrorPage component which we have created inside the ErrorPage.jsx file as you can see below:
import React from 'react';
import NotFoundImage from '../../assets/writer.svg';
import './error_page.scss';

const ErrorPage = ({ error }) => {
  console.log('Error occured', error);
  return (
    <div className='error-page'>
      <img src={NotFoundImage} alt='Page not found' />
      <p className='error-msg'>
        Something went wrong. Try clicking the refresh page button to reload the
        application.{' '}
        <button className='btn'>
          Refresh page
        </button>
      </p>
    </div>
  );
};

export default ErrorPage;
In the above code, we're just logging the error prop value to the console.
The ErrorBoundary component also accepts an onReset function prop where we can write code to redirect the user to the home page.
And with the onReset prop added to the ErrorBoundary component, we get access to the resetErrorBoundary prop inside the ErrorPage component.
So change the ErrorPage component to the below code:
const ErrorPage = ({ error, resetErrorBoundary }) => {
  console.log('Error occured', error);
  return (
    <div className='error-page'>
      <img src={NotFoundImage} alt='Page not found' />
      <p className='error-msg'>
        Something went wrong. Try clicking the refresh page button to reload the
        application.{' '}
        <button className='btn' onClick={resetErrorBoundary}>
          Refresh page
        </button>
      </p>
    </div>
  );
};
In the above code, we're destructuring the resetErrorBoundary prop which we will be using for the onClick handler of Refresh page button.
Now, change the ErrorBoundary component code from src/main.jsx file to the below code:
import React from 'react';
import ReactDOM from 'react-dom/client';
import { ErrorBoundary } from 'react-error-boundary';
import App from './App';
import ErrorPage from './components/error-page/ErrorPage';
import './index.scss';

ReactDOM.createRoot(document.getElementById('root')).render(
  <React.StrictMode>
    <ErrorBoundary
      FallbackComponent={ErrorPage}
      onReset={() => (location.href = '/')}
    >
      <App />
    </ErrorBoundary>
  </React.StrictMode>
);
So when we click on the Refresh page button, the resetErrorBoundary function will be called and it will reset all the errors and code from the onReset function which we have added to the src/main.jsx file will be executed which will redirect the user to the home page.
You can see it in action below:
 Resetting Errors With Redirection
So as you can see above, with the error boundary added, we're clearly able to see the proper error page with Refresh page button. Once we click on the button, we're redirected to the home page, and all the errors are cleared from the console.
This is a great user experience for the end user instead of getting a blank page.
Thanks for Reading
That's it for this tutorial. I hope you learned a lot from it.
Want to watch the video version of this tutorial? You can check out this video.
You can find the complete source code for this application in this repository.
If you want to master JavaScript, ES6+, React, and Node.js with easy-to-understand content, check out my YouTube channel. Don't forget to subscribe.
Want to stay up to date with regular content on JavaScript, React, and Node.js? Follow me on LinkedIn.