

Data binding is a technique used when you want to glue pieces of information (your data) to some visual user input elements. In this process, whenever the input gets updated, the data behind it gets updated as well.
This is far from a new concept, and there are a plethora of frameworks that have incorporated this into their design (like AngularJS/React/Vue).
Our attention in this article is not on front-end frameworks but rather on mobile development. Google introduced the Data Binding Library in Android, which is part of Android Jetpack.
If you are unfamiliar with the Jetpack library suite, it might be because Google has announced that it will be dropping development for its support libraries. Instead, it will move into supporting AndroidX libraries (which are the newer version of the support libraries).
I am aware that there are many articles explaining how to use data binding using an adapter, but this piece won’t focus on that. Instead, I will show a bare-bones, minimal approach to data binding that can save you time by minimizing the amount of code you have to write.
Why Use Data Binding?
If you aren’t sold yet, let’s take a few minutes to explain the benefit of using data binding by showing an example. Let’s say you have a menu with three custom buttons, where each button is a layout within itself.
 Our layout
One way to generate all of this is by using four different XML layouts: one for the main layout and one for each of the three buttons.
You need to do this since each button will direct the user to a different part of your application and therefore needs different text and a different image.
<?xml version="1.0" encoding="utf-8"?>
<LinearLayout xmlns:android="http://schemas.android.com/apk/res/android"
    android:orientation="vertical"
    android:layout_gravity="center_horizontal"
    android:layout_height="wrap_content"
    android:layout_width="wrap_content">


    <ImageView
        android:id="@+id/imageView"
        android:layout_height="100dp"
        android:layout_width="100dp"
        android:src="@drawable/image_name"
        android:adjustViewBounds="true"
        android:scaleType="centerInside"
        />

    <TextView
        android:id="@+id/textView"
        android:gravity="center_horizontal"
        android:layout_height="wrap_content"
        android:layout_width="match_parent"
        android:text="Image Text"
        android:textSize="16sp" />

</LinearLayout>
Granted, this isn’t a lot of code duplication as we are only handling three layouts. But if you think about it, it’s quite a waste of time dealing with all that code. If you take into account an application that has a more complicated layout, one that might showcase products and their images, this can lead to a lot of tedious code replication.
With data binding, we will manage to create only one XML layout that will be used by all of our buttons.
Where Do We Start?
We need to let our project enable data binding. For that, we need to add the dataBinding element in our application’s build.gradle file:
android {
    compileSdkVersion 29
    buildToolsVersion "29.0.2"
    defaultConfig {
        applicationId "com.tomerpacific.example"
        minSdkVersion 15
        targetSdkVersion 29
        versionCode 1
        versionName "1.0"
        testInstrumentationRunner "androidx.test.runner.AndroidJUnitRunner"
        dataBinding {              //<-------
          enabled = true
        }
    }
    buildTypes {
        release {
            minifyEnabled false
            proguardFiles getDefaultProguardFile('proguard-android-optimize.txt'), 'proguard-rules.pro'
        }
    }
}
After synchronizing our project, we’ll create our data class, which we will use to bind the layout to.
package com.tomerpacific.example

import android.graphics.drawable.Drawable

data class ButtonData(val buttonText: String, val buttonImageSrc : Drawable)
Pay attention to the fact that we have two fields in our ButtonData class:
buttonText— This is the text that will show up beneath our image.buttonImageSrc— This is responsible for the button’s image.
If we wanted more data, we would just add more fields to our data class.
The Actual Binding
Next, we need to declare a variable property in our layout so that it can be used. This variable will be bounded to the data class that we created. To do this, there are two things we need to do:
- Wrap our root layout element in a layout tag.
- Add a data tag that will contain the declaration of our variable (
buttonData).
<?xml version="1.0" encoding="utf-8"?>
<layout xmlns:android="http://schemas.android.com/apk/res/android">  // <---- 1

    <data>
        <variable name="buttonData" type="com.tomerpacific.example.ButtonData"/> // <---- 2
    </data>

    <androidx.constraintlayout.widget.ConstraintLayout xmlns:app="http://schemas.android.com/apk/res-auto"
        android:layout_width="match_parent"
        android:layout_height="match_parent">


        <TextView
            android:id="@+id/textView2"
            android:layout_width="wrap_content"
            android:layout_height="wrap_content"
            android:text="Example"
            android:textSize="30dp"
            app:layout_constraintLeft_toLeftOf="parent"
            app:layout_constraintRight_toRightOf="parent"
            app:layout_constraintTop_toTopOf="parent" />

        <LinearLayout
            android:layout_width="wrap_content"
            android:layout_height="wrap_content"
            android:layout_gravity="center_horizontal"
            android:orientation="vertical"
            app:layout_constraintBottom_toBottomOf="parent"
            app:layout_constraintEnd_toStartOf="@+id/linearLayout3"
            app:layout_constraintStart_toStartOf="parent"
            app:layout_constraintTop_toBottomOf="@+id/textView2">

            <ImageButton
                android:layout_width="100dp"
                android:layout_height="100dp"
                android:adjustViewBounds="true"
                android:scaleType="centerInside"
                android:src="@drawable/android">

            </ImageButton>

            <TextView
                android:layout_width="match_parent"
                android:layout_height="wrap_content"
                android:gravity="center_horizontal"
                android:text="Image Text"
                android:textSize="16sp" />

        </LinearLayout>

        <LinearLayout
            android:id="@+id/linearLayout3"
            android:layout_width="wrap_content"
            android:layout_height="wrap_content"
            android:layout_gravity="center_horizontal"
            android:orientation="vertical"
            app:layout_constraintBottom_toBottomOf="parent"
            app:layout_constraintEnd_toEndOf="parent"
            app:layout_constraintStart_toStartOf="parent"
            app:layout_constraintTop_toBottomOf="@+id/textView2"
            app:layout_constraintVertical_bias="0.504">

            <ImageButton
                android:layout_width="100dp"
                android:layout_height="100dp"
                android:adjustViewBounds="true"
                android:scaleType="centerInside"
                android:src="@drawable/android_p_logo">

            </ImageButton>

            <TextView
                android:layout_width="match_parent"
                android:layout_height="wrap_content"
                android:gravity="center_horizontal"
                android:text="Image Text"
                android:textSize="16sp" />

        </LinearLayout>

        <LinearLayout
            android:id="@+id/linearLayout2"
            android:layout_width="wrap_content"
            android:layout_height="wrap_content"
            android:layout_gravity="center_horizontal"
            android:orientation="vertical"
            app:layout_constraintBottom_toBottomOf="parent"
            app:layout_constraintEnd_toEndOf="parent"
            app:layout_constraintHorizontal_bias="0.200"
            app:layout_constraintStart_toEndOf="@+id/linearLayout3"
            app:layout_constraintTop_toBottomOf="@+id/textView2"
            app:layout_constraintVertical_bias="0.504">

            <ImageButton
                android:layout_width="100dp"
                android:layout_height="100dp"
                android:adjustViewBounds="true"
                android:scaleType="centerInside"
                android:src="@drawable/android_studio_icon">

            </ImageButton>

            <TextView
                android:layout_width="match_parent"
                android:layout_height="wrap_content"
                android:gravity="center_horizontal"
                android:text="Image Text"
                android:textSize="16sp" />

        </LinearLayout>


    </androidx.constraintlayout.widget.ConstraintLayout>

</layout>
Notice that we can remove the schema from our previous main layout as it was moved to the root layout tag. Also, the variable we added is tied directly to our data class.
In our MainActivity file, we need to add code to handle the binding:
package com.tomerpacific.example

import androidx.appcompat.app.AppCompatActivity
import android.os.Bundle
import androidx.databinding.DataBindingUtil
import com.tomerpacific.example.databinding.ActivityMainBinding

class MainActivity : AppCompatActivity() {

    override fun onCreate(savedInstanceState: Bundle?) {
        super.onCreate(savedInstanceState)
        setContentView(R.layout.activity_main)

        val binding: ActivityMainBinding = DataBindingUtil.setContentView(
            this, R.layout.activity_main)

        binding.buttonData = ButtonData("First", resources.getDrawable(R.drawable.android))
    }
}
Each time you create a variable inside of a layout, a binding class is generated for that layout automatically. In our case, our layout is called activity_main, so the binding class will be named ActivityMainBinding.
The convention is always the name of the layout with Binding added at the end.
Since we declared buttonData as our variable in the layout, it gets appended to the binding object and we can assign it a new instance of our ButtonData class.
After doing all that, we can finally use the data that we just bound in our layout.
<LinearLayout
            android:layout_width="wrap_content"
            android:layout_height="wrap_content"
            android:layout_gravity="center_horizontal"
            android:orientation="vertical"
            app:layout_constraintBottom_toBottomOf="parent"
            app:layout_constraintEnd_toStartOf="@+id/linearLayout3"
            app:layout_constraintStart_toStartOf="parent"
            app:layout_constraintTop_toBottomOf="@+id/textView2">

            <ImageButton
                android:layout_width="100dp"
                android:layout_height="100dp"
                android:adjustViewBounds="true"
                android:scaleType="centerInside"
                android:src="@{buttonData.buttonImageSrc}">  // <----

            </ImageButton>

            <TextView
                android:layout_width="match_parent"
                android:layout_height="wrap_content"
                android:gravity="center_horizontal"
                android:text="@{buttonData.buttonText}"   // <----
                android:textSize="16sp" />
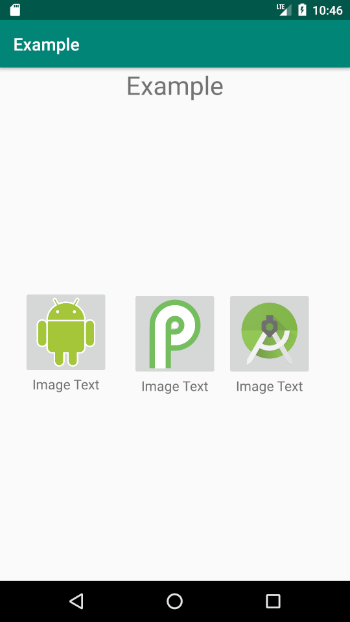
And the result is:
 Pretty smooth, eh?
Wait a Second…
We have three buttons and our data class can only be used for one button, so how do we get past this?
package com.tomerpacific.example

data class ButtonsData(val buttonsData : List<ButtonData>) {

    fun get(index: Int) : ButtonData {
        return buttonsData.get(index)
    }
}
We had to override the get method as it needs to be recognized when we use it in our layout.
Then, we need to change the references in our activity_main.xml:
 <data>
        <variable name="buttonsData" type="com.tomerpacific.example.ButtonsData"/>
 </data>
And we have to create a new binding to the new data class:
override fun onCreate(savedInstanceState: Bundle?) {
        super.onCreate(savedInstanceState)
        setContentView(R.layout.activity_main)

        val binding: ActivityMainBinding = DataBindingUtil.setContentView(
            this, R.layout.activity_main)

        val firstButton : ButtonData = ButtonData("First", resources.getDrawable(R.drawable.android))

        val secondButton : ButtonData = ButtonData("Second", resources.getDrawable(R.drawable.android_p_logo))

        val thirdButton : ButtonData = ButtonData("Third", resources.getDrawable(R.drawable.android_studio_icon))

        val buttonsData : ButtonsData = ButtonsData(listOf(firstButton, secondButton, thirdButton))

        binding.buttonsData = buttonsData
    }
We create three instances of the ButtonData class. Then we instantiate a ButtonsData object and attach it to our binding object.
Lastly, we can now use our data class properly in our layout:
 <LinearLayout
            android:layout_width="wrap_content"
            android:layout_height="wrap_content"
            android:layout_gravity="center_horizontal"
            android:orientation="vertical"
            app:layout_constraintBottom_toBottomOf="parent"
            app:layout_constraintEnd_toStartOf="@+id/linearLayout3"
            app:layout_constraintStart_toStartOf="parent"
            app:layout_constraintTop_toBottomOf="@+id/textView2">

            <ImageButton
                android:layout_width="100dp"
                android:layout_height="100dp"
                android:adjustViewBounds="true"
                android:scaleType="centerInside"
                android:src="@{buttonsData.get(0).buttonImageSrc}">   // <-------

            </ImageButton>

            <TextView
                android:layout_width="match_parent"
                android:layout_height="wrap_content"
                android:gravity="center_horizontal"
                android:text="@{buttonsData.get(0).buttonText}"       // <--------
                android:textSize="16sp" />

        </LinearLayout>
 Works like a charm
This article was written due to my experience developing the following application:
(You never know, it might be useful)
You can see the entire source code here: