

In today's digital landscape, creating a content management system (CMS) that is both cost-effective and easy to maintain can be difficult, especially if you're operating on a tight budget.
This tutorial will show you a solution that leverages Google Sheets as a makeshift database and React to build the frontend. This will let you effectively bypass the need for a dedicated server or traditional database system.
This approach not only reduces the overhead costs associated with web development, but also simplifies content updates and management. It's an ideal solution if you're looking to launch your own simple CMS without substantial investment.
This solution is suitable for freelancers at the beginning of their career and for clients who cannot invest much in their website.
Why Google Sheets?
Opting for Google Sheets as the backbone of your CMS comes down to its simplicity, flexibility, and cost-effectiveness.
Traditional web development requires a backend server to process data, a database to store information, and a frontend to display content. But each layer adds complexity and cost.
Google Sheets, on the other hand, acts as a highly accessible and intuitive interface that eliminates the need for a server and a database. It lets your users update content in real-time, much like any CMS, but without the usual setup and maintenance costs. This makes it an excellent choice for individuals, small businesses, or anyone looking to deploy a web application quickly and with minimal expense.
Getting Started
Before diving into the code, ensure you have Node.js and npm installed on your system. These tools will allow us to create a React application and manage its dependencies.
Let's start with Google Sheets now.
Step 1: Set Up Your Google Sheets
- Go to your Google Sheets
- Open the sheet you want to use or create a new one
- Click on
Extensionsin the menu - Then click on
Apps Script
In the Apps Script editor, you can write a script to serve as your endpoint. Here's a script that returns the contents of a Google Sheet in JSON format:
function convertRangeToJson(data) {
  var jsonArray = [];

  // Check if data is empty or doesn't contain enough rows for headers and at least one data row
  if (!data || data.length < 2) {
    // Return an empty array or a meaningful message as needed
    return jsonArray; // or return 'No data available';
  }

  var headers = data[0];
  for (var i = 1, length = data.length; i < length; i++) {
    var row = data[i];
    var record = {};

    for (var j = 0; j < row.length; j++) {
      record[headers[j]] = row[j];
    }

    jsonArray.push(record);
  }

  return jsonArray;
}
Then:
- Click
File>Save, and give your project a name - Click on
Deploy>New deployment. - Click on
Select typeand chooseWeb app. - Fill in the details for your deployment. Under
Execute as, choose whether the script should run as your account or as the user accessing the web app. UnderWho has access, choose who can access your web app. - Click
Deploy.
You may be asked to authorize the script to access your Google Sheets. Follow the prompts to do so.
After deploying, you'll be given a URL for your web app. This is your API endpoint.
To give you an idea of what you have done so far, this is your sheet structure:
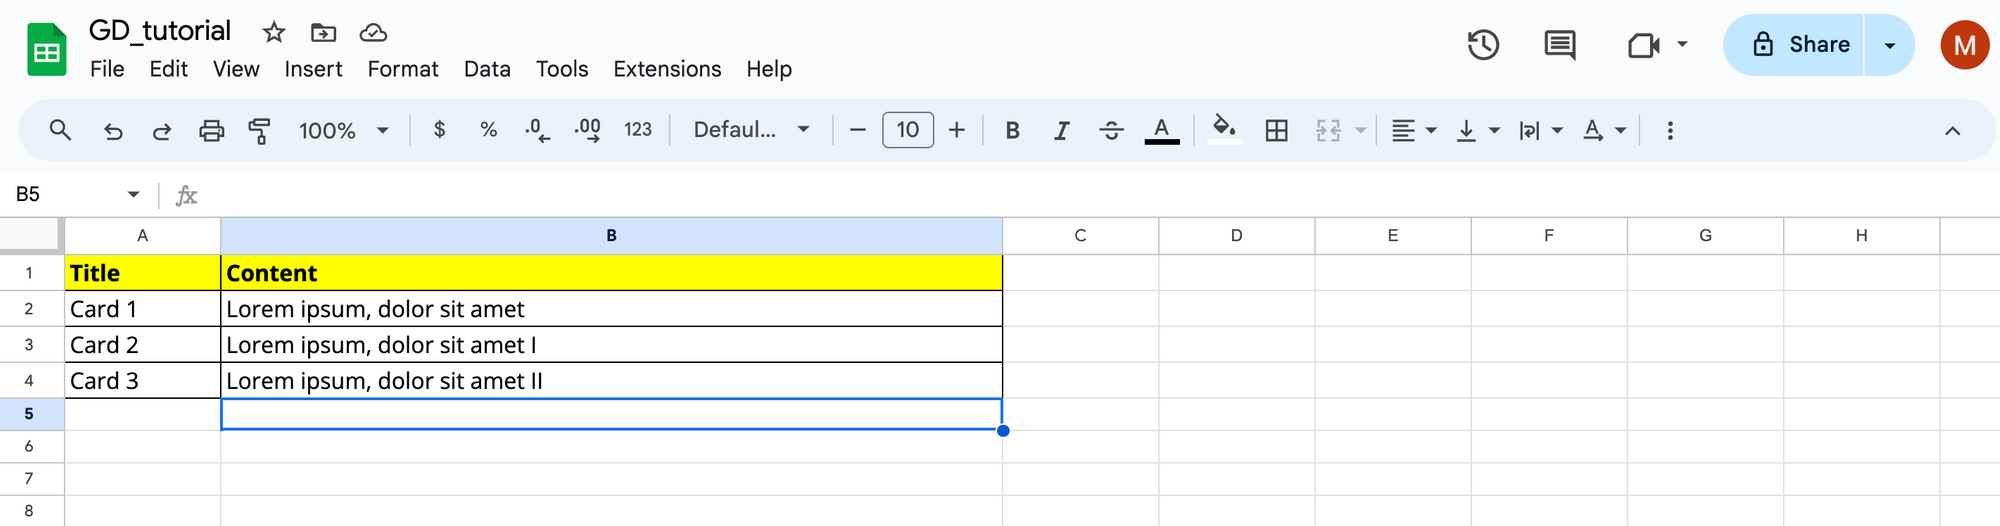 How your sheet should currently look
And this is the JSON you get when you call the endpoint:
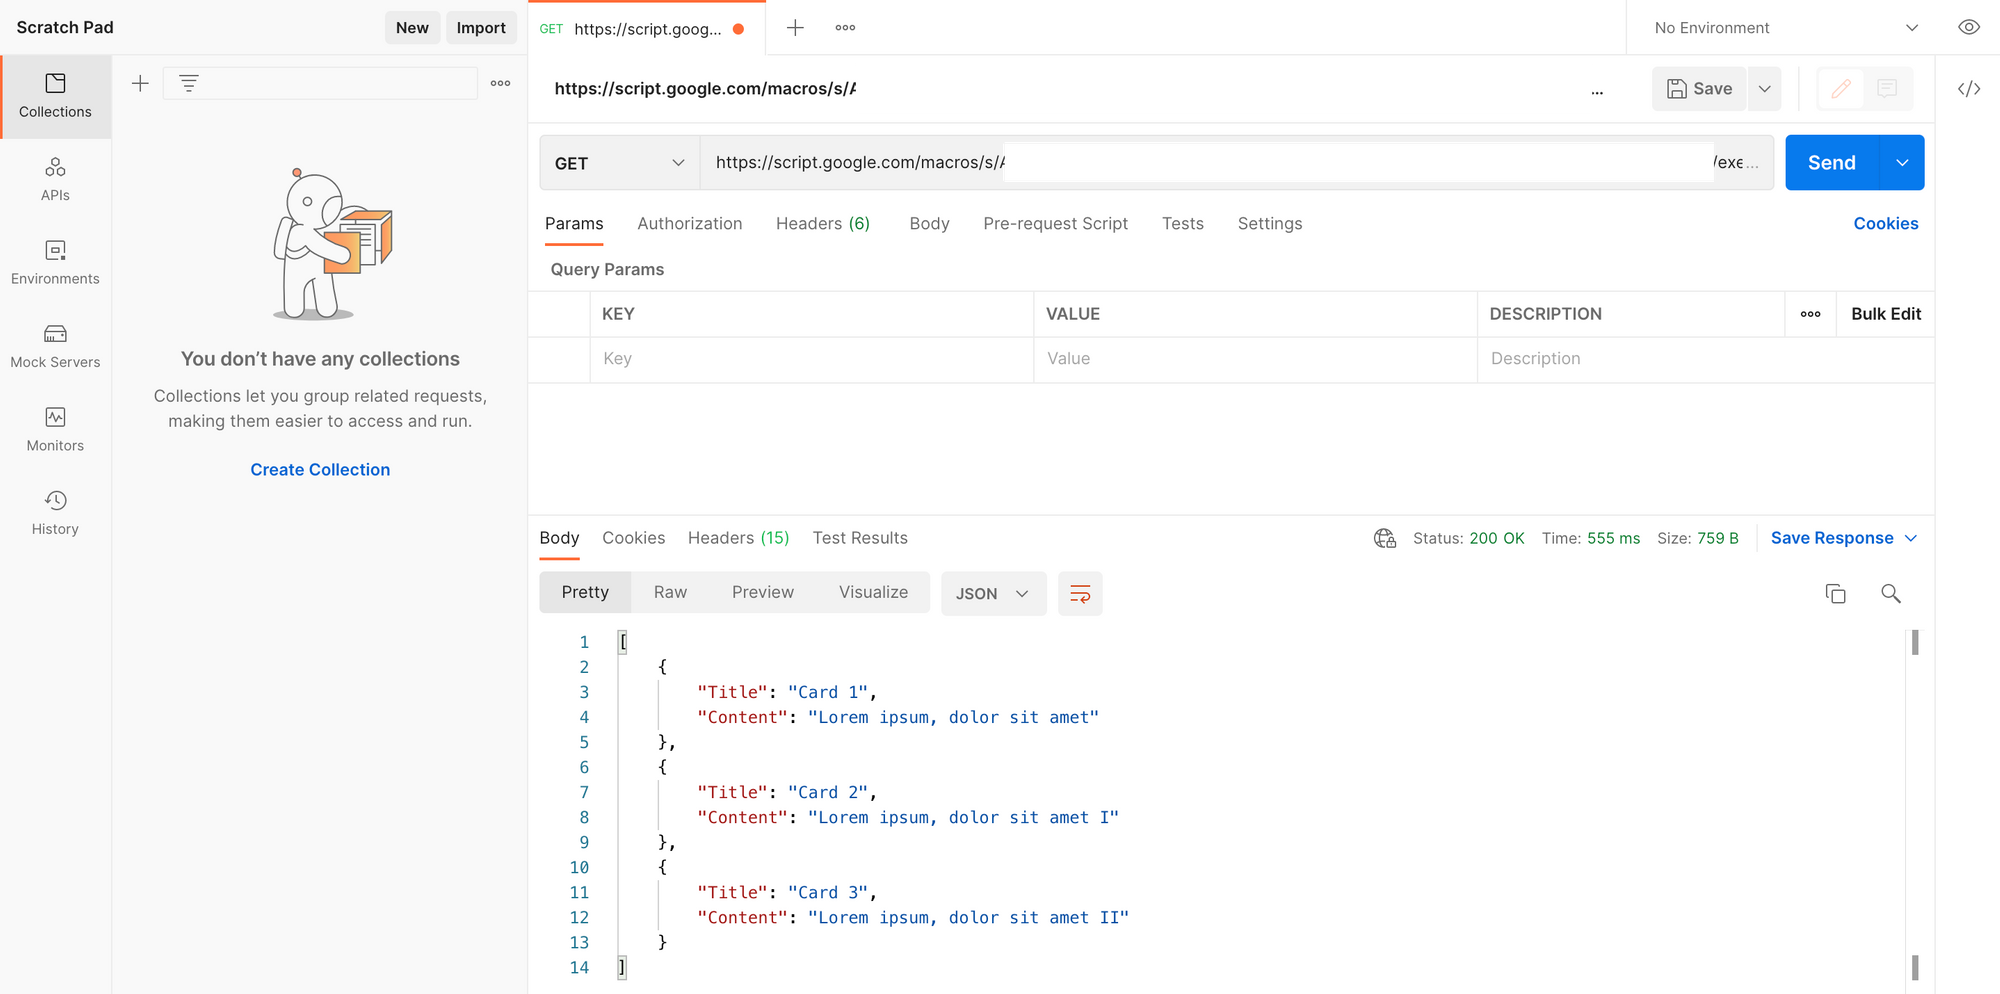 JSON
JSON
Step 2: Create Your React App
With your Google Sheets API ready, it's time to create the React app that will fetch and display this data.
First, go ahead and create a React app. Run the following command in your terminal to create a new React application:
npx create-react-app google-sheets-cards
cd google-sheets-cards
npm start
You can also use modern build tools like Vite for this purpose, as CRA is no longer the recommended way of building a React app.
Next, create the card component. Inside the src directory, create a file named Card.js. This component will be responsible for displaying each data record:
// src/Card.js
function Card({ title, content }) {
  return (
    <div className="card">
      <h1>{title}</h1>
      <p>{content}</p>
    </div>
  );
}

export default Card;
Now it's time to fetch and display your data in App.js. Modify the App.js file to include logic for fetching the data from your Google Sheets API and using the Card component to display it:
// src/App.js
import React, { useEffect, useState } from 'react';
import Card from './Card';
import './App.css'; // Make sure to create some basic styles for the cards in App.css

function App() {
  const [data, setData] = useState([]);

  useEffect(() => {
    fetch('YOUR_ENDPOINT_URL') // Replace with your actual endpoint URL
      .then(response => response.json())
      .then(data => setData(data))
      .catch(error => console.error('Error fetching data:', error));
  }, []);

  return (
    <div className="App">
      <h1>Data from Google Sheets</h1>
      <div className="cards-container">
        {data.map((item, index) => (
          <Card key={index} title={item.Title} content={item.Content} />
        ))}
      </div>
    </div>
  );
}

export default App;
Next, you can style your cards. Go ahead and add the below CSS in App.css for basic card styling:
.card {
  box-shadow: 0 4px 8px rgba(0, 0, 0, 0.2);
  margin: 10px;
  padding: 10px;
  display: inline-block;
  background: #f9f9f9;
}

.cards-container {
  display: flex;
  flex-wrap: wrap;
  justify-content: center;
}
Step 3: Run Your React App
With everything set up, you can now run your React application and see the data from Google Sheets displayed in your browser. To do this, follow these steps:
First, start the React app. In your terminal, navigate to the root directory of your React app if you're not already there. Run the following command to start the development server:
npm start
This command compiles your React application and opens it in your default web browser. You should see a webpage with a title "Data from Google Sheets", and below that, a series of cards, each displaying a title and content fetched from your Google Sheets data.
Here's, in fact, what we get:
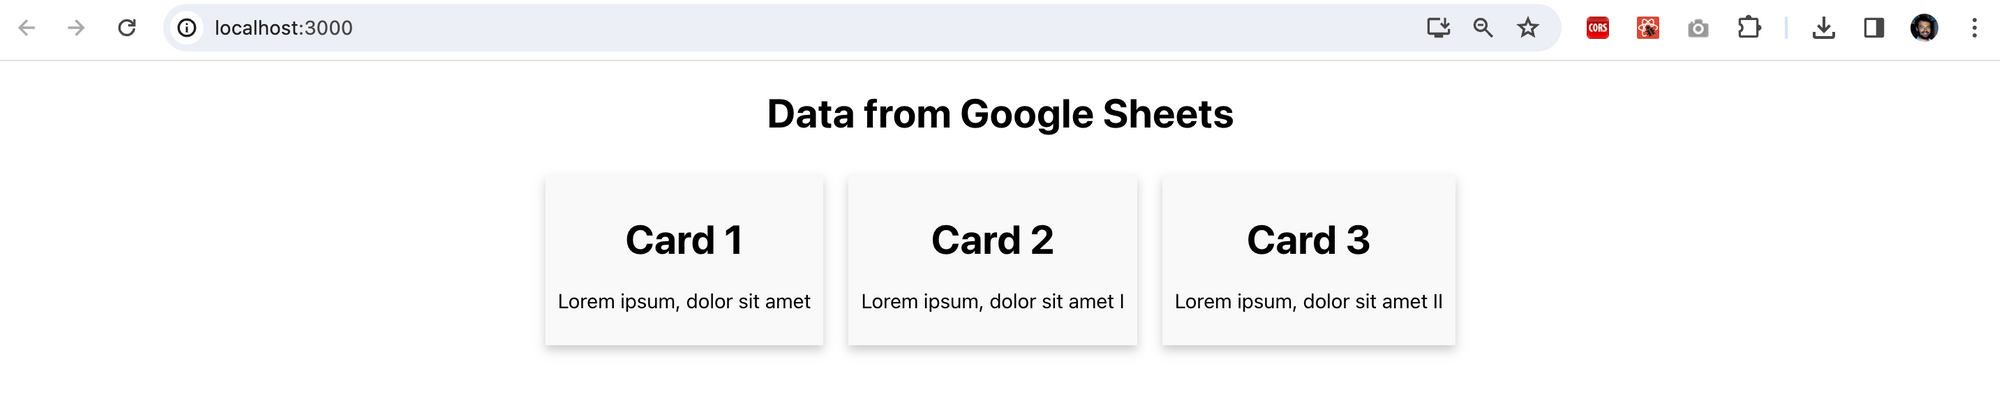 Data from Google Sheets and Card 1, Card 2, and Card 3 displayed on the screen
Now you can view your data. Each card on the page corresponds to a row in your Google Sheets, with the title and content fields displayed as specified in your Card component. If you make any updates to your Google Sheets data, you can refresh the web page to see the changes reflected immediately.
You can deploy your React app to one of the many services you can find online such as Github Actions or Netlify. This is a simple and effective way to host your frontend application for free with significant performance.
Conclusion
Congratulations! You've created a dynamic web application that fetches data from a Google Sheet and displays it using React.
This approach offers a flexible and straightforward way to manage your application's content without needing a backend server or database.
Google Sheets serves as an accessible and collaborative platform for managing data, while React allows you to build a responsive and interactive user interface. Together, they provide a powerful combination for creating web applications that can be quickly updated and easily maintained.