

Machine learning is a really interesting concept in computer programming. It involves using data to train a computer program to carry out tasks.
During the process, the program learns from data by discovering patterns. This reduces the need for programmers to hard code rules in some applications.
Languages like Python and R are excellent for learning and carrying out machine learning tasks. But those languages aren’t absolute. They have weaknesses. Some machine learning applications may need to perform operations with great speed and computer resource efficiency.
Rust is a powerful and efficient programming language. Although Rust doesn’t have a mature ecosystem, the programming language’s nature makes it perfect for applications that require speed and efficiency.
Rust programmers will find this tutorial useful in getting started with machine learning. And, machine learning engineers will find this tutorial useful in getting started with machine learning on Rust.
Prerequisites
To follow along with this tutorial you’ll need the following:
- Knowledge of Rust
- Rust installed in your system
What is Machine Learning?
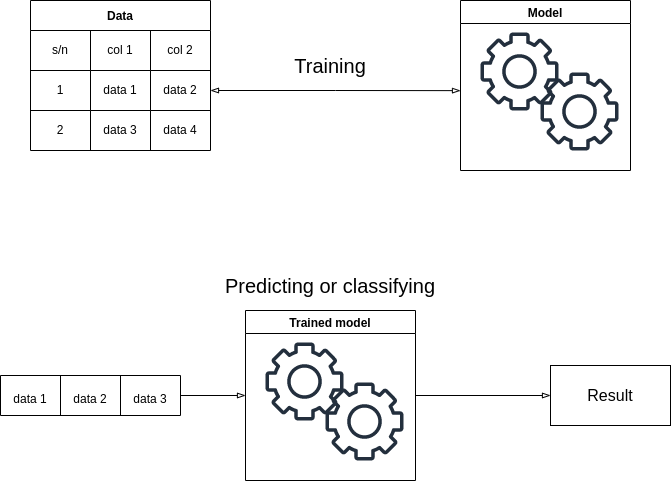
In machine learning, a model is a software object that can understand patterns from data. Training a model is the process of giving data to the model to draw out patterns. Machine learning is the process of training a model to carry out tasks.
Once you've trained your model, you can use it to draw conclusions from new data. You can either base those conclusions on classifications or predictions. A predictive model uses current data to predict an event, result, or outcome. A classification model uses data to classify an object, or concept.
The following diagram is a basic overview of the machine learning process:
What is a Decision Tree?
A decision tree algorithm is one of the most straightforward machine learning algorithms. This algorithm, unlike most other algorithms, gives a real sense of what machine learning is about.
A decision tree is a machine learning algorithm for classification and regression tasks. A decision tree is structured like a tree. It has a root node, internal nodes, leaf nodes, and branches.
The table below is an example of data that represents a classification of four animals with their properties:
| s/n | Is wild | Has round pupils | Animal |
| 1 | True | True | Wolf |
| 2 | True | False | Tiger |
| 3 | False | True | Dog |
| 4 | False | False | Cat |
A model recognizes the pattern(s) in the table, then creates a tree with this structure:
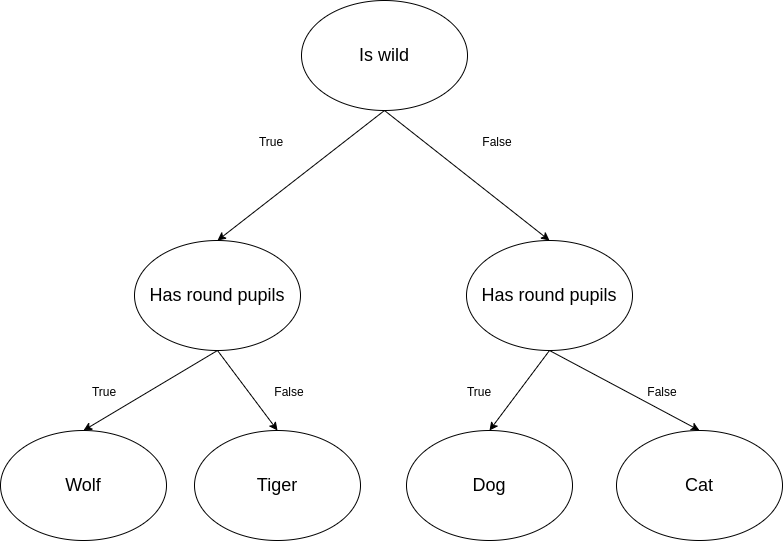
The root node is the first node in a decision tree. The leaf nodes are on the final line of the decision tree. The inner nodes are located between the root nodes and the leaf nodes. A decision tree can have more than one layer of inner nodes.
We'll use this algorithm in this article.
Getting Started
There are a bunch of tools that allow you to create machine learning applications in Rust. All the tools are great, but for this tutorial you’ll use Linfa. Linfa is a toolkit that is similar to the popular Python machine learning toolkit scikit-learn.
In this section, you’ll learn how to set up a Rust project for machine learning. The process of setting up a project is relatively simple. All you need to do is follow these steps:
First, create a new project called ml-project with the following command:
cargo new --bin ml-project
Next, paste the following dependencies in ml-project’s Cargo.toml file, under [dependencies]:
linfa = "0.6.0"
linfa-trees = "0.6.0"
linfa-datasets = { version = "0.6.0", features = ["iris"] }
Finally, run the following command to build the dependencies:
cargo build
The following is an explanation of the dependencies:
linfais the base package for Linfa machine learning models.linfa-treesis a sub-package for building decision tree models.linfa-datasetsis a package that provides already prepared datasets.
The linfa-datasets package is optional. If you want to prepare your own dataset, follow the next section.
How to Prepare the Dataset
Most machine learning models used in day-to-day projects are trained with external data, not the data provided by the toolkit. In this section, you’ll learn how to prepare your own dataset from a csv file.
First, you need to get a dataset if you don’t have one you can use. You can get a dataset from Kaggle. For this tutorial, I’ll use the heart disease dataset. The heart disease dataset looks like the below:

In this dataset, target indicates that a person has heart disease. 1 means they have a heart disease, 0 means they do not have a heart disease.
The rest of the fields on the dataset are details of each person. A model can learn from this dataset and be able to tell if a person has a heart disease or not.
Once you have downloaded the dataset, extract the csv file into your project’s src folder.
.
├── Cargo.lock
├── Cargo.toml
└── src
    ├── heart.csv
    └── main.rs
To prepare a dataset, you’ll need to add the csv and ndarray packages to your project. Open Cargo.toml, and write the following under [dependencies]:
csv = "1.1"
ndarray = "0.15.6"
Now, run cargo build to download the packages, and you are ready to go.
In the coming steps, I’ll guide you through building a get_dataset function. The get_dataset function reads the heart.csv file, parses its content, prepares a dataset with its contents, and returns the prepared dataset. Let’s get started!
First, import the necessary packages:
use csv::Reader;
use std::fs::File;
use ndarray::{ Array, Array1, Array2 };
use linfa::Dataset;
Next, write the get_dataset function below into main.rs:
fn get_dataset() -> Dataset<f32, i32, ndarray::Dim<[usize; 1]>> {
 let mut reader = Reader::from_path("./src/heart.csv").unwrap();

 let headers = get_headers(&mut reader);
 let data = get_data(&mut reader);
 let target_index = headers.len() - 1;

 let features = headers[0..target_index].to_vec();
 let records = get_records(&data, target_index);
 let targets = get_targets(&data, target_index);

 return Dataset::new(records, targets)
   .with_feature_names(features);
}
Finally, finish up by adding the definitions for get_headers, get_data, get_records, and get_targets:
fn get_headers(reader: &mut Reader<File>) -> Vec<String> {
 return reader
   .headers().unwrap().iter()
   .map(|r| r.to_owned())
   .collect();
}

fn get_records(data: &Vec<Vec<f32>>, target_index: usize) -> Array2<f32> {
 let mut records: Vec<f32> = vec![];
 for record in data.iter() {
   records.extend_from_slice( &record[0..target_index] );
 }
 return Array::from( records ).into_shape((303, 13)).unwrap();
}

fn get_targets(data: &Vec<Vec<f32>>, target_index: usize) -> Array1<i32> {
 let targets = data
   .iter()
   .map(|record| record[target_index] as i32)
   .collect::<Vec<i32>>();
  return Array::from( targets );
}

fn get_data(reader: &mut Reader<File>) -> Vec<Vec<f32>> {
 return reader
   .records()
   .map(|r|
     r
       .unwrap().iter()
       .map(|field| field.parse::<f32>().unwrap())
       .collect::<Vec<f32>>()
   )
   .collect::<Vec<Vec<f32>>>();
}
Here’s a step-by-step explanation of the get_dataset function:
First, initialize a reader pointing to ./src/heart.csv:
let mut reader = Reader::from_path("./src/heart.csv").unwrap();
Next, extract the headers and data from reader:
let headers = get_headers(&mut reader);
let data = get_data(&mut reader);
Then, calculate the index of target in the headers:
let target_index = headers.len() - 1;
After that, get the features from headers:
let features = headers[0..target_index].to_vec();
Next, retrieve the records and targets from data:
let records = get_records(&data, target_index);
let targets = get_targets(&data, target_index);
Finally, build the dataset with records, targets, and features, then return:
return Dataset::new(records, targets)
   .with_feature_names(features);
To finish up the function and to see how the dataset looks, make the following your main function:
fn main() {
   let dataset = get_dataset();
   println!("{:?}", dataset);
}
Once you make that your main function and run it with cargo run, you’ll see the dataset in the output:
DatasetBase { records: [[63.0, 1.0, 3.0, 145.0, 233.0, ..., 0.0, 2.3, 0.0, 0.0, 1.0],
 [37.0, 1.0, 2.0, 130.0, 250.0, ..., 0.0, 3.5, 0.0, 0.0, 2.0],
 [41.0, 0.0, 1.0, 130.0, 204.0, ..., 0.0, 1.4, 2.0, 0.0, 2.0],
 [56.0, 1.0, 1.0, 120.0, 236.0, ..., 0.0, 0.8, 2.0, 0.0, 2.0],
 [57.0, 0.0, 0.0, 120.0, 354.0, ..., 1.0, 0.6, 2.0, 0.0, 2.0],
 ...,
 [57.0, 0.0, 0.0, 140.0, 241.0, ..., 1.0, 0.2, 1.0, 0.0, 3.0],
 [45.0, 1.0, 3.0, 110.0, 264.0, ..., 0.0, 1.2, 1.0, 0.0, 3.0],
 [68.0, 1.0, 0.0, 144.0, 193.0, ..., 0.0, 3.4, 1.0, 2.0, 3.0],
 [57.0, 1.0, 0.0, 130.0, 131.0, ..., 1.0, 1.2, 1.0, 1.0, 3.0],
 [57.0, 0.0, 1.0, 130.0, 236.0, ..., 0.0, 0.0, 1.0, 1.0, 2.0]], shape=[303, 13], strides=[13, 1], layout=Cc (0x5), const ndim=2, targets: [1, 1, 1, 1, 1, 1, 1, 1, 1, 1, 1, 1, 1, 1, 1, 1, 1, 1, 1, 1, 1, 1, 1, 1, 1, 1, 1, 1, 1, 1, 1, 1, 1, 1, 1, 1, 1, 1, 1, 1, 1, 1, 1, 1, 1, 1, 1, 1, 1, 1, 1, 1, 1, 1, 1, 1, 1, 1, 1, 1, 1, 1, 1, 1, 1, 1, 1, 1, 1, 1, 1, 1, 1, 1, 1, 1, 1, 1, 1, 1, 1, 1, 1, 1, 1, 1, 1, 1, 1, 1, 1, 1, 1, 1, 1, 1, 1, 1, 1, 1, 1, 1, 1, 1, 1, 1, 1, 1, 1, 1, 1, 1, 1, 1, 1, 1, 1, 1, 1, 1, 1, 1, 1, 1, 1, 1, 1, 1, 1, 1, 1, 1, 1, 1, 1, 1, 1, 1, 1, 1, 1, 1, 1, 1, 1, 1, 1, 1, 1, 1, 1, 1, 1, 1, 1, 1, 1, 1, 1, 1, 1, 1, 1, 1, 1, 0, 0, 0, 0, 0, 0, 0, 0, 0, 0, 0, 0, 0, 0, 0, 0, 0, 0, 0, 0, 0, 0, 0, 0, 0, 0, 0, 0, 0, 0, 0, 0, 0, 0, 0, 0, 0, 0, 0, 0, 0, 0, 0, 0, 0, 0, 0, 0, 0, 0, 0, 0, 0, 0, 0, 0, 0, 0, 0, 0, 0, 0, 0, 0, 0, 0, 0, 0, 0, 0, 0, 0, 0, 0, 0, 0, 0, 0, 0, 0, 0, 0, 0, 0, 0, 0, 0, 0, 0, 0, 0, 0, 0, 0, 0, 0, 0, 0, 0, 0, 0, 0, 0, 0, 0, 0, 0, 0, 0, 0, 0, 0, 0, 0, 0, 0, 0, 0, 0, 0, 0, 0, 0, 0, 0, 0, 0, 0, 0, 0, 0, 0, 0, 0, 0, 0, 0, 0], shape=[303], strides=[1], layout=CFcf (0xf), const ndim=1, weights: [], shape=[0], strides=[0], layout=CFcf (0xf), const ndim=1, feature_names: ["age", "sex", "cp", "trestbps", "chol", "fbs", "restecg", "thalach", "exang", "oldpeak", "slope", "ca", "thal"] }
How to Create a Decision Tree Model
In this section, I’ll show you how to create a decision tree model and train it. The dataset I’ll use is the iris dataset provided by linfa-datasets.
The iris dataset contains a record of the sepal width, sepal height, petal width, and petal height of several irises, and classifies each record according to number-labeled species.
The code for the model is simple. Open the main.rs file, and paste the following into it:
use linfa_trees::DecisionTree;
use linfa::prelude::*;

fn main() {
    let (train, test) = linfa_datasets::iris()
        .split_with_ratio(0.9);

    let model = DecisionTree::params()
        .fit(&train).unwrap();

    let predictions = model.predict(&test);

    println!("{:?}", predictions);
    println!("{:?}", test.targets);
}
Here's an explanation:
First, import the necessary packages:
use linfa_trees::DecisionTree;
use linfa::prelude::*;
Next, fetch the dataset, and split into testing and training data:
let (train, test) = linfa_datasets::iris()
    .split_with_ratio(0.9);
After that, initialize the model and train it with the training data:
let model = DecisionTree::params()
    .fit(&train).unwrap();
Then, use the testing data to make some predictions:
let predictions = model.predict(&test);
Finally, compare the predictions with the actual values:
println!("{:?}", predictions);
println!("{:?}", test.targets);
If you run the program with cargo run, you’ll get the predicted category and the actual category in the terminal as output:
$ cargo run
[2, 2, 2, 2, 2, 2, 2, 2, 2, 2, 2, 2, 2, 2, 2], shape=[15], strides=[1], layout=CFcf (0xf), const ndim=1
[2, 2, 2, 2, 2, 2, 2, 2, 2, 2, 2, 2, 2, 2, 2], shape=[15], strides=[1], layout=CFcf (0xf), const ndim=1
From the above, you can see that this model is 100% accurate. This won’t always be the case for all machine learning models. If you shuffle the dataset before training the model in the above, the model may not be as accurate anymore.
The goal of machine learning is to be as accurate as possible. Most times 100% accuracy is not possible.
Conclusion
In this tutorial, you learnt a little about machine learning, and you also saw how to create a decision tree model using Rust.
Machine learning models in Linfa follow a similar process in building and training, so all you need to do to use other types of models is to learn about each one, and you are good to go.
You can learn more about Linfa and the models it supports using its documentation.
Thanks for reading, and happy coding!