
What we're building
In this beginner React tutorial, we're going to build a shopping app. We'll work with complex state objects, update parts of the state, and use existing state to calculate new state.
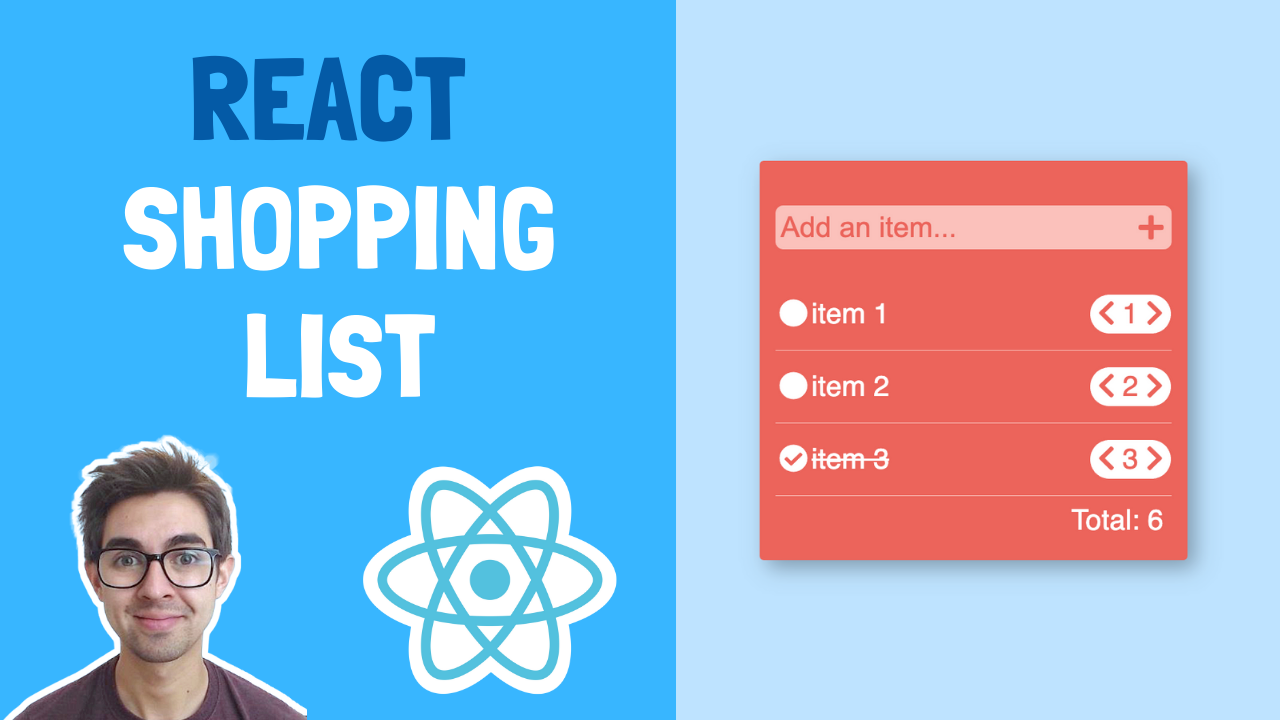
Check it out here:

Try it yourself
If you want to have a go yourself first, here are the scenarios (you can also grab the starter code below):
- The user should be able to add new items to the list, by typing into the input and clicking the "+" symbol
- The user should be able to increase/decrease the quantities of a particular item
- The total should show the total quantity for all the items in the list
Video walkthrough
Starter Code
How to display a list of items
The first thing we're going to do is display a list of items. If you working with the starter code, you'll see that I've added a state object:
const [items, setItems] = useState([]);
We're going to initialise this with an array of objects. We'll then use the map function to loop over this list and display the items.
Replace the above line with the following:
const [items, setItems] = useState([
    { itemName: 'item 1', quantity: 1, isSelected: false },
    { itemName: 'item 2', quantity: 3, isSelected: true },
    { itemName: 'item 3', quantity: 2, isSelected: false },
]);
You'll notice that each item in the array is an object. This object represents each item (or row) and holds the things we'll need to display:
- The item's name
- The quantity
- A flag which we'll use to display a "tick" or "empty circle"
The reason we put this list in state as an array is because the list will change. When we want to change the list, we just add things to or remove them from the array and React will automatically update the UI for us.
Ok now we just have to add a map function to our JSX and loop over this array and display the properties on the UI.
Replace the item list div with the following:
<div className='item-list'>
    {items.map((item, index) => (
        <div className='item-container'>
            <div className='item-name'>
                {item.isSelected ? (
                    <>
                        <FontAwesomeIcon icon={faCheckCircle} />
                        <span className='completed'>{item.itemName}</span>
                    </>
                ) : (
                    <>
                        <FontAwesomeIcon icon={faCircle} />
                        <span>{item.itemName}</span>
                    </>
                )}
            </div>
            <div className='quantity'>
                <button>
                    <FontAwesomeIcon icon={faChevronLeft} />
                </button>
                <span> {item.quantity} </span>
                <button>
                    <FontAwesomeIcon icon={faChevronRight} />
                </button>
            </div>
        </div>
    ))}
</div>
Let's walk through this.
We've introduced the map function. It will loop over the items in the items array and display a bunch of JSX for each item. Remember, the map function gives us the current object it is currently on as a variable so we can access its properties.
We're using a ternary to check the item.isSelected variable. If the variable is true, we display a "tick" with a strikethrough. If the value is false, we display an "empty circle" along with the item name.
We're also displaying the quantity for that particular item.
How to store what the user types in state
Now that we've got some items displaying, we'll let the user add some items to the list. It wouldn't be a very good shopping list if they couldn't add things to it!
You'll see in the starter code that I've included an input:
<div className='add-item-box'>
    <input className='add-item-input' placeholder='Add an item...' />
    <FontAwesomeIcon icon={faPlus} />
</div>
At the moment this doesn't do very much. We need to give control to React so that we can easily work with the value the user typed.
To do this, we'll create a new state value to hold the value of what the user has typed, and we'll add an onChange event to change this value.
Add a new state object, and initialise it to an empty string:
const [inputValue, setInputValue] = useState('');
Now within the input, add a value and an onChange function like so:
<input value={inputValue} onChange={(event) => setInputValue(event.target.value)} className='add-item-input' placeholder='Add an item...' />
Whenever the user types, the onChange event gets called. React passes in the event automatically for us, so we can get the value the user has typed from this.
We then take this value and call the setInputValue to set what the user has typed into state.
We then set the value of the input to be whatever value is stored in the inputValue state variable.
How to add a new item to the list
Now it makes sense to add the value the user has typed to the list. Since we know the current list, and we know the thing the user typed (we stuck everything in state!) all we have to do is mash these things together.
In order words, we're going to add the inputValue to the items array.
Start by creating a new function, which will get called when the user clicks the "+" icon:
const handleAddButtonClick = () => {
    const newItem = {
        itemName: inputValue,
        quantity: 1,
        isSelected: false,
    };

    const newItems = [...items, newItem];

    setItems(newItems);
    setInputValue('');
};
What does this is:
Creates a new object called newItem which is what gets pushed to the array. We set the itemName to whatever the inputValue is, we default the quantity to 1, and default the isSelected boolean to false
Copies the existing array (we do this to avoid mutating state), and adds our newItem object to the end
Pushes the new array back into state
Finally, resets the inputValue to empty string so that the user can type and add more stuff
Now that we've got a function, we just have to wire it up to our button:
<FontAwesomeIcon icon={faPlus} onClick={() => handleAddButtonClick()} />
If you run the code, type stuff into the input, and click the "plus" icon, it should get added to the list. Woohooo!
How to toggle an item
Now we'll look at how we can toggle an item to indicate that it was selected. We know that each item in the array/list has an *isSelected variable, so all we have to do is update this when an item is clicked.
Create a new function like so:
const toggleComplete = (index) => {
    const newItems = [...items];

    newItems[index].isSelected = !newItems[index].isSelected;

    setItems(newItems);
};
This takes an index as a parementer. The index is given to us by the map function, and indicates what position in the array we're currently on.
We then use this index to get the object from the array, and set the isSelected variable to the opposite of what it currently is.
We then put the updated items into state. This causes React to rerender the component and render either a "checked circle" or an "empty circle" for each item depending on the this flag (remember we wrote the ternery logic for this earlier).
To get this all to work we just need to call toggleComplete when the user clicks the circle:
Update the itemName div like so:
<div className='item-name' onClick={() => toggleComplete(index)}>
    // ...other code
</div>
Note we pass in the index which we get from the map function. This tells us the current position in the array we're currently on.
Run the code and you should be able to "select" and item. Success!
How to update the quantities
We're going to take a similar approach to update the quantities. We'll start with the increase quantity. Add a function like so:
const handleQuantityIncrease = (index) => {
    const newItems = [...items];

    newItems[index].quantity++;

    setItems(newItems);
};
You'll notice this is similar to the toggleComplete function:
- We use the index to get the item/object from the array
- We increase the quantity
- We put everything back into state
Now we just need to update our button to call this function:
<button>
    <FontAwesomeIcon icon={faChevronRight} onClick={() => handleQuantityIncrease(index)} />
</button>
Try this, and you should be able to click the "right chevron" and the quantity should go up.
Handling the decrease quantity will be similar again. Create a function like so:
const handleQuantityDecrease = (index) => {
    const newItems = [...items];

    newItems[index].quantity--;

    setItems(newItems);
};
What we're doing:
- We use the index to get the item/object from the array
- We decrese the quantity
- We put everything back into state
How to calculate the total quantity
Ok, our app is looking good. The last thing we need to do is update the total quantity at the bottom.
The first thing we're going to do is create a state value. This will be used to hold/display the total quantities:
const [totalItemCount, setTotalItemCount] = useState(6);
We'll default this to 6 as this is what the quantities in the initial list add up to.
Next we'll render this in our JSX:
<div className='total'>Total: {totalItemCount}</div>
Everything will look the same so far. That's because we haven't written any logic to update the state yet. We'll create a new function:
const calculateTotal = () => {
    const totalItemCount = items.reduce((total, item) => {
        return total + item.quantity;
    }, 0);

    setTotalItemCount(totalItemCount);
};
This uses the reduce function to add up all the quantities in our items array.
Lastly, all we have to do is call this function whenever the user increases/decreases the quantity, or adds a new item. Update the respective functions like so:
    const handleAddButtonClick = () => {
    // ...other code
        calculateTotal();
    };

    const handleQuantityIncrease = (index) => {
    // ...other code
        calculateTotal();
    };

    const handleQuantityDecrease = (index) => {
    // ...other code
        calculateTotal();
    };
Go ahead and try increasing/decreasing the quantities. You'll notice the total quantity changes as well!
Want more project ideas?
Why not try building some React projects to boost your learning even further?
Every week I send out a new project for you to try a working example, starter code, and tips. Subscribe to get this straight to your inbox!