

Hello folks, welcome to this tutorial. Today we're going to build a production-ready Todo application with React, Next, and Supabase.
Before we begin, you should be familiar with the basics of React.js and Next.js to get the most out of this guide.
If you're not and need to brush up, I would recommend that you go through the ReactJS documentation and NextJS documentation.
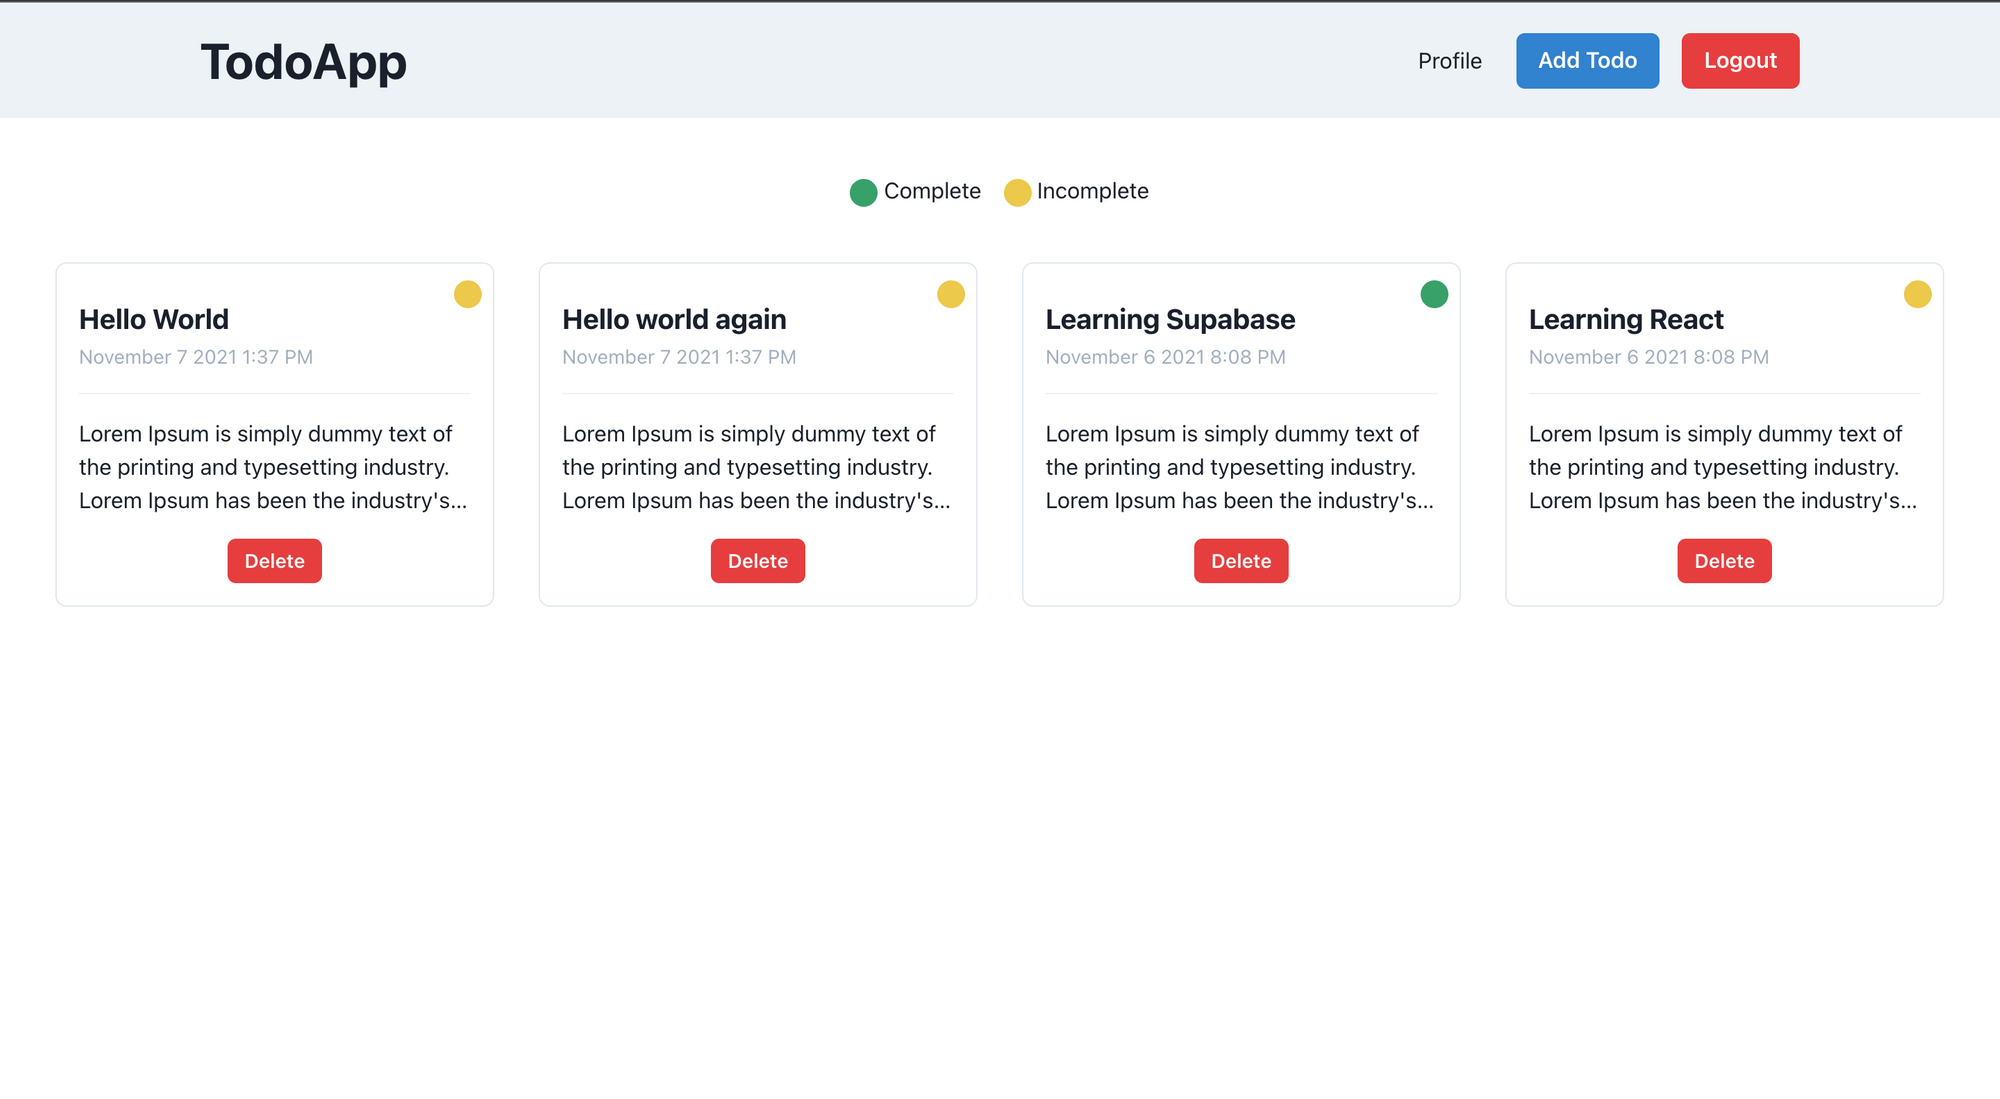
Here's what we're going to build
We'll build a ToDo app that looks like this:
And here's the tech we'll use:
ReactJS: a JavaScript library for building user interfaces. It is declarative and component-based.
NextJS: a React-based framework that lets us render data on the server-side. It helps Google crawl the application which results in SEO benefits.
Supabase: provides authentication, database, and storage that we are going to use in our application.
Chakra UI: is a simple, modular, and accessible component library that will provide us with the building blocks to build the application.
Vercel: will host our application. It scales well, all without any configuration, and deployment is instant.
Why use Supabase?
According to the Supabase documentation, Supabase is "an open source Firebase alternative".
However, Supabase is not completely similar to Firebase. The difference between the two is that Supabase uses Postgres (a relational database) for storing data whereas Firebase uses the NoSQL mechanism to store data.
Personally, I typically use Postgres as my primary database and I have found it to scale well.
Supabase provides the following services:
Authentication
Postgres database
Real time rest server
Row level security
Storage bucket
Now let's understand how it works:
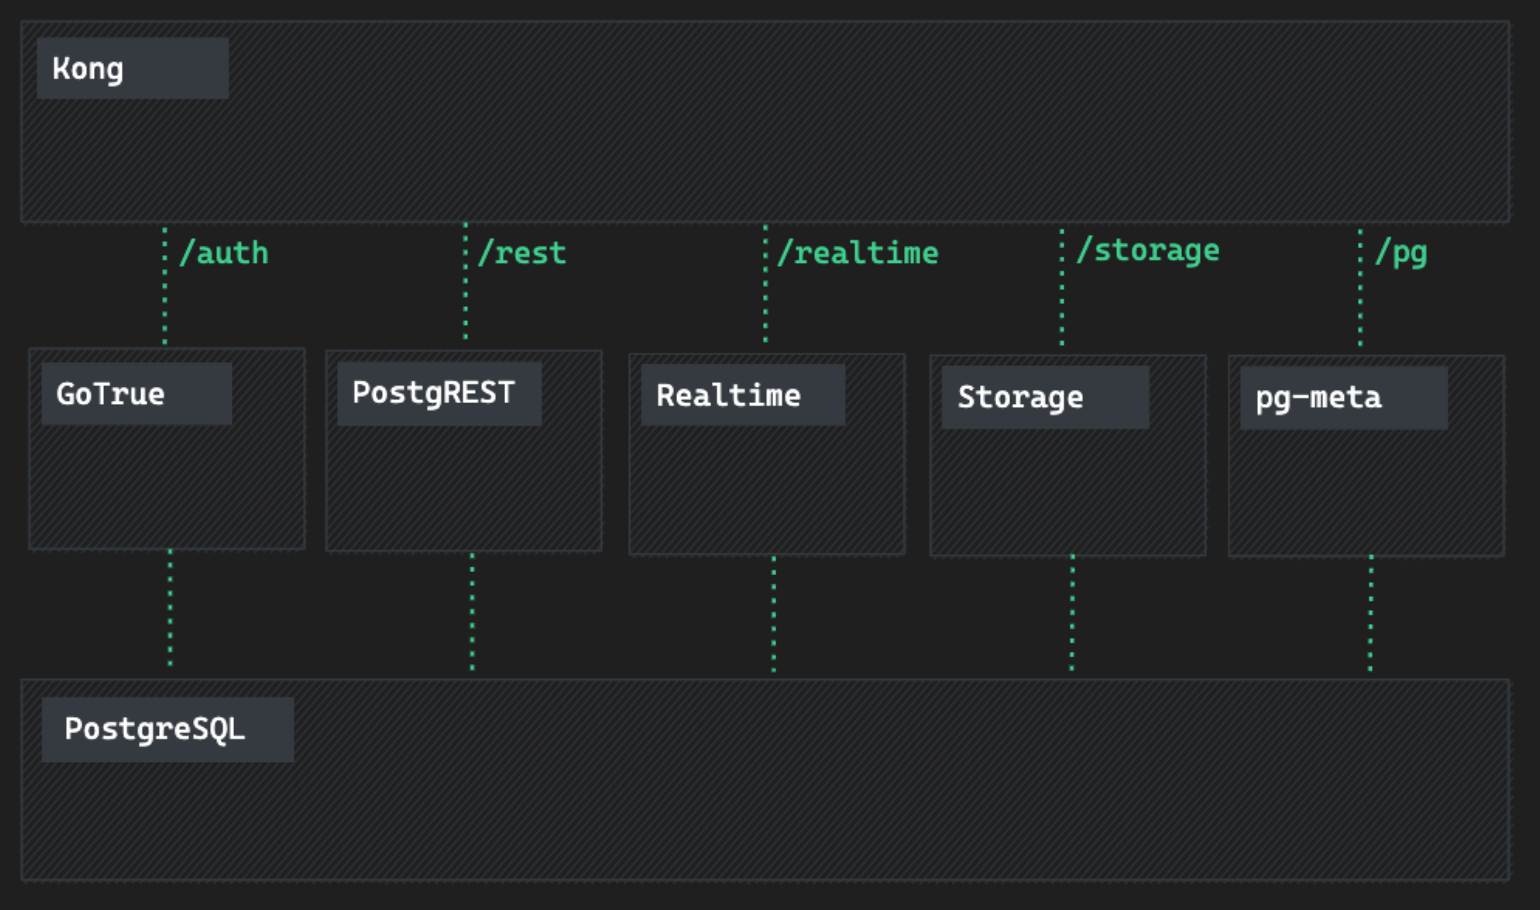
Architectural Diagram from Supabase documentation
Alright, what's going on here?
As you already know, Supabase uses Postgres as a database – but it also has many other components which provide different services.
One of my favorites is Realtime. Supabase uses the Elixir server to set up a web socket connection to listen for insert, update, and delete the events.
PostgRest directly converts the Postgres database into a Rest API.
GoTrue is an API for managing users and issuing SWT tokens.
Postgres-Meta is a Restful API for managing the Postgres database.
Kong is an API gateway.
Note: All these definitions are taken from the supabase documentation. To read more about how Supabase works, you can visit their documentation.
And with that, we're ready to dive into our project. Here's what we'll cover:
Table of Contents
How to show all todos, add new todos, and update and delete todos
How to deploy the app to Vercel and configure Supabase authentication
I am going to divide this tutorial into four separate sections. At the start of every section, you will find a Git commit that has the code developed in that section. Also If you want to see the complete code, then it is available in this repository.
How to Configure Supabase Tables, Auth, and Storage
In this section, we'll implement the following functionality:
Create a Supabase project.
Setup authentication for users and policies.
Configure database and policies for users and todos.
To create a Supabase project, visit the following link. Click on the "Start your project" button and login via GitHub (at the time of writing this article, they only support GitHub as an auth provider).
Once you've created your account, click on New project where it will ask for the organization. By default, Supabase will create an organizational account for you with your username. I'll be using the default but you can create your own for this project.
Once the organization is selected, Supabase will ask for the project name, database password, and region.
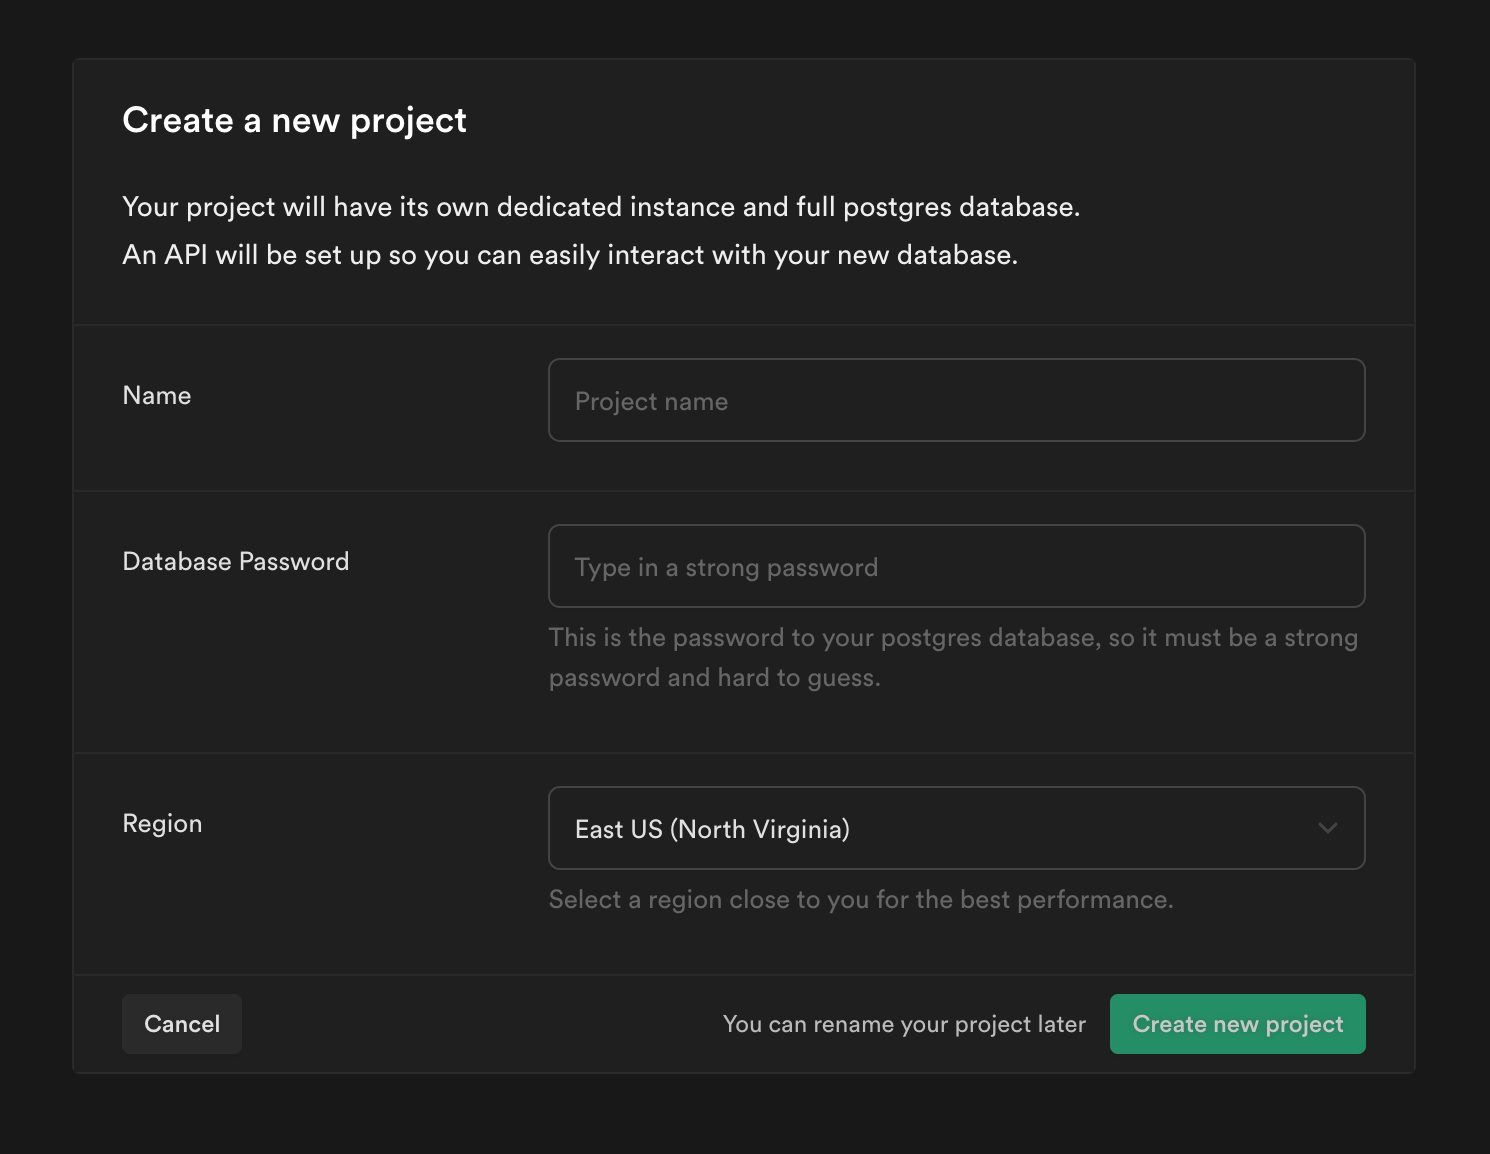
Supabase Create Project
Fill out this form and click on the Create new project button.
Supabase will start setting up the application. It may take a few minutes to set up.
Under the Project API keys section, you'll see two types of keys:
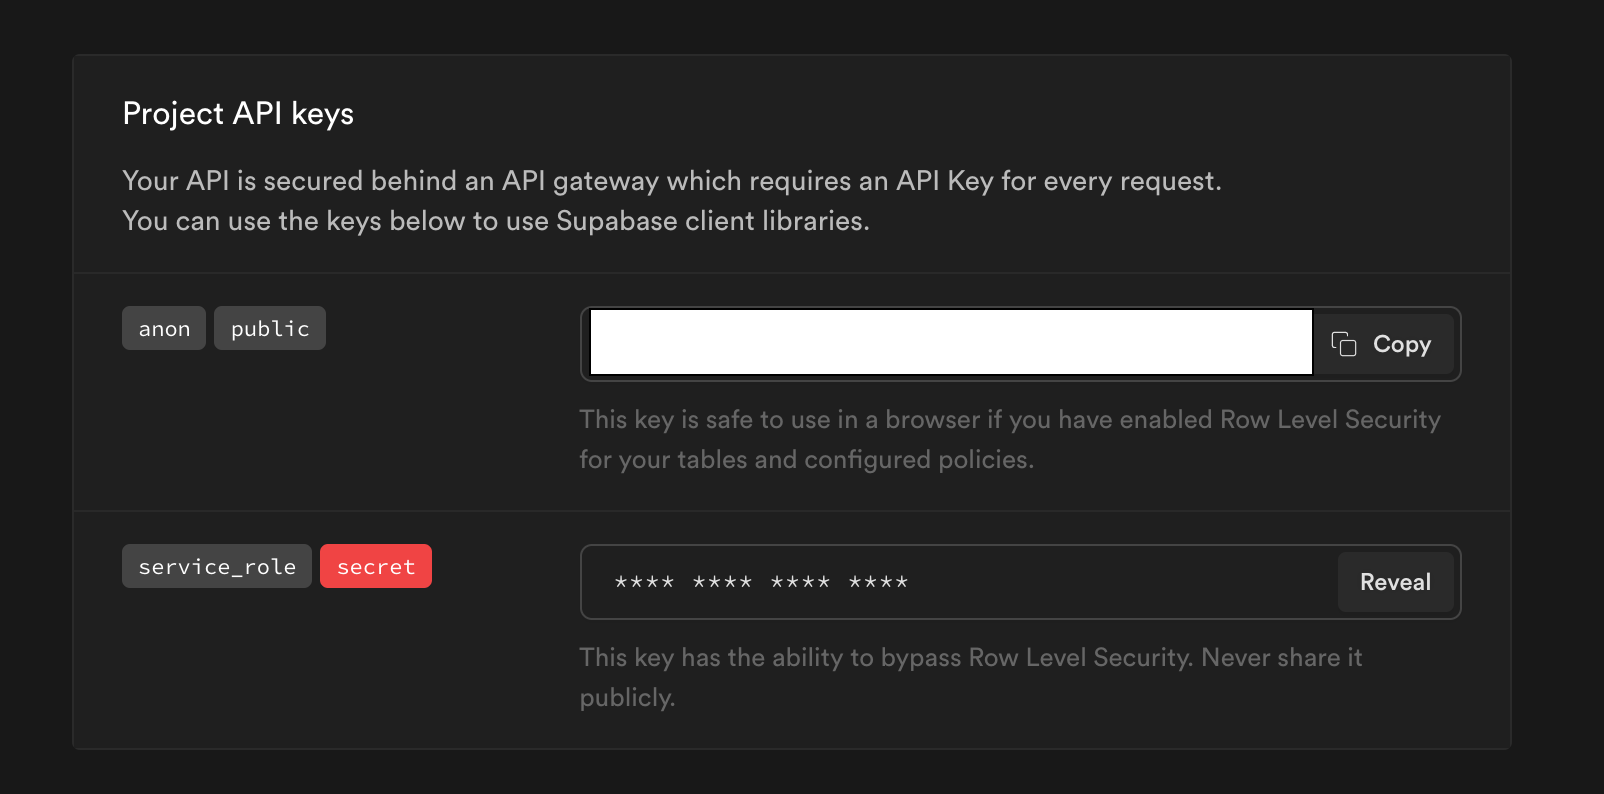
Supabase Project API Keys
anon is a public API key and it can be used on the client-side.
service_role is a private API key and you use it on the server-side only. This key can bypass the row-level security and mutate the data.
What is Row Level Security in Supabase?
You might be wondering – what is row-level security and why it is so important?
Well, Supabase has a client library to access data directly from the browser and for that, we use the anon key. As the anon key is on the client, anyone can have access to the key via the network tab.
But there are some cases where we don't want the data to be directly accessed by the browser using the client library.
In these cases, we can set up row-level security, which specifies which data can be accessed using the anon key.
To learn more about row-level security, read this documentation.
Returning back to the application, once the project is configured you'll get the following message "Welcome to your new project."
How to Create Tables in the Database
Now let's create a script to create tables in our database.
Go to the SQL section from the sidebar and click on New query.

SQL section from Supabase panel
Click on New Query and copy-paste the following code:
create table profiles (
  id uuid references auth.users not null,
  username text unique,
  avatarUrl text,
  website text,
  bio text,
  joinedAt timestamp with time zone default timezone('utc'::text, now()) not null,

  primary key (id),
  unique(username)
);

alter table profiles enable row level security;

create policy "Profiles are viewable by user only."
  on profiles for select
  using ( auth.uid() = id );

create policy "Users can insert their own profile."
  on profiles for insert
  with check ( auth.uid() = id );

create policy "Users can update own profile."
  on profiles for update
  using ( auth.uid() = id );

begin;
  drop publication if exists supabase_realtime;
  create publication supabase_realtime;
commit;
alter publication supabase_realtime add table profiles;

-- Set up Storage!
insert into storage.buckets (id, name)
values ('avatars', 'avatars');

create policy "Avatar images are publicly accessible."
  on storage.objects for select
  using ( bucket_id = 'avatars');

create policy "Anyone can upload an avatar."
  on storage.objects for insert
  with check ( bucket_id = 'avatars' );

create policy "Anyone can update an avatar."
  on storage.objects for update
  with check ( bucket_id = 'avatars' );
Let's understand this Profiles script piece by piece.
First, we create table profiles that relate to users in our TodoApp. To understand how to set up unique in a table, we have set up username as a unique constraint and primary key as id.
After that, we set up the row-level security and assign policies so that each individual can access only their data.
After that, we enable real-time for our database. Realtime gives an event whenever there are any changes in the row, and we can update the UI accordingly.
Now click on the RUN button at the right corner and you'll get the following message:
Success. No rows returned
Now let's create our todos table. For generating the table, click on the New query button and copy-paste the following script:
create table todos (
  id bigint generated by default as identity primary key,
  user_id uuid references auth.users not null,
  title text,
  description text,
  "isComplete" boolean default false,
  insertedAt timestamp with time zone default timezone('utc'::text, now()) not null
);

alter table todos enable row level security;

create policy "Individuals can create todos." on todos for
    insert with check (auth.uid() = user_id);

create policy "Individuals can view their own todos. " on todos for
    select using (auth.uid() = user_id);

create policy "Individuals can update their own todos." on todos for
    update using (auth.uid() = user_id);

create policy "Individuals can delete their own todos." on todos for
    delete using (auth.uid() = user_id);
Now click on the RUN button at the right corner, and you'll get the following message:
Success. No rows returned
To confirm our tables are generated, go to the table editor section from the sidebar.

Table Editor section from Supabase panel
Inside the table editor, you'll find our tables generated successfully.
Supabase Table sidebar
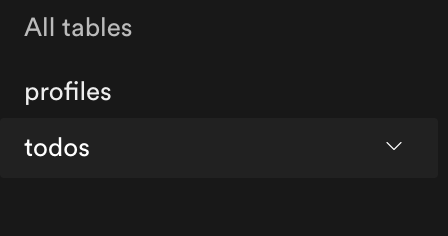
As you can see in the above Todos Script, we didn't enable real-time. To enable a real-time server, we need to go to the Database > Replication section.
Database section from Supabase panel
Here you'll see the following view:
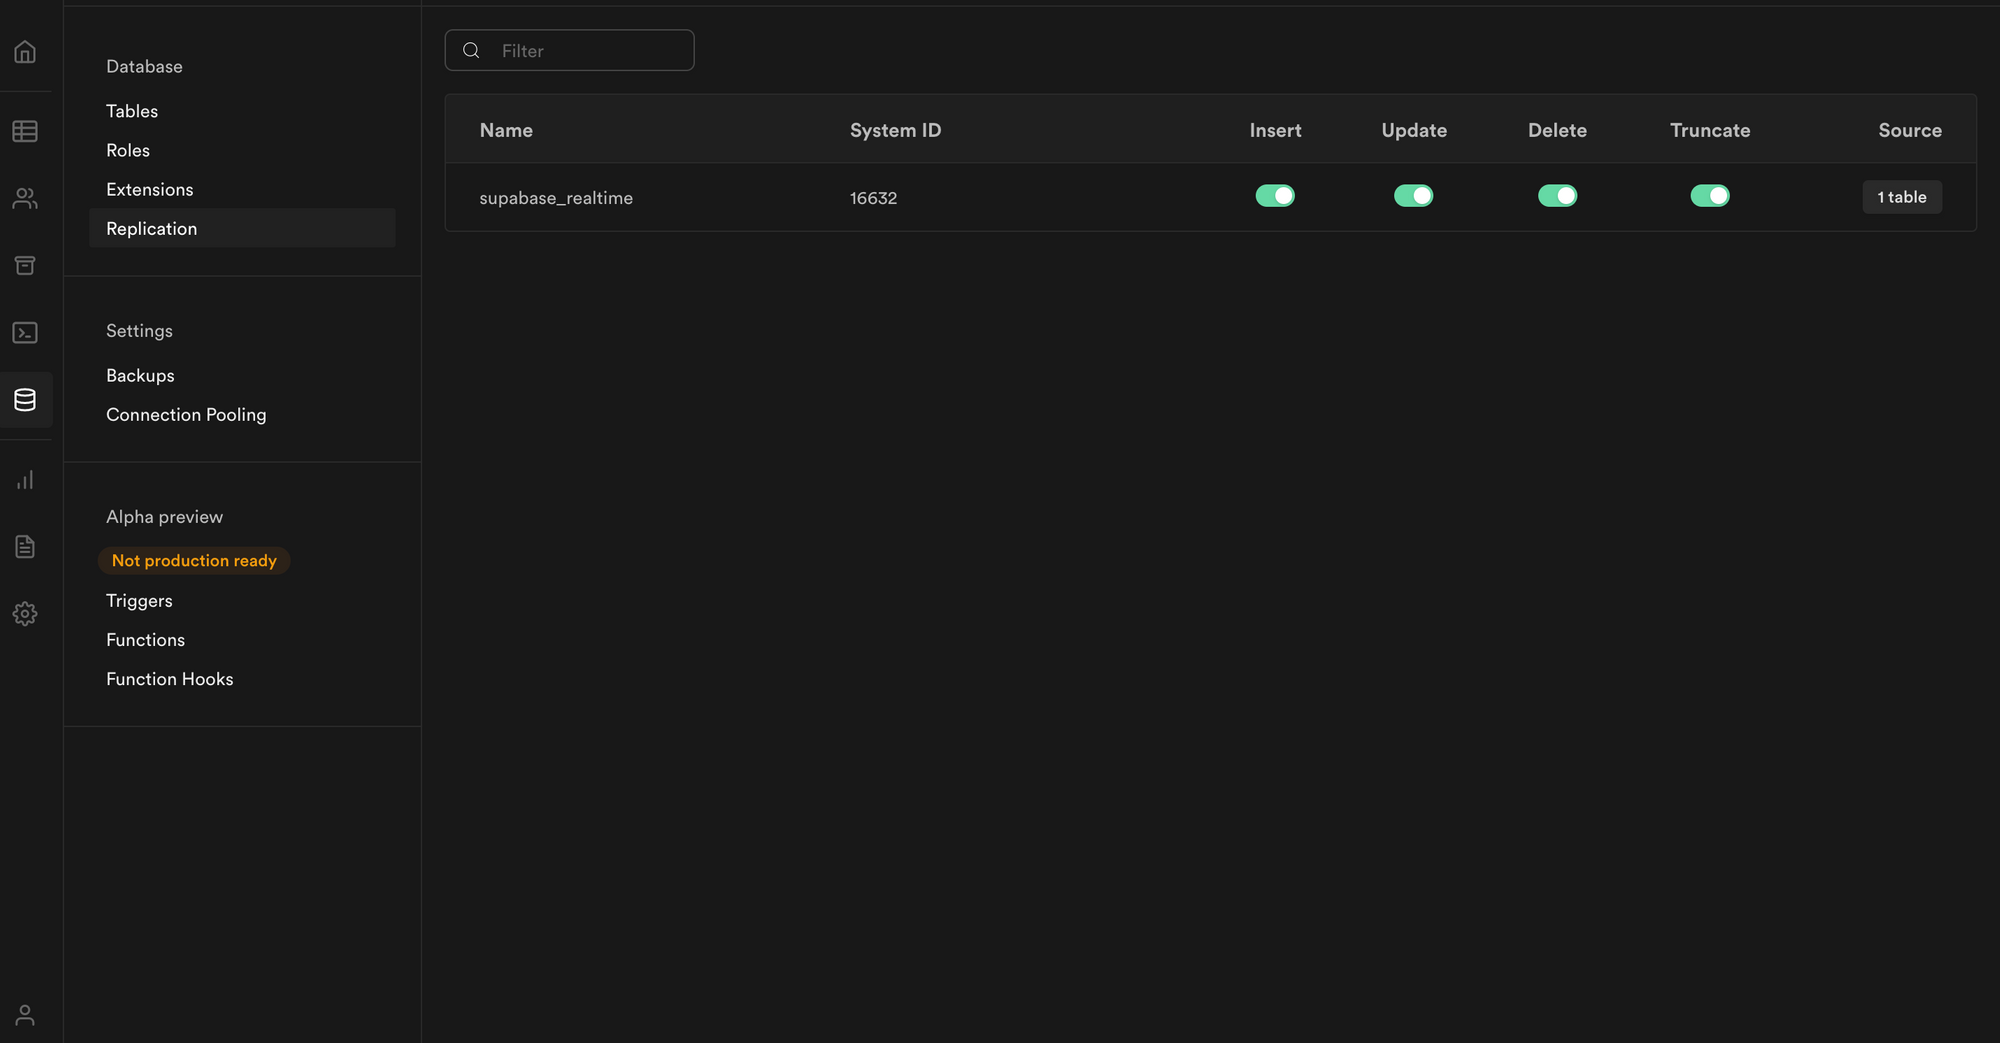
Supabase Database Replication Section
Click on the 1 table button under source and then toggle the switch for todos. It will enable a real-time server for our todos also.
Now suppose we want to disable row-level security for todos (note that this is not advisable), but just for the scope of the article to understand how to, we will disable it.
Go to the Authentication section and, inside that, go to the Policies.

Authentication section from Supabase panel
Now you'll see the todos section with RLS enabled written in the green box. Click on the Disable RLS option at the top right-hand corner of this box. It will disable the row-level security for our application.
How to Implement Sign In Using Supabase
The code for this section is available under this commit if you need to refer to it in the future for reference.
First, let's create our application using the following command:
npx create-next-app todo_app
It's time to install our dependencies and have a basic configuration in place.
How to Install Chakra UI
npm i @chakra-ui/react @emotion/react@^11 @emotion/styled@^11 framer-motion@^4
Note: If you use zsh you'll need to add the escape character () after @ as follows:
npm i @chakra-ui/react @emotion/react@\^11 @emotion/styled@\^11 framer-motion@\^4
Now let's clean up our code by removing the code that is not required and configuring ChakraUI into our application.
As per Chakra's documentation, we need to wrap <Component /> with ChakraProvider in the pages/_app.js. Go to the _app.js and copy-paste the following code:
import { ChakraProvider, extendTheme } from "@chakra-ui/react";
import customTheme from "../lib/theme";

function MyApp({ Component, pageProps }) {
  return (
    <ChakraProvider theme={customTheme}>
      <Component {...pageProps} />
    </ChakraProvider>
  );
}

export default MyApp;
Let's create a directory under our root directory and name it lib. Under this directory, create a file named theme.js.
Copy-paste the following code inside this file:
import { extendTheme } from "@chakra-ui/react"

const config = {
  initialColorMode: "light",
  useSystemColorMode: false,
}

const theme = extendTheme({ config })

export default theme
Now under the pages directory, create a _document.js file and copy-paste the following code:
import { ColorModeScript } from "@chakra-ui/react"
import NextDocument, { Html, Head, Main, NextScript } from "next/document"
import theme from "../lib/theme"

export default class Document extends NextDocument {
  render() {
    return (
      <Html lang="en">
        <Head />
        <body>
          {/* 👇 Here's the script */}
          <ColorModeScript initialColorMode={theme.config.initialColorMode} />
          <Main />
          <NextScript />
        </body>
      </Html>
    )
  }
}
By creating _document.js and theme.js we have just set our color to be light by default.
From ChakraUI version 1.6.12, it sets the system chosen color by default. So for some users who have dark mode enabled for the browser, the application will have a dark color theme. Dark mode is nice, but for starting purposes, we only want the color to be light.
Go to index.js and copy paste the following code:
import { Box } from "@chakra-ui/react";
import Head from "next/head";

const Home = () => {
  return (
    <div>
      <Head>
        <title>TodoApp</title>
        <meta
          name="description"
          content="Awesome todoapp to store your awesome todos"
        />
        <link rel="icon" href="/favicon.ico" />
      </Head>
      <main>
        <Box>Hello world</Box>
      </main>
    </div>
  );
};

export default Home;
How to Install the Supabase Client Library
npm i @supabase/supabase-js
Under lib directory create a file named client.js.
Under that file copy paste the following code:
import { createClient } from "@supabase/supabase-js";

const SUPABASE_URL = process.env.NEXT_PUBLIC_SUPABASE_URL;
const SUPBASE_ANON_KEY = process.env.NEXT_PUBLIC_SUPABASE_ANON_KEY;

const client = createClient(SUPABASE_URL, SUPBASE_ANON_KEY);

export { client as supabaseClient };
Here we are just creating a Supabase Client which will be used throughout the project.
Now under the root directory create a .env.local file and copy-paste the following part with Supabase URL and anon key:
NEXT_PUBLIC_SUPABASE_URL=#Add_your_supabase_url
NEXT_PUBLIC_SUPABASE_ANON_KEY=#Add_your_supabase_key
You can find the Supabase URL and anon key under the Settings > API section.
Under Project API keys is the anon key and under Config is the URL.
With this, our Supabase client is configured and ready to use.
Let's run our application using the following command:
npm run dev
You'll get the following output:

Todo App Home Screen
Now under the pages directory, create a file named signin.js and copy-paste the following code:
import {
  Alert,
  AlertIcon,
  Box,
  Button,
  chakra,
  FormControl,
  FormLabel,
  Heading,
  Input,
  Stack,
  Text,
} from "@chakra-ui/react";
import { useState } from "react";
import { supabaseClient } from "../lib/client";

const SignIn = () => {
  const [email, setEmail] = useState("");
  const [isLoading, setIsLoading] = useState(false);
  const [isSubmitted, setIsSubmitted] = useState(false);
  const [error, setError] = useState(null);

  const submitHandler = async (event) => {
    event.preventDefault();
    setIsLoading(true);
    setError(null);
    try {
      const { error } = await supabaseClient.auth.signIn({
        email,
      });
      if (error) {
        setError(error.message);
      } else {
        setIsSubmitted(true);
      }
    } catch (error) {
      setError(error.message);
    } finally {
      setIsLoading(false);
    }
  };

  const changeHandler = (event) => {
    setEmail(event.target.value);
  };

  return (
    <Box minH="100vh" py="12" px={{ base: "4", lg: "8" }} bg="gray.50">
      <Box maxW="md" mx="auto">
        <Heading textAlign="center" m="6">
          Welcome to Todo App
        </Heading>
        {error && (
          <Alert status="error" mb="6">
            <AlertIcon />
            <Text textAlign="center">{error}</Text>
          </Alert>
        )}
        <Box
          py="8"
          px={{ base: "4", md: "10" }}
          shadow="base"
          rounded={{ sm: "lg" }}
          bg="white"
        >
          {isSubmitted ? (
            <Heading size="md" textAlign="center" color="gray.600">
              Please check {email} for login link
            </Heading>
          ) : (
            <chakra.form onSubmit={submitHandler}>
              <Stack spacing="6">
                <FormControl id="email">
                  <FormLabel>Email address</FormLabel>
                  <Input
                    name="email"
                    type="email"
                    autoComplete="email"
                    required
                    value={email}
                    onChange={changeHandler}
                  />
                </FormControl>
                <Button
                  type="submit"
                  colorScheme="blue"
                  size="lg"
                  fontSize="md"
                  isLoading={isLoading}
                >
                  Sign in
                </Button>
              </Stack>
            </chakra.form>
          )}
        </Box>
      </Box>
    </Box>
  );
};

export default SignIn;
Here we have created a form and used a supabase auth method to sign in the user.
Note: In
supabaseClient.auth.signInmethod, when you don't pass a password, it considers the authentication method as the magic link.
Now go to the _app.js and copy paste the following code:
import { ChakraProvider } from "@chakra-ui/react";
import { useRouter } from "next/router";
import { useEffect } from "react";
import { supabaseClient } from "../lib/client";
import customTheme from "../lib/theme";

function MyApp({ Component, pageProps }) {
  const router = useRouter();
  const user = supabaseClient.auth.user();

  useEffect(() => {
    const { data: authListener } = supabaseClient.auth.onAuthStateChange(
      (event, session) => {
        handleAuthSession(event, session);
        if (event === "SIGNED_IN") {
          const signedInUser = supabaseClient.auth.user();
          const userId = signedInUser.id;
          supabaseClient
            .from("profiles")
            .upsert({ id: userId })
            .then((_data, error) => {
              if (!error) {
                router.push("/");
              }
            });
        }
        if (event === "SIGNED_OUT") {
          router.push("/signin");
        }
      }
    );

    return () => {
      authListener.unsubscribe();
    };
  }, [router]);

  useEffect(() => {
    if (user) {
      if (router.pathname === "/signin") {
        router.push("/");
      }
    }
  }, [router.pathname, user, router]);

  const handleAuthSession = async (event, session) => {
    await fetch("/api/auth", {
      method: "POST",
      headers: new Headers({ "Content-Type": "application/json" }),
      credentials: "same-origin",
      body: JSON.stringify({ event, session }),
    });
  };

  return (
    <ChakraProvider theme={customTheme}>
      <Component {...pageProps} />
    </ChakraProvider>
  );
}

export default MyApp;
Now inside the API directory, remove the hello.js file and create a new file called auth.js. Copy-paste the following code in that new file:
import { supabaseClient } from "../../lib/client";

export default function handler(req, res) {
  supabaseClient.auth.api.setAuthCookie(req, res);
}
The code under _app.js is crucial for authentication when the user clicks on the magic link.
Supabase provides a listener method under the hood auth.onAuthStateChange which gives two events SIGNED_IN and SIGNED_OUT.
We use SIGNED_IN event to set a cookie by calling /api/auth which uses another method exposed by supabase. This method auth.api.setAuthCookie is useful to set cookies via server-side. Once the user is authenticated we push the user to the / page where all todos will be.
Now let's restart our server using npm run dev and then go to http://localhost:3000/signin. You'll see the following UI:
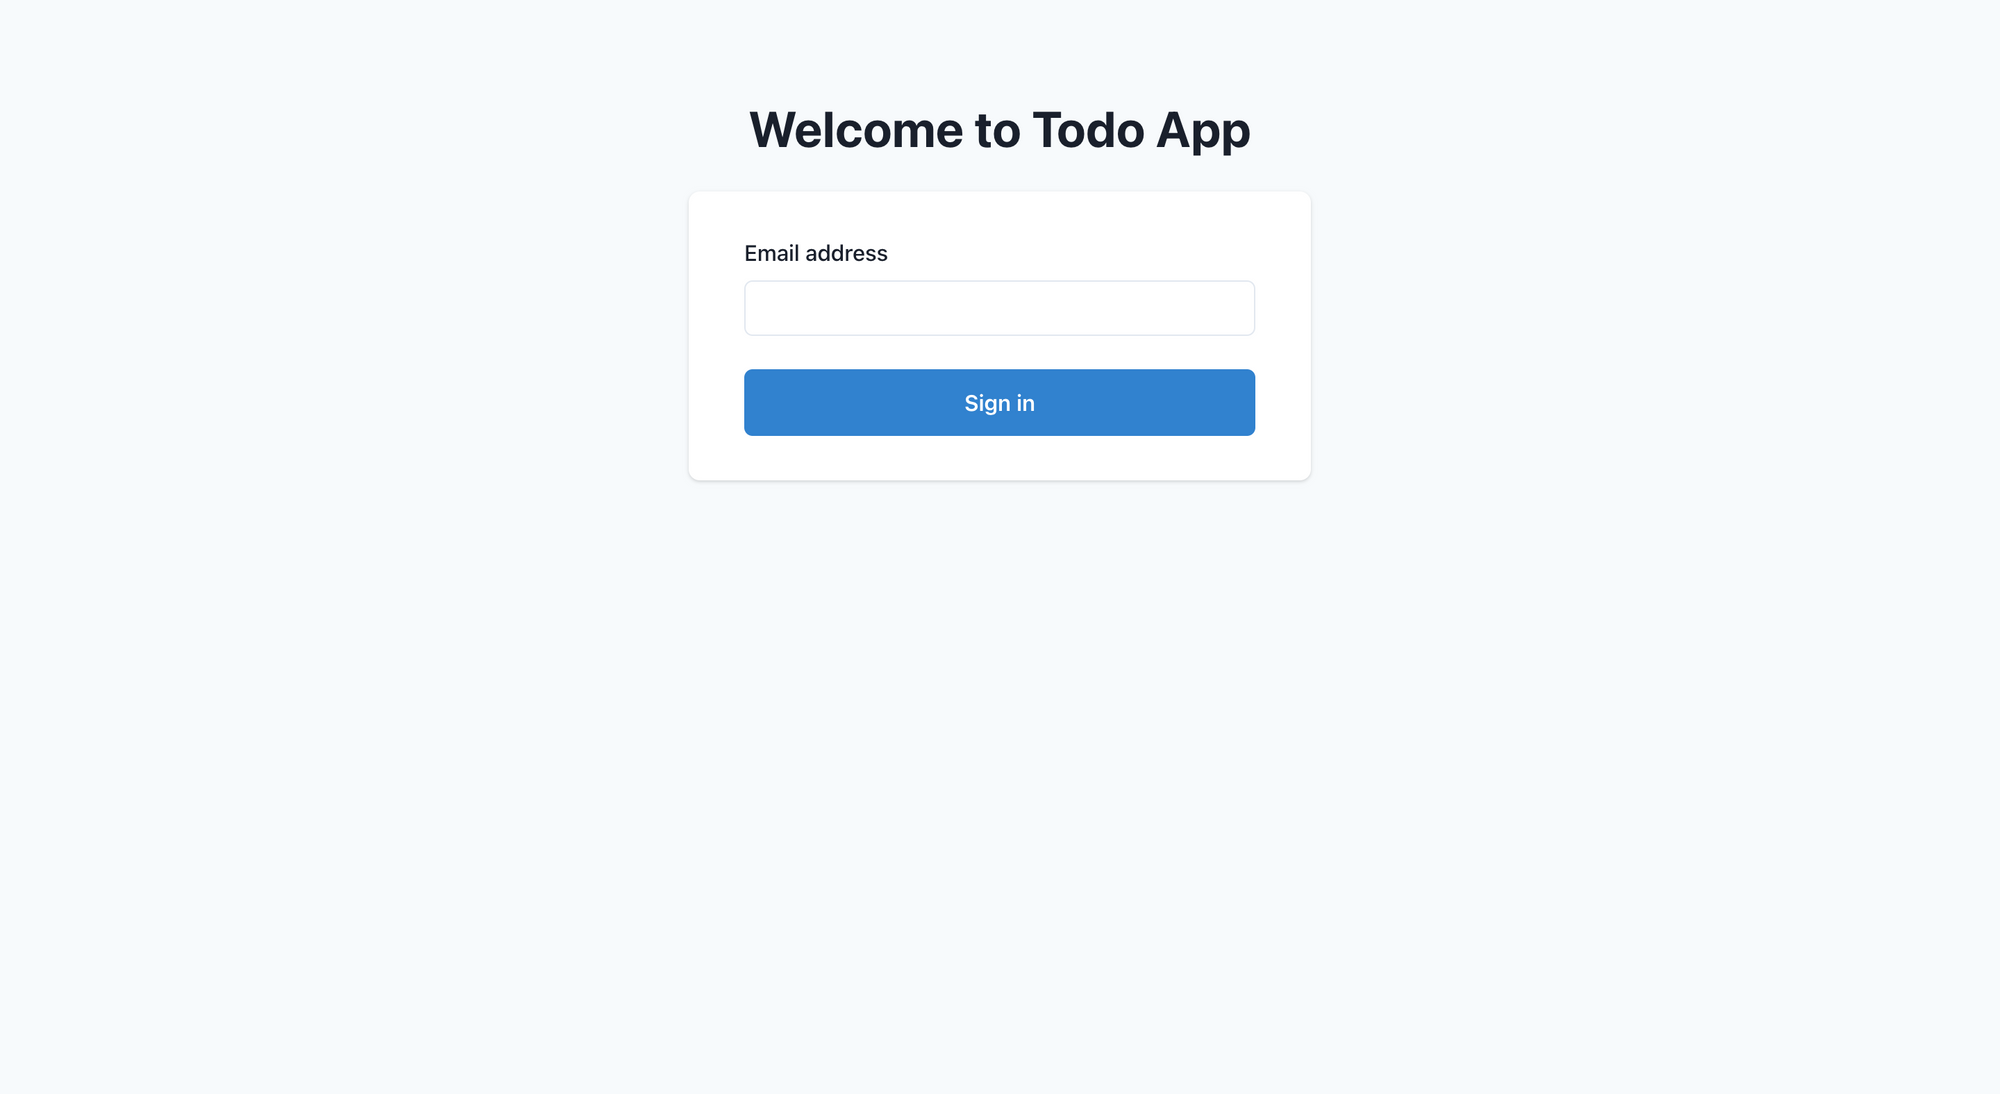
Todo SignIn Page
Add your email and click the submit button. Go to the email and click on verify, and you'll be redirected to the / page.
How to Show All Todos, Add New Todos, and Update and Delete Todos
The code is available under this commit if you need to refer to it in the future for reference.
Before implementing Todo crud operations, let's implement the logout functionality. Go to index.js and replace the existing code with the following code:
import Head from "next/head";
import { useRouter } from "next/router";
import { useEffect } from "react";
import Navbar from "../components/Navbar";
import { supabaseClient } from "../lib/client";

const Home = () => {
  const router = useRouter();
  const user = supabaseClient.auth.user();

  useEffect(() => {
    if (!user) {
      router.push("/signin");
    }
  }, [user, router]);

  return (
    <div>
      <Head>
        <title>TodoApp</title>
        <meta
          name="description"
          content="Awesome todoapp to store your awesome todos"
        />
        <link rel="icon" href="/favicon.ico" />
      </Head>
      <main>
        <Navbar />
      </main>
    </div>
  );
};

export default Home;
Create a component directory under the root directory, and inside the component directory create a file named Navbar.js. Copy-paste the following content under that file:
import { Box, Button, ButtonGroup, Flex, Heading } from "@chakra-ui/react";
import NavLink from "next/link";
import { useRouter } from "next/router";
import { useState } from "react";
import { supabaseClient } from "../lib/client";

const Navbar = () => {
  const router = useRouter();
  const [isLogoutLoading, setIsLogoutLoading] = useState(false);

  const logoutHandler = async () => {
    try {
      setIsLogoutLoading(true);
      await supabaseClient.auth.signOut();
      router.push("/signin");
    } catch (error) {
      router.push("/signin");
    } finally {
      setIsLogoutLoading(false);
    }
  };

  return (
    <Box height="100%" p="5" bg="gray.100">
      <Box maxW="6xl" mx="auto">
        <Flex
          as="nav"
          aria-label="Site navigation"
          align="center"
          justify="space-between"
        >
          <Heading mr="4">TodoApp</Heading>
          <Box>
            <NavLink href="/profile">Profile</NavLink>
            <ButtonGroup spacing="4" ml="6">
              <Button colorScheme="blue">Add Todo</Button>
              <Button
                colorScheme="red"
                onClick={logoutHandler}
                isLoading={isLogoutLoading}
              >
                Logout
              </Button>
            </ButtonGroup>
          </Box>
        </Flex>
      </Box>
    </Box>
  );
};

export default Navbar;
We have created a navbar component with a Profile link, Add Todo button, and a Logout button.
The logoutHandler uses a Supabase method called signOut to clear the session and log us out of the application.
Go to http://localhost:3000 and click on the Logout button.
The cookie will be cleared from the browser, and the user will get redirected to the sign-in page.
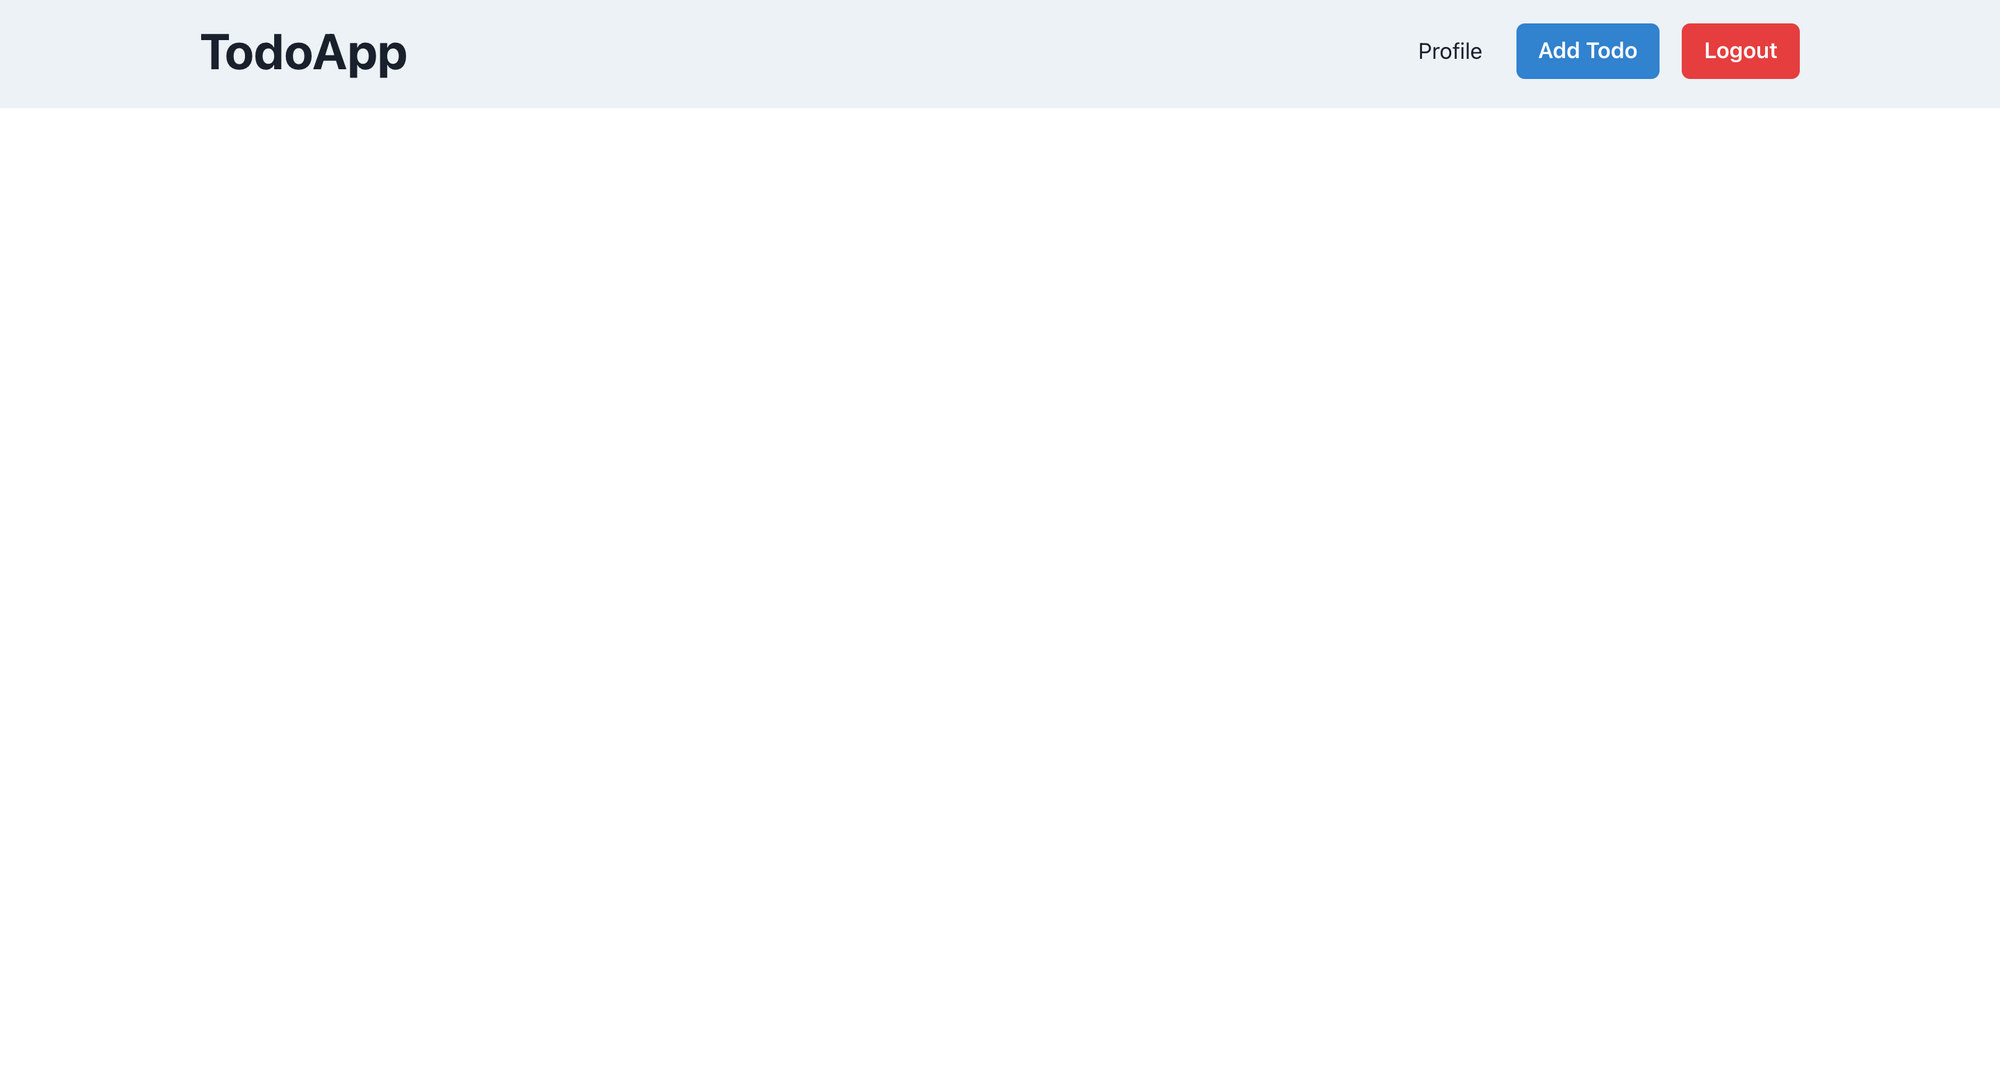
TodoApp Home Page
How to Add a Todo
Go to the Navbar.js and copy paste the following code:
import { Box, Button, ButtonGroup, Flex, Heading } from "@chakra-ui/react";
import NavLink from "next/link";
import { useRouter } from "next/router";
import { useState } from "react";
import { supabaseClient } from "../lib/client";

const Navbar = ({ onOpen }) => {
  const router = useRouter();
  const [isLogoutLoading, setIsLogoutLoading] = useState(false);

  const logoutHandler = async () => {
    try {
      setIsLogoutLoading(true);
      await supabaseClient.auth.signOut();
      router.push("/signin");
    } catch (error) {
      router.push("/signin");
    } finally {
      setIsLogoutLoading(false);
    }
  };

  return (
    <Box height="100%" p="5" bg="gray.100">
      <Box maxW="6xl" mx="auto">
        <Flex
          as="nav"
          aria-label="Site navigation"
          align="center"
          justify="space-between"
        >
          <Heading mr="4">TodoApp</Heading>
          <Box>
            <NavLink href="/profile">Profile</NavLink>
            <ButtonGroup spacing="4" ml="6">
              <Button colorScheme="blue" onClick={onOpen}>
                Add Todo
              </Button>
              <Button
                colorScheme="red"
                onClick={logoutHandler}
                isLoading={isLogoutLoading}
              >
                Logout
              </Button>
            </ButtonGroup>
          </Box>
        </Flex>
      </Box>
    </Box>
  );
};

export default Navbar;
Here we have just assigned an onClick handler to our Add Todo button which will open a modal to add a todo.
Now create a file named ManageTodo.js under the components directory and copy paste the following code:
import {
  Alert,
  AlertIcon,
  Button,
  ButtonGroup,
  FormControl,
  FormHelperText,
  FormLabel,
  Input,
  Modal,
  ModalBody,
  ModalCloseButton,
  ModalContent,
  ModalFooter,
  ModalHeader,
  ModalOverlay,
  Switch,
  Text,
  Textarea,
} from "@chakra-ui/react";
import { useState } from "react";
import { supabaseClient } from "../lib/client";

const ManageTodo = ({ isOpen, onClose, initialRef }) => {
  const [title, setTitle] = useState("");
  const [description, setDescription] = useState("");
  const [isComplete, setIsComplete] = useState(false);
  const [isLoading, setIsLoading] = useState("");
  const [errorMessage, setErrorMessage] = useState("");

  const submitHandler = async (event) => {
    event.preventDefault();
    setErrorMessage("");
    if (description.length <= 10) {
      setErrorMessage("Description must have more than 10 characters");
      return;
    }
    setIsLoading(true);
    const user = supabaseClient.auth.user();
    const { error } = await supabaseClient
      .from("todos")
      .insert([{ title, description, isComplete, user_id: user.id }]);
    setIsLoading(false);
    if (error) {
      setErrorMessage(error.message);
    } else {
      closeHandler();
    }
  };

  const closeHandler = () => {
    setTitle("");
    setDescription("");
    setIsComplete(false);
    onClose();
  };

  return (
    <Modal
      isOpen={isOpen}
      onClose={onClose}
      isCentered
      initialFocusRef={initialRef}
    >
      <ModalOverlay />
      <ModalContent>
        <form onSubmit={submitHandler}>
          <ModalHeader>Add Todo</ModalHeader>
          <ModalCloseButton />
          <ModalBody pb={6}>
            {errorMessage && (
              <Alert status="error" borderRadius="lg" mb="6">
                <AlertIcon />
                <Text textAlign="center">{errorMessage}</Text>
              </Alert>
            )}
            <FormControl isRequired={true}>
              <FormLabel>Title</FormLabel>
              <Input
                ref={initialRef}
                placeholder="Add your title here"
                onChange={(event) => setTitle(event.target.value)}
                value={title}
              />
            </FormControl>

            <FormControl mt={4} isRequired={true}>
              <FormLabel>Description</FormLabel>
              <Textarea
                placeholder="Add your description here"
                onChange={(event) => setDescription(event.target.value)}
                value={description}
              />
              <FormHelperText>
                Description must have more than 10 characters.
              </FormHelperText>
            </FormControl>

            <FormControl mt={4}>
              <FormLabel>Is Completed?</FormLabel>
              <Switch
                value={isComplete}
                id="is-completed"
                onChange={(event) => setIsComplete(!isComplete)}
              />
            </FormControl>
          </ModalBody>

          <ModalFooter>
            <ButtonGroup spacing="3">
              <Button
                onClick={closeHandler}
                colorScheme="red"
                type="reset"
                isDisabled={isLoading}
              >
                Cancel
              </Button>
              <Button colorScheme="blue" type="submit" isLoading={isLoading}>
                Save
              </Button>
            </ButtonGroup>
          </ModalFooter>
        </form>
      </ModalContent>
    </Modal>
  );
};

export default ManageTodo;
This part will be responsible for adding and updating the todos. Here we have created a modal with a form and 3 form control elements.
Once the form is submited we call a supabase server with following code:
const { error } = await supabaseClient
      .from("todos")
      .insert([{ title, description, isComplete, user_id: user.id }]);
This just inserts a new todo inside our supabase table.
Now let's go to pages > index.js file and copy paste the following code:
import { useDisclosure } from "@chakra-ui/hooks";
import Head from "next/head";
import { useRouter } from "next/router";
import { useEffect, useRef } from "react";
import ManageTodo from "../components/ManageTodo";
import Navbar from "../components/Navbar";
import { supabaseClient } from "../lib/client";

const Home = () => {
  const initialRef = useRef();
  const { isOpen, onOpen, onClose } = useDisclosure();

  const router = useRouter();
  const user = supabaseClient.auth.user();

  useEffect(() => {
    if (!user) {
      router.push("/signin");
    }
  }, [user, router]);

  return (
    <div>
      <Head>
        <title>TodoApp</title>
        <meta
          name="description"
          content="Awesome todoapp to store your awesome todos"
        />
        <link rel="icon" href="/favicon.ico" />
      </Head>
      <main>
        <Navbar onOpen={onOpen} />
        <ManageTodo isOpen={isOpen} onClose={onClose} initialRef={initialRef} />
      </main>
    </div>
  );
};

export default Home;
Here we are using useDisclosure hook from Chakra to maintain the modal state. Besides that you'll see we have passed onOpen to the Navbar and added the ManageTodo component.
Now go to http://localhost:3000 and click on Add Todo Button. You'll see the following screen:
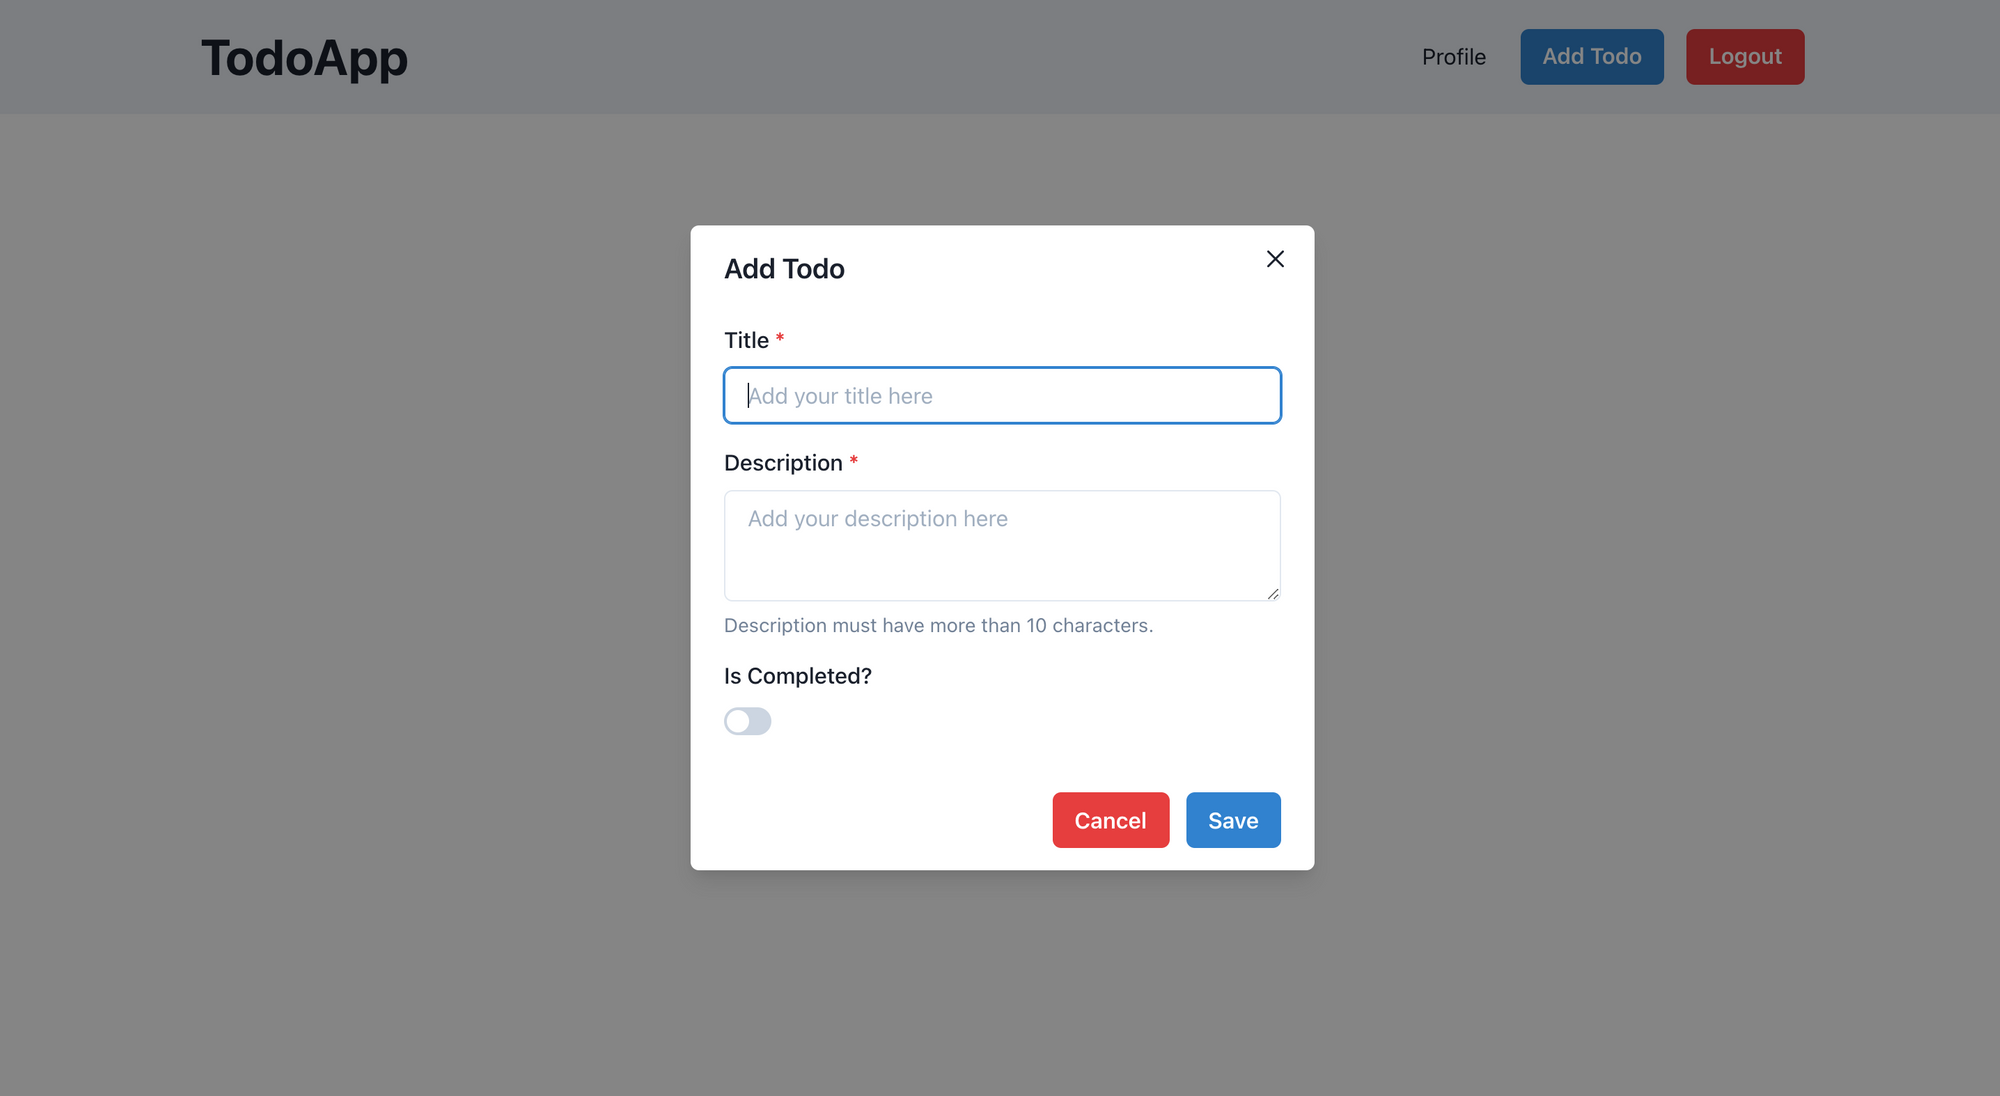
Add Todo Modal
Fill out the form, click save, and then go to the Supabase todos table. You'll find that a new todo has been added to our table.
Note: Supabase sometimes requires manual refresh when a new record is added.
How to Get All Todos
So our todos are getting added successfully. Now let's work on getting all todos from a Supabase table.
Under the components directory, create a file named SingleTodo.js and copy paste the following code:
import { Box, Divider, Heading, Text, Tag } from "@chakra-ui/react";

const SingleTodo = ({ todo }) => {
  const getDateInMonthDayYear = (date) => {
    const d = new Date(date);
    const options = {
      year: "numeric",
      month: "long",
      day: "numeric",
      hour: "numeric",
      minute: "numeric",
    };
    const n = d.toLocaleDateString("en-US", options);
    const replase = n.replace(new RegExp(",", "g"), " ");
    return replase;
  };

  return (
    <Box
      position="relative"
      maxW="sm"
      borderWidth="1px"
      borderRadius="lg"
      overflow="hidden"
      p="4"
    >
      <Heading size="md" mt="3">{todo.title}</Heading>
      <Tag
        position="absolute"
        top="3"
        right="2"
        bg={todo.isComplete ? "green.500" : "yellow.400"}
        borderRadius="3xl"
        size="sm"
      />
      <Text color="gray.400" mt="1" fontSize="sm">
        {getDateInMonthDayYear(todo.insertedat)}
      </Text>
      <Divider my="4" />
      <Text noOfLines={[1, 2, 3]} color="gray.800">
        {todo.description}
      </Text>
    </Box>
  );
};

export default SingleTodo;
This is just UI code with a utitlity function converting the date to human readable format.
Go to the index.js and replace the old code with following code:
import { useDisclosure } from "@chakra-ui/hooks";
import { Box, SimpleGrid, Text, HStack, Tag } from "@chakra-ui/react";
import Head from "next/head";
import { useRouter } from "next/router";
import { useEffect, useRef, useState } from "react";
import ManageTodo from "../components/ManageTodo";
import Navbar from "../components/Navbar";
import SingleTodo from "../components/SingleTodo";
import { supabaseClient } from "../lib/client";

const Home = () => {
  const initialRef = useRef();
  const [todos, setTodos] = useState([]);

  const router = useRouter();
  const { isOpen, onOpen, onClose } = useDisclosure();
  const user = supabaseClient.auth.user();

  useEffect(() => {
    if (!user) {
      router.push("/signin");
    }
  }, [user, router]);

  useEffect(() => {
    if (user) {
      supabaseClient
        .from("todos")
        .select("*")
        .eq("user_id", user?.id)
        .order("id", { ascending: false })
        .then(({ data, error }) => {
          if (!error) {
            setTodos(data);
          }
        });
    }
  }, [user]);

  useEffect(() => {
    const todoListener = supabaseClient
      .from("todos")
      .on("*", (payload) => {
        const newTodo = payload.new;
        setTodos((oldTodos) => {
          const newTodos = [...oldTodos, newTodo];
          newTodos.sort((a, b) => b.id - a.id);
          return newTodos;
        });
      })
      .subscribe();

    return () => {
      todoListener.unsubscribe();
    };
  }, []);

  return (
    <div>
      <Head>
        <title>TodoApp</title>
        <meta
          name="description"
          content="Awesome todoapp to store your awesome todos"
        />
        <link rel="icon" href="/favicon.ico" />
      </Head>
      <main>
        <Navbar onOpen={onOpen} />
        <ManageTodo isOpen={isOpen} onClose={onClose} initialRef={initialRef} />
        <HStack m="10" spacing="4" justify="center">
          <Box>
            <Tag bg="green.500" borderRadius="3xl" size="sm" mt="1" /> Complete
          </Box>
          <Box>
            <Tag bg="yellow.400" borderRadius="3xl" size="sm" mt="1" />{" "}
            Incomplete
          </Box>
        </HStack>
        <SimpleGrid
          columns={{ base: 2, md: 3, lg: 4 }}
          gap={{ base: "4", md: "6", lg: "8" }}
          m="10"
        >
          {todos.map((todo) => (
            <SingleTodo todo={todo} key={todo.id} />
          ))}
        </SimpleGrid>
      </main>
    </div>
  );
};

export default Home;
Let's understand the code. Here we have added two useEffects:
  useEffect(() => {
    if (user) {
      supabaseClient
        .from("todos")
        .select("*")
        .eq("user_id", user?.id)
        .order("id", { ascending: false })
        .then(({ data, error }) => {
          if (!error) {
            setTodos(data);
          }
        });
    }
  }, [user]);
This useEffect is usefull when the page is rendered for the first time. We query data from the Supabase table for that particular user in descending fashion.
  useEffect(() => {
    const todoListener = supabaseClient
      .from("todos")
      .on("*", (payload) => {
        const newTodo = payload.new;
        setTodos((oldTodos) => {
          const newTodos = [...oldTodos, newTodo];
          newTodos.sort((a, b) => b.id - a.id);
          return newTodos;
        });
      })
      .subscribe();

    return () => {
      todoListener.unsubscribe();
    };
  }, []);
This useEffect is a real time subscription with the Supabase real time server. Whenever a new todo is added we get the payload event which we use to add the todo in our local state.
Note: the Supabase docs suggest not using real time subscription on a server-side application.
Now go to http://localhost:3000 and add a todo. You'll see the following view:
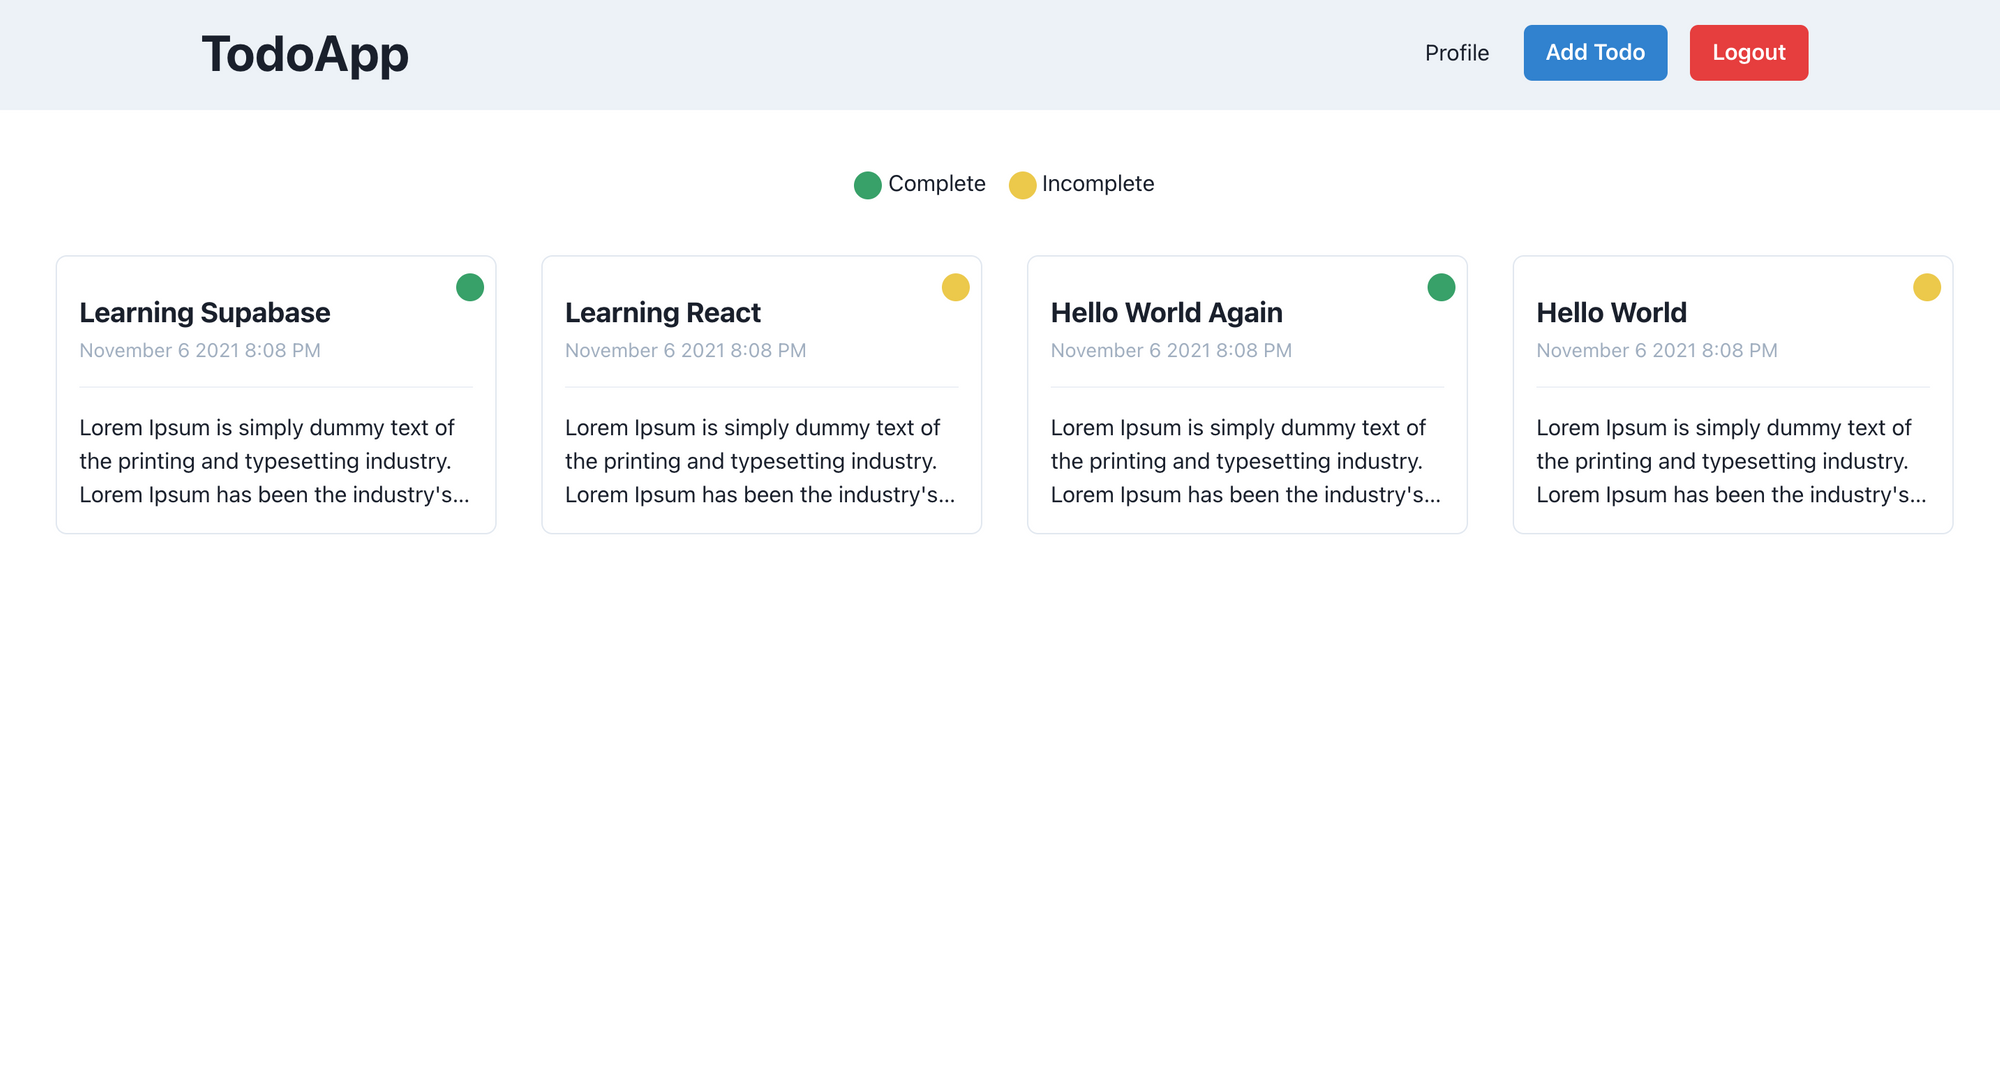
All Todos
How to Update a Todo
Updating the todo mechanism might be complex for beginners. So I'll explain the process as simply as I can:
We create a
todostate in our parent component ofindex.js. This todo state is updated when user clicks on SingleTodo.We pass an
openHandlerfunction for doing that. This function updates the todo state with the clicked todo detail and opens the modal.In
ManageTodo.jswe have written auseEffectwith a dependency oftodowhich updates the values oftitle,description, andisCompletewhenever thetodochanges.At last we update the todo in our table using the Supbase update method on the basis of
todo id.
Time to implement the code. Under the components directory, go to SingleTodo.js and replace the code with the following:
import { Box, Divider, Heading, Tag, Text } from "@chakra-ui/react";

const SingleTodo = ({ todo, openHandler }) => {
  const getDateInMonthDayYear = (date) => {
    const d = new Date(date);
    const options = {
      year: "numeric",
      month: "long",
      day: "numeric",
      hour: "numeric",
      minute: "numeric",
    };
    const n = d.toLocaleDateString("en-US", options);
    const replase = n.replace(new RegExp(",", "g"), " ");
    return replase;
  };

  return (
    <Box
      position="relative"
      maxW="sm"
      borderWidth="1px"
      borderRadius="lg"
      overflow="hidden"
      p="4"
      onClick={() => openHandler(todo)}
    >
      <Heading size="md" mt="3">
        {todo.title}
      </Heading>
      <Tag
        position="absolute"
        top="3"
        right="2"
        bg={todo.isComplete ? "green.500" : "yellow.400"}
        borderRadius="3xl"
        size="sm"
      />
      <Text color="gray.400" mt="1" fontSize="sm">
        {getDateInMonthDayYear(todo.insertedat)}
      </Text>
      <Divider my="4" />
      <Text noOfLines={[1, 2, 3]} color="gray.800">
        {todo.description}
      </Text>
    </Box>
  );
};

export default SingleTodo;
Under the components directory go to ManageTodo.js and replace the code with the following code:
import {
  Alert,
  AlertIcon,
  Button,
  ButtonGroup,
  FormControl,
  FormHelperText,
  FormLabel,
  Input,
  Modal,
  ModalBody,
  ModalCloseButton,
  ModalContent,
  ModalFooter,
  ModalHeader,
  ModalOverlay,
  Switch,
  Text,
  Textarea,
} from "@chakra-ui/react";
import { useEffect, useState } from "react";
import { supabaseClient } from "../lib/client";

const ManageTodo = ({ isOpen, onClose, initialRef, todo, setTodo }) => {
  const [title, setTitle] = useState("");
  const [description, setDescription] = useState("");
  const [isComplete, setIsComplete] = useState(false);
  const [isLoading, setIsLoading] = useState("");
  const [errorMessage, setErrorMessage] = useState("");

  useEffect(() => {
    if (todo) {
      setTitle(todo.title);
      setDescription(todo.description);
      setIsComplete(todo.isComplete);
    }
  }, [todo]);

  const submitHandler = async (event) => {
    event.preventDefault();
    setErrorMessage("");
    if (description.length <= 10) {
      setErrorMessage("Description must have more than 10 characters");
      return;
    }
    setIsLoading(true);
    const user = supabaseClient.auth.user();
    let supabaseError;
    if (todo) {
      const { error } = await supabaseClient
        .from("todos")
        .update({ title, description, isComplete, user_id: user.id })
        .eq("id", todo.id);
      supabaseError = error;
    } else {
      const { error } = await supabaseClient
        .from("todos")
        .insert([{ title, description, isComplete, user_id: user.id }]);
      supabaseError = error;
    }

    setIsLoading(false);
    if (supabaseError) {
      setErrorMessage(supabaseError.message);
    } else {
      closeHandler();
    }
  };

  const closeHandler = () => {
    setTitle("");
    setDescription("");
    setIsComplete(false);
    setTodo(null);
    onClose();
  };

  return (
    <Modal
      isOpen={isOpen}
      onClose={onClose}
      isCentered
      initialFocusRef={initialRef}
    >
      <ModalOverlay />
      <ModalContent>
        <form onSubmit={submitHandler}>
          <ModalHeader>{todo ? "Update Todo" : "Add Todo"}</ModalHeader>
          <ModalCloseButton onClick={closeHandler} />
          <ModalBody pb={6}>
            {errorMessage && (
              <Alert status="error" borderRadius="lg" mb="6">
                <AlertIcon />
                <Text textAlign="center">{errorMessage}</Text>
              </Alert>
            )}
            <FormControl isRequired={true}>
              <FormLabel>Title</FormLabel>
              <Input
                ref={initialRef}
                placeholder="Add your title here"
                onChange={(event) => setTitle(event.target.value)}
                value={title}
              />
            </FormControl>

            <FormControl mt={4} isRequired={true}>
              <FormLabel>Description</FormLabel>
              <Textarea
                placeholder="Add your description here"
                onChange={(event) => setDescription(event.target.value)}
                value={description}
              />
              <FormHelperText>
                Description must have more than 10 characters.
              </FormHelperText>
            </FormControl>

            <FormControl mt={4}>
              <FormLabel>Is Completed?</FormLabel>
              <Switch
                isChecked={isComplete}
                id="is-completed"
                onChange={(event) => setIsComplete(!isComplete)}
              />
            </FormControl>
          </ModalBody>

          <ModalFooter>
            <ButtonGroup spacing="3">
              <Button
                onClick={closeHandler}
                colorScheme="red"
                type="reset"
                isDisabled={isLoading}
              >
                Cancel
              </Button>
              <Button colorScheme="blue" type="submit" isLoading={isLoading}>
                {todo ? "Update" : "Save"}
              </Button>
            </ButtonGroup>
          </ModalFooter>
        </form>
      </ModalContent>
    </Modal>
  );
};

export default ManageTodo;
Let's understand the code above. Here we are checking if the user has clicked on the update button ( By checking if todo exists ) and then showing the data in the initial object.
Based upon the condition, showing update text instead of Save text on the button. Also, based upon condition, we execute supabase update if todo exists and if not then insert.
Go to pages > index.js and replace the existing code with the following code:
import { useDisclosure } from "@chakra-ui/hooks";
import { Box, HStack, SimpleGrid, Tag } from "@chakra-ui/react";
import Head from "next/head";
import { useRouter } from "next/router";
import { useEffect, useRef, useState } from "react";
import ManageTodo from "../components/ManageTodo";
import Navbar from "../components/Navbar";
import SingleTodo from "../components/SingleTodo";
import { supabaseClient } from "../lib/client";

const Home = () => {
  const initialRef = useRef();
  const [todos, setTodos] = useState([]);
  const [todo, setTodo] = useState(null);

  const router = useRouter();
  const { isOpen, onOpen, onClose } = useDisclosure();
  const user = supabaseClient.auth.user();

  useEffect(() => {
    if (!user) {
      router.push("/signin");
    }
  }, [user, router]);

  useEffect(() => {
    if (user) {
      supabaseClient
        .from("todos")
        .select("*")
        .eq("user_id", user?.id)
        .order("id", { ascending: false })
        .then(({ data, error }) => {
          if (!error) {
            setTodos(data);
          }
        });
    }
  }, [user]);

  useEffect(() => {
    const todoListener = supabaseClient
      .from("todos")
      .on("*", (payload) => {
        const newTodo = payload.new;
        setTodos((oldTodos) => {
          const exists = oldTodos.find((todo) => todo.id === newTodo.id);
          let newTodos;
          if (exists) {
            const oldTodoIndex = oldTodos.findIndex(
              (obj) => obj.id === newTodo.id
            );
            oldTodos[oldTodoIndex] = newTodo;
            newTodos = oldTodos;
          } else {
            newTodos = [...oldTodos, newTodo];
          }
          newTodos.sort((a, b) => b.id - a.id);
          return newTodos;
        });
      })
      .subscribe();

    return () => {
      todoListener.unsubscribe();
    };
  }, []);

  const openHandler = (clickedTodo) => {
    setTodo(clickedTodo);
    onOpen();
  };

  return (
    <div>
      <Head>
        <title>TodoApp</title>
        <meta
          name="description"
          content="Awesome todoapp to store your awesome todos"
        />
        <link rel="icon" href="/favicon.ico" />
      </Head>
      <main>
        <Navbar onOpen={onOpen} />
        <ManageTodo
          isOpen={isOpen}
          onClose={onClose}
          initialRef={initialRef}
          todo={todo}
          setTodo={setTodo}
        />
        <HStack m="10" spacing="4" justify="center">
          <Box>
            <Tag bg="green.500" borderRadius="3xl" size="sm" mt="1" /> Complete
          </Box>
          <Box>
            <Tag bg="yellow.400" borderRadius="3xl" size="sm" mt="1" />{" "}
            Incomplete
          </Box>
        </HStack>
        <SimpleGrid
          columns={{ base: 2, md: 3, lg: 4 }}
          gap={{ base: "4", md: "6", lg: "8" }}
          m="10"
        >
          {todos.map((todo) => (
            <SingleTodo todo={todo} key={todo.id} openHandler={openHandler} />
          ))}
        </SimpleGrid>
      </main>
    </div>
  );
};

export default Home;
Here we add the ManageTodo component that we created and pass props that are used by this component.
Now go to http://localhost:3000 and click on any todo to update it and you'll see the following view:
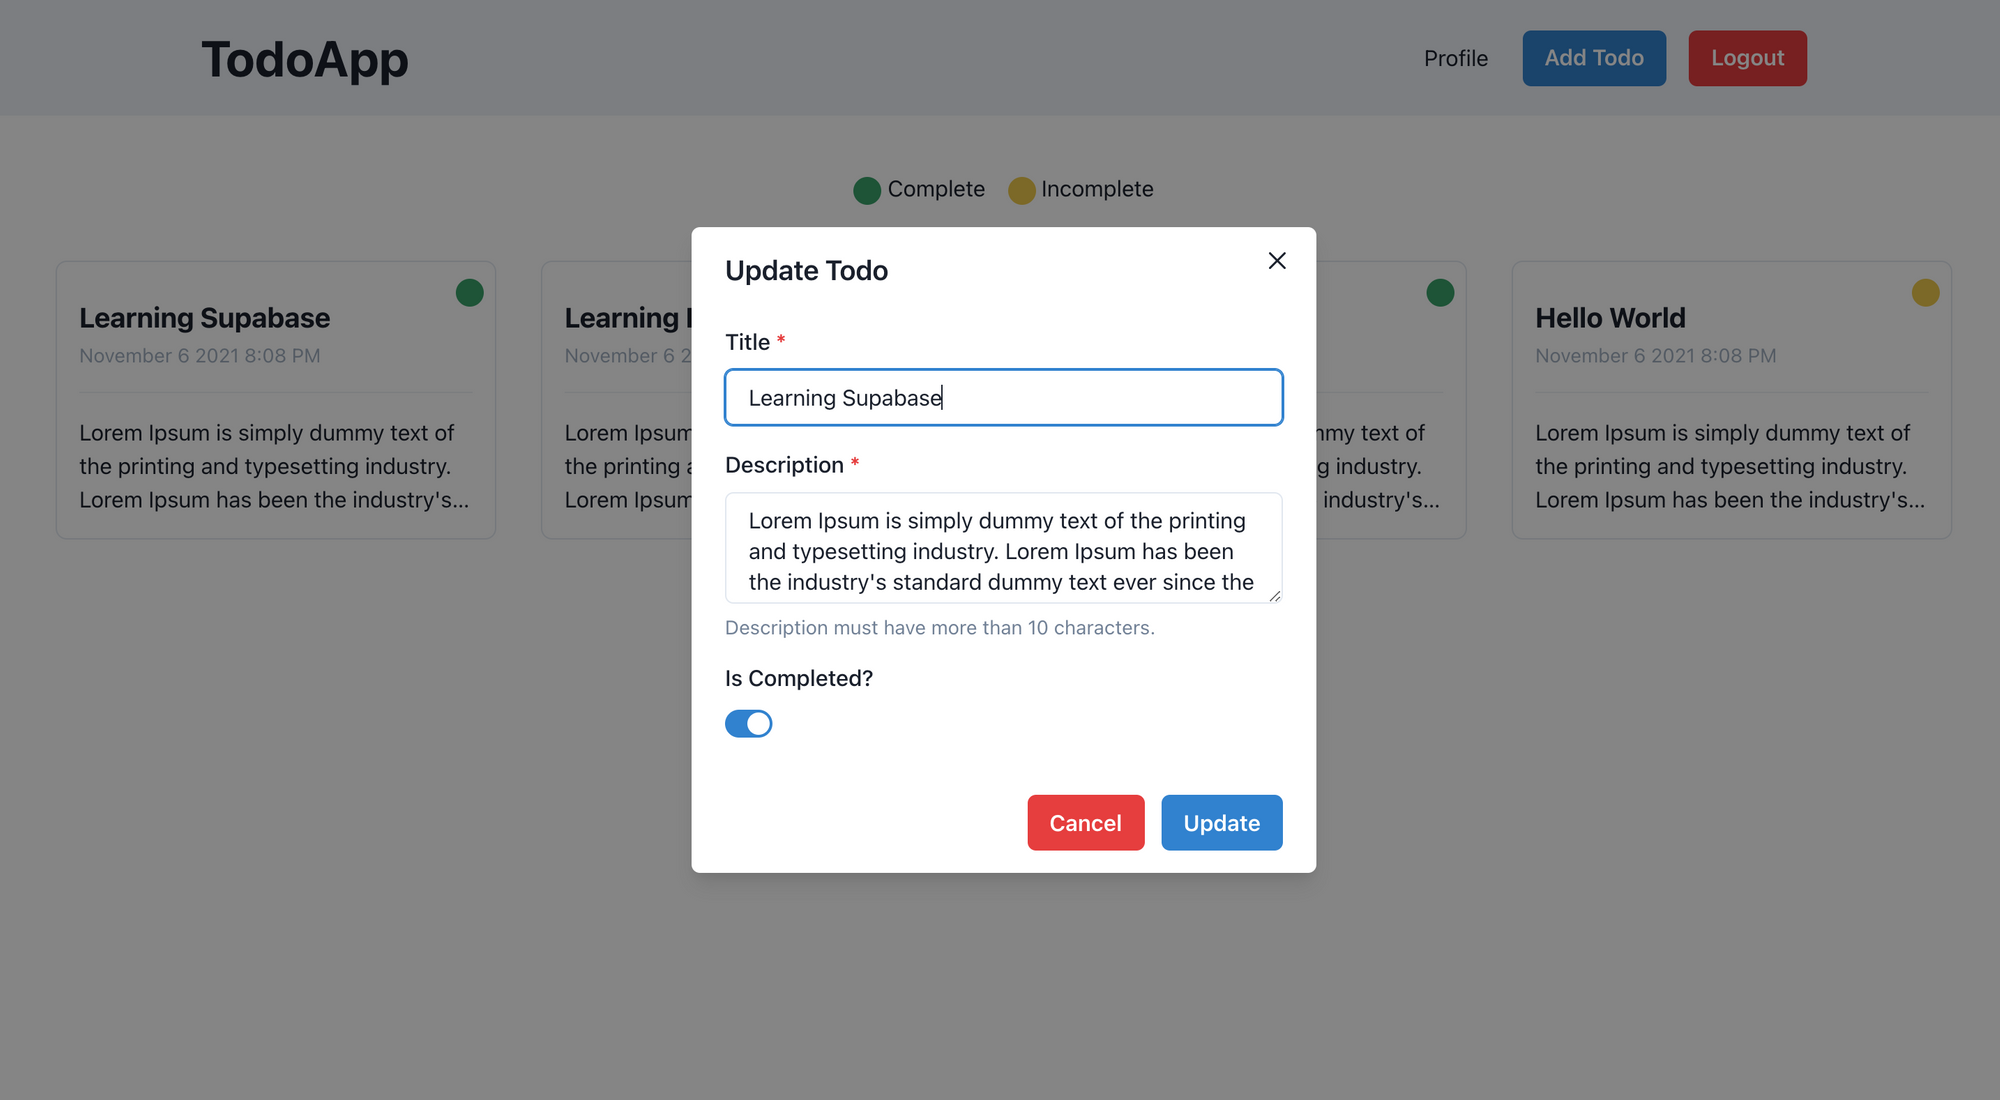
Update Todo
How to Delete a Todo
This functionality will need us to update our some of existing code. First we will do that and then understand how it works and why changes are required.
Go to the SingleTodo.js inside the components directory and replace the existing code with the following code:
import {
  Box,
  Divider,
  Heading,
  Tag,
  Text,
  Button,
  Center,
} from "@chakra-ui/react";

const SingleTodo = ({ todo, openHandler, deleteHandler, isDeleteLoading }) => {
  const getDateInMonthDayYear = (date) => {
    const d = new Date(date);
    const options = {
      year: "numeric",
      month: "long",
      day: "numeric",
      hour: "numeric",
      minute: "numeric",
    };
    const n = d.toLocaleDateString("en-US", options);
    const replase = n.replace(new RegExp(",", "g"), " ");
    return replase;
  };

  return (
    <Box
      position="relative"
      maxW="sm"
      borderWidth="1px"
      borderRadius="lg"
      overflow="hidden"
      p="4"
      onClick={() => openHandler(todo)}
    >
      <Heading size="md" mt="3">
        {todo.title}
      </Heading>
      <Tag
        position="absolute"
        top="3"
        right="2"
        bg={todo.isComplete ? "green.500" : "yellow.400"}
        borderRadius="3xl"
        size="sm"
      />
      <Text color="gray.400" mt="1" fontSize="sm">
        {getDateInMonthDayYear(todo.insertedat)}
      </Text>
      <Divider my="4" />
      <Text noOfLines={[1, 2, 3]} color="gray.800">
        {todo.description}
      </Text>
      <Center>
        <Button
          mt="4"
          size="sm"
          colorScheme="red"
          onClick={(event) => {
            event.stopPropagation();
            deleteHandler(todo.id);
          }}
          isDisabled={isDeleteLoading}
        >
          Delete
        </Button>
      </Center>
    </Box>
  );
};

export default SingleTodo;
Here we have added a delete button with an onClick event. Now this delete event is under another event which opens the modal. So whenever we click on delete it will open the modal too.
We don't want this behavour, so we use a method from event called stopPropagation. This method doesn't allow events from children to be passed to the parent.
Now go to the index.js inside the pages directory and replace the existing code with the following code:
import { useDisclosure } from "@chakra-ui/hooks";
import { Box, HStack, SimpleGrid, Tag } from "@chakra-ui/react";
import Head from "next/head";
import { useRouter } from "next/router";
import { useEffect, useRef, useState } from "react";
import ManageTodo from "../components/ManageTodo";
import Navbar from "../components/Navbar";
import SingleTodo from "../components/SingleTodo";
import { supabaseClient } from "../lib/client";

const Home = () => {
  const initialRef = useRef();
  const [todos, setTodos] = useState([]);
  const [todo, setTodo] = useState(null);
  const [isDeleteLoading, setIsDeleteLoading] = useState(false);

  const router = useRouter();
  const { isOpen, onOpen, onClose } = useDisclosure();
  const user = supabaseClient.auth.user();

  useEffect(() => {
    if (!user) {
      router.push("/signin");
    }
  }, [user, router]);

  useEffect(() => {
    if (user) {
      supabaseClient
        .from("todos")
        .select("*")
        .eq("user_id", user?.id)
        .order("id", { ascending: false })
        .then(({ data, error }) => {
          if (!error) {
            setTodos(data);
          }
        });
    }
  }, [user]);

  useEffect(() => {
    const todoListener = supabaseClient
      .from("todos")
      .on("*", (payload) => {
        if (payload.eventType !== "DELETE") {
          const newTodo = payload.new;
          setTodos((oldTodos) => {
            const exists = oldTodos.find((todo) => todo.id === newTodo.id);
            let newTodos;
            if (exists) {
              const oldTodoIndex = oldTodos.findIndex(
                (obj) => obj.id === newTodo.id
              );
              oldTodos[oldTodoIndex] = newTodo;
              newTodos = oldTodos;
            } else {
              newTodos = [...oldTodos, newTodo];
            }
            newTodos.sort((a, b) => b.id - a.id);
            return newTodos;
          });
        }
      })
      .subscribe();

    return () => {
      todoListener.unsubscribe();
    };
  }, []);

  const openHandler = (clickedTodo) => {
    setTodo(clickedTodo);
    onOpen();
  };

  const deleteHandler = async (todoId) => {
    setIsDeleteLoading(true);
    const { error } = await supabaseClient
      .from("todos")
      .delete()
      .eq("id", todoId);
    if (!error) {
      setTodos(todos.filter((todo) => todo.id !== todoId));
    }
    setIsDeleteLoading(false);
  };

  return (
    <div>
      <Head>
        <title>TodoApp</title>
        <meta
          name="description"
          content="Awesome todoapp to store your awesome todos"
        />
        <link rel="icon" href="/favicon.ico" />
      </Head>
      <main>
        <Navbar onOpen={onOpen} />
        <ManageTodo
          isOpen={isOpen}
          onClose={onClose}
          initialRef={initialRef}
          todo={todo}
          setTodo={setTodo}
        />
        <HStack m="10" spacing="4" justify="center">
          <Box>
            <Tag bg="green.500" borderRadius="3xl" size="sm" mt="1" /> Complete
          </Box>
          <Box>
            <Tag bg="yellow.400" borderRadius="3xl" size="sm" mt="1" />{" "}
            Incomplete
          </Box>
        </HStack>
        <SimpleGrid
          columns={{ base: 2, md: 3, lg: 4 }}
          gap={{ base: "4", md: "6", lg: "8" }}
          m="10"
        >
          {todos.map((todo, index) => (
            <SingleTodo
              todo={todo}
              key={index}
              openHandler={openHandler}
              deleteHandler={deleteHandler}
              isDeleteLoading={isDeleteLoading}
            />
          ))}
        </SimpleGrid>
      </main>
    </div>
  );
};

export default Home;
Let's understand the deleteHandler method first. In this method we use the Supabase client to delete a record from the todos table. Once it's successfully deleted, we use the filter method to remove the todo from our local state.
For the useEffect which has the todoListener we add an if condition based on an event type. We don't want to do anything on the DELETE event as we are updating the local state in deleteHandler.
Go to http://localhost:3000 and you'll see the following view:
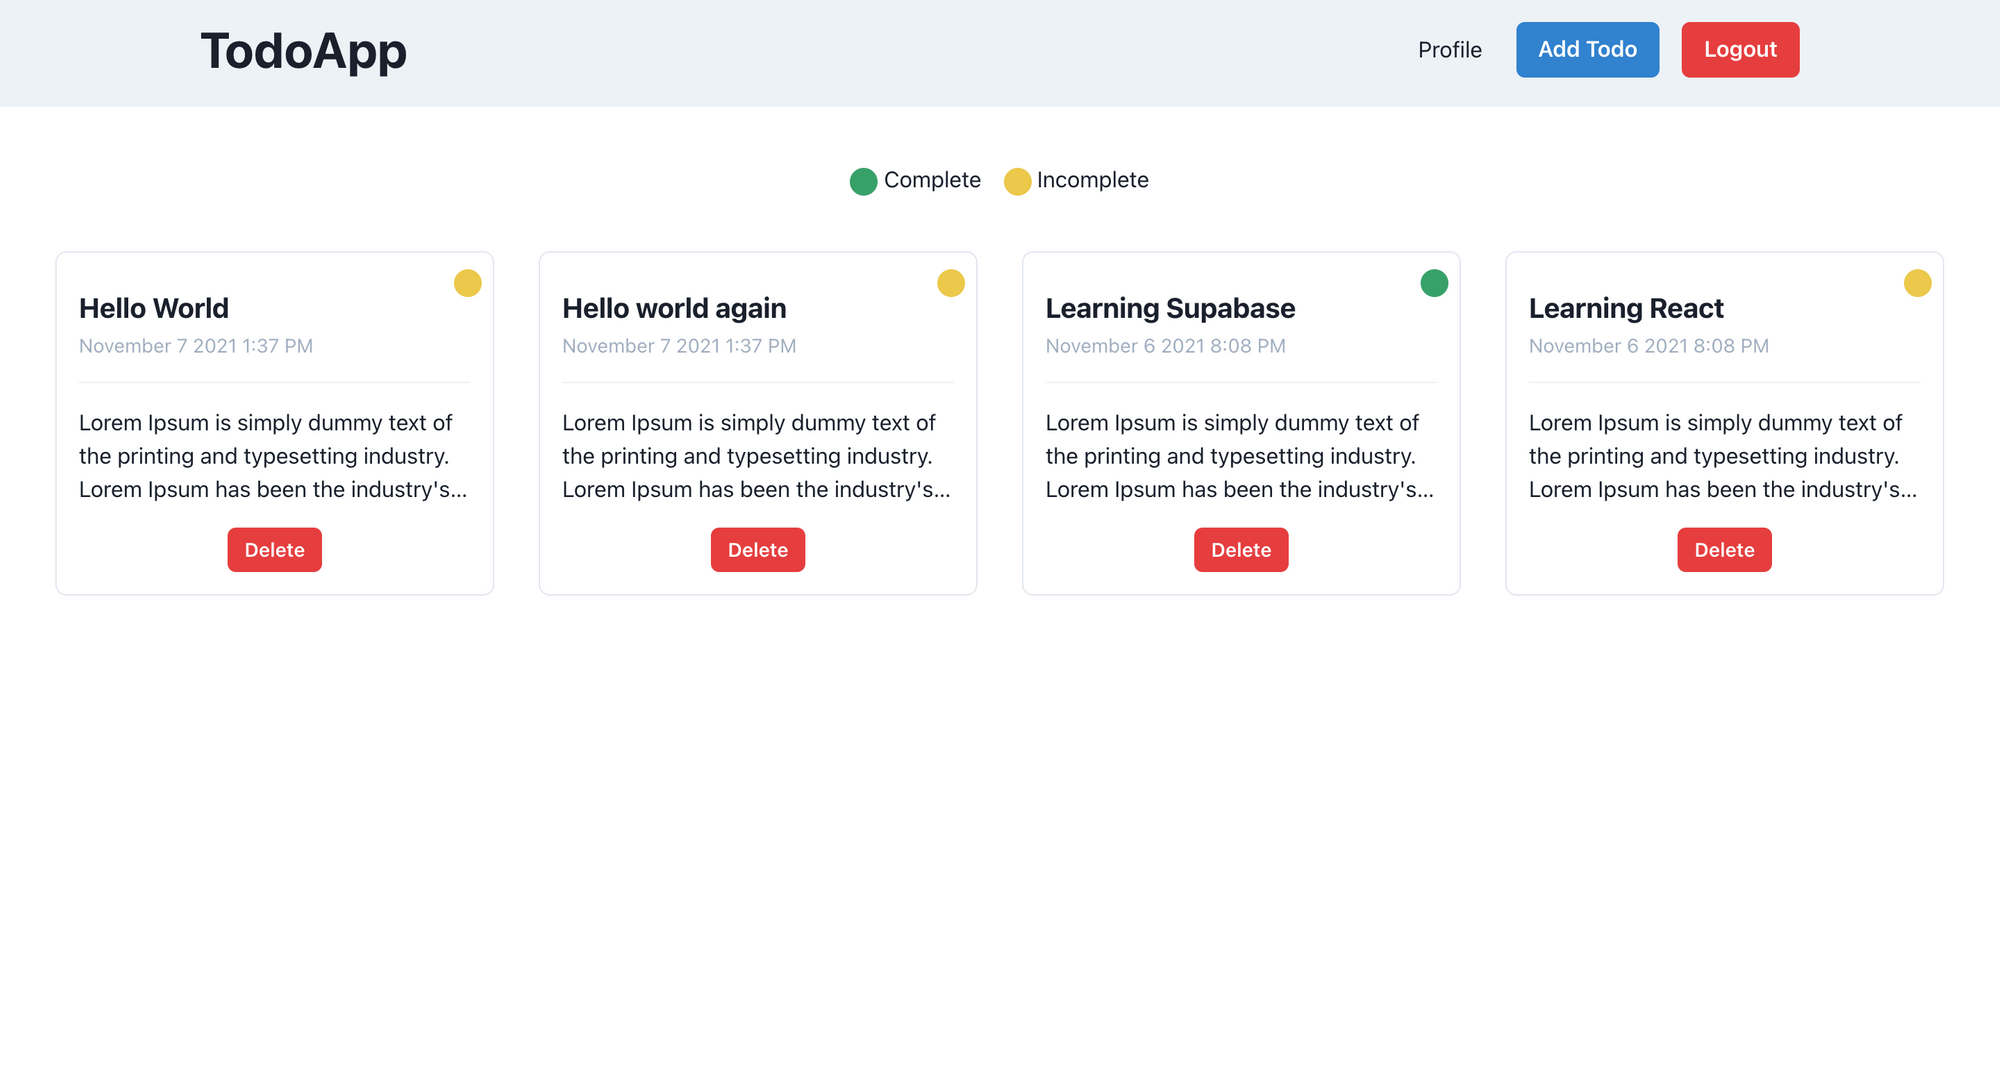
Click the Delete button and you'll see that the todo is gone from our todos view.
With this we have completed our TODO CRUD operation flow.
How to Update Profile Details and Avatars
The Profile Update Operation code is available under this commit if you need to refer to it in the future for reference.
Before working on the profile section we have to make our TodoApp Heading as a route so we can go back to the home page from the profile page.
In Navbar.js under the components directory replace the existing code with the following code:
import { Box, Button, ButtonGroup, Flex, Heading } from "@chakra-ui/react";
import NavLink from "next/link";
import { useRouter } from "next/router";
import { useState } from "react";
import { supabaseClient } from "../lib/client";

const Navbar = ({ onOpen }) => {
  const router = useRouter();
  const [isLogoutLoading, setIsLogoutLoading] = useState(false);

  const logoutHandler = async () => {
    try {
      setIsLogoutLoading(true);
      await supabaseClient.auth.signOut();
      router.push("/signin");
    } catch (error) {
      router.push("/signin");
    } finally {
      setIsLogoutLoading(false);
    }
  };

  return (
    <Box height="100%" p="5" bg="gray.100">
      <Box maxW="6xl" mx="auto">
        <Flex
          as="nav"
          aria-label="Site navigation"
          align="center"
          justify="space-between"
        >
          <NavLink href="/">
            <Heading mr="4" as="button">
              TodoApp
            </Heading>
          </NavLink>
          <Box>
            <NavLink href="/profile">Profile</NavLink>
            <ButtonGroup spacing="4" ml="6">
              {router.pathname === "/" && (
                <Button colorScheme="blue" onClick={onOpen}>
                  Add Todo
                </Button>
              )}
              <Button
                colorScheme="red"
                onClick={logoutHandler}
                isLoading={isLogoutLoading}
              >
                Logout
              </Button>
            </ButtonGroup>
          </Box>
        </Flex>
      </Box>
    </Box>
  );
};

export default Navbar;
Let's start working on building the last part of our app which is the profile section. This section will have a form which can update the username, website, bio and an avatar.
To store our pictures we will be using Supabase storage. By default these storage buckets are private and can be accessed using a token. But for the sake of this article we will make the bucket public. But if you are storing any sensitive information make sure to keep that bucket private.
Go to https://app.supabase.io/ and go to the storage tab. There you'll see the avatars listed under All Buckets.
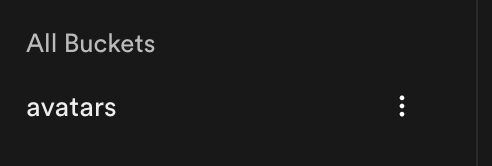
Click on the three dots and select the Make public option.
Back to our code: inside the pages directory create a file named profile.js and copy paste the following code:
import {
  Avatar,
  Box,
  Button,
  Flex,
  FormControl,
  FormLabel,
  Input,
  Stack,
  Textarea,
} from "@chakra-ui/react";
import { useEffect, useState } from "react";
import Navbar from "../components/Navbar";
import { supabaseClient } from "../lib/client";

const Profile = () => {
  const [email, setEmail] = useState("");
  const [username, setUsername] = useState("");
  const [website, setWebsite] = useState("");
  const [bio, setBio] = useState("");
  const [avatarurl, setAvatarurl] = useState("");

  const [isLoading, setIsLoading] = useState(false);
  const [isImageUploadLoading, setIsImageUploadLoading] = useState(false);

  const user = supabaseClient.auth.user();

  useEffect(() => {
    if (user) {
      setEmail(user.email);
      supabaseClient
        .from("profiles")
        .select("*")
        .eq("id", user.id)
        .then(({ data, error }) => {
          if (!error) {
            setUsername(data[0].username || "");
            setWebsite(data[0].website || "");
            setBio(data[0].bio || "");
            setAvatarurl(data[0].avatarurl || "");
          }
        });
    }
  }, [user]);

  const updateHandler = async (event) => {
    event.preventDefault();
    setIsLoading(true);
    const body = { username, website, bio };
    const userId = user.id;
    const { error } = await supabaseClient
      .from("profiles")
      .update(body)
      .eq("id", userId);
    if (!error) {
      setUsername(body.username);
      setWebsite(body.website);
      setBio(body.bio);
    }
    setIsLoading(false);
  };

  function makeid(length) {
    let result = "";
    const characters =
      "ABCDEFGHIJKLMNOPQRSTUVWXYZabcdefghijklmnopqrstuvwxyz0123456789";
    const charactersLength = characters.length;
    for (var i = 0; i < length; i++) {
      result += characters.charAt(Math.floor(Math.random() * charactersLength));
    }
    return result;
  }

  const uploadHandler = async (event) => {
    setIsImageUploadLoading(true);
    const avatarFile = event.target.files[0];
    const fileName = makeid(10);

    const { error } = await supabaseClient.storage
      .from("avatars")
      .upload(fileName, avatarFile, {
        cacheControl: "3600",
        upsert: false,
      });
    if (error) {
      setIsImageUploadLoading(false);
      console.log("error", error);
      return;
    }
    const { publicURL, error: publicURLError } = supabaseClient.storage
      .from("avatars")
      .getPublicUrl(fileName);
    if (publicURLError) {
      setIsImageUploadLoading(false);
      console.log("publicURLError", publicURLError);
      return;
    }
    const userId = user.id;
    await supabaseClient
      .from("profiles")
      .update({
        avatarurl: publicURL,
      })
      .eq("id", userId);
    setAvatarurl(publicURL);
    setIsImageUploadLoading(false);
  };

  return (
    <Box>
      <Navbar />
      <Box mt="8" maxW="xl" mx="auto">
        <Flex align="center" justify="center" direction="column">
          <Avatar
            size="2xl"
            src={avatarurl || ""}
            name={username || user?.email}
          />
          <FormLabel
            htmlFor="file-input"
            my="5"
            borderRadius="2xl"
            borderWidth="1px"
            textAlign="center"
            p="2"
            bg="blue.400"
            color="white"
          >
            {isImageUploadLoading ? "Uploading....." : "Upload Profile Picture"}
          </FormLabel>
          <Input
            type="file"
            hidden
            id="file-input"
            onChange={uploadHandler}
            multiple={false}
            disabled={isImageUploadLoading}
          />
        </Flex>
        <Stack
          borderWidth="1px"
          borderRadius="lg"
          overflow="hidden"
          p={5}
          mt="-2"
          spacing="4"
          as="form"
          onSubmit={updateHandler}
        >
          <FormControl id="email" isRequired>
            <FormLabel>Email</FormLabel>
            <Input type="email" isDisabled={true} value={email} />
          </FormControl>
          <FormControl id="username" isRequired>
            <FormLabel>Username</FormLabel>
            <Input
              placeholder="Add your username here"
              type="text"
              value={username}
              onChange={(event) => setUsername(event.target.value)}
            />
          </FormControl>
          <FormControl id="website" isRequired>
            <FormLabel>Website URL</FormLabel>
            <Input
              placeholder="Add your website here"
              type="url"
              value={website}
              onChange={(event) => setWebsite(event.target.value)}
            />
          </FormControl>
          <FormControl id="bio" isRequired>
            <FormLabel>Bio</FormLabel>
            <Textarea
              placeholder="Add your bio here"
              value={bio}
              onChange={(event) => setBio(event.target.value)}
            />
          </FormControl>
          <Button colorScheme="blue" type="submit" isLoading={isLoading}>
            Update
          </Button>
        </Stack>
      </Box>
    </Box>
  );
};

export default Profile;
Here we have 4 FormControl elements, and each is pre-filled if a value exists. This is possible because on render useEffect runs which uses the Supabase client to fetch the user record from the auth and profiles tables.
Note: the auth table is maintained by Supabase and can be accessed via client using following command:
supabase.auth.user()
Except images, other records can be updated using the updateHandler function. This function updates the user record using id.
The uploadHandler function is responsible for uploading the image to the storage bucket and setting the avatarurl in the profiles table for a record based on id.
The upload method from Supabase uploads the image while the getPublicUrl method gives us a public URL of the image. We use the from('profiles').update method to update the record.
Visit http://localhost:3000 and click on profile link. You'll see the following view:
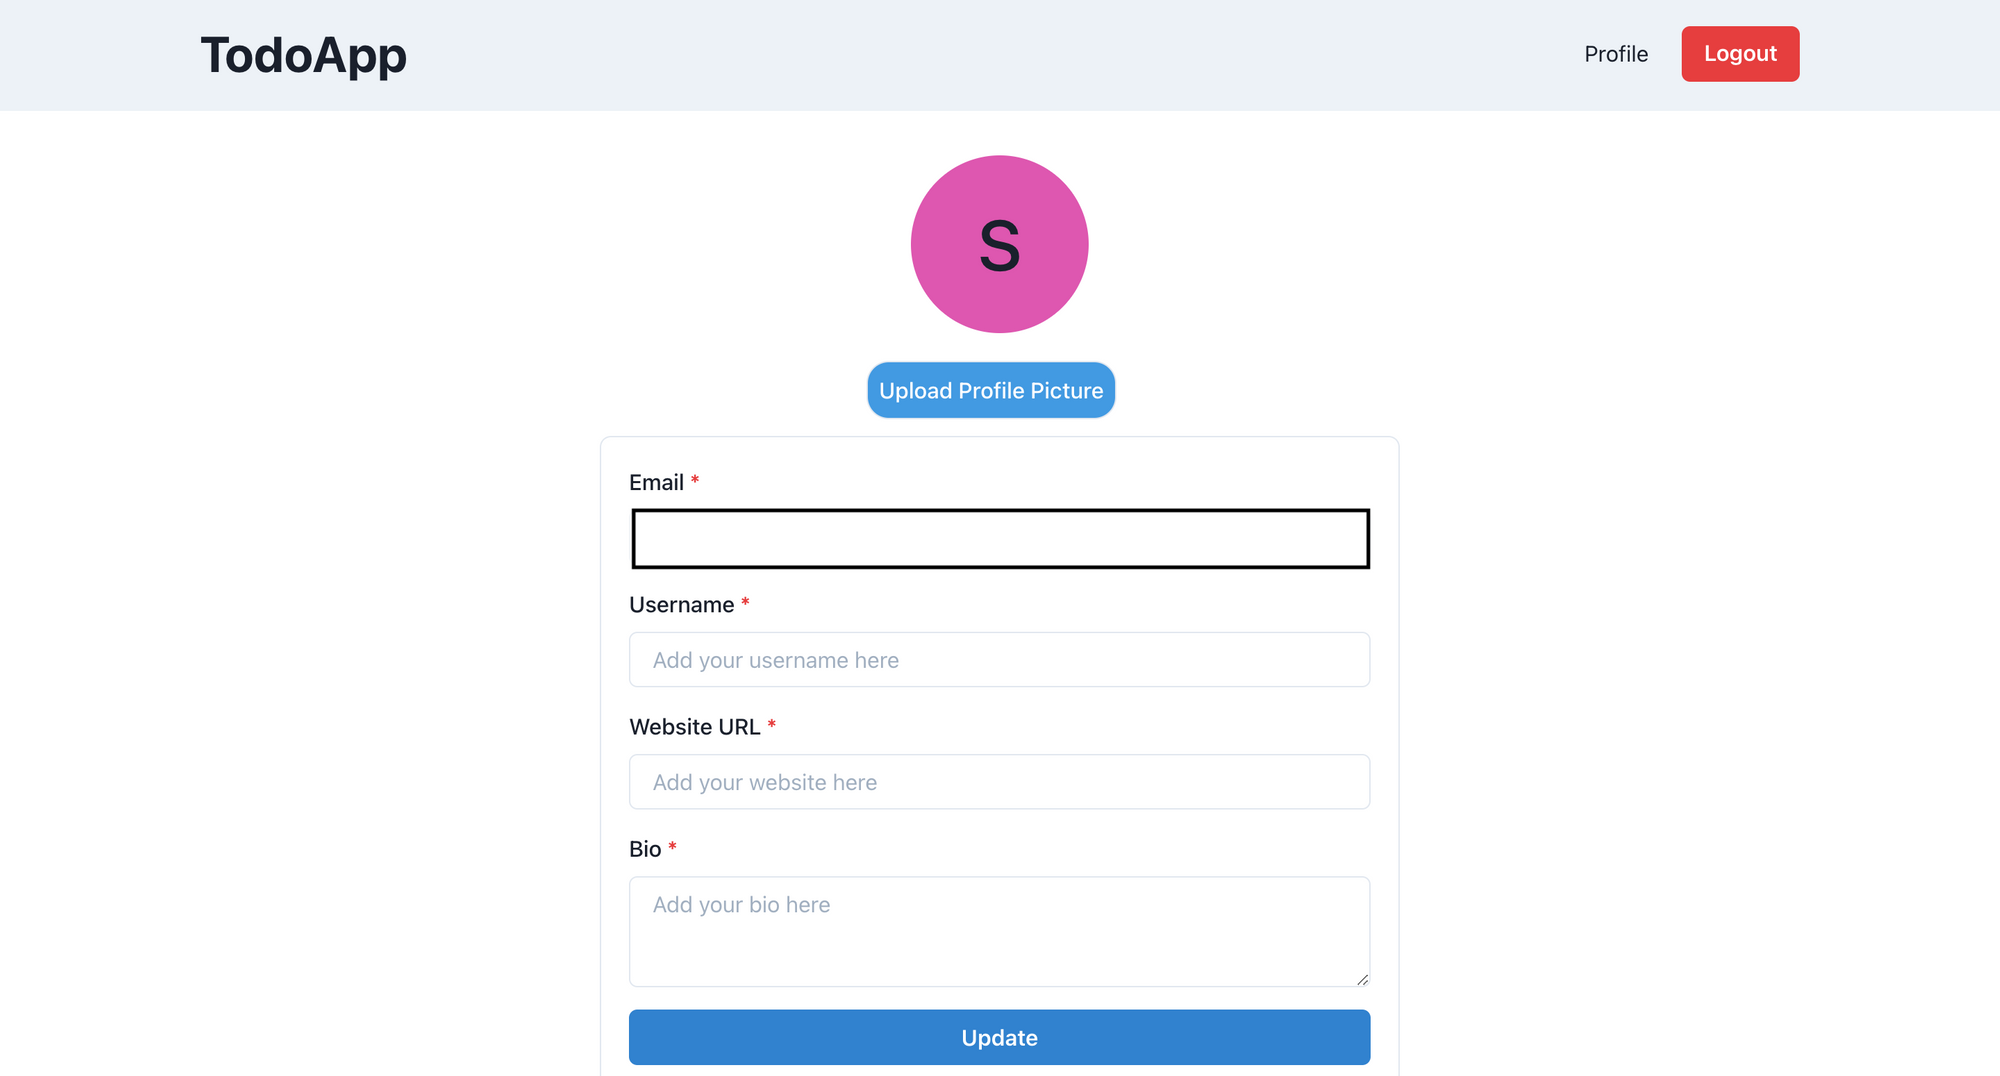
Now you can use the update method to update your username, website URL, and bio.
With this our TodoApp is completed and ready for production.
How to Deploy the App to Vercel and Configure Supabase Authentication
Before deploying the application on Vercel we need to run the npm run build command and check the terminal output to see if we have any errors.
There are two ways to configure an application on Vercel:
Using the Vercel npm library and pushing the code locally to a Vercel server
Connecting the Vercel bot to the GitHub repository.
I am going to use the second method.
You need to create a repository on GitHub and push the code over there.
If you haven't created an account on Vercel, then you can go to https://vercel.com/ and click on the sign up button.
Once you've created your account you'll be directed to a dashboard that looks like this:
Vercel Dashboard
Click on the New Project button. It will ask you to install the Vercel bot and permissions.
Note: You can allow the Vercel bot to read all repositories from your GitHub account or give permission for the currently created repository.
Click the Import button on the GitHub repository created above:

Vercel Import Project from Github
Now it will ask if you want to create a team. Team is a feature available under the Pro Plan. By default Vercel is under the hobby plan. For now I'll skip that.
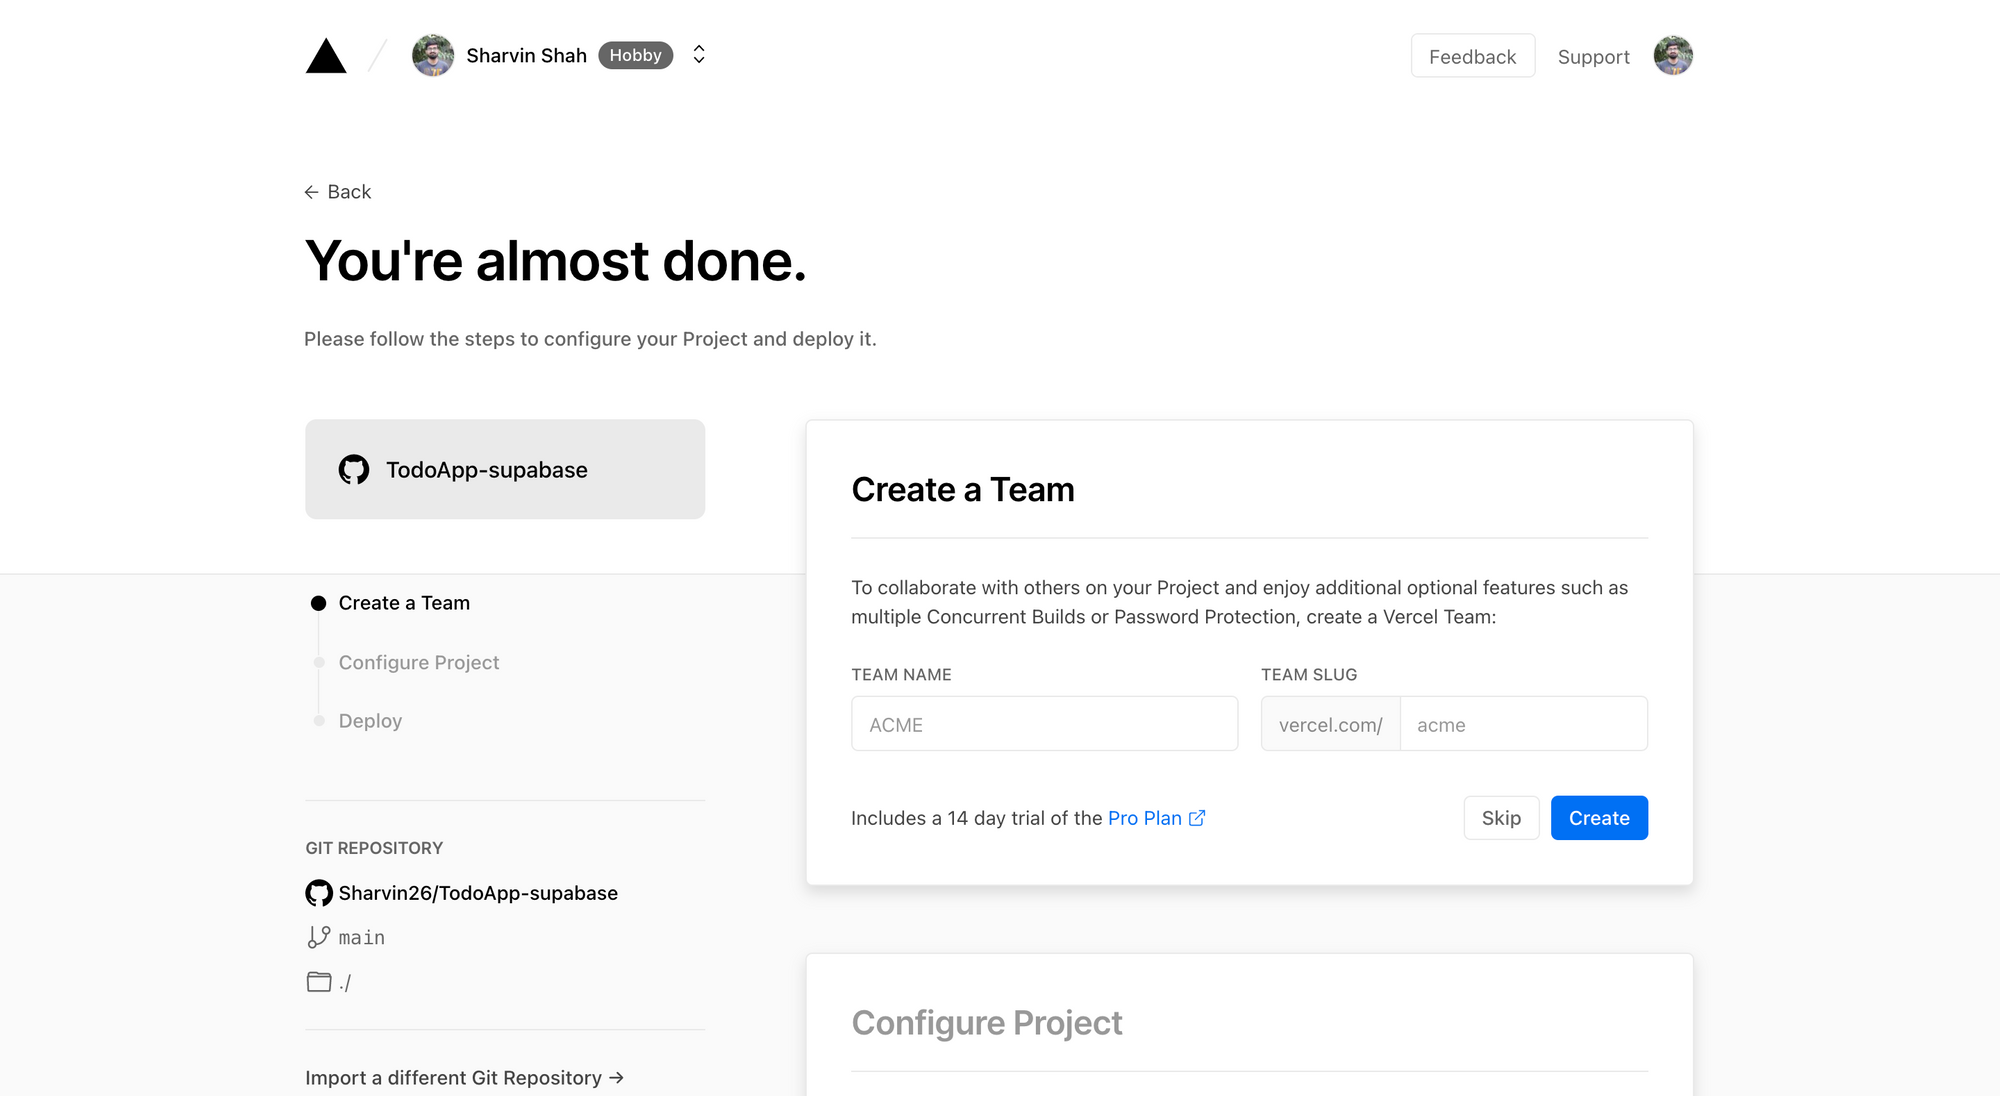
Vercel Create Team
Now you'll need to add environment variables. Add them from .env.local.
Click on the Accordion that's in front of Environment Variables and add the variables over there as follows:
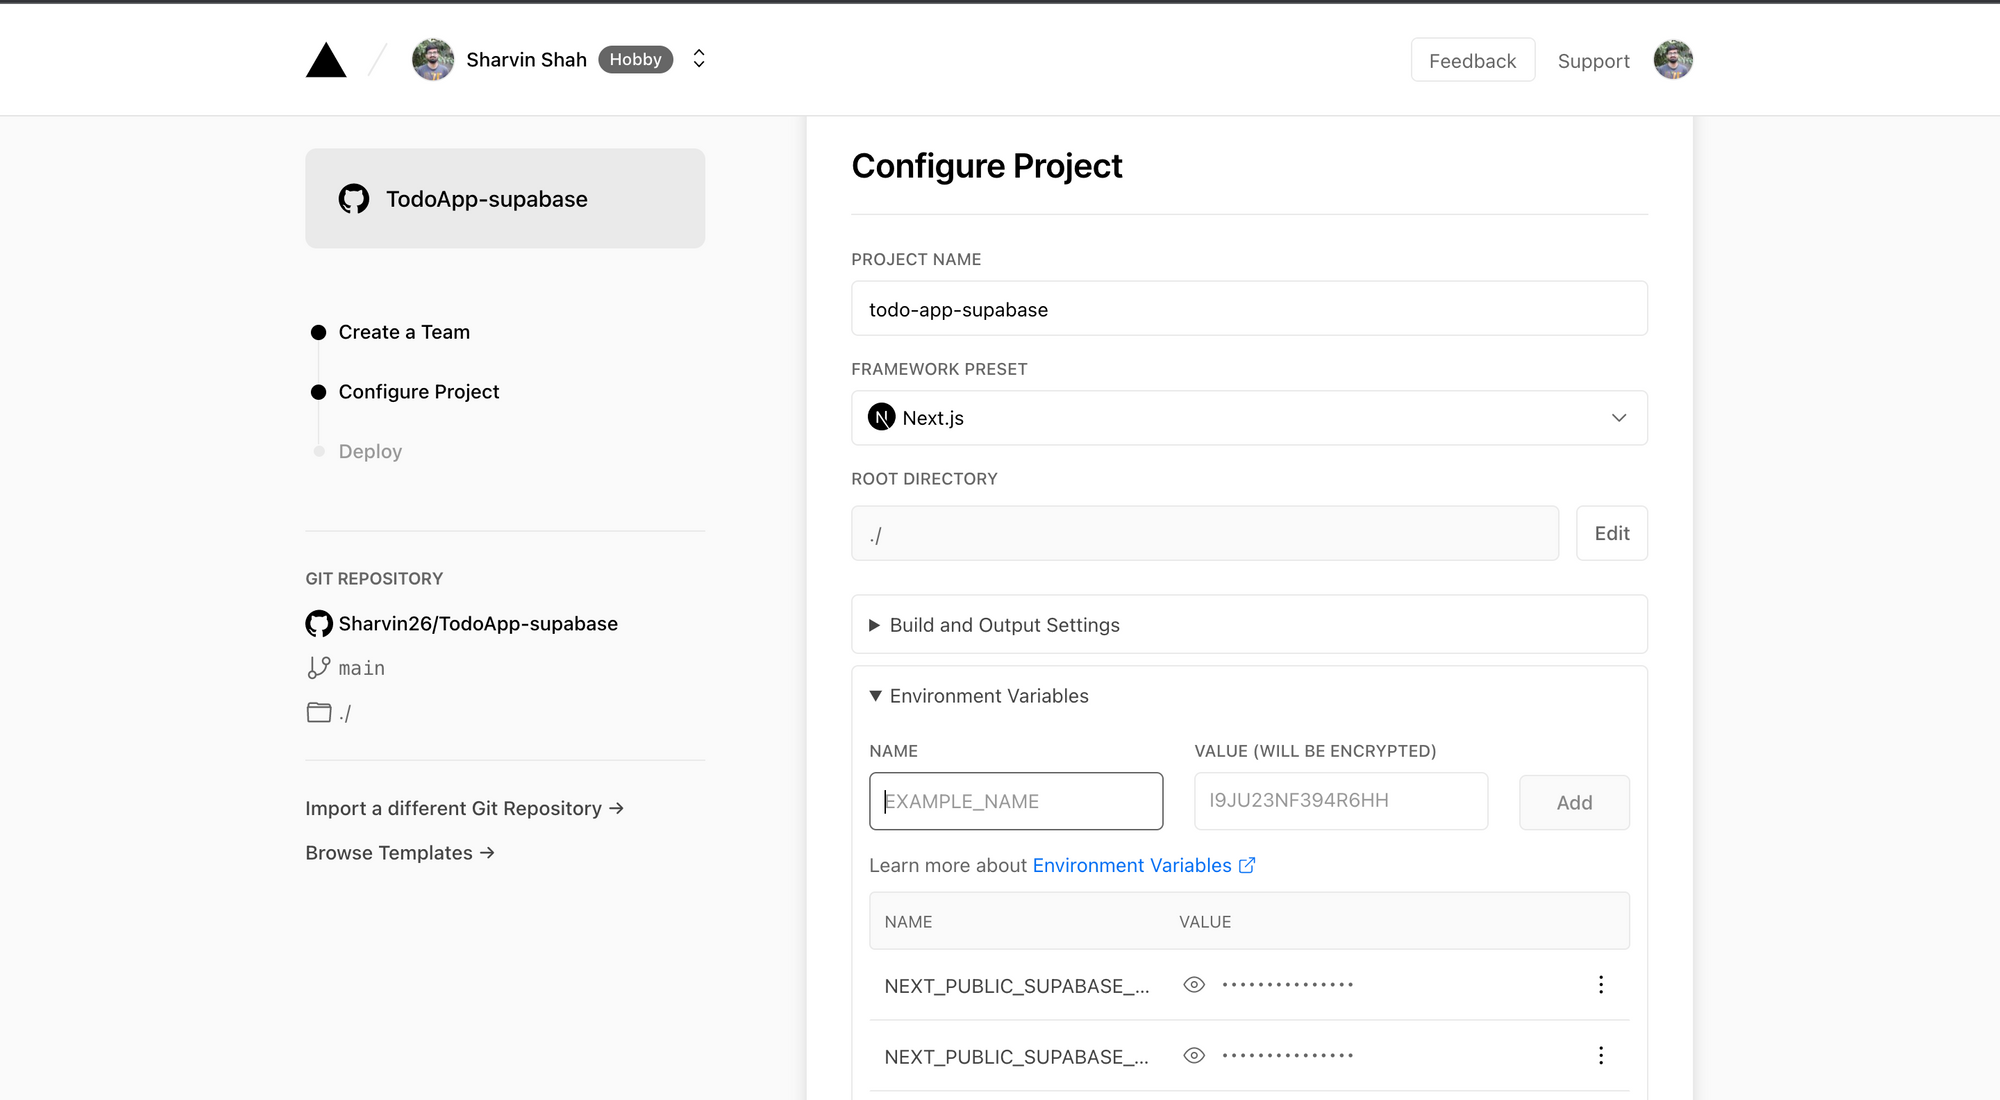
Vercel Configure Env and Build Settings
Once they are added, click on the Deploy button. After the deployment is successful you'll get the following screen:

Vercel Deployment Success
Now click on the gray box where your application is shown. It will redirect you to a page where you can find preconfigured domain for your applications.
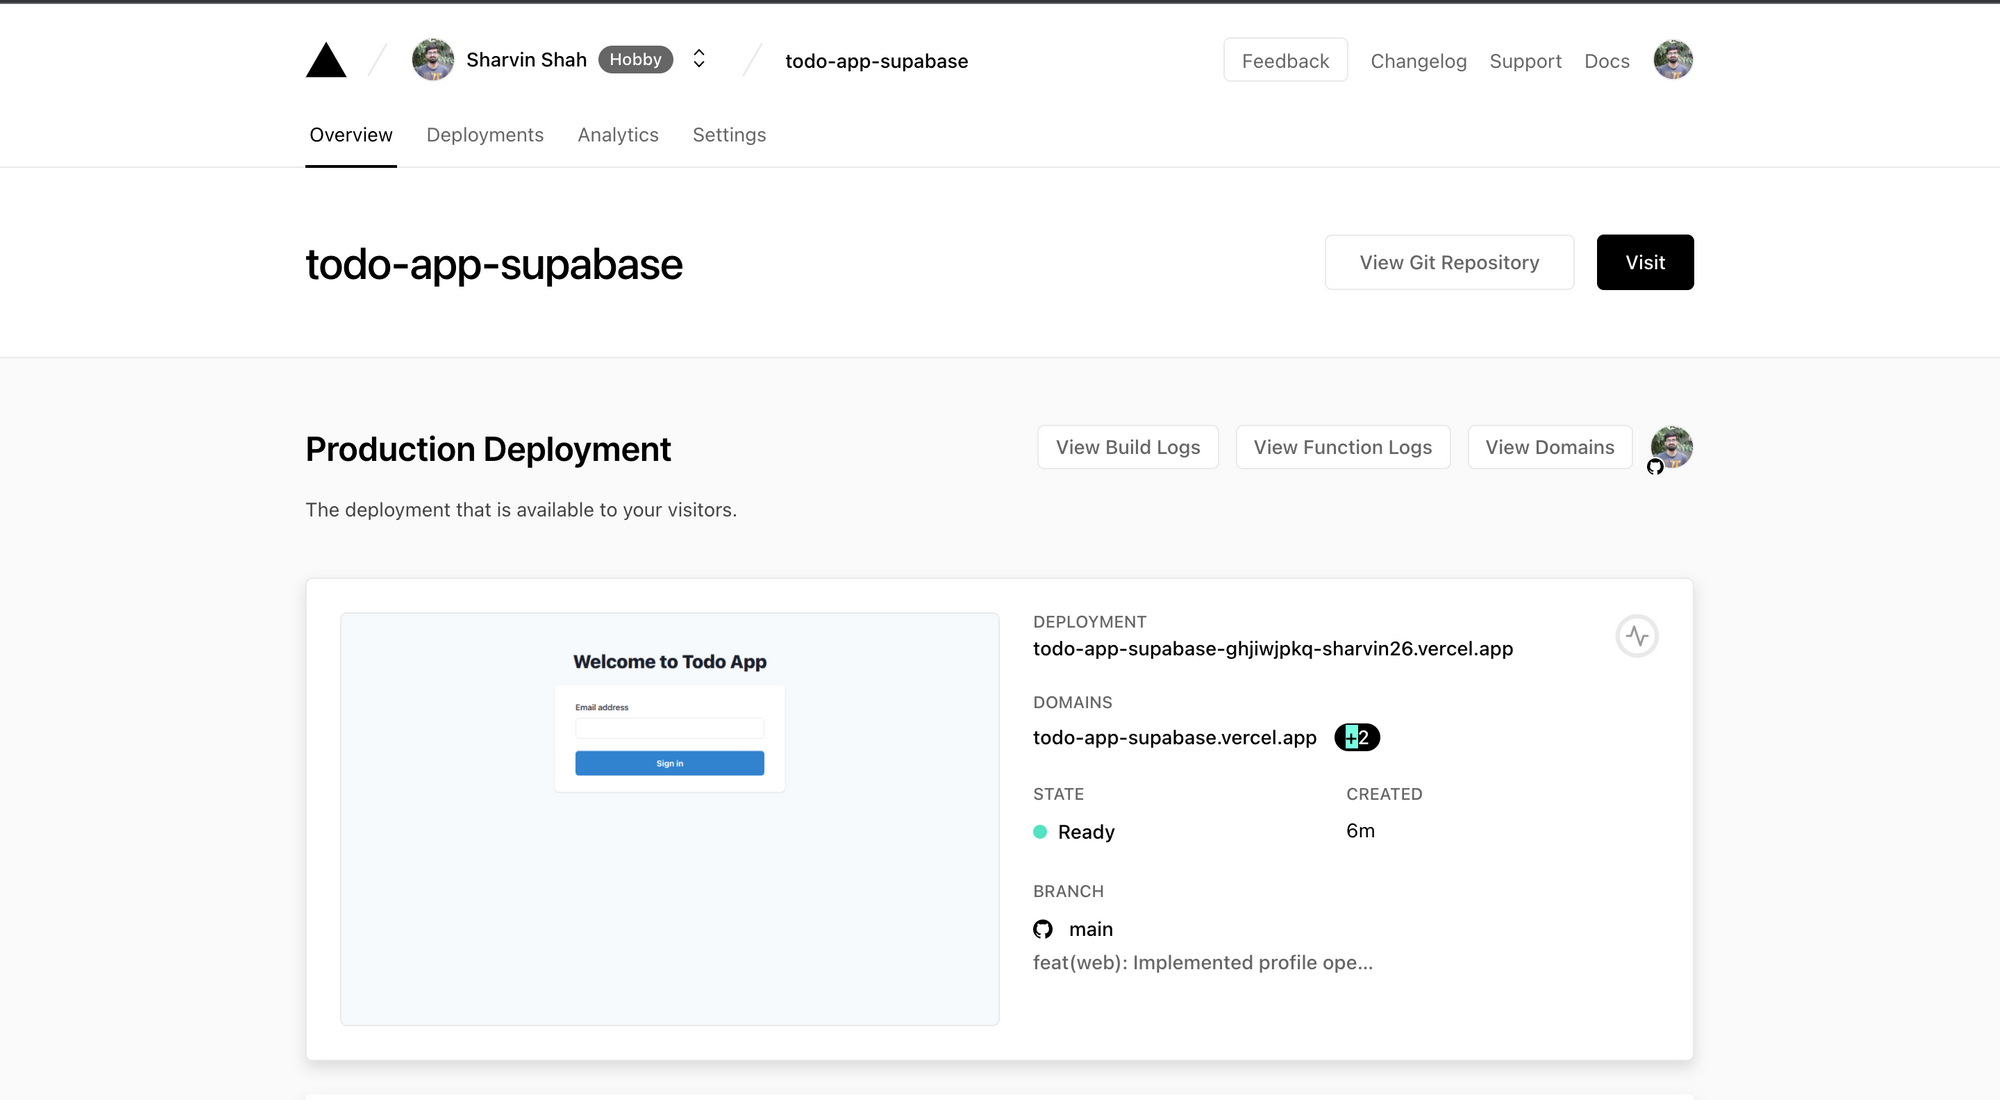
Vercel Project Overview
Yes vercel provides subdomains for which we can set a custom domain also. For now we will use the Vercel domain. Copy the first domain under the Domains section and go to your Supabase project.
Go to Authentication > Settings and update the Site URL and Additional Redirect URLs to the copied URL (make sure to add https:// in front of the copied URL):
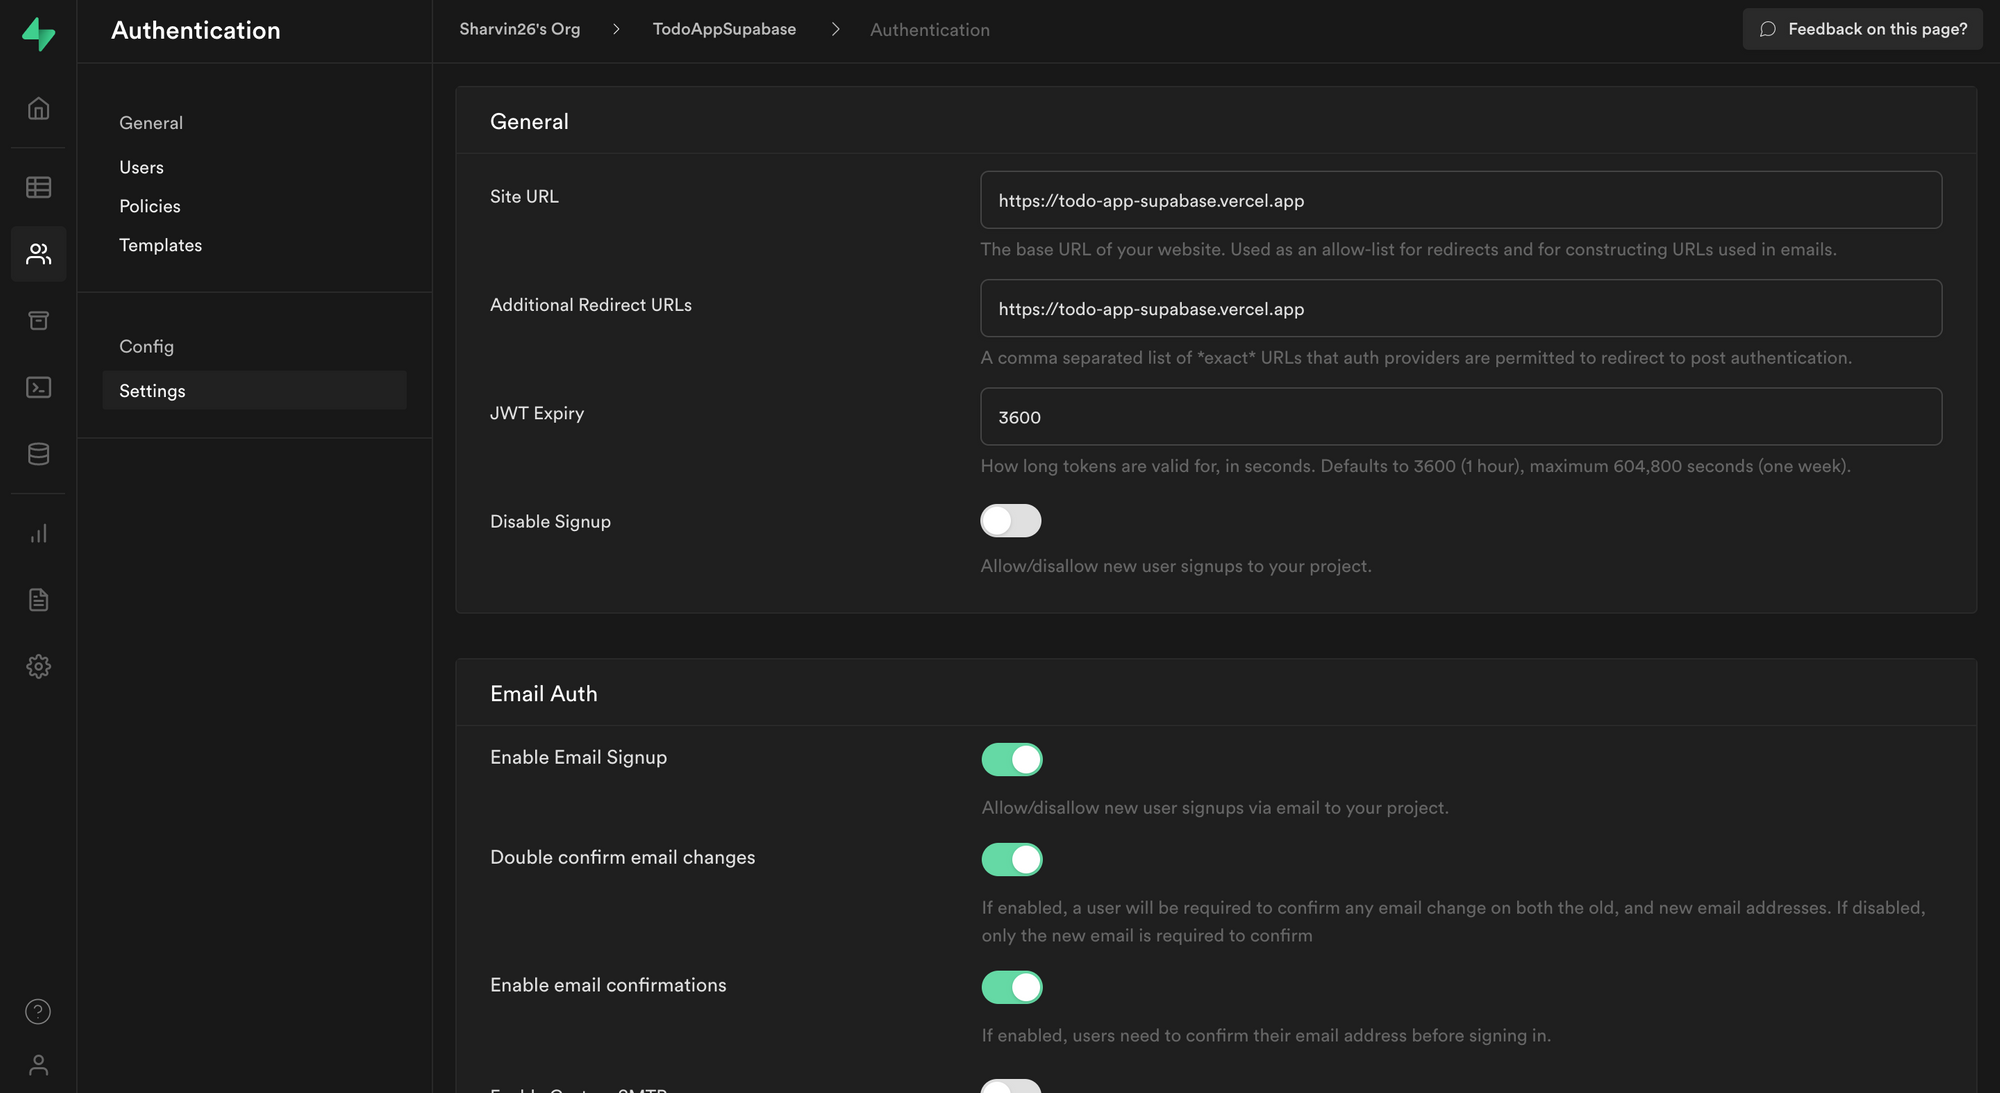
Supabase Authentication Settings
With this, we have created our production-ready todo application. If you have built the app along with the tutorial, then a very big congratulations to you on this achievement.
Thank you for reading!
Feel free to connect with me on Twitter and Github.
If you want any project to be developed or want to consult with me, you can DM me on my Twitter (@sharvinshah26).