
By Manu Arora
Contact forms are useful on websites if you want your users to be able to interact with you over email. And there are lots of ways to build them.
Traditionally you'd have either used PHP for sending emails over the server or some third party service that would take care of the email logic.
But in this article, we are going to talk about how to send emails from your Next.js application with the SendGrid API.
We are going to create a simple page – a contact form built with React – that has input fields which we'll validate before sending. We'll connect the form to the SendGrid API which will take care of sending the emails to you. Then, at the end of the day, all you have to do is check your email to find those queries.
However, if you don't have a Next.js project yet, you can easily create one and integrate it with Vercel by following the below mentioned steps:
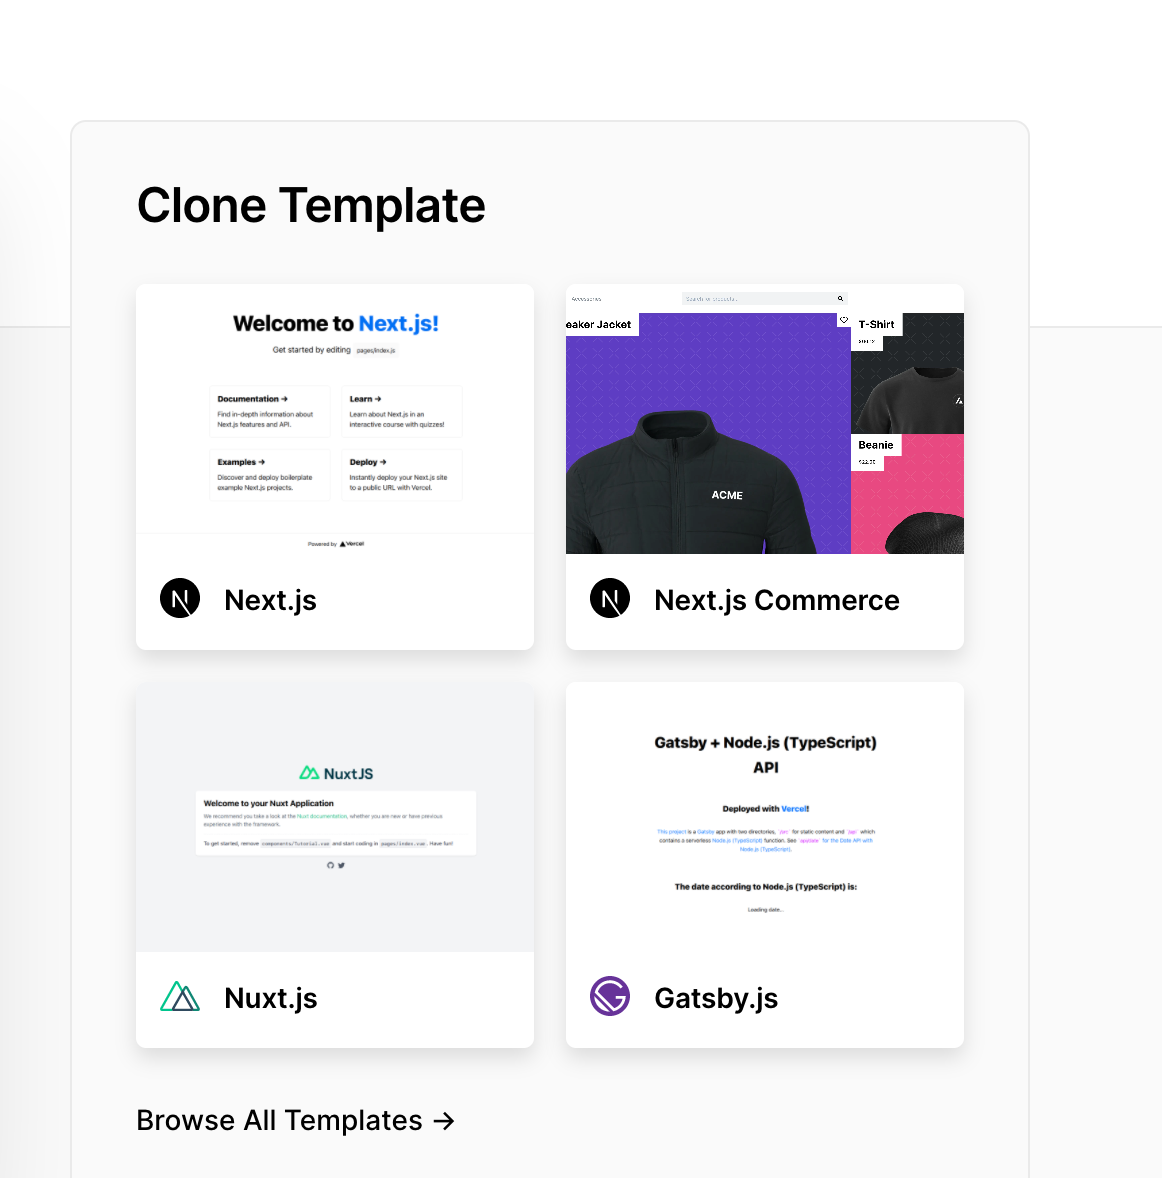
- Create an account on Vercel and click on
New Project

- Choose the template as
Next.js:
- Name your repository anything you would like and click on create project. (Choose GitHub, GitLab or BitBucket for your remote code versioning)
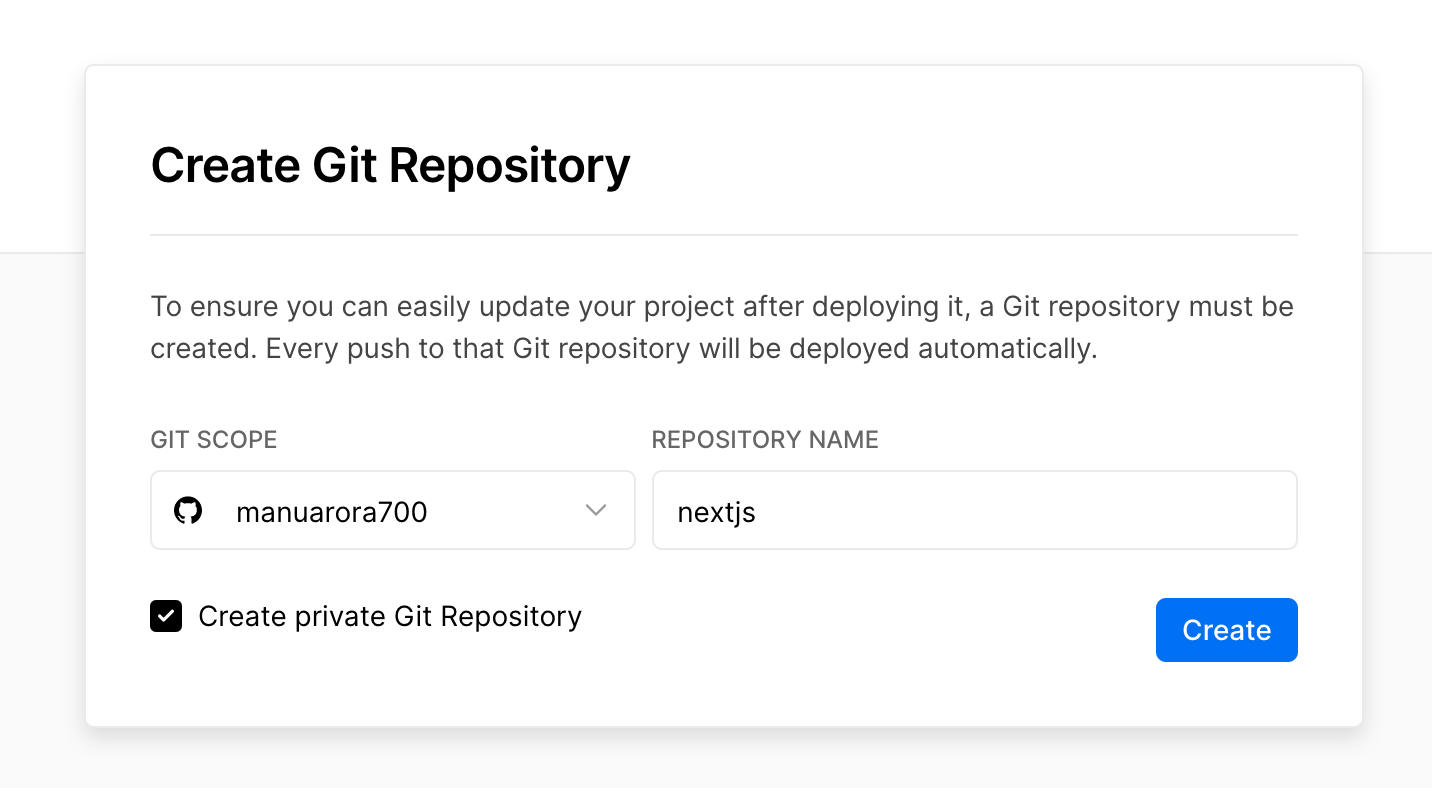
Following the above three points, you'll have a repository on your versioning account.
The Tech Stack We'll Use
- Next.js for creating a contact form landing page
- TailwindCSS for styling the components
- SendGrid for sending emails using their APIs
- Vercel for hosting our application and CI/CD
We are going to use Nextjs' API routes to handle form events. The API modules provide a flexible way to handle backend logic in our Next.js application.
Whatever code we write in the API folder will get deployed as a Serverless function onto Vercel for hosting. You can read more about Next.js API routes here
If you already have a Next.js project where you want to set up a working contact form, that's great. In that case, it'll be easy for you to create pages and get started right away.
But if you don't have a project set up yet, that's ok – go to Vercel and create a Next.js starter project and clone the repository.
Application Flow
Let's take a look at the application flow – or how the sending of emails actually works:
- The end-user fills in the mandotary 4 fields and clicks on submit.
- On submit, the
handleSubmitfunction gets triggered. handleSubmitvalidates the form for input fields and checks if they are not empty.- If the form fields are not empty, an API call is made to
api/sendgridwhere the logic of sending emails lives. - In
api/sendgrid, the@sendgrid/mailmodule initializes asendfunction that takes it your application's API keys and sends the email with the required fields. - If email is successfully delivered, a
200response is sent to the client, else a400response is sent to the client. - Responses are handled at the frontend and the appropriate messages are displayed.
How to Set Up TailwindCSS
Setting up TailwindCSS is quite easy, and you can do it in two simple ways.
- Install TailwindCSS as a dependency in your project:
npm install -D tailwindcss@latest postcss@latest autoprefixer@latest
- Initialize a TailwindCSS configuration file for your project. This will create a
tailwind.config.jsfile in the root directory:
npx tailwindcss init
Then you'll need to edit the configuration file, include purge paths, and enable jit mode:
module.exports = {
   purge: [],
   mode: 'jit',
   purge: ['./pages/**/*.{js,ts,jsx,tsx}', './components/**/*.{js,ts,jsx,tsx}'],
    darkMode: false, // or 'media' or 'class'
    theme: {
      extend: {},
    },
    variants: {
      extend: {},
    },
    plugins: [],
  }
You use purge to remove unwanted styles from your project at build time. It is helpful if you want to reduce the CSS bundle size.
jit is the new TailwindCSS mode where you can specify dynamic classnames in the code itself.
For example, if you want to have your text size be 10px (which is not already there in the TailwindCSS modules), you can write text-[10px] in your class names and it will reflect automatically. No need to write custom style attributes anymore. 💯
Next, import Tailwind styles in your root _app.js file:
// pages/_app.js
 import '../styles/globals.css'
 import 'tailwindcss/tailwind.css'

  function MyApp({ Component, pageProps }) {
    return <Component {...pageProps} />
  }

  export default MyApp
Then include Tailwind's core CSS in your root level stylesheet like this:
/* ./styles/globals.css */
@tailwind base;
@tailwind components;
@tailwind utilities;
With this, you have successfully setup TailwindCSS for your project.
The Markup and Styling for the Contact Page
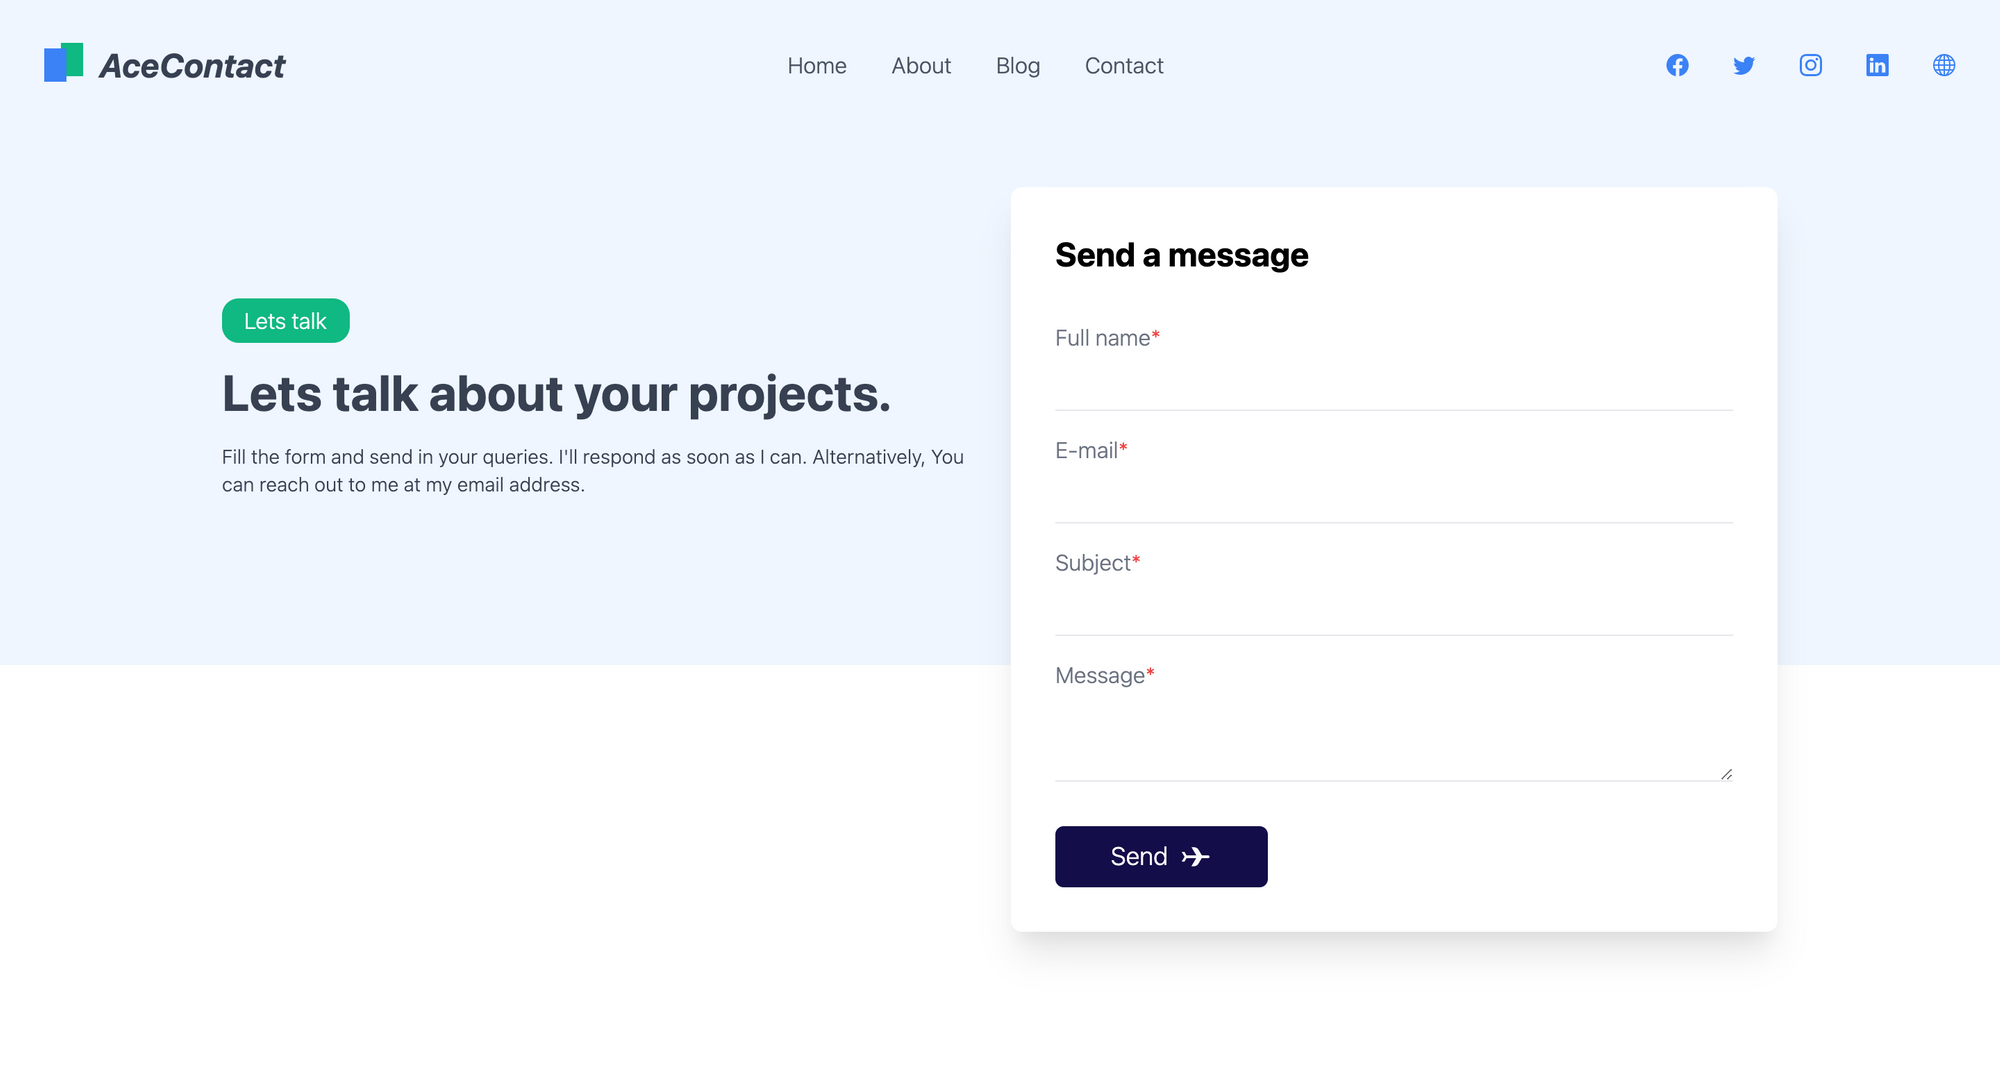
We'll build the webpage completely with Tailwind. I got the page itself directly from the Tailwind Master Kit which is a components and templates library for Tailwind web projects.
Let's go through the HTML of the page (essentially the contact form) to understand how everything's implemented:
<form class="rounded-lg shadow-xl flex flex-col px-8 py-8 bg-white dark:bg-blue-500">
      <h1 class="text-2xl font-bold dark:text-gray-50">Send a message</h1>

      <label for="fullname" class="text-gray-500 font-light mt-8 dark:text-gray-50">Full name<span class="text-red-500 dark:text-gray-50">*</span></label>
      <input type="text" name="fullname" class="bg-transparent border-b py-2 pl-4 focus:outline-none focus:rounded-md focus:ring-1 ring-green-500 font-light text-gray-500" />

      <label for="email" class="text-gray-500 font-light mt-4 dark:text-gray-50">E-mail<span class="text-red-500">*</span></label>
      <input type="email" name="email" class="bg-transparent border-b py-2 pl-4 focus:outline-none focus:rounded-md focus:ring-1 ring-green-500 font-light text-gray-500" />

      <label for="subject" class="text-gray-500 font-light mt-4 dark:text-gray-50">Subject<span class="text-red-500">*</span></label>
      <input type="text" name="subject" class="bg-transparent border-b py-2 pl-4 focus:outline-none focus:rounded-md focus:ring-1 ring-green-500 font-light text-gray-500" />

      <label for="message" class="text-gray-500 font-light mt-4 dark:text-gray-50">Message<span class="text-red-500">*</span></label>
      <textarea name="message" class="bg-transparent border-b py-2 pl-4 focus:outline-none focus:rounded-md focus:ring-1 ring-green-500 font-light text-gray-500"></textarea>
      <div class="flex flex-row items-center justify-start">
        <button class="px-10 mt-8 py-2 bg-[#130F49] text-gray-50 font-light rounded-md text-lg flex flex-row items-center">
          Send
          <svg width="24" height="24" viewBox="0 0 24 24" class="text-cyan-500 ml-2" fill="currentColor" xmlns="http://www.w3.org/2000/svg">
            <path d="M9.00967 5.12761H11.0097C12.1142 5.12761 13.468 5.89682 14.0335 6.8457L16.5089 11H21.0097C21.562 11 22.0097 11.4477 22.0097 12C22.0097 12.5523 21.562 13 21.0097 13H16.4138L13.9383 17.1543C13.3729 18.1032 12.0191 18.8724 10.9145 18.8724H8.91454L12.4138 13H5.42485L3.99036 15.4529H1.99036L4.00967 12L4.00967 11.967L2.00967 8.54712H4.00967L5.44417 11H12.5089L9.00967 5.12761Z" fill="currentColor" />
          </svg>
        </button>
      </div>
    </form>
The form has 4 fields:
- Full Name
- Subject
- Message
All the fields are mandatory – and we'll validate them too later on. You'll expect your user to provide you with all their details while sending the email.
To capture the fields, we are going to use React's useState() hook to ensure that our data is persisted in the application.
export default function ContactUs() {
  const [fullname, setFullname] = useState("");
  const [email, setEmail] = useState("");
  const [subject, setSubject] = useState("");
  const [message, setMessage] = useState("");

    return (
        <form
          onSubmit={handleSubmit}
          className="rounded-lg shadow-xl flex flex-col px-8 py-8 bg-white dark:bg-blue-500"
        >
          <h1 className="text-2xl font-bold dark:text-gray-50">
            Send a message
          </h1>

          <label
            htmlFor="fullname"
            className="text-gray-500 font-light mt-8 dark:text-gray-50"
          >
            Full name<span className="text-red-500 dark:text-gray-50">*</span>
          </label>
          <input
            type="text"
            value={fullname}
            onChange={(e) => {
              setFullname(e.target.value);
            }}
            name="fullname"
            className="bg-transparent border-b py-2 pl-4 focus:outline-none focus:rounded-md focus:ring-1 ring-green-500 font-light text-gray-500"
          />


          <label
            htmlFor="email"
            className="text-gray-500 font-light mt-4 dark:text-gray-50"
          >
            E-mail<span className="text-red-500">*</span>
          </label>
          <input
            type="email"
            name="email"
            value={email}
            onChange={(e) => {
              setEmail(e.target.value);
            }}
            className="bg-transparent border-b py-2 pl-4 focus:outline-none focus:rounded-md focus:ring-1 ring-green-500 font-light text-gray-500"
          />


          <label
            htmlFor="subject"
            className="text-gray-500 font-light mt-4 dark:text-gray-50"
          >
            Subject<span className="text-red-500">*</span>
          </label>
          <input
            type="text"
            name="subject"
            value={subject}
            onChange={(e) => {
              setSubject(e.target.value);
            }}
            className="bg-transparent border-b py-2 pl-4 focus:outline-none focus:rounded-md focus:ring-1 ring-green-500 font-light text-gray-500"
          />

          <label
            htmlFor="message"
            className="text-gray-500 font-light mt-4 dark:text-gray-50"
          >
            Message<span className="text-red-500">*</span>
          </label>
          <textarea
            name="message"
            value={message}
            onChange={(e) => {
              setMessage(e.target.value);
            }}
            className="bg-transparent border-b py-2 pl-4 focus:outline-none focus:rounded-md focus:ring-1 ring-green-500 font-light text-gray-500"
          ></textarea>

          <div className="flex flex-row items-center justify-start">
            <button
              type="submit"
              className="px-10 mt-8 py-2 bg-[#130F49] text-gray-50 font-light rounded-md text-lg flex flex-row items-center"
            >
              Submit
              <svg
                width="24"
                height="24"
                viewBox="0 0 24 24"
                className="text-cyan-500 ml-2"
                fill="currentColor"
                xmlns="http://www.w3.org/2000/svg"
              >
                <path
                  d="M9.00967 5.12761H11.0097C12.1142 5.12761 13.468 5.89682 14.0335 6.8457L16.5089 11H21.0097C21.562 11 22.0097 11.4477 22.0097 12C22.0097 12.5523 21.562 13 21.0097 13H16.4138L13.9383 17.1543C13.3729 18.1032 12.0191 18.8724 10.9145 18.8724H8.91454L12.4138 13H5.42485L3.99036 15.4529H1.99036L4.00967 12L4.00967 11.967L2.00967 8.54712H4.00967L5.44417 11H12.5089L9.00967 5.12761Z"
                  fill="currentColor"
                />
              </svg>
            </button>
          </div>
        </form>
    )
}
Notice the form attribute onSubmit={handleSubmit}. This is the function where we are going to actually send the email through SendGrid. But before that, let's create a SendGrid Project and retrieve the API keys.
How to Set Up a SendGrid Project

First, you just need to head over to SendGrid's homepage and signup for an account (if you don't have one already).
After successfully creating an account, register for an API Key. You can do it here.
Sendgrid requires you to create a Sender Identity to protect against spam and malicious mails. To do so, go to the Sendgrid Identity page and click on Create New Sender to create a sender identity.
You'll be rqeuired to fill out a detailed form. Just complete the form and hit submit. Finally, just verify your email address and you're done.
Once you've retrieved the API keys, create a .env.local file in your local environment and paste the following code:
SENDGRID_API_KEY= YOUR_API_KEY_HERE
Replace YOUR_API_KEY_HERE with the API key you just retrieved.
How to Create a Serverless API Route
Creating a serverless API route is quite easy with Next.js.
Go to /pages/api and inside the api folder create a file called sendgrid.js.
import sendgrid from "@sendgrid/mail";

sendgrid.setApiKey(process.env.SENDGRID_API_KEY);

async function sendEmail(req, res) {
  try {
    // console.log("REQ.BODY", req.body);
    await sendgrid.send({
      to: "mannuarora7000@gmail.com", // Your email where you'll receive emails
      from: "manuarorawork@gmail.com", // your website email address here
      subject: `${req.body.subject}`,
      html: `<div>You've got a mail</div>`,
    });
  } catch (error) {
    // console.log(error);
    return res.status(error.statusCode || 500).json({ error: error.message });
  }

  return res.status(200).json({ error: "" });
}

export default sendEmail;
SendGrid requires us to initialize a sendgrid object with the API keys with the setApiKey() method. Initialize the object with your API key and you can send emails with the send() method.
There are essentially four fields that are required in the send() method's body:
to– The email address where you want your email to get deliveredfrom– Your SendGrid Email that you used for Sender Identity Verification. Your emails will be sent from this email.subject– The subject line of the emailmessage– the message body of the email
We are going to construct these four parameters ourselves so that we can understand our emails better. Here is the updated code from the same snippet above:
import sendgrid from "@sendgrid/mail";
sendgrid.setApiKey(process.env.SENDGRID_API_KEY);
async function sendEmail(req, res) {
try {
await sendgrid.send({
to: "youremail@gmail.com", // Your email where you'll receive emails
from: "youremail@gmail.com", // your website email address here
subject: `[Lead from website] : ${req.body.subject}`,
html: `<!DOCTYPE html PUBLIC "-//W3C//DTD XHTML 1.0 Transitional//EN" "http://www.w3.org/TR/xhtml1/DTD/xhtml1-transitional.dtd">
<html lang="en">
<head>
<meta charset="utf-8">
<title>The HTML5 Herald</title>
<meta name="description" content="The HTML5 Herald">
<meta name="author" content="SitePoint">
<meta http-equiv="Content-Type" content="text/html charset=UTF-8" />
<link rel="stylesheet" href="css/styles.css?v=1.0">
</head>
<body>
<div class="img-container" style="display: flex;justify-content: center;align-items: center;border-radius: 5px;overflow: hidden; font-family: 'helvetica', 'ui-sans';">
</div>
<div class="container" style="margin-left: 20px;margin-right: 20px;">
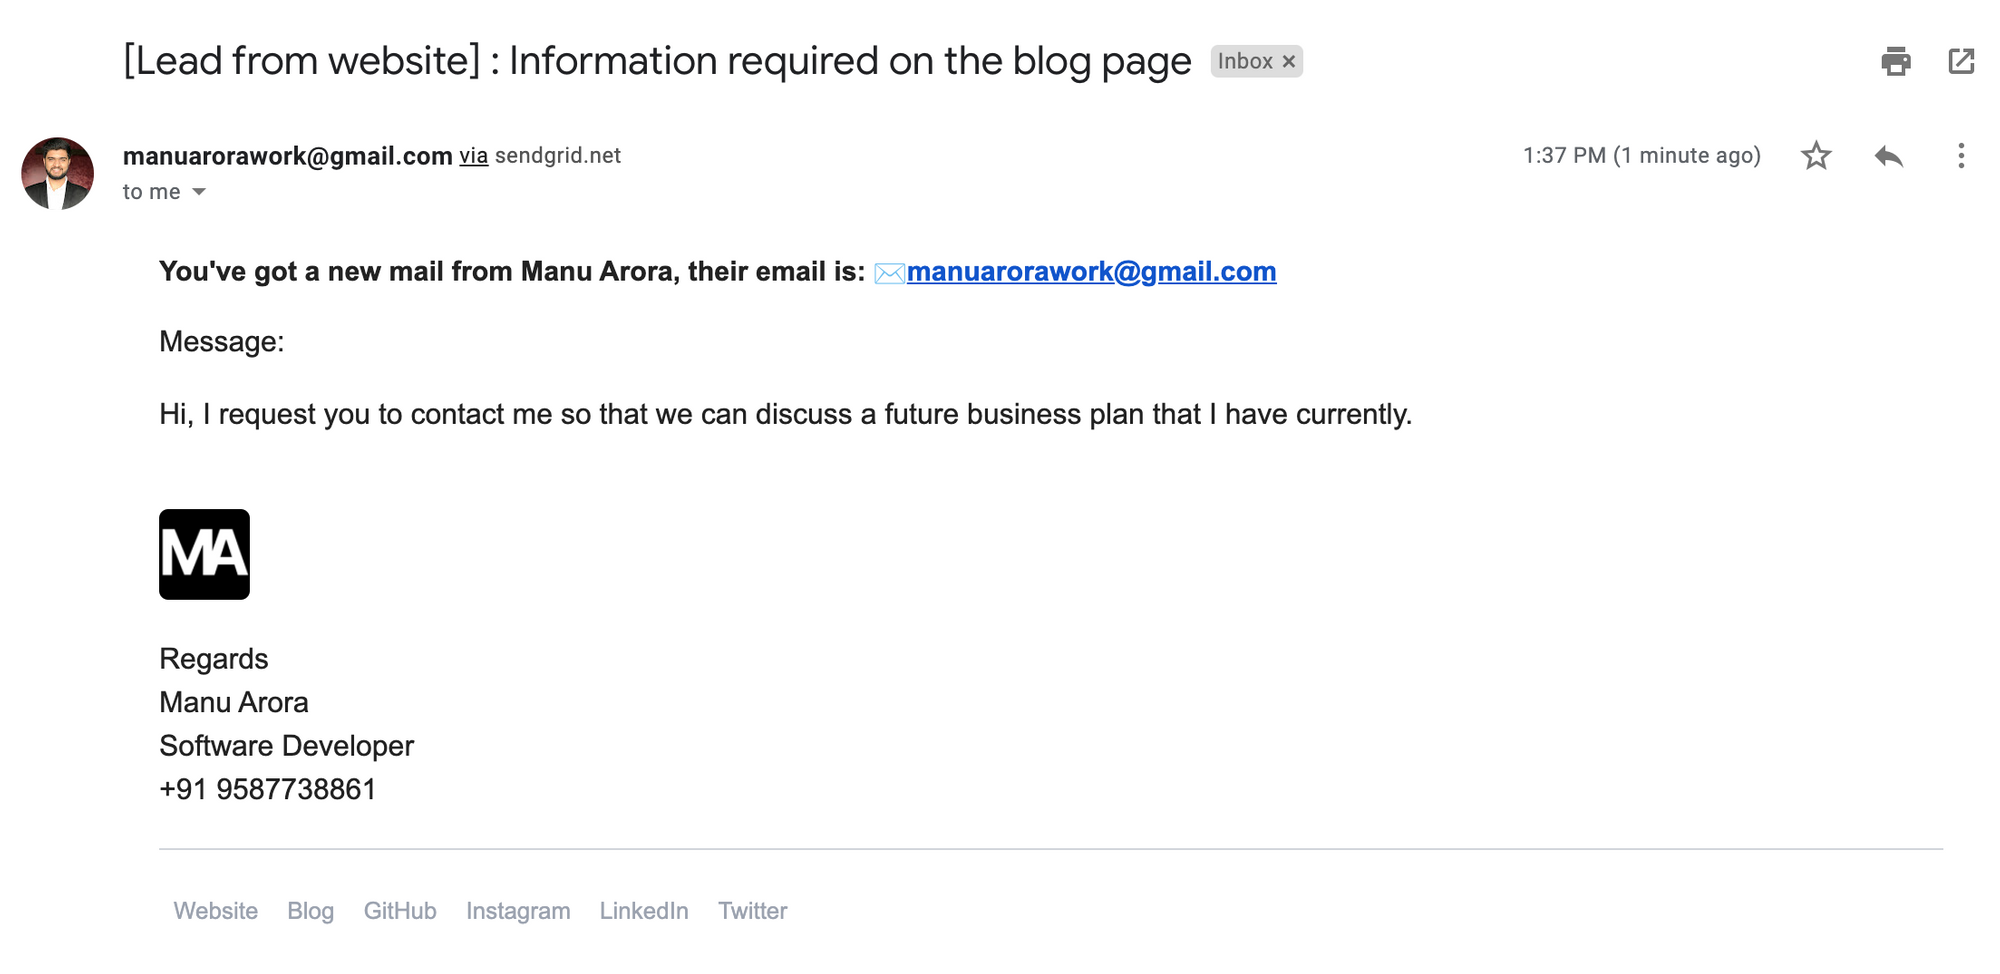
<h3>You've got a new mail from ${req.body.fullname}, their email is: ✉️${req.body.email} </h3>
<div style="font-size: 16px;">
<p>Message:</p>
<p>${req.body.message}</p>
<br>
</div>
<img src="https://manuarora.in/logo.png" class="logo-image" style="height: 50px;width: 50px;border-radius: 5px;overflow: hidden;">
<p class="footer" style="font-size: 16px;padding-bottom: 20px;border-bottom: 1px solid #D1D5DB;">Regards<br>Manu Arora<br>Software Developer<br>+91 9587738861</p>
<div class="footer-links" style="display: flex;justify-content: center;align-items: center;">
<a href="https://manuarora.in/" style="text-decoration: none;margin: 8px;color: #9CA3AF;">Website</a>
<a href="https://manuarora.in/blog/" style="text-decoration: none;margin: 8px;color: #9CA3AF;">Blog</a>
<a href="https://github.com/manuarora700/" style="text-decoration: none;margin: 8px;color: #9CA3AF;">GitHub</a>
<a href="https://instagram.com/maninthere/" style="text-decoration: none;margin: 8px;color: #9CA3AF;">Instagram</a>
<a href="https://linkedin.com/in/manuarora28/" style="text-decoration: none;margin: 8px;color: #9CA3AF;">LinkedIn</a>
<a href="https://twitter.com/mannupaaji/" style="text-decoration: none;margin: 8px;color: #9CA3AF;">Twitter</a>
</div>
</div>
</body>
</html>`,
});
} catch (error) {
// console.log(error);
return res.status(error.statusCode || 500).json({ error: error.message });
}
return res.status(200).json({ error: "" });
}
export default sendEmail;
If you want to send html in the email body, you will have to use inline styles which are there in the example as well.
Here, we are essentially using SendGrid's send() method provided by the SendGrid API to send emails. We use the send() method with the sendgrid object which we initialized with the API key. This makes sure that our emails are secure and delivered only by our permission.
Also, we've wrapped the code in a try - catch block. This ensures that our application can handle exceptions and errors correctly. If by any change the email sending fails, then the code immediately falls into the catch() block and we return an error object. This signifies that there has been some problem on the back-end.
Looking at the API response from the back-end, the front-end responds accordingly and the UI changes.
The styling goes into the html attribute inside of the send() method body. How you want to style your email completely depends on you. Here, I've included a simple template with a footer to my Twitter, Instagram, GitHub and website, along with the original message body that the end-user sends.
Now our API route is setup, so let's move on to the front end and learn how to handle the response correctly.
How to Call the API and Handle Responses
Since our API route is setup, we are now going to call our serverless API and fetch the response.
import React, { useState } from "react";

export default function ContactUs() {
  const [fullname, setFullname] = useState("");
  const [email, setEmail] = useState("");
  const [subject, setSubject] = useState("");
  const [message, setMessage] = useState("");


  const handleSubmit = async (e) => {
    e.preventDefault();

    let isValidForm = handleValidation();


      const res = await fetch("/api/sendgrid", {
        body: JSON.stringify({
          email: email,
          fullname: fullname,
          subject: subject,
          message: message,
        }),
        headers: {
          "Content-Type": "application/json",
        },
        method: "POST",
      });

      const { error } = await res.json();
      if (error) {
        console.log(error);
        return;
      }
    console.log(fullname, email, subject, message);
  };
  return (
    <main>
        <form class="rounded-lg shadow-xl flex flex-col px-8 py-8 bg-white dark:bg-blue-500">
      <h1 class="text-2xl font-bold dark:text-gray-50">Send a message</h1>

      <label for="fullname" class="text-gray-500 font-light mt-8 dark:text-gray-50">Full name<span class="text-red-500 dark:text-gray-50">*</span></label>
      <input type="text" name="fullname" class="bg-transparent border-b py-2 pl-4 focus:outline-none focus:rounded-md focus:ring-1 ring-green-500 font-light text-gray-500" />

      <label for="email" class="text-gray-500 font-light mt-4 dark:text-gray-50">E-mail<span class="text-red-500">*</span></label>
      <input type="email" name="email" class="bg-transparent border-b py-2 pl-4 focus:outline-none focus:rounded-md focus:ring-1 ring-green-500 font-light text-gray-500" />

      <label for="subject" class="text-gray-500 font-light mt-4 dark:text-gray-50">Subject<span class="text-red-500">*</span></label>
      <input type="text" name="subject" class="bg-transparent border-b py-2 pl-4 focus:outline-none focus:rounded-md focus:ring-1 ring-green-500 font-light text-gray-500" />

      <label for="message" class="text-gray-500 font-light mt-4 dark:text-gray-50">Message<span class="text-red-500">*</span></label>
      <textarea name="message" class="bg-transparent border-b py-2 pl-4 focus:outline-none focus:rounded-md focus:ring-1 ring-green-500 font-light text-gray-500"></textarea>
      <div class="flex flex-row items-center justify-start">
        <button class="px-10 mt-8 py-2 bg-[#130F49] text-gray-50 font-light rounded-md text-lg flex flex-row items-center">
          Send
          <svg width="24" height="24" viewBox="0 0 24 24" class="text-cyan-500 ml-2" fill="currentColor" xmlns="http://www.w3.org/2000/svg">
            <path d="M9.00967 5.12761H11.0097C12.1142 5.12761 13.468 5.89682 14.0335 6.8457L16.5089 11H21.0097C21.562 11 22.0097 11.4477 22.0097 12C22.0097 12.5523 21.562 13 21.0097 13H16.4138L13.9383 17.1543C13.3729 18.1032 12.0191 18.8724 10.9145 18.8724H8.91454L12.4138 13H5.42485L3.99036 15.4529H1.99036L4.00967 12L4.00967 11.967L2.00967 8.54712H4.00967L5.44417 11H12.5089L9.00967 5.12761Z" fill="currentColor" />
          </svg>
        </button>
      </div>
    </form>
    </main>
  );
}
Here we are calling the API we just created with fetch, which is provided by React.
Fetch calls the serverless API with the body like this:
body: JSON.stringify({
          email: email,
          fullname: fullname,
          subject: subject,
          message: message,
        })
These are our form fields with the form data filled in already (remember useState()?) which are now available to us.
The API responds with either success or failure. If it is a success, the email gets delivered – otherwise, the mail doesn't get delivered.
For the end-user to know the form status, we need to show some UI elements. But before that, we need to handle what happens if there are empty fields.
How to Handle Form Validation and Make the UI Respond to the API Response
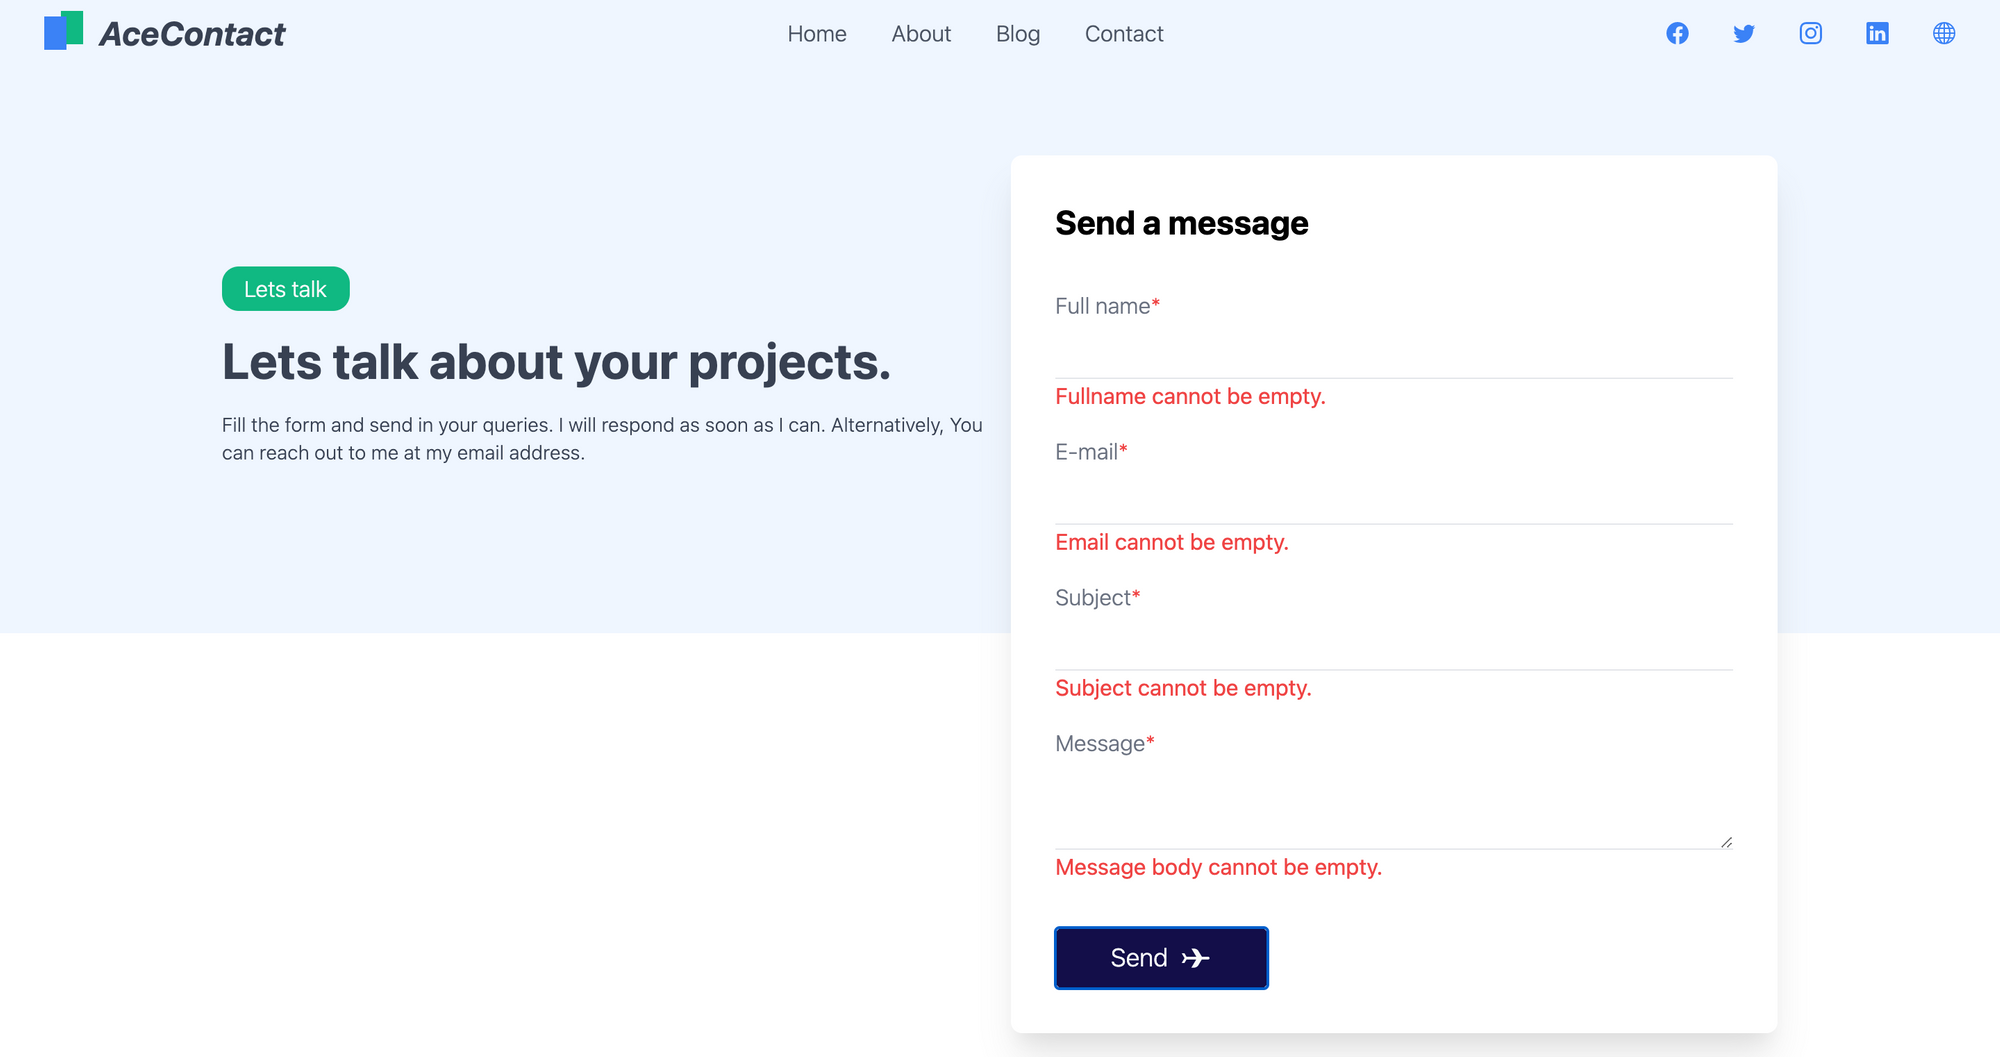
We need to ensure 3 things here:
- All the fields should be filled in – that is, we can't submit the form if any of the fields are empty. Also, the user must know why the form is not submitting. For that, we are going to display error messages.
- While the form is being submitted, the user must know that some processing is going on. For that, we are going to change the button text when the form is in the process of submitting.
- When the form is successfully submitted or if it fails, we are going to show the final status at the bottom of the form.
Let's create a method handleValidation() to check for validation:
  const handleValidation = () => {
    let tempErrors = {};
    let isValid = true;

    if (fullname.length <= 0) {
      tempErrors["fullname"] = true;
      isValid = false;
    }
    if (email.length <= 0) {
      tempErrors["email"] = true;
      isValid = false;
    }
    if (subject.length <= 0) {
      tempErrors["subject"] = true;
      isValid = false;
    }
    if (message.length <= 0) {
      tempErrors["message"] = true;
      isValid = false;
    }

    setErrors({ ...tempErrors });
    console.log("errors", errors);
    return isValid;
  };
The function is pretty straightforward: it checks for all the fields and returns a boolean isValid if the form is valid.
Also, we are maintaining state for all the fields to display error messages at the end – essentially, we are saving the fields that contain errors.
The final code looks something like this, with button text, error messages, and form validations:
import React, { useState } from "react";

export default function ContactUs() {
   // States for contact form fields
  const [fullname, setFullname] = useState("");
  const [email, setEmail] = useState("");
  const [subject, setSubject] = useState("");
  const [message, setMessage] = useState("");

  //   Form validation state
  const [errors, setErrors] = useState({});

  //   Setting button text on form submission
  const [buttonText, setButtonText] = useState("Send");

  // Setting success or failure messages states
  const [showSuccessMessage, setShowSuccessMessage] = useState(false);
  const [showFailureMessage, setShowFailureMessage] = useState(false);

  // Validation check method
  const handleValidation = () => {
    let tempErrors = {};
    let isValid = true;

    if (fullname.length <= 0) {
      tempErrors["fullname"] = true;
      isValid = false;
    }
    if (email.length <= 0) {
      tempErrors["email"] = true;
      isValid = false;
    }
    if (subject.length <= 0) {
      tempErrors["subject"] = true;
      isValid = false;
    }
    if (message.length <= 0) {
      tempErrors["message"] = true;
      isValid = false;
    }

    setErrors({ ...tempErrors });
    console.log("errors", errors);
    return isValid;
  };

  //   Handling form submit

  const handleSubmit = async (e) => {
    e.preventDefault();

    let isValidForm = handleValidation();

    if (isValidForm) {
      setButtonText("Sending");
      const res = await fetch("/api/sendgrid", {
        body: JSON.stringify({
          email: email,
          fullname: fullname,
          subject: subject,
          message: message,
        }),
        headers: {
          "Content-Type": "application/json",
        },
        method: "POST",
      });

      const { error } = await res.json();
      if (error) {
        console.log(error);
        setShowSuccessMessage(false);
        setShowFailureMessage(true);
        setButtonText("Send");
        return;
      }
      setShowSuccessMessage(true);
      setShowFailureMessage(false);
      setButtonText("Send");
    }
    console.log(fullname, email, subject, message);
  };
  return (
    <main>
      // Rest of the JSX code goes here. (With form fields)
    </main>
  );
}
When the form is delivered successfully, we get a nice response at the UI. To deliver that response, we have showSuccessMessage and showFailureMessage states. If the response from the back-end API route does NOT contain the property error, that means the form submission was successful and the email has been sent.
In that case, showSuccessMessage is set to True, which shows the corresponding markup just beneath the Form box. If the response body contains the property of error, the showFailureMessage is set to True and the corresponding message is displayed on the screen.
In both success and failure scenarios, we have to reset the button text to send instead of sending.... For that, we are using the state setButtonText('send') that sets the button text in case of failure or success. We set the button text to sending... when the Send button is clicked.
How to Receive Emails and UI Responses
When the email is successfully delivered, we get a success message in the contact form itself.
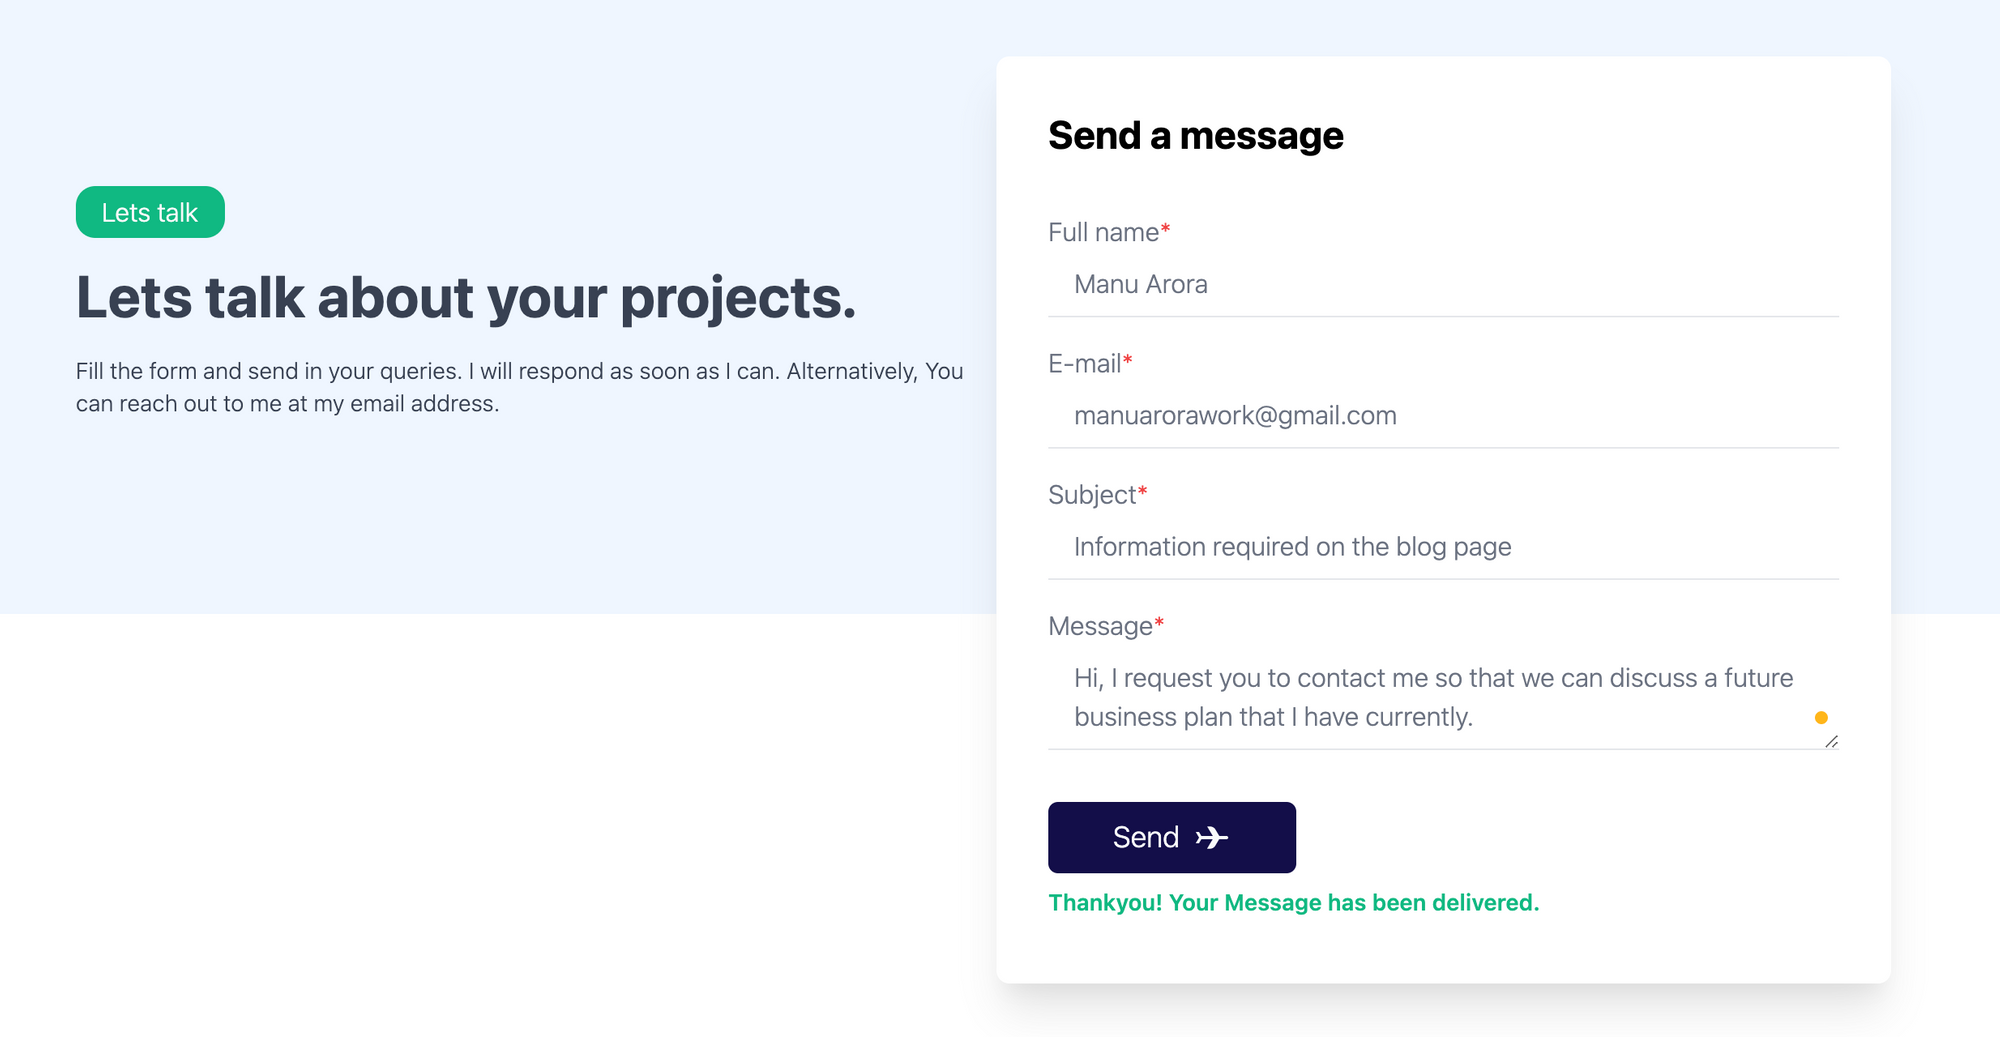
And you will successfully receive an email with the template that we just created, securely delivered by SendGrid 💯
Environment Variables
Please note that we are using the API keys and the keys are sensitive. This means that we should always store secret or API keys in environment variables.
As we already have .env.local for our local environment, the hosting provider needs to know about the API keys too.
Vercel provides an easy way to store API keys on the hosting panel itself.
To store the API keys securely in your Vercel account, do the following:
- Go to your projects page
- Go to settings
- Go to Environment variables
- Add the name of the environment variable, in our case it is
SENDGRID_API_KEY, and add the corresponding API key in the value field. - Re-deploy your application and your project will work in a production environment.
Live Demo and Source Code
Here are the source code and a live demo of the application:
Conclusion
SendGrid is an excellent option to use to send emails from a website. When you integrate it with Next.js and their serverless API routes, it becomes extremely easy to integrate forms in any part of your website.
SendGrid also gives you an option to integrate templates where you can have custom themes for your emails.
There are other options too for sending emails like Nodemailer that I've used in the past and still use for some of my projects.
It took me around an hour to build this application from the ground up – all thanks to Next.js, TailwindCSS, and SendGrid for their extremely intuitive workflow and API semantics. Also thanks to the Tailwind Master Kit for the beautiful Contact Page UI.
If you liked this blog, try implementing it in your own website so you can reach out to your end-users.
If you'd like to give any feedback, reach out to me at my Twitter handle or visit my Website
Happy coding. :)