

React is a popular front-end framework for building interactive user interfaces. It has helped revolutionize the development of data-intensive front-end applications.
React's declarative nature makes building user interfaces intuitive. And reusable React components increase development speed and reduce time to production.
To further improve the development experience when building user interfaces, several React frameworks have emerged. One such framework is refine.
refine is a React-based framework for building web applications. It is similar to React-admin, Redwood, and Retool.
The refine ecosystem comes with out-of-the-box integrations for user authentication, routing, networking, internalization, and more.
In this article, you will learn refine by building a simple admin panel. This will help highlight the main building blocks of the refine framework. We will also explore the main features and possible use cases of refine.
What is refine?
refine is an open-source, MIT-licensed React-based framework for building front-end applications. It is similar to React-admin, Retool, and Redwood. refine is a "headless" React framework. It is not opinionated about your styling and design choices.
This means that you can use refine with a custom design or a UI component library. It ships with integrations for the most popular component libraries and design systems, such as Material UI, Chakra UI, and Ant design.
refine has built-in router providers for the most popular routing libraries, such as React Router, Remix Router, Next.js Router, and React Location. You can choose a routing library that meets your project's requirements.
You can use refine to build data-intensive applications such as admin panels, dashboards, internal tools, and storefronts. The command line tool, which is part of the React ecosystem, can help you set up a refine application fast.
You can get up and running fast if you have beginner to intermediate knowledge of React, since refine is a React-based framework. You can also use refine with other React frameworks like Next and Remix.
Prerequisites – Development Tools
You will need the following tools to run some of the examples in this article.
The Node runtime environment
If you don't have Node, download and install it from the Node downloads page. After installation, run the command below on the command line to check if the installation was successful.
node -v
The command above will display the Node version on your machine if the installation is successful.
Recent versions of Node also ship with npm. Run the command below on the terminal to be sure you have npm. It should display the version of npm that you installed with Node.
npm -v
A text editor
You will need a text editor like VS Code or Sublime Text. My favorite is VS Code. You can download it from the VS Code downloads page. Alternatively, download Sublime Text for your system from the Sublime Text downloads page.
How to Set Up a refine Application
You can set up a custom refine application or use the refine command line utility to bootstrap a refine application fast. If you are just starting out, I recommend you use the refine command line tool for a quick project setup.
The command line tool will create a refine project with all the required configurations. Follow the steps below to create a simple refine project using the command line tool. You should have the development tools I highlighted in the previous section to follow the steps below.
Step 1 — Create a refine application
Navigate to the directory where you want to create the refine application and run the command below on the command line. I am using npm as a package manager. But you can also use a different package manager.
Also note that if it is your first time creating a refine project, the command below will prompt you to install the create-refine-app package.
npm create refine-app@latest
The command above will launch the installation process. Respond to the prompts during the installation. I chose the refine-react project template, RESTful back-end integration, and Material UI as the UI framework for this project.
You will notice I have opted out of the other setup configurations.
✔ Downloaded remote source successfully.
✔ Choose a project template · refine-react
✔ What would you like to name your project?: · refine-demo
✔ Choose your backend service to connect: · data-provider-custom-json-rest
✔ Do you want to use a UI Framework?: · mui
✔ Do you want to add example pages?: · no
✔ Do you want to add dark mode support?: · no
✔ Do you want to customize the Material UI theme?: · no
✔ Do you want to customize the Material UI layout?: · no
✔ Do you need any Authentication logic?: · none
✔ Do you need i18n (Internationalization) support?: · no
✔ Do you want to add kbar command interface support?: · no
✔ Choose a package manager: · npm
✔ Would you mind sending us your choices so that we can improve superplate? · no
Step 2 — Open the project in a text editor
Once the installation is complete, open the project directory in a text editor. If you are using VS Code, use the code global command with the name of the project directory to open the project directory in VS Code.
The command below assumes that the name of your project directory is refine-demo.
code refine-demo
Step 3 — Launch the development server
You can start the development server by running the command below on the command line.
npm run dev
The above command will launch the development sever for your refine project in your default browser on localhost, port 3000. The welcome page should look like the screenshot below:

Main Concepts in refine
You will encounter several possibly unfamiliar concepts when working with refine. Below are the explanations of some of these common concepts you might encounter.
Data providers
More often than not, you have to communicate with an API when building data-intensive front-end applications with React. Unlike React, refine abstracts HTTP requests to APIs in data providers.
A data provider makes network requests to an API and forwards the response to the component that needs it.
The refine ecosystem has data providers for REST API, GraphQL API, cloud databases like Firebase, and some of the popular headless content management systems like Strapi.
You can declare a custom data provider if you don't intend to use the data providers in the refine ecosystem. A refine data provider needs to have the shape and methods below.
const dataProvider = {
    create: ({ resource, variables, metaData }) => Promise,
    createMany: ({ resource, variables, metaData }) => Promise,
    deleteOne: ({ resource, id, variables, metaData }) => Promise,
    deleteMany: ({ resource, ids, variables, metaData }) => Promise,
    getList: ({
        resource,
        pagination,
        hasPagination,
        sort,
        filters,
        metaData,
    }) => Promise,
    getMany: ({ resource, ids, metaData }) => Promise,
    getOne: ({ resource, id, metaData }) => Promise,
    update: ({ resource, id, variables, metaData }) => Promise,
    updateMany: ({ resource, ids, variables, metaData }) => Promise,
    custom: ({
        url,
        method,
        sort,
        filters,
        payload,
        query,
        headers,
        metaData,
    }) => Promise,
    getApiUrl: () => "",
};
The method names in a data provider are self-explanatory. The create method creates an item in a resource like its name suggests and returns a promise. And it takes several parameters. The other method names are self-descriptive too.
Your refine application interacts with data providers via data hooks. To perform a CRUD operation, you can trigger the methods in your data provider using data hooks.
Data hooks
As pointed out above, you can trigger any of the methods in the data provider from a component using data hooks. Each method in a data provider has a corresponding data hook. For example, the useCreate hook triggers the create method in your data provider.
You can use the useCreate hook in your component like so:
import { useCreate } from "@pankod/refine-core";

const MyComponent = () => {
  const { mutate } = useCreate();
  const clickHandler = () => {
    mutate({ resource: "posts", values: { title: "Refine hello world!" } });
  };
  return <button onClick={clickHandler}>Click to Create an item</button>;
};
Though the useCreate hook returns an object with several properties, we are interested in the mutate function in the above example.
Invoking the mutate function like we did triggers the create method in your data provider. After that, the create method makes a network request to your API and forwards the response to your component.
There are several data hooks that you can look up in the Refine documentation.
Resources
As hinted above, working with APIs is inevitable when building front-end applications. The API usually consists of resources you can access via endpoints and perform CRUD operations on.
The Refine component is the entry point for any refine application. When you create any refine application using create-refine-app, the App.tsx component will always render the Refine component like in the example below.
function App() {
  return (
    <Refine
      dataProvider={dataProvider(apiUrl)}
      routerProvider={routerProvider}
      resources={[
        {
          name: "users",
          list: List,
          show: Show,
          create: Create,
          edit: Edit,
        },
      ]}
    />
  );
}
One of the props you pass to theRefine component is the resources prop. The value of the resources prop is an array of resource objects. Each resource object needs to have a name property.
As in the example above, you can pass additional properties such as list, show, create, and edit.
The values of list, show, create, and edit are components. In the example above, the value of the name field is "users".
The name field determines the routes in your front-end application. When you navigate to the /users route in your app, refine will render the List component.
Similarly, when you navigate to the /users/show route, refine will render the Show component. The table below summarizes the relationship between the fields in the above resource object and the routes in your application.
| Resource object property | Route | Rendered component |
list | /users | List |
show | /users/show | Show |
create | /users/create | Create |
edit | /users/edit | Edit |
Instead of creating components from scratch, you can also generate them based on your resources using an Inferencer.
Inferencer
Inferencer is one of the packages in the refine ecosystem of packages. It increases your development speed by generating CRUD pages after analyzing your data model. You can then customize the auto-generated components to meet the requirements of your project.
Instead of setting the values of the resource object properties list, show, create, and edit to a custom component like in the previous sub-section, the inferencer can generate the components for you. You can then customize the components to your needs.
import { HeadlessInferencer } from "@pankod/refine-inferencer/headless";

function App() {
  return (
    <Refine
      dataProvider={dataProvider(apiUrl)}
      routerProvider={routerProvider}
      resources={[
        {
          name: "topics",
          list: HeadlessInferencer,
          show: HeadlessInferencer,
          create: HeadlessInferencer,
          edit: HeadlessInferencer,
        },
      ]}
    />
  );
}
The code above assumes you are using HeadlessInferencer. You can also use MuiInferencer if you are using Material UI.
The Inferencer relies on the @pankod/refine-react-hook-form and @pankod/refine-react-table packages internally to generate forms and tables. So be sure to install them.
npm i @pankod/refine-react-table @pankod/refine-react-hook-form
How to Build an Admin Panel with refine
In this section, you will build a simple admin panel by modifying the refine app you created above.
Remember, we chose the RESTful API back-end integration while bootstrapping the app using create-refine-app. So we will use a fake RESTful API for this illustration.
In a real-world application, you will work with a different back-end integration. It can be a RESTful API, GraphQL API, cloud databases like Firebase, or a Content Management System like Strapi.
You need to read the refine documentation on using the different back-end integrations available in the refine ecosystem.
The fake RESTful API has several endpoints for accessing the available resources. We will build an admin panel for the users resource. Follow the steps below if you have opened the refine project we created at the beginning of this article in a text editor.
Step 1 — Install Inferencer dependencies
We will use MuiInferencer to generate CRUD pages. The Inferencer relies on @pankod/refine-react-hook-form and @pankod/refine-react-table packages internally. Run the command below on the terminal to install them.
npm i @pankod/refine-react-table @pankod/refine-react-hook-form
Step 2 — Import MuiInferencer
After successfully installing the required dependencies, open the src/App.tsx file and add the following import statement at the top:
import { MuiInferencer } from "@pankod/refine-inferencer/mui";
Step 3 — Generate components using Inferencer
As explained under the "Main concepts" section, the values of the list, show, create, and edit properties of the resource object are components. You can create these components from scratch or generate them using Inferencer. In this example, we will use the MuiInferencer to create them.
In the src/App.tsx file, the App component renders the Refine built-in component. Refine is the entry point for any refine application. Add the resources prop to your Refine component so that the App component looks like so:
function App() {
  return (
    <ThemeProvider theme={LightTheme}>
      <CssBaseline />
      <GlobalStyles styles={{ html: { WebkitFontSmoothing: "auto" } }} />
      <RefineSnackbarProvider>
        <Refine
          dataProvider={dataProvider("https://api.fake-rest.refine.dev")}
          notificationProvider={notificationProvider}
          Layout={Layout}
          ReadyPage={ReadyPage}
          catchAll={<ErrorComponent />}
          routerProvider={routerProvider}
          resources = {[
            {
              name: 'users',
              list: MuiInferencer,
              show: MuiInferencer,
              create: MuiInferencer,
              edit: MuiInferencer

            }
          ]}
        />
      </RefineSnackbarProvider>
    </ThemeProvider>
  );
}
}
Step 4 — Preview the changes
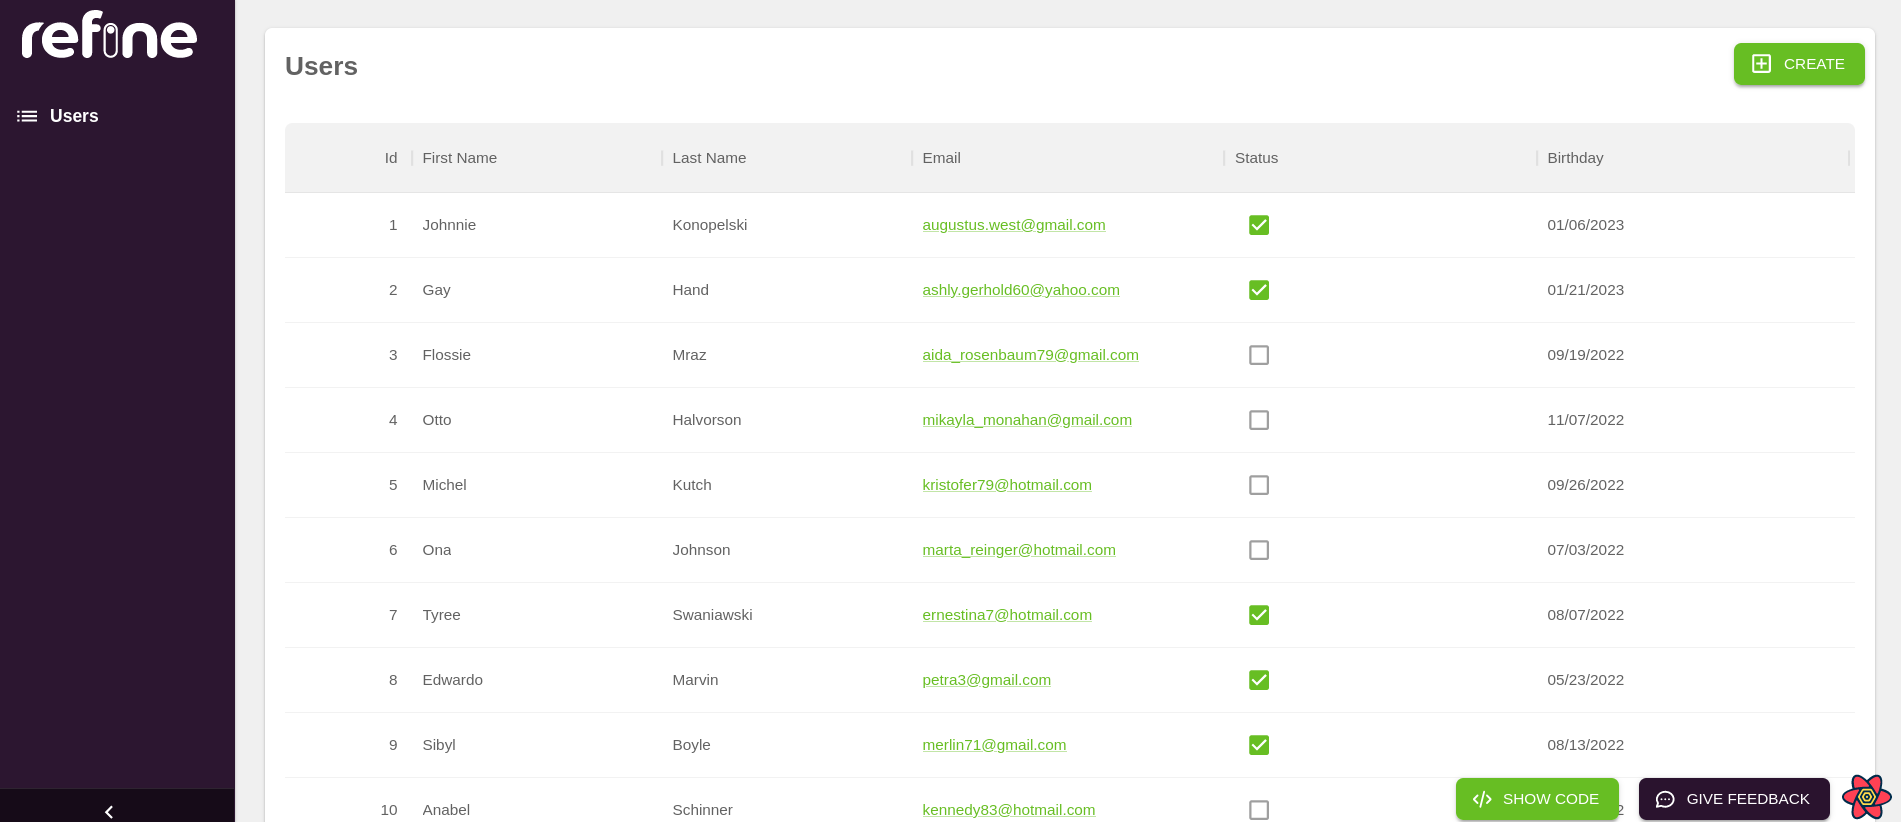
View the list of users
After saving the above changes, refine will generate the CRUD pages and redirect to the /users route. Your welcome page should look like the image below. The component generated by the Inferencer renders a table of users from the users resource.
The table has several columns, some of which are hidden from view if you use a small screen. Scroll horizontally to see all of them.
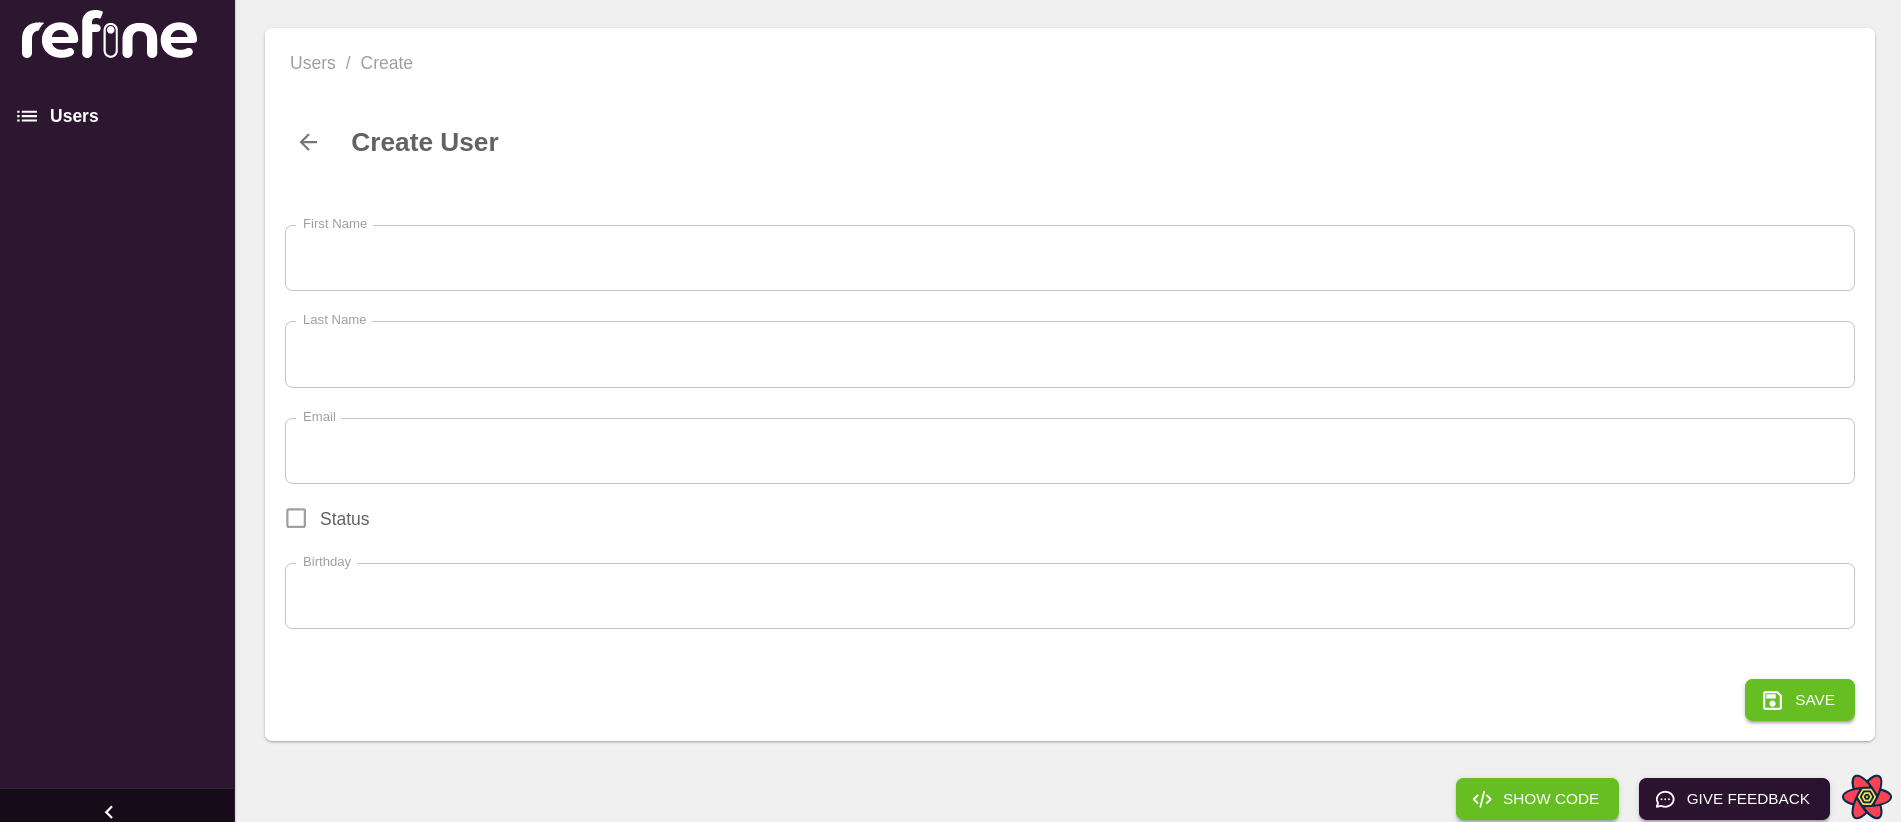
Create a new user
You can also navigate to the users/create route to create a new user by clicking the "CREATE" button. refine will render the component generated by the Inferencer. It has a form that looks like the image below for creating a new user.
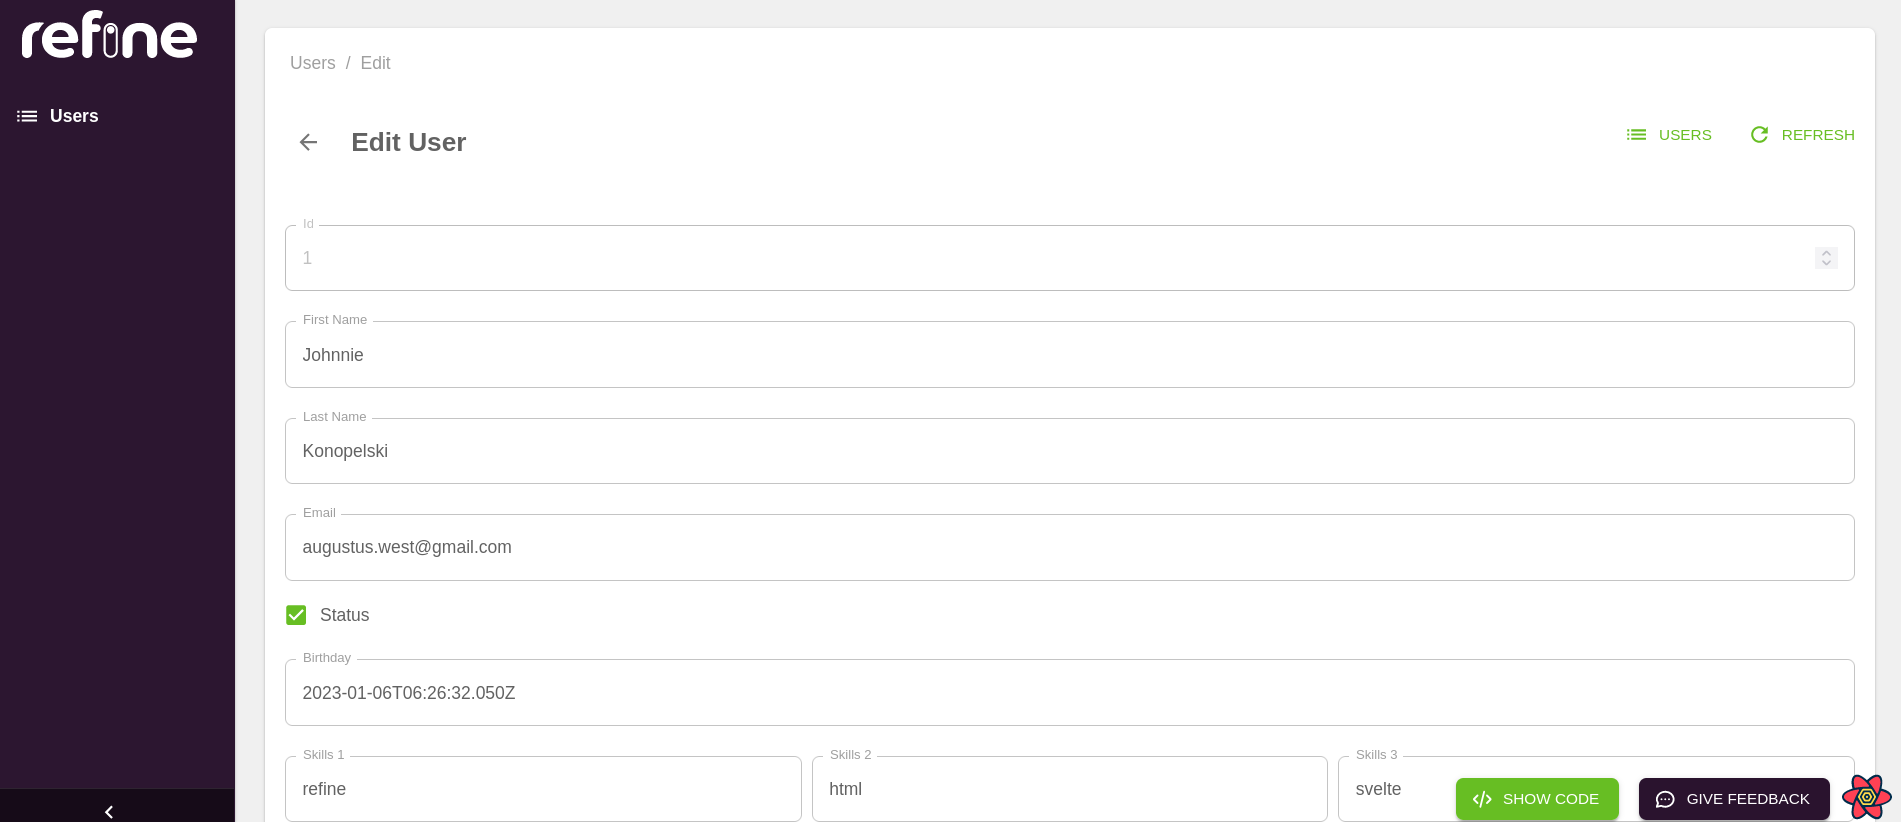
Update an existing user
To update an existing resource, navigate to the /users/edit/:id route. The id route parameter should be the id of an object in the users resource.
To edit the details of the user whose id is 1, navigate to the /users/edit/1 endpoint by clicking the edit button of the first record in the users table.
The edit button is under the last column labeled "Actions". The edit page should look like the image below.
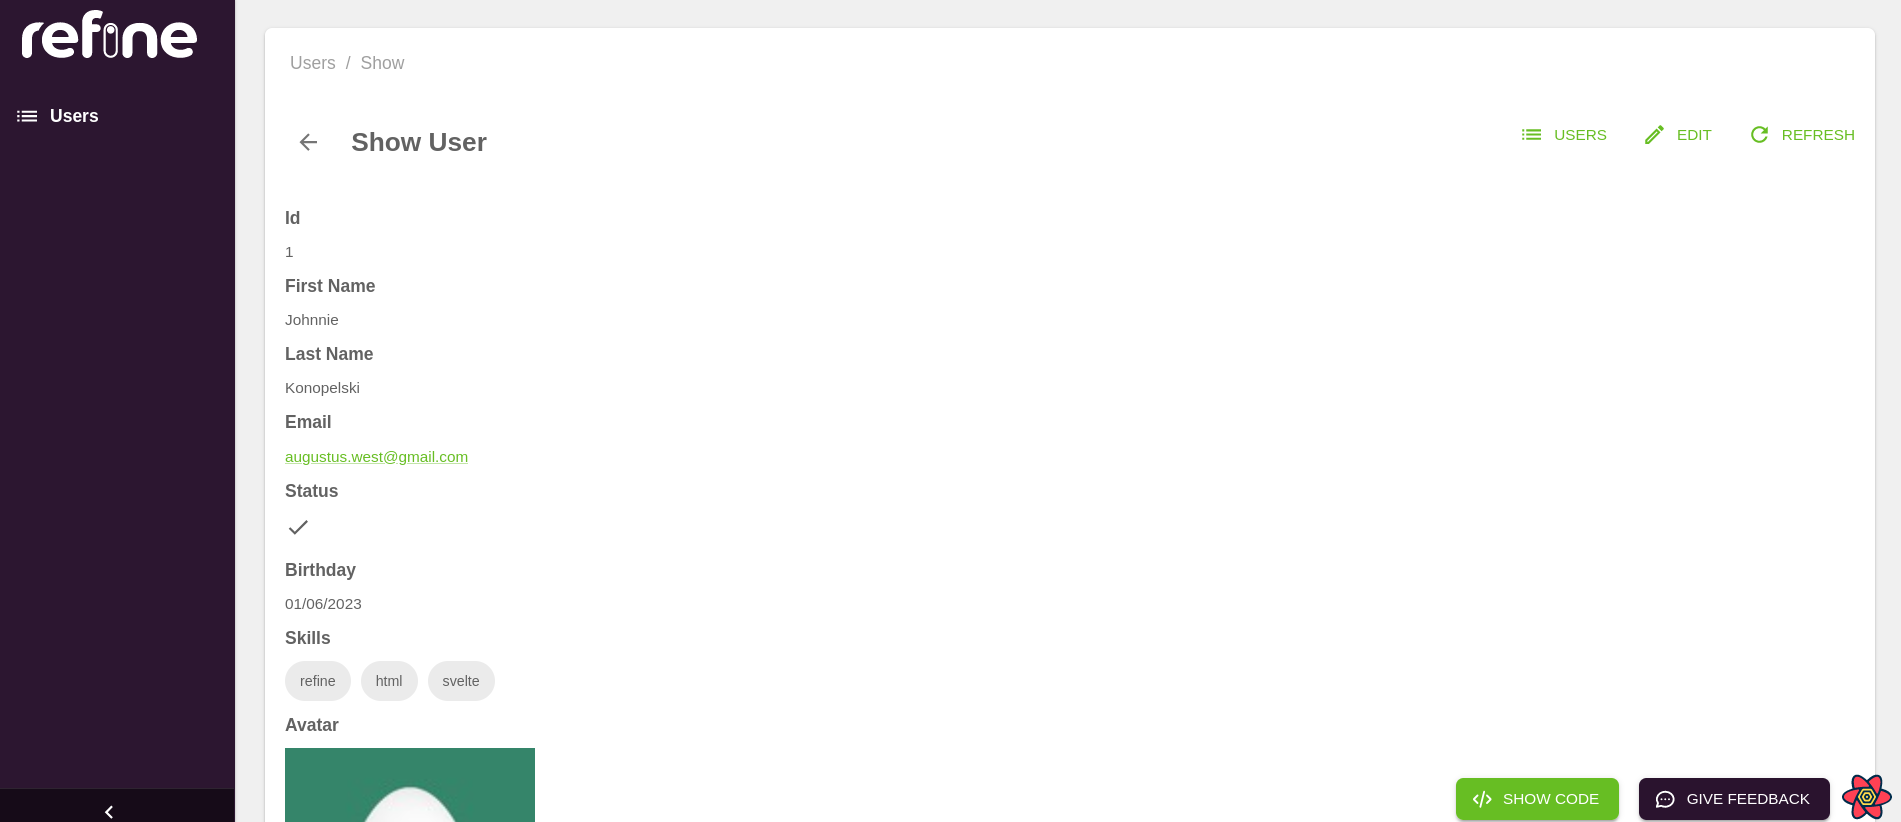
View a specific user
To view the details of a user with a specific id, navigate to the /users/show/:id route. The id should be that of an existing object in the users resource.
To view the details of the first user, click the show button of the first record in the users table. The show button is under the last column labeled "Actions".
When you navigate to the /users/show/1 endpoint, you should see the details of the first user whose id is 1.
Step 5 — View the code generated by Inferencer
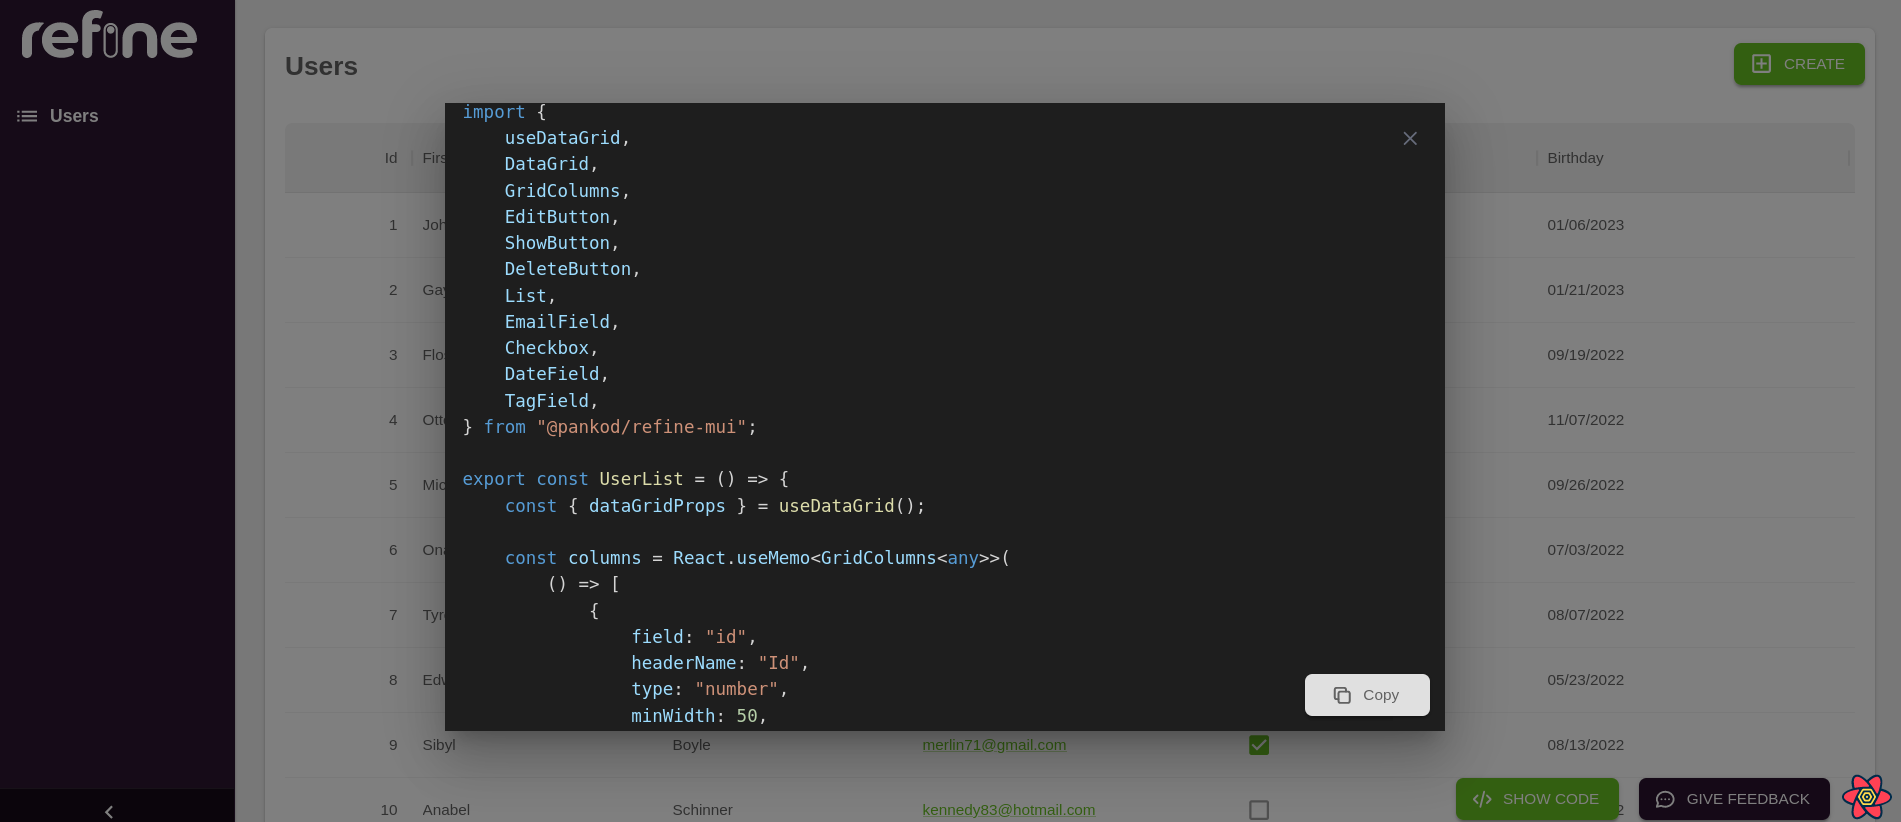
The Inferencer created components for us using the response from the /users endpoint of our fake RESTful API. In each of the pages you visited above, there is a button at the bottom right with the label "SHOW CODE".
Click it to display the code generated by the Inferencer for each page.
Step 6 — Customize the generated components
In the previous steps, you generated CRUD pages using MuiInferencer. Using MuiInferencer will get you up and running by generating the boilerplate code. But in a real-world application, you almost always want to customize the components to suit your needs.
To customize the generated code, create a src/users directory. In the src/users directory, create four files with the following names. You can name them differently if you want.
List.tsxCreate.tsxEdit.tsxShow.tsx
In the previous step, you learned how to view the generated code for each page.
Copy and paste the code for /users page in the List.tsx file you have created. In the same way, copy and paste the code for the /users/create page in the Create.tsx file. You do the same for the other pages and their corresponding components.
Import the components you have created above in your App.tsx like so:
import { UserList } from "users/List";
import { UserCreate } from "users/Create";
import { UserShow  } from "users/Show";
import { UserEdit } from "users/Edit";
In the App.tsx file, the App component renders the built-in Refine component. Modify the resources prop you are passing to the Refine component to look like so:
<Refine
  ...
  resources={[
    {
      name: "users",
      list: UserList,
      show: UserShow,
      create: UserCreate,
      edit: UserEdit,
    },
  ]}
/>;
Hopefully, you noticed how the values of the list, show, create, and edit properties of the resource object have changed from MuiInferencer to UserList, UserShow, UserCreate, and UserEdit, respectively. You can now modify the code in the components you have created.
That is just about how easy it is to create dashboards and admin panels with refine.
Within a few minutes, you have bootstrapped a project template based on your data model. You can then customize it further. Bootstrapping such a project from scratch would require a lot of work.
Conclusion
refine is an open-source MIT-licensed React-based framework for building front-end applications. It comes in handy when building dashboards, admin panels, internal tools, and storefronts. You can use it pretty much in any application that uses React.
refine comes with out-of-the-box functionalities for networking, authentication, routing, and internationalization. It also has integrations for the most popular cloud databases, such as Firebase and Supabase, and content management systems, like Strapi.
If you are looking to start using refine, use the command line tool. With the command line tool, you can choose a headless setup or use one of the built-in component or design systems such as Material UI and Ant design.
Hopefully, this article has introduced you to the very basics of refine. refine has several other features and use cases that I haven't highlighted here. Check out the documentation to fully understand refine and its capabilities.