
By Scott Spence
UPDATE 20190507: This tutorial is probably not relevant anymore as Twitter depreciate parts of the API this will be less and less relevant. I won’t be updating this going forward. ?
UPDATE 20171105: For ease of navigation I have compiled all of this story into a GitBook it is a near exact representation of this story but will be kept up to date with any changes that are made to the GitHub repository. Thanks.
I’ve been busy building Twitter bots again!
If you take a look at my GitHub profile, you’ll see that I have quite a few repos relating to Twitter bots.
My latest project started with the decision to repurpose one of my testing repos as documentation for how to use the npm twit package. But as I added new examples, it quickly morphed into another Twitter bot.
This bot is cobbled together from three examples we’ll go over here. I’ll also detail how I used Zeit’s now platform to deploy the bot to a server.
Special thanks go to Tim for helping me with the now deployment. And to Hannah Davis for the egghead.io course material. It has some pretty neat examples, which I’ve linked to in the relevant sections.
Get started
This article is meant as a reference for me and anyone else that’s interested in Twitter bots in JavaScript using Node.js. Note that all of the examples here use the npm package twit.
Bot example 1: tweeting media with the NASA picture of the day
Ganymede: The Largest Moon pic.twitter.com/6ir3tp1lRM
— Botland Mc Bot ??? (@DroidScott) May 14, 2017
Bot example 2: using RiTa to make a Markov bot that will use your Twitter archive to post statuses based off of your tweet history.
I had the best turkey pie and mash made by my sister in law # nomnomnom the pants still not turned up?
— Botland Mc Bot ??? (@DroidScott) May 14, 2017
Bot example 3: posting links (or other data) from a spreadsheet.
https://t.co/9M9K7Gmtoa a link from a Google spreadsheet
— Botland Mc Bot ??? (@DroidScott) May 15, 2017
We'll go through setting up a simple bot, which we’ll use to run each of these examples.
I'm going to assume that you have Node.js installed along with npm and that you are comfortable with the terminal.
If you are not familiar with Node.js or do not have your environment set up to use it, take a look at the README.md on my Twitter bot bootstrap repo. It gives details about getting a Twitter application set up and a development environment with c9.
A great resource is Aman Mittal's Awesome Twitter bots repo which has resources and bot examples.
A lot of this information is already out there, but I'm hoping this is all the information someone will need to get started with their own Twitter bot. I'm doing this for my own learning and hopefully other people will get something out of this as well.
Set up the bot
Before touching the terminal or writing any code, we’ll need to create a Twitter app to get our API keys (we’ll need them all):
Consumer Key (API Key)
Consumer Secret (API Secret)
Access Token
Access Token Secret
Keep the keys somewhere safe so you can use them again when you need them. We’re going to use them in an [.env](https://www.npmjs.com/package/dotenv) file that we’ll create.
We’re using [dotenv](https://www.npmjs.com/package/dotenv) so that if at some point in the future we want to add our bot to GitHub the Twitter API keys are not added to GitHub for all to see.
Starting from scratch, create a new folder via the terminal and initialise the package.json via npm or yarn. We'll need twit and dotenv for all these examples.
I’ll be using yarn for all these examples, you can use npm if you prefer.
Terminal commands:
mkdir tweebot-play
cd tweebot-play
yarn init -y
yarn add twit dotenv
touch .env .gitignore index.js
If you take a look at the package.json that was created it should look something like this:
{
  "name": "tweebot-play",
  "version": "1.0.0",
  "main": "index.js",
  "author": "Scott Spence <spences10apps@gmail.com> (https://spences10.github.io/)",
  "license": "MIT",
  "dependencies": {
    "dotenv": "^4.0.0",
    "twit": "^2.2.5"
  }
}
Add an npm script to the package.json to kick off the bot when we're testing and looking for output:
"scripts": {
    "start": "node index.js"
  },
It should look something like this now:
{
  "name": "tweebot-play",
  "version": "1.0.0",
  "main": "index.js",
  "scripts": {
    "start": "node index.js"
  },
  "author": "Scott Spence <spences10apps@gmail.com> (https://spences10.github.io/)",
  "license": "MIT",
  "dependencies": {
    "dotenv": "^4.0.0",
    "twit": "^2.2.5"
  }
}
Now we can add the following pointer to the bot in index.js, like so:
require('./src/bot')
So when we use yarn start to run the bot it calls the index.js file which runs the bot.js file from the src folder we're going to create.
Now we add our API keys to the .env file, it should look something like this:
CONSUMER_KEY=AmMSbxxxxxxxxxxNh4BcdMhxg
CONSUMER_SECRET=eQUfMrHbtlxxxxxxxxxxkFNNj1H107xxxxxxxxxx6CZH0fjymV
ACCESS_TOKEN=7xxxxx492-uEcacdl7HJxxxxxxxxxxecKpi90bFhdsGG2N7iII
ACCESS_TOKEN_SECRET=77vGPTt20xxxxxxxxxxxZAU8wxxxxxxxxxx0PhOo43cGO
In the .gitignore file we need to add .env and node_modules
# Dependency directories
node_modules

# env files
.env
Then init git:
git init
Ok, now we can start to configure the bot, we'll need a src folder a bot.js file and a config.js file.
Terminal:
mkdir src
cd src
touch config.js bot.js
Then we can set up the bot config, open the config.js file and add the following:
require('dotenv').config()

module.exports = {
  consumer_key: process.env.CONSUMER_KEY,
  consumer_secret: process.env.CONSUMER_SECRET,
  access_token: process.env.ACCESS_TOKEN,
  access_token_secret: process.env.ACCESS_TOKEN_SECRET,
}
Okay, with the bot config done, now we can set up the bot. Each of the examples detailed here will have the same three lines of code:
const Twit = require('twit')
const config = require('./config')

const bot = new Twit(config)
Do a test with yarn start from the terminal, we should get this for output:
yarn start
yarn start v0.23.4
$ node index.js
Done in 0.64s.
Our bot is now configured and ready to go!
Post Statuses
To post a status, use .post('statuses/update'.... This example makes the bot post a “hello world!” status.
bot.post('statuses/update', {
  status: 'hello world!'
}, (err, data, response) => {
  if (err) {
    console.log(err)
  } else {
    console.log(`${data.text} tweeted!`)
  }
})
Work with users
To get a list of follower IDs, use .get('followers/ids'... and include the account of which you want the followers. In this example, we're using [@DroidScott](https://twitter.com/DroidScott), but you can use any account you like. We can then log them out to the console.
bot.get('followers/ids', {
  screen_name: 'DroidScott',
  count: 5
}, (err, data, response) => {
  if (err) {
    console.log(err)
  } else {
    console.log(data)
  }
})
You can use the count parameter the specify how many results you get, up to 100 at a time.
Or to get a detailed list you can use .get('followers/list'...
Here we print off a list of user.screen_name's up to 200 per call.
bot.get('followers/list', {
  screen_name: 'DroidScott',
  count:200
}, (err, data, response) => {
  if (err) {
    console.log(err)
  } else {
    data.users.forEach(user => {
      console.log(user.screen_name)
    })
  }
})
To follow back a follower we can use .post('friendships/create'... here the bot is following back the user MarcGuberti
A bot should only follow users that follow the bot.
bot.post('friendships/create', {
  screen_name: 'MarcGuberti'
}, (err, data, response) => {
  if (err) {
    console.log(err)
  } else {
    console.log(data)
  }
})
Like we did with followers, you can get a list of accounts that your bot is following back.
bot.get('friends/ids', {
  screen_name: 'DroidScott'
}, (err, data, response) => {
  if (err) {
    console.log(err)
  } else {
    console.log(data)
  }
})
And also a detailed list.
bot.get('friends/list', {
  screen_name: 'DroidScott'
}, (err, data, response) => {
  if (err) {
    console.log(err)
  } else {
    console.log(data)
  }
})
You can get friendship statuses. This is useful for following new followers, and gives us the relation of a specific user. You can run through your followers list and follow back any users that do not have the following connection.
Lets take a look at the relation between our bot and [@ScottDevTweets](https://twitter.com/ScottDevTweets)
bot.get('friendships/lookup', {
  screen_name: 'ScottDevTweets'
}, (err, data, response) => {
  if (err) {
    console.log(err)
  } else {
    console.log(data)
  }
})
If the user follows the bot, then relationship will be:
[ { name: 'Scott Spence ???♻',
    screen_name: 'ScottDevTweets',
    id: 4897735439,
    id_str: '4897735439',
    connections: [ 'followed_by' ] } ]
If the user and the bot are following each other, the relationship will be:
[ { name: 'Scott Spence ???♻',
    screen_name: 'ScottDevTweets',
    id: 4897735439,
    id_str: '4897735439',
    connections: [ 'following', 'followed_by' ] } ]
And if there is no relationship then:
[ { name: 'Scott Spence ???♻',
    screen_name: 'ScottDevTweets',
    id: 4897735439,
    id_str: '4897735439',
    connections: [ 'none' ] } ]
Direct Message a user with bot.post('direct_messages/new'...
A bot should only DM a user that is following the bot account
bot.post('direct_messages/new', {
  screen_name: 'ScottDevTweets',
  text: 'Hello from bot!'
}, (err, data, response) => {
  if (err) {
    console.log(err)
  } else {
    console.log(data)
  }
})
Interact with tweets
To get a list of tweets in the bot’s time line, use .get(statuses/home_timeline'...
bot.get('statuses/home_timeline', {
  count: 1
}, (err, data, response) => {
  if (err) {
    console.log(err)
  } else {
    console.log(data)
  }
})
To be more granular you can pull out specific information on each tweet.
bot.get('statuses/home_timeline', {
  count: 5
}, (err, data, response) => {
  if (err) {
    console.log(err)
  } else {
    data.forEach(t => {
      console.log(t.text)
      console.log(t.user.screen_name)
      console.log(t.id_str)
      console.log('\n')
    })
  }
})
To retweet use .post('statuses/retweet/:id'... and pass in a tweet id to retweet.
bot.post('statuses/retweet/:id', {
  id: '860828247944253440'
}, (err, data, response) => {
  if (err) {
    console.log(err)
  } else {
    console.log(`${data.text} retweet success!`)
  }
})
To unretweet just use .post('statuses/unretweet/:id'...
bot.post('statuses/unretweet/:id', {
  id: '860828247944253440'
}, (err, data, response) => {
  if (err) {
    console.log(err)
  } else {
    console.log(`${data.text} unretweet success!`)
  }
})
To like a tweet use .post('favorites/create'...
bot.post('favorites/create', {
  id: '860897020726435840'
}, (err, data, response) => {
  if (err) {
    console.log(err)
  } else {
    console.log(`${data.text} tweet liked!`)
  }
})
To unlike a post use .post('favorites/destroy'...
bot.post('favorites/destroy', {
  id: '860897020726435840'
}, (err, data, response) => {
  if (err) {
    console.log(err)
  } else {
    console.log(`${data.text} tweet unliked!`)
  }
})
To reply to a tweet is much the same as posting a tweet, but you need to include the in_reply_to_status_id parameter. Also, you will need to put in the screen name of the person you are replying to.
bot.post('statuses/update', {
  status: '@ScottDevTweets I reply to you yes!',
  in_reply_to_status_id: '860900406381211649'
}, (err, data, response) => {
  if (err) {
    console.log(err)
  } else {
    console.log(`${data.text} tweeted!`)
  }
})
Finally, if you want to delete a tweet, use .post('statuses/destroy/:id'... by passing the tweet id you want to delete.
bot.post('statuses/destroy/:id', {
  id: '860900437993676801'
}, (err, data, response) => {
  if (err) {
    console.log(err)
  } else {
    console.log(`${data.text} tweet deleted!`)
  }
})
Use Twitter search
To use search, use .get('search/tweets',.... There are quite a few search parameters for search.
The structure is q: '' where the q is for query. You would use q: 'mango' to search for mango. We can also limit the results returned with count: n so let's limit the count to 5 in the example.
bot.get('search/tweets', {
  q: 'mango',
  count: 5
}, (err, data, response) => {
  if (err) {
    console.log(err)
  } else {
    console.log(data.statuses)
  }
})
Like we did with the timeline we will pull out specific items from the data.statuses returned, like this:
bot.get('search/tweets', {
  q: 'mango',
  count: 5
}, (err, data, response) => {
  if (err) {
    console.log(err)
  } else {
    data.statuses.forEach(s => {
      console.log(s.text)
      console.log(s.user.screen_name)
      console.log('\n')
    })
  }
})
The search API returns results for relevance and not completeness. If you want to search for an exact phrase, you’ll need to wrap the query in quotes "purple pancakes". If you want to search for one of two words, then use OR like 'tabs OR spaces'. And if you want to search for both, use AND like 'tabs AND spaces'.
If you want to search for a tweet without another word use - like donald -trump. You can use it multiple times as well, like donald -trump -duck
You can search for tweets with emoticons, like q: 'sad :(' try it!
Of course, you can look for hashtags q: '#towie'. Look for tweets to a user q: 'to:@stephenfry' or from a user q: 'from:@stephenfry'
You can filter out indecent tweets with the filter:safe parameter. You can also use it to filter for media tweets which will return tweets containing video. You can specify for images to view tweets with images and you can specify links for tweets with links.
If you want tweets from a certain website, you can specify with the url parameter like url:asda
bot.get('search/tweets', {
  q: 'from:@dan_abramov url:facebook filter:images since:2017-01-01',
  count: 5
}, (err, data, response) => {
  if (err) {
    console.log(err)
  } else {
    data.statuses.forEach(s => {
      console.log(s.text)
      console.log(s.user.screen_name)
      console.log('\n')
    })
  }
})
Last few now, there’s the result_type parameter that will return recent, popular, or mixed results.
The geocode parameter takes the format latitude longitude then radius in miles '51.5033640,-0.1276250,1mi' example:
bot.get('search/tweets', {
  q: 'bacon',
  geocode: '51.5033640,-0.1276250,1mi',
  count: 5
}, (err, data, response) => {
  if (err) {
    console.log(err)
  } else {
    data.statuses.forEach(s => {
      console.log(s.text)
      console.log(s.user.screen_name)
      console.log('\n')
    })
  }
})
Use Twitter Stream API
There are two ways to use the Stream API. First, there’s .stream('statuses/sample').
const stream = bot.stream('statuses/sample');

stream.on('tweet', t => {
  console.log(`${t.text}\n`)
})
This will give you a random sampling of tweets.
For more specific information use .stream('statuses/filter')... then pass some parameters, and use track: to specify a search string.
var stream = bot.stream('statuses/filter', {
  track: 'bot'
})

stream.on('tweet', function (t) {
  console.log(t.text + '\n')
})
You can also use multiple words in the track parameter, this will get you results with either twitter or bot in them.
const stream = bot.stream('statuses/filter', {
  track: 'twitter, bot'
});

stream.on('tweet', t => {
  console.log(`${t.text}\n`)
})
If you want both words, then remove the comma , — you can think of spaces as AND and commas as OR.
You can also use the follow: parameter which lets you input the ids of specific users.
const stream = bot.stream('statuses/filter', {
  follow: '4897735439'
});

stream.on('tweet', t => {
  console.log(`${t.text}\n`)
})
Tweet media files
This egghead.io video is a great resource for this section thanks to Hannah Davis for the awesome content!
This will be a request to get the NASA image of the day and tweet it.
We will need references to request and fs for working with the file system.
const Twit = require('twit')
const request = require('request')
const fs = require('fs')
const config = require('./config')

const bot = new Twit(config)
The first step is to get the photo from the NASA API. We will need to create a parameter object inside our getPhoto function that will be passed to the node HTTP client request for the image.
function getPhoto() {
  const parameters = {
    url: 'https://api.nasa.gov/planetary/apod',
    qs: {
      api_key: process.env.NASA_KEY
    },
    encoding: 'binary'
  };
}
The parameters specify an api_key so for this you can apply for an API key or you can use the DEMO_KEY. This API key can be used for initially exploring APIs prior to signing up, but it has much lower rate limits, so you’re encouraged to signup for your own API key.
In the example, you can see that I have configured my key with the rest of my .env variables.
CONSUMER_KEY=AmMSbxxxxxxxxxxNh4BcdMhxg
CONSUMER_SECRET=eQUfMrHbtlxxxxxxxxxxkFNNj1H107xxxxxxxxxx6CZH0fjymV
ACCESS_TOKEN=7xxxxx492-uEcacdl7HJxxxxxxxxxxecKpi90bFhdsGG2N7iII
ACCESS_TOKEN_SECRET=77vGPTt20xxxxxxxxxxxZAU8wxxxxxxxxxx0PhOo43cGO

NASA_KEY=DEMO_KEY
Now to use the request to get the image:
function getPhoto() {
  const parameters = {
    url: 'https://api.nasa.gov/planetary/apod',
    qs: {
      api_key: process.env.NASA_KEY
    },
    encoding: 'binary'
  };
  request.get(parameters, (err, respone, body) => {
    body = JSON.parse(body)
    saveFile(body, 'nasa.jpg')
  })
}
In the request, we pass in our parameters and parse the body as JSON so we can save it with the saveFile function.
function saveFile(body, fileName) {
  const file = fs.createWriteStream(fileName);
  request(body).pipe(file).on('close', err => {
    if (err) {
      console.log(err)
    } else {
      console.log('Media saved!')
      console.log(body)
    }
  })
}
request(body).pipe(file).on('close'... is what saves the file from the file variable. It has the name nasa.jpg passed to it from the getPhoto function.
Calling getPhoto() should now save the NASA image of the day to the root of your project.
Now we can share it on Twitter. There are two parts to this, the first is to save the file.
function saveFile(body, fileName) {
  const file = fs.createWriteStream(fileName);
  request(body).pipe(file).on('close', err => {
    if (err) {
      console.log(err)
    } else {
      console.log('Media saved!')
      const descriptionText = body.title;
      uploadMedia(descriptionText, fileName)
    }
  })
}
Then uploadMedia to upload media to Twitter before we can post it. This had me stumped for a bit as I have my files in a srcfolder. If you have your bot files nested in folders, then you will need to do the same if you are struggling with file does not exist errors.
Add a require to path then use join with the relevant relative file path.
const path = require('path')
//...
const filePath = path.join(__dirname, '../' + fileName)
Here’s the complete function:
function uploadMedia(descriptionText, fileName) {
  console.log(`uploadMedia: file PATH ${fileName}`)
  bot.postMediaChunked({
    file_path: fileName
  }, (err, data, respone) => {
    if (err) {
      console.log(err)
    } else {
      console.log(data)
      const params = {
        status: descriptionText,
        media_ids: data.media_id_string
      }
      postStatus(params)
    }
  })
}
Then with the params we created in uploadMedia we can post with a straightforward .post('statuses/update'...
function postStatus(params) {
  bot.post('statuses/update', params, (err, data, respone) => {
    if (err) {
      console.log(err)
    } else {
      console.log('Status posted!')
    }
  })
}
Call the getPhoto() function to post to Twitter... super straight forward, right? I know it wasn't. Here’s the complete module:
const Twit = require('twit')
const request = require('request')
const fs = require('fs')
const config = require('./config')
const path = require('path')

const bot = new Twit(config)

function getPhoto() {
  const parameters = {
    url: 'https://api.nasa.gov/planetary/apod',
    qs: {
      api_key: process.env.NASA_KEY
    },
    encoding: 'binary'
  }
  request.get(parameters, (err, respone, body) => {
    body = JSON.parse(body)
    saveFile(body, 'nasa.jpg')
  })
}

function saveFile(body, fileName) {
  const file = fs.createWriteStream(fileName)
  request(body).pipe(file).on('close', err => {
    if (err) {
      console.log(err)
    } else {
      console.log('Media saved!')
      const descriptionText = body.title
      uploadMedia(descriptionText, fileName)
    }
  })
}

function uploadMedia(descriptionText, fileName) {
  const filePath = path.join(__dirname, `../${fileName}`)
  console.log(`file PATH ${filePath}`)
  bot.postMediaChunked({
    file_path: filePath
  }, (err, data, respone) => {
    if (err) {
      console.log(err)
    } else {
      console.log(data)
      const params = {
        status: descriptionText,
        media_ids: data.media_id_string
      }
      postStatus(params)
    }
  })
}

function postStatus(params) {
  bot.post('statuses/update', params, (err, data, respone) => {
    if (err) {
      console.log(err)
    } else {
      console.log('Status posted!')
    }
  })
}

getPhoto()
Make a Markov bot
This is pretty neat, again from the egghead.io series it uses [rita](https://www.npmjs.com/package/rita) natural language toolkit. It also uses csv-parse as we're going to be reading out our Twitter archive to make the bot sound like it’s us tweeting.
First of all, to set up the Twitter archive, you’ll need to request your data from the Twitter settings page. You’ll be emailed a link to download your archive, then when you have downloaded the archive extract out the tweets.csv file, we'll then put that in it's own folder, so from the root of your project:
cd src
mkdir twitter-archive
We’ll move our tweets.csv there to be accessed by the bot we're going to go over now.
Use fs to set up a read stream...
const filePath = path.join(__dirname, './twitter-archive/tweets.csv')

const tweetData =
  fs.createReadStream(filePath)
  .pipe(csvparse({
    delimiter: ','
  }))
  .on('data', row => {
    console.log(row[5])
  })
When you run this from the console you should get the output from your Twitter archive.
Now clear out things like @ and RT to help with the natural language processing. We'll set up two functions cleanText and hasNoStopWords
cleanText will tokenize the text delimiting it on space ' ', filter out the stop words, then .join(' ') back together with a space, and .trim() any whitespace that may be at the start of the text.
function cleanText(text) {
  return rita.RiTa.tokenize(text, ' ')
    .filter(hasNoStopWords)
    .join(' ')
    .trim()
}
The tokenized text can then be fed into the hasNoStopWords function to be sanitized for use in tweetData
function hasNoStopWords(token) {
  const stopwords = ['@', 'http', 'RT'];
  return stopwords.every(sw => !token.includes(sw))
}
Now that we have the data cleaned, we can tweet it. Replace console.log(row[5]) with inputText = inputText + ' ' + cleanText(row[5]). Next we can use rita.RiMarkov(3) where the 3 is the number of words to take into consideration. Then use markov.generateSentences(1) where 1 is the number of sentences being generated. We'll also use .toString() and .substring(0, 140) to truncate the result down to 140 characters.
const tweetData =
  fs.createReadStream(filePath)
  .pipe(csvparse({
    delimiter: ','
  }))
  .on('data', function (row) {
    inputText = `${inputText} ${cleanText(row[5])}`
  })
  .on('end', function(){
    const markov = new rita.RiMarkov(3)
    markov.loadText(inputText)
    const sentence = markov.generateSentences(1)
      .toString()
      .substring(0, 140)
  }
Now we can tweet this with the bot using .post('statuses/update'...passing in the sentence variable as the status and logging a message to the console when there is a tweet.
const tweetData =
  fs.createReadStream(filePath)
    .pipe(csvparse({
      delimiter: ','
    }))
    .on('data', row => {
      inputText = `${inputText} ${cleanText(row[5])}`
    })
    .on('end', () => {
      const markov = new rita.RiMarkov(3)
      markov.loadText(inputText)
      const sentence = markov.generateSentences(1)
        .toString()
        .substring(0, 140)
      bot.post('statuses/update', {
        status: sentence
      }, (err, data, response) => {
        if (err) {
          console.log(err)
        } else {
          console.log('Markov status tweeted!', sentence)
        }
      })
    })
}
If you want your sentences to be closer to the input text you can increase the words to consider in rita.RiMarkov(6) and if you want to make it gibberish then lower the number.
Here’s the completed module:
const Twit = require('twit')
const fs = require('fs')
const csvparse = require('csv-parse')
const rita = require('rita')
const config = require('./config')
const path = require('path')

let inputText = ''

const bot = new Twit(config)

const filePath = path.join(__dirname, '../twitter-archive/tweets.csv')

const tweetData =
  fs.createReadStream(filePath)
    .pipe(csvparse({
      delimiter: ','
    }))
    .on('data', row => {
      inputText = `${inputText} ${cleanText(row[5])}`
    })
    .on('end', () => {
      const markov = new rita.RiMarkov(10)
      markov.loadText(inputText)
      const sentence = markov.generateSentences(1)
        .toString()
        .substring(0, 140)
      bot.post('statuses/update', {
        status: sentence
      }, (err, data, response) => {
        if (err) {
          console.log(err)
        } else {
          console.log('Markov status tweeted!', sentence)
        }
      })
    })
}

function hasNoStopWords(token) {
  const stopwords = ['@', 'http', 'RT']
  return stopwords.every(sw => !token.includes(sw))
}

function cleanText(text) {
  return rita.RiTa.tokenize(text, ' ')
    .filter(hasNoStopWords)
    .join(' ')
    .trim()
}
Retrieve and Tweet data from Google sheets
If you want to tweet a list of links, you can use [tabletop](https://www.npmjs.com/package/tabletop) to work though the list. In this example, again from egghead.io, we'll go through a list of links.
So, set up the bot and require tabletop:
const Twit = require('twit')
const config = require('./config')
const Tabletop = require('tabletop')

const bot = new Twit(config)
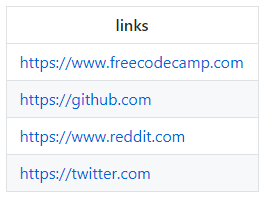
On your [Google spreadsheet](https://github.com/spences10/twitter-bot-playground/blob/master/sheets.google.com) you'll need to have a header defined and then add your links, we'll use the following for an example:
Now from Google sheets we can select ‘File’>’Publish to the web’ and copy the link that is generated to use in tabletop.
Now init Tabletop with three parameters, key: which is the spreadsheet URL, a callback: function to get the data and simpleSheet: which is true if you only have one sheet, like in our example here:
const spreadsheetUrl = 'https://docs.google.com/spreadsheets/d/1842GC9JS9qDWHc-9leZoEn9Q_-jcPUcuDvIqd_MMPZQ/pubhtml'

Tabletop.init({
  key: spreadsheetUrl,
  callback(data, tabletop) {
    console.log(data)
  },
  simpleSheet: true
})
Running the bot now should give output like this:
$ node index.js
[ { 'links': 'https://www.freecodecamp.com' },
  { 'links': 'https://github.com' },
  { 'links': 'https://www.reddit.com' },
  { 'links': 'https://twitter.com' } ]
So now we can tweet them using .post('statuses/update',... with a forEach on the data that is returned in the callback:
Tabletop.init({
  key: spreadsheetUrl,
  callback(data, tabletop) {
    data.forEach(d => {
      const status = `${d.links} a link from a Google spreadsheet`;
      bot.post('statuses/update', {
        status
      }, (err, response, data) => {
        if (err) {
          console.log(err)
        } else {
          console.log('Post success!')
        }
      })
    })
  },
  simpleSheet: true
})
Note that ${d.links} is the header name we use in the Google spreadsheet, I tried using skeleton and camel case and both returned errors so I went with a single name header on the spreadsheet.
The completed code here:
const Twit = require('twit')
const config = require('./config')
const Tabletop = require('tabletop')

const bot = new Twit(config)

const spreadsheetUrl = 'https://docs.google.com/spreadsheets/d/1842GC9JS9qDWHc-9leZoEn9Q_-jcPUcuDvIqd_MMPZQ/pubhtml'

Tabletop.init({
  key: spreadsheetUrl,
  callback(data, tabletop) {
    data.forEach(d => {
      const status = `${d.links} a link from a Google spreadsheet`
      console.log(status)
      bot.post('statuses/update', {
        status
      }, (err, response, data) => {
        if (err) {
          console.log(err)
        } else {
          console.log('Post success!')
        }
      })
    })
  },
  simpleSheet: true
})
Putting it all together
Ok, so those examples were good and all, but we haven’t really got a bot out of this have we? I mean you run it from the terminal and it’s done, but we want to be able to kick off the bot and leave it to do its thing.
One way I have found to do this is to use setInterval which will kick off events from the main bot.js module.
Take the example we did to tweet a picture and add it to it’s own module, so from the root directory of our project:
cd src
touch picture-bot.js
Take the example code from that and paste it into the new module. Then we’re going to make the following changes, to getPhoto:
const getPhoto = () => {
  const parameters = {
    url: 'https://api.nasa.gov/planetary/apod',
    qs: {
      api_key: process.env.NASA_KEY
    },
    encoding: 'binary'
  }
  request.get(parameters, (err, respone, body) => {
    body = JSON.parse(body)
    saveFile(body, 'nasa.jpg')
  })
}
Then at the bottom of the module add:
module.exports = getPhoto
So now we can call the getPhoto function from the picture-bot.js module in our bot.js module. Our bot.js module should look something like this:
const picture = require('./picture-bot')

picture()
That’s it, two lines of code, try running that from the terminal now:
yarn start
We should get some output like this:
yarn start v0.23.4
$ node index.js
Media saved!
file PATH C:\Users\path\to\project\tweebot-play\nasa.jpg
{ media_id: 863020197799764000,
  media_id_string: '863020197799763968',
  size: 371664,
  expires_after_secs: 86400,
  image: { image_type: 'image/jpeg', w: 954, h: 944 } }
Status posted!
Done in 9.89s.
The picture of the day is set up, but it has run once and completed. We need to put it on an interval with setInterval. It takes two options, the function it's going to call and the timeout value.
The picture updates every 24 hours so that will be how many milliseconds in 24 hours [8.64e+7].
The formula is 1000 60 = 1 minute, so 1000 60 60 24 so for now let’s add that directly into the setInterval function:
const picture = require('./picture-bot')

picture()
setInterval(picture, 1000 * 60 * 60 * 24)
Cool, that’s a bot that will post the NASA image of the day every 24 hours!
Lets keep going, now lets add some randomness in with the Markov bot. Like what we did for the picture of the day example, let’s create a new module for the Markov bot and add all the code in there from the previous example, so from the terminal:
cd src
touch markov-bot.js
Then copy and paste the Markov bot example into the new module, and make the following changes:
const tweetData = () => {
  fs.createReadStream(filePath)
    .pipe(csvparse({
      delimiter: ','
    }))
    .on('data', row => {
      inputText = `${inputText} ${cleanText(row[5])}`
    })
    .on('end', () => {
      const markov = new rita.RiMarkov(10)
      markov.loadText(inputText)
        .toString()
        .substring(0, 140)
      const sentence = markov.generateSentences(1)
      bot.post('statuses/update', {
        status: sentence
      }, (err, data, response) => {
        if (err) {
          console.log(err)
        } else {
          console.log('Markov status tweeted!', sentence)
        }
      })
    })
}
Then at the bottom of the module add:
module.exports = tweetData
Similar to the picture bot example, we’re going to add the tweetData export from markov-bot.js to our bot.jsmodule, which should now look something like this:
const picture = require('./picture-bot')
const markov = require('./markov-bot')

picture()
setInterval(picture, 1000 * 60 * 60 * 24)

markov()
Let’s make the Markov bot tweet at random intervals between 5 minutes and 3 hours
const picture = require('./picture-bot')
const markov = require('./markov-bot')

picture()
setInterval(picture, 1000 * 60 * 60 * 24)

const markovInterval = (Math.floor(Math.random() * 180) + 1) * 1000
markov()
setInterval(markov, markovInterval)
Alright! Picture bot and Markov bot, both done.
Do the same with the link bot? Ok, same as before, you get the idea now, right?
Create a new file in the src folder for link bot:
touch link-bot.js
Copy and paste the code from the link bot example into the new module, like this:
const link = () => {
  Tabletop.init({
    key: spreadsheetUrl,
    callback(data, tabletop) {
      data.forEach(d => {
        const status = `${d.links} a link from a Google spreadsheet`
        console.log(status)
        bot.post('statuses/update', {
          status
        }, (err, response, data) => {
          if (err) {
            console.log(err)
          } else {
            console.log('Post success!')
          }
        })
      })
    },
    simpleSheet: true
  })
}

module.exports = link
Then we can call it from the bot, so it should look something like this:
const picture = require('./picture-bot')
const markov = require('./markov-bot')
const link = require('./link-bot')

picture()
setInterval(picture, 1000 * 60 * 60 * 24)

const markovInterval = (Math.floor(Math.random() * 180) + 1) * 1000
markov()
setInterval(markov, markovInterval)

link()
setInterval(link, 1000 * 60 * 60 * 24)
We can now leave the bot running to do its thing!!
Deploy to now
We have a bot that does a few things, but it’s on our development environment and can’t stay there forever. (It could, but that would be pretty impractical). Let’s put our bot on a server somewhere to do it’s thing.
We’re going to be using Zeit’s now platform, which allows for simple deployments from the CLI. If you're not familiar with it, then take a quick look at the documentation. In these examples we're going to be using the now-cli.
There’s a few things we need to do in order to get our bot ready to go on now. Let's list them quickly and then go into detail.
- Signup and install
now-cli - Add
nowsettings +.npmignorefile - Add
.envvariables as secrets - Add npm
deployscript - Re jig
picture-bot.js
Ready? Lets do this!
Signup and install now-cli
First, signup for Zeit by creating an account and authenticating it, then install the CLI.
Install now globally on your machine so you can use it everywhere.
npm install -g now
Once it’s completed, login with:
now --login
The first time you run now, it'll ask for your email address in order to identify you. Go to the email account you supplied when signing up, click on the email sent to you from now, and you'll be logged in automatically.
If you need to switch the account or re-authenticate, run the same command again.
You can always check out the now-cli documentation for more information along with the [your first deployment](https://zeit.co/docs/getting-started/your-first-deployments#deploying-node) guide.
Add now settings
With signup and install done, we can configure the bot for deploying to now. First let’s add the now settings to our package.json file. I put it between my npm scripts and the author name in my package.json:
"scripts": {
    "start": "node index.js"
  },
  "now": {
    "alias": "my-awesome-alias",
    "files": [
      "src",
      "index.js"
    ]
  },
  "author": "Scott Spence",
This was a source of major confusion for me so I’m hoping I can save you the pain I went through trying to configure this. All the relevant documentation is there, you just need to put it all together.
If you find anything in here that doesn’t make sense or seems wrong, then please log an issue or create a pull request.
The now settings alias is to give your deployment a shorthand name over the auto generated URL that now creates. The files section covers what we want to include in the deployment to now which I’ll cover shortly. Basically, what is included in the files array is all that get passed up to the now servers.
Now we need to add a .npmignore file in the root of the project and add the following line to it:
!tweets.csv
The tweets.csv needs to go up to the now server to be used by the bot, but we previously included it in our .gitignore. This is what now uses to build your project when it's being loaded to the server. This means that the file isn't going to get loaded unless we edit the .npmignore to not ignore the tweets.csv.
Add .env variables as secrets
Our super secret Twitter keys will need to be stored as secrets in now. This is a pretty neat feature where you can define anything as a secret and reference it as an alias.
The syntax is now secrets add my-secret "my value" so for our .env keys, add them all in, giving them a descriptive (but short!) name.
You will not need to wrap your “my value” in quotes but the documentation does say “when in doubt, wrap your value in quotes.”
In the terminal, now secrets ls should list out your secrets you just created:
$ now secrets ls
> 5 secrets found under spences10 [1s]
                            id  name                   created
  sec_xxxxxxxxxxZpLDxxxxxxxxxx  ds-twit-key            23h ago
  sec_xxxxxxxxxxTE5Kxxxxxxxxxx  ds-twit-secret         23h ago
  sec_xxxxxxxxxxNorlxxxxxxxxxx  ds-twit-access         23h ago
  sec_xxxxxxxxxxMe1Cxxxxxxxxxx  ds-twit-access-secret  23h ago
  sec_xxxxxxxxxxMJ2jxxxxxxxxxx  nasa-key               23h ago
Add npm deploy script
With our secrets defined, we can create a deployment script to deploy to now. In our package.json, add an additional script:
"main": "index.js",
  "scripts": {
    "start": "node index.js",
    "deploy": "now -e CONSUMER_KEY=@ds-twit-key -e CONSUMER_SECRET=@ds-twit-secret -e ACCESS_TOKEN=@ds-twit-access  -e ACCESS_TOKEN_SECRET=@ds-twit-access-secret -e NASA_KEY=@nasa-key"
  },
  "now": {
We added deploy, which will run the now command and pass it all our environment -e variables and the associated secret value. If we break it down into separate lines it will be a bit clearer:
now
-e CONSUMER_KEY=@ds-twit-key
-e CONSUMER_SECRET=@ds-twit-secret
-e ACCESS_TOKEN=@ds-twit-access
-e ACCESS_TOKEN_SECRET=@ds-twit-access-secret
-e NASA_KEY=@nasa-key
Re-jig picture-bot.js
Because now deployments are immutable, it means that there's no write access to the disk where we want to save our NASA photo of the day. To get around that we need to use the /tmp file location.
Thank you to Tim from Zeit for helping me out with this!
In the picture-bot.js module, add the following two lines to the top of the module:
const os = require('os')
const tmpDir = os.tmpdir()
Those two lines give us the temp directory of the operating system. If you’re like me and you use Windows, it will work just as well as if you are on another system like a linux based system (what now is). In our saveFile function, we're going to use tmpDir to save our file.
We’ve taken out the nasa.jpg from the getPhoto function since we can define that information in the saveFile function. The NASA photo of the day is not always a jpeg, some items posted there are videos. We can define the type with a ternary function off of the body being passed in, this will send a tweet with a link to the video:
function saveFile(body) {
  const fileName = body.media_type === 'image/jpeg' ? 'nasa.jpg' : 'nasa.mp4';
  const filePath = path.join(tmpDir + `/${fileName}`)

  console.log(`saveFile: file PATH ${filePath}`)
  if (fileName === 'nasa.mp4') {
    // tweet the link
    const params = {
      status: 'NASA video link: ' + body.url
    }
    postStatus(params)
    return
  }
  const file = fs.createWriteStream(filePath)

  request(body).pipe(file).on('close', err => {
    if (err) {
      console.log(err)
    } else {
      console.log('Media saved!')
      const descriptionText = body.title
      uploadMedia(descriptionText, filePath)
    }
  })
}
The completed code here:
const Twit = require('twit')
const request = require('request')
const fs = require('fs')
const config = require('./config')
const path = require('path')

const bot = new Twit(config)

const os = require('os')
const tmpDir = os.tmpdir()

const getPhoto = () => {
  const parameters = {
    url: 'https://api.nasa.gov/planetary/apod',
    qs: {
      api_key: process.env.NASA_KEY
    },
    encoding: 'binary'
  }
  request.get(parameters, (err, respone, body) => {
    body = JSON.parse(body)
    saveFile(body)
  })
}

function saveFile(body) {
  const fileName = body.media_type === 'image/jpeg' ? 'nasa.jpg' : 'nasa.mp4';
  const filePath = path.join(tmpDir + `/${fileName}`)

  console.log(`saveFile: file PATH ${filePath}`)
  if (fileName === 'nasa.mp4') {
    // tweet the link
    const params = {
      status: 'NASA video link: ' + body.url
    }
    postStatus(params)
    return
  }
  const file = fs.createWriteStream(filePath)

  request(body).pipe(file).on('close', err => {
    if (err) {
      console.log(err)
    } else {
      console.log('Media saved!')
      const descriptionText = body.title
      uploadMedia(descriptionText, filePath)
    }
  })
}

function uploadMedia(descriptionText, fileName) {
  console.log(`uploadMedia: file PATH ${fileName}`)
  bot.postMediaChunked({
    file_path: fileName
  }, (err, data, respone) => {
    if (err) {
      console.log(err)
    } else {
      console.log(data)
      const params = {
        status: descriptionText,
        media_ids: data.media_id_string
      }
      postStatus(params)
    }
  })
}

function postStatus(params) {
  bot.post('statuses/update', params, (err, data, respone) => {
    if (err) {
      console.log(err)
    } else {
      console.log('Status posted!')
    }
  })
}

module.exports = getPhoto
Ok, thats it! We’re ready to deploy to now!
In the terminal we call our deployment script we defined earlier:
yarn deploy
You will get some output:
λ yarn deploy
yarn deploy v0.24.4
$ now -e CONSUMER_KEY=@ds-twit-key -e CONSUMER_SECRET=@ds-twit-secret -e ACCESS_TOKEN=@ds-twit-access  -e ACCESS_TOKEN_SECRET=@ds-twit-access-secret -e NASA_KEY=@nasa-key
> Deploying ~\gitrepos\tweebot-play under spences10
> Using Node.js 7.10.0 (default)
> Ready! https://twee-bot-play-rapjuiuddx.now.sh (copied to clipboard) [5s]
> Upload [====================] 100% 0.0s
> Sync complete (1.54kB) [2s]
> Initializing…
> Building
> ▲ npm install
> ⧗ Installing:
>  ‣ csv-parse@^1.2.0
>  ‣ dotenv@^4.0.0
>  ‣ rita@^1.1.63
>  ‣ tabletop@^1.5.2
>  ‣ twit@^2.2.5
> ✓ Installed 106 modules [3s]
> ▲ npm start
> > tweet-bot-playground@1.0.0 start /home/nowuser/src
> > node index.js
> saveFile: file PATH /tmp/nasa.jpg
> Media saved!
> uploadMedia: file PATH /tmp/nasa.jpg
Woot! You have your bot deployed!
If you click on the link produced, you will be able to inspect the bot as it is on now. There's also a handy logs section on the page where you can check for output.
Resources
Thanks for reading! If you liked this story, please don’t forget to recommend it by clicking the button on the side, and by sharing it with your friends through social media.
If you want to learn more about me, you can ask me anything check my Github, or tweet me @ScottDevTweets.
You can read other articles like this on my blog.