
By subash adhikari
Introduction
I have been building GraphQL APIs in a Serverless environment for over 3 years now. I can't even imagine working with RESTful APIs anymore. Combine the power of GraphQL with the scalability of AWS Lambda, and you have a server that can handle infinite amounts of traffic.
In this tutorial, we will build and deploy a GraphQL server to AWS Lambda and access it via an API Gateway endpoint. We will use CloudFormation and the AWS CLI to deploy all our AWS Resources and application code.
What we'll cover
- Build a GraphQL Server using Apollo
- Deploy that GraphQL Server to Lambda
- Use API Gateway to proxy requests to Lambda
- Use CloudFormation to deploy application stack to AWS
- Set up Lambda for local development.
TL;DR – You can get the full source code for the application from Github.
What is GraphQL?
GraphQL is a query language for describing APIs using a strongly typed schema system. A GraphQL server fulfills those queries using existing data. Following are a few of the main advantages of using GraphQL.
Query only what your application needs
Unlike REST APIs, GraphQL enables clients to query precisely and only what they need. The server fulfills the client’s request by returning only what the client is asking for.
GraphQL uses a strongly typed system
The strongly typed system of GraphQL enables users to introspect the entire schema. And the GraphQL API serves as clear documentation about the capabilities of the server and notifies you about errors during development.
You can compose your queries in a single request
With GraphQL, you can query multiple resources and get combined responses with a single request. With fewer requests, apps using GraphQL perform much faster.
What is AWS Lambda?
AWS Lambda is a compute service offered by AWS that lets you run your application code without having to manage any servers. AWS manages all the overhead like infrastructure, security, resources, operating system, and patches so developers can focus on just building the application.
Let’s get started…
Setting up the project
Let’s start by creating a project folder. Then, change into the directory and initialise a Node project. I am using node 10.x in the examples. You can install the Node version of your choice using asdf.
mkdir apollo-server-lambda-nodejs
cd apollo-server-lambda-nodejs
yarn init
Next, create a folder that houses all our source code.
mkdir src
Finally, create an index file inside the src directory that serves as the lambda handler.
cd src
touch index.js
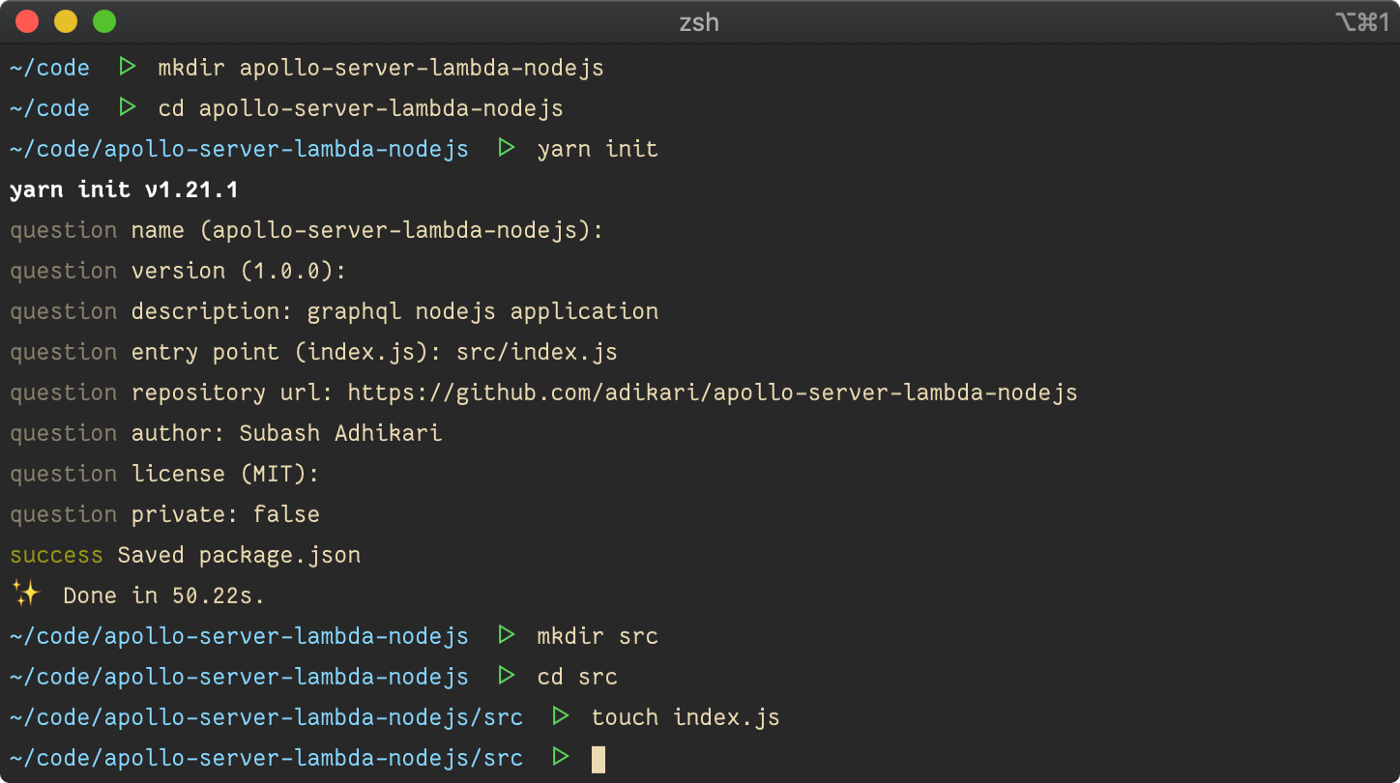 Initialize node project
Populate the index file with the following code.
exports.handler = async () => {
    return {
        body: 'Hello from Lambda'
    };
};
The above code is a very simple Lambda handler which will return Hello from Lambda when invoked. Let's first deploy our code to AWS Lambda.
Package the application code
Before we can deploy our code to Lambda, we need to create a zip of our application and upload it to an S3 bucket. We are using AWS CLI to create the bucket. Set up AWS CLI now by following this guide if you have not already done so.
Create an S3 bucket to use for deploying our code to Lambda. Pick a unique name for your S3 bucket. The bucket names are unique globally across all AWS Regions.
aws s3 mb s3://lambda-deploy-asln
Create an archive of the application using the zip command and verify the files inside the zip.
zip -rq dist-latest.zip src package.json
zipinfo dist-latest.zip
Copy the zip file to S3 using the AWS CLI command.
aws s3 cp dist-latest.zip s3://lambda-deploy-asln/dist-latest.zip
Finally, use the following command to verify that the file exists in S3.
aws s3 ls s3://lambda-deploy-asln
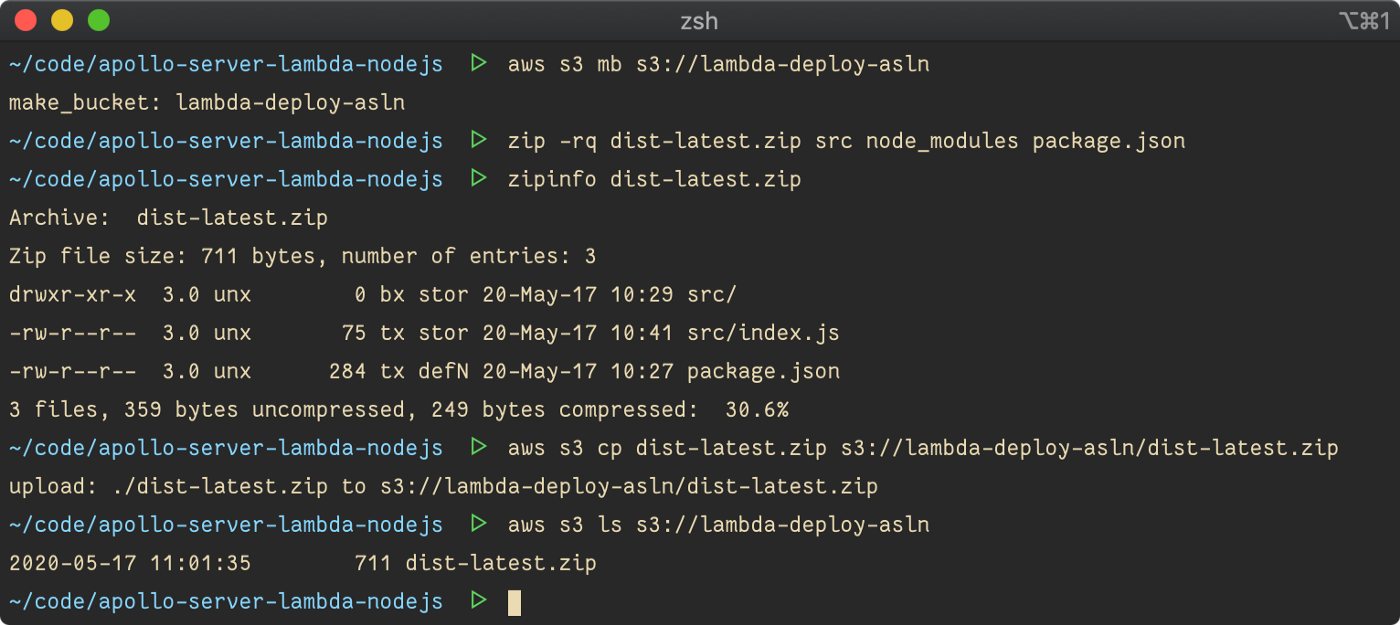 Copy application package to S3
Now that we have deployed the packaged application to S3, next we need to set up our Lambda and API Gateway in AWS. In the next section, we'll use CloudFormation to set up all necessary AWS Resources.
Set up AWS lambda with API gateway proxy integration
CloudFormation is an AWS service that helps us to write infrastructure as code. CloudFormation makes it very simple to create and manage our application resources. Let’s use CloudFormation to define our stack.
Create a file named cloudformation.yml at the root of the project.
touch cloudformation.yml
Add the following code to the cloudformation.yml
---
Description: GraphQL server on AWS lambda

Parameters:
  Version:
    Description: Application version number
    Type: String

  BucketName:
    Description: S3 bucket name where the source code lives
    Type: String

Resources:
  LambdaFunction:
    Type: AWS::Lambda::Function
    Properties:
      Code:
        S3Bucket: !Ref BucketName
        S3Key: !Sub dist-${Version}.zip
      Handler: src/index.handler
      Description: GraphQL Apollo Server
      Role: !GetAtt LambdaExecutionRole.Arn
      Runtime: nodejs10.x
      Timeout: 10

  LambdaExecutionRole:
    Type: "AWS::IAM::Role"
    Properties:
      AssumeRolePolicyDocument:
        Version: "2012-10-17"
        Statement:
          - Effect: "Allow"
            Principal:
              Service:
                - "lambda.amazonaws.com"
            Action:
              - "sts:AssumeRole"
      Policies:
        - PolicyName: "LambdaFunctionPolicy"
          PolicyDocument:
            Version: '2012-10-17'
            Statement:
            - Effect: Allow
              Action:
              - logs:CreateLogGroup
              - logs:CreateLogStream
              - logs:PutLogEvents
              Resource: "*"

  GraphQLApi:
    Type: 'AWS::ApiGateway::RestApi'
    Properties:
      Name: apollo-graphql-api

  GraphQLApiResource:
    Type: 'AWS::ApiGateway::Resource'
    Properties:
      ParentId: !GetAtt GraphQLApi.RootResourceId
      RestApiId: !Ref GraphQLApi
      PathPart: 'graphql'

  GraphQLApiMethod:
    Type: 'AWS::ApiGateway::Method'
    Properties:
      RestApiId: !Ref GraphQLApi
      ResourceId: !Ref GraphQLApiResource
      AuthorizationType: None
      HttpMethod: POST
      Integration:
        Type: AWS_PROXY
        IntegrationHttpMethod: POST
        Uri: !Sub arn:aws:apigateway:${AWS::Region}:lambda:path/2015-03-31/functions/${LambdaFunction.Arn}/invocations

  GraphQLApiDeployment:
    Type: 'AWS::ApiGateway::Deployment'
    Properties:
      RestApiId: !Ref GraphQLApi
      StageName: v1
    DependsOn:
      - GraphQLApiResource
      - GraphQLApiMethod

  GraphQLApiPermission:
    Type: 'AWS::Lambda::Permission'
    Properties:
      Action: lambda:invokeFunction
      FunctionName: !GetAtt LambdaFunction.Arn
      Principal: apigateway.amazonaws.com
      SourceArn: !Sub arn:aws:execute-api:${AWS::Region}:${AWS::AccountId}:${GraphQLApi}/*

Outputs:
  ApiUrl:
    Description: Invoke url of API Gateway endpoint
    Value: !Sub https://${GraphQLApi}.execute-api.${AWS::Region}.amazonaws.com/v1/graphql
I know a lot is happening in this template. Let’s examine the code step by step.
Template Parameters
Firstly, we define some parameters that we use in the template. We can pass those variables as parameter overrides when deploying the CloudFormation Stack.
Description: GraphQL server on AWS lambda

Parameters:
  Version:
    Description: Application version number
    Type: String

  BucketName:
    Description: S3 bucket name where the source code lives
    Type: String
Lambda Function
We define our lambda function specifying the path from where it should pull the application code. This bucket is the same one we created earlier.
LambdaFunction:
    Type: AWS::Lambda::Function
    Properties:
      Code:
        S3Bucket: !Ref BucketName
        S3Key: !Sub dist-${Version}.zip
      Handler: src/index.handler
      Description: GraphQL Apollo Server
      Role: !GetAtt LambdaExecutionRole.Arn
      Runtime: nodejs10.x
      Timeout: 10
We want our Lambda function to be able to send application logs to AWS CloudWatch. Lambda requires special permissions to be able to write logs to CloudWatch. So we create a role that enables writing to CloudWatch and assign it to the Lambda function.
LambdaExecutionRole:
    Type: "AWS::IAM::Role"
    Properties:
      AssumeRolePolicyDocument:
        Version: "2012-10-17"
        Statement:
          - Effect: "Allow"
            Principal:
              Service:
                - "lambda.amazonaws.com"
            Action:
              - "sts:AssumeRole"
      Policies:
        - PolicyName: "LambdaFunctionPolicy"
          PolicyDocument:
            Version: '2012-10-17'
            Statement:
            - Effect: Allow
              Action:
              - logs:CreateLogGroup
              - logs:CreateLogStream
              - logs:PutLogEvents
              Resource: "*"
API Gateway
We also want an HTTP endpoint to invoke the lambda function. API Gateway can be used to create an HTTP endpoint. We can then configure API Gateway to proxy all incoming requests from the client to the Lambda function and send the response from Lambda back to the client.
Firstly, we create an API Gateway RestApi.
GraphQLApi:
    Type: 'AWS::ApiGateway::RestApi'
    Properties:
      Name: apollo-graphql-api
Then, we create an API Gateway Resource, which accepts requests at /graphql.
GraphQLApiResource:
    Type: 'AWS::ApiGateway::Resource'
    Properties:
      ParentId: !GetAtt GraphQLApi.RootResourceId
      RestApiId: !Ref GraphQLApi
      PathPart: 'graphql'
Next, we configure the Resource to accept POST requests by creating an API Gateway Method and then we integrate it with Lambda.
GraphQLApiMethod:
    Type: 'AWS::ApiGateway::Method'
    Properties:
      RestApiId: !Ref GraphQLApi
      ResourceId: !Ref GraphQLApiResource
      AuthorizationType: None
      HttpMethod: POST
      Integration:
        Type: AWS_PROXY
        IntegrationHttpMethod: POST
        Uri: !Sub arn:aws:apigateway:${AWS::Region}:lambda:path/2015-03-31/functions/${LambdaFunction.Arn}/invocations
Finally, we create an API Gateway Deployment which deploys the API to the specified stage.
GraphQLApiDeployment:
    Type: 'AWS::ApiGateway::Deployment'
    Properties:
      RestApiId: !Ref GraphQLApi
      StageName: v1
    DependsOn:
      - GraphQLApiResource
      - GraphQLApiMethod
Lambda / API Gateway permission
At this point, we have both the Lambda function and API gateway configured correctly. However, API Gateway needs special permission to invoke a Lambda function. We permit API Gateway to invoke Lambda by creating a Lambda Permission resource.
GraphQLApiPermission:
    Type: 'AWS::Lambda::Permission'
    Properties:
      Action: lambda:invokeFunction
      FunctionName: !GetAtt LambdaFunction.Arn
      Principal: apigateway.amazonaws.com
      SourceArn: !Sub arn:aws:execute-api:${AWS::Region}:${AWS::AccountId}:${GraphQLApi}/*
Finally, we export the API URL at the end of the template. We can use this URL to invoke calls to the Lambda.
Outputs:
  ApiUrl:
    Description: Invoke url of API Gateway endpoint
    Value: !Sub https://${GraphQLApi}.execute-api.${AWS::Region}.amazonaws.com/v1/graphql
Deploy CloudFormation stack to AWS
Now that we have the CloudFormation template ready let’s use the AWS CLI command to deploy it to AWS.
Run the following command in your console. Make sure to update the BucketName to whatever the name of the bucket you created earlier is.
aws cloudformation deploy \
  --template-file ./cloudformation.yml \
  --stack-name apollo-server-lambda-nodejs \
  --parameter-overrides BucketName=lambda-deploy-asln Version=latest \
  --capabilities CAPABILITY_IAM
 Deploy CloudFormation stack to AWS
It might take some time to deploy the stack. Lambda function should be ready to start taking requests when the deployment finishes.
Verify API Gateway and Lambda are working as expected
Now that we have deployed our CloudFormation Stack let us verify if everything is working as expected. We need the API Gateway URL to send a request to our Lambda Function. The API URL we exported in the CloudFormation template comes in handy here.
Run the following command to print the API URL in the command line.
aws cloudformation describe-stacks \
--stack-name=apollo-server-lambda-nodejs \
--query "Stacks[0].Outputs[?OutputKey=='ApiUrl'].OutputValue" \
--output text
 Describe CloudFormation Stack
Now, use the curl command to invoke the API URL. You should get "Hello from Lambda" back from the server.
curl -d '{}' https://o55ybz0sc5.execute-api.us-east-1.amazonaws.com/v1/graphql
 Invoke AWS Lambda
Add deploy script for easier deployment
You might have noticed that we ran a whole bunch of commands to package and deploy our application. It would be very tedious to have to run those commands every time we deploy the application. Let’s add a bash script to simplify this workflow.
Create a directory called bin at the root of the application and add a file named deploy.
mkdir bin
touch bin/deploy
Before we can execute the script, we need to set correct file permissions. Let’s do that by running the following command.
chmod +x bin/deploy
 Create deploy script
At this point, our directory structure should look like in the screenshot below.
 Current directory structure
Add the following code to the file.
#!/bin/bash

set -euo pipefail

OUTPUT_DIR=dist
CURRENT_DIR=$(pwd)
ROOT_DIR="$( dirname "${BASH_SOURCE[0]}" )"/..
APP_VERSION=$(date +%s)
STACK_NAME=apollo-server-lambda-nodejs

cd $ROOT_DIR

echo "cleaning up old build.."
[ -d $OUTPUT_DIR ] && rm -rf $OUTPUT_DIR

mkdir dist

echo "zipping source code.."
zip -rq $OUTPUT_DIR/dist-$APP_VERSION.zip src node_modules package.json

echo "uploading source code to s3.."
aws s3 cp $OUTPUT_DIR/dist-$APP_VERSION.zip s3://$S3_BUCKET/dist-$APP_VERSION.zip

echo "deploying application.."
aws cloudformation deploy \
  --template-file $ROOT_DIR/cloudformation.yml \
  --stack-name $STACK_NAME \
  --parameter-overrides Version=$APP_VERSION BucketName=$S3_BUCKET \
  --capabilities CAPABILITY_IAM

# Get the api url from output of cloudformation stack
API_URL=$(
  aws cloudformation describe-stacks \
  --stack-name=$STACK_NAME \
  --query "Stacks[0].Outputs[?OutputKey=='ApiUrl'].OutputValue" \
  --output text
)

echo -e "\n$API_URL"

cd $CURRENT_DIR
OK, let’s break down what’s going on in this script.
We start by defining some variables. We generate the archive file inside the dist directory. We set the app version to the current timestamp at which the script runs. Using the timestamp, we can make sure that the version number is always unique and incremental.
#!/bin/bash

set -euo pipefail

OUTPUT_DIR=dist
CURRENT_DIR=$(pwd)
ROOT_DIR="$( dirname "${BASH_SOURCE[0]}" )"/..
APP_VERSION=$(date +%s)
STACK_NAME=apollo-server-lambda-nodejs
We then clean up any old builds and create a new dist directory.
echo "cleaning up old build.."
[ -d $OUTPUT_DIR ] && rm -rf $OUTPUT_DIR

mkdir dist
Then we run the zip command to archive the source code and its dependencies.
echo "zipping source code.."
zip -rq $OUTPUT_DIR/dist-$APP_VERSION.zip src node_modules package.json
Next, we copy the zip file to the S3 bucket.
echo "uploading source code to s3.."
aws s3 cp $OUTPUT_DIR/dist-$APP_VERSION.zip s3://$S3_BUCKET/dist-$APP_VERSION.zip
Then we deploy the CloudFormation stack.
echo "deploying application.."
aws cloudformation deploy \
  --template-file $ROOT_DIR/cloudformation.yml \
  --stack-name $STACK_NAME \
  --parameter-overrides Version=$APP_VERSION BucketName=$S3_BUCKET \
  --capabilities CAPABILITY_IAM
Finally, we query the CloudFormation Stack to get the API URL from the CloudFormation Outputs and print it in the console.
# Get the api url from output of cloudformation stack
API_URL=$(
  aws cloudformation describe-stacks \
  --stack-name=$STACK_NAME \
  --query "Stacks[0].Outputs[?OutputKey=='ApiUrl'].OutputValue" \
  --output text
)

echo -e "\n$API_URL"
Deploy to AWS using the deploy script
Let’s try out the deployment using the deploy script. The script expects the S3_Bucket variable to be present in the environment. Run the following command to run the deployment. When the deployment is successful, the script will output the API URL that we can use to invoke the lambda.
S3_BUCKET=lambda-deploy-asln ./bin/deploy
 Run the deploy script
To simplify this even further, let’s invoke it using yarn. Add the following in your package.json.
"scripts": {
  "deploy": "S3_BUCKET=lambda-deploy-asln ./bin/deploy"
}
Hereafter we can simply run yarn deploy to initiate deployments.
Improve workflow with local Lambda and API Gateway
We frequently modified the application code while working on our application. Right now, deploying to AWS us-east-1 region takes me around 10 seconds. I am on a 40Mb/s upload speed internet connection.
Time to deploy becomes more significant as the size of the application grows. Having to wait 10 seconds or more to realize I have made a syntax error is not productive at all.
Let’s fix this by setting up the lambda function locally and invoke it using a local API Endpoint. AWS SAM CLI enables us to do just that. Follow the instruction on this page to install it.
Once done, from the root of the project, run the following command.
sam local start-api --template-file cloudformation.yml
 Start local development server
The local endpoint is now available at http://localhost:3000. We can use this endpoint to send requests to our local Lambda.
Open another terminal and run the following command to send a request. You should see the response from our local Lambda function.
curl -d '{}' http://localhost:3000/graphql
 Invoke local lambda function
Finally, add the following lines in the scripts section of the package.json.
"dev": "sam local start-api --template-file cloudformation.yml"
Hereafter we can run the yarn dev command to start the dev server.
Set up the GraphQL server in Lambda
Without further talking, let’s jump right into the code and build the GraphQL server.
Start by installing the dependencies. We are using Apollo Server to build our GraphQL server. Apollo Server is an open-source implementation of GraphQL Server.
yarn add apollo-server-lambda graphql
Replace the content of src/index.js with the following code.
const { ApolloServer, gql } = require('apollo-server-lambda');

const typeDefs = gql`
  type Query {
    user: User
  }

  type User {
    id: ID
    name: String
  }
`;

const resolvers = {
  Query: {
    user: () => ({ id: 123, name: 'John Doe' })
  }
};

const server = new ApolloServer({ typeDefs, resolvers });

exports.handler = server.createHandler();
Here, we define a schema which consists of a type User and a user query. We then define a resolver for the user query. For the sake of simplicity, the resolver returns a hardcoded user. Finally, we create a GraphQL handler and export it.
To perform queries to our GraphQL server, we need a GraphQL client. Insomnia is my favourite client. However, any other GraphQL client should be just fine.
Now, let’s run a query to ensure our server is working as expected.
Create a new GraphQL request in Insomnia.
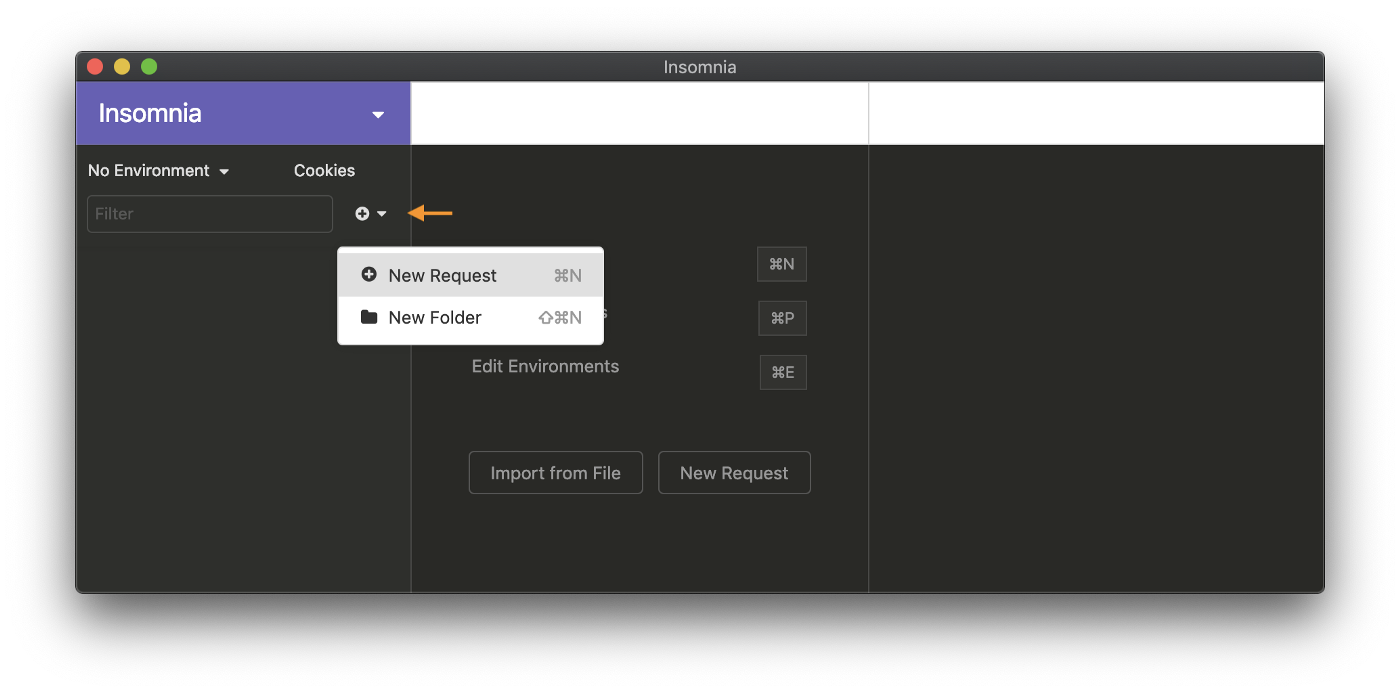 Create new GraphQL request
 Configure GraphQL request
Add the following query in the body and submit the query to http://localhost:3000. Assuming your dev server is still running, you should see the following response from the GraphQL server.
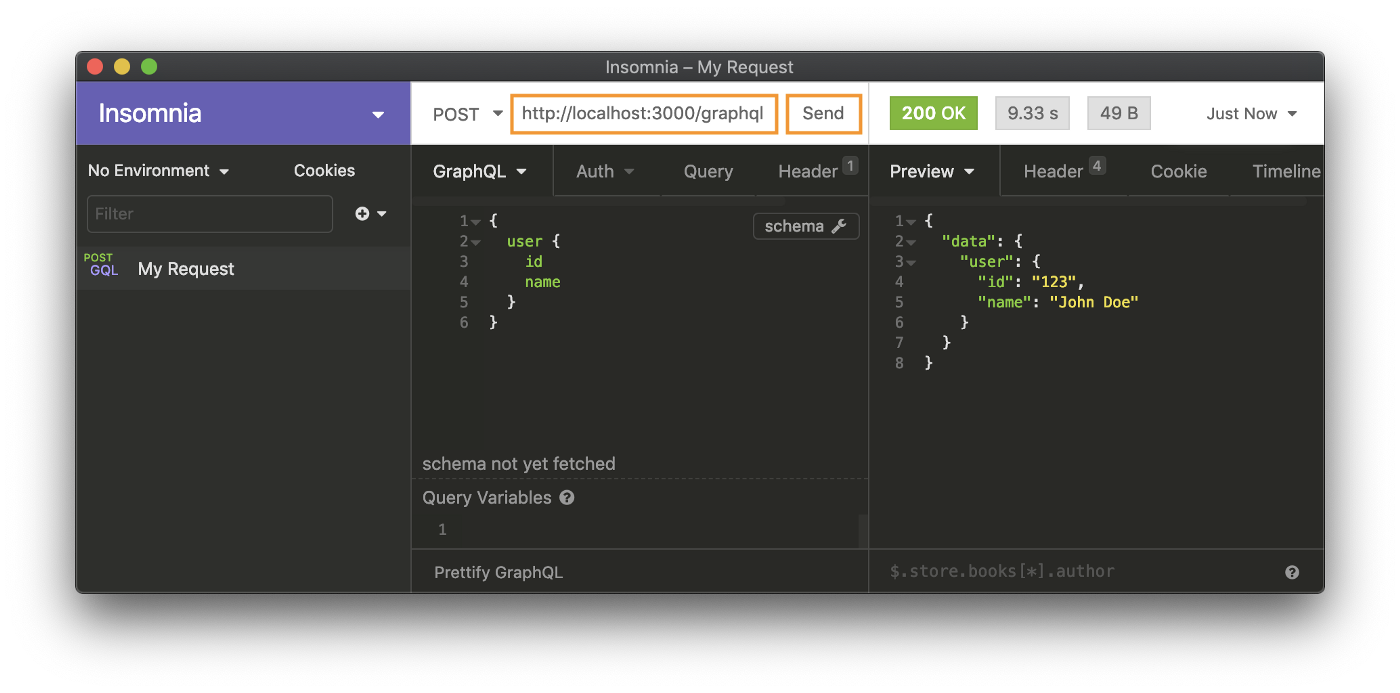 Perform GraphQL request to Local Server
Now that we've verified everything is working fine in the local server let’s run the following command to deploy the GraphQL server to AWS.
yarn deploy
 Deploy server to AWS
The API URL is outputted in the console once the deployment is complete. Replace the URL in Insomnia with the one from API Gateway. Rerun the query to see it resolve.
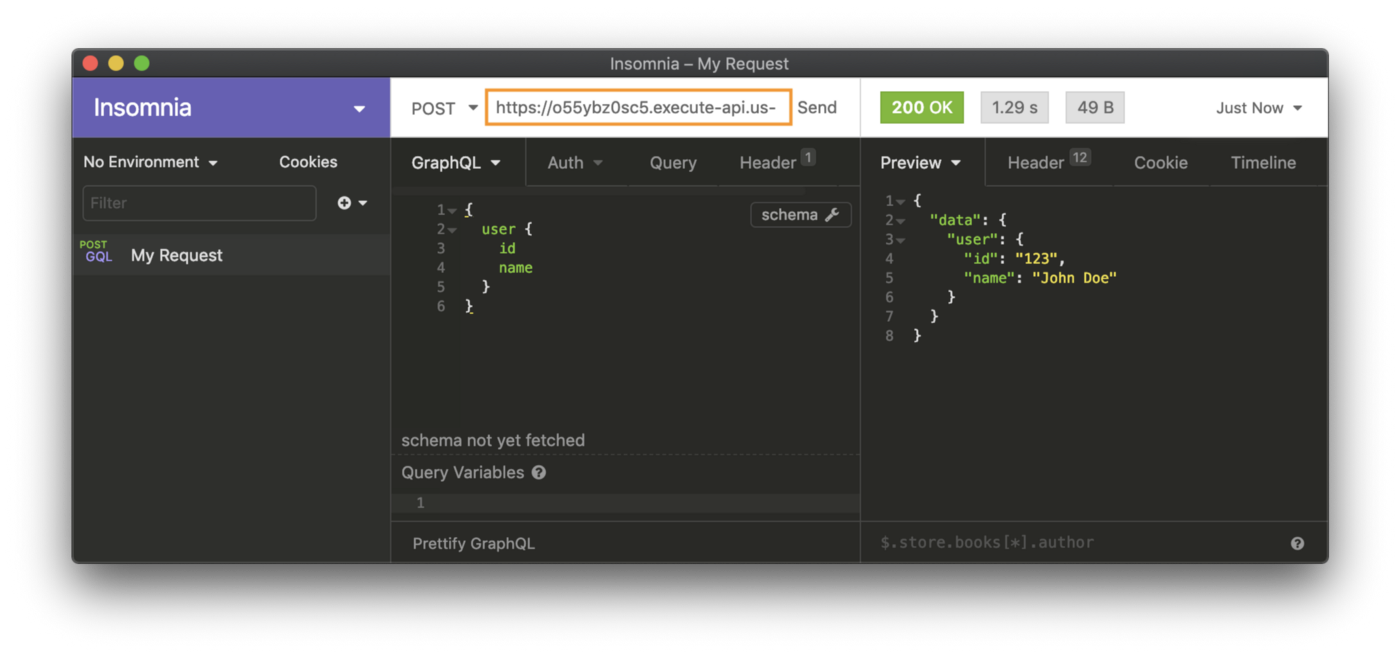 Perform GraphQL request to AWS Lambda
Summary
Congratulations, you have successfully deployed a GraphQL Server in AWS Lambda purely using CloudFormation. The server can receive GraphQL requests from the client and return the response accordingly.
We also set up the development environment for local development without adding many dependencies.
If you liked this tutorial, please share it with your network.