
![How to Build API Documentation From Scratch [A Roadmap for Technical Writers]](https://cdn.hashnode.com/uploads/covers/5e1e335a7a1d3fcc59028c64/7f6c4ca5-30ca-42fd-a473-d6262774e149.png)
As a technical writer, building public-facing API documentation from scratch for a real product can feel like a dream come true, especially if you’ve only been documenting fictional APIs or updating existing API documentation.
But that dream can become a little scary when you realize you have no clear roadmap to build the entire API documentation.
What should you do first when you officially get onboarded? Test all the API endpoints or research your target audience? In terms of structure, how do you ensure that the way you organize information aligns with users’ journey?
All these questions can be overwhelming and make you even doubt your competence.
I had a similar experience when I landed my first API documentation role. But I was able to wade through doubts and build the entire API documentation.
I created this guide to give first-time API documentation writers a clear roadmap to build API documentation from scratch. You'll learn how to create a documentation plan that aligns with your users' journey and write helpful documentation that accelerates adoption rate.
This article assumes you know how APIs work and understand their associated terminology.
Table of Contents
Step 6: Convert Endpoints in Postman Collections Into an OpenAPI Specification
Step 7: Migrate the Content to Your Preferred Documentation Tool
Step 1: Set the Foundation of Your API Documentation
Just as a strong house is built on a solid foundation, helpful API documentation is built on the right foundation. This means that before you even test the APIs or document how they work, you have to assemble certain building blocks to get the foundation right.
Here's a guide to help you get the foundation right:
Think Beyond API Endpoints
Before you officially get onboarded as an API documentation writer, the first mindset shift you need is this: you want to document a product, not just APIs.
I mean, you have to think beyond making API calls and receiving responses. You need to think about the broader problem the APIs solve for businesses.
This means asking questions like, "Who will likely use this API?” “What problem does it solve for them?” “What is its unique value proposition?” “What alternatives exist?”
It’s okay if you don’t have answers to all of these questions at first. Just note them down.
Get to Know the APIs
Your manager will likely introduce you to the product you're about to document and how it works. This session should naturally answer the questions you highlighted before. If not, this is the perfect time to ask.
At the end of the meeting, you should have access to existing technical notes, API credentials, dashboards, endpoints, and the like.
Test the APIs the Way a User Would
At this point, your goal is to step into a user role and focus on just one goal: understanding the APIs' functionality. Test the APIs in Postman, play around with them, break linear flows, test edge cases, provide invalid credentials, and watch what breaks.
If you notice something doesn't work as expected, or you don’t understand how it works, note it down. These are the questions you’ll ask the engineers later.
Again, at this stage you're not documenting for users yet. You just want to test the API like a user.
Meet With the Engineers
You’ll likely have tons of questions after testing the APIs. But before you meet with engineers, note down all your questions so you can get the most out of the meeting. It's also very important to get all your recording materials ready (a phone voice recorder will work) so you don’t end up forgetting their answers.
Side note, though: it's a good idea to ask the engineers for permission before recording the call.
During the meeting, go straight to the point when asking questions, and if their answers are unclear, feel free to ask for clarification. In fact, don't be shy about asking questions because if something is unclear to you, users will likely find it unclear too.
That being said, you also don’t want to ask obvious or basic questions, such as what is an API key, right?
In fact, if you need to do research before meeting with them, do so.
Create a Documentation Plan
At this point, you already have a good understanding of how the APIs work and the broader problem they solve. So, your next step is to create a plan.
According to the authors of Docs for Developers, here’s the best way to create a documentation plan that aligns with your users’ journey:
First, define who your users are
Who will likely read or consume the documentation you are about to build? For example, developers, non-technical merchants, project managers, and so on. Be specific about their roles and even their technical knowledge levels.
Second, identify your users' goals
What exactly do you want users to do when they read your documentation? For example, you could say “I want developers to independently integrate our APIs end-to-end without contacting the support team.” Be specific about these goals and list as many goals as you can. These goals will serve as the metric you use to measure the success of the documentation once it goes live.
Next, identify likely questions users will ask when they encounter your product
For example, how does this API work? How do I authenticate a request? How many countries and payment methods do you support?
You’ll likely ask these questions yourself while interacting with the API. You can also review existing support tickets, Slack messages, emails, and so on to find these questions. Just ensure you jot down all these questions in your notes.
Then identify what users need to do or know before they test the APIs
For example, signing up for a paid merchant account, completing KYB (know your business), generating API keys, understanding how you operate, knowing the specific payment you support, and so on. Note: This is highly specific to the product you're documenting.
After that, categorize the endpoints based on users' use cases
For example, if you're documenting a fintech API, you could categorize the endpoints this way: “Initiate a payment," “Verify a payment," and "Get payment status” under a “Payments” section. You could also have a “Subscriptions” section with endpoints like “Create a plan,” “Delete a plan,” “List all plans,” and so on. I hope you get the drift. Just categorize them based on the order a user is likely to use them.
Then create an outline based on a user's journey
For example, the average user journey often looks like this:

They start by creating and account/sighing up, continue with onboarding, then they get their AIP keys, and finally test the endpoints. If there are any other specific tasks they need to complete before testing the APIs, highlight and list them in sequence.
Here’s a typical example of how to structure your documentation based on a user's journey:
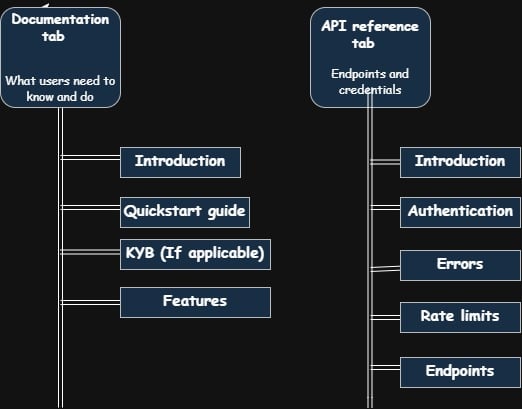
As you can see in the image above, you'll likely have at least two main tabs: Documentation and API reference.
The documentation tab is where you explain everything users need to know about your product and its features.
For example, you could have the following pages under this tab:
Introduction
Quick start guide (get users to complete a simple task within two to three minutes)
KYB (Know Your Business (if applicable))
Features (other specific features your product offers). Just ensure it is task-oriented, i.e., you organize the outline based on how a user would use it
The API reference tab is where you document all endpoints, describe their functionalities, and explain how to get credentials and authenticate requests.
For example, you could have the following pages under this tab:
Introduction
Authentication
Errors
Rate limits
Pagination
Endpoints
and more
Don't chase perfection at this point. You’ll likely edit or restructure it anyway. Just look for a way to structure all the information you’ve gathered.
Next, reference other similar API documentation
This is hands down the best way to structure your documentation. Review similar products like yours, take note of how they structure their information, and use that to guide yours.
Note: you're not copying (because you want yours to be better). Just draw inspiration from them and use that to improve yours.
Here are some examples of standard API documentation in the industry:
Finally, submit your documentation plan to your manager for review and implement the necessary feedback.
Step 2: Prepare Your Writing Tools
Once you've created your documentation plan, the next step is to choose your writing tools. Here are some writing checklists to tick:
Choose your preferred writing style guide to maintain consistency. Common options are the Microsoft writing style guide and the Google developer style guide.
Select your preferred writing tools to write your draft. For example, Google Docs.
Choose your preferred snipping tool. For example, Draw.io for drawing diagrams, ShareX for screenshots, and Annotely for annotating images.
Select your preferred documentation tool. This largely depends on your team. Here are some of the top options: Mintlify, Readme.io, Fern, and GitBook.
Step 3: Write Your First Draft
You've now completed the most difficult part of building API documentation: setting the right foundation.
Building on that foundation is fairly straightforward, as your goal is to test and document your process in a way another person (or AI agent) can understand and use.
Just make sure you follow all generally accepted technical writing principles when writing. You can check out this guide if you need a refresher.
How to Write Your First Draft
Depending on your documentation outline, here’s how to write each page:
For the Documentation tab:
Introduction: Briefly explain the broader problem your APIs solve, how they work, and their use cases. This is very important because a lot of people will land on this page, sometimes without even seeing your website landing page or interacting with any other marketing materials. So you need to give them that high-level overview.
The MoneyHash API introduction page is a perfect example. First, it provides a high-level overview of what MoneyHash is, then its benefits and core features.
Here's an excerpt from the overview section:
"MoneyHash is an innovative payment infrastructure that serves as a Super-API for managing payments and revenue operations in emerging markets. With our platform, you can easily integrate your network of pay-in and pay-out providers and other related services to build a customized payment stack."
KYB: Clearly explain the specific documents users need to provide to complete the onboarding and how many hours the verification will take.
You can review the Spotflow KYB page for a concrete example.
Note: This might not be a required step in your product.
Features: Clearly explain each of your product's core features and functionalities and provide a step-by-step guide on how users can integrate them.
Note: Feel free to add relevant screenshots, images, diagrams, code examples, and even video walkthroughs/demos where necessary.
The Paystack documentation uses the same structure. For example, the "Accept Payment" page briefly outlines the four main ways to accept payments on Paystack and provides a step-by-step guide for integrating each of these payment methods.
For the API Reference Tab:
Introduction: Provide a high-level overview of the API, the base URL, available environments (for example, test and live), content type, HTTP responses and response codes, and so on.
The Stripe API reference introduction page is a gold standard. It briefly covers essential information developers need before using the API.
Authentication: Clearly explain how users can authenticate their requests and get their credentials. For example, if your API uses API keys to authenticate requests, state it clearly, and provide a step-by-step guide on how to get their API keys.
Errors: This is one of the top pages users will visit, so you have to be extremely intentional about what you include here. Don’t just dump general error codes (400, 401, 403, 5xxx). Intentionally test edge cases and clearly explain errors you encounter, why they happen, and how to resolve them.
The Paystack error page is a perfect example. It highlights the specific error message, what it means, and how to fix it. So whenever a developer encounters any error, this page can help them fix it in a few minutes.
Rate Limits: Explain the rate limits of each endpoint, what happens when they hit the limit, and what to do.
The GitHub rate limit page explains this clearly.
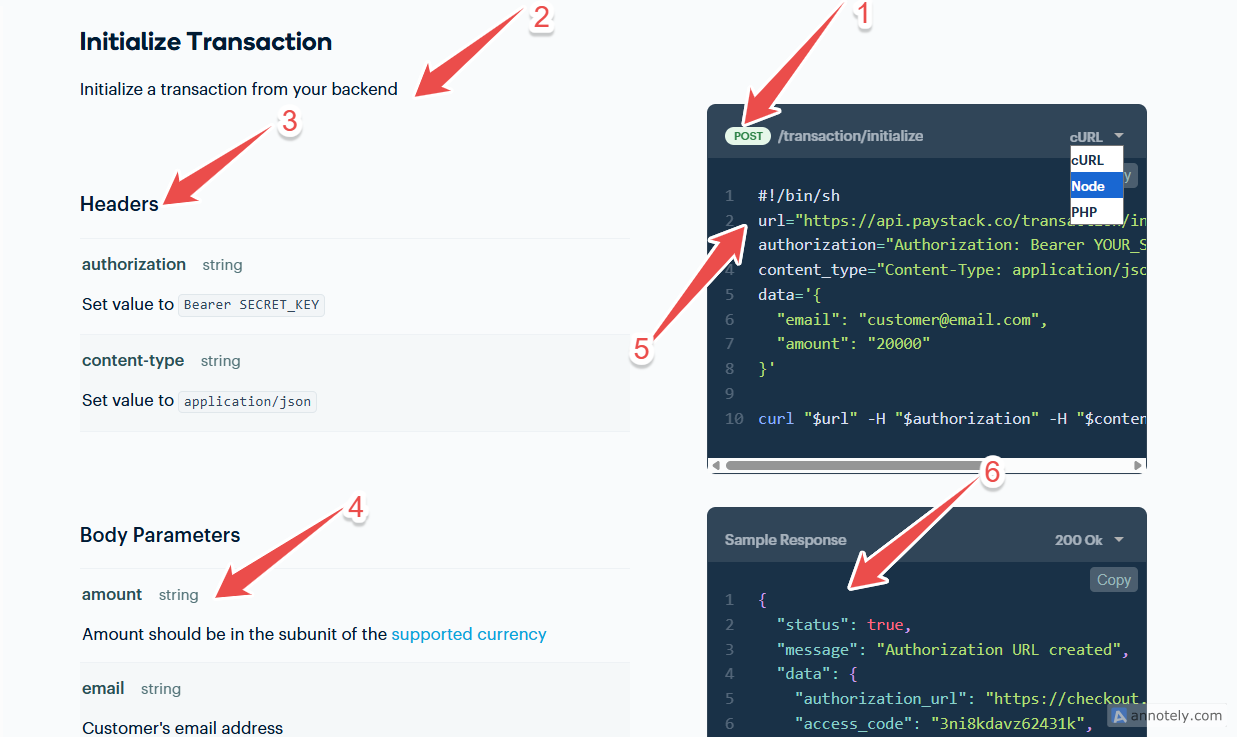
Endpoints: Test and document each endpoint again in Postman. This time, your goal is to document. Every endpoint you document must have six sections.
First, its HTTP method type, whether that is GET, POST, or PUT.
Then the endpoint description so developers can understand its functionality.
The third section is Headers, that is required API credentials.
Then list all available parameters with a brief description of how to get them.
The fifth section is the request example, provided in multiple languages so developers can copy and paste the one that best suits their stack.
Lastly, display the response examples, including successful and failed API responses.
Step 4: Edit Your Documentation
There are several ways to edit your documentation. But the authors of Docs for Developers suggest that the best way to edit your content is to organize it based on factors such as technical accuracy, completeness, clarity, and brevity.
For example, you can first edit for technical accuracy and then for completeness, clarity, and brevity.
Technical Accuracy: Your goal is to ensure that all your explanations are technically accurate. If a user follows the steps, will they get the same results? Are your definitions, code examples, and provided steps technically correct?
Completeness: You're editing to ensure that you provide all the necessary information a user needs.
Clarity and Brevity: You’re checking if your explanations are clear and concise.
Structure: You’re checking whether your documentation is sequentially organized.
Step 5: Submit First Draft for Review
Depending on your team structure, you could submit your first draft to your manager or editor, or even ask engineers to review specific pages for technical accuracy.
Once you receive the feedback, implement it to improve the documentation.
Step 6: Convert Endpoints in Postman Collections Into an OpenAPI Specification
You've likely documented all the endpoints on Postman. But instead of manually documenting them again in your specific API documentation tool, you can convert them into an OpenAPI Specification.
The OpenAPI specification is a standardized format for describing APIs. It's a blueprint (or template) that defines the structure and functionality of an API.
Converting your endpoints in Postman collections into an OpenAPI specification gives you the flexibility to migrate it to any API documentation tool such as Mintlify, Fern, or GitBook.
You can check out this resource for a step-by-step guide on how to convert your Postman collections into an OpenAPI specification.
Step 7: Migrate the Content to Your Preferred Documentation Tool
Once you've edited your first draft and converted all your API endpoints into an OpenAPI specification, the next step is to migrate your content to your team’s preferred documentation tool.
Popular options are Mintlify, Fern, Readme.io, GitBook, and others. You can check the documentation of your preferred tool to set it up.
For example, if Mintlify is your preferred documentation tool, here is a step-by-step guide to migrate the content from your word processing tool to Mintlify.
Step 1: Create a Mintlify account. (Or your company may handle that, so you can just request access to the company's Mintlify account.)
Step 2: Log in to your Mintlify account.
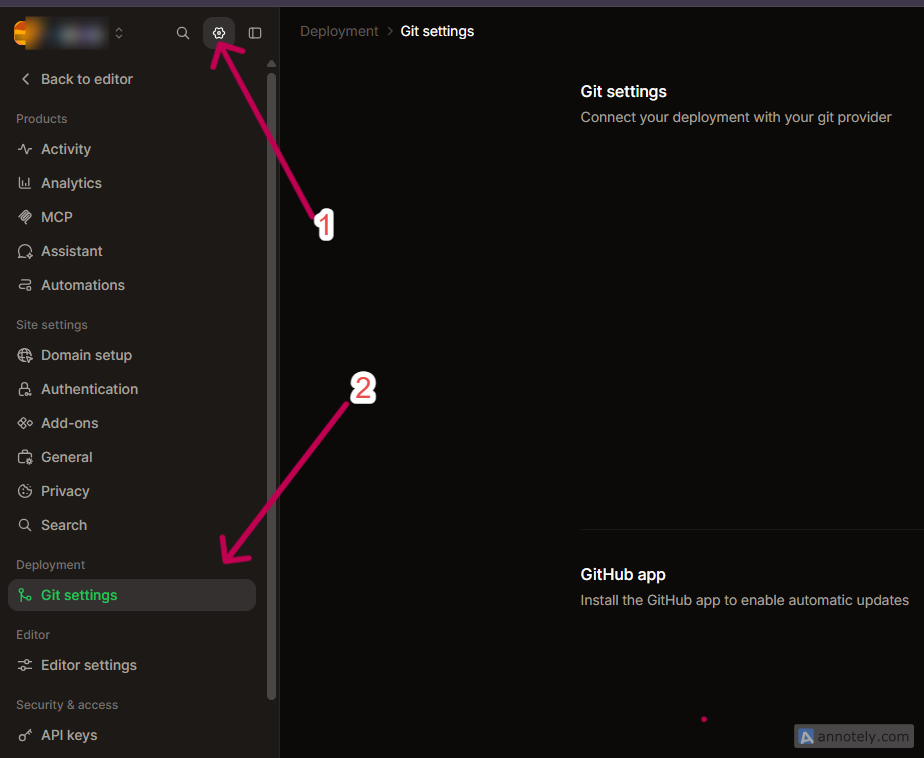
Step 3: Click the "Settings" icon in the upper-left corner next to your profile icon. Then select the "Git Settings" option.
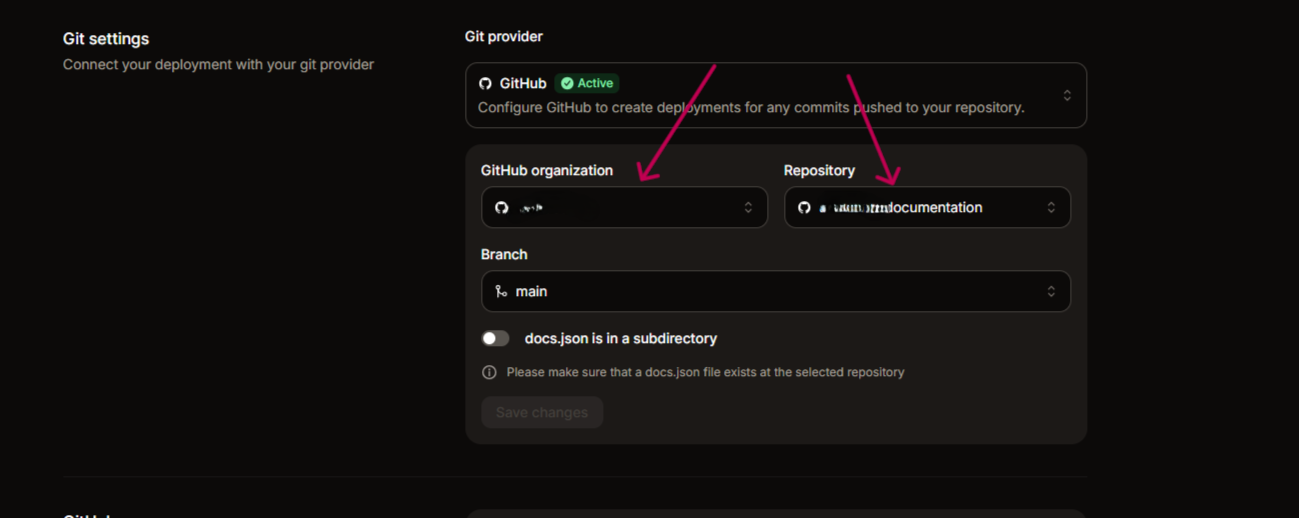
Step 4: Add your GitHub organization and your docs repository.
Note: You can create a new docs repository if you don't have an existing one yet.
Step 5: Scroll down to the "GitHub App" section and click the "Install GitHub App." This wires up automatic deployment.
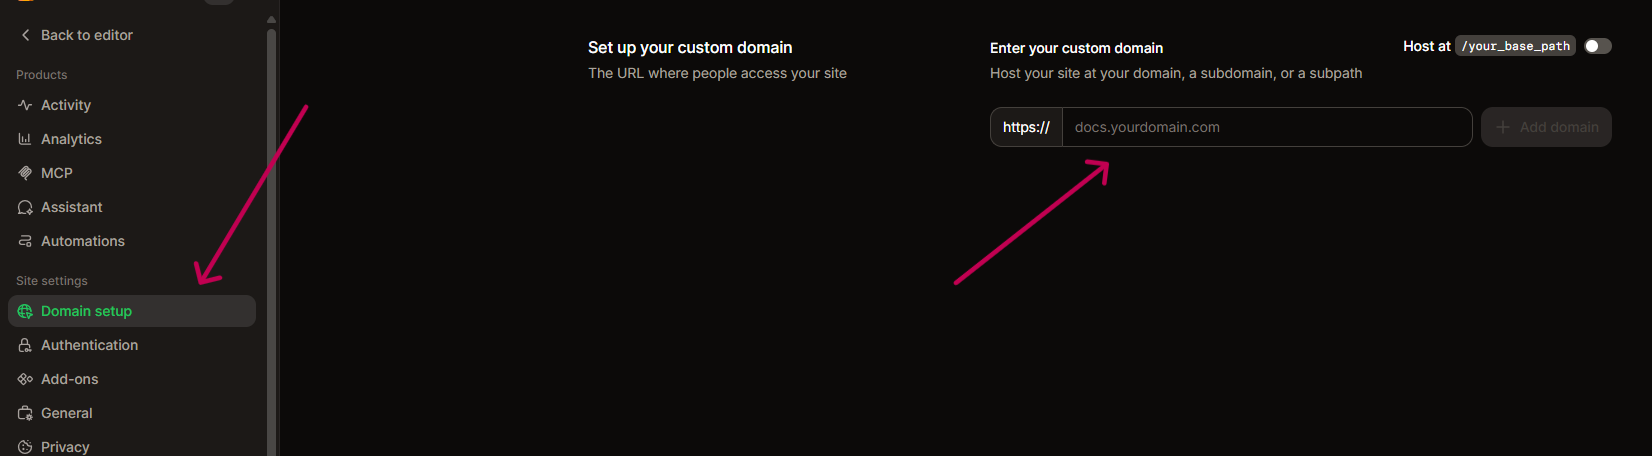
Step 6: The next step is to add your custom domain. Navigate to "Domain Setup" and enter your custom URL.
Step 7: Navigate to your docs repo in GitHub and clone it.
git clone <your-repo-url>
Step 8: Navigate to the cloned folder in VS Code and install the Mintlify CLI.
npm install -g mintlify
Note: Ensure you have Node.js v20.17.0 or higher installed on your device.
Step 9: Explore the Mintlify starter kit structure: docs.json for site navigation and configuration, MDX files for each docs page, and the asset folder for images/logo.
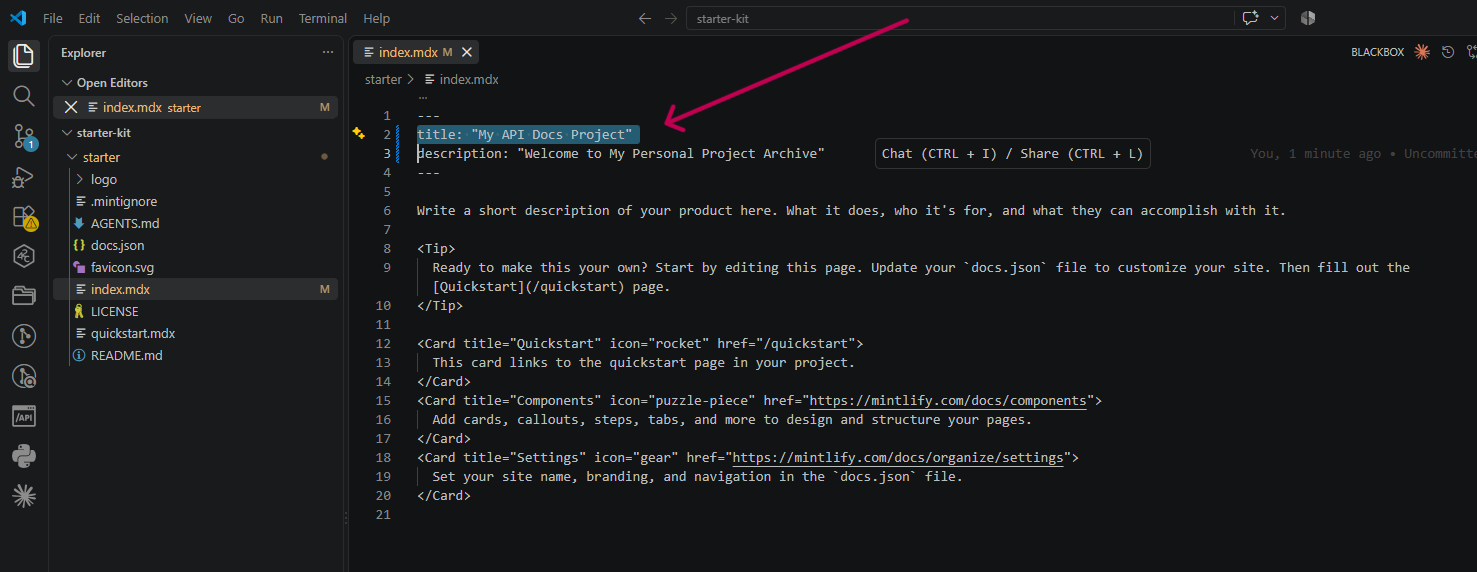
Step 10: Edit one of the .mdx file templates and make small changes, for example, the page title.
Step 11: Run mintlify dev from the project root to preview your changes locally.
Step 12: Create new .mdx files and copy-paste your docs content from your word processing tool to Mintlify.
Step 13: Once you're happy with the docs' feel and look locally, push your changes. The changes should reflect on your live site automatically.
Visit the Mintlify official documentation for a more detailed guide.
Step 8: Update Documentation to Maintain Accuracy
Your work is half done once your documentation goes live. The other half remains undone as long as your product continues to evolve and users use the documentation.
So you have to keep the documentation in sync with your product. For example, if the engineering team releases or deprecates an endpoint, the documentation needs to reflect the changes. This matters because users treat documentation as the source of truth, and when it gets outdated, it can keep them stuck for hours or, worse, lose their trust entirely.
One way to ensure your documentation stays updated is to keep your documentation repository close to your source code repository. This helps you catch every code change engineers make and update your docs accordingly.
You can use some tools to automate this process. For example, Mintlify and GitBook offer automated workflows that let you connect your documentation repository directly to every other relevant source code repository in GitHub or GitLab.
So whenever engineers make user-facing changes that affect how users use your product, for example, a change in response shape or renamed parameters, it drafts matching documentation reflecting these changes and opens a pull request. Then a human can review these changes before merging them into the documentation.
How to Optimize API Documentation for AI Agents
When you're building your API documentation these days, it's pretty much expected that you'll optimize it for AI agents.
According to the Stack Overflow Developer Survey, 51% of developers use AI tools daily in their development process, meaning they no longer spend hours reading documentation. Instead, they rely on AI to instantly find and summarize or use information in the docs. So you must optimize your documentation for these agents so they can provide accurate answers to users.
Here are some techniques you can use to optimize your docs for agents:
Make your pages self-contained: ensure each page contains all the necessary information a user needs without having to rely on any other context from other pages.
For example, it should highlight all prerequisites, clear steps on how to complete an action or task, existing limitations, and next steps. (According to GitBook.)
Document all edge cases and errors specific to your API and provide clear solutions to fix them. This helps AI agents provide accurate solutions whenever developers ask them to debug errors.
Properly structure your headers: ensure H1s, H2s, and H3s are hierarchically structured so AI agents can understand how each section relates.
Add alt text to all images and diagrams.
Lead with the answer. According to Mintlify, you should provide the most important information first, as AI tools prefer direct answers.
GitBook suggests you serve your docs content in Markdown files so AI agents can easily retrieve it, as opposed to HTML files, which are mainly for human consumption.
Generate an llms.txt file for your documentation so AI agents can easily understand and navigate the documentation. Most API documentation tools (Mintlify, Fern, and GitBook) automatically generate this for you, so you don’t have to create it manually.
Feed your API documentation to different AI tools and ask them realistic questions users are likely to ask. This is the best way to know if the agents are citing your documentation accurately.
Use the Mintlify agent score to evaluate how well AI agents access and retrieve information from your documentation site.
Conclusion
The thought of building an entire API documentation from scratch for a real product can be overwhelming, especially if it’s your first time.
But in this guide, you’ve learned how to lay the foundation for your API documentation, choose your writing tools, write your first draft, edit the documentation, and even optimize it for AI agents.
The next step is to move to the building phase and implement what you've learned in this guide to create API documentation that makes developers' integration as smooth as possible.


