By Ashwin Hariharan
Featured in Mybridge’s Top Ten NodeJS articles from Jan-Feb 2017 and Top 50 NodeJS articles of the year (v.2018)
Update: Read the updated version of this article on my tech blog.
Welcome to part 2 of this series Building your own Uber-for-X App. In part 1, you used an example of a citizen-cop app and learned how to fetch cops located near a given pair of latitude and longitude coordinates. In this part, you’ll continue building the same app and learn to implement these features:
- Exchanging data between cops and citizens in real time using web sockets
- Using maps to show location details of the citizen and the cop
- Visualizing crime data
Be sure to read part 1 thoroughly and try out the examples before proceeding with the rest of this tutorial.
Project Set-up and folder organization
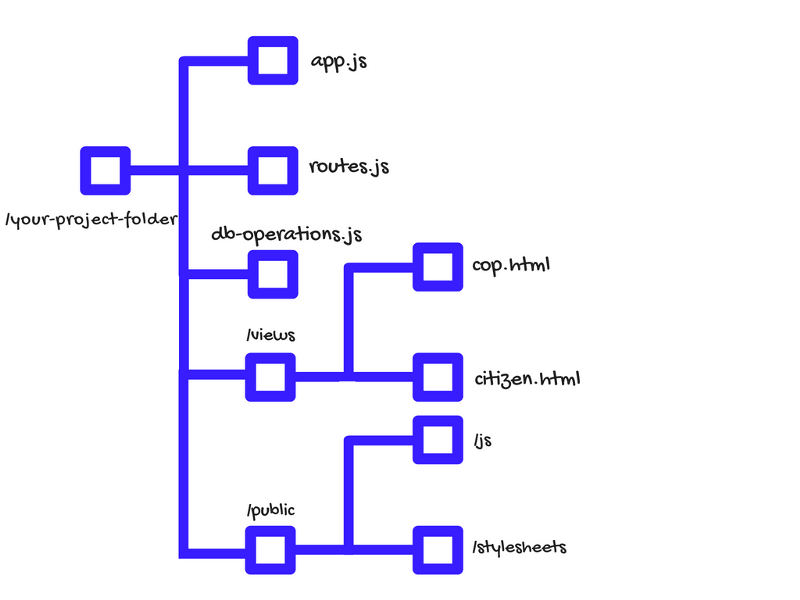
Let’s analyze the project files that we currently have, from the previous part:
- app.js contains your server set-up and database configs. Every time you need to start the server you’ll use this file by typing node app.js in your terminal.
- routes.js — you’ll use this file to write end-points and handlers
- db-operations — where you’ll write database operations
- views will contain your HTML pages
- public will contain sub-folders for storing JavaScripts, stylesheets and images
If you’ve used Uber before, you’re aware that there’s the driver-facing app, and a rider facing app. Let’s try implementing the same — citizen.html will show the citizen facing side of the app and cop.html will show the cop facing app. You’ll save these files inside the views folder. Open citizen.html in your text editor and add this:
<!DOCTYPE html>
<html lang = "en">
<head>
    <meta charset="utf-8"/>
    <title>Citizen <%= userId %> </title>
</head>
<body data-userId="<%= userId %>">
    <h1>Hello Citizen <%= userId %></h1>
    <h4 id="notification">
        <!-- Some info will be displayed here-->
    </h4>
    <div id="map">
        <!-- We will load a map here later-->
    </div>
    <!--Load JavaScripts -->
</body>
</html>
Repeat this step for cop.html as well, but replace the word Citizen with Cop.
The data-userId is an attribute that begins with the prefix data-, which you can use to store some information as strings, that doesn’t necessarily need to have a visual representation. <%= userId %> would appear to be a strange looking syntax, but don’t worry —y our template engine understands that anything that’s between _<%=_ and %> is a variable, and it will substitute the variable userId for actual value on the server side before the page is served. You’ll understand this better as you progress.
If you recall in the earlier part, you had these lines in app.js :
app.set('views', 'views');
app.use(express.static('./public'));
app.set('view engine','html');
app.engine('html',consolidate.underscore);
The first line tells your app to look for HTML files inside the views folder whenever it gets a request for a particular page. The second line sets the folder from which static assets like stylesheets and JavaScripts will be served when a page loads on the browser. The next two lines tell our application to use the underscore template engine to parse our html files.
Now that the directory structure is set-up and the views are ready, it’s time to start implementing features! Before continuing, it’ll be helpful to keep the following points in mind:
- Write JS code inside the script tag in the HTML document. You may choose to write it inside a .js file, in which case you should save the JS file(s) inside /public/js folder and load it in your page. Make sure that you load the libraries and other dependencies first!
- It’ll be helpful if you keep the developer console open in your browser to check for error messages in case something doesn’t seem to be working. Keep a watch on the terminal output too.
- The words event and signal will be used interchangeably in this tutorial — both mean the same thing.
Let’s start hacking!
Serving Citizen and Cop Pages
Let’s render the citizen page on going to http://localhost:8000/citizen.html, and the cop page on going to http://localhost:8000/cop.html. To do this, open app.js and add these lines inside the callback function of mongoClient.connect:
app.get('/citizen.html', function(req, res){
    res.render('citizen.html',{
        userId: req.query.userId
    });
});

app.get('/cop.html', function(req, res){
    res.render('cop.html', {
        userId: req.query.userId
    });
});
Save your files, re-start your server and load the citizen and cop pages. You should see Hello Citizen on the page. If you pass userId as query parameters in the URL, for example — http://localhost:8000/citizen.html?userId=YOURNAME then you’ll see Hello Citizen YOURNAME. That’s because your template engine substituted the variable userId with the value that you passed from the query parameters, and served the page back.
Why do you need web sockets, and how do they work?
Event or signal based communication has always been an intuitive way to pass messages ever since historic times. The earliest techniques were quite rudimentary — like using fire signals for various purposes, mostly to warn of danger to people.

Over the centuries, newer and better forms of communication have emerged. The advent of computers and the internet sparked something really innovative — and with the development of the OSI model, socket programming and the smart-phone revolution, one-on-one communication has become quite sophisticated. The basic principles remain the same, but now much more interesting than setting something on fire and throwing it.
Using Sockets, you can send and receive information via events, or in other words signals. There can be different types of such signals, and if the parties involved know what kind of signal to ‘listen’ to, then there can be an exchange of information.
But why not simply use HTTP requests?
I read a very nice article on the difference between HTTP requests and web-sockets. It’s a short one, so you can read it to understand the concept of web-sockets better.
But briefly put, traditional HTTP requests like GET and POST initiate a new connection request and later close the connection after the server sends back the response. If you were to attempt building a real time app using HTTP, the client would have to initiate requests at regular intervals to check for new information (which may or may not be available). This is because of the fact that the server itself is unable to push information on its own.
And this is highly inefficient — the client would waste resources in constantly interrupting the server and saying “Hi, I’m XYZ - let’s shake hands. Do you have something new for me?”, and the server will be like — “Hi (shaking hands). No I don’t. Good-bye!” over and over again, which means even the server is wasting resources!
Web-sockets however, create a persistent connection between a client and the server. So this way the client need not keep asking the server, the server can push information when it needs to. This method is much more efficient for building real time applications.
Web-sockets have support in all major browsers, but for few browsers that don’t — there are other fallback options/techniques to rely on, like Long Polling. These fallback techniques and the Web Sockets APIs are bundled together within Socket.IO, so you wouldn’t have to worry about browser compatibility. Here is an excellent answer on Stack Overflow that compares lots of those options.
Integrating Socket.IO
Let’s start by integrating Socket.io with the express server and also load socket.io’s client-side library in the html pages. You’ll also use jQuery — it isn’t needed for socket.io to work, but your app will need it for making AJAX requests and tons of other stuff. So go ahead, write this in both the pages:
<!-- Load socket.io client library -->
<script src="/socket.io/socket.io.js"></script>

<!-- Load JQuery from a CDN -->
<script type="text/javascript" src="https://cdnjs.cloudflare.com/ajax/libs/jquery/3.1.1/jquery.min.js"></script>

<!-- load libraries before your JS code
Write rest of your JS code here -->

<script type="text/javascript">
    var socket = io();

    //Fetch userId from the data-atribute of the body tag
    var userId = document.body.getAttribute("data-userId");

    /*Fire a 'join' event and send your userId to the server, to join a room - room-name will be the userId itself!
*/
    socket.emit('join', {userId: userId});

//Declare variables, this will be used later
    var requestDetails = {};
    var copDetails = {};
    var map, marker;

</script>
The first script tag loads Socket.IO’s client library (once we serve the page using socket.io server), which exposes a global io object. Your app will make use of this object to emit events/signals to the server and listen to events from the server.
Now you have to change app.js to use socket.io:
var http = require("http");
var express = require("express");
var consolidate = require("consolidate"); //1
var _ = require("underscore");
var bodyParser = require('body-parser');

var routes = require('./routes'); //File that contains our endpoints
var mongoClient = require("mongodb").MongoClient;

var app = express();
app.use(bodyParser.urlencoded({
    extended: true,
}));

app.use(bodyParser.json({
    limit: '5mb'
}));

app.set('views', 'views'); //Set the folder-name from where you serve the html page.
app.use(express.static('./public')); //setting the folder name (public) where all the static files like css, js, images etc are made available

app.set('view engine', 'html');
app.engine('html', consolidate.underscore); //Use underscore to parse templates when we do res.render

var server = http.Server(app);
var portNumber = 8000; //for locahost:8000

var io = require('socket.io')(server); //Creating a new socket.io instance by passing the HTTP server object

server.listen(portNumber, function() { //Runs the server on port 8000
    console.log('Server listening at port ' + portNumber);

    var url = 'mongodb://localhost:27017/myUberApp'; //Db name
    mongoClient.connect(url, function(err, db) { //a connection with the mongodb is established here.
        console.log("Connected to Database");

        app.get('/citizen.html', function(req, res) { //a request to /citizen.html will render our citizen.html page
            //Substitute the variable userId in citizen.html with the userId value extracted from query params of the request.
            res.render('citizen.html', {
                userId: req.query.userId
            });
        });

        app.get('/cop.html', function(req, res) {
            res.render('cop.html', {
                userId: req.query.userId
            });
        });

        io.on('connection', function(socket) { //Listen on the 'connection' event for incoming sockets
            console.log('A user just connected');

            socket.on('join', function(data) { //Listen to any join event from connected users
                socket.join(data.userId); //User joins a unique room/channel that's named after the userId
                console.log("User joined room: " + data.userId);
            });

            routes.initialize(app, db, socket, io); //Pass socket and io objects that we could use at different parts of our app
        });
    });
});

/* 1. Not all the template engines work uniformly with express, hence this library in js, (consolidate), is used to make the template engines work uniformly. Altough it doesn't have any
modules of its own and any template engine to be used should be seprately installed!*/
Make sure to change the initialize function in routes.js to accept four parameters instead of two, like this — function initialize(app, db, socket, io).
If you restart the server and refresh your pages, you’ll see the message A user just connected in your terminal. The server will also create a new room once it receives a join event from the connected clients, so you’ll see another message printed — User joined room. Try it with http://localhost:8000/cop.html?userId=02, you should get a similar output.
Perfect — now that you have integrated socket.io, you can begin building the rest of your application.
Citizen-cop communication:
The entire process can be broadly divided into two sets of features:
- Requesting for help and notifying nearby cops
- Accepting the request and notifying the citizen
Let’s try to understand how to implement each of these features in detail.
Requesting for help and notifying nearby cops:
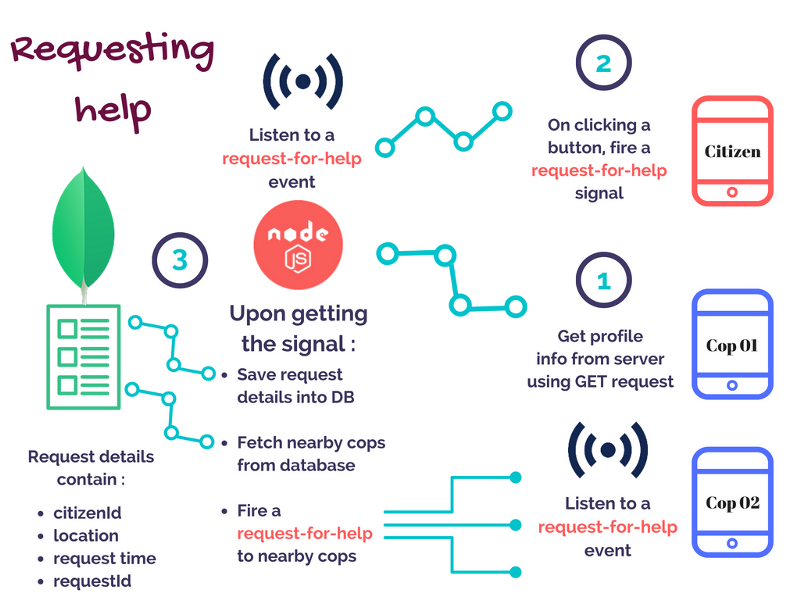
- First create an end-point /cops/info inside routes.js, that will call a function to fetch a cop’s profile info, and return the results in the form of JSON to the client —
// GET request to '/cops/info?userId=02'
app.get('/cops/info', function(req, res){
    var userId = req.query.userId //extract userId from query params
    dbOperations.fetchCopDetails(db, userId, function(results){
        res.json({
            copDetails: results //return results to client
        });
    });
});
- Next, you’ll write the function fetchCopDetails in db-operations.js, that accepts an instance of db, the cop’s userId and a callback function. This function will use MongoDB’s findOne query to fetch a cop’s info with a given userId from the database, and then return the result to the callback:
function fetchCopDetails(db, userId, callback) {
    db.collection("policeData").findOne({
        userId: userId
    }, function(err, results) {
        if (err) {
            console.log(err);
        } else {
            callback({
                copId: results.userId,
                displayName: results.displayName,
                phone: results.phone,
                location: results.location
            });
        }
    });
}
exports.fetchCopDetails = fetchCopDetails;
- Inside cop.html :
Now that you’ve created the endpoint, you can call it using JQuery’s AJAX function to fetch the cop’s profile info and display it inside an empty div id=”copDetails”. You’ll also configure the cop page to begin listening to any help requests:
//First send a GET request using JQuery AJAX and get the cop's details and save it
$.ajax({
    url: "/cops/info?userId="+userId,
    type: "GET",
    dataType: "json",
    success: function(data){ //Once response is successful
        copDetails = data.copDetails; //Save the cop details
        copDetails.location = {
            address: copDetails.location.address,
            longitude: copDetails.location.coordinates[0],
            latitude: copDetails.location.coordinates[1]
        };
        document.getElementById("copDetails").innerHTML = JSON.stringify(data.copDetails);
    },
    error: function(httpRequest, status, error){
        console.log(error);
    }
});

//Listen for a "request-for-help" event
socket.on("request-for-help", function(eventData){
    //Once request is received, do this:

    //Save request details
    requestDetails = eventData; //Contains info of citizen

    //display the data received from the event
    document.getElementById("notification").innerHTML = "Someone's being attacked by a wildling! \n" + JSON.stringify(requestDetails);
});
If you restart the server and go to http://localhost:8000/cop.html?userId=02, (passing userId of a saved cop in the query params) you’ll find the cop’s info displayed on the page. Your cop page has also begun to listen to any request-for-help events.
Inside citizen.html
The next step is to create a button for the citizen that can be clicked in case of emergency. Once clicked, it will fire a request-for-help signal and the signal can carry back information of the citizen back to the server:
<button onclick="requestForHelp()">
    Request for help
</button>
Write the handler for generating the event in the script tag:
//Citizen's info
requestDetails = {
    citizenId: userId,
    location: {
        address: "Indiranagar, Bengaluru, Karnataka 560038, India",
        latitude: 12.9718915,
        longitude: 77.64115449999997
    }
}

//When button is clicked, fire request-for-help and send citizen's userId and location
function requestForHelp(){
    socket.emit("request-for-help", requestDetails);
}
- Finally, the server needs to handle this event, as shown in the illustration. Go to db-operations.js and create a new function that can be used to save the request details in a new table requestsData:
//Saves details like citizen’s location, time
function saveRequest(db, issueId, requestTime, location, citizenId, status, callback){

    db.collection('requestsData').insert({
        "_id": issueId,
        "requestTime": requestTime,
        "location": location,
        "citizenId": citizenId,
        "status": status
    }, function(err, results){
           if(err) {
               console.log(err);
           }else{
               callback(results);
           }
    });
}
exports.saveRequest = saveRequest;
The status field will tell whether a cop has responded to the request or not. Finally, in routes.js, add this inside the initialize function:
//Listen to a 'request-for-help' event from connected citizens
socket.on('request-for-help', function(eventData) {
    /*
        eventData contains userId and location
        1. First save the request details inside a table requestsData
        2. AFTER saving, fetch nearby cops from citizen’s location
        3. Fire a request-for-help event to each of the cop’s room
    */

    var requestTime = new Date(); //Time of the request

    var ObjectID = require('mongodb').ObjectID;
    var requestId = new ObjectID; //Generate unique ID for the request

    //1. First save the request details inside a table requestsData.
    //Convert latitude and longitude to [longitude, latitude]
    var location = {
        coordinates: [
            eventData.location.longitude,
            eventData.location.latitude
        ],
        address: eventData.location.address
    };
    dbOperations.saveRequest(db, requestId, requestTime, location, eventData.citizenId, 'waiting', function(results) {

        //2. AFTER saving, fetch nearby cops from citizen’s location
        dbOperations.fetchNearestCops(db, location.coordinates, function(results) {
            eventData.requestId = requestId;
            //3. After fetching nearest cops, fire a 'request-for-help' event to each of them
            for (var i = 0; i < results.length; i++) {
                io.sockets.in(results[i].userId).emit('request-for-help', eventData);
            }
        });
    });
});
That’s it, you’ve built the first set of features! Re-start the server and test this out by opening 4 tabs, one for a citizen and cop pages 01, 02 and 03.
Once you press the help button, you’ll notice that cop 01 does not get the request because that cop is far away from the citizen’s location. However cop 02 and cop 03 pages show the help request.
Awesome, you managed to send a request from a citizen and notify all nearby cops! Now, for the second set of features — this involves notifying the citizen once a cop accepts the request.
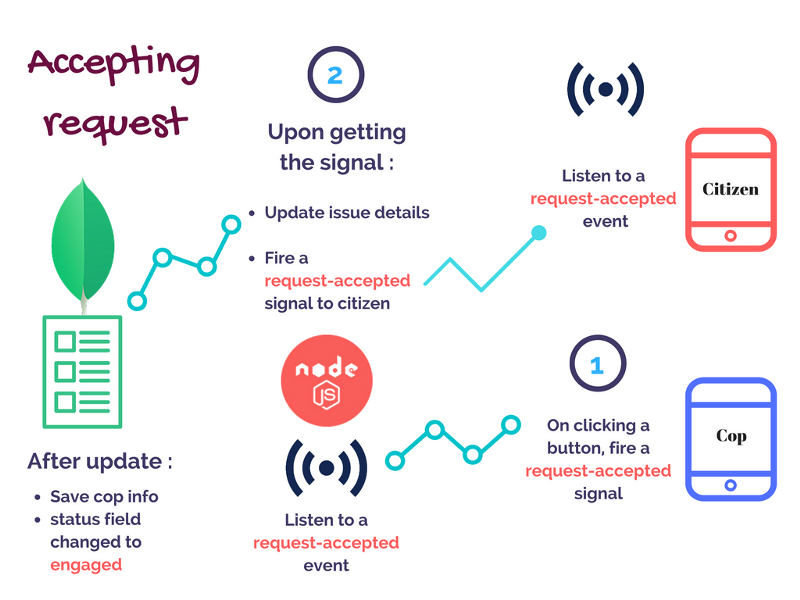
Accepting the request and notifying the citizen
Inside cop.html
The cop should be able to click a button to inform the citizen that the request has been accepted. When clicked, this button will fire a request-accepted event and also send back the cop’s info to the server:
<button onclick="helpCitizen()">
    Help Citizen
</button>
and the event handler will look like this:
function helpCitizen(){
    //Fire a "request-accepted" event/signal and send relevant info back to server
    socket.emit("request-accepted", {
        requestDetails: requestDetails,
        copDetails: copDetails
    });
 }
Inside citizen.html
The citizen page will start listening to any request-accepted events from the server. Once it receives the signal, you can display the cop info inside an empty div:
//Listen for a "request-accepted" event
socket.on("request-accepted", function(eventData){
    copDetails = data; //Save cop details

   //Display Cop details
    document.getElementById("notification").innerHTML = "A cop is coming to your rescue! \n" + JSON.stringify(copDetails);
});
Now the server needs to handle the request-accepted event as shown in the illustration. First you’ll write a function in db-operations.js that will update the request in the database with the cop’s userId and change the status field from waiting to engaged:
function updateRequest(db, requestId, copId, status, callback) {
    db.collection('requestsData').update({
        "_id": requestId //Perform update for the given requestId
    }, {
        $set: {
            "status": status, //Update status to 'engaged'
            "copId": copId  //save cop's userId
        }
    }, function(err, results) {
        if (err) {
            console.log(err);
        } else {
            callback("Issue updated")
        }
    });
}
exports.updateRequest = updateRequest;
When the server listens to a request-accepted event, it’ll use the above function to save the request details and then emit a request-accepted event to the citizen. So go ahead, write this in your routes.js file:
//Listen to a 'request-accepted' event from connected cops
socket.on('request-accepted', function(eventData){

    //Convert string to MongoDb's ObjectId data-type
    var ObjectID = require('mongodb').ObjectID;
    var requestId = new ObjectID(eventData.requestDetails.requestId);
    //For the request with requestId, update request details
    dbOperations.updateRequest(db, requestId, eventData.copDetails.copId, 'engaged’, function(results){

       //Fire a 'request-accepted' event to the citizen and send cop details
    io.sockets.in(eventData.requestDetails.citizenId).emit('request-accepted', eventData.copDetails);
       });

 });
Great, you’ve built finished building the second set of features! Re-start your server, refresh your pages, and try it out!
What’s next?
By now it might have become obvious to you — the citizen page sends a hard-coded value of location every-time the button for help is clicked. Similarly the location info for all your sample cops have already been fed into the database earlier and are fixed values.
However in the real world, both the citizen and the cop don’t have a fixed location because they keep moving around — and therefore you’ll need a way to test this behavior out!
Enter Maps
There are lot of mapping options out there. Google Maps API are very robust and feature rich. I personally love Mapbox too, it uses OpenStreetMap protocols under the hood, and here is the best part — it’s open source and hugely customizable! So let’s use that for building the rest of your app.
Using Mapbox API
- In order to begin using these APIs, you need to first create an account on MapBox and get the authentication key here.
Depending on your needs, Mapbox offers different pricing plans to use these APIs in your apps — for now the free starter plan is sufficient. - Next, you’ll load mapbox.js library (current version 2.4.0) in both the pages using a script tag. It’s built on top of Leaflet (another JavaScript library).
<script src="https://api.mapbox.com/mapbox.js/v2.4.0/mapbox.js"></script>
You’ll also load the stylesheet used by mapbox.js inside the head tag of your HTML:
<link href="https://api.mapbox.com/mapbox.js/v2.4.0/mapbox.css" rel="stylesheet" />
Once you’ve done this, it’s time for you to start writing the logic —
- First, load the map and set it to show some location as default
- Display a marker on the map
- Use the autocomplete feature offered by Mapbox geocoder api. This allows you to input for a place and choose from the autocomplete suggestions.
After choosing the place, you can extract the place information and do whatever you want with it.
Leaflet exposes all it’s APIs inside a global variable L. Since mapbox.js is built on top of Leaflet, the APIs that you’re gonna use will also be exposed in a global L variable.
- In citizen.html — write this in your JavaScript
L.mapbox.accessToken = "YOUR_API_KEY";

//Load the map and give it a default style
map = L.mapbox.map("map", "mapbox.streets");

//set it to a given lat-lng and zoom level
map.setView([12.9718915, 77.64115449999997], 9);

//Display a default marker
marker = L.marker([12.9718915, 77.64115449999997]).addTo(map);

//This will display an input box
map.addControl(L.mapbox.geocoderControl("mapbox.places", {
    autocomplete: true, //will suggest for places as you type
}).on("select", function(data){
    //This function runs when a place is selected

    //data contains the geocoding results
    console.log(data);

    //Do something with the results
    //Extract address and coordinates from the results and save it
    requestDetails.location = {
        address: data.feature["place_name"],
        latitude: data.feature.center[1],
        longitude: data.feature.center[0]
    };

    //Set the marker to new location
    marker.setLatLng( [data.feature.center[1], data.feature.center[0]]);
}));
The above code extracts the place information once you select a place and updates the location details, so the next time you click the help button, you’ll send the new location along with your request.
Once a cop accepts the request, you can show the location of the cop using a custom marker. First save this image inside /public/images, then write this code inside the event-handler of the request-accepted event:
//Show cop location on the map
L.marker([
    copDetails.location.latitude,
    copDetails.location.longitude
],{
    icon: L.icon({
        iconUrl: "/images/police.png", //image path
        iconSize: [60, 28] //in pixels
    })
}).addTo(map);
That’s it! Now let’s repeat the same for the cop page as well inside cop.html.
Your cop’s page fetches the cop’s location info from the server using AJAX, so all you need to do is set the map and the marker to point to it. Let’s write this code inside the success callback of your AJAX function:
L.mapbox.accessToken = "YOUR_API_KEY";

//Load the map and give it a default style
map = L.mapbox.map("map", "mapbox.streets");

//set it to a cop's lat-lng and zoom level
map.setView( [copDetails.location.latitude, copDetails.location.longitude ], 9);

//Display a default marker
marker = L.marker([copDetails.location.latitude, copDetails.location.longitude]).addTo(map);

//This will display an input box
map.addControl(L.mapbox.geocoderControl("mapbox.places", {
    autocomplete: true, //will suggest for places as you type
}).on("select", function(data){
    //This function runs when a place is selected

    //data contains the geocoding results
    console.log(data);

    //Do something with the results

    //Set the marker to new location
    marker.setLatLng([
        data.feature.center[1],
        data.feature.center[0]
    ]);
}));
Once a cop gets a request, you can use a custom marker to display the citizen’s location. Download the marker image and save it in /public/images. Next, let’s write the logic inside the event handler of your request-for-help event:
//Show citizen location on the map
L.marker([
    requestDetails.location.latitude,
    requestDetails.location.longitude
],{
    icon: L.icon({
       iconUrl: "/images/citizen.png",
       iconSize: [50,50]
    })
}).addTo(map);
Cool, let’s try this out — open cop pages 04, 05 and 06. In the citizen page, type “the forum bengaluru”, select the first result and watch the app in action when you ask for help!
Data Visualization
A Picture is worth a thousand words
People love visualizing data. It helps you understand a certain topic better. For example in the metric system, I didn’t quite realize just how large a Gigameter really is, but I understood it better after I saw this picture:
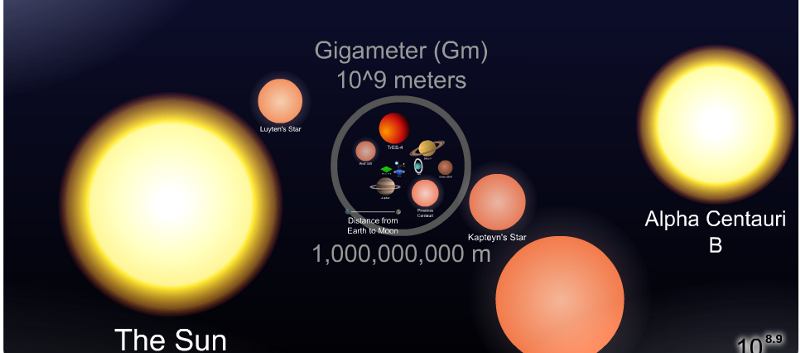 _[htwins.net/scale2/](http://htwins.net/scale2/" rel="noopener" target="blank" title=")
Unlike computers, humans don’t understand numbers laid out on spreadsheets very easily — the larger the data-set, the harder it becomes for us to identify any meaningful patterns in it. Lot’s of meaningful information could go undetected, simply because the human brain is not trained to pour over large number of tables filled with text and numbers.
It’s much easier to process information and identify patterns if the data can be visualized. There are many ways to do that, in the form of graphs, charts etc. and there are several libraries that allows you to do those things in a screen.
At this point, I’m assuming that you probably have played around with your app a little bit, and saved help requests in MongoDB. If not, you can download the data-set and then import it to your database by typing this in your terminal:
mongoimport --db myUberApp --collection requestsData --drop --file ./path/to/jsonfile.json
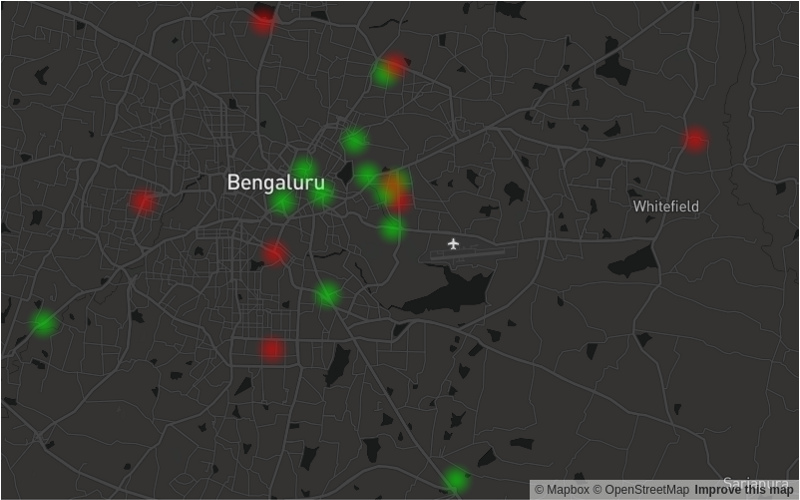
As you already know, the saved requests contain useful information like the location details, the status field which indicates whether a citizen has received help or not, and so forth. Perfect for using this information to visualize crime data on a heat-map! Here’s an example from Mapbox.
I’m gonna use MapBox GL JS — it’s a library that uses WebGL to help visualize data inside maps and make them very interactive. It’s extremely customizable — with features like colors, transitions and lighting. Feel free to try your own styles later!
For the heat-map feature, the library accepts data-sets in the GeoJSON format, and then plots data-points on the map. GeoJSON is a format for encoding a variety of geographic data structures. Hence you need to convert your saved data to adhere to this format.
So, here are the following steps:
- An endpoint to serve your visualization page data.html.
- Next, have an endpoint — /requests/info that fetches your requests from MongoDB, converts them to the GeoJSON format and returns them to the client.
- Create a page data.html that loads the visualization library and stylesheet.
- Using AJAX, fetch the data-set from MongoDB and create a heatmap!
Step 1:
Open app.js, and write this code to serve the visualization page:
app.get('/data.html', function(req, res) {
    res.render('data.html');
});
Step 2:
Let’s write a function in db-operations.js that fetches all results from your requestsData table:
function fetchRequests(db, callback) {
    var collection = db.collection('requestsData');
    //Using stream to process potentially huge records
    var stream = collection.find({}, {
        requestTime: true,
        status: true,
        location: true
    }).stream();

    var requestsData = [];

    stream.on('data', function(request) {
        requestsData.push(request);
    });

    //Runs after results are fetched
    stream.on('end', function() {
        callback(requestsData);
    });
}
exports.fetchRequests = fetchRequests;
In the above code, you query the requestsData table to return all documents. You can specify which fields to include and exclude from the results using boolean values — true to include the field and false to exclude the field. The results are then returned back to a callback function.
How does GeoJSON look like?
Information stored in GeoJSON has the following format:
{
    type: "FeatureCollection",
    features: [
        {
             type: "Feature",
             geometry: {
                 type: "Point",
                 coordinates: [<longitude>, <latitude>]
             },
             properties: {
                 <field1>: <value1>,
                 <field2>: <value2>,
                        ...
             }
        }
        ...
    ]
}
You’ll need to convert each object returned by your function into feature objects. The properties field can hold optional meta-data like status, requestTime, address etc. You’ll write the handle in routes.js that will call the function, convert it to GeoJSON and then return it back:
app.get('/requests/info', function(req, res){
    dbOperations.fetchRequests(db, function(results){
        var features = [];

        for(var i=0; i<results.length; i++){
            features.push({
                type: 'Feature',
                geometry: {
                    type: 'Point',
                    coordinates: results[i].location.coordinates
                },
                properties: {
                    status: results[i].status,
                    requestTime: results[i].requestTime,
                    address: results[i].location.address
                }
            });
        }
        var geoJsonData = {
            type: 'FeatureCollection',
            features: features
        }

        res.json(geoJsonData);
    });
});
Step 3:
Create a page data.html in your views folder, and load the stylesheet and library for the visualization:
<!DOCTYPE html>
<html lang="en">

<head>
    <meta charset="utf-8" />
    <title>Visualize Data</title>
    <link href="https://api.tiles.mapbox.com/mapbox-gl-js/v0.26.0/mapbox-gl.css" rel="stylesheet" />
</head>

<body>

    <div id="map" style="width: 800px; height: 500px">
        <!--Load the map here -->
    </div>

    <!-- Load socket.io client library -->
    <script src="/socket.io/socket.io.js"></script>

    <!-- Load JQuery from a CDN -->
    <script type="text/javascript" src="https://cdnjs.cloudflare.com/ajax/libs/jquery/3.1.1/jquery.min.js"></script>

    <!-- Load Mapbox GL Library -->
    <script src="https://api.tiles.mapbox.com/mapbox-gl-js/v0.26.0/mapbox-gl.js"></script>

    <!-- load libraries before your JS code
    Write rest of your JS code here -->

    <script type="text/javascript">
        var socket = io();
        var map, marker;
        mapboxgl.accessToken = "YOUR_ACCESS_TOKEN";
    </script>
</body>
</html>
Now you’ll use AJAX to call your endpoint and fetch the GeoJSON data:
$.ajax({
    url: "/requests/info",
    type: "GET",
    dataType: "json",

    success: function(data) {
        console.log(data);
    }
    error: function(httpRequest, status, error) {
        console.log(error);
    }
});
Cool — save your code, re-start your server and point your browser to http://localhost:8000/data.html . You’ll see the results of your AJAX call in the console.
Now, let’s use it to generate a heat-map. Write this inside the success callback of your AJAX call:
var map = new mapboxgl.Map({
    container: "map",
    style: "mapbox://styles/mapbox/dark-v9",
    center: [77.64115449999997, 12.9718915],
    zoom: 10
});

map.on("load", function() {

    //Add a new source from our GeoJSON data
    map.addSource("help-requests", {
       type: "geojson",
       data: data
    });

//we can specify different color and styling formats by adding different layers

    map.addLayer({
        "id": "help-requests",
        "type": "circle",
        "source": "help-requests",
        "paint": {
        //Apply a different color to different status fields
            "circle-color": {
                property: "status",
                type: "categorical",
                stops: [
                    //For waiting, show in red
                    ["waiting", "rgba(255,0,0,0.5)"],

                    //For engaged, show in green
                    ["engaged", "rgba(0,255,0,0.5)"]
                ]
            },
            "circle-radius": 20, //Radius of the circle
            "circle-blur": 1 //Amount of blur
        }
    });
});
Refresh your page to see a cool looking heatmap generated from your data-set!
Conclusion
If you made it this far, congratulations! Hopefully this tutorial series gave you an insight on how to build a real time web application with ease — all you now need is the next big idea!
I’m sure you’re aware that there are still plenty of places to improve upon in the app that you just built. You can try adding more features to it and make it more ‘intelligent’, for example:
- Mimic a moving cop and a moving citizen that continuously send location updates to each other in real time, and update the marker icons on the map.
- Set the status field to closed once the cop has helped the citizen out. Then, you can assign a different color to visualize closed issues on a heat-map. That way you’ll have an understanding of how efficient cops are in a given area.
- Build a rating system with which a citizen and a cop can rate each other. This way, neither citizen nor cop will misuse the system, and cops can get performance reports.
- Have a cool looking user interface, like Material UI.
- Lastly, have a sign-up and login mechanism!
Using a library like React or a framework like Angular might help you implement features in a robust and scalable manner. You could also experiment with charting libraries like D3.js to visualize information in the forma of bar-charts, pie-charts, line-charts etc.
At some point you could deploy your app on a cloud hosting service provider — like Amazon Web Services or Google Cloud Platform, to show people what you made and have them test out features. It’ll be a nice way to get feedback and ideas, and who knows — your app might turn out to be a life saver some day!

Thank you for reading.
Do recommend this if it helped you. In-case you have questions on any aspect of this tutorial series or need my help in understanding something, feel free to tweet or leave a comment here. I’d love to hear about your Uber-for-X ideas! You can read more such articles in my tech blog too.
And here’s what you’ve been waiting for, the full source code!
Liked what you read? You should subscribe. I won't waste your time.
Check out my Patreon page! Become a Patron!