
By Samuel Teboul
The Angular CLI makes it easy to create an application that already works, right out of the box. It is a great tool, but have you never thought: "How does it work? How can I build an application without the CLI?"
Those questions came to my mind when Angular 7 was released. I started to look for answers on the web and what I found was not up-to-date for my purpose. Indeed, as Angular and webpack are always evolving, so dependencies and configurations.
In this article you are about to learn:
- How to setup an Angular 7 basic application, from scratch
- How to configure webpack for development mode (Just-in-Time compilation)
- How to configure webpack for production mode (Ahead-of-Time compilation)
Angular 7: setup a basic app
Create a new package.json file and add the following lines to install Angular and its dependencies.
"dependencies":
  "@angular/animations": "~7.0",
  "@angular/common": "~7.0",
  "@angular/compiler": "~7.0",
  "@angular/compiler-cli": "~7.0",
  "@angular/core": "~7.0",
  "@angular/forms": "~7.0",
  "@angular/http": "~7.0",
  "@angular/platform-browser": "~7.0",
  "@angular/platform-browser-dynamic": "~7.0",
  "@angular/platform-server": "~7.0",
  "@angular/router": "~7.0",
  "@angular/upgrade": "~7.0",
  "core-js": "~2.5",
  "rxjs": "~6.3",
  "zone.js": "~0.8"
}
I have struggled for a long time to find the best folder structure that fits every Angular project, especially when the application grows in size. This article has taught me a lot on the subject.
Create a new src folder and the following folders/files inside it. All our Angular app business logic will be in this folder.
src
|__ app
    |__ modules
        |__ menu
            |__ components
                |__ menu
                    |__ menu.component.html
                    |__ menu.component.scss
                    |__ menu.component.ts
            |__ menu.module.ts
            |__ menu-routing.module.ts
|__ shared
         |__ components
             |__ home
                 |__ home.component.html
                 |__ home.component.scss
                 |__ home.component.ts
|__ app.component.html
        |__ app.component.scss
        |__ app.component.ts
        |__ app.module.ts
        |__ app-routing.module.ts
|__ index.html
|__ main.ts
Every application has at least one Angular module, the root module that you bootstrap to launch the application. By convention, it is usually called AppModule. I create another module, the MenuModule to show you how you can use lazy loading in your project, especially for production.
Some important points :
index.html
Add <base href=”/”> tells our Angular router how to compose navigation URLs . This line means that your app will start from root folder i.e locally it would consider localhost:3000/ and on server it would consider root folder.
app-routing.module.ts
There are three main steps to setting up a lazy loaded feature module:
- Create the feature module
- Create the feature module’s routing module
- Configure the routes
{path: ‘menu’, loadChildren:’./modules/menu/menu.module#MenuModule’} tells Angular to lazy load our feature module MenuModule by the time the user visit the /menu route.
TypeScript configuration
Add the following lines to your package.json file:
"devDependencies": {
  "@types/core-js": "~2.5",
  "@types/node": "~10.12",
  "typescript": "~3.1"
}
Create in your root project folder a tsconfig.json file:
{
  "compilerOptions": {
    "target": "es5",
    "module": "commonjs",
    "moduleResolution": "node",
    "sourceMap": true,
    "emitDecoratorMetadata": true,
    "experimentalDecorators": true,
    "noImplicitAny": true,
    "suppressImplicitAnyIndexErrors": true,
    "lib": ["es6", "dom"],
    "typeRoots": ["node_modules/@types"]
  },
  "exclude": ["node_modules"]
}
This is a basic TypeScript configuration file. It’s essential to install node and core-js types definition. Without it, TypeScript won’t be able to compile our Angular application to JavaScript.
Webpack configuration for development mode (Just-in-Time compilation)
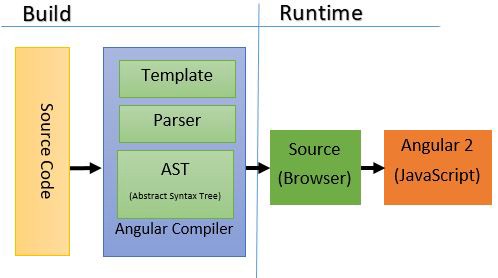
First of all, what does compilation means ? It doesn’t mean compiling TypeScript files to JavaScript, this is not related to Angular. Angular itself needs to compile your HTML templates into JavaScript and this can occurred at 2 different points of time:
- After your app is downloaded in the Browser (JiT)
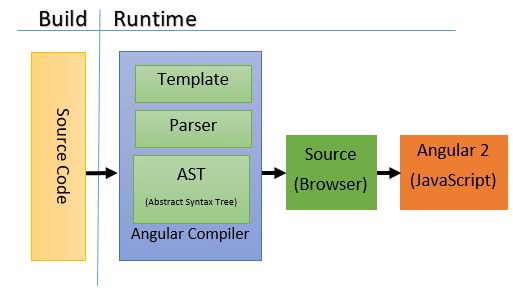
- Right after development, at build time, before your app is downloaded in the Browser (AoT)
What is webpack?
According to Wikipedia:
Webpack is an open source JavaScript module bundler. Its main purpose is to bundle JavaScript files for usage in a browser, yet it is also capable of transforming, bundling, or packaging just about any resource or asset. Webpack takes modules with dependencies and generates static assets representing those modules. It’s a module bundler primarily for JavaScript, but it can transform front-end assets like HTML, CSS, even images if the corresponding plugins are included.
To tell webpack how to bundle our application we have to configure what we call the Core Concepts:
Entry — An entry point indicates which module webpack should use to begin building out its internal dependency graph. Webpack will figure out which other modules and libraries that entry point depends on (directly and indirectly).
Output — The output property tells webpack where to emit the bundles it creates and how to name these files. It defaults to ./dist/main.js for the main output file and to the ./dist folder for any other generated file.
Loaders — At a high level, loaders have two properties in your webpack configuration:
- The test property identifies which file or files should be transformed.
- The use property indicates which loader should be used to do the transforming.
Plugins — While loaders are used to transform certain types of modules, plugins can be leveraged to perform a wider range of tasks like bundle optimization, asset management, and injection of environment variables.
All of these must be set up in the webpack configuration file webpack.config.js.
Configuring webpack
In the src folder we need to create 2 more files:
vendor.tsthat only imports the application's third-party modules.polyfills.tswe need polyfills to run an Angular application in most browsers as explained in the Browser Support guide. This bundle file will load first so this is a good place to configure the browser environment for production or development.
Create a new config folder and the following files inside:
webpack.config.common.js: configuration that we will use for development and production.
Entry — For this application (and for most of them actually) we have 3 different entry points : vendor.ts polyfills.ts and main.ts.
entry: {
    vendor: './src/vendor.ts',
    polyfills: './src/polyfills.ts',
    main: './src/main.ts'
}
Loaders — We load .html files with html-loader which is pretty standard. Loading .scss files is a bit tricky for an Angular app and I struggled for many hours to figure out how to do it.
First of all, we must load sass files by using two loaders sass-loader and css-loader. If you want to make debugging easy, especially in development mode, it’s really important to add sourceMap: **true** as options. In an Angular application we add styles to component by passing a file path to styleUrls array as follow styleUrls: ["./path/styles.scss"] but we need to have style as a string and to-string-loader will do it for us and cast the output to a string.
{
    test: /\.html$/,
    loader: 'html-loader'
},
{
    test: /\.(scss|sass)$/,
    use: [
        'to-string-loader',
        {
            loader: 'css-loader',
            options: {
                sourceMap: true
            }
        },
        {
            loader: 'sass-loader',
            options: {
                sourceMap: true
            }
        }
    ],
    include: helpers.root('src', 'app')
}
Plugins — CleanWebpackPlugin will remove/clean your build folder(s) before building again. HtmlWebpackPlugin plugin will generate an HTML5 file for you that includes all your webpack bundles in the body using script tags. It only requires path to the template.
new CleanWebpackPlugin(
    helpers.root('dist'),
    {
        root: helpers.root(),
        verbose: true
    }
),
new HtmlWebpackPlugin({
    template: 'src/index.html'
})
webpack.config.dev.jsis our webpack configuration that we will use for development mode only.
mode: "development"
In webpack 4, chosen mode tells webpack to use its built-in optimizations accordingly.
devtool: 'cheap-module-eval-source-map'
This option controls if and how source maps are generated. By using cheap-module-eval-source-map Source Maps from loaders are processed for better results. However, loader Source Maps are simplified to a single mapping per line.
output: {
    path: helpers.root('dist'),
    publicPath: '/',
    filename: '[name].bundle.js',
    chunkFilename: '[id].chunk.js'
}
The output key contains a set of options instructing webpack on how and where it should output your bundles, assets and anything else you bundle or load with webpack. Here we tell webpack to output our bundles to the dist folder.
optimization: {
    noEmitOnErrors: true
}
Skips the emitting phase whenever there are errors while compiling. This ensures that no erroring assets are emitted. The optimization key has many others options that are set by default depending on your webpack configuration mode (development/production). You can read more about it here.
{
    test: /\.ts$/,
    loaders: [
        'babel-loader',
        {
            loader: 'awesome-typescript-loader',
            options: {
                configFileName: helpers.root('tsconfig.json')
            }
        },
        'angular2-template-loader',
        'angular-router-loader'
    ],
    exclude: [/node_modules/]
}
angular-router-loader is a webpack loader that enables string-based module loading with the Angular Router.
angular2-template-loader is a chain-to loader that inlines all html and styles in Angular components.
awesome-typescript-loader is currently the faster webpack TypeScript loader. It uses dependency resolution to build modules dependency graph. This relatively speeds up the build process.
babel-loader allows transpiling JavaScript files.
devServer: {
    historyApiFallback: true,
    stats: 'minimal'
}
When using the HTML5 History API, the index.html page will likely have to be served in place of any 404 responses. For that we need to enable historyApiFallback.
stats option lets you precisely control what bundle information gets displayed. This can be a nice middle ground if you want some bundle information, but not all of it.
Adding scripts
Add the following lines to your package.json file:
"scripts": {
  "build:dev": "webpack-dev-server --inline --hot --progress --port 8080"
}
--hot enables webpack Hot Module Replacement (HMR). It exchanges, adds, or removes modules while an application is running, without a full reload. This can significantly speed up development in a few ways:
- Retain application state which is lost during a full reload.
- Save valuable development time by only updating what’s changed.
- Modifications made to CSS/JS in the source code results in an instant browser update which is almost comparable to changing styles directly in the browser’s dev tools.
Now you are all setup! You can run npm run build:dev open your browser and navigate to localhost:8080.
Webpack configuration for production mode (Ahead-of-Time compilation)
Advantages of AoT compilation
- With AoT, the browser downloads a pre-compiled version of the application. The browser loads executable code so it can render the application immediately, without waiting to compile the app first.
- The compiler inlines external HTML templates and CSS style sheets within the application JavaScript, eliminating separate AJAX requests for those source files.
- There’s no need to download the Angular compiler if the app is already compiled. The compiler is roughly half of Angular itself, so omitting it dramatically reduces the application payload.
- The AoT compiler detects and reports template binding errors during the build step before users can see them.
- AoT compiles HTML templates and components into JavaScript files long before they are served to the client. With no templates to read and no risky client-side HTML or JavaScript evaluation, there are fewer opportunities for injection attacks.
Configuring webpack
In your config folder create a new file webpack.config.prod.js
mode: 'production'
We usually proceed to AoT compilation in production mode and, as I wrote previously, in webpack 4, chosen mode tells webpack to use its built-in optimizations accordingly.
output: {
    path: helpers.root('dist'),
    publicPath: '/',
    filename: '[hash].js',
    chunkFilename: '[id].[hash].chunk.js'
}
We also tell webpack to output our bundles to the dist folder. We include a hash to the file names to leverage client level cache efficiently. This way webpack knows whether or not a file has changed. Webpack provides placeholders for this purpose. These strings are used to attach specific information to outputs. The most valuable ones are:
[id]returns the chunk id.[path]returns the file path.[name]returns the file name.[ext]returns the extension.[ext]works for most available fields.[hash]returns the build hash. If any portion of the build changes, this changes as well.[chunkhash]returns an entry chunk-specific hash. Eachentrydefined in the configuration receives a hash of its own. If any portion of the entry changes, the hash will change as well.[chunkhash]is more granular than[hash]by definition.[contenthash]returns a hash generated based on content.
It’s preferable to use particularly hash and chunkhash only for production as hashing is not essential during development.
optimization: {
    noEmitOnErrors: true,
    splitChunks: {
        chunks: 'all'
    },
    runtimeChunk: 'single',
    minimizer: [
        new UglifyJsPlugin({
            cache: true,
            parallel: true
        }),

         new OptimizeCSSAssetsPlugin({
             cssProcessor: cssnano,
             cssProcessorOptions: {
                 discardComments: {
                     removeAll: true
                 }
             },
             canPrint: false
         })
    ]
}
- As in development mode, we want to skip the emitting phase whenever there are errors while compiling. This ensures that no erroring assets are emitted.
chunks: ‘all’indicates which chunks will be selected for optimization. Providingallcan be particularly powerful, because it means that chunks can be shared even between async and non-async chunks.- Imported modules are initialized for each runtime chunk separately. As webpack suggests, while working on a project with multiple entry points you want to have only one runtime instance. For that you need to set it to
‘single’. UglifyJsPluginuses uglify-js to minify your JavaScript files. We setcacheandparallelproperties totruein order to enable file caching and to use multi-process parallel running to improve the build speed. There are more options available and I invite you to learn more about this plugin.OptimizeCSSAssetsPluginwill search for CSS assets during the webpack build and will optimize and minimize it. The CSS processor used for optimization iscssnano.All comments will be removed from our minified CSS and no messages will be print to the console.
module: {
    rules: [
        {
            test: /(?:\.ngfactory\.js|\.ngstyle\.js|\.ts)$/,
            loader: '@ngtools/webpack'
        }
    ]
}

plugins: [
    new ngw.AngularCompilerPlugin({
        tsConfigPath: helpers.root('tsconfig.aot.json'),
        entryModule: helpers.root('src', 'app', 'modules', 'app', 'app.module#AppModule')
    })
]
@ngtools/webpack is the official plugin that AoT compiles your Angular components and modules. The loader works with webpack plugin to compile your TypeScript. It’s important to include both, and to not include any other TypeScript compiler loader.
Adding main.aot.ts file
In the src folder add main.aot.ts file:
import { enableProdMode } from '@angular/core';
import { platformBrowser } from '@angular/platform-browser';

import { AppModuleNgFactory } from './app/app.module.ngfactory';

enableProdMode();

platformBrowser().bootstrapModuleFactory(AppModuleNgFactory);
Your main entry is a bit different in production mode and AoT compilation:
- Import
enableProdModeto disable Angular’s development mode, which turns off assertions and other checks within the framework. - Import
platformBrowserAND NOTplatformBrowserDynamicbecause in AoT compilation your application is shipped to the browser already compiled whereas in JiT compilation it occurs at the browser level. - Instead of importing
AppModuleyou need to importAppModuleFactorywhich is your compiled application generated by our Angular compiler.
Adding scripts
Add the following scripts to your package.json file :
"webpack-prod": "cross-env NODE_ENV=production webpack --mode production"

"build:prod": "npm run build:clean && ngc && npm run webpack-prod && npm run build:clean"

"build:clean": "del-cli 'src/**/*.js' 'src/**/*.js.map' 'src/**/*.ngsummary.json' 'src/**/*.metadata.json' 'src/**/**/*.ngfactory.ts' 'src/**/*.ngstyle.ts' 'src/**/*.shim.ts'"

"serve": "lite-server"
build:clean: the Angular compiler generates many files in order to compile your application. To stay clean in our project, we delete all these files before compilation and after generating bundles.build:prod: run the Angular compiler withngccommand and then run webpack in production mode to generate your bundles.serve: I use lite-server to serve our application and see what it looks like. Of course, you won’t need it in a real world project because your app will be serve by the cloud.
Now, you can run npm run build:prod to compile your Angular application and build your bundles. Then, run npm run serve to serve your app to the browser.

I hope you enjoyed this article! If you have any questions/suggestions, let me know in the comments below.
The project files are on my GitHub:
samteb/Angular-7-Webpack-4
_Contribute to samteb/Angular-7-Webpack-4 development by creating an account on GitHub._github.co