By Jared Wolff
One thing that’s always tripped me up as an IoT developer is figuring out the best way to transmit data. There are many different kinds of radios and mediums. On top of that, there are different protocols to boot.
As of this writing, there is one protocol that has reigned supreme in the IoT world:
MQTT.
Unlike an HTTP server, a device can connect, publish, and subscribe to topics. These topics then get sent to a broker and distributed to other subscribed devices. It also happens that MQTT on Nordic’s nRF9160 is well supported.
In this post, I’ll show you how to connect the nRF9160 Feather to a self-hosted Mosquitto instance. You’ll learn how to generate your own certificates, and get a hang of how to test your connections.
Ready to play? Let’s get to it.
Where to host?
If you want to host Mosquitto, you’ll need a server. Since Mosquitto is written in C it’s lightweight and can go almost anywhere. Plus it sips resources so you can install it on a budget VPS without much worry. That’s where a VPS provider like Digital Ocean or Vultr comes in.
To set up a new server here are some steps:
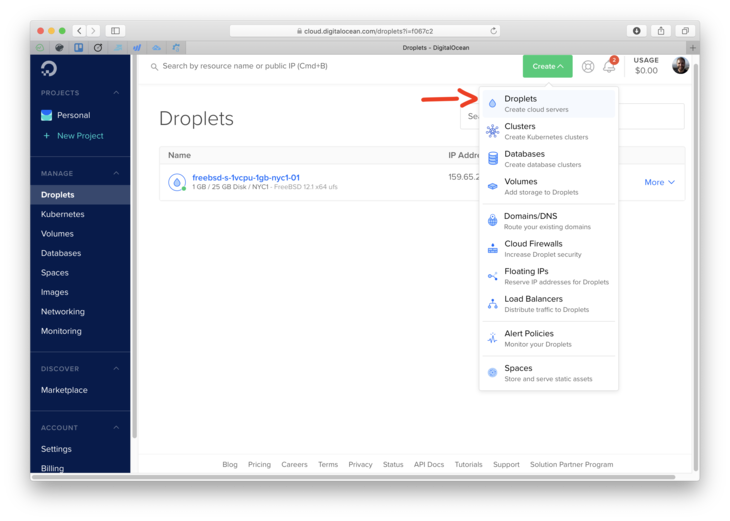
- Login to Digital Ocean. If you don’t have Digital Ocean and would like to support click here to create an account.
- Create a new Droplet
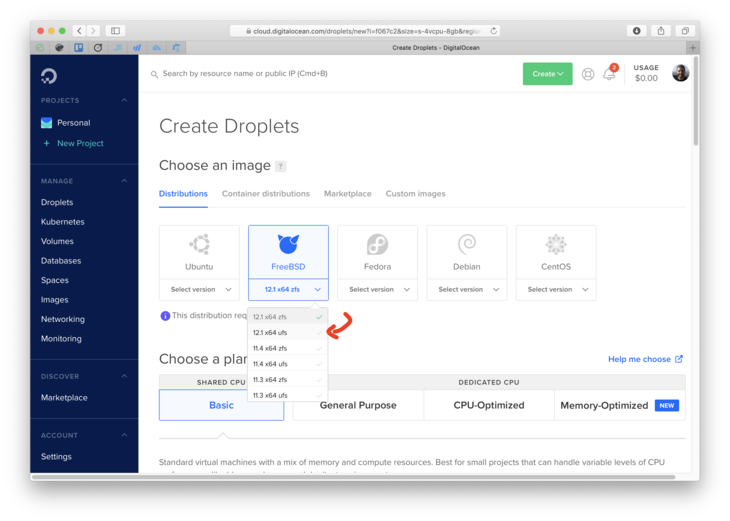
- Choose the FreeBSD 12.1 with UFS.
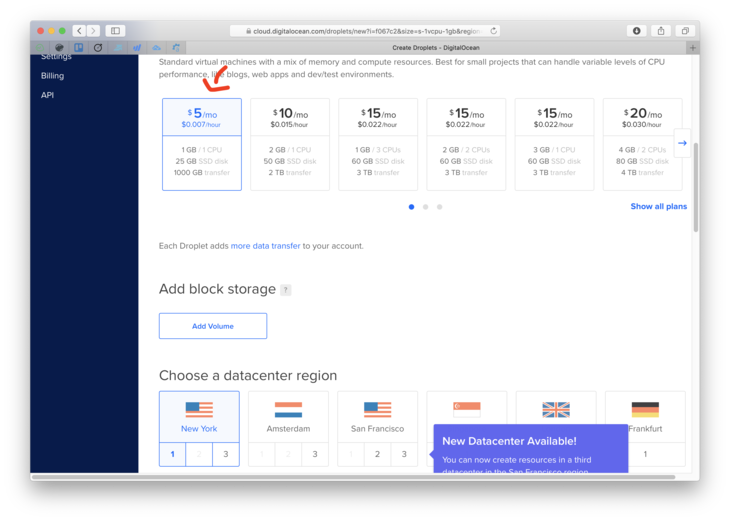
- Choose the $5 instance. That’s usually more than enough.
- Make sure you import your public key. Otherwise, you won’t be able to immediately use password-less login.
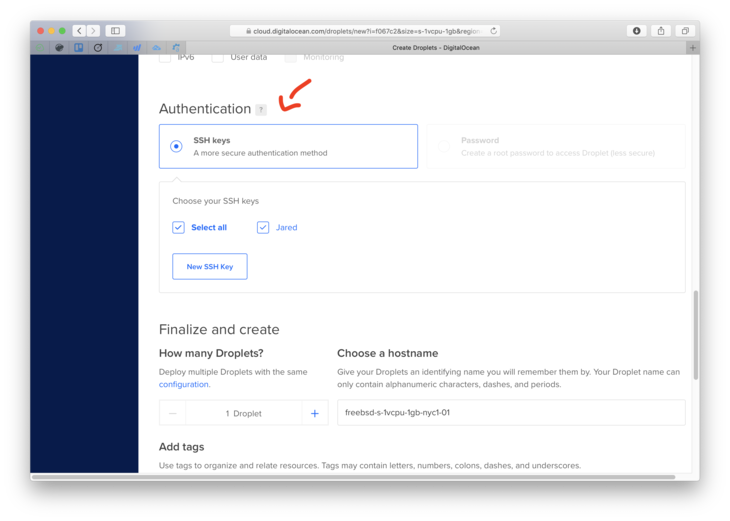
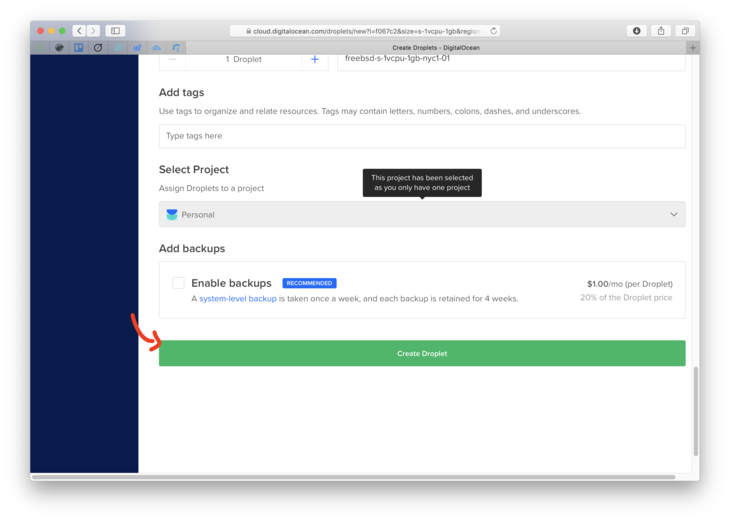
- Hit that green Create Droplet button, and let’s get this show on the road.
Important Extra step
For the certs to work with Mosquitto, you’ll have to set a domain to point to your VPS IP address. A CNAME or A record works. If you’re unsure how to do that, here’s a good guide. Note which (sub)domain you’ve used. We’ll need it in a bit…
Install Mosquitto
I run my servers inside of a FreeBSD jail using Bastille. In this tutorial, we’ll be skipping the jail part and focusing on getting the nRF9160 Feather working.
- You should be set with a Digital Ocean instance (or similar) using FreeBSD. If you haven't done that yet, head back up to the Where to host? section.
- Next, to install
mosquittoon your droplet, runpkg install mosquitto. If you’re running something other than FreeBSD, this command may differ.apt-get install mosquittoworks on Debian-based systems. If you want the most up to date repositories, make sure you runsudo apt-add-repository ppa:mosquitto-dev/mosquitto-ppabeforehand. Here’s what the full output on FreeBSD looks like:
$ pkg install mosquitto
The package management tool is not yet installed on your system.
Do you want to fetch and install it now? [y/N]: y
Bootstrapping pkg from pkg+http://pkg.FreeBSD.org/FreeBSD:12:amd64/quarterly, please wait...
Verifying signature with trusted certificate pkg.freebsd.org.2013102301... done
[mosquitto] Installing pkg-1.14.6...
[mosquitto] Extracting pkg-1.14.6: 100%
Updating FreeBSD repository catalogue...
[mosquitto] Fetching meta.conf: 100%    163 B   0.2kB/s    00:01
[mosquitto] Fetching packagesite.txz: 100%    6 MiB   6.6MB/s    00:01
Processing entries: 100%
FreeBSD repository update completed. 31943 packages processed.
All repositories are up to date.
Updating database digests format: 100%
The following 4 package(s) will be affected (of 0 checked):

New packages to be INSTALLED:
        c-ares: 1.16.1
        ca_root_nss: 3.55
        e2fsprogs-libuuid: 1.45.6
        mosquitto: 1.6.7

Number of packages to be installed: 4

The process will require 2 MiB more space.
682 KiB to be downloaded.

Proceed with this action? [y/N]: y
[mosquitto] [1/4] Fetching mosquitto-1.6.7.txz: 100%  226 KiB 231.1kB/s    00:01
[mosquitto] [2/4] Fetching ca_root_nss-3.55.txz: 100%  285 KiB 291.5kB/s    00:01
[mosquitto] [3/4] Fetching e2fsprogs-libuuid-1.45.6.txz: 100%   34 KiB  34.7kB/s    00:01
[mosquitto] [4/4] Fetching c-ares-1.16.1.txz: 100%  138 KiB 140.9kB/s    00:01
Checking integrity... done (0 conflicting)
[mosquitto] [1/4] Installing ca_root_nss-3.55...
[mosquitto] [1/4] Extracting ca_root_nss-3.55: 100%
[mosquitto] [2/4] Installing e2fsprogs-libuuid-1.45.6...
[mosquitto] [2/4] Extracting e2fsprogs-libuuid-1.45.6: 100%
[mosquitto] [3/4] Installing c-ares-1.16.1...
[mosquitto] [3/4] Extracting c-ares-1.16.1: 100%
[mosquitto] [4/4] Installing mosquitto-1.6.7...
===> Creating users
Using existing user 'nobody'.
[mosquitto] [4/4] Extracting mosquitto-1.6.7: 100%
=====
Message from ca_root_nss-3.55:

--
FreeBSD does not, and can not warrant that the certification authorities
whose certificates are included in this package have in any way been
audited for trustworthiness or RFC 3647 compliance.

Assessment and verification of trust is the complete responsibility of the
system administrator.

This package installs symlinks to support root certificates discovery by
default for software that uses OpenSSL.

This enables SSL Certificate Verification by client software without manual
intervention.

If you prefer to do this manually, replace the following symlinks with
either an empty file or your site-local certificate bundle.

  * /etc/ssl/cert.pem
  * /usr/local/etc/ssl/cert.pem
  * /usr/local/openssl/cert.pem
=====
Message from mosquitto-1.6.7:

--
The mosquitto MQTT Python driver is now provided by net/py-paho-mqtt
All installed package configuration lives at /usr/local/etc/mosquitto/. We’ll need to edit mosquitto.conf in that folder to use certificates. Here’s what it looks like:
# Daemon configuration
pid_file /var/run/mosquitto.pid
user nobody

# Port to use for the default listener.
port 8885

# At least one of cafile or capath must be defined.
cafile /root/pki/ca.crt

# Path to the PEM encoded server certificate.
certfile /root/pki/issued/mosquitto.crt

# Path to the PEM encoded keyfile.
keyfile /root/pki/private/mosquitto.key

# Path to CRL file
#crlfile /root/pki/crl.pem

# Each client has their own cert
require_certificate true
use_identity_as_username true

# listener port-number [ip address/host name]
listener 1883
protocol mqtt

# listener port-number [ip address/host name]
# listener 8080
# protocol websockets

# =================================================================
# Logging
# =================================================================
log_dest syslog

# Types of messages to log.
log_type all
#log_type warning
# websockets_log_level 127

# -----------------------------------------------------------------
# Default authentication and topic access control
# -----------------------------------------------------------------
# password_file /usr/local/etc/mosquitto/pwfile
Before we can start the server we’ll need to provision some RSA certificates. We’ll get to that in the next step.
Provision Certs
You can use easy-rsa to generate a CA server and client certs. (These instructions come from this guide.) For production, you should generate your keys and certs on an offline machine. That way your private keys are safe if your server becomes a target.
First, install easy-rsa:
$ pkg install easy-rsa
Updating FreeBSD repository catalogue...
FreeBSD repository is up to date.
All repositories are up to date.
The following 1 package(s) will be affected (of 0 checked):

New packages to be INSTALLED:
        easy-rsa: 3.0.7

Number of packages to be installed: 1

44 KiB to be downloaded.

Proceed with this action? [y/N]: y
[mosquitto] [1/1] Fetching easy-rsa-3.0.7.txz: 100%   44 KiB  44.8kB/s    00:01
Checking integrity... done (0 conflicting)
[mosquitto] [1/1] Installing easy-rsa-3.0.7...
[mosquitto] [1/1] Extracting easy-rsa-3.0.7: 100%
Then let's begin the cert creation process:
$ easyrsa init-pki

Note: using Easy-RSA configuration from: /usr/local/share/easy-rsa/vars

init-pki complete; you may now create a CA or requests.
Your newly created PKI dir is: /root/pki
$
$ easyrsa build-ca

Note: using Easy-RSA configuration from: /usr/local/share/easy-rsa/vars
Using SSL: openssl OpenSSL 1.1.1d-freebsd  10 Sep 2019

Enter New CA Key Passphrase:
Re-Enter New CA Key Passphrase:
Generating RSA private key, 2048 bit long modulus (2 primes)
......................+++++
..................................................................................+++++
e is 65537 (0x010001)
You are about to be asked to enter information that will be incorporated
into your certificate request.
What you are about to enter is what is called a Distinguished Name or a DN.
There are quite a few fields but you can leave some blank
For some fields there will be a default value,
If you enter '.', the field will be left blank.
-----
Common Name (eg: your user, host, or server name) [Easy-RSA CA]:testserver.jaredwolff.com

CA creation complete and you may now import and sign cert requests.
Your new CA certificate file for publishing is at:
/root/pki/ca.crt
Note: You will be prompted for a password at the build-ca step. Make sure you keep this password handy.
Then to generate a server cert use:
$ easyrsa gen-req mosquitto nopass

Note: using Easy-RSA configuration from: /usr/local/share/easy-rsa/vars
Using SSL: openssl OpenSSL 1.1.1d-freebsd  10 Sep 2019
Generating a RSA private key
...............+++++
........................................+++++
writing new private key to '/root/pki/easy-rsa-82720.X2NVQ0/tmp.akOxhO'
-----
You are about to be asked to enter information that will be incorporated
into your certificate request.
What you are about to enter is what is called a Distinguished Name or a DN.
There are quite a few fields but you can leave some blank
For some fields there will be a default value,
If you enter '.', the field will be left blank.
-----
Common Name (eg: your user, host, or server name) [mosquitto]:testserver.jaredwolff.com

Keypair and certificate request completed. Your files are:
req: /root/pki/reqs/mosquitto.req
key: /root/pki/private/mosquitto.key
$
$ easyrsa sign-req server mosquitto

Note: using Easy-RSA configuration from: /usr/local/share/easy-rsa/vars
Using SSL: openssl OpenSSL 1.1.1d-freebsd  10 Sep 2019

You are about to sign the following certificate.
Please check over the details shown below for accuracy. Note that this request
has not been cryptographically verified. Please be sure it came from a trusted
source or that you have verified the request checksum with the sender.

Request subject, to be signed as a server certificate for 825 days:

subject=
    commonName                = testserver.jaredwolff.com

Type the word 'yes' to continue, or any other input to abort.
  Confirm request details: yes
Using configuration from /root/pki/easy-rsa-82744.hyuGzt/tmp.lZHLEH
Enter pass phrase for /root/pki/private/ca.key:
Check that the request matches the signature
Signature ok
The Subject's Distinguished Name is as follows
commonName            :ASN.1 12:'testserver.jaredwolff.com'
Certificate is to be certified until Nov  3 01:12:53 2022 GMT (825 days)

Write out database with 1 new entries
Data Base Updated

Certificate created at: /root/pki/issued/mosquitto.crt
You’ll be prompted for both the Common Name (i.e. your server name) and the CA cert password in the above step. Important: the Common Name needs to match the domain name of your server! (Remember, we wrote that down earlier?)
To generate the nRF9160 cert, use:
$ easyrsa gen-req nrf9160 nopass batch
$ easyrsa sign-req client nrf9160 batch
Follow the same procedure as earlier. The only difference is that we’re generating a client cert instead of a server cert.
Once complete, we’ll need some files. Here’s a full list:
For your Mosquitto Server
/root/pki/ca.crt/root/pki/private/mosquitto.key/root/pki/issued/mosquitto.crt
For your nRF9160 Feather
/root/pki/ca.crt/root/pki/private/nrf9160.key/root/pki/issued/nrf9160.crt
If you’re using the configuration from above, it’s already pointing to your server certificates. All we have to do now is start mosquitto!
$ service mosquitto start
Cannot 'start' mosquitto. Set mosquitto_enable to YES in /etc/rc.conf or use 'onestart' instead of 'start'.
If you get an error about mosquitto_enable simply run:
$ sysrc mosquitto_enable=YES
$ service mosquitto start
Starting mosquitto.
This enables mosquitto to start when your system starts.
Now, check if mosquitto is running by using ps aux:
$ ps aux
USER     PID %CPU %MEM   VSZ  RSS TT  STAT STARTED    TIME COMMAND
root   82401  0.0  0.2 11472 2424  -  SsJ  01:02   0:00.00 /usr/sbin/syslogd -ss
root   82457  0.0  0.2 11408 2284  -  IsJ  01:02   0:00.00 /usr/sbin/cron -J 60 -s
nobody 82900  0.0  0.6 16352 6212  -  SsJ  01:17   0:00.02 /usr/local/sbin/mosquitto -c /usr/local/etc/mosquitto/mosquitto.conf -d
root   82488  0.0  0.3 12096 2848  0  IJ   01:02   0:00.01 login [pam] (login)
root   82489  0.0  0.3 13092 3504  0  SJ   01:02   0:00.03 -csh (csh)
root   82902  0.0  0.3 11704 2540  0  R+J  01:17   0:00.00 ps aux
Now that we have a server loaded and running, let’s get the firmware working.
Firmware bits
Dealing with certificates on the nRF9160 Feather is a two-step process. The first step is to load the certificates using the at_client firmware. The second is to load the mqtt_simple library with added TLS support. Let’s tackle the certs first.
Program at_client first
Change directories to ncs/nrf/samples/nrf9160/at_client/ and start a fresh build:
$ west build -b circuitdojo_feather_nrf9160ns -p
Then flash to your board using:
$ west flash --erase
$ nrfjprog -r
We’ll need this sample on your board for the next step.
Add certs to device
To install our new certs, we’ll need nRF Connect Desktop installed. You can download it by going here.
You’ll also need a custom version of LTE Link Monitor. You can get the modified version on docs.jaredwolff.com.
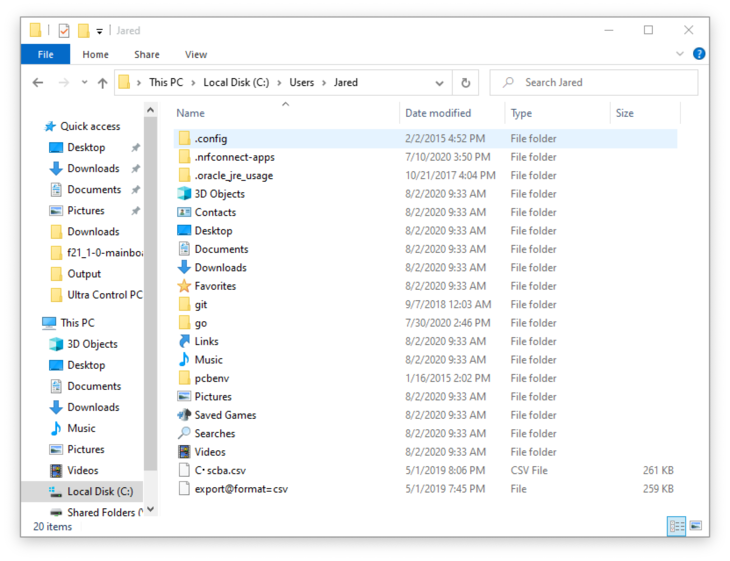
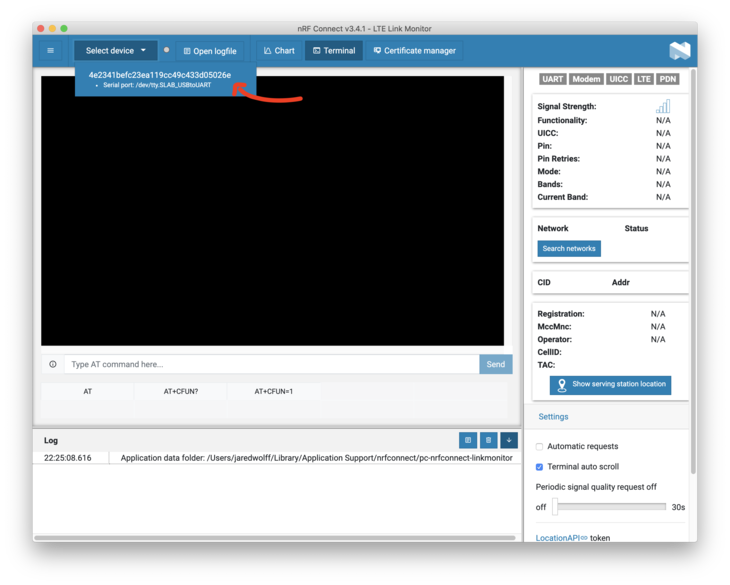
First, Install nRF Connect Desktop app. Then, copy the LTE Link Monitor .tgz file to %USERPROFILE%\.nrfconnect-apps\local (on Windows) or $HOME/.nrfconnect-apps/local (on Linux/macOS). Here’s an example of where it is on Windows:
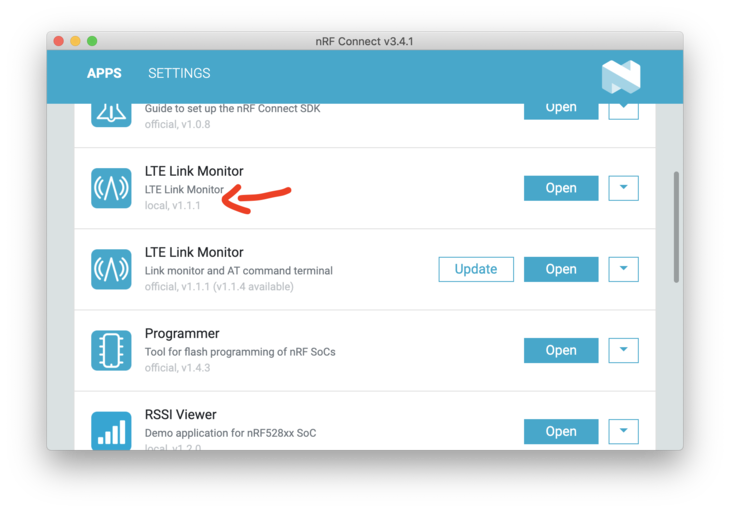
Close and re-open nRF Connect Desktop (if it’s open).
Then, click Open next to the v1.1.1 version of LTE Link Monitor. It will also have local written underneath it.
Next, let’s launch it!
Once you’ve opened the port, hit the reset button. Make sure you turn off Automatic requests.
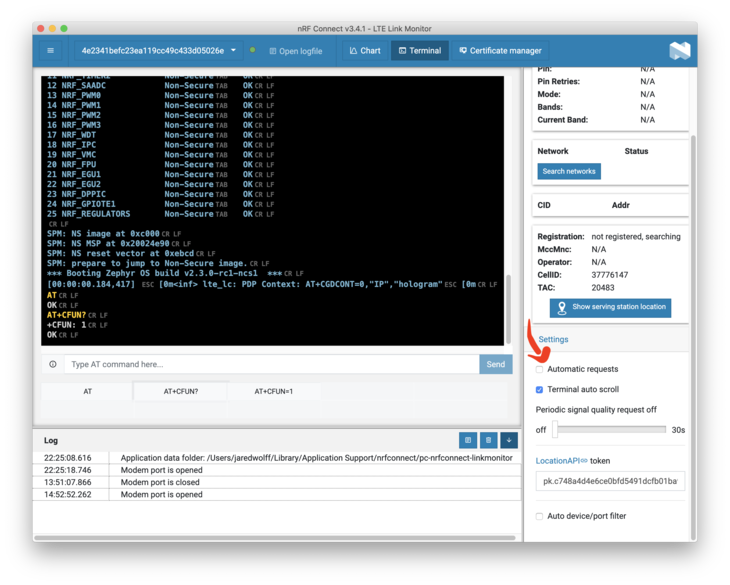
Then in the command box send AT+CFUN=4. This will shut down your modem so it’s ready to upload certs. You can run AT+CFUN? to confirm your modem in that mode.
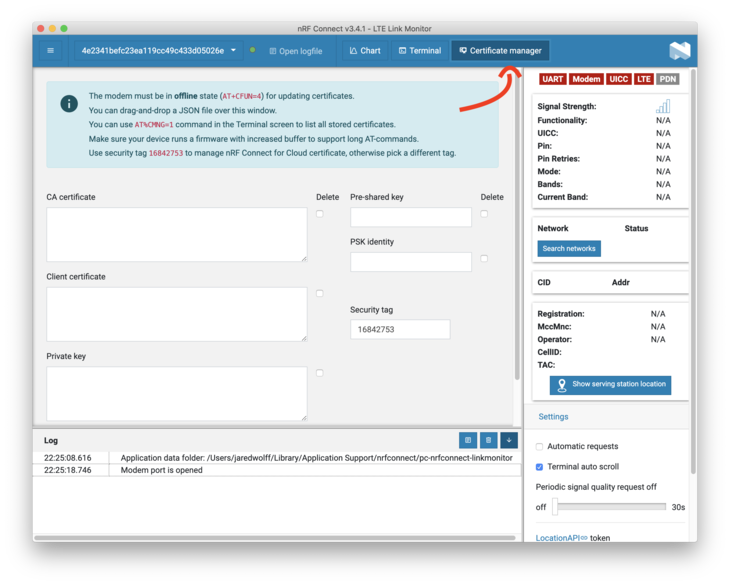
Open up the Certificate manager.
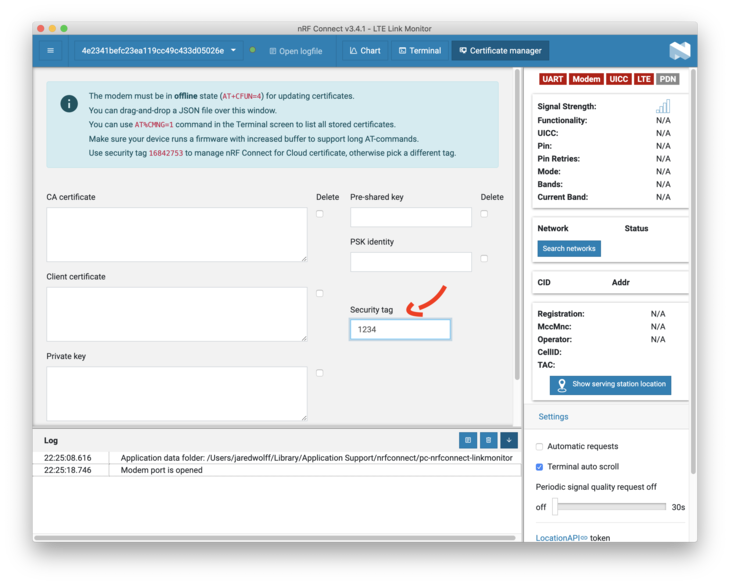
Make sure you set the security tag. In this case, I’m using 1234. This is an important identifier that you’ll need later. Make it whatever you want but I would avoid using 16842753. This is the default tag for NRF Cloud. You don’t want to blast away your nRF Cloud certs!
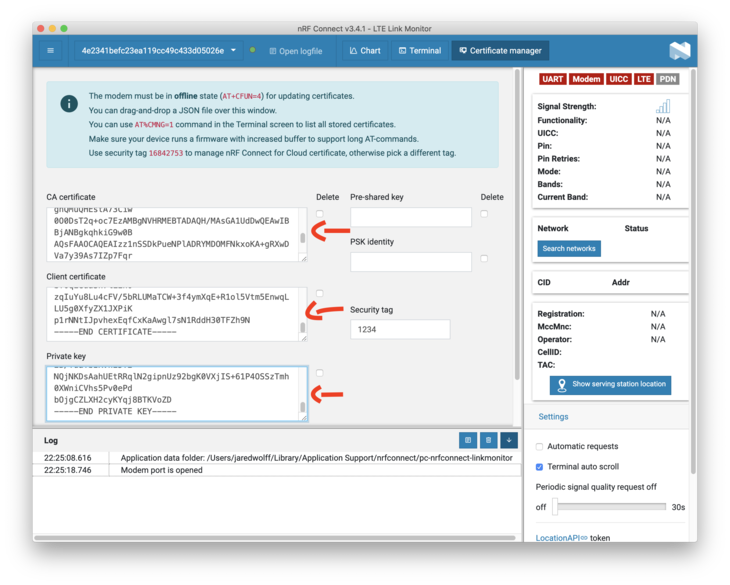
Copy and paste the contents of your ca.crt, nrf9160.crt and nrf9160.key into the boxes (in that order). You can easily get the certs by using cat on Unix/Linux:
$ cat cat.crt
-----BEGIN CERTIFICATE-----
MIIDdTCCAl2gAwIBAgIUDLkBxLLQO9wosNDtA7E9qvqHOxMwDQYJKoZIhvcNAQEL
BQAwJDEiMCAGA1UEAwwZdGVzdHNlcnZlci5qYXJlZHdvbGZmLmNvbTAeFw0yMDA3
MzEwMTExNDJaFw0zMDA3MjkwMTExNDJaMCQxIjAgBgNVBAMMGXRlc3RzZXJ2ZXIu
amFyZWR3b2xmZi5jb20wggEiMA0GCSqGSIb3DQEBAQUAA4IBDwAwggEKAoIBAQC3
de1v8k+FXzY/Im7Z2YKS7wwbBRft5CUxqP1sdYJgMvheS9LhFufk81URZ0lHD9pK
aNPxU1UEmnLvVDTGLJ+YAmMH08xn17FS1R1UVPYzi2ouwqRM2pR9EStsSlP9Zj44
1MsdizABnnlkZndUVLL/gjc4cNsNncMLBSEbsz6b5WzhtAGg3rOpdAxSSblZVSFw
bquCgg5hb2NUzy+JxGtUIsE5d6CxTDdSs4Z3FK/RRYjmCG6qsaya4N5W35yf8h5O
StfKRecl3kq2kCnWa6P+lErG4wuxIBtMkgz2zV+zd1tz4aHXxSdoZTqLz7dTVbFA
zEVnKD+ZReBG+4fwUL6rAgMBAAGjgZ4wgZswHQYDVR0OBBYEFIvdGnjrxRPzvXQi
7XJ70LzpZSOjMF8GA1UdIwRYMFaAFIvdGnjrxRPzvXQi7XJ70LzpZSOjoSikJjAk
MSIwIAYDVQQDDBl0ZXN0c2VydmVyLmphcmVkd29sZmYuY29tghQMuQHEstA73Ciw
0O0DsT2q+oc7EzAMBgNVHRMEBTADAQH/MAsGA1UdDwQEAwIBBjANBgkqhkiG9w0B
AQsFAAOCAQEAIzz1nSSDkPueNPlADRYMDOMFNkxoKA+gRXwDVa7y39As7IZp7Fqr
KAH79U1XtGyDlt6FPKTvDJ7jtd4y8auIGVQO7z3AG9pVU1imIWZHoIqgBUCEhsjp
uMxD23kRCX5kd9dsmF9WOGGxb4kkMv83Rh2rCONQmvnozuI3fJv2ZFX/ORoADGLP
OPSJPl11x+2rxPxiLi+T8RyzDh3DwqnPVsSnbRWV7hosaN0ip/cbnSTaIul9mbCY
ID6qm9leqlY/gha9aZfg+tv1Lm6PT6o8Pzek2VeDoIS5YERBMOwV84hQrZjV3vIE
jT6y663HGsl7KvqVaWdV3fM6Cr7f0QdR5A==
-----END CERTIFICATE-----
You’ll need everything from -----BEGIN CERTIFICATE----- to -----END CERTIFICATE-----
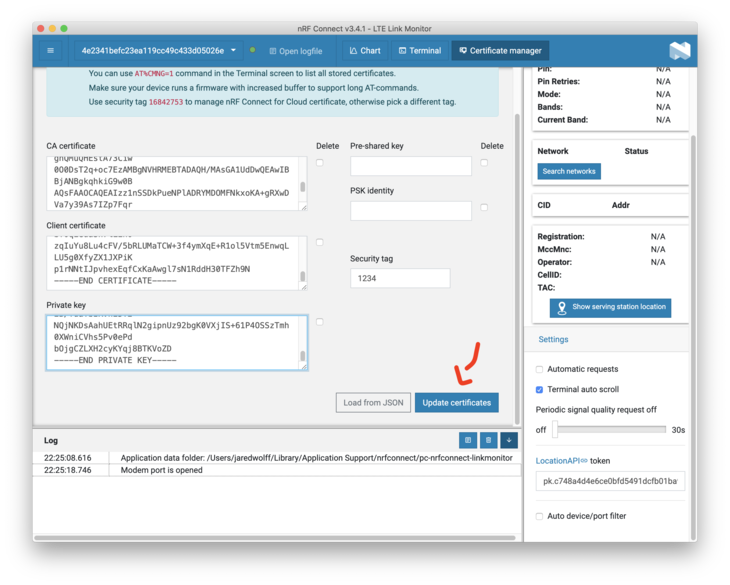
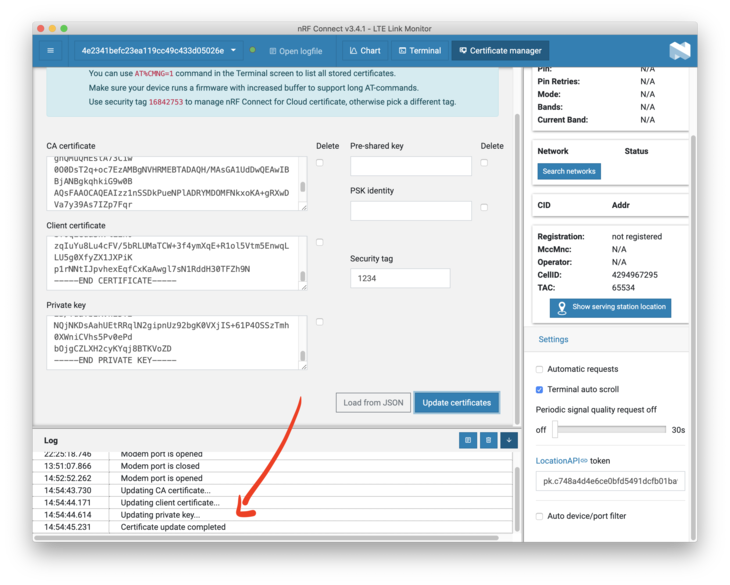
Check the Log area for more details. If all went well, it should say that your certificates updated.
Using the mqtt_simple example
We’ll be using the mqtt_simple sample within the nRF Connect SDK repository. The full path is: ncs/nrf/samples/nrf9160/mqtt_simple. We’ll need to make a few edits to add full TLS compatibility. All the files are within the mqtt_simple directory.
First, we’ll have to update the proj.conf file. See the highlighted differences:
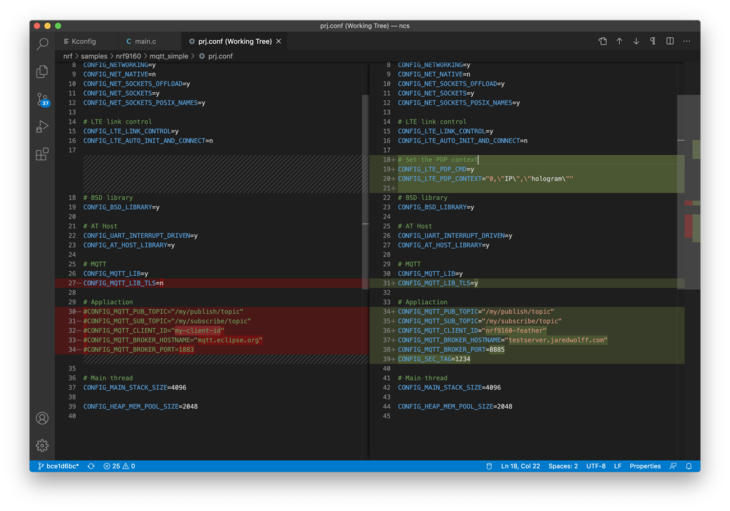
The # Set the PDP Context section is especially important if you’re using a Hologram SIM card (included with the nRF9160 Feather). If you are using a SIM that doesn’t need it, you do not need this section.
Adopt your CONFIG_MQTT_BROKER_HOSTNAME to your hostname (configured at the beginning of this guide).
You’ll also have to add these lines in KConfig:
config SEC_TAG
    int "Security tag to use for the connection"
    default 1234

config PEER_VERIFY
    int "Peer verify parameter for mqtt_client"
    default 1
    help
            Set to 0 for VERIFY_NONE, 1 for VERIFY_OPTIONAL, and 2 for VERIFY_REQUIRED.
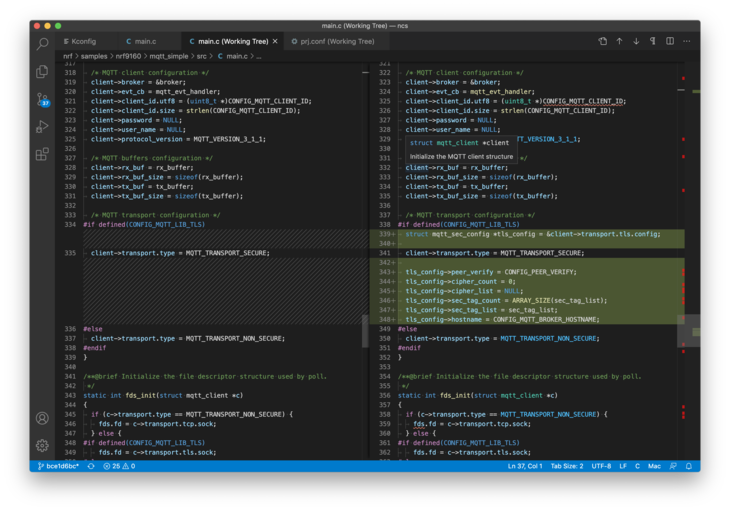
Finally in main add this block to the top of your file:
#if defined(CONFIG_MQTT_LIB_TLS)
static sec_tag_t sec_tag_list[] = { CONFIG_SEC_TAG };
#endif /* defined(CONFIG_MQTT_LIB_TLS) */
Then add this block to client_init under #if defined(CONFIG_MQTT_LIB_TLS)
  struct mqtt_sec_config *tls_config = &client->transport.tls.config;

    client->transport.type = MQTT_TRANSPORT_SECURE;

    tls_config->peer_verify = CONFIG_PEER_VERIFY;
    tls_config->cipher_count = 0;
    tls_config->cipher_list = NULL;
    tls_config->sec_tag_count = ARRAY_SIZE(sec_tag_list);
    tls_config->sec_tag_list = sec_tag_list;
    tls_config->hostname = CONFIG_MQTT_BROKER_HOSTNAME;
The changes should look like this:
Then build with:
$ west build -b circuitdojo_feather_nrf9160ns -p
Finally, flash it using west flash:
$ west flash --erase
$ nrfjprog -r
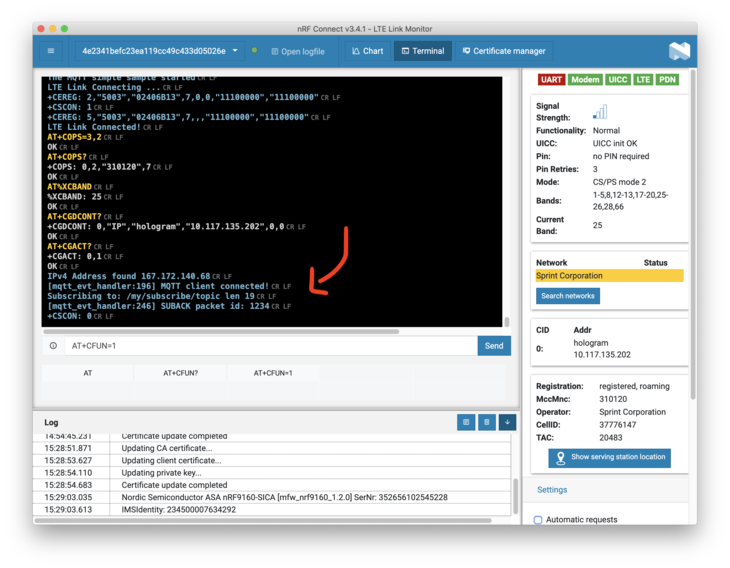
Open your serial terminal and double check that your nRF9160 Feather is connecting. You can also use LTE Link Monitor to view your progress as well (Example below).
Lots of the information above came from Nordic's post on the subject.
Sending a message
We’re almost there! You’ve configured your nRF9160 Feather to connect to Mosquitto using self-generated certificates. The last part is connecting another device to see if the nRF9160 Feather replies to a message.
I’ve created a new set of certs for this purpose. I called them test.
$ easyrsa gen-req test nopass batch
$ easyrsa sign-req client test batch
I copied them to my desktop using CyberDuck (a great little visual SFTP client):

You can also use something like scp if you're confident in your command line file transfer abilities. Then, open a terminal and run:
mosquitto_sub --cafile ca.crt --cert test.crt --key test.key -q 1 -d -h testserver.jaredwolff.com -p 8885 -t "/my/publish/topic" &
mosquitto_pub --cafile ca.crt --cert test.crt --key test.key -q 1 -d -h testserver.jaredwolff.com -p 8885 -t "/my/subscribe/topic" -m "hello there"
You should see an output like this:
$ mosquitto_sub --cafile ca.crt --cert test.crt --key test.key -q 1 -d -h testserver.jaredwolff.com -p 8885 -t "/my/publish/topic" &
$ mosquitto_pub --cafile ca.crt --cert test.crt --key test.key -q 1 -d -h testserver.jaredwolff.com -p 8885 -t "/my/subscribe/topic" -m "hello there"
Client mosq-CczskQKzMKdtTo4O4s sending CONNECT
Client mosq-CczskQKzMKdtTo4O4s received CONNACK (0)
Client mosq-CczskQKzMKdtTo4O4s sending PUBLISH (d0, q1, r0, m1, '/my/subscribe/topic', ... (11 bytes))
Client mosq-CczskQKzMKdtTo4O4s received PUBACK (Mid: 1, RC:0)
Client mosq-CczskQKzMKdtTo4O4s sending DISCONNECT
MacBook-Pro:Downloads jaredwolff$ Client mosq-qK8tMlJk0Qri4Z7jUo sending PINGREQ
Client mosq-qK8tMlJk0Qri4Z7jUo received PINGRESP
MacBook-Pro:Downloads jaredwolff$ Client mosq-qK8tMlJk0Qri4Z7jUo received PUBLISH (d0, q0, r0, m0, '/my/publish/topic', ... (11 bytes))
hello there
Booyah! You have an active working connection to your very own Mosquitto server.
Conclusion
We’ve made it to the end! By this point in the post, you should have a Mosquitto server running and an nRF9160 connected. Now you can use your new-found skills to add more devices to your deployments and more.
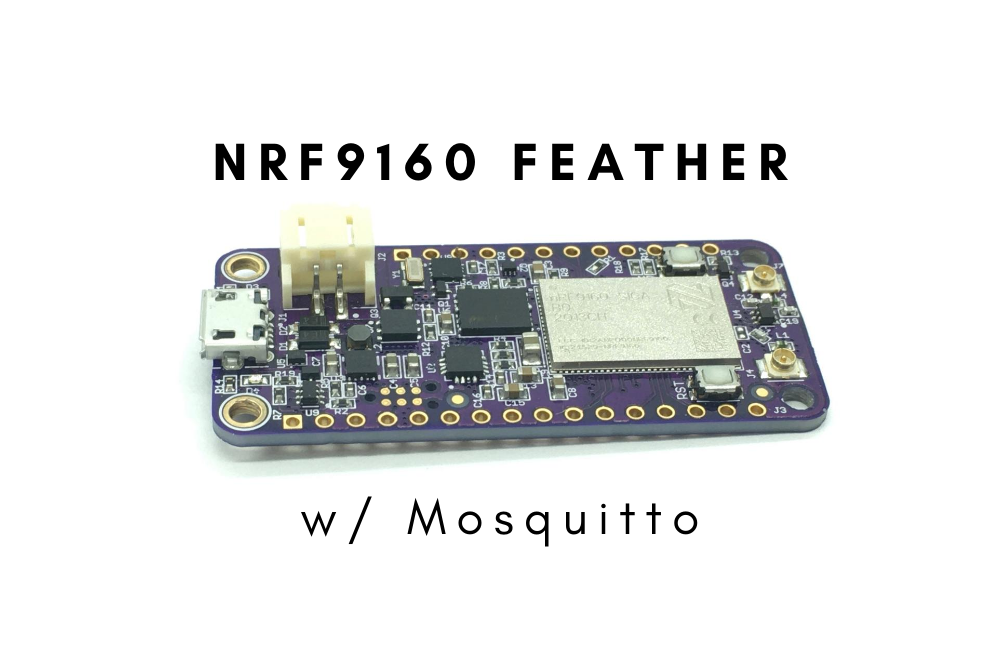
If you haven’t had a chance to play with the nRF9160 you should check out the nRF9160 Feather. It has Nordic Semiconductor’s nRF9160 LTE-M, NB IoT + GPS Combo, plus flexible power supply, external flash, and low power shutdown.
Oh, and did I mention it’s 100% open source? Learn more by checking out the campaign on GroupGets and Hackster Launch. ?
Photo credit to the awesome folks at GroupGets!
You can read this article and lots of other good stuff at jaredwolff.com.