
By Mohammad Iqbal
Hello everyone! With the recent release of create-react-app v3 and React hooks, I decided to write a tutorial on how to refactor a class component to a functional hooks component.
In this tutorial, I will share how I did it. I refer to this as the “easy way” since it doesn't require you to change your Redux code at all. The reducers and actions can be virtually left as is.
If you want a more basic intro to React Hooks integration check out my previous tutorial.
You can find the project code here.
You can also follow me on twitter for more tutorials in the future: here
This project uses both Redux and React hooks which will allow you to see the code and differences side by side. Open up the hooks_container1.js file and container1.js files in your text editor to see the differences. I tried my best to match the React class and React hook line for line making it easier to see the differences. However, it didn’t work out perfectly since there are some major differences between React Hooks and React classes. I tried to keep the functionality of both components the same so it will be easier for you to pick out the differences in syntax.
Table of Contents
- TLDR version
- useReducer and Context
- When to use local or global state and useState and useReducer
- How Context Works
- Directory Structure
- The Context Object
- Reducers and Actions
- Reading and Updating state in React Redux vs. React Hooks
- Merging the old state in React Hooks
- Reading and Updating state with useReducer and Redux Reducers
- Reading state and Dispatching Actions
- Context with useState
- Context with useReducer
The Easy Way — TL;DR
Step 1: For your reducers, export both the initialState and the reducer. Do not export default the reducer.
Step 2: Actions can be left as is from React-Redux
Step 3: Import all your reducers and their initialState to the root App.js file. Import actions as normal.
Step 4: Pass in each reducer and its initialState to a separate useReducer() hook in the App.js file.
Step 5: Import the React.createContext() function to App.js after initializing it in its own file. Wrap all child components with <Context.Provider />
Step 6: Next simply cut and paste the properties defined in your React-Redux mapStateToProps() and mapDispatchToProps() functions to the value prop of <Context.Provider />
Step 7: Change the dispatch keyword in your properties from the mapDispatchToProps() function to the name of the dispatch actions function (2nd element in the array destructuring) in the useReducer() hook. Since each reducer will have its own useReducer hook, you will have to match the appropriate action dispatches with the right reducer.
Step 8: Do the same thing for the mapStateToProps() function. Change the name of the property to match the useReducer hook. The state value for the useReducer() hook (1st element in the array destructuring) contains the entire initial state from the reducer. You will need to access each property of state with dot notation, and then pass it into a property in the “value” prop.
Step 9: Finally to actually use the global Context state in a child component, you first import the original Context object to the child component. Then pass in the imported Context object to the useContext() hook. Save the result of the useContext hooks in a variable. Now you have access to all the properties that we defined in the value prop of the <Context.Provider /> in the root App.js file.
Accessing state values in a child component with context: context.stateprop1
Dispatching actions in a child component with context: () => context.action1()
Here is an example of a React Redux class container and a React Hooks functional component with similar functionality side by side.
 class Container1 extends Component {
    constructor(props) {
      super(props)

      this.state = {
        local_state_prop1: true,
        local_state_prop2: 0,
        cDM_value: ''
      }
    }

 ...

    inc_local = () => {
      this.setState({local_state_prop2: this.state.local_state_prop2 + 1})
    }

    dec_local = () => {
      this.setState({local_state_prop2: this.state.local_state_prop2 - 1})
    }

  ...
    <button onClick={() => this.inc_local()}> INC Local State  </button>
    <button onClick={() => this.dec_local()}> DEC Local State  </button>
    <br />
    <br />
      {this.state.local_state_prop2}
    <br />
 ...
const HooksContainer1 = () => {
    const [value, setValue] = useState({local_state_prop1: true,
                                        local_state_prop2: 0
                                       })

...
    const incrementValue_uS = () => {
      setValue({...value, local_state_prop2: value.local_state_prop2 + 1} )
    }

    const decrementValue_uS = () => {
      setValue({...value, local_state_prop2: value.local_state_prop2 - 1} )
    }

...

      <button onClick={() => incrementValue_uS()}> Add Local Value uS </button>
      <button onClick={() => decrementValue_uS()}> Dec Local Value uS</button>
      <br />
      <p>Local useState Value: {value.local_state_prop2}</p>
      <br />
 ...
Before getting started, I’d like to clarify a few things that confused me when I first started working with React Hooks.
useReducer and Context
I was confused a little at first by useReducer. I thought by simply using useReducer, I would have automatically mimicked Redux functionality and have a global state. That isn’t the case. It is Context that makes our state global. Context can be used with either useReducer and useState.
global state: meaning state persists from one component to another. If you changed state in one component and went to another component, the state would be saved if it is global. If the state is local and you went to another component the state would not be saved.
When to use local or global state and useState and useReducer
For teaching purposes, I will show you all four possible combinations of local and global state with useState and useReducer. In a real app, I would use the useReducer hook for complex global states, such as authentication and storing data from a server. I would use the useState hook for simpler local state, such as opening up and closing a modal.
How Context Works
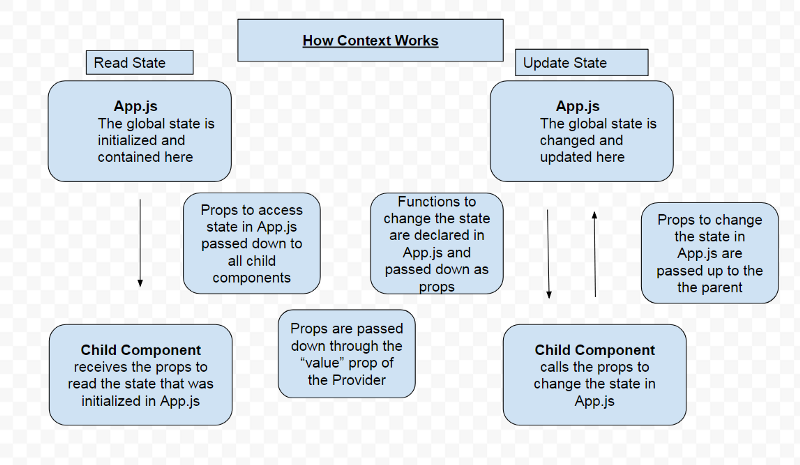
Context predates React hooks and is a way to pass down props to deeply nested child components. Without context, props would have to be passed down to every intermediary component to get to the intended child component.
Context solved this by allowing you to pass in a prop to the parent component. Then it would be available to all the child components automatically. You did not have to pass it down through middle man components. And this is essentially how we have a global state. By using the Context in the root component, our state is available to all child components. Since App.js is the root component, and every other component is the child component, the state we defined in App.js is available to all components.
It’s important to keep in mind that all the state is contained, initialized and updated in the App.js file. You can call a function to change the state from a child component but it is ultimately updated in the App.js file.
Directory Structure and Intro
Instead of focusing on how to build this app step by step, I will instead focus more on the differences between the React-Redux class and the React hooks.
Here are a couple of acronyms I use and their meaning
uS = useState signifies when something is using the useState hook
uR = useReducer signifies when something is using the useReducer hook
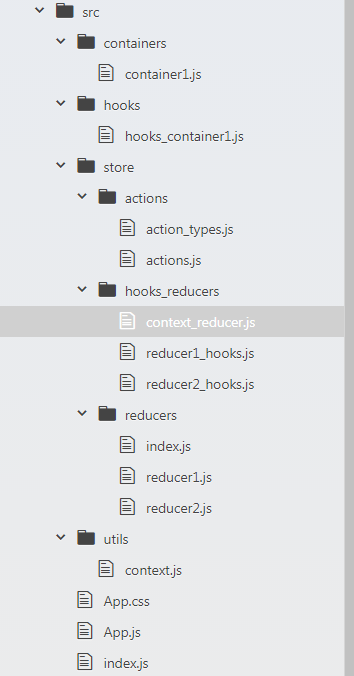
Here is the directory structure. It is a very basic app that has:
- 1 React-Redux class
- 1 React functional component that uses the useState, useReducer, and useContext hooks
- Actions and action types
- Reducers to use with React hooks
- Reducers to use with React-Redux
- a Context file
- The root App.js file
The Context Object
I like to have context in its own file since you have to import it to every child component that you use with the useContext() hook. We don’t need to do anything else to setup the Context object, we just need this one function.
import React from 'react';

const Context = React.createContext()

export default Context;
Also, notice we are not passing in any state to the Context object. You may see other tutorials that pass values to the createContext() function. This is pointless as we will override these values when we setup the <Context.Provider /> and pass in the state to the value prop.
Reducers and Actions
Now I will show a reducer for use with React Hooks and one for use with regular React Redux.
Reducer for use with React Hooks:
import * as ACTION_TYPES from '../actions/action_types'

export const initialState = {
  hooks_stateprop1: false,
}

export const Reducer1 = (state = initialState, action) => {
    switch(action.type) {
      case ACTION_TYPES.SUCCESS:
        return {
          ...state,
          hooks_stateprop1: true,
        }
      case ACTION_TYPES.FAILURE:
        return {
          ...state,
          hooks_stateprop1: false,
        }
      default:
        throw new Error();
    }
}
Reducer for React Redux:
import * as ACTION_TYPES from '../actions/action_types'

const initialState = {
  stateprop1: false
}

const Reducer1 = (state = initialState, action) => {
    switch(action.type) {
      case ACTION_TYPES.SUCCESS:
        return {
          ...state,
          stateprop1: true
        }
      case ACTION_TYPES.FAILURE:
        return {
          ...state,
          stateprop1: false
        }
      default:
        return state
    }
}

export default Reducer1;
Notice in the React Hooks reducer we are exporting both the intialState and reducer. We are not using export default at the bottom. In the React Redux reducer we export default the reducer.
Next, we have our actions and action types:
export const SUCCESS = "SUCCESS"

export const FAILURE = "FAILURE"

...
import * as ACTION_TYPES from './action_types'

export const SUCCESS = {
  type: ACTION_TYPES.SUCCESS
}

export const FAILURE = {
  type: ACTION_TYPES.FAILURE
}

export const success = () => {
  return {
    type: ACTION_TYPES.SUCCESS
  }
}

export const failure = () => {
  return {
    type: ACTION_TYPES.FAILURE
  }
}
...
Actions and action creators require no changes from React Redux.
Reading and Updating state in React Redux vs React Hooks
With the preliminary information out of the way, we can now look at the hooks_container1.js and container1.js and see the differences between React Hooks and React Redux in the code.
Let’s start off and look at local state for each and see how you would implement a simple counter.
React-Redux
class Container1 extends Component {
    constructor(props) {
      super(props)

      this.state = {
        local_state_prop1: true,
        local_state_prop2: 0,
        cDM_value: ''
      }
    }

 ...

    inc_local = () => {
      this.setState({local_state_prop2: this.state.local_state_prop2 + 1})
    }

    dec_local = () => {
      this.setState({local_state_prop2: this.state.local_state_prop2 - 1})
    }

  ...
    <button onClick={() => this.inc_local()}> INC Local State  </button>
    <button onClick={() => this.dec_local()}> DEC Local State  </button>
    <br />
    <br />
      {this.state.local_state_prop2}
    <br />
 ...
React Hooks
const HooksContainer1 = () => {
    const [value, setValue] = useState({local_state_prop1: true,
                                        local_state_prop2: 0
                                       })

...
    const incrementValue_uS = () => {
      setValue({...value, local_state_prop2: value.local_state_prop2 + 1} )
    }

    const decrementValue_uS = () => {
      setValue({...value, local_state_prop2: value.local_state_prop2 - 1} )
    }

...

      <button onClick={() => incrementValue_uS()}> Add Local Value uS </button>
      <button onClick={() => decrementValue_uS()}> Dec Local Value uS</button>
      <br />
      <p>Local useState Value: {value.local_state_prop2}</p>
      <br />
 ...
The first thing to note is that we are going from using a class component in React Redux to a functional component in React Hooks. Hence why we don't have the “this” keyword anywhere in our React Hooks code. Since we are not in a class, we can reference the variable and function names directly.
In React Redux we initialize the state in the constructor and have a dedicated setState() function. Both “state” and “setState()” are reserved names.
This is not so in React hooks. In React Hooks we create our own “state” keyword and setState() function ourselves with the useState() Hook. In the example above, you can think of value as the equivalent to this.state in a class component. And similar to this.state, we use dot notation to access each individual property of state, so the syntax we will be:
value.name_of_property
When I first started learning Hooks, I used to confuse the useState() hook as the equivalent to setState() function in React Redux. This isn’t the case. The React Redux setState() function is equivalent to the second element in the array destructuring. Which in the example above is setValue(). This setValue() function is how we update our state with hooks. useState() is then just a way we initialize the ability to read and update the state in a functional component. This previously was only available to class components.
Merging the old state in React Hooks
Another important thing to notice in the React Hooks example is that I am using …value before updating the state in the increment and decrement functions. This is the spread operator, that passes in the entire flattened previous state to the setState() function.
I did not need to pass in the previous state in the React Redux example. When we update a state property in React Redux the new state property is automatically merged with the old state properties
This does not happen in React Hooks. When you update the state in React Hooks, a new state is created. You see in the React Hooks example we have 2 state properties: local_state_prop1 and local_state_prop2. If we update the state with only local_state_prop2 and not pass in …value then a new state will be created that has only local_state_prop2. Meaning our local_state_prop1 will simply just be deleted.
So when converting state from React Redux to React Hooks, you will need to pass in the entire previous state with the spread operator when updating a single state property.
Reading and Updating state with useReducers and Redux Reducers
We can now compare reading and updating state with useReducer and Reducers.
We are using the same reducer as in the above example. A reducer with SUCCESS and FAILURE action types that changes stateprop1 from true to false and vice versa.
useReducer Hook
import * as Reducer1 from '../store/hooks_reducers/reducer1_hooks';

...
const HooksContainer1 = () => {
      const [stateLocal1, dispatchLocal1] = useReducer(Reducer1.Reducer1,
                                                     Reducer1.initialState)

...

    const action1 = () => {
      //    dispatchLocal1({type: "SUCCESS"})
      //  dispatchLocal1(ACTIONS.success())
          dispatchLocal1(ACTIONS.SUCCESS)

    }

    const action2 = () => {
      //   dispatchLocal1({type: "FAILURE"})
      //   dispatchLocal1(ACTIONS.failure())
           dispatchLocal1(ACTIONS.FAILURE)

    }
 ...

    <button onClick={() => action1()}>Dispatch Action 1  </button>
    <button onClick={() => action2()}>Dispatch Action 2 </button>
      <br />
      {stateLocal1.stateprop1
        ? <p> stateprop1 is true </p>
        : <p> stateprop1 is false </p>
      }
      <br />
...
React Redux
...

function mapStateToProps(state) {
  return {
    stateprop1: state.reducer1.stateprop1,
  }
}

function mapDispatchToProps(dispatch) {
  return {
    // action_creator1: () => dispatch(ACTIONS.success()),
    // action_creator2: () => dispatch(ACTIONS.failure()),
    // action_type1: () => dispatch({type: "SUCCESS"}),
    // action_type2: () => dispatch({type: "FAILURE}),
    action1: () => dispatch(ACTIONS.SUCCESS),
    action2: () => dispatch(ACTIONS.FAILURE),
  }
}

...

  <button onClick={() => this.props.action1()}> Dispatch Action 1 </button>
  <button onClick={() => this.props.action2()}>Dispatch Action 2 </button>
  <br />
  {this.props.stateprop1
    ? <p> stateprop1 is true </p>
    : <p> stateprop1 is false </p>
  }
  <br />
...
As mentioned in the intro, even though we are using useReducer() in the functional component, we are still only updating the local component state. I will show you how to mimic Redux functionality with Context and have a global state in the next section. It is important to keep in mind we are still only updating the local state here in our Hooks container even though we are using actions and reducers.
On the other hand, in our React Class component, we are updating the global state since we are using Redux.
So the first difference you will notice with useReducer is that we have to import our reducer and initial state and pass it into the useReducer hook, which is something we don't do with React Redux. In React Redux we just use the connect() function.
Reading state and Dispatching Actions
Next, to dispatch actions in React Hooks, we use an arrow function then dispatch our actions in the body of the function. You can dispatch actions directly in the onClick() event but having the dispatch in a function will make your code more readable.
In React Redux we set properties in the mapDispatchToProps() function, then each property is an arrow function that dispatches actions.
You will notice that we pass in actions and actions creators in the exact same way to the dispatch function in both React Hooks and React Redux. There is literally no difference which is why we didn't need to change our actions at all. I have included all the ways of dispatching actions as a comment.
The only difference between React Hooks and React Redux is that the “dispatch” function name is reserved in React Redux. In React Hooks we create our own “dispatch” function name through the useReducer hook.
To call the dispatch function in React Redux we use the syntax this.props then the name of the property in mapDispatchToProps() function. In React Hooks we just call the dispatch function name directly.
To read the state in React Redux we do this.props and then the name of the property in the mapStateToProps() function. The name of the property holds the value for a specific property in a specific reducer. In React Hooks we just do the name of the state value. This is the first element in the array destructuring in the useReducer hook call. Then the name of the property we defined in the intialState in the reducer.
Context with useState
Now I will go over Context which is how we setup a global state. It is important to note that Context is not part of React Hooks. useContext() is a React Hook, but Context itself is not part of React Hooks. Context is simply a way to pass down props from a parent component to a deeply nested child component. See the “How Context Works” section at the beginning of this tutorial for a full explanation.
Also, I will not be making comparisons between React Redux and Context because Context does not have an opposite in React Redux. I will show you how to implement a global state with Context using both the useReducer() and useState() hook.
We will first start off with the using the useState() hook to setup a global state.
We will begin setting up our global state in the root App.js file. We will first import the Context object we setup in the context.js file. We will also need to import our Hooks functional component.
import Context from '../utils/context';
import HooksContainer1 from './hooks/hooks_container1';
...

const App = () => {
    const [valueGlobal_uS, setValueGlobal_uS] = useState(0)

    const incrementValueGlobal_uS = () => {
      setValueGlobal_uS(valueGlobal_uS + 1 )
    }

    const decrementValueGlobal_uS = () => {
      setValueGlobal_uS(valueGlobal_uS - 1 )
    }

...

    <div>
     <Context.Provider
          value={{
            //global state with useState
            valueGlobalState_uS: valueGlobal_uS,
            addGlobalValue_uS: () => incrementValueGlobal_uS(),
            decGlobalValue_uS: () => decrementValueGlobal_uS(),
          }}>
        <HooksContainer1 />
      </Context.Provider>
     </div>
...
We can just set up a simple counter for now. Our useState() hook is setup as usual. In our JSX we are wrapping our <HooksContainer1 /> with the <Context.Provider /> element. This is what allows us to pass state from App.js to child components. We also have 3 properties supplied to our value prop. 1 to hold the state value and 2 properties to change the state. Notice that we don't use the useContext() hook in App.js. The useContext() hook will actually be used in child components to read and update the state.
You can essentially think of the value prop as both the mapStateToProps() and mapDispatchToProps() functions combined into one because of the value prop holds properties that allow you to read and update the state that can be called and accessed by the child component which is exactly what the mapStateToProps() and mapDispatchToProps() functions do.
Now let's look at how we would use this Context object in a child component.
import Context from '../utils/context';

...
const HooksContainer1 = () => {

...
    const context = useContext(Context)


    <p>Global useState Value: {context.valueGlobalState_uS}</p>

    <button onClick={() => context.addGlobalValue_uS()}> Add Global Value uS </button>
    <button onClick={() => context.decGlobalValue_uS()}> Dec Global Value uS </button>

...
We first have to import our Context object at the top. This is the original Context object that we created with the createContext() function, not the <Context.Provider /> we just setup. Then we simply pass this Context object to the useContext() hook and save it in a variable. This context variable now has all the properties we just defined in the value prop of the <Context.Provider />.
To access the properties of the value prop we can just use dot notation. For example, to access the state value here in our child component, we use the syntax context.valueGlobalstate_uS.
Note that valueGlobalState is the name of the property we defined in the App.js file in the value prop. valueGlobalState is the property that holds the value of the state which in App.js we defined as valueGlobal_uS. Similarly, to change the state we call the property name and not the name of the function we set in App.js.
I have intentionally kept the property and function names different so its easier to see how Context works in the child component.
This is it for using Context with useState. I will now demonstrate with useReducer.
Context with useReducer
Using Context with useReducer is essentially how we achieve Redux functionality.
In order to avoid confusion, I will setup a new reducer and actions for this.
export const CONTEXT_INC = "CONTEXT_INC"

export const CONTEXT_DEC = "CONTEXT_DEC"
export const CONTEXT_INC = {
  type: ACTION_TYPES.CONTEXT_INC
}

export const CONTEXT_DEC = {
  type: ACTION_TYPES.CONTEXT_DEC
}
import * as ACTION_TYPES from '../actions/action_types'

export const initialState = {
  context_prop1: 0,
}

export const ContextReducer = (state = initialState, action) => {
    switch(action.type) {
      case ACTION_TYPES.CONTEXT_INC:
        return {
          ...state,
          context_prop1: state.context_prop1 + 1
        }
      case ACTION_TYPES.CONTEXT_DEC:
        return {
          ...state,
          context_prop1: state.context_prop1 - 1
        }
      default:
        throw new Error();
    }
}
So we have a simple reducer that functions as a counter. Now we can set up the useReducer hook in our App.js file and we will set this up in the exact same way that we set up useReducer in our Hooks container. We import the ContextReducer and its initial state and pass it into the useReducer Hook in App.js. Because we are now using Context we will not import our Context Reducer to the child components. The state will be changed here in our App.js file and will simply be passed down as props.
import * as ACTIONS from './store/actions/actions';
import * as ContextReducer from './store/reducers/context_reducer';

...

const App = () => {

...

    const [contextState, contextDispatch] = useReducer(ContextReducer.ContextReducer,
                                                       ContextReducer.initialState)

    const dispatchContextInc = () => {
      contextDispatch(ACTIONS.CONTEXT_INC)
    }

    const dispatchContextDec = () => {
      contextDispatch(ACTIONS.CONTEXT_DEC)
    }
 ...


       <div>
      <Context.Provider
          value={{
            //global state with useState
            valueGlobalState_uS: valueGlobal_uS,
            addGlobalValue_uS: () => incrementValueGlobal_uS(),
            decGlobalValue_uS: () => decrementValueGlobal_uS(),

            //global state with useReducer
            valueGlobalState_uR: contextState,
            addGlobalValue_uR: () => dispatchContextInc(),
            decGlobalValue_uR: () => dispatchContextDec()
          }}>
              <HooksContainer1 />
          </Context.Provider>
        </div>
...
We set up our properties in the value prop in the exact same way that we did when we used Context with the useState() hook. The actions are also dispatched in the exact same way as we’ve seen before.
Now for our child component:
...

const HooksContainer1 = () => {

 const context = useContext(Context)

...

 <button onClick={() => context.addGlobalValue_uR()}> Add Global Value uR </button>
 <button onClick={() => context.decGlobalValue_uR()}> Dec Global Value uR </button>

 <p>Global useReducer Value: {context.valueGlobalState_uR.context_prop1}</p>
As you can see, reading and updating state with useReducer() hook is very similar to the useState() example. We can even use the same context variable we used for useState(), we don't have to initialize another one. To update the state we simply call the property name we defined in the value prop of the provider. This updates the state in App.js. Because we are updating our state in App.js we don't have to import the ContextReducer here in our child component and pass it into the useReducer() hook.
Reading the state is a little bit different. Since valueGlobalState_uR contains our entire state, we have to specify a single property of state which in this case is context_prop1.
And this is it! After this you can read and update the state in any component in your app using this same pattern, allowing you to mimic Redux functionality essentially.
For a 100% Free Video version of this tutorial and more in-depth React Hooks content see my Udemy course or Youtube playlist:
https://www.udemy.com/react-hooks-with-react-redux-migration
https://www.youtube.com/watch?v=l8ODM-KoDpA&list=PLMc67XEAt-ywplHhDpoj5vakceZNr8S0B