
Hooks are a handy addition to the React API that allow us to organize some of our logic and state in function components. How can we build a custom hook and share it with the rest of the world?
- What are hooks?
- Why are custom hooks cool?
- What are we going to make?
- Step 0: Naming your hook
- Step 1: Setting up your project
- Step 2: Writing your new React Hook
- Step 3: Using your React hook in an example
- Step 4: Compiling your React hook and Example
- Step 5: Publishing your React hook to npm
- More resources about hooks
What are hooks?
React hooks in simple terms are functions. When you include them in your component or within another hook, they allow you to make use of React internals and parts of the React lifecycle with native hooks like useState and useEffect.
I don’t plan on doing a deep dive about hooks, but you can check out a quick introduction with an example of useState as well as the intro from the React team.
Why are custom hooks cool?
The great thing about creating custom hooks is they allow you to abstract logic for your components making it easier to reuse across multiple components in your app.
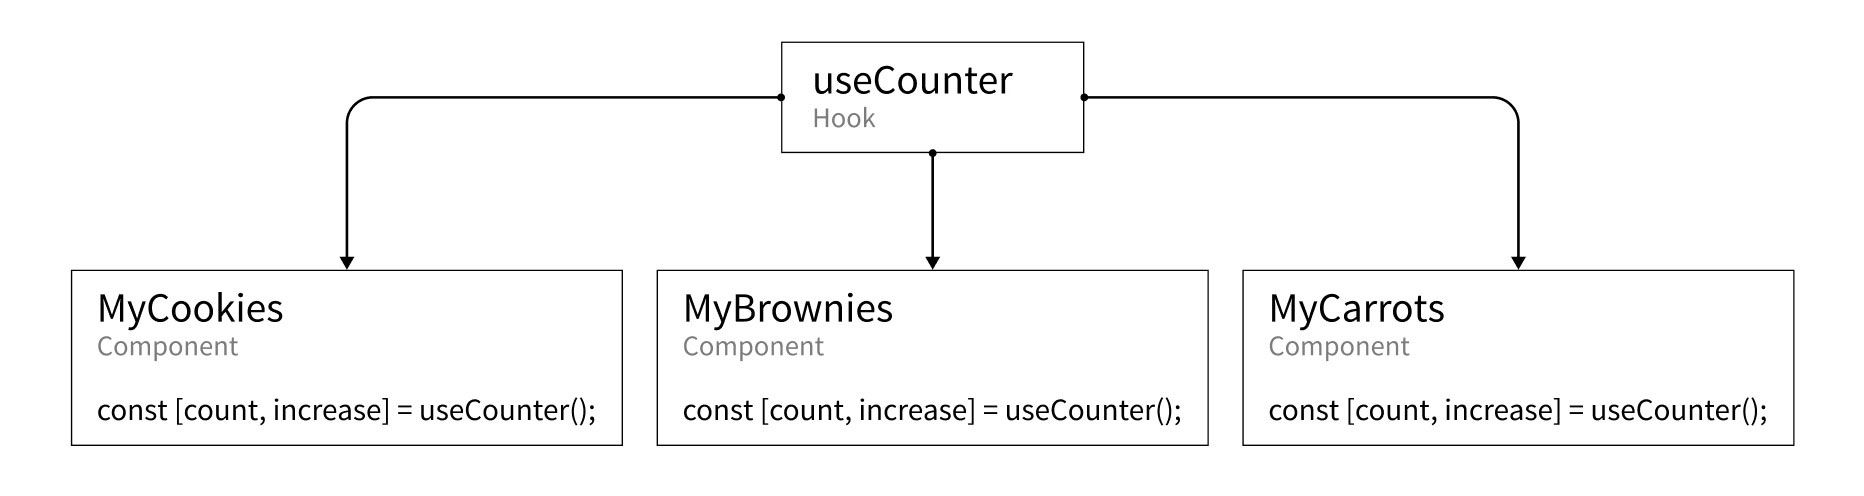 Hook diagram example for useCounter
For instance, if you wanted to create a simple counter where you use React’s state to manage the current count. Instead of having the same useState hook in each component file, you can create that logic once in a useCounter hook, making it easier to maintain, extend, and squash bugs if they come up.
What are we going to make?
For the purposes of this article, we’re going to keep it simple with a basic hook. Typically, you might use a hook because rather than a typical function, you use other native hooks that are required to be used within React function components. We’re going to stick with some basic input and output to keep things simple.
We’re going to recreate this custom Placecage hook I made, that allows you to easily generate image URLs that you can use as placeholder images.
 Nic Cage excited
If you’re not familiar, Placecage is an API that allows you to generate pictures of Nic Cage as placeholder images for your website. Silly? Yes. Fun? Absolutely!
But if you’re not a fan of Nic's work, you can just as easily swap in the URL for Fill Murray which uses pictures of Bill Murray or placeholder.com which generates simple solid color background with text that shows the size of the image.
Step 0: Naming your hook
Before we jump in to our actual code, our ultimate goal is to publish this hook. If that’s not your goal, you can skip this step, but for publishing, we’ll want to create a name for our hook.
In our case, our hook name will be usePlaceCage. Now with that in mind, we have 2 formats of our name — one in camelCase format and one in snake-case format.
- camelCase: usePlaceCage
- snake-case: use-placecage
The camelCase format will be used for the actual hook function, where the snake-case name will be used for the package name and some of the folders. When creating the name, keep in mind that the package name must be unique. If a package with the same name exists on npmjs.com already, you won't be able to use it.
If you don’t already have a name, it's okay! You can just use your own name or something you can think of, it doesn’t really matter too much as really we're just trying to learn how to do this. If it were me for instance, I would use:
- camelCase: useColbysCoolHook
- snake-case: use-colbyscoolhook
But just to clarify, for the rest of our example, we’re going to stick with usePlaceCage and use-placecage.
Step 1: Setting up your project
Though you can set up your project however you’d like, we’re going to walk through building a new hook from this template I created.
The hope here, is that we can take out some of the painful bits of the process and immediately get productive with our custom hook. Don’t worry though, I’ll explain what’s going on along the way.
The requirements here are git and yarn as it helps provide tools that make it easy to scaffold this template, such as using the workspaces feature to allow easy npm scripts to manage the code from the root of the project. If either of those are a dealbreaker, you can try downloading the repo via the download link and update it as needed.
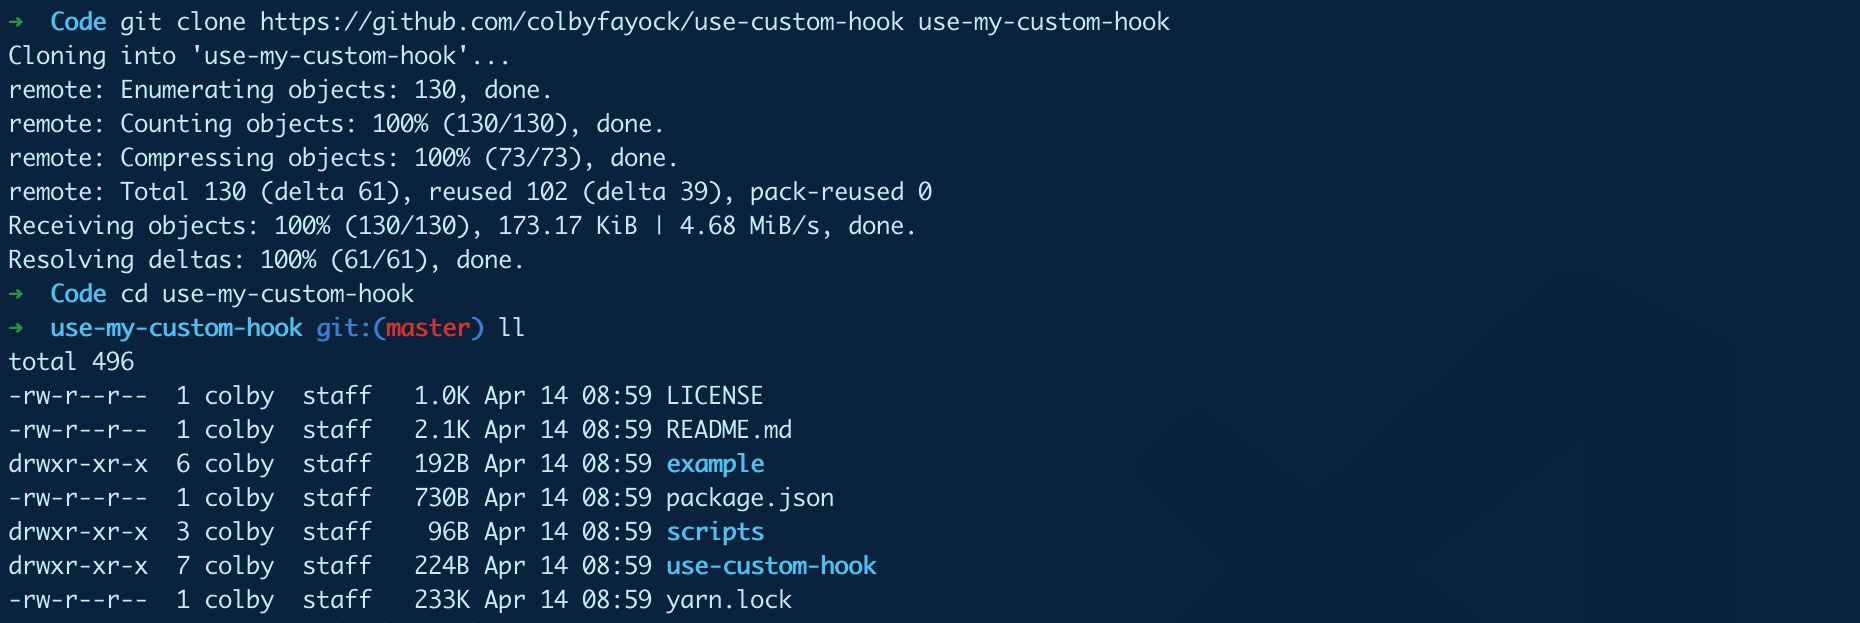
Cloning the hook template from git
To start, let’s clone the repository from Github. In the command below, you should replace use-my-custom-hook with the name of your hook, such as use-cookies or use-mooncake.
git clone https://github.com/colbyfayock/use-custom-hook use-my-custom-hook
cd use-my-custom-hook
Once you clone and navigate to that folder, you should now see 2 directories – an example directory and a use-custom-hook directory.
 Cloning use-custom-hook
This will give you a few things to get started:
- A hook directory that will include the source for our hook
- Build scripts that compile our hook with babel
- An example page that imports our hook and creates a simple demo page with next.js
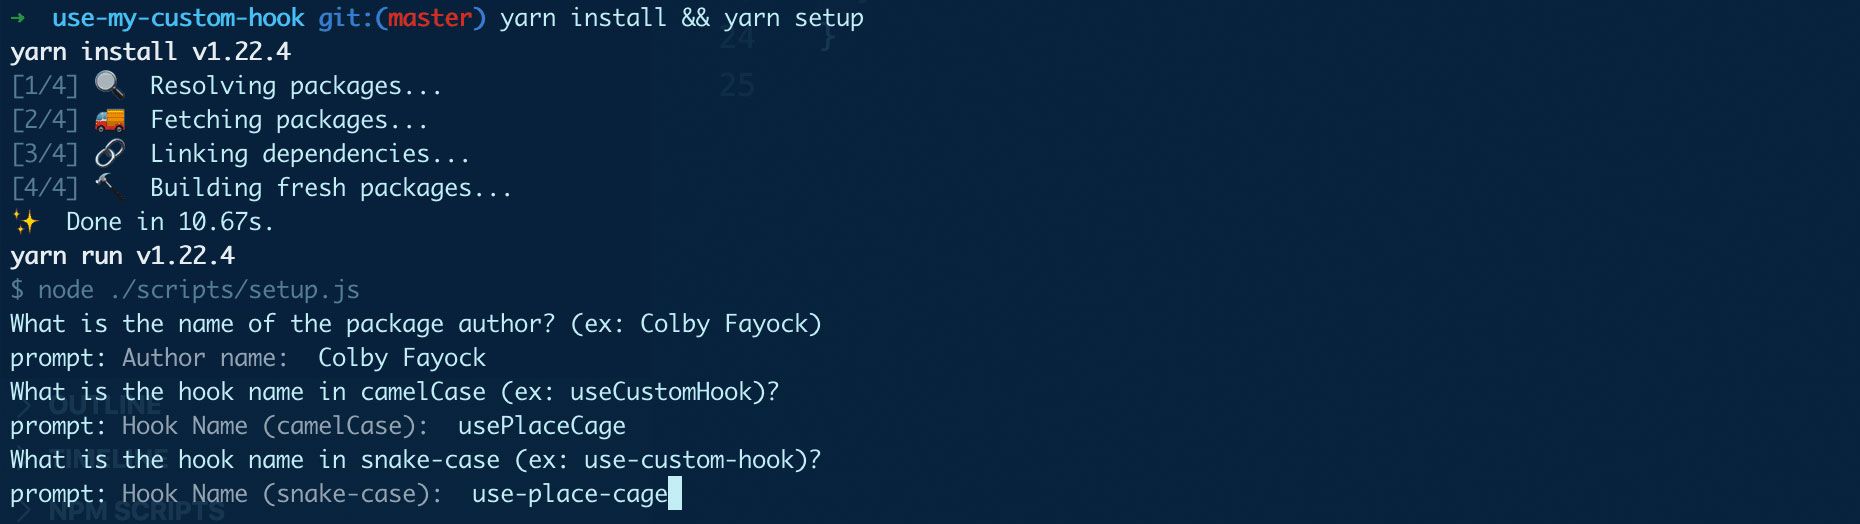
Running the hook setup scripts
After we successfully clone the repo, we want to run the setup scripts which install dependencies and update the hook to the name we want.
yarn install && yarn setup
 Setting up a new hook from the use-custom-hook template
When the setup script runs, it will do a few things:
- It will ask you for your name – this is used to update the LICENSE and the package's author name
- It will ask you for your hook's name in 2 variations – camelCase and snake-case - this will be used to update the name of the hook throughout the template and move files with that name to the correct location
- It will reset git – it will first remove the local .git folder, which contains the history from my template and reinitialize git with a fresh commit to start your new history in
- Finally, it will remove the setup script directory and remove the package dependencies that were only being used by those scripts
Starting the development server
Once the setup scripts finish running, you'll want to run:
yarn develop
This runs a watch process on the hook source, building the hook locally each time a source file is changed, and running the example app server, where you can test the hook and make changes to the example pages.
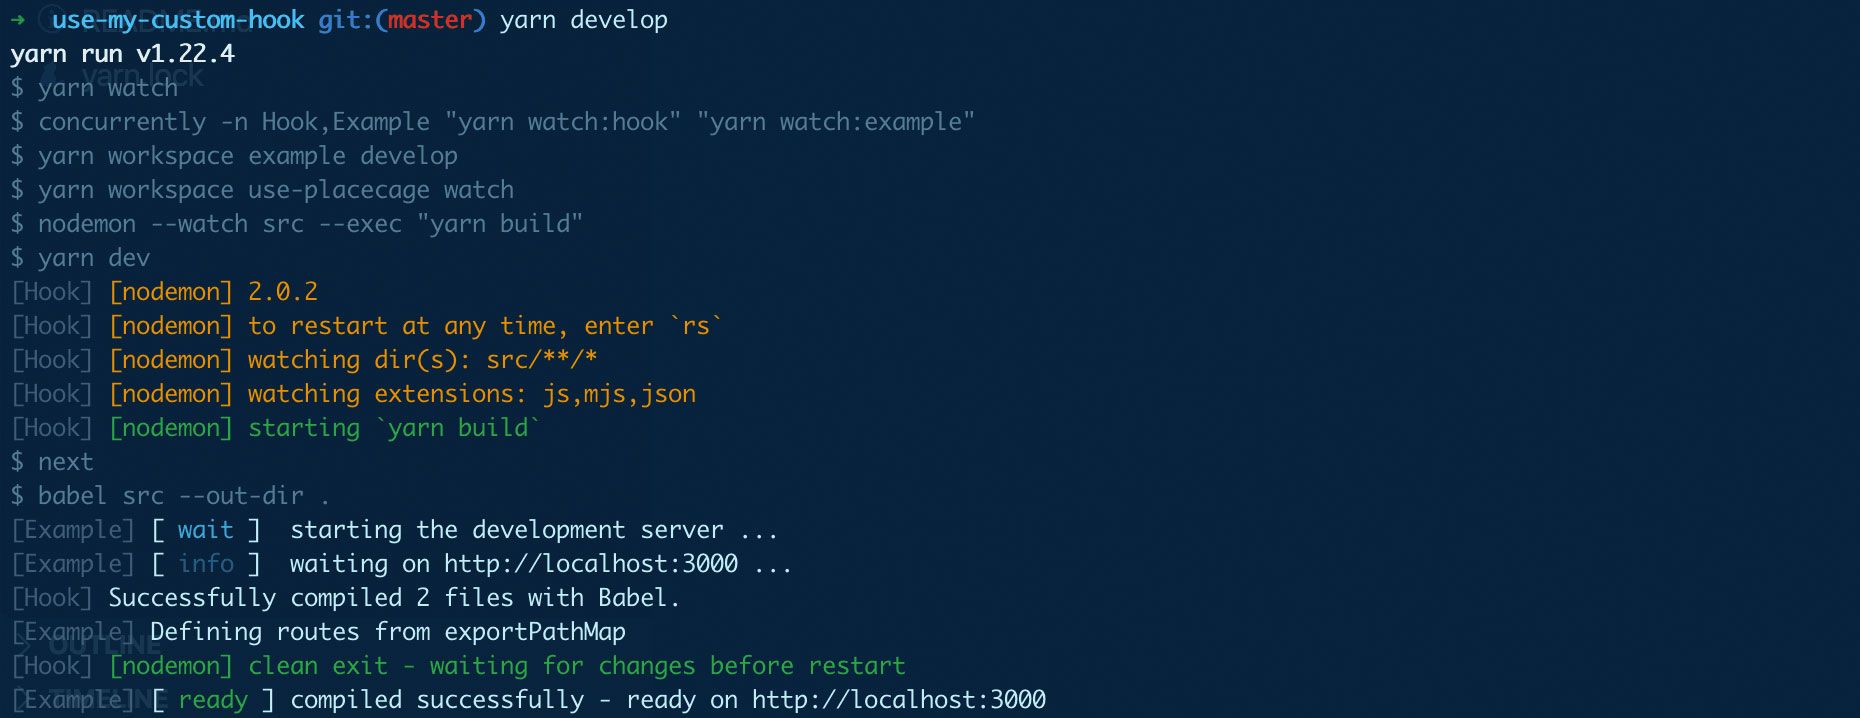 Starting up the use-custom-hook development server
With this all ready, we can get started!
Step 2: Writing your new React Hook
At this point, you should now have a new custom hook where you can make it do whatever you'd like. But since we're going to walk through rebuilding the usePlaceCage hook, let's start there.
The usePlaceCage hook does 1 simple thing from a high level view – it takes in a configuration object and returns a number of image URLs that you can then use for your app.
Just as a reminder, any time I mention usePlaceCage or use-placecage, you should use the hook name that you set up before.
A little bit about placecage.com
Placecage.com is a placeholder image service that does 1 thing. It takes a URL with a simple configuration and returns an image... of Nic Cage.
 placecage.com
From the simplest use, the service uses a URL pattern as follows:
https://www.placecage.com/200/300
This would return an image with a width of 200 and height of 300.
Optionally, you can pass an additional URL parameter that defines the type of image:
https://www.placecage.com/gif/200/300
In this particular instance, our type is gif, so we'll receive a gif.
The different types available to use are:
- Nothing: calm
g: grayc: crazygif: gif
We'll use this to define how we set up configuration for our hook.
Defining our core generator function
To get started, we're going to copy over a function at the bottom of our use-placecage/src/usePlaceCage.js file, which allows us to generate an image URL, as well as a few constant definitions that we'll use in that function.
First, let's copy over our constants to the top of our usePlaceCage.js file:
const PLACECAGE_HOST = 'https://www.placecage.com/';
const TYPES = {
  calm: null,
  gray: 'g',
  crazy: 'c',
  gif: 'gif'
};
const DEFAULT_TYPE = 'calm';
const ERROR_BASE = 'Failed to place Nick';
Here we:
- Define a host, which is the base URL of our image service.
- Define the available types, which we'll use in the configuration API. We set
calmtonull, because it's the default value which you get by not including it at all - Our default type will be
calm - And we set an error base which is a consistent message when throwing an error
Then for our function, let's copy this at the bottom of our usePlaceCage.js file:
function generateCage(settings) {
  const { type = DEFAULT_TYPE, width = 200, height = 200, count = 1 } = settings;
  const config = [];

  if ( type !== DEFAULT_TYPE && TYPES[type] ) {
    config.push(TYPES[type]);
  }

  config.push(width, height);

  if ( isNaN(count) ) {
    throw new Error(`${ERROR_BASE}: Invalid count ${count}`);
  }

  return [...new Array(count)].map(() => `${PLACECAGE_HOST}${config.join('/')}`);
}
Walking through this code:
- We define a
generateCagefunction which we'll use to generate our image URL - We take in a settings object as an argument, which defines the configuration of our image URL. We'll be using the same parameters as we saw in our placecage.com URL
- We destructure those settings to make them available for us to use
- We have a few defaults here just to make it easier. Our default
typewill be defined byDEFAULT_TYPEalong with a default width, height, and number of results we want to return - We create a
configarray. We'll use this to append all of the different configuration objects in our URL and finally join them together with a/essentially making a URL - Before we push our config to that array, we check if it's a valid argument, by using the
TYPESobject to check against it. If it's valid, we push it to our config array - We then push our width and height
- We do some type checking, if we don't have a valid number as the
count, we throw an error, otherwise we'll get incorrect results - Finally, we return a new array with the number of results requested, mapped to a URL creator, which uses
PLACECAGE_HOSTas our defined base URL, and with our config array joined by/
And if we were to test this function, it would look like this:
const cage = generateCage({
  type: 'gif',
  width: 500,
  height: 500,
  count: 2
});

console.log(cage); // ['https://www.placecage.com/gif/500/500', 'https://www.placecage.com/gif/500/500']
Using our function in the hook
So now that we have our generator function, let's actually use it in our hook!
Inside of the usePlaceCage function in the use-placecage/src/usePlaceCage.js file, we can add:
export default function usePlaceCage (settings = {}) {
  return generateCage(settings);
}
What this does it uses our generator function, takes in the settings that were passed into the hook, and returns that value from the hook.
Similar to our previous use example, if we were to use our hook, it would look like this:
const cage = usePlaceCage({
  type: 'gif',
  width: 500,
  height: 500,
  count: 2
});

console.log(cage); // ['https://www.placecage.com/gif/500/500', 'https://www.placecage.com/gif/500/500']
At this point, it does the same thing!
So now we have our hook, it serves as a function to generate image URLs for the placecage.com service. How can we actually use it?
Step 3: Using your React hook in an example
The good news about our template, is it already includes an example app that we can update to easily make use of our hook to both test and provide documentation for those who want to use it.
Setting up the hook
To get started, let's open up our example/pages/index.js file. Inside of this file you'll see the following:
const hookSettings = {
  message: 'Hello, custom hook!'
}

const { message } = usePlaceCage(hookSettings);
This snippet is what was used by default in the template just for a proof of concept, so let's update that. We're going to use the same exact configuration as we did in Step 2:
const hookSettings = {
  type: 'gif',
  width: 500,
  height: 500,
  count: 2
}

const cage = usePlaceCage(hookSettings);
Again, we set up our settings object with the configuration for our hook and invoke our hook and set the value to the cage constant.
If we now console log that value our to our dev tools, we can see it working!
console.log('cage', cage);
 Using console.log to show the cage value
Note: If you get an error here about message, you can comment that our or remove it under the Examples section.
Updating the example with our new hook configuration
If you scroll down to the Examples section, you'll notice that we have the same default hookSettings as above, so let's update that again to make sure our example is accurate.
{`const hookSettings = {
  type: 'gif',
  width: 500,
  height: 500,
  count: 2
}

const cage = usePlaceCage(hookSettings);`}
You'll also notice that we're no longer using the message variable. If you didn't remove it in the last step, we can now replace it under the Output heading with:
<p>
  { JSON.stringify(cage) }
</p>
<p>
  { cage.map((img, i) => <img key={`img-${i}`} width={200} src={img} />)}
</p>
We're doing 2 things here:
- Instead of showing the variable itself, we wrap it with
JSON.stringifyso that we can show the contents of the array - We also use the
mapfunction to loop over our image URLs in thecageconstant and create a new image element for each. This let's us preview the output instead of just seeing the values
And once you save and open your browser, you should now see your updated examples and output!
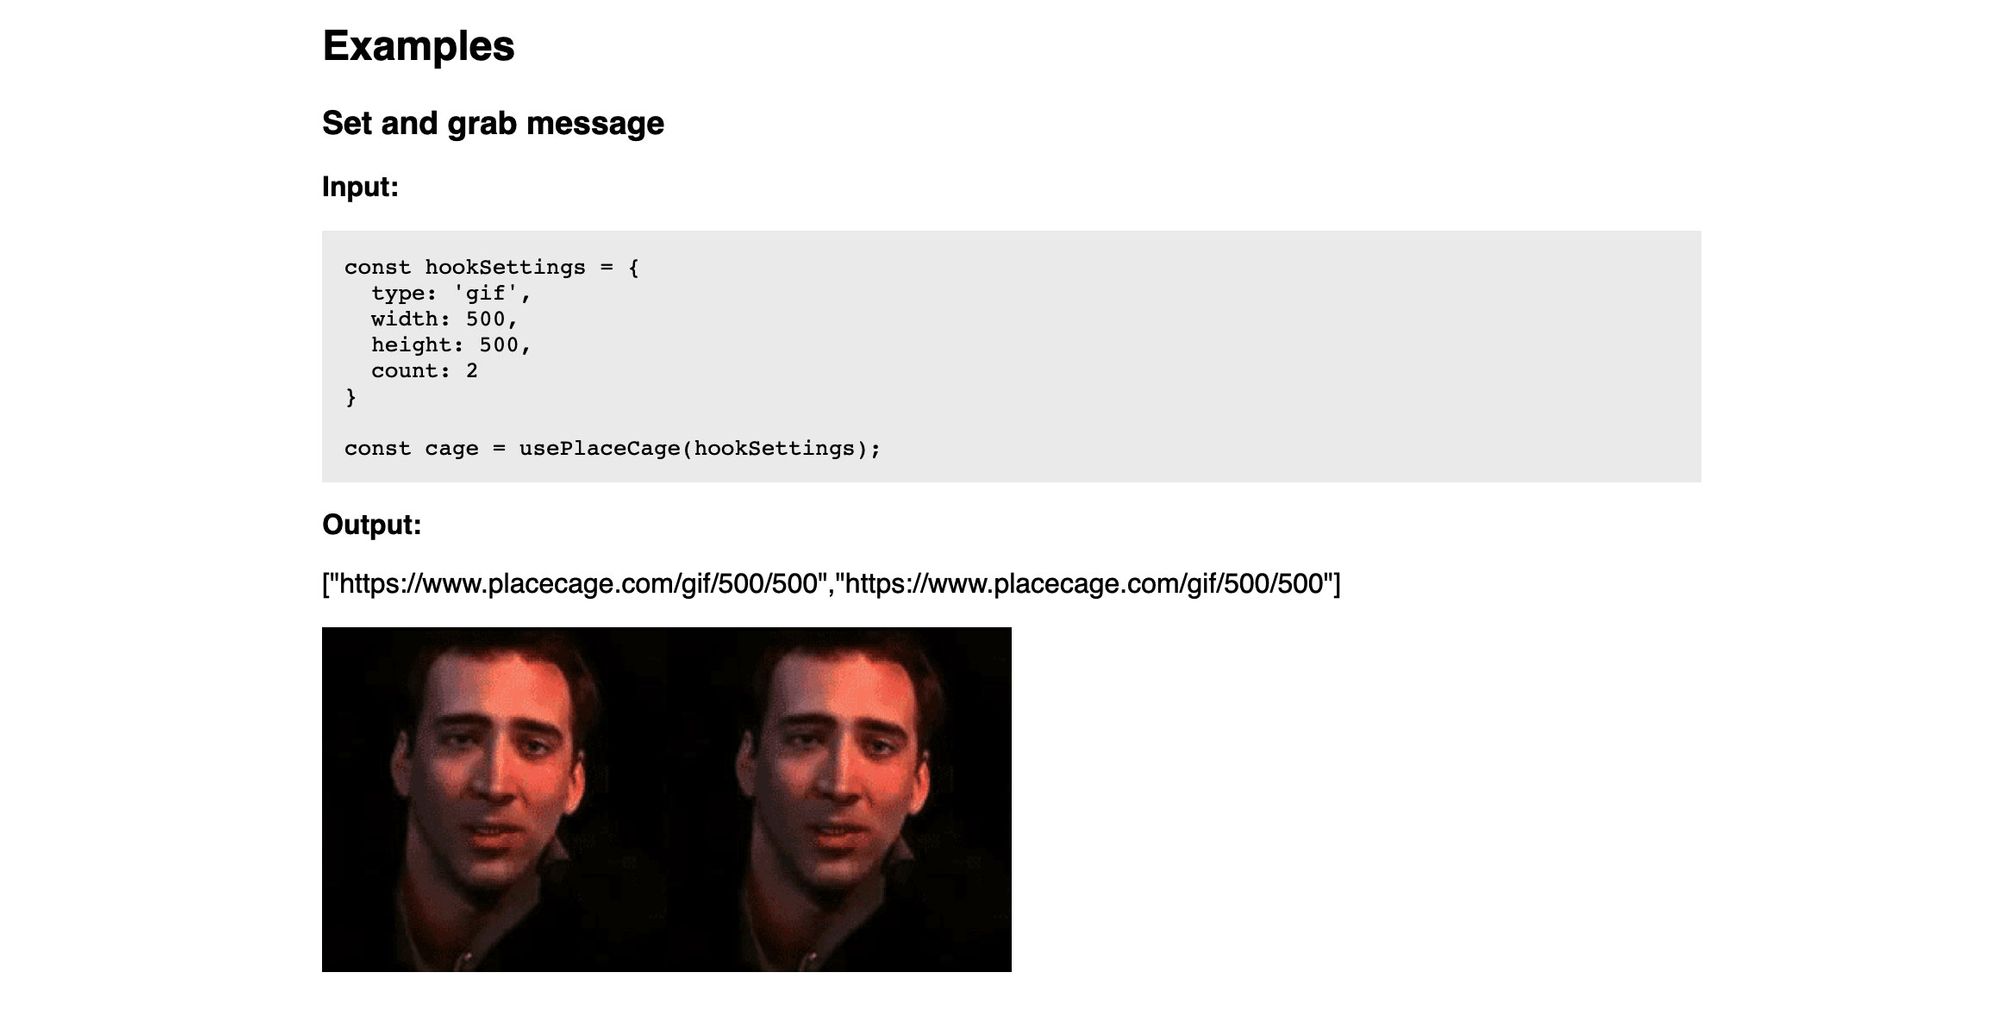 Custom hook example page
Other things you can do on that page
Before moving on, you can also update a few other things that will be important for your hooks page:
- Update the How to use section with instructions
- Add additional examples to make it easier for people to know what to do
A few things are also automatically pulled in from the use-placecage/package.json file. You can either update them there to make it easier to maintain or you can replace them in the example page:
name: Is used at the<h1>of the pagedescription: Is used at the description under the<h1>repository.url: Used to include a link to the repositoryauthor: Thenameandurlare used to include a link at the bottom of the page
Step 4: Compiling your React hook and Example
The way we can make our hook work easily as an npm module is to compile it for others to use. We're using babel to do this.
Though the publish process already does this for us automatically with the prepublishOnly script in use-placecage/package.json, we can manually compile our hook using the yarn build command from the root of the project.
Along with compiling the hook, running yarn build will also compile the example page, allowing you to upload it wherever you'd like. After running that command, you should see an output of static HTML files in the example/out directory.
If you're looking for a recommendation, Netlify makes it easy to connect your Github account and deploy the static site.
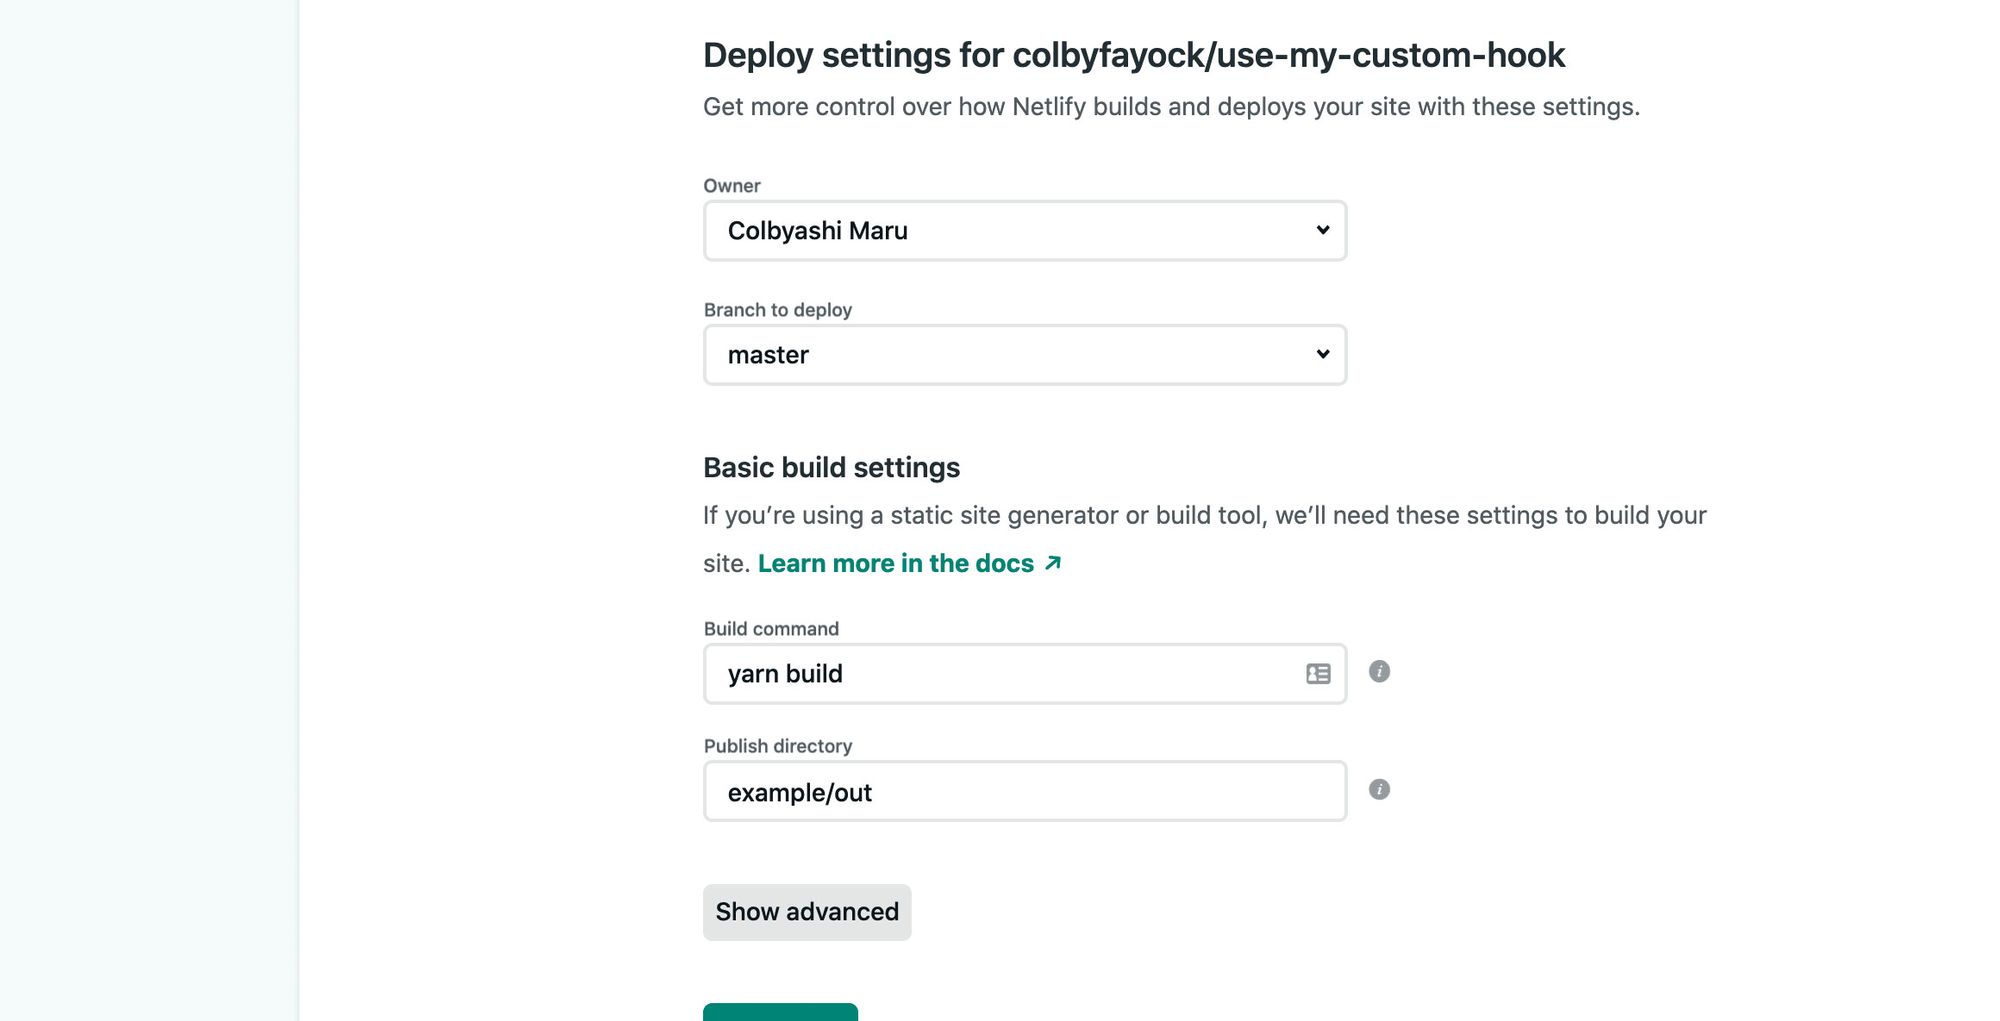 Deployment setup in Netlify
See the demo site deployed to Netlify!
Step 5: Publishing your React hook to npm
Finally, if you're happy with your hook, it's time to publish!
npm makes this part really easy. The only prerequisite you need to have an npm account. With that account, let's log in:
npm login
Which will prompt you for your login credentials.
Next, let's navigate to our hook's directory, as our package configuration is there under use-placecage/package.json:
cd use-placecage
Then, we can simply publish!
npm publish
Keep in mind, that each package name needs to be unique. If you used use-placecage, it's already taken... by me. ?
But if you're successful, npm should build your hook and upload it to the package registry!
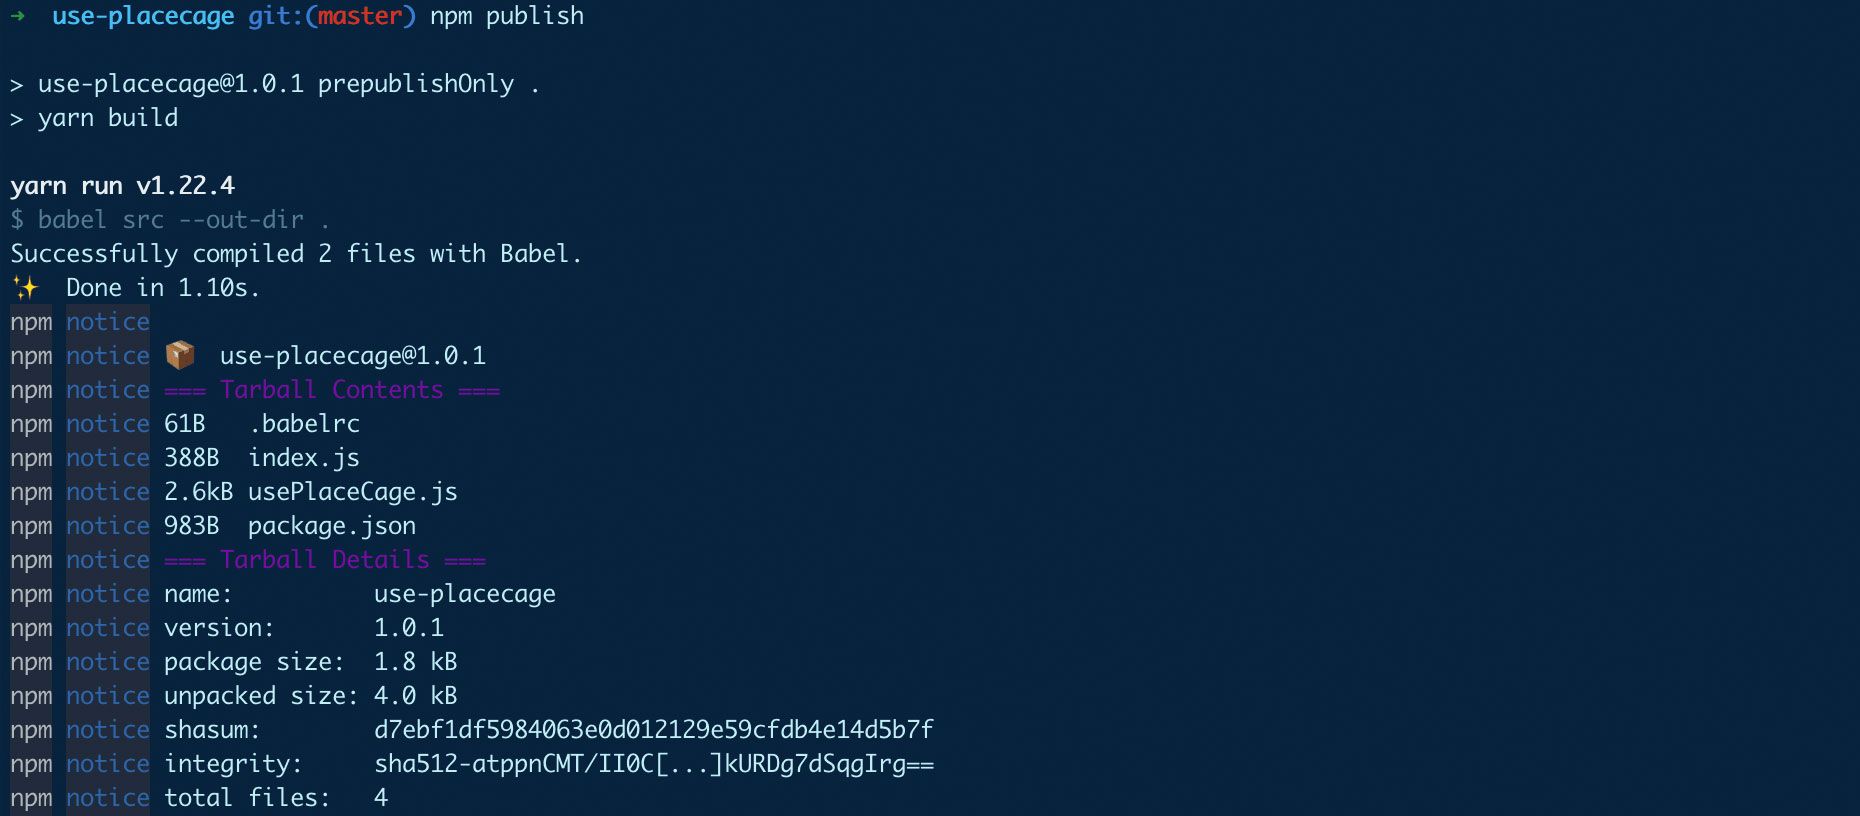 Publishing an npm package
It will then be available on npm with the following pattern:
https://www.npmjs.com/package/[package-name]
So for use-placeage, it's available here: https://www.npmjs.com/package/use-placecage
We now have a custom hook!
Yay ? if you followed along, you should now have created a custom hook and published it to npm.
Though this was a silly example using placecage.com, it gives us a good idea of how we can easily set this up.
You'll also notice that this specific example wasn't the best use case for a hooks, where we could have simply used a function. Typically, we'll want to use custom hooks to wrap functionality that can only live inside a React component, such as useState. To learn more about that, you can read one of my other articles about custom hooks.
However, this gave us a good basis to talk through the creation and configuration of our new hook!
More resources about hooks
- How to destructure the fundamentals of React Hooks (freecodecamp.org)
- Introducing Hooks (reactjs.org)
- Hooks API Reference (reactjs.org)
