By Per Harald Borgen
In this article, I’ll show you how to create and train a neural network using Synaptic.js, which allows you to do deep learning in Node.js and the browser.
We’ll be creating the simplest neural network possible: one that manages to solve the XOR equation.
I’ve also created an interactive Scrimba tutorial on this example, so check that out as well:
 _In the Scrimba tutorial, you’ll be able to play around with the code whenever you want._
Or if you’re interested in a full course on neural networks in JavaScript, please check out our a free course on Brain.js at Scrimba.
 _Click here to get to the course_
But before we look at the code, let’s go through the very basics of neural networks.
Neurons and synapses
The first building block of a neural network is, well, neurons.
A neuron is like a function, it takes a few inputs and returns an output.
There are many different types of neurons. Our network is going to use sigmoid neurons, which take any given number and squash it to a value between 0 and 1.
The circle below illustrates a sigmoid neuron. Its input is 5 and its output is 1. The arrows are called synapses, which connects the neuron to other layers in the network.
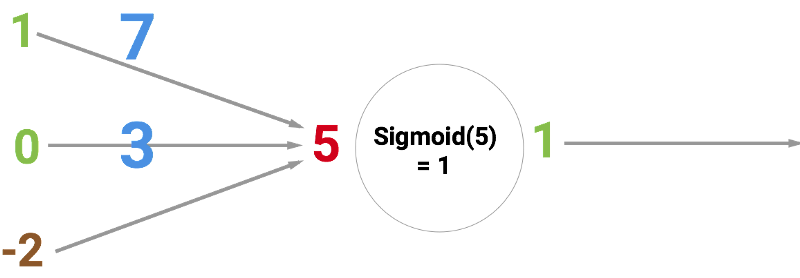
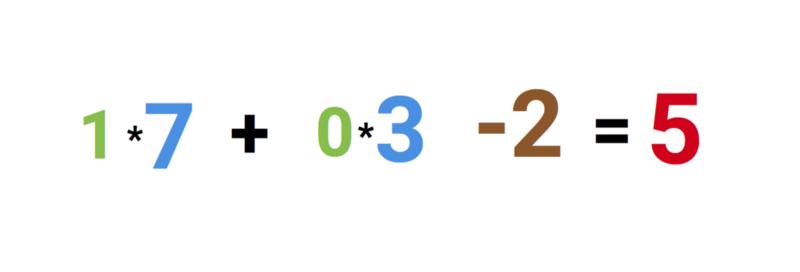
So why is the red number 5? Because it’s the sum of the three synapses that are connecting to the neuron as shown by the three arrows at the left. Let’s unpack that.
At the far left, we see two values plus a so-called bias value. The values are 1 and 0 which are the green numbers. The bias value is -2 which is the brown number.
First, the two inputs are multiplied with their weights, which are 7 and 3 as shown by the blue numbers.
Finally, we add it up with the bias and end up with 5 or the red number. This is the input for our artificial neuron.
As this is a sigmoid neuron which squashes any value to between 0 and 1, the output gets squeezed down to 1.
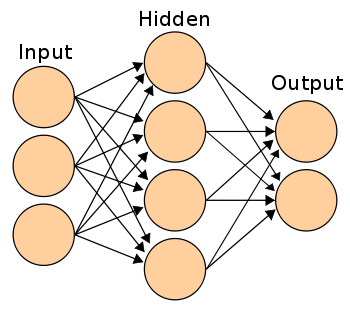
If you connect a network of these neurons together, you have a neural network. This propagates forward from input to output, via neurons which are connected to each other through synapses. Like on the image below:
The goal of a neural network is to train it to do generalizations, such as recognizing handwritten digits or email spam. And being good at generalizing is a matter of having the right weights and bias values across the network. Like with the blue and brown numbers in our example above.
When training the network, you’re simply showing it loads of examples such as handwritten digits, and getting the network to predict the right answer.
After each prediction, you’ll calculate how wrong the prediction was, and adjust the weights and bias values so that the network will guess a little bit more correct the next time around. This learning process is called backpropagation. Do this for thousands of times and your network will soon become good at generalizing.
How backpropagation works technically is outside the scope of this tutorial, but here are the three best sources I’ve found for understanding it:
- A Step by Step Backpropagation Example — by Matt Mazur
- Hackers Guide to Neural Nets — by Andrej Karpathy
- NeuralNetworksAndDeepLarning — by Michael Nielsen
The code
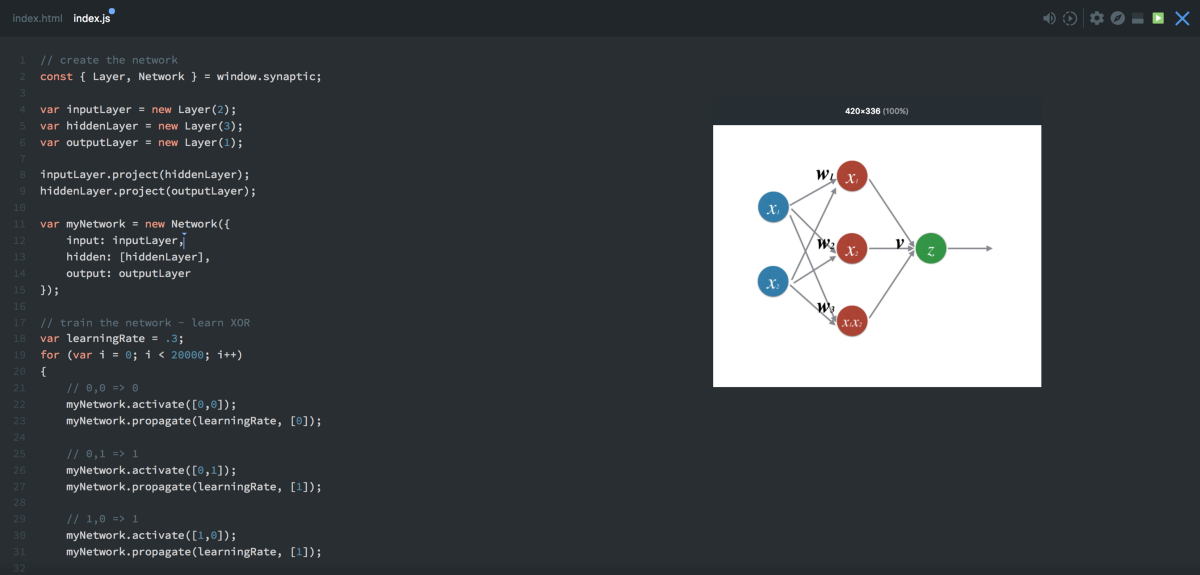
Now that you’ve gotten a basic intro, let’s jump into the code. The first thing we need to do is to create the layers. We do this with the new Layer() function in synaptic. The number passed to the function dictates how many neurons each layer should have.
If you’re confused about what a layer is, check out the screencast above.
const { Layer, Network } = window.synaptic;
var inputLayer = new Layer(2);
var hiddenLayer = new Layer(3);
var outputLayer = new Layer(1);
Next up we’ll connect these layers together and instantiate a new network, like this:
inputLayer.project(hiddenLayer);
hiddenLayer.project(outputLayer);
var myNetwork = new Network({
input: inputLayer,
hidden: [hiddenLayer],
output: outputLayer
});
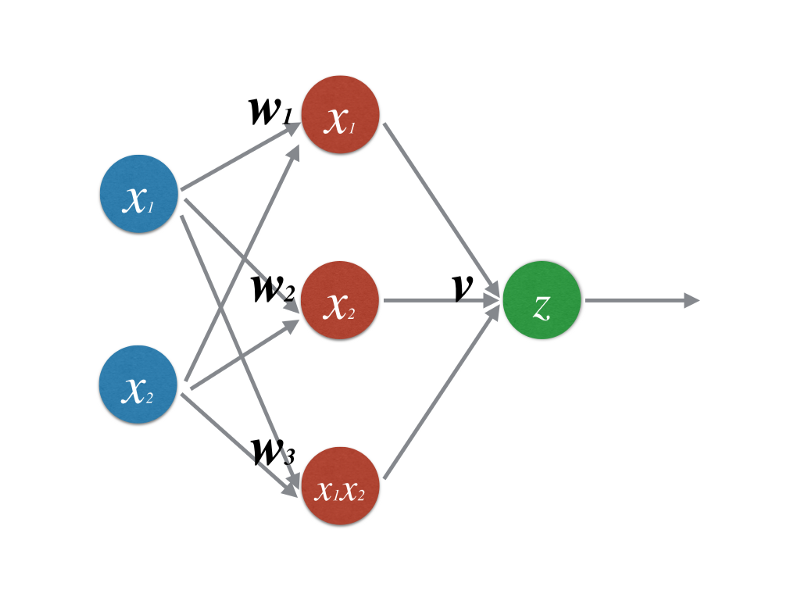
So this is a 2–3–1 network, which can be visualized like this:
Now let’s train the network:
// train the network - learn XOR

var learningRate = .3;

for (var i = 0; i < 20000; i++) {
  // 0,0 => 0
  myNetwork.activate([0,0]);
  myNetwork.propagate(learningRate, [0]);

  // 0,1 => 1
  myNetwork.activate([0,1]);
  myNetwork.propagate(learningRate, [1]);

  // 1,0 => 1
  myNetwork.activate([1,0]);
  myNetwork.propagate(learningRate, [1]);

  // 1,1 => 0
  myNetwork.activate([1,1]);
  myNetwork.propagate(learningRate, [0]);
}
Here we’re running the network 20,000 times. Each time we propagate forward and backwards four times, passing in the four possible inputs for this network: [0,0] [0,1] [1,0] [1,1] .
We start by doing myNetwork.activate([0,0]) , where [0,0] is the data point we’re sending into the network. This is the forward propagation, also called activating the network. After each forward propagation, we need to do a backpropagation, where the network updates it’s own weights and biases.
The backpropagation is done with this line of code: myNetwork.propagate(learningRate, [0]), where the learningRate is a constant that tells the network how much it should adjust its weights each time. The second parameter 0 represents the correct output given the input [0,0].
The network then compares its own prediction to the correct label. This tells it how right or wrong it was.
It uses the comparison as a basis for correcting its own weights and bias values so that it will guess a little bit more correct the next time.
After it has done this process 20,000 times, we can check how well our network has learned by activating the network with all four possible inputs:
console.log(myNetwork.activate([0,0]));
// -> [0.015020775950893527]

console.log(myNetwork.activate([0,1]));
// -> [0.9815816381088985]

console.log(myNetwork.activate([1,0]));
// ->  [0.9871822457132193]

console.log(myNetwork.activate([1,1]));
// -> [0.012950087641929467]
If we round these values to the closest integer, we’ll get the correct answers for the XOR equation. Hurray!
And that’s about it. Even though we’ve just scratched the surface of neural networks, this should give you enough to start playing with Synaptic for yourself and continue learning on your own. Their wiki contains a lot of good tutorials.
Finally, be sure to share your knowledge by creating a Scrimba screencast or writing an article when you learn something new! :)
PS: We have more free courses for you!
If you’re looking for your next challenge, we have several other free courses you can check out at Scrimba.com. Here are three might be relevant for you:
Happy coding!