
By Ankit Sharma
Introduction
In this article, we will create an optical character recognition (OCR) application using Angular and the Azure Computer Vision Cognitive Service.
Computer Vision is an AI service that analyzes content in images. We will use the OCR feature of Computer Vision to detect the printed text in an image. The application will extract the text from the image and detects the language of the text.
Currently, the OCR API supports 25 languages.
Prerequisites
- Install the latest LTS version of Node.JS from https://nodejs.org/en/download/
- Install the Angular CLI from https://cli.angular.io/
- Install the .NET Core 3.1 SDK from https://dotnet.microsoft.com/download/dotnet-core/3.1
- Install the latest version of Visual Studio 2019 from https://visualstudio.microsoft.com/downloads/
- An Azure subscription account. You can create a free Azure account at https://azure.microsoft.com/en-in/free/
Source Code
You can get the source code from GitHub.
We will use an ASP.NET Core backend for this application. The ASP.NET Core backend provides a straight forward authentication process to access Azure cognitive services. This will also ensure that the end-user won’t have direct access to cognitive services.
Create the Azure Computer Vision Cognitive Service resource
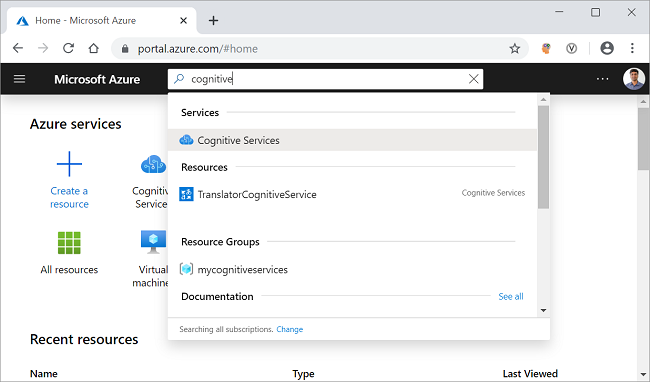
Log in to the Azure portal and search for the cognitive services in the search bar and click on the result. Refer to the image shown below.
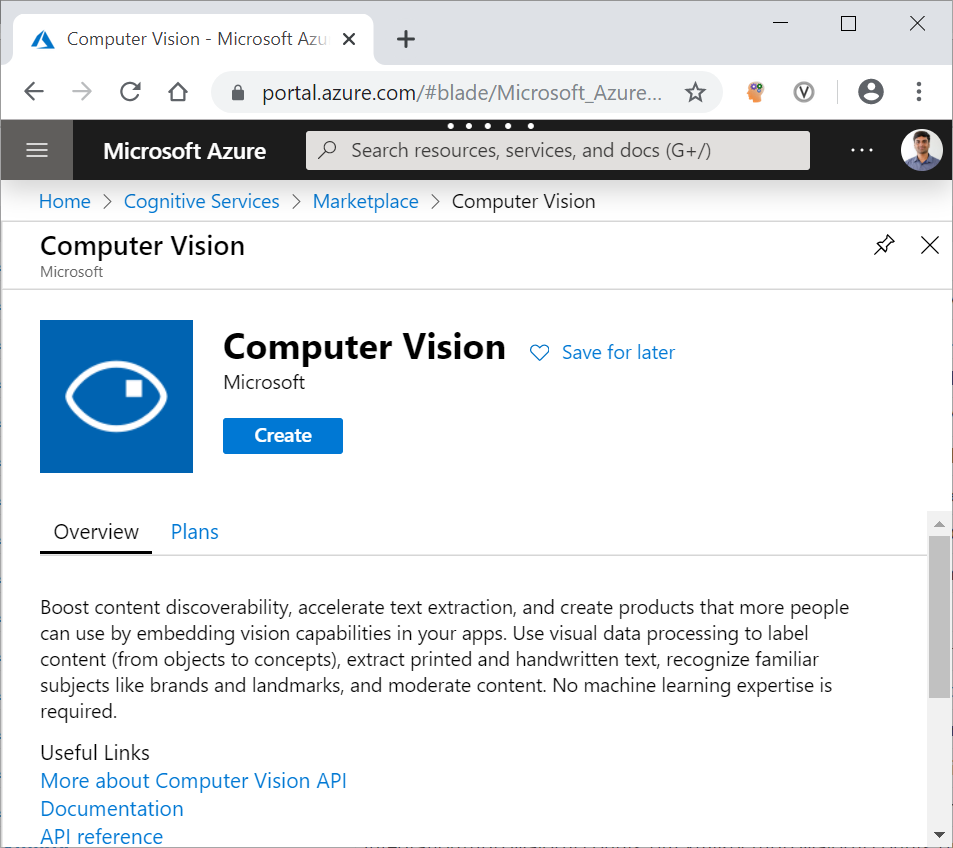
On the next screen, click on the Add button. It will open the cognitive services marketplace page. Search for the Computer Vision in the search bar and click on the search result. It will open the Computer Vision API page. Click on the Create button to create a new Computer Vision resource. Refer to the image shown below.
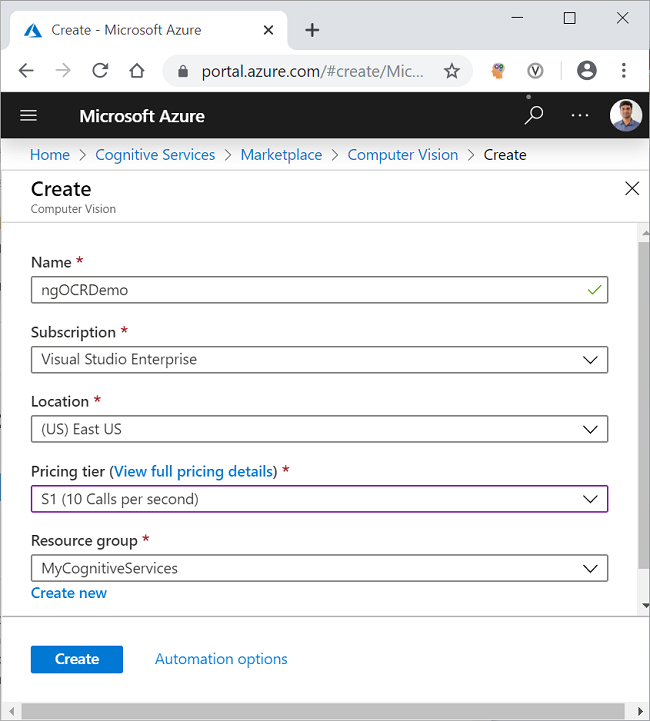
On the Create page, fill in the details as indicated below.
- Name: Give a unique name for your resource.
- Subscription: Select the subscription type from the dropdown.
- Pricing tier: Select the pricing tier as per your choice.
- Resource group: Select an existing resource group or create a new one.
Click on the Create button. Refer to the image shown below.
After your resource is successfully deployed, click on the “Go to resource” button. You can see the Key and the endpoint for the newly created Computer Vision resource. Refer to the image shown below.
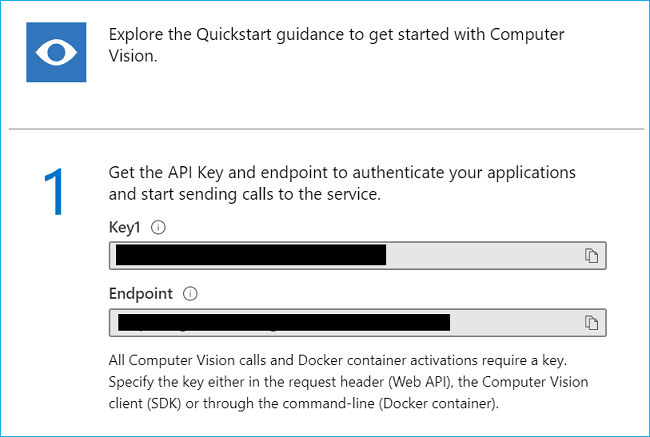
Make a note of the key and the endpoint. We will be using these in the latter part of this article to invoke the Computer Vision OCR API from the .NET Code. The values are masked here for privacy.
Creating the ASP.NET Core application
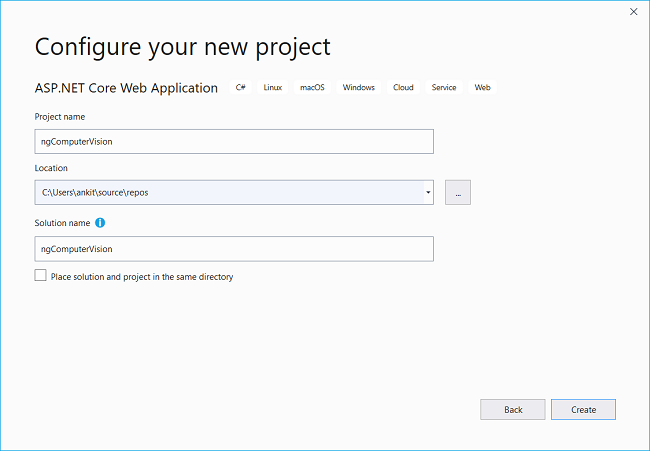
Open Visual Studio 2019 and click on “Create a new Project”. A “Create a new Project” dialog will open. Select “ASP.NET Core Web Application” and click on Next. Now you will be at “Configure your new project” screen, provide the name for your application as ngComputerVision and click on create. Refer to the image shown below.
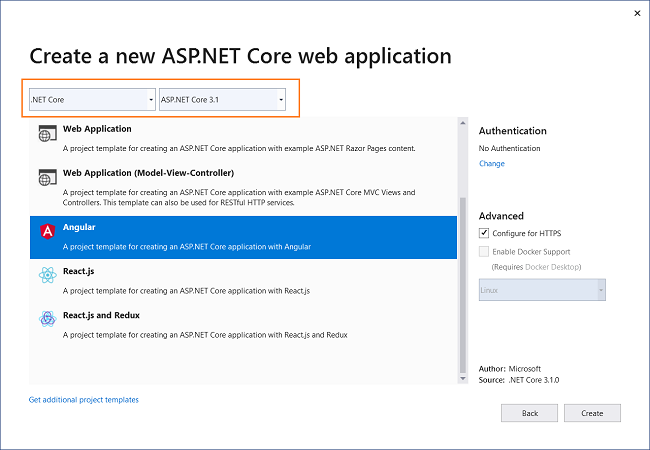
You will be navigated to “Create a new ASP.NET Core web application” screen. Select “.NET Core” and “ASP.NET Core 3.1” from the dropdowns on the top. Then, select the “Angular” project template and click on Create. Refer to the image shown below.
This will create our project. The folder structure of the application is shown below.
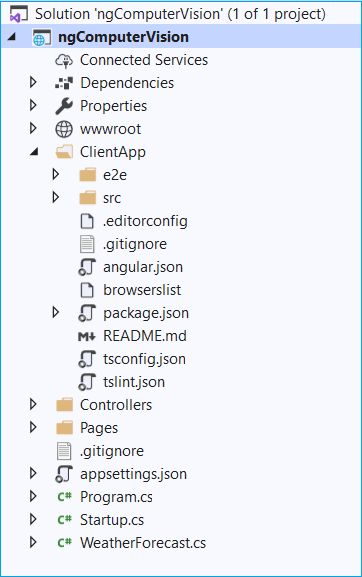
The ClientApp folder contains the Angular code for our application. The Controllers folders will contain our API controllers. The angular components are present inside the ClientApp\src\app folder.
The default template contains a few Angular components. These components won’t affect our application, but for the sake of simplicity, we will delete fetchdata and counter folders from ClientApp/app/components folder. Also, remove the reference for these two components from the app.module.ts file.
Installing Computer Vision API library
We will install the Azure Computer Vision API library which will provide us with the models out of the box to handle the Computer Vision REST API response. To install the package, navigate to Tools >> NuGet Package Manager >> Package Manager Console. It will open the Package Manager Console. Run the command as shown below.
Install-Package Microsoft.Azure.CognitiveServices.Vision.ComputerVision -Version 5.0.0
You can learn more about this package at the NuGet gallery.
Create the Models
Right-click on the ngComputerVision project and select Add >> New Folder. Name the folder as Models. Again, right-click on the Models folder and select Add >> Class to add a new class file. Put the name of your class as LanguageDetails.cs and click Add.
Open LanguageDetails.cs and put the following code inside it.
namespace ngComputerVision.Models
{
    public class LanguageDetails
    {
        public string Name { get; set; }
        public string NativeName { get; set; }
        public string Dir { get; set; }
    }
}
Similarly, add a new class file AvailableLanguage.cs and put the following code inside it.
using System.Collections.Generic;

namespace ngComputerVision.Models
{
    public class AvailableLanguage
    {
        public Dictionary<string, LanguageDetails> Translation { get; set; }
    }
}
We will also add two classes as DTO (Data Transfer Object) for sending data back to the client.
Create a new folder and name it DTOModels. Add the new class file AvailableLanguageDTO.cs in the DTOModels folder and put the following code inside it.
namespace ngComputerVision.DTOModels
{
    public class AvailableLanguageDTO
    {
        public string LanguageID { get; set; }
        public string LanguageName { get; set; }
    }
}
Add the OcrResultDTO.cs file and put the following code inside it.
namespace ngComputerVision.DTOModels
{
    public class OcrResultDTO
    {
        public string Language { get; set; }
        public string DetectedText { get; set; }
    }
}
Adding the OCR Controller
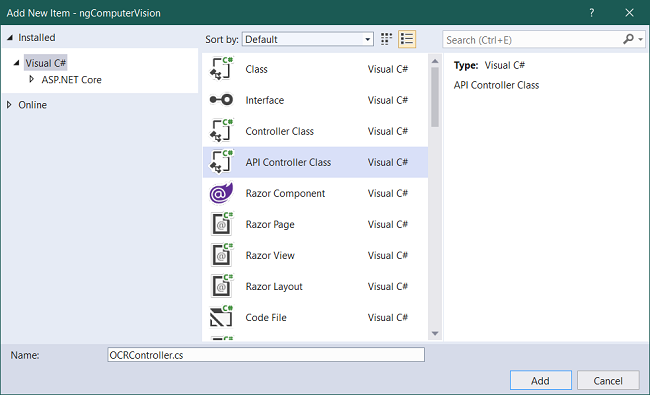
We will add a new controller to our application. Right-click on the Controllers folder and select Add >> New Item. An “Add New Item” dialog box will open. Select “Visual C#” from the left panel, then select “API Controller Class” from templates panel and put the name as OCRController.cs. Click on Add.
Refer to the image below.
The OCRController will handle the image recognition requests from the client app. This controller will also return the list of all the languages supported by OCR API.
Open the OCRController.cs file and put the following code inside it.
using System;
using System.Threading.Tasks;
using Microsoft.AspNetCore.Mvc;
using System.Net.Http;
using System.Net.Http.Headers;
using Newtonsoft.Json.Linq;
using System.IO;
using Newtonsoft.Json;
using System.Text;
using ngComputerVision.Models;
using System.Collections.Generic;
using Microsoft.Azure.CognitiveServices.Vision.ComputerVision.Models;
using ngComputerVision.DTOModels;

namespace ngComputerVision.Controllers
{
    [Produces("application/json")]
    [Route("api/[controller]")]
    public class OCRController : Controller
    {
        static string subscriptionKey;
        static string endpoint;
        static string uriBase;

        public OCRController()
        {
            subscriptionKey = "b993f3afb4e04119bd8ed37171d4ec71";
            endpoint = "https://ankitocrdemo.cognitiveservices.azure.com/";
            uriBase = endpoint + "vision/v2.1/ocr";
        }

        [HttpPost, DisableRequestSizeLimit]
        public async Task<OcrResultDTO> Post()
        {
            StringBuilder sb = new StringBuilder();
            OcrResultDTO ocrResultDTO = new OcrResultDTO();
            try
            {
                if (Request.Form.Files.Count > 0)
                {
                    var file = Request.Form.Files[Request.Form.Files.Count - 1];

                    if (file.Length > 0)
                    {
                        var memoryStream = new MemoryStream();
                        file.CopyTo(memoryStream);
                        byte[] imageFileBytes = memoryStream.ToArray();
                        memoryStream.Flush();

                        string JSONResult = await ReadTextFromStream(imageFileBytes);

                        OcrResult ocrResult = JsonConvert.DeserializeObject<OcrResult>(JSONResult);
                        if (!ocrResult.Language.Equals("unk"))
                        {
                            foreach (OcrLine ocrLine in ocrResult.Regions[0].Lines)
                            {
                                foreach (OcrWord ocrWord in ocrLine.Words)
                                {
                                    sb.Append(ocrWord.Text);
                                    sb.Append(' ');
                                }
                                sb.AppendLine();
                            }
                        }
                        else
                        {
                            sb.Append("This language is not supported.");
                        }
                        ocrResultDTO.DetectedText = sb.ToString();
                        ocrResultDTO.Language = ocrResult.Language;
                    }
                }
                return ocrResultDTO;
            }
            catch
            {
                ocrResultDTO.DetectedText = "Error occurred. Try again";
                ocrResultDTO.Language = "unk";
                return ocrResultDTO;
            }
        }

        static async Task<string> ReadTextFromStream(byte[] byteData)
        {
            try
            {
                HttpClient client = new HttpClient();
                client.DefaultRequestHeaders.Add("Ocp-Apim-Subscription-Key", subscriptionKey);
                string requestParameters = "language=unk&detectOrientation=true";
                string uri = uriBase + "?" + requestParameters;
                HttpResponseMessage response;

                using (ByteArrayContent content = new ByteArrayContent(byteData))
                {
                    content.Headers.ContentType = new MediaTypeHeaderValue("application/octet-stream");
                    response = await client.PostAsync(uri, content);
                }

                string contentString = await response.Content.ReadAsStringAsync();
                string result = JToken.Parse(contentString).ToString();
                return result;
            }
            catch (Exception e)
            {
                return e.Message;
            }
        }

        [HttpGet]
        public async Task<List<AvailableLanguageDTO>> GetAvailableLanguages()
        {
            string endpoint = "https://api.cognitive.microsofttranslator.com/languages?api-version=3.0&scope=translation";
            var client = new HttpClient();
            using (var request = new HttpRequestMessage())
            {
                request.Method = HttpMethod.Get;
                request.RequestUri = new Uri(endpoint);
                var response = await client.SendAsync(request).ConfigureAwait(false);
                string result = await response.Content.ReadAsStringAsync();

                AvailableLanguage deserializedOutput = JsonConvert.DeserializeObject<AvailableLanguage>(result);

                List<AvailableLanguageDTO> availableLanguage = new List<AvailableLanguageDTO>();

                foreach (KeyValuePair<string, LanguageDetails> translation in deserializedOutput.Translation)
                {
                    AvailableLanguageDTO language = new AvailableLanguageDTO();
                    language.LanguageID = translation.Key;
                    language.LanguageName = translation.Value.Name;

                    availableLanguage.Add(language);
                }
                return availableLanguage;
            }
        }
    }
}
In the constructor of the class, we have initialized the key and the endpoint URL for the OCR API.
The Post method will receive the image data as a file collection in the request body and return an object of type OcrResultDTO. We will convert the image data to a byte array and invoke the ReadTextFromStream method. We will deserialize the response into an object of type OcrResult. We will then form the sentence by iterating over the OcrWord object.
Inside the ReadTextFromStream method, we will create a new HttpRequestMessage. This HTTP request is a Post request. We will pass the subscription key in the header of the request. The OCR API will return a JSON object having each word from the image as well as the detected language of the text.
The GetAvailableLanguages method will return the list of all the language supported by the Translate Text API. We will set the request URI and create a HttpRequestMessage which will be a Get request. This request URI will return a JSON object which will be deserialized to an object of type AvailableLanguage.
Why do we need to fetch the list of supported languages?
The OCR API returns the language code (e.g. en for English, de for German, etc.) of the detected language. But we cannot display the language code on the UI as it is not user-friendly. Therefore, we need a dictionary to look up the language name corresponding to the language code.
The Azure Computer Vision OCR API supports 25 languages. To know all the languages supported by OCR API see the list of supported languages. These languages are a subset of the languages supported by the Azure Translate Text API.
Since there is no dedicated API endpoint to fetch the list of languages supported by OCR API, we are using the Translate Text API endpoint to fetch the list of languages. We will create the language lookup dictionary using the JSON response from this API call and filter the result based on the language code returned by the OCR API.
Working on the Client side of the application
The code for the client-side is available in the ClientApp folder. We will use Angular CLI to work with the client code.
Using Angular CLI is not mandatory. I am using Angular CLI here as it is user-friendly and easy to use. If you don’t want to use CLI then you can create the files for components and services manually.
Navigate to the ngComputerVision\ClientApp folder in your machine and open a command window. We will execute all our Angular CLI commands in this window.
Create the client-side models
Create a folder called models inside the ClientApp\src\app folder. Now we will create a file availablelanguage.ts in the models folder. Put the following code in it.
export class AvailableLanguage {
    languageID: string;
    languageName: string;
}
Similarly, create another file inside the models folder called ocrresult.ts. Put the following code in it.
export class OcrResult {
    language: string;
    detectedText: string
}
You can observe that both these classes have the same definition as the DTO classes we created on the server-side. This will allow us to bind the data returned from the server directly to our models.
Create the Computervision Service
We will create an Angular service which will invoke the Web API endpoints, convert the Web API response to JSON and pass it to our component. Run the following command.
ng g s services\Computervision
This command will create a folder name as services and then create the following two files inside it.
- computervision.service.ts — the service class file.
- computervision.service.spec.ts — the unit test file for service.
Open computervision.service.ts file and put the following code inside it.
import { Injectable } from '@angular/core';
import { HttpClient } from '@angular/common/http';

@Injectable({
  providedIn: 'root'
})
export class ComputervisionService {

  baseURL: string;

  constructor(private http: HttpClient) {
    this.baseURL = '/api/OCR';
  }

  getAvailableLanguage() {
    return this.http.get(this.baseURL)
      .pipe(response => {
        return response;
      });
  }

  getTextFromImage(image: FormData) {
    return this.http.post(this.baseURL, image)
      .pipe(response => {
        return response;
      });
  }
}
We have defined a variable baseURL which will hold the endpoint URL of our API. We will initialize the baseURL in the constructor and set it to the endpoint of the OCRController.
The getAvailableLanguage method will send a Get request to the GetAvailableLanguages method of the OCRController to fetch the list of supported languages for OCR.
The getTextFromImage method will send a Post request to the OCRController and supply the parameter of type FormData. It will fetch the detected text from the image and language code of the text.
Create the Ocr component
Run the following command in the command prompt to create the OcrComponent.
ng g c ocr --module app
The --module flag will ensure that this component will get registered at app.module.ts.
Open ocr.component.html and put the following code in it.
<h2>Optical Character Recognition (OCR) using Angular and Azure Computer Vision Cognitive Services</h2>

<div class="row">
  <div class="col-md-5">
    <textarea disabled class="form-control" rows="10" cols="15">{{ocrResult?.detectedText}}</textarea>
    <hr />
    <div class="row">
      <div class="col-sm-5">
        <label><strong> Detected Language :</strong></label>
      </div>
      <div class="col-sm-6">
        <input disabled type="text" class="form-control" value={{DetectedTextLanguage}} />
      </div>
    </div>
  </div>
  <div class="col-md-5">
    <div class="image-container">
      <img class="preview-image" src={{imagePreview}}>
    </div>
    <input type="file" (change)="uploadImage($event)" />
    <p>{{status}}</p>
    <hr />
    <button [disabled]="loading" class="btn btn-primary btn-lg" (click)="GetText()">
      <span *ngIf="loading" class="spinner-border spinner-border-sm mr-1"></span>Extract Text
    </button>
  </div>
</div>
We have defined a text area to display the detected text and a text box for displaying the detected language. We have defined a file upload control which will allow us to upload an image. After uploading the image, the preview of the image will be displayed using an <img> element.
Open ocr.component.ts and put the following code in it.
import { Component, OnInit } from '@angular/core';
import { ComputervisionService } from '../services/computervision.service';
import { AvailableLanguage } from '../models/availablelanguage';
import { OcrResult } from '../models/ocrresult';

@Component({
  selector: 'app-ocr',
  templateUrl: './ocr.component.html',
  styleUrls: ['./ocr.component.css']
})
export class OcrComponent implements OnInit {

  loading = false;
  imageFile;
  imagePreview;
  imageData = new FormData();
  availableLanguage: AvailableLanguage[];
  DetectedTextLanguage: string;
  ocrResult: OcrResult;
  DefaultStatus: string;
  status: string;
  maxFileSize: number;
  isValidFile = true;

  constructor(private computervisionService: ComputervisionService) {
    this.DefaultStatus = "Maximum size allowed for the image is 4 MB";
    this.status = this.DefaultStatus;
    this.maxFileSize = 4 * 1024 * 1024; // 4MB
  }

  ngOnInit() {
    this.computervisionService.getAvailableLanguage().subscribe(
      (result: AvailableLanguage[]) => this.availableLanguage = result
    );
  }

  uploadImage(event) {
    this.imageFile = event.target.files[0];
    if (this.imageFile.size > this.maxFileSize) {
      this.status = `The file size is ${this.imageFile.size} bytes, this is more than the allowed limit of ${this.maxFileSize} bytes.`;
      this.isValidFile = false;
    } else if (this.imageFile.type.indexOf('image') == -1) {
      this.status = "Please upload a valid image file";
      this.isValidFile = false;
    } else {
      const reader = new FileReader();
      reader.readAsDataURL(event.target.files[0]);
      reader.onload = () => {
        this.imagePreview = reader.result;
      };
      this.status = this.DefaultStatus;
      this.isValidFile = true;
    }
  }

  GetText() {
    if (this.isValidFile) {

      this.loading = true;
      this.imageData.append('imageFile', this.imageFile);

      this.computervisionService.getTextFromImage(this.imageData).subscribe(
        (result: OcrResult) => {
          this.ocrResult = result;
          if (this.availableLanguage.find(x => x.languageID === this.ocrResult.language)) {
            this.DetectedTextLanguage = this.availableLanguage.find(x => x.languageID === this.ocrResult.language).languageName;
          } else {
            this.DetectedTextLanguage = "unknown";
          }
          this.loading = false;
        });
    }
  }
}
We will inject the ComputervisionService in the constructor of the OcrComponent and set a message and the value for the max image size allowed inside the constructor.
We will invoke the getAvailableLanguage method of our service in the ngOnInit and store the result in an array of type AvailableLanguage.
The uploadImage method will be invoked upon uploading an image. We will check if the uploaded file is a valid image and within the allowed size limit. We will process the image data using a FileReader object. The readAsDataURL method will read the contents of the uploaded file.
Upon successful completion of the read operation, the reader.onload event will be triggered. The value of imagePreview will be set to the result returned by the fileReader object, which is of type ArrayBuffer.
Inside the GetText method, we will append the image file to a variable for type FormData. We will invoke the getTextFromImage of the service and bind the result to an object of type OcrResult. We will search for the language name from the array availableLanguage, based on the language code returned from the service. If the language code is not found, we will set the language as unknown.
We will add the styling for the text area in ocr.component.css as shown below.
.preview-image {
    max-height: 300px;
    max-width: 300px;
}

.image-container{
  display: flex;
  padding: 15px;
  align-content: center;
  align-items: center;
  justify-content: center;
  border: 2px dashed skyblue;
}
Adding the links in Nav Menu
We will add the navigation links for our components in the nav menu. Open nav-menu.component.html and remove the links for Counter and Fetch data components. Add the following lines in the list of navigation links.
<li class="nav-item" [routerLinkActive]="['link-active']">
 <a class="nav-link text-dark" routerLink='/computer-vision-ocr'>Computer Vision</a>
</li>
Execution Demo
Press F5 to launch the application. Click on the Computer Vision button on the nav menu at the top. You can upload an image and extract the text from the image as shown in the image below.
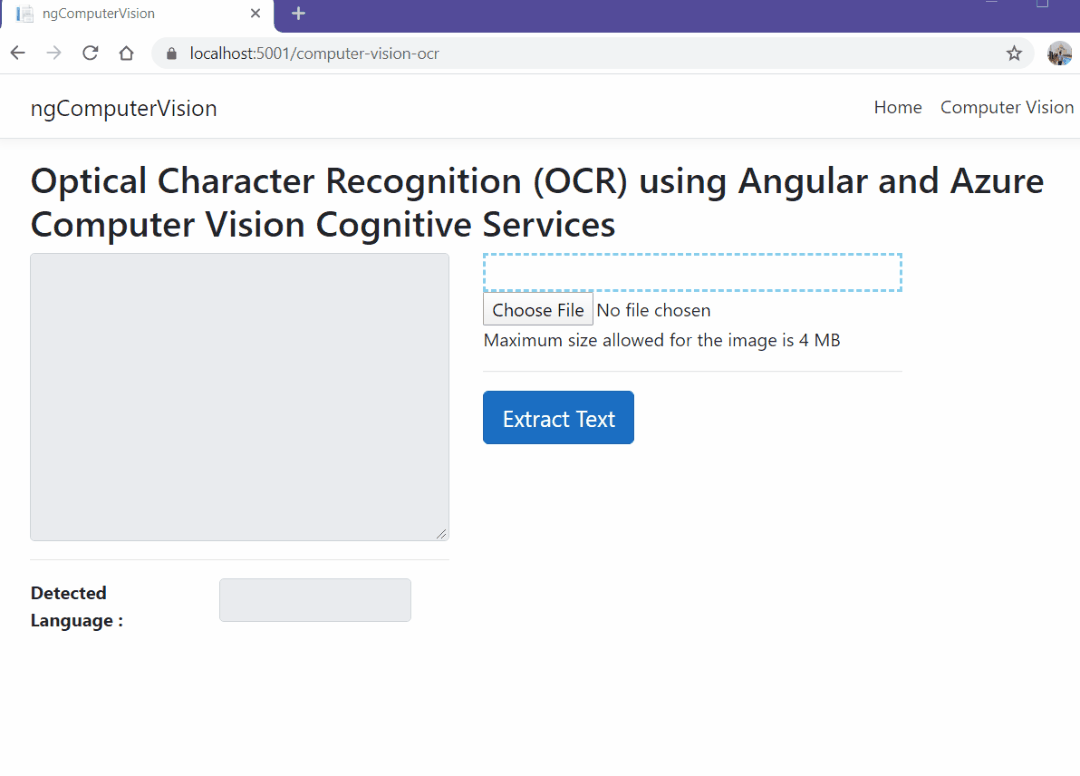 Execution Demo
Summary
We have created an optical character recognition (OCR) application using Angular and the Computer Vision Azure Cognitive Service. The application is able to extract the printed text from the uploaded image and recognizes the language of the text. The OCR API of the Computer Vision is used which can recognize text in 25 languages.
I just released a free eBook on Angular and Firebase. You can download the free book from Build a Full-Stack Web Application Using Angular & Firebase
See Also
- Template-Driven Form Validation In Angular
- Reactive Form Validation In Angular
- Continuous Deployment For Angular App Using Heroku And GitHub
- Policy-Based Authorization In Angular Using JWT
- Optical Character Reader Using Blazor And Computer Vision
If you like the article, share with you friends. You can also connect with me on Twitter and LinkedIn.