
By MaximeF
It's tricky to make a good-looking and functional table of contents in Microsoft Word.
You might often encounter documents that have messy tables of contents along with navigation panes with links to missing headings, non harmonized styles, and badly structured sections.
This wouldn't be a big problem for smaller documents, but with hundreds of pages in a file it ruins the user experience and makes it painful to navigate from one section to another. Not to mention that non-harmonized styles throughout the file can mess with the overall hierarchy of titles.
So how can you build a customizable and structured table of contents with pretty personalized titles and numbering? You'll learn how in this guide.
How to Build a Table of Contents in Microsoft Word
How to Define Numbering Styles in Word
What we're going to do first is define a new list style to create a personalized numbering for our titles. Go to the Home tab > Paragraph section and click the multilevel list button. Choose Define New List Style.
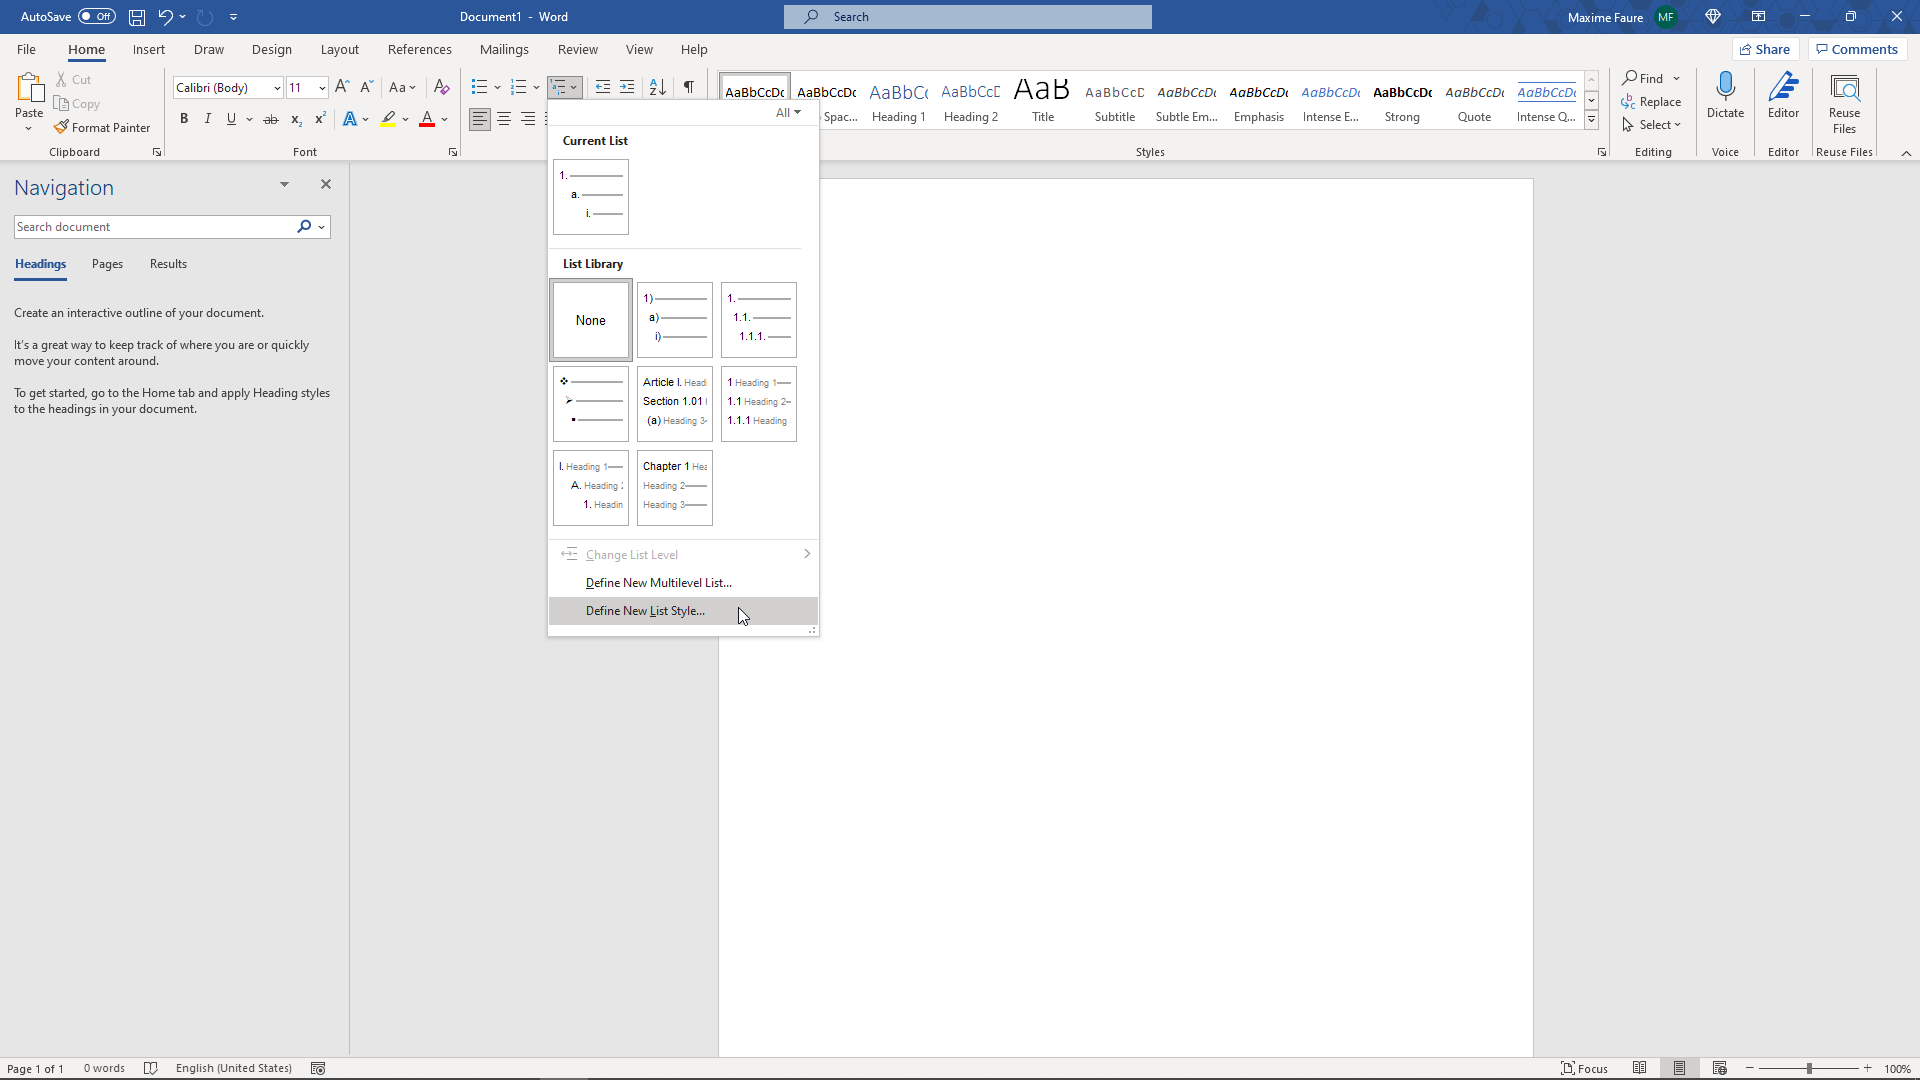
This will open the Define New List Style window which we will use to customize the numbering style and format of our titles.

Name your style however you want (here MyNewListStyle), then click the Format button > Numbering... This will open the Modify Multilevel list window.
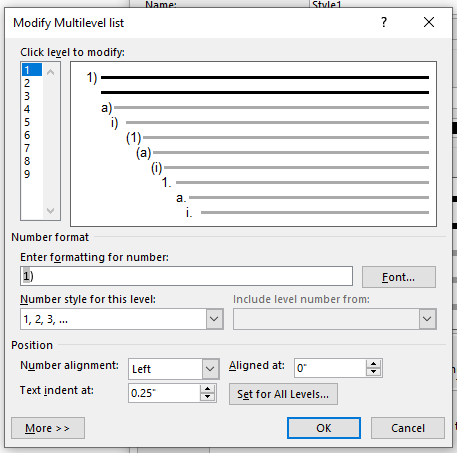
We will only define the numbering ("1)","a)") and no format or style will be applied at this level. We'll define and apply font styles and formats later on.
Let's take the following numbering for our titles "1.","1.1","1.1.1","2.","2.1","2.2" and so on.
First replace the parenthesis character with a dot character in the Enter formatting for number field. This will change the level 1 numbering format to "1.".
Then we'll define the second level of numbering by clicking the number 2 in the Click level to modify list.

Change the Number style for this level by clicking the associated dropdown menu then select 1,2,3, ... You should get this result:

Erase the parenthesis character in the Enter formatting for number field and place a dot before the "1". You should have ".1".
Now how do I get the numbering style 1.1 at level 2? Pretty simple! Place your mouse before the ".1" in the Enter formatting for number field. Then open the Include level number from dropdown menu and select Level 1.

This will insert the numbering for level 1 before your numbering for level 2. You should get this result:

Inserting numbers manually in this field will give you static numbers which won't be linked to any dynamic numbering in your document. These numbers won't be highlighted in grey in the Enter formatting for number field.
Let's repeat the same steps for level 3. Select level 3 in the Click level to modify list. Select the right Number style for this level in the dropdown menu. Remove unwanted characters and add a dot before the "1".
Then place your mouse before the ".1" in the Enter formatting for number field and open the Include level number from dropdown menu and select level 2. Add a dot before the level 2 "1" in the Enter formatting for number field. Then open Include level number from and select level 1. You should get this result:

You can modify the space character following the number by clicking More >> then Follow number with and select what you want. Here I am going to use Tab character for all my levels.
Click the OK button and you're all set for the numbering part! You won't have to do these steps again as the styles you define can be available from one Word document to another. We'll talk more about that later.
Your list style should be available by clicking the Multilevel list button in the Paragraph section of the Home tab.

We will now define our title styles.
How to Define Title Styles in Word
In the Home tab and under the Style section, click the down arrow next to the different styles available.
Then click Create a Style.

Give your new style a name. It's good practice to include the level number where you're going to apply this title so it's easier to follow your title hierarchy. I am going to name mine NewStyle1 for level 1. Then click Modify.
If you've clicked OK too fast don't worry – you can find your style and modify at anytime in the style section. You can edit it by right clicking on it and clicking Modify...


We are going to apply formatting to our title style.

Start by opening the Style based on dropdown menu and select Heading 1 for level 1. This is an important step for Word to understand the title hierarchy level. You'll apply this step to each level (Heading 2 for your level 2 style, Heading 3 for your level 3 style...).
Then open the Style for following paragraph and select Normal. This will prevent any formatting from applying automatically to the following lines of text you type.
Open the Format menu and open the Numbering... menu. Make sure that None is selected then click OK. This will prevent any conflict between the numbering we defined earlier.

You can then select any font formatting that you want. This is what I picked:

Let's create a style for level 2 and 3 by following the same steps. Be sure to have the numbering set to None each time. This is what I have for level 2:

And level 3:

We are now going to link our title styles with our numbering style.
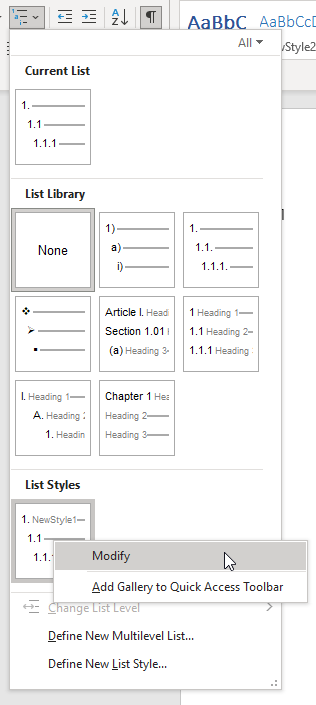
Go to the Home tab, Paragraph section, Mutlilevel list. Then right click on the Numbering list style we created in the first part and click Modify.
Open the Numbering window by clicking Format. Select the level 1 and in the Link level to style dropdown menu select the level 1 style you created for your level 1 title. You should get this:

Repeat these steps for level 2 and 3.

Then click OK.
How to Apply Your New Title Styles
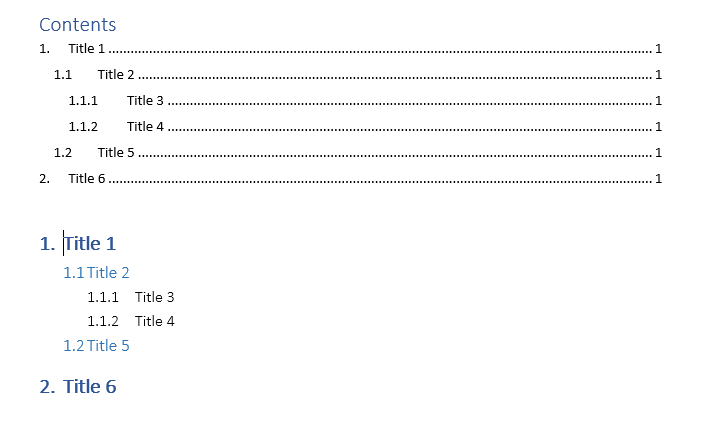
Now let's try to apply our new title styles. Type in Title 1 in your document without any formatting applied.
If you already have a format applied you can remove it by clicking in the paragraph and applying the Normal style in the Styles section. This is useful to remove any unwanted formatting or styles you may find.
Now click in the Title 1 text and click on your newly created style for level 1. This will apply your level 1 style to the whole paragraph.
If you go to the View tab you can check the Navigation pane and see that "1. Title 1" just appeared as a selectable heading on the left Navigation panel, allowing you to go to it quickly.

Let's try our other titles styles as well. Type in the text without formatting, place your mouse in the relevant paragraph, and then click on your newly created styles to apply them. You should get something like this:

As you can see on the left panel, all my titles are appearing in a structured way with harmonized numbering. You can collapse are expand these to navigate faster. There is also a search engine available on top of this panel.
You can now insert a structured table of contents by going to the References tab > Table of Contents > Automatic table 1. You should now have something like this:
You can customize this table of contents to only display titles down to a certain level by clicking Table of Contents > Custom table of Contents > decrease the Show levels number > OK.

How to Preserve Your Styles in Word
At the moment, these title styles are only available in this Word file. We are going to make them available every time we open Word as well as make them transferable to other people.
Open the Developer tab in Word. If you can't see it displayed click File > Options > Customize Ribbon > Check Developer in the right panel > OK.
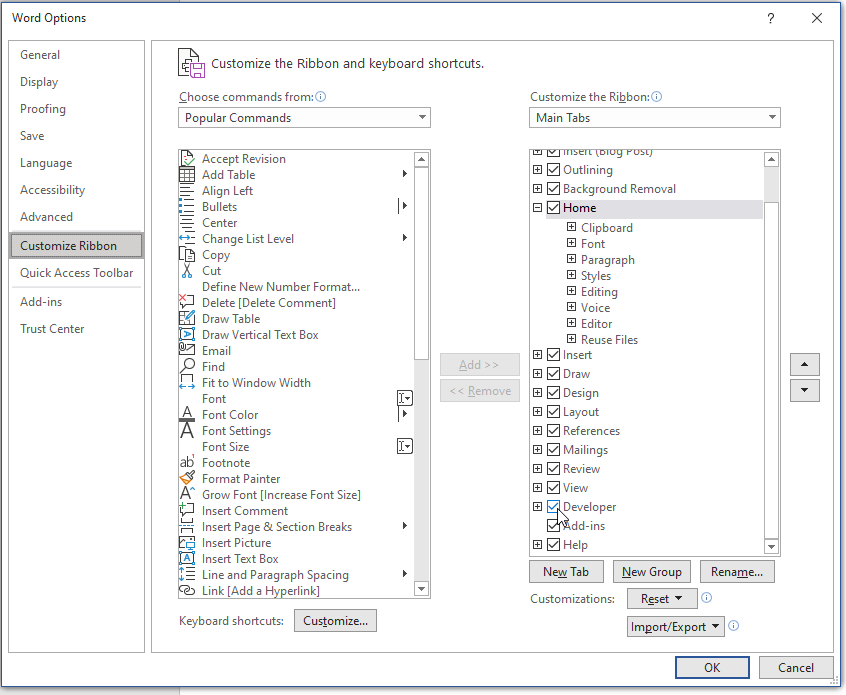
Once you're in the Developer tab go to Document Template > Organizer.

In the left panel (in Document1 for me) you can see the styles available in this file. In the right panel are the styles available in the Normal.dotm which allows you to store styles that will be available every time you open Word.
Let's select all our newly created styles then click Copy->. You should get something like this:

Now if you open another file your styles will be directly available in the styles section. This can be useful if you want to transfer styles among your group and harmonize the structure and format of your files.
That's it!
Voilà! You are now able to build a structured Word document with customizable titles styles and a reliable navigation panel.