
By Rajind Ruparathna
I have been involved in the AdroitLogic AS2Gateway, a SaaS B2B AS2 messaging platform for almost two years now. One of the common issues we see in the users who are getting started with AS2 is decryption failure. In this blog post, we will look at what encryption and decryption are in AS2 protocol. We will cover how to decrypt an AS2 message and some tips on figuring out the cause for certain decryption failures.
Encryption in AS2 Protocol
AS2 protocol basically uses Public-key cryptography or asymmetric cryptography for encryption. There, the receiver’s public key is used for encryption and receiver’s private key is used for decryption as shown below.
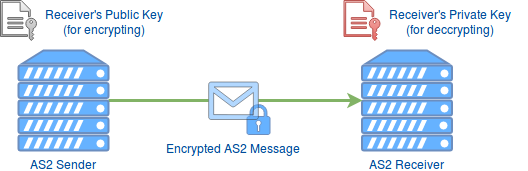
Assuming the receiver’s private key has not been compromised, encrypting data and messages offers the following security benefits.
- Confidentiality — Ensures that only the intended recipient can decrypt and view the contents, that is the content is encrypted with the recipient’s public key. Hence it can only be decrypted with the receiver’s private key.
- Data Integrity — Determine whether the file or data the receiver got was altered along the way. Part of the decryption process involves verifying that the contents of the original encrypted message and the new decrypted contents match. The slightest change to the original content would cause the decryption process to fail.
Let’s get to work!
For demonstration purposes, we will be using an incoming AS2 message to the AS2Gateway. Since we are only focusing on decryption in this blog post, the incoming AS2 message is not signed or compressed.
Downloading Raw Message and Transport Headers
Once we have received an AS2 message, we can see the received message in the inbox view in AS2Gateway as shown below.
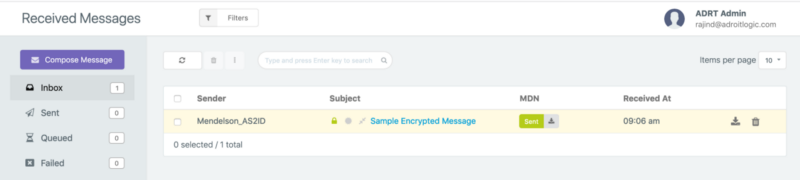
Then we can click on the message subject (in this case it is “Sample Encrypted Message”) to go to the detailed view of the received message as shown below.
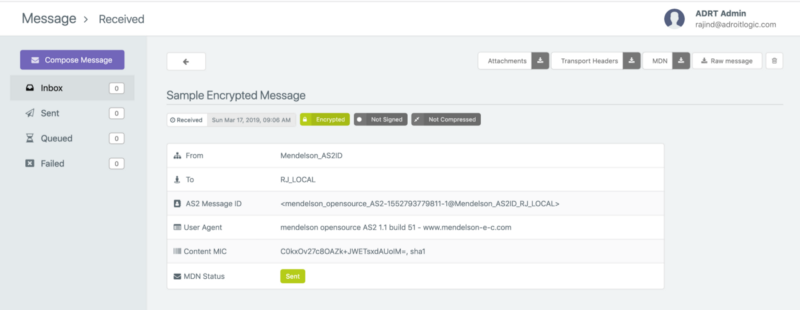
Now you can click on the “Raw Message” button and “Download Transport Headers” button to download the unprocessed AS2 message payload and transport headers we received from the partner, respectively. The raw message will be download to a file with name message.raw. The transport headers will be downloaded to a file with name headers.raw.
Getting the Receiver’s Public and Private Key
Now that we have the raw message and transport headers, we need the receiver’s public and private keys. As for the public key, you can directly download it by clicking the PEM (purple) button from the certificates view (shown below) in the AS2Gateway. For the private key, you will have to first download the JKS (identity.jks). You do this by clicking on the JKS (red) button from the certificates view and extract the private key from the JKS. Check out my step by step guide on extracting private key from JKS for more details.
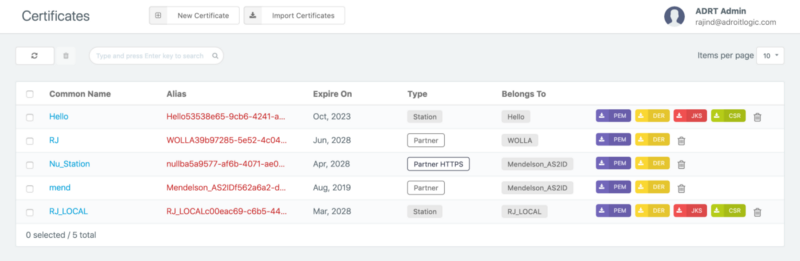
Note that you’ll need the key password and key store password when extracting the private key. If you do not remember them you can view more details on the certificate by clicking on the common name (in this case the common name on the relevant AS2 Station for this demonstration is “RJ_LOCAL”). From there you should be able to find the relevant passwords.
Before we proceed with the next steps, let’s make sure we have everything we need in place.
- Raw message (message.raw)
- Transport headers (headers.raw)
- Receiver’s private key (private_key.pem)
- Receiver’s public key (cert.pem)
Analyzing the HTTP Transport Headers
Let’s first take a look at the transport headers before we proceed.
As you can see, there are a bunch of headers and thus let us only focus on a couple of important ones in the context of decrypting the AS2 message.
- The content-type header suggests that we have an encrypted payload in the outer most layer.
- The content-disposition header gives away the file name of the payload to be test_message.txt.
- We also have the mime-version to be 1.0
If you are interested in knowing more in-depth details the best place to start would be the AS2 RFC 4130.
So now, we know that the payload is encrypted (which should be the case since that is the type we selected for this demo). We know that the file name is test_message.txt. Great. Now we have almost everything we need to perform the decryption. Few more steps to go.
Encoding Raw Message in Base64
Since we are working with an encrypted raw message here, it is always better to convert it to base64 so that we can safely play with it using text editors. Of course one can and should be able to proceed without converting it to base64 as well. I prefer to convert the raw message to base64 for convenience in the next steps. Let’s run the below command (here we use the ‘base64’ command line tool ) to covert the raw message to base64. Note that it is very important to have the parameter ‘–break=64’ which breaks the base64 output to lines with 64 characters or else you might run into an error during decryption.
base64 message.raw --break=64 > base64_message.raw
From now on, we will be working on following the base64_message.raw file.
Adding Required Headers
Do you remember that we talked about a few important transport headers when we looking at the transport headers? Now is the time to use them. We need to add those headers to our base64_message.raw file so that the final output would be as follows. (Let’s take the new file as base64_message_with_headers.raw). Note that the white space between the headers and the base64 encoded payload is intentional. You might notice that in addition to the headers we talked about earlier, we have added ‘content-transfer-encoding: base64’ to denote that content is in base64.
Decrypting…
It’s time to run the decryption command. Here we use the ‘smime’ tool by OpenSSL.
openssl smime -decrypt -in base64_message_with_headers.raw -recip cert.pem -inkey private_key.pem >> test_message.txt
Once you run the command you should have the output in the test_message.txt file. Note that in this case, we will get the plain text output since we used a payload without compression and signing.
This is a test message for the demonstration of AS2 decryption by OpenSSL.
As I stated before, if the base64 output is not split into lines with 64 characters, you may get an error similar to the following. I thought of adding that for completeness so that whoever else faces that issue may find the solution here.
That concludes the steps on decrypting the payload. Even though we’ve looked at doing the decryption entirely using command line tools in this article, this can be done using a few lines of Java code as well. I hope to cover it in a future article.
Bonus Pack
Before signing off, I would like to share some bonus details will would help you identify the cause for certain decryption failure scenarios. The first one is on how to find out the encryption algorithm used.
Finding out the Encryption Algorithm Used
In order to find the encryption algorithm used, we can use the asn1parse tool by OpenSSL. Let us run the following command to get the asn1parse output. (Note that if you run the command without the ‘-inform der’ parameter you might get an error as ‘Error: offset too large’)
openssl asn1parse -inform der -in message.raw
The output would be as follows. If you can see below, there are roughly two main parts shown here in ASN.1 notation as pkcs7-envelopedData part and pkcs7-data part. In pkcs7-data part, we have ‘des-ede3-cbc’ which is the encryption algorithm used.
Finding out the Public Key Used for Encryption
The bonus package is not done yet ;-). Sometimes it is important to figure out the certificate used in encryption to make sure if the sender has used the correct public key of the recipient. If you look at the asn1parse output above, you should see that we have commonName, organizationName etc in pkcs7-envelopedData section. These are the details on the certificate used to encrypt the AS2 payload.
Now after the countryName entry, you might see a line as follows.
122:d=9 hl=2 l= 4 prim: PRINTABLESTRING :None
128:d=6 hl=2 l= 6 prim: INTEGER :01627AE13D2D
This is the certificate serial in hex and with this, you can verify if the correct public has been used during the encryption.
That concludes the bonus pack. May all your AS2 decryption failures go away. ?
Call To Action
- Clap. Appreciate and let others find this article.
- Comment. Share your views on this article.
- Follow me. Rajind Ruparathna to receive updates on articles like this.
- Keep in touch. LinkedIn, Twitter
Originally published at notebookbft.wordpress.com on March 17, 2019.