

Serverless architectures have transformed the way we build and deploy applications in the cloud, bringing in more efficiency and scalability.
In this article, we'll dive into the Serverless Stack Toolkit (SST), a framework for building serverless applications. We'll deploy a Next.js application and set up a custom domain, all without visiting the AWS console.
Let's begin this journey!
What Does Serverless Mean?
The term "serverless" refers to a cloud computing model where developers can build and deploy applications without the need to manage servers. In a serverless architecture, the cloud provider handles server provisioning, scaling, and maintenance. This allows developers to focus solely on writing code for their applications.
With serverless, developers are billed based on actual usage rather than fixed server costs, making it a cost-effective and scalable solution. It offers increased flexibility and agility, as resources are automatically allocated and released based on demand. This eliminates the need for developers to worry about infrastructure management.
Now that we have a good idea of what serverless means, let's see what the Serverless Stack Toolkit (SST) is.
Understanding Serverless Stack Toolkit (SST)
The Serverless Stack Toolkit, or SST in short, is a flexible, open-source framework designed to enable faster development and reliable deployment of serverless applications on AWS.
It aims to make it easier for developers to define their application's infrastructure using AWS CDK (Cloud Development Kit).
You can use it to test applications in real-time with Live Lambda Development, debug code in Visual Studio Code, manage applications through a web-based dashboard, and deploy to multiple environments and regions seamlessly.
Benefits of Using SST
Here are some benefits of using the SST stack:
Infrastructure as Code
With SST, developers can define their application's infrastructure programmatically using AWS CDK. This improves version control and collaboration among team members.
Efficient Testing and Debugging
SST enables live Lambda development, making it easier to test and debug serverless applications locally before deployment to AWS. This reduces potential issues and ensures smoother deployment.
Simplified Deployment
SST simplifies the deployment process, allowing developers to deploy applications to multiple environments and regions effortlessly.
Language Flexibility
SST supports multiple programming languages, including JavaScript, TypeScript, Go, Python, C#, and F#, providing developers with the flexibility to use their preferred language for building serverless applications.
Now that we have understood what SST is and some of its benefits, let's see the power of SST in action.
How to Configure AWS
Before we add SST we have to configure some AWS credentials. To do that, type the below command in your terminal:
aws configure
 AWS Configure
You'll be required to enter your AWS Access Key ID, Secret Access Key, Region name and output format. If you don't have these keys, please create an IAM user and enter the credentials.
How to Add SST to Your Next.js App
We can use SST in an existing Next.js app in drop-in mode or inside a monorepo app in standalone mode.
In this article, we'll create new Next.js project and add SST which follows drop-in mode installation using the commands below:
yarn create next-app
cd my-app
yarn create sst
yarn install
Note: You should ensure that you have the index.tsx file inside the /pages folder. Without the file, you'll get errors while deploying your app using SST. You don't need to make any changes to this file.
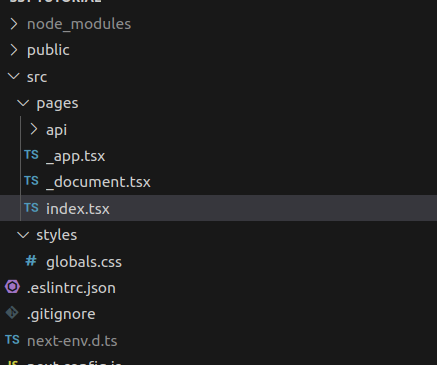 Folder structure
Once you run the above commands, SST will create two new files —sst.config.ts and sst-env.d.ts
We have to define all our infrastructure and stacks in the sst.config.ts file.
You can use these commands to run the app locally:
# Start SST locally
yarn sst dev

# Start Next.js locally
yarn dev
On executing the yarn sst dev command, you'll be asked to enter the stage name. Please enter your environment name. I'll use dev for this project's stage name.
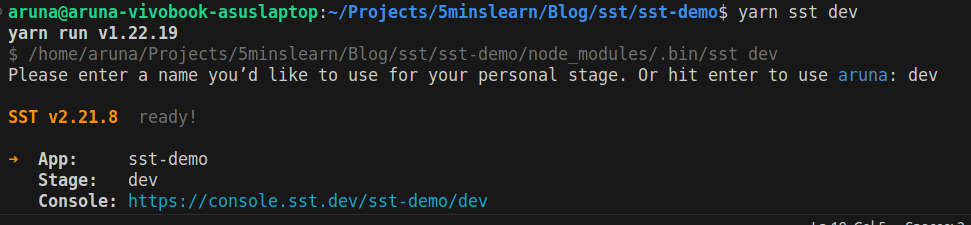 Start SST locally
Just sit back and watch. It will automatically create the necessary IAM roles, permissions and CloudFormation stacks.
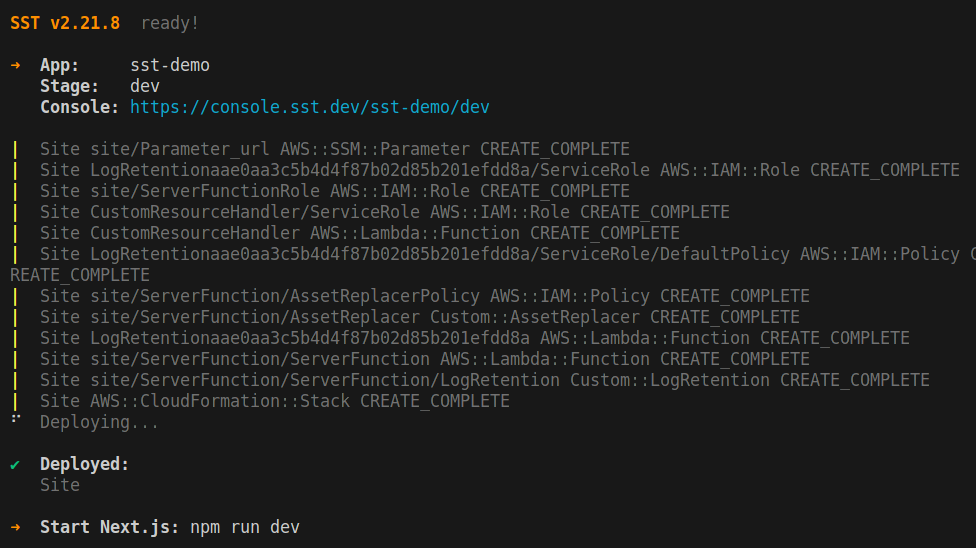 SST - Creating the neccessary IAM roles, permissions and stack
Notice in the image above that you can see the Console URL, https://console.sst.dev/sst-demo/dev. With the Console URL, you can view real-time logs, invoke functions, replay invocations, make queries, run migrations, view uploaded files, query your GraphQL APIs, and more!
Just awesome right? I would recommend you to visit the official documentation to learn more about the services they offer.
Next, start the Next.js site by running yarn dev. You should see the default page after that.
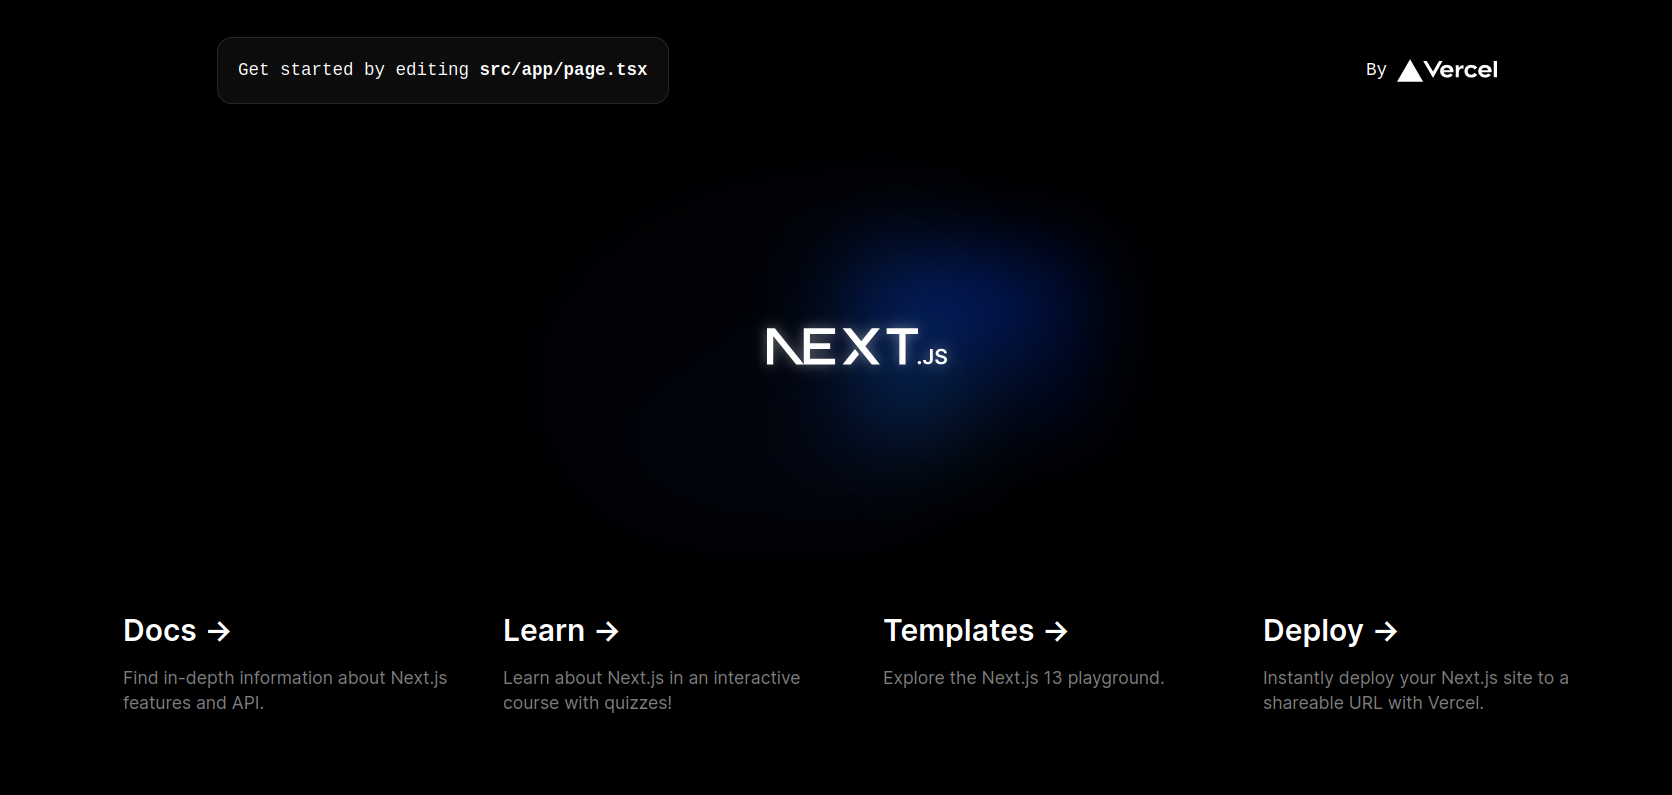 Next.js default page
Our Next.js app is now ready to be deployed to AWS! Just run the following command and see the magic.
yarn sst deploy --stage prod
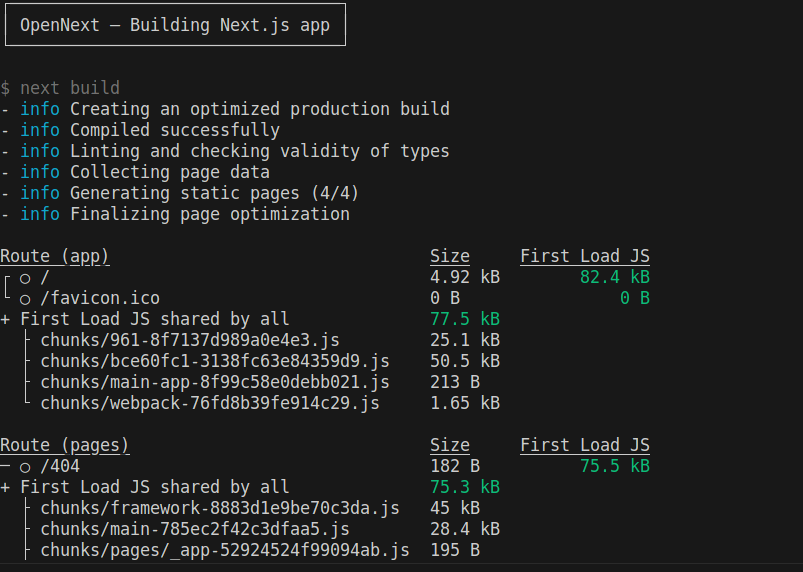 OpenNext building the Next.js App
It will automatically start building the app using OpenNext , deploy it to AWS using CDK, and output the CloudFront URL. Click on the link and you should be able to see your app up and running.
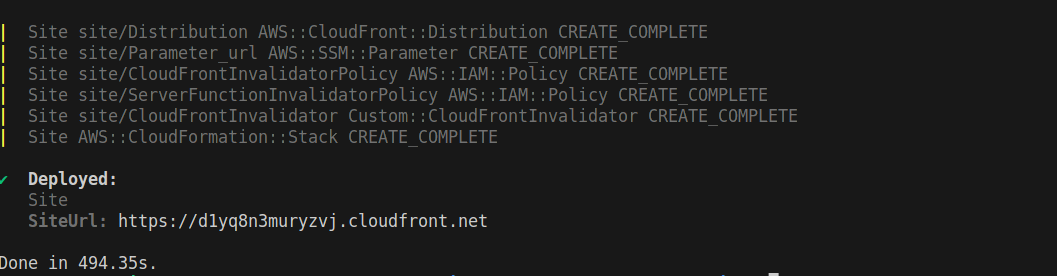 SST - Deployed changes and outputs CloudFront url
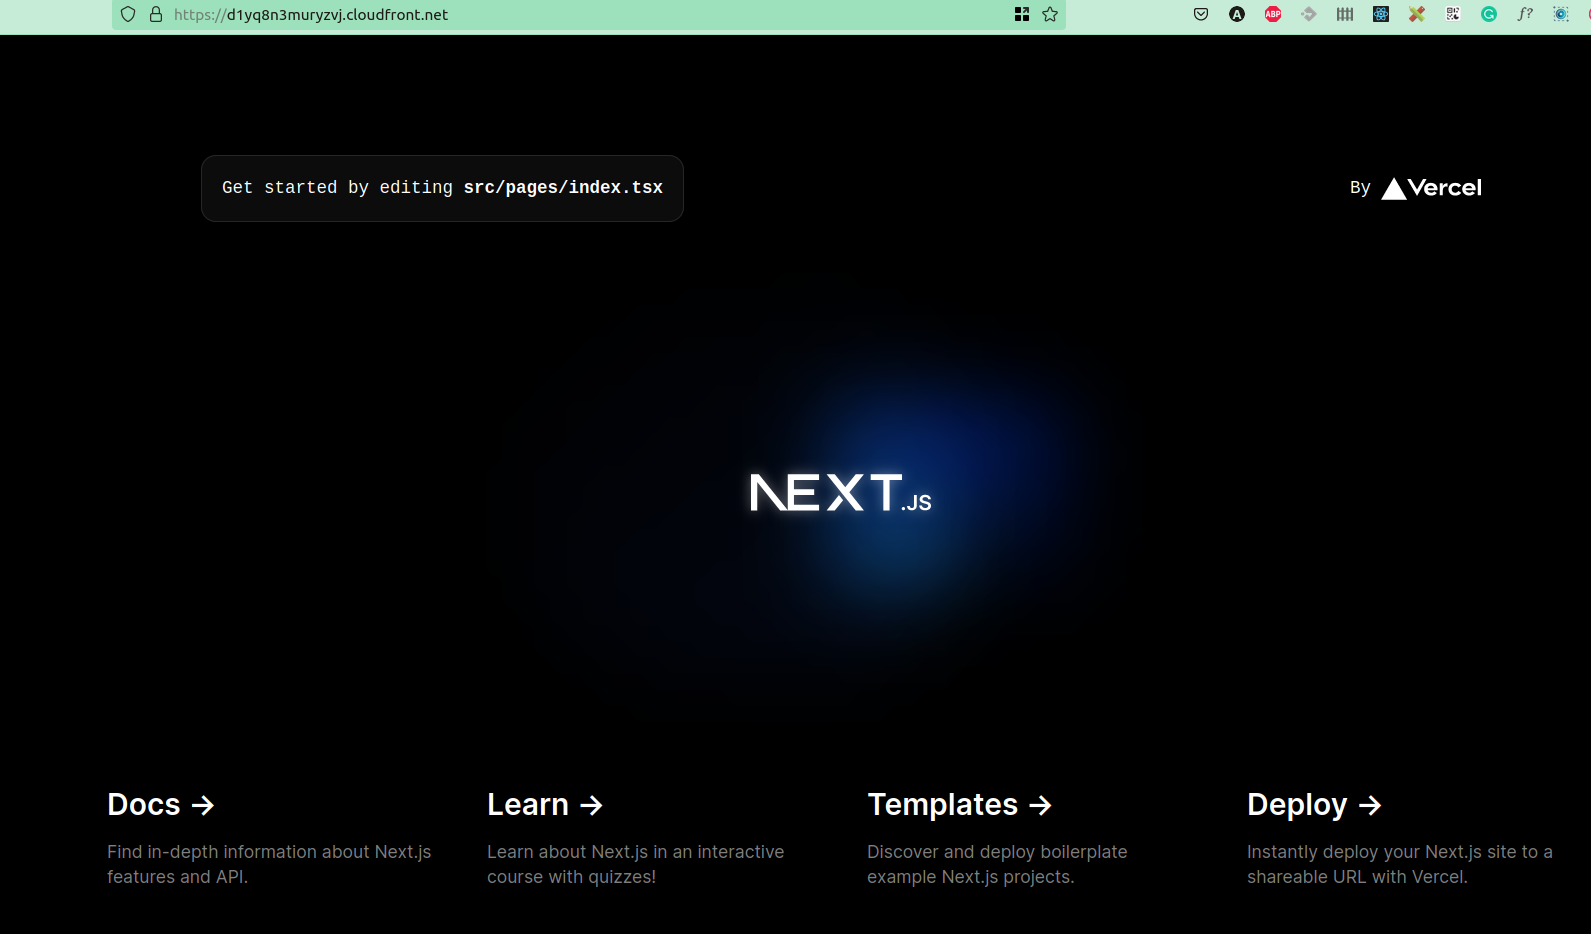 The Next.js app up and running
How to Create Infrastructure using SST
To create an infrastructure, we simply need to edit sst.config.ts and import any AWS services like S3 bucket, RDS, API Gateway, and so on from sst/constructs
Let's add a simple S3 file upload feature. Open sst.config.ts file and add the code below:
import { SSTConfig } from "sst";
import {Bucket, NextjsSite } from "sst/constructs";

export default {
  config(_input) {
    return {
      name: "sst-tutorial",
      region: "us-east-1",
    };
  },
  stacks(app) {
    app.stack(function Site({ stack }) {
      const bucket = new Bucket(stack, "public");
      const site = new NextjsSite(stack, "site",{
        bind:[bucket],
      });
      stack.addOutputs({
        SiteUrl: site.url,
      });
    });
  },
} satisfies SSTConfig;
Here, we're creating a new public S3 bucket and binding it with our NextjsSite.
Let's edit our index page to add file upload feature.
How to Upload Files to S3 using SST
To upload a file to S3, we need to generate a pre-signed URL. To do that, we need to add this package @aws-sdk/s3-request-presigner in our repo.
yarn add @aws-sdk/s3-request-presigner
Open index.tsx file and create a function called getServerSideProps above the Home function, as shown in the below code snippet.
...
import { Bucket } from "sst/node/bucket";
import { getSignedUrl } from "@aws-sdk/s3-request-presigner";
import { S3Client, PutObjectCommand } from "@aws-sdk/client-s3";
...
export async function getServerSideProps() {
  const command = new PutObjectCommand({
    ACL: "public-read",
    Key: crypto.randomUUID(),
    Bucket: Bucket.public.bucketName,
  });
  const url = await getSignedUrl(new S3Client({}), command);
  const bucketName = Bucket.public.bucketName
  console.log(bucketName)
  return { props: { url } };
}
Update the Home() function with the following code.
import styles from "@/styles/Home.module.css";
export default function Home({ url }: { url: string }) {
return (
<main className={styles.main}>
<div className={styles.center}>
<a
href="https://5minslearn.gogosoon.com/?ref=github_sst_app"
className={styles.card}
target="_blank"
rel="noopener noreferrer"
>
<h2 className={inter.className}>
5minslearn <span>-></span>
</h2>
<p className={inter.className}>Learn tech in 5mins</p>
</a>
</div>
<form
className={styles.form}
onSubmit={async (e) => {
e.preventDefault();
const file = (e.target as HTMLFormElement).file.files?.[0]!;
const image = await fetch(url, {
body: file,
method: "PUT",
headers: {
"Content-Type": file.type,
"Content-Disposition": `attachment; filename="${file.name}"`,
},
});
window.location.href = image.url.split("?")[0];
}}
>
<input name="file" type="file" accept="image/png, image/jpeg" />
<button type="submit" className={inter.className}>
Upload
</button>
</form>
</main>
);
}
I added an input with a file type and a button for submitting the form. The selected image will be uploaded to S3 when the form is submitted. It's time to deploy the changes.
To deploy the changes, run the yarn sst deploy command.
Once deployed you'll see a page like this:
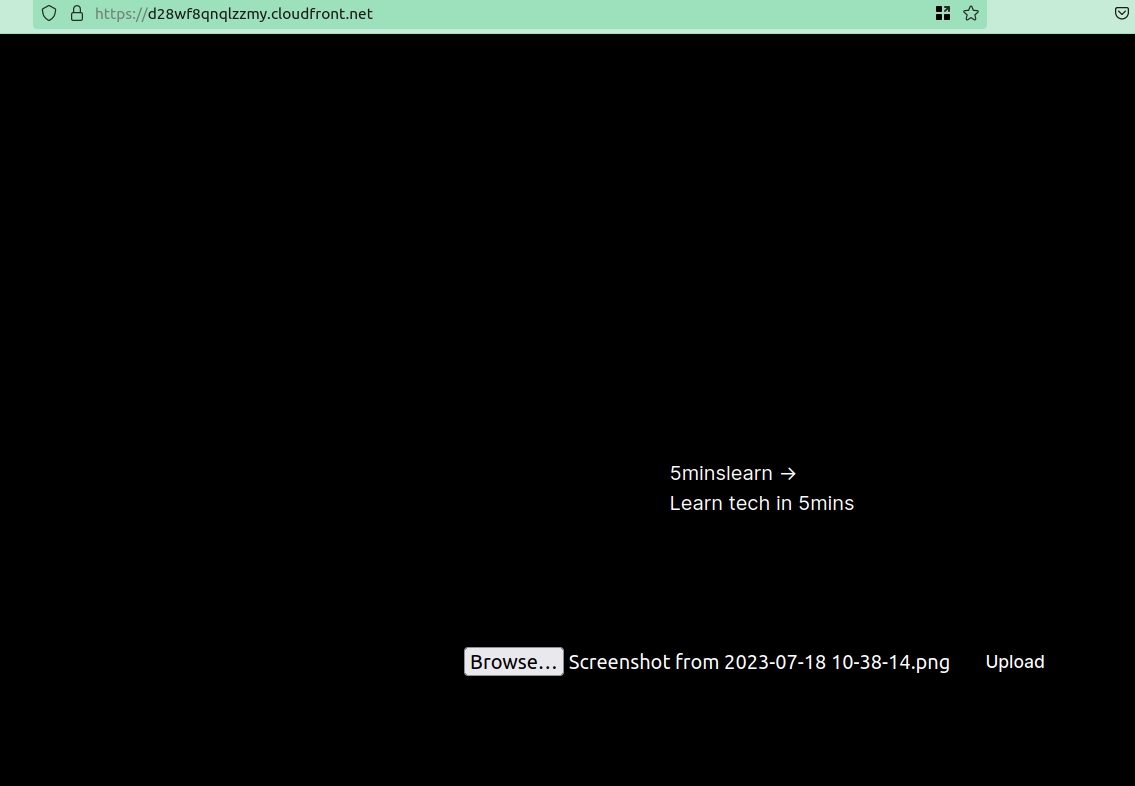 Next.js up and running with updated changes
Now you can upload any image and check your S3. The selected file will be uploaded to your S3 bucket.
Great, we have successfully deployed the changes. But we still have the random URL generated by CloudFront which may be difficult to memorize for humans. Let's configure a custom domain.
How to Configure Custom Domains
To configure custom domains, we need a valid domain or sub-domain. You can create one using Route 53 or your preferred domain provider like GoDaddy, Namecheap, and so on.
If you have a domain on an external DNS provider, you'll need to create an SSL certificate on AWS Certificate Manager (ACM).
I have my domain on Cloudflare. If you have yours with other providers like Namecheap or GoDaddy, then the steps below should still work for you.
How to Point CNAME to CloudFront
- Login into your DNS provider.
- Add a CNAME. In my case, I used
awsas the name because my domain isaws.gogosoon.com, and target as the CloudFront URL withouthttps.

We've successfully pointed our CNAME to CloudFront. Now let's create an SSL certificate for our domain.
How to Create ACM Certificate
ACM certificates are managed SSL/TLS certificates that can be used with a variety of AWS services, including CloudFront.
However, there is a specific requirement for using ACM certificates with CloudFront: the certificate must be created in the US East (N. Virginia) region (us-east-1). The reason for this is that CloudFront has all of its provisioning/administrative infrastructure based in us-east-1.
Quoting from their documentation:
To use a certificate in AWS Certificate Manager (ACM) to require HTTPS between viewers and CloudFront, make sure you request (or import) the certificate in the US East (N. Virginia) Region (us-east-1).
Here are the steps to follow to create an ACM:
- Login into AWS console.
- Search for certificate manager, switch to us-east-1 and click on "Request Certificate" in the sidebar.
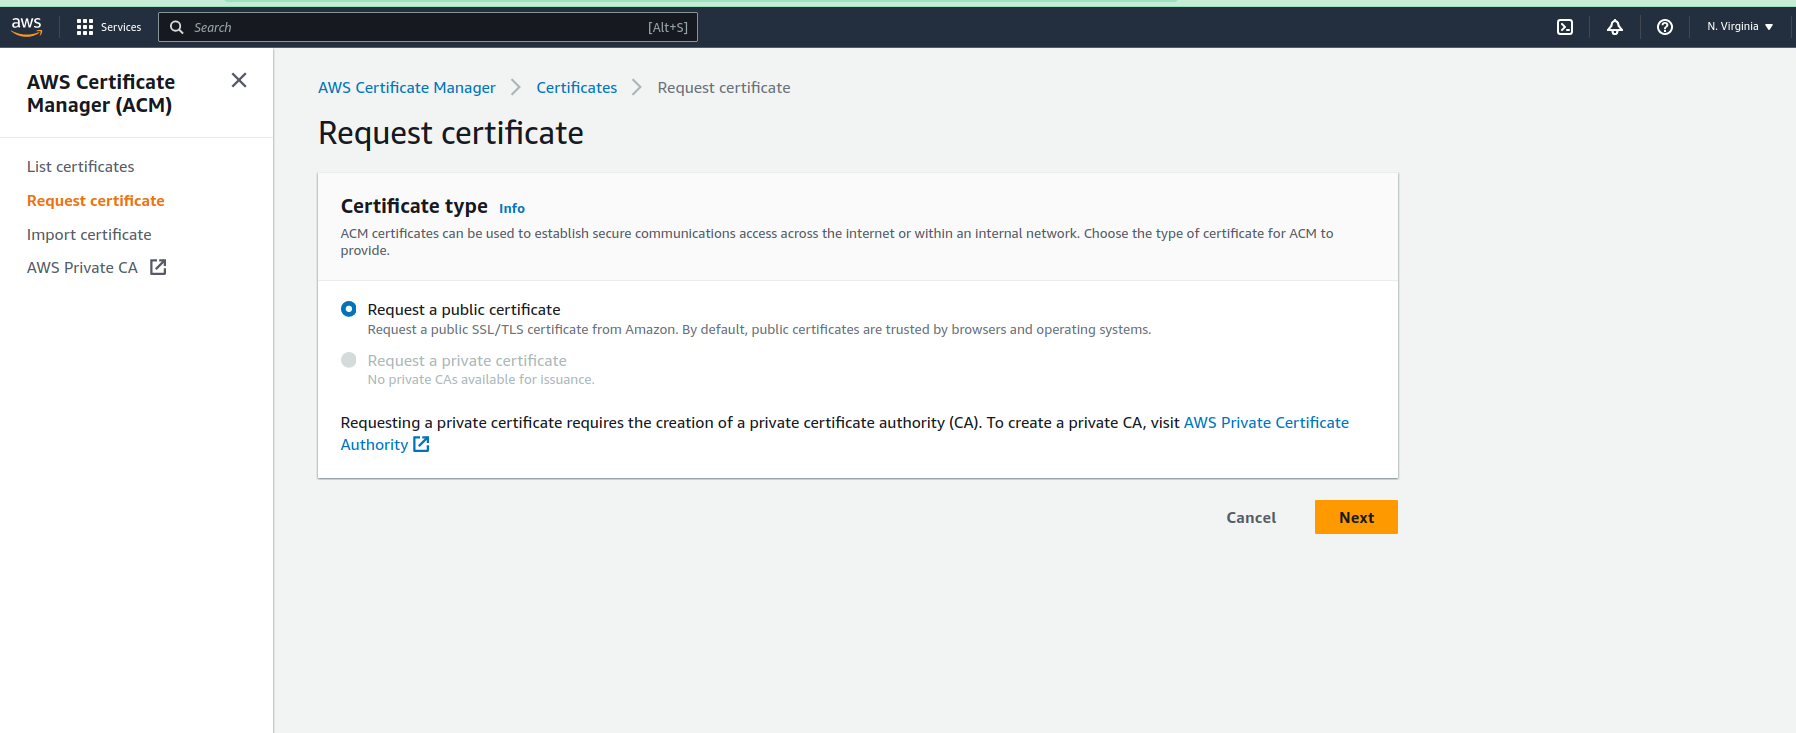 AWS ACM - Request Certificate
- Enter the domain name you pointed to in your DNS provider configuration. Under "Validation method", select "Email validation" and click next.
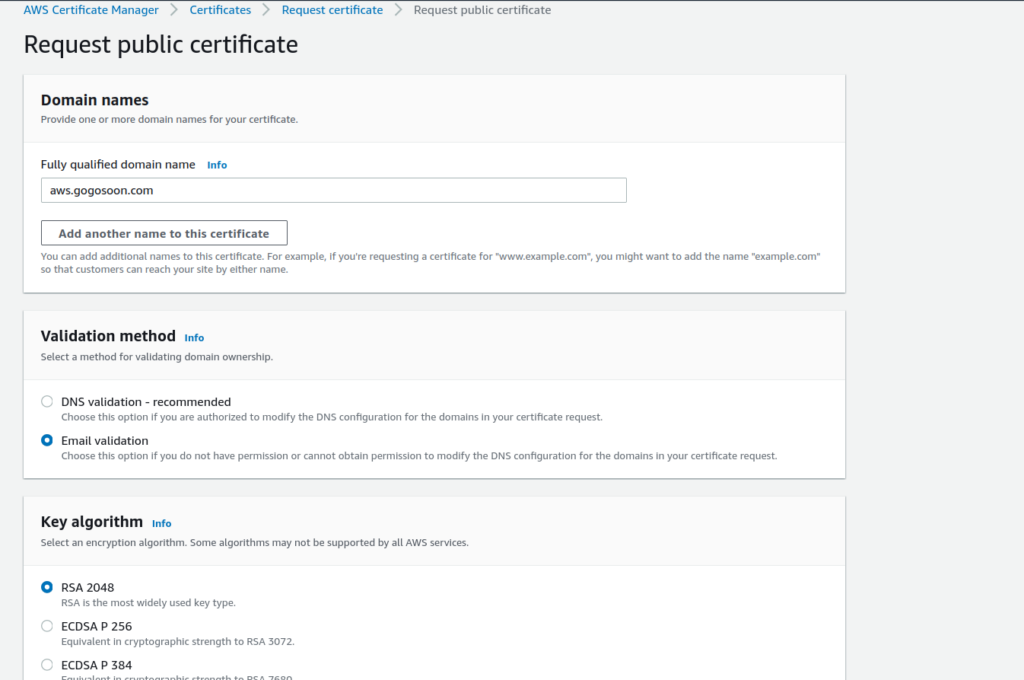 AWS ACM - Request Certificate
- A certificate with the status of "Pending Validation" will be created. You'll receive an email from AWS with a link to validate the request.
 ACM certificate with pending status
- Once you click on the link in the email, the status of the certificate will be changed to "Issued". Copy the ARN – we'll need it in the next steps.
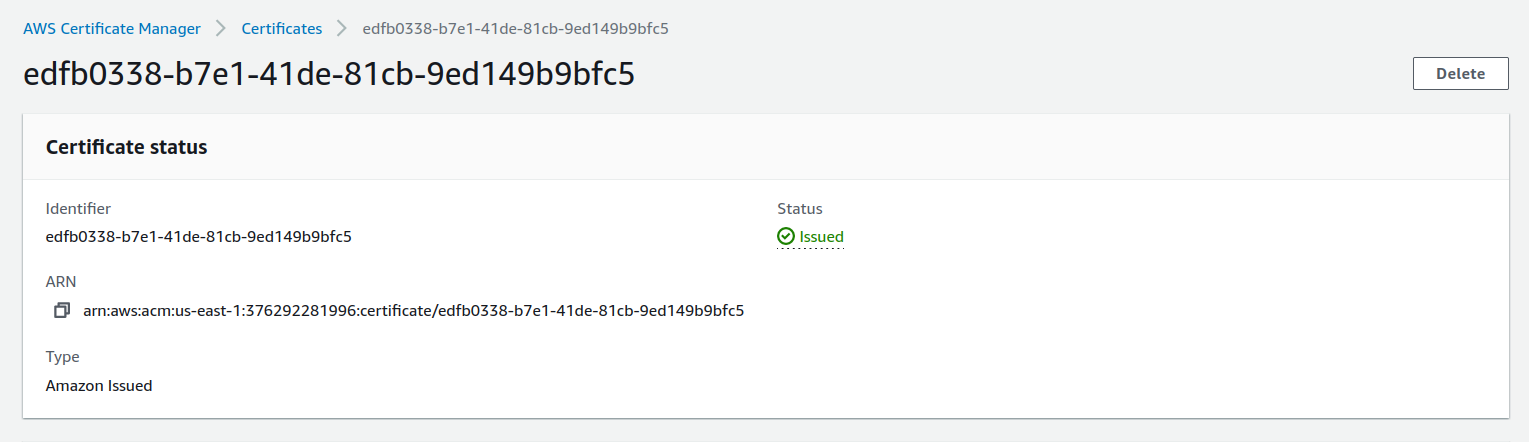 AWS ACM certificate issued
Now that we've created the certificate successfully, let's create the alternate domain for CloudFront.
How to Create an Alternate Domain for CloudFront Distribution
- Log into the AWS Console and search for CloudFront.
- Click on the distribution created by SST.
- In the "General" tab, click the "Edit" button.
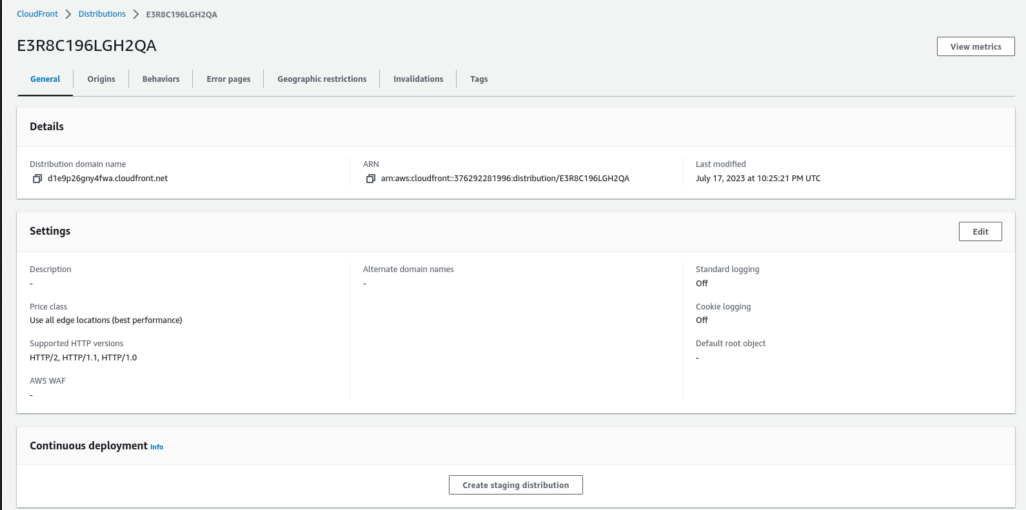 Edit CloudFront distribution
- Enter the alternate domain name and select the certificate that we created. Leave all other options as default and click on the "Save changes" button.
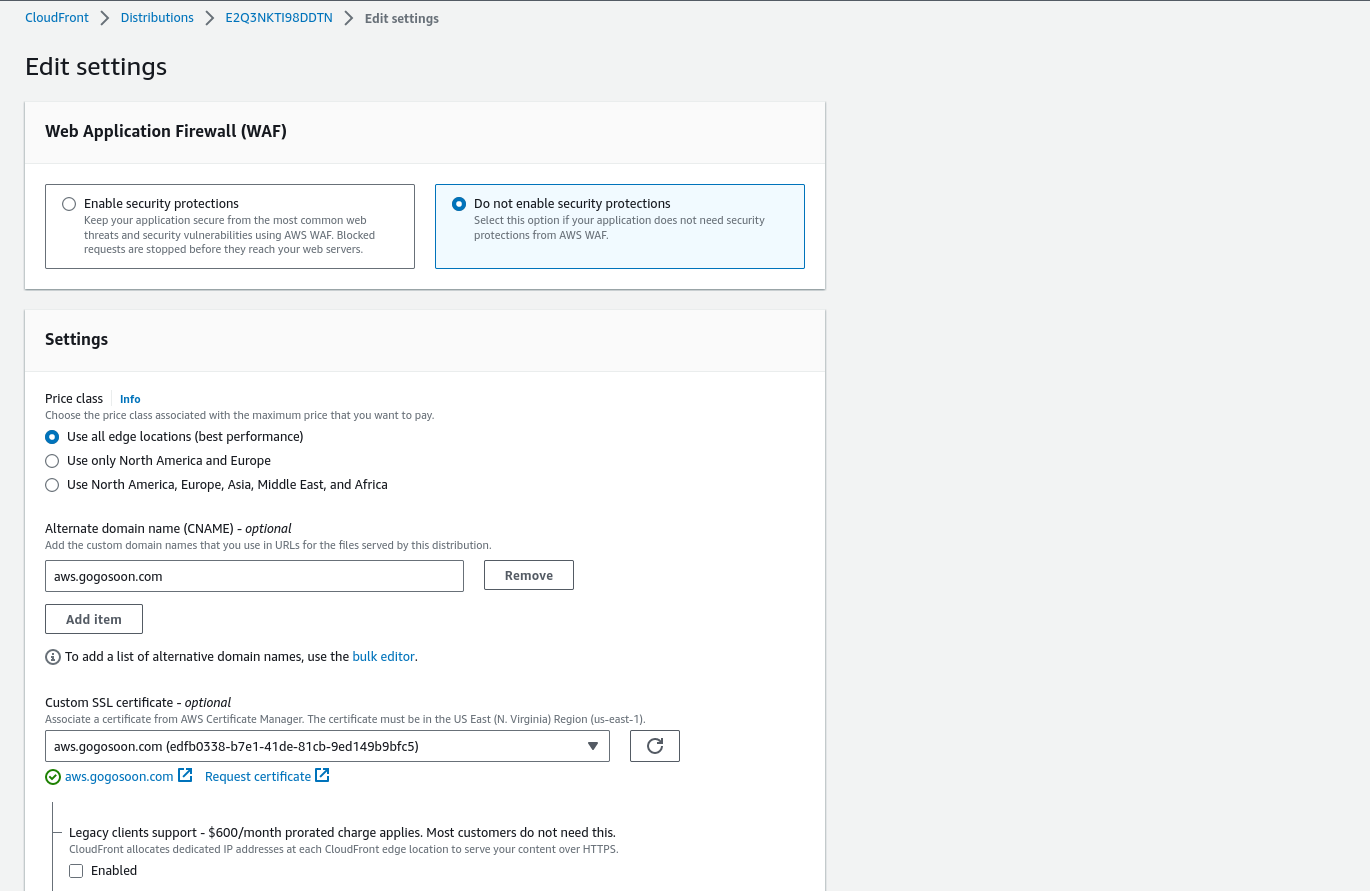 Add alternate domain for CloudFront distribution
All set! Let's edit our app to deploy the changes to our custom domain.
How to Configure External Custom Domain using SST
Update the sst.config.ts file with the following code. Paste the ARN you copied while creating the certificate as a value for the variable certArn. Replace the domainName with your domain:
import { SSTConfig } from "sst";
import {Bucket, NextjsSite } from "sst/constructs";
import { Certificate } from "aws-cdk-lib/aws-certificatemanager";


export default {
  config(_input) {
    return {
      name: "sst-tutorial",
      region: "us-east-1",
    };
  },
  stacks(app) {
    app.stack(function Site({ stack }) {
      const bucket = new Bucket(stack, "public");
      const certArn = 'Paste the certificate arn'
      const site = new NextjsSite(stack, "site",{
        bind:[bucket],
        customDomain: {
          isExternalDomain: true,
          domainName: "aws.gogosoon.com",
          cdk: {
            certificate: Certificate.fromCertificateArn(stack, "MyCert", certArn),
          },
        },
      });
      stack.addOutputs({
        SiteUrl: site.customDomainUrl || site.url,
      });
    });
  },
} satisfies SSTConfig;
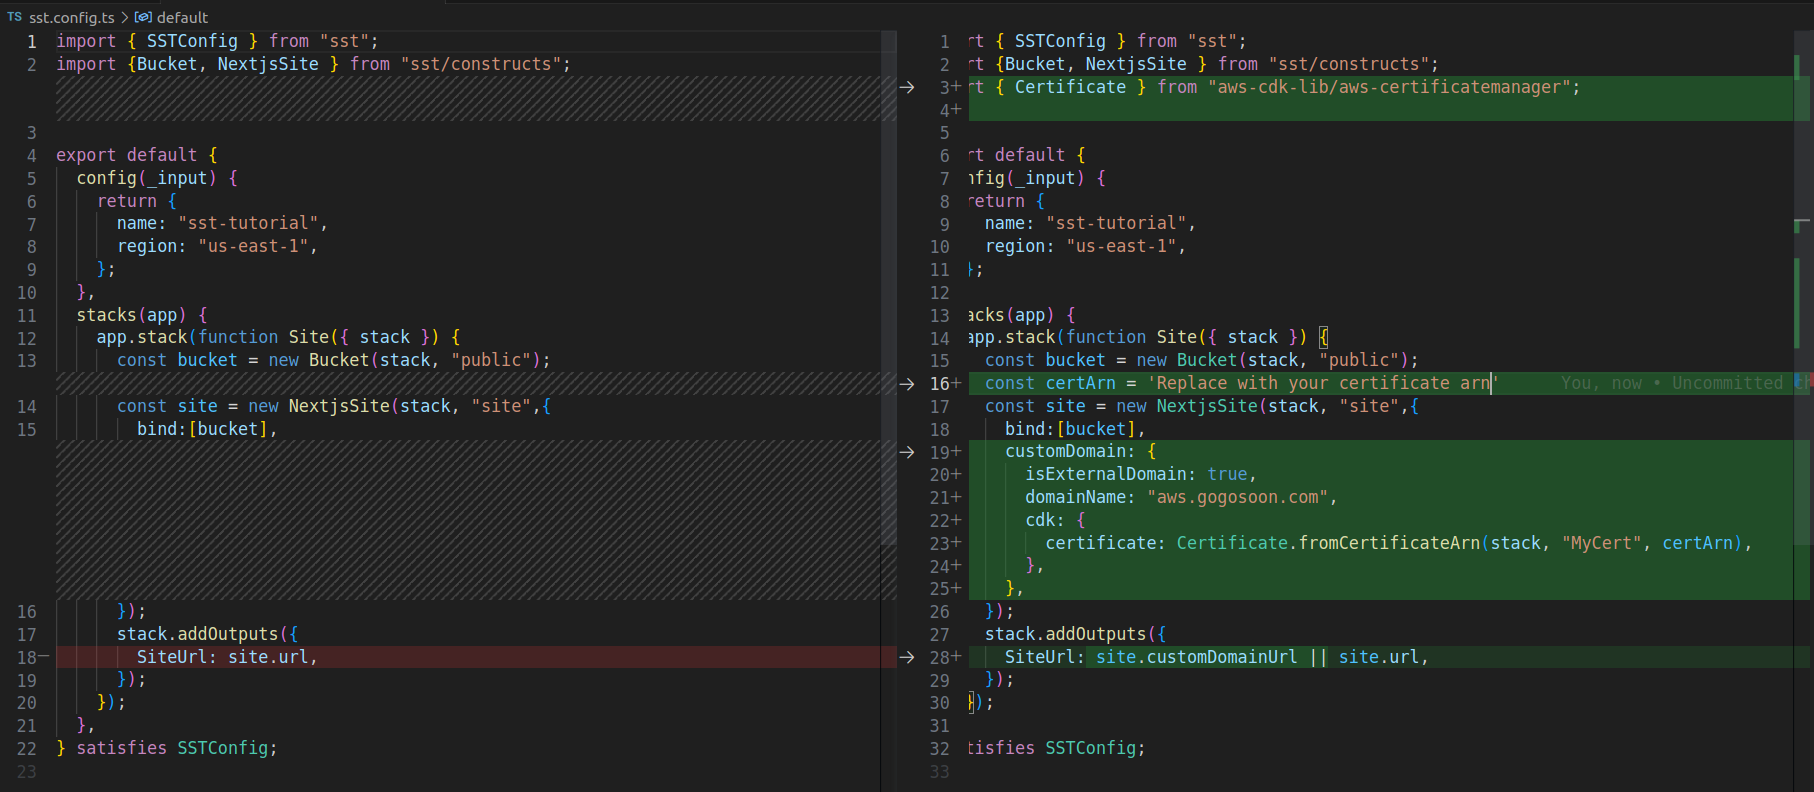 sst.config.ts - File changes
Run yarn sst deploy to deploy the changes to a custom domain. Once deployed, you should have the app running on the custom URL.
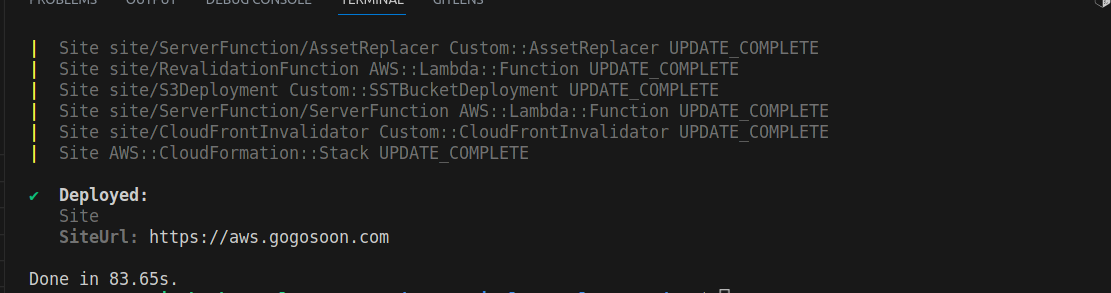 Next.js deployed with custom domain using SST
 Next.js app up and running with custom domain
Conclusion
Voila! Our Next.js app is now deployed to AWS, and we've connected it with our custom domain. Please check out the source code here.
The SST framework provides an excellent toolset for deploying serverless applications, contributing significantly to development speed, scalability, and error handling.
Feel free to explore more about SST and its potential in transforming your cloud development experience. Happy coding!
If you wish to learn more about AWS Services, subscribe to my email newsletter (https://5minslearn.gogosoon.com/) and follow me on social media.