
By Eric Burel
Why you need this?
Because JS + Python + Mongo = full data development
I am a Meteor developer. More precisely I use Vulcan.js, but that’s a whole other story. Meteor is a full-fledged Node.js framework, pretty nice for SaaS, real-time apps, prototyping, management softwares and a lot of other use cases.
As a default, it works with MongoDB. MongoDB is a NoSQL database management system (DBMS). It stores documents as JSON and its shell uses JavaScript, which are some reasons why it is so appreciated by Node.js developers.
There is a neat tool called Meteor Up to automatically deploy Meteor apps and the associated Mongo databases on production servers. Neat is actually an understatement, it’s freakin’ awesome.
And I am also a Python developer. Python is excellent for web scraping and data science. It’s both easy to use and suited for high performance.
Sometimes, I like to use both Python to extract and process data and Meteor to create the user interface. I call this “full data development”, as it goes from the raw data source to the end user interface.

But there is a problem: Meteor Up currently does not expose the Mongo database, only the local Meteor app can connect to it. So I cannot plug my Python servers to my Meteor managed databases out-of-the-box :(
A paid service would do the job by providing an URL for the hosted database, such as this one:
mongo://username:password@somedomain.com:27017
But why spend money when you can struggle for hours to set up your own Mongo database on AWS using Docker, and learn tons of useful tricks in the process? It’s even better if someone, say, me, does it first and writes a lengthy tutorial to make things easier for you!
Important note: it’s perfectly fine if it takes you multiple sessions to finish this looong tutorial. Don’t give up! The result is worth the hassle, as mastering Docker and AWS are two skills very appreciated by employers, and very useful in real life. Post your questions as comments if you have any, I’ll do my best to answer all of them.
1 — Let’s discover Docker
Our first container
I invite you to read Docker’s official installation doc here and install it, which takes only a few minutes. Then, let’s play a little. Run the following commands in your terminal and observe the results:
docker run --name my-lame-db -d mongo
docker ps

As simple as that, we just created an isolated container that runs Mongo!
You can access the official Mongo image Docker files somewhere in this folder hosted on GitHub to understand better what happens here. According to the last lines of the Dockerfile our db is available on port “27017” as a default:
EXPOSE 27017 CMD ["mongod"]
But Mongo exposes itself on this port INSIDE the container. But the container is isolated, so only programs INSIDE the container can talk to Mongo. Our database is up and running but trapped alone in its container :/
That’s lame! Let’s free it!
Open the container, map the ports
If you want to access Mongo from OUTSIDE the container, you’ll have to map the exposed port and a port of the machine. The -p option is specifically meant for this:
docker run -p 27017:27017 --name my-local-db -d mongo
If you had a Node server, you’d write docker run -p 80:3000 my-node-app for example. Your server running on port 3000 would thus be available through HTTP (port 80). First the container port, then the image port.
Let’s try to access our db in the browser, just for fun:
docker stop my-awesome-db and docker start my-awesome-db commands. You’ll see this address becoming not available and then available again.
As expected, you can’t connect to your db through the browser. But this rejection message comes from Mongo, which is a good sign. Let’s try again using the official CLI tool:
mongo localhost:27017 #or just "mongo", as this is the default uri
You can access your database shell, we are making progress!
But… I want my database to be on a distant server, not to run locally on my isolated machine.

2 — Access AWS from your terminal
We picked AWS as our cloud provider because it is widely spread, but keep in mind this is just an example. AWS offers to new users free hosting for 12 months for one server instance, so you don’t need to pay to follow this tutorial. The steps are mostly similar if you pick another hosting service.
First step is to create a programmatic access to Amazon Web Services using the IAM service (Identity and Access Management). This key will be used by Docker Machine (see below) to do some operations, such as creating an AWS EC2 instance for you.
Setting this up is outside the scope of our tutorial. Therefore, I invite you to read the first part of this article from Vishal Kumar. Follow the first 8 steps until you get AWS credentials. The rest of the article is interesting too but a bit advanced at this point and targeted to the MEAN stack. Let’s focus on Mongo only for the moment.
At this point you should have your credentials.
[default]
aws_access_key_id = [access key from the downloaded credential file]
aws_secret_access_key = [secret access key from the downloaded credential file]
Keep them safe! You will have to recreate a key pair if you lose them… and you certainly DON’T want anybody to discover them either!

3 —Put Docker in the cloud with Docker Machine
Never need the AWS console again
Docker Machine is an utility to manage the different machines hosting your containers (local machines, cloud servers). Hence the name, Docker… Machine. You can set it up for multiple cloud providers and it works very well with AWS.
The official documentation gives all the information you need for AWS. I just jumped the VPC part, it’s a bit too advanced for the moment, but the rest is very useful.
Create the EC2 instance
You will end up writing a command similar to the one below.
docker-machine create \
--driver amazonec2 \
--amazonec2-access-key ***** --amazonec2-secret-key **** \
--amazonec2-region ***** \
--amazonec2-open-port 27017 my-awesome-server
Let’s break it down.
- I use the EC2 driver, since I am an AWS user.
- I pass the credentials inline as I have multiple accounts to manage
- I pass the region where I usually host my apps (“eu-west-3” for me),
- Don’t forget to open port 27017 (
--amazonec2-open-port 27017), otherwise AWS will block connections even if your container is correctly set.
If you did not specify the region correctly, you may have trouble finding your instance on the AWS console. I still don’t get why you can’t have all zones displayed easily in this interface, but that’s how it works.
You should also be able to get rid of the access key and secret key somehow by setting your local machine AWS credentials, or store them as environment variables. I personally prefer to have them in the command line as I may replace them with environment variables.

At this point, you can check the AWS console and see your instance set as expected!

4 — Run a Mongo container on your instance
Activate the correct machine
Now the tricky part, it took me a while to get it right. Docker Machine’s role is to manage your distant machines, launch instances and install Docker on it. That’s all. It’s NOT Docker.
So you still have to use Docker. But how does Docker know which machine to connect too?
Try this and look at the result:
docker-machine env my-awesome-server
It will show a small shell script to setup environment variables.

It also tells you to run this command:
eval $(docker-machine env my-awesome-server)
This will simply run the displayed script in your shell. When those env variables are set, your machine becomes “active”.
Type docker-machine active to check that the correct machine is listed.
\o/
Now type docker info , you should see that the Name matches your app. Magic! Docker is “connected” to the active machine, configured by Docker Machine.
We can now run the same command as earlier:
docker run -p 27017:27017 --name my-awesome-db -d mongo .
It will create the database not on our local machine, but on the distant server. As simple as that!
Run this command to get your machine IP:
docker-machine ip my-awesome-server
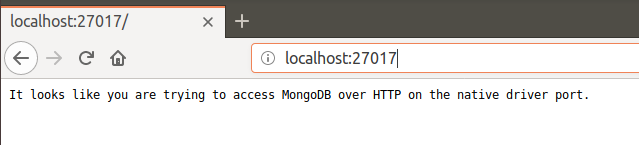
And open the address http://<ip-given-by-docker-machine>:27017 : you should get a beautiful error message, telling you that you are trying to access MongoDB over HTTPS: it works!!!
Run mongo <ip-given-by-docker-machine>:27017 … and… you are in ! Congratulations, you just setup your Docker container on a production server.
Ok now, we definitely DON’T want the whole world to access our db, so next step is setting up authentication.

5 — Setup authentication — 2 containers solution
Sorry but you can already delete the container you’ve just created (exercise: I let you figure out the container stopping and removing commands). It was just an example. Sadly, you won’t be able to setup auth with it.
Stay focused because the process is a bit trickier than you would expect:
- We will create a first container, let’s name it “Container #1”, WITHOUT auth.
- We will setup this container so data is saved on the server disk (that’s an important step), create and admin, and delete the container.
- We will create a second container, “Container #2” WITH auth. The admin user credentials will still be valid, because they are saved on the disk.
There might be simpler solutions I am not yet aware of, for example by providing the admin user credentials during the container creation, so feel free to comment if you are a Docker/Mongo superhero! And a one container solution is also provided in the annexes at the end of the article.
Share data between containers
At this point you should think “well, containers are isolated, so how can Container #1 and Container #2 share the same admin user”? And you are right. The solution lies in storing files on the server.
Remember when we mapped ports, so that the container’s open port maps Mongo’s port? We will apply the same logic to the file system: we can map folders on the container and folders on the server.
Let’s add an option to our command, and let’s call it the Final command for Container #1:
docker run \
-d \
-p 27017:27017 \
--name my-awesome-db \
-v ~/dataMongo:/data/db mongo \
mongod
Smart! Now when our Mongo containers will read/write their data in data/db they will also be available to the host server, in the ~/dataMongo folder (host folder first, then container folder).
Create the admin user
It’s all in the title: you will now connect to your newly created Mongo instance and create the admin user.
docker-machine ip my-awesome-server
mongo <resulting-ip>
Now you should be connected to your database shell. You simply need to create a super admin user:
db.createUser(
  {
    user: "admin",
    pwd: "yourpassword",
    roles: [ { role: "userAdminAnyDatabase", db: "admin" } ],
    passwordDigestor : "server"
  }
)
You can look at the official doc, this article and this stack overflow thread for more information.
Also, see this thread about the difference between the root role, which is an actual super admin, and userAdminAnyDatabase role, which is a kind of “user creator”.
Delete the container and activate auth
We can remove Container #1, it’s role was only to let us access a Mongo shell on our server, but it lacked authentication.
docker stop my-awesome-db
docker rm my-awesome-db
We can then create our final container, with authentication activated. Since it will be connected to the server file system too, the data created using Container #1 are still available, including our admin user.
We simply add the --auth option to the initial command, it tells Mongo… well, to enable authentication. You guessed right.
Final command for Container #2:
docker run \
-d \
-p 27017:27017 \
--name my-awesome-db \
-v ~/dataMongo:/data/db mongo \
--auth
mongod
Now connect again to your Mongo instance and run:
db.createCollection('IAMAHACKER')
You’ll get a nice error message as expected!

And now try again while being authenticated:
mongo $(docker-machine ip my-awesome-server):27017 -u admin -p yourpassword
If it works, you are done! Congratulations ;)
Now what?
Your Mongo database is up and running in the cloud, safely isolated in its Docker container, and secured with username/password authentication.
The next steps will be plugging your applications to this database. Remember you can access your server IP using the command docker-machine ip my-awesome-server. You will certainly have to create additional users to administrate your databases.
Also, you probably won’t want anybody to connect to your database shell, even with authentication set. AWS will let you whitelist a few IPs, corresponding to your applications and your own computer, so that only trusted sources can connect to your database.
Below this article, you’ll find a glossary, the final script, and a one-container solution to setup authentication, and a few additional tips.
I hope you found this tutorial helpful! If it’s the case, don’t forget to clap ;) And please check out the annexes below…

Annex 1 — Final script
# Launch an EC2 instance
docker-machine create \
--driver amazonec2 \
--amazonec2-access-key ***** --amazonec2-secret-key **** \
--amazonec2-region ***** \
--amazonec2-open-port 27017 my-awesome-server
# Activate the instance
eval $(docker-machine env my-awesome-server)
# Create container 1
docker run \
-d \
-p 27017:27017 \
--name my-awesome-db \
-v ~/dataMongo:/data/db mongo \
mongod
# Connect to your DB
mongo $(docker-machine ip my-awesome-server):27017
# IN THE MONGO SHELL create a super admin
db.createUser(
  {
    user: "admin",
    pwd: "yourpassword",
    roles: [ { role: "userAdminAnyDatabase", db: "admin" } ],
    passwordDigestor : "server"
  }
)
# QUIT THE MONGO SHELL
# Delete the container and recreate one with auth
docker stop my-awesome-db
docker rm my-awesome-db
# Run the final container
docker run \
-d \
-p 27017:27017 \
--name my-awesome-db \
-v ~/dataMongo:/data/db mongo \
--auth \
mongod
# IF CA FAILS WITH PERMISSION DENIED ERROR
# see https://github.com/kubernetes/minikube/issues/3083
# sudo vim /var/lib/snapd/apparmor/profiles/snap.docker.docker
# Add following line inside file (e.g alongside with other "owner" lines):
# owner @{HOME}/.docker/machine/machines/** r,
# sudo apparmor_parser -r /var/lib/snapd/apparmor/profiles/snap.docker.docker
Annex 2 — Neat tricks I wish I did not have to learn by myself
- If you are in devops, you will eventually get a muscle memory of Docker commands. Otherwise, if you setup projects for production only once a year, WRITE DOWN EVERYTHING. For example, you could write a Medium article.
Seriously I’ve lost a few hours of work because I did not write down my progression. The next week I had forgotten everything. Docker is not trivial. - I ran into a permission issue with cert authentication when using Docker Machine, the solution is in the comments of this thread: https://github.com/kubernetes/minikube/issues/3083
docker ps -awill print all containers, including inactive ones, whiledocker psonly prints active containers.- An image is NOT a Dockerfile. A Dockerfile is a configuration file. Think of the blueprint of a boat. An image is a built Docker file. Think of a boat THAT IS NOT YET in the sea. A container is an image that you are running. Think of a boat ROAMING THE SEAS.
Differences between a Dockerfile, Docker Image and Docker Container
_Quick Jump: It All Starts With a Dockerfile | If You Build It, They Will Run (Usually) In casual conversation you may…_nickjanetakis.com
docker pull mongowill for example pull a Mongo Docker image, already built. But how to display the Dockerfile associated? You can’t. If you want to check it, you can look for the relevant GitHub repository (if it exists). That’s the exact same relation between an installed NPM package and its code.npm installdoes install a build (an “image”) but does not necessarily download the code (a “Dockerfile” here), which usually lives on GitHub but can also be private.
How can I view the Dockerfile in an image?
_Hi, Looking at some images in the repository (this one, for example: https://hub.docker.com/r/filippobosi/mfi/) I do…_forums.docker.com
- On EC2, your instance IP can change over restarts! You’ll have to regenerate certs to keep connecting to the instance using
docker-machine regenerate-certs my-awesome-server
Annex 3— Setup authentication — one container solution
There is also a “one container” solution. It’s less instructive, but faster and requires only one container.
Note : if you already setup auth using the 2 containers approach, you are already done. If you still want to try the 1 container approach, you’ll need to create a new instance on EC2 or remove the ~/dataMongo folder of the server.
You still need to share your folders with the host, otherwise your data are tied to the container, which should not happen! Containers should be easily deletable without any data loss, so documents have to be stored elsewhere.
The idea is to connect to your server and access Mongo from there, instead of accessing Mongo from your local machine. It’s a very subtle difference but that’s what saves us one step.
If you connect to Mongo while being connected to your server, you will have more permission and will be able to setup an admin user even if auth is already set, as Mongo considers you as a “local” user. To rephrase it, since you were able to connect to the machine Mongo is running on, your AWS instance, Mongo already considers you as a “safe” user, as a hacker should not be there in the first place.
Run only the Final command for Container #2
docker run \
-d \
-p 27017:27017 \
--name my-awesome-db \
-v ~/dataMongo:/data/db mongo \
--auth
mongod
You can always ssh your server using docker-machine ssh:
docker-machine ssh my-awesome-server
Running mongo will open the Mongo shell. From there, you can add an admin user EVEN is auth is set, as we have done previously.
Annex 4— Glossary
A bit of devops people mumbling.
AWS: Amazon Web Services, a famous collection of cloud services with cheap offers.
AWS EC2: service for hosting server instances. That’s where you’d host your API or your whole website. Note that there might be services more suited for DB hosting but since EC2 is a must-know, it is my choice as a beginner.
Docker: it’s a… well, a program? In a nutshell that’s a bunch of things that helps you to run programs in containers, isolated from the other programs running on the server, without costing as many resources as a virtual machine. Containers are also helpful to manage services (APIs, databases etc.) on a daily basis: kill/restart it, create new instance in one line…
Container: that will be my simplified definition, think of a virtual machine without an OS. It provides isolation while not consuming too many computing resources.
Dockerfile: that’s a config file for docker, which defines all the programs/files/commands/options you need to run your app.
Docker Machine: a CLI to push your Docker containers where you want, in the cloud or on your own servers.
I am the co-founder of the French company Lebrun Burel Knowledge Engineering (LBKE) — https://www.lbke.fr
Always happy to talk about code, machine learning, innovation and entrepreneurship!