
In this article, I will walk you through the process of publishing a Next.js application on GitHub Pages.
What makes this guide particularly helpful is that I'll teach you how to integrate with GitHub Actions, too. This means your application will be automatically deployed every time you push code to your GitHub repository.
We'll just focus on deployment rather than building the entire Next.js app from scratch. For our example project, we'll use one from a previous article I wrote on freeCodeCamp in my article How to Build 2048 Game in React. I recently upgraded the codebase to use React 18 and added the Next.js framework.
If you want to see the end result of before reading the whole article, you can check it here.
As I mentioned above, we're using a project I made in my previous tutorial – and so that you can use it here, you can find its source code on Github. Feel free to clone or fork this repository, and just follow the steps in the tutorial to make it with me.
Prerequisites
Before we start, make sure you know a little bit about React and Next.js. We'll also be using GitHub, so it's important to understand some basics. You don't have to be an expert, just have some basic experience with these things.
Brief Introduction
Today we are going to explore two new things – GitHub Actions and GitHub Pages. If you haven't heard of them, let me quickly explain:
GitHub Actions are like little workflows that can do tasks on your projects. It's like having a helper that automatically does things you tell it to do. You can use Actions to run tests, for quality checks, or to build your application. In our case, we're going to use these workflows to publish my 2048 Game on GitHub Pages.
Now, what are GitHub Pages? Think of them like a web hosting option for developers and open source projects. You can use GitHub Pages to share your portfolios, host websites of your open-source projects, or just publish your pet projects like we're doing today.
If you want to learn more, you can read more on their official websites:
Now let's get our hands dirty.
Step 1 – Activate GitHub Pages for Your Repository
To publish our Next.js application, we have to activate GitHub Pages for our repository. Let's navigate to the Settings tab (1 in the image below), select Pages from the menu on the left-hand side (2), and find the dropdown menu that allows us to specify the deployment Source (3).
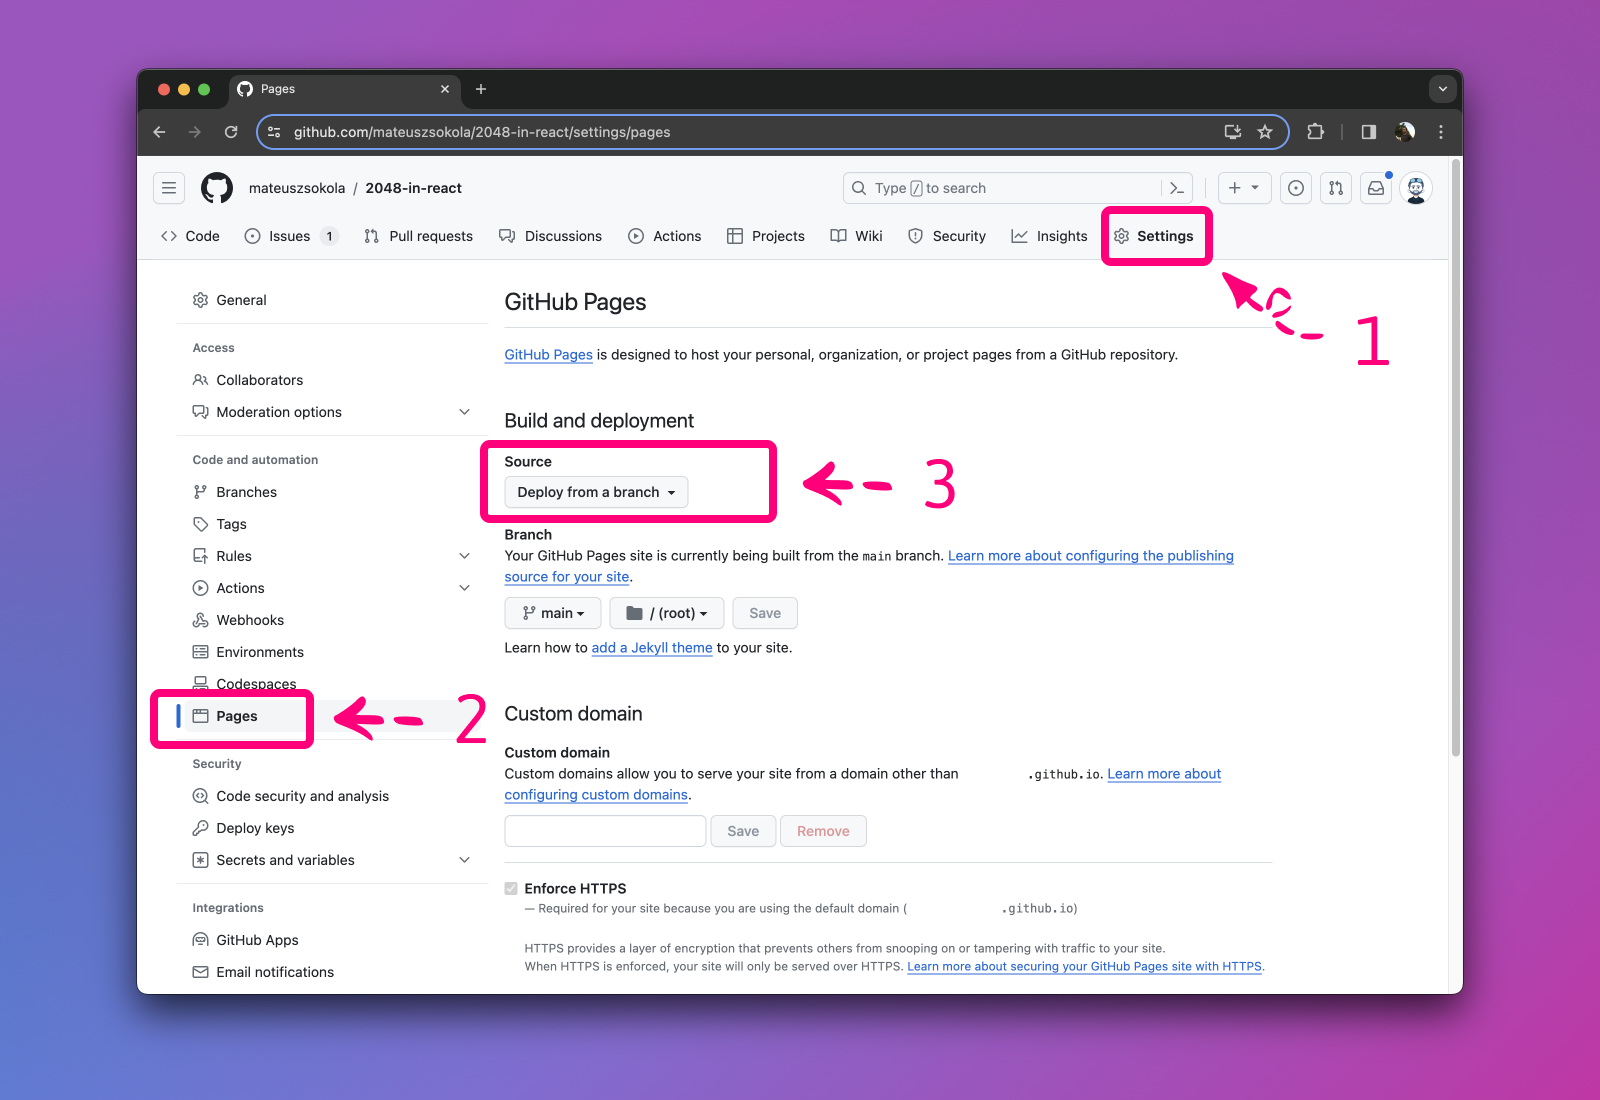 GitHub Project Settings
Now let's change the deployment Source to GitHub Actions.
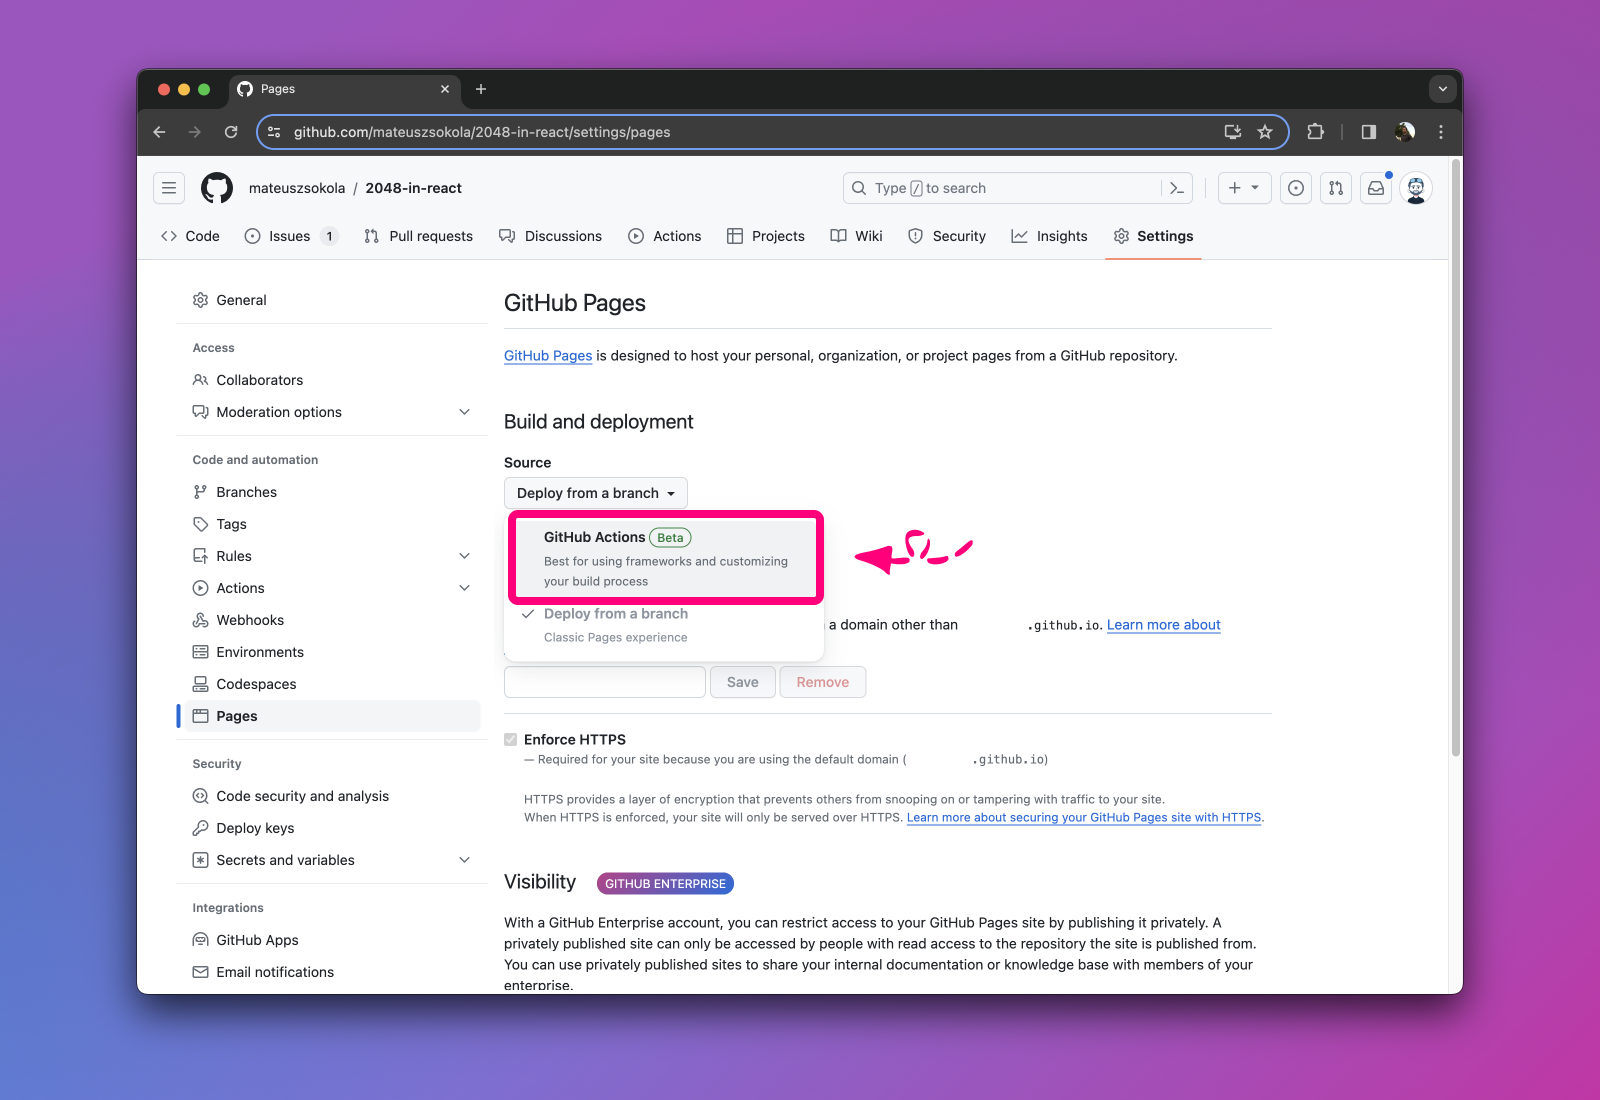 GitHub Project Settings – GitHub Pages configuration
From now on, our project has a dedicated page. We only need to create an action that will publish content there.
Step 2 – Configure the Next.js Build Process
Before deploying the Next.js app, it's important to change the build output. By default, Next.js uses Node.js to run the application, and this is incompatible with GitHub Pages.
GitHub Pages is designed to host static files, which means we can publish only HTML, CSS, JavaScript (and other static files) there. So we'll need to enable static page generation in Next.js.
To do so, we will change the output mode to export inside next.config.js:
/** @type {import('next').NextConfig} */
const nextConfig = {
  output: "export",  // <=== enables static exports
  reactStrictMode: true,
};

module.exports = nextConfig;
Now after running next build, Next.js will generate an out folder containing static assets for our application. In the next steps, we will take this directory and upload it to GitHub Pages.
Side note for seasoned Next.js developers: you can use getStaticProps and getStaticPaths to generate static files for each page in your pages directory.
Step 3 – Configure Base Path to Fix Missing Images
Github publishes Pages under a sub-path of a domain and takes the project name as a sub-path. It sounds confusing, so let's take a URL to my 2048 game as an example:
https://mateuszsokola.github.io/2048-in-react/
As you can see, Github assigned a dedicated subdomain for me called mateuszsokola (after my username). But the project is published under the sub-path, which in my case is /2048-in-react. Unfortunately, this will lead to issues with missing images and styles.
By default, Next.js maps all static assets the domain. This means that the favicon.ico file will be resolved to mateuszsokola.github.io/favicon.ico instead of mateuszsokola.github.io/2048-in-react/favicon.icon.
To fix this, we can set up a path prefix by adding basePath inside the next.config.js file:
/** @type {import('next').NextConfig} */
const nextConfig = {
  basePath: "/2048-in-react",
  output: "export",
  reactStrictMode: true,
};

module.exports = nextConfig;
In my case, it is /2048-in-react since my project is called 2048-in-react.
Remember to include the (/) at beginning of the path.
Step 4 – Configure Github Actions
Now it's time to set up Github Actions for Next.js deployment. Reusability is a good practice so I divided the deployment into two separate actions:
setup-nodeaction – This action is responsible for setting up Node.js and installing all dependencies. Having a standalone action for the Node.js setup enables us to reuse it for other pipelines. For example, in my 2048 Game, I have pipelines that run code linter and tests. Likely you will have more than one action as well.publishaction – This action handles the build process and publishes the Next.js app to GitHub Pages each time we merge code into themainbranch.
Now, you can understand why it's beneficial to split the deployment into two actions.
Let me begin by explaining the setup-node action. Here is the code:
# File: .github/workflows/setup-node/action.yml
name: setup-node
description: "Setup Node.js ⚙️ - Cache dependencies ⚡ - Install dependencies 🔧"
runs:
  using: "composite"
  steps:
    - name: Setup Node.js ⚙️
      uses: actions/setup-node@v4
      with:
        node-version: 20

    - name: Cache dependencies ⚡
      id: cache_dependencies
      uses: actions/cache@v3
      with:
        path: node_modules
        key: node-modules-${{ hashFiles('package-lock.json') }}

    - name: Install dependencies 🔧
      shell: bash
      if: steps.cache_dependencies.outputs.cache-hit != 'true'
      run: npm ci
Important: Put this file in the .github/workflows/setup-node directory in your project. Make sure to call the file action.yml.
What does this code do?
- It declares a
compositeaction. Thecompositeaction allows you to bundle multiple workflow steps into a single action, combining multiple run commands into a single reusable action. - It creates a new build environment and sets up Node.js 20 there.
- It installs npm dependencies and uses a caching mechanism to speed up this process.
These are the most important parts of the setup-node action. Now, let's move on to the last action, which is publish.
# File: .github/workflows/publish.yml
name: publish-to-github-pages
on:
  push:
    branches:
      - master

permissions:
  contents: read
  pages: write
  id-token: write

concurrency:
  group: "pages"
  cancel-in-progress: false

jobs:
  build:
    runs-on: ubuntu-latest

    steps:
      - name: Checkout 🛎️
        uses: actions/checkout@v4

      - name: Setup Node.js ⚙️ - Cache dependencies ⚡ - Install dependencies 🔧
        uses: ./.github/workflows/setup-node

      - name: Setup Pages ⚙️
        uses: actions/configure-pages@v4
        with:
          static_site_generator: next

      - name: Build with Next.js 🏗️
        run: npx next build

      - name: Upload artifact 📡
        uses: actions/upload-pages-artifact@v3
        with:
          path: ./out

  deploy:
    environment:
      name: github-pages
      url: ${{ steps.deployment.outputs.page_url }}

    runs-on: ubuntu-latest
    needs: build

    steps:
      - name: Publish to GitHub Pages 🚀
        id: deployment
        uses: actions/deploy-pages@v4
Put this file in the .github/workflows directory in your project. You can name the file as you like – I called it publish.yml.
What does this code do?
- This action is executed when code is pushed or merged into the
mainbranch. - It uses the
setup-nodeaction to set up the environment. - The action has two stages: in the first stage, the Next.js app is bundled. In the second stage, we upload the artifacts from the first stage to GitHub Pages.
These are the most important aspects of the deployment pipeline. I skipped the permissions and concurrency setup since they remain unchanged for all deployments.
Now, your action is ready to use.
Commit and Push
After committing and pushing your changes to the main branch, GitHub will automatically initiate the deployment to GitHub Pages.
To inspect the process, navigate to the Actions tab (1 in the image below), and select the publish-to-github-pages action from the menu on the left hand side (2). You will see a all your deployments on the screen (they are called workflows).
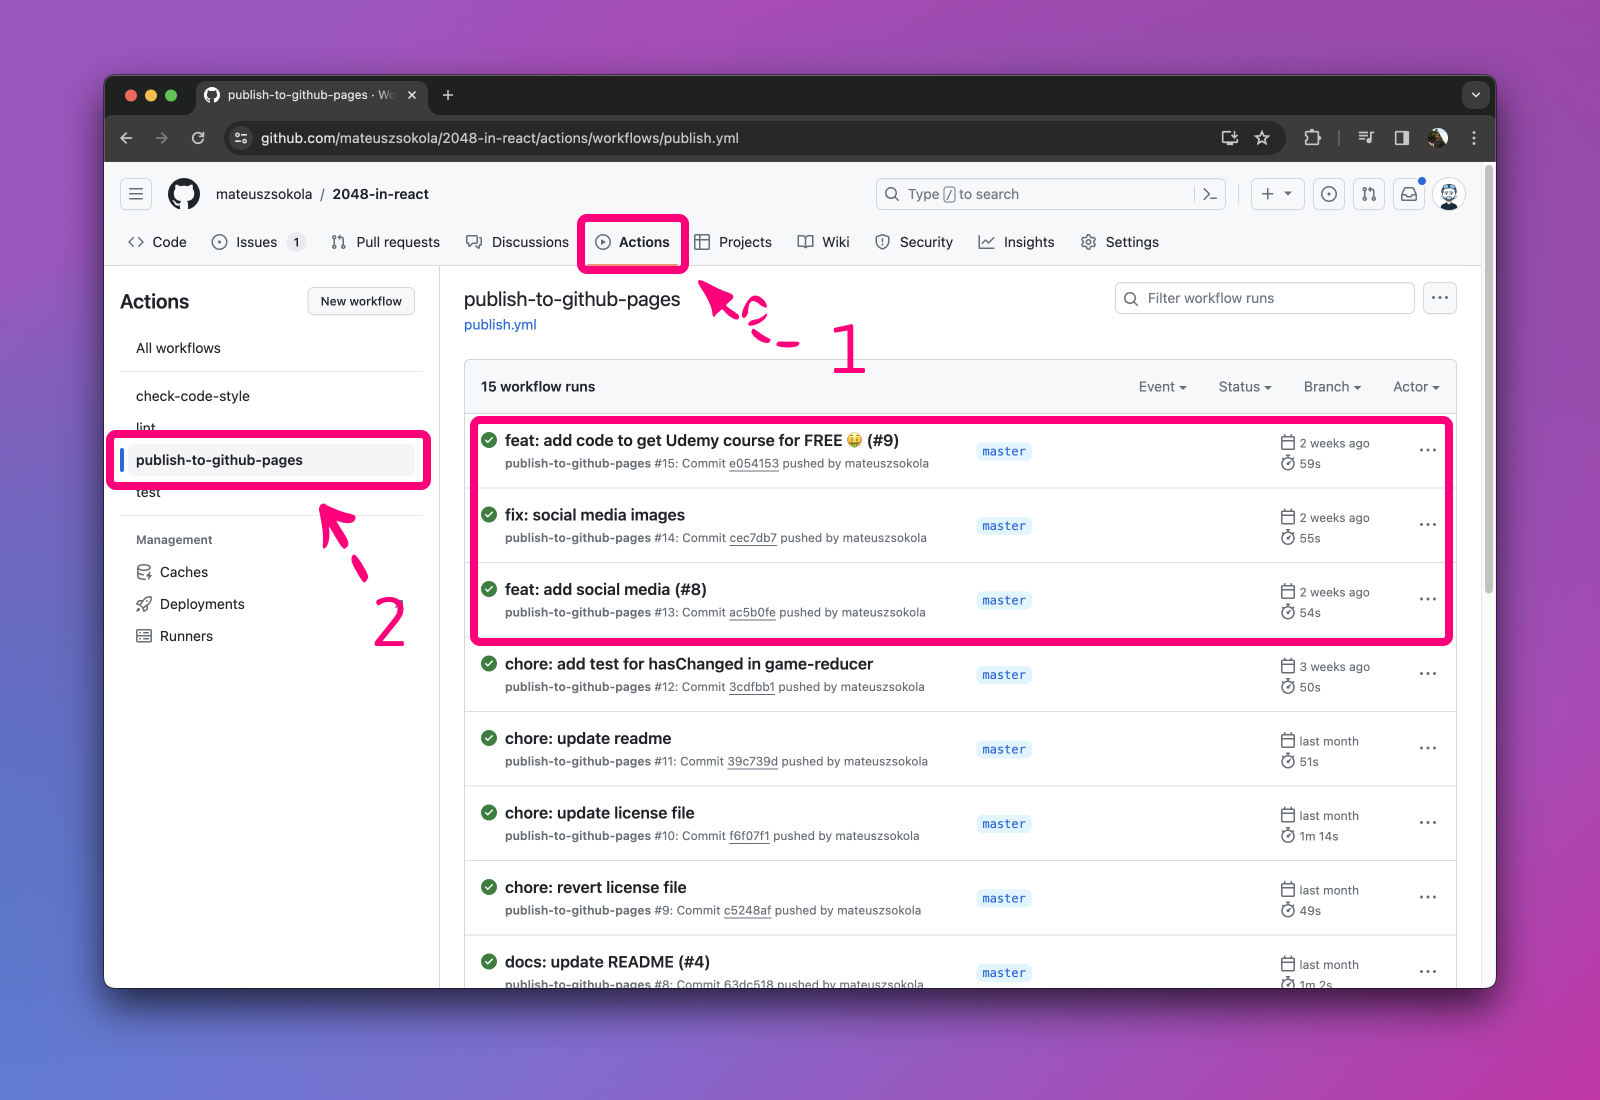 GitHub Actions – Workflows responsible for publishing to GitHub Pages
Now, we need to select the first one of those workflows, and you will see a two-stage deployment. In the deploy stage, you can find a link to your website on GitHub Pages.
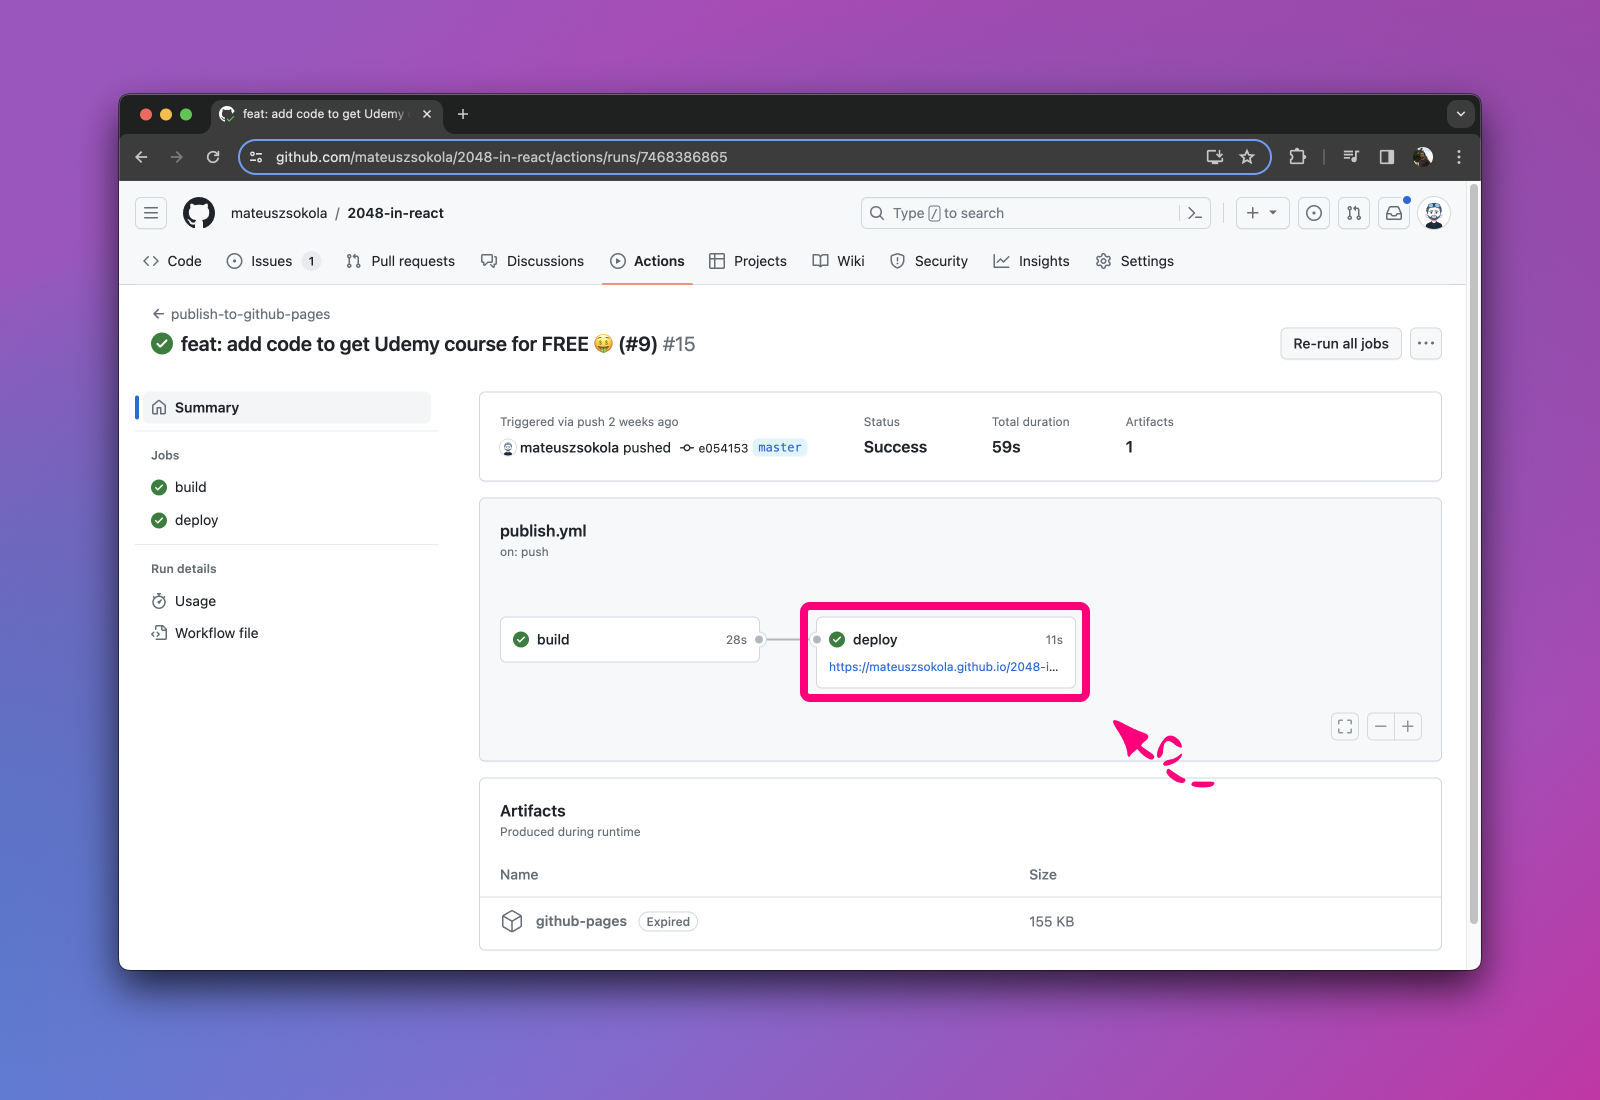 GitHub Project Workflow – Successful deployment
Wrapping Up
Github Pages isn't sufficient for hosting websites with millions of views. But it's an excellent choice for building your portfolio or hosting a website for your open-source project.
Nowadays, there are many free options to host our websites, but I wanted to show you this alternative. GitHub Pages is built by developers for developers – you can consider it a developer's natural habitat. I think every developer should be familiar with it.
I hope this article will be a gentle push towards learning more about GitHub Actions. Feel free to experiment with different approaches and try to create your own. Every application needs to be shipped and consider this article just as a starting point.
Here are the resources:
- 2048 Game on Github Pages
- Source code on Github. It'd mean the world to me if you star ⭐ this repository.
If this article helped you, please let me know on Twitter. Educators, like me, often feel like we are speaking into a vacuum and nobody cares what we teach. A simple "shoutout" shows it was worth an effort and inspires me to work even harder to create more content like this.
Feel free to share this article on your social media.
Thank you.
If you wish to know more about me – My name is Matéush. I am a software engineer and digital nomad. I can say I have an extraordinary career. I lived in three different countries and worked in various environments from startups to large enterprises.
Recently I started to share advice on growing a software developer career. I believe I created my blog for my younger self — a bit lost, motivated to become one of the best developers, and seeking a path into the world of “big tech”.