Deploying your application is a key aspect of software development. Typically, having an app on your local system isn't enough – it needs to be accessible online. So choosing a suitable and user-friendly hosting and deployment plan is vital.
The key to making the right decision lies in understanding the goal of your application. Perhaps it’s a simple website, a one-page app, or it requires serverless or cloud functions. Having clarity about these aspects will significantly ease the deployment process.
In this article, we will look at a few popular methods for deploying your application that will help tackle these challenges.
What we'll cover:
- What to consider when deploying a hosting platform
- How to deploy a website or app with Render
- How to deploy a website or app with Surge
- How to deploy a website or app with Vercel
- How to deploy a website or app with GitHub Pages
- How to deploy a website or app with Netlify
- Conclusion
What to Consider when Deploying to a Hosting Platform
There are several factors to take into account when selecting a hosting platform:
- Purpose: Before you host your application, consider the technologies you used to build it and how much storage the platform can handle.
- Interface: A good interface is essential for a hosting platform. Look for a control panel or dashboard that allows you to easily administer your website.
- Reviews: Look at the hosting service's reviews and read what other clients have to say.
- Security: To safeguard your website and data, it is essential to have the right security measures in place.
- Support: You should always have someone there to help you out when you need it.
Why is Deploying an Application Important?
If you've built an app, there are various reasons you may want or need to deploy it, such as:
- It showcases professionalism and credibility to users.
- It increases the accessibility of the application to a broader audience.
- It enables user interaction and feedback.
- It facilitates data analysis and provides insights for informed decision-making.
- It identifies areas for improvement in the application.
What's the Benefit of Choosing a User-Friendly Deployment Method?
Opting for a more approachable deployment method brings significant advantages:
- Collaboration: When working together as a team, it’s useful to have straightforward methods to deploy your application. This makes collaboration and teamwork easy. These will encourage cooperation throughout the deployment process.
- Efficiency: A user-friendly deployment method simplifies the process.
- Simplicity: Choosing a hosting platform that is easy to understand will benefit everyone involved.
- Reliability: easy to use deployment methods ensure a more reliable application and minimise potential disruptions.
How to Deploy a Website or App with Render
Render provides an interface for quick and straightforward publishing of static web content. Let's now go through how to deploy an app to Render step by step.
Step 1: First, ensure you have deployed your work or code from your editor to your GitHub account.
Step 2: Open a new browser tab and navigate to the Render website.

Step 3: Select the “GET STARTED” button on Render's home page to get going.
- You can use your GitHub, GitLab, or Bitbucket account when signing up. Choose the GitHub option and follow the steps to grant Render access to your GitHub account.
- If you already have a Render account, click the “Sign in” button to be redirected to the Sign-in page. You can sign in via email and authenticate using your Google account or your GitHub account.

Step 4: Once you access the dashboard, click the “New” button.

Step 5: Upon doing so, a drop-down menu will appear. It'll show you a comprehensive list of services provided by Render.

Step 6: Clicking “Static Site” from the drop-down menu will lead you to the “Create a New Static Site” page. From there, you can select the repository you wish to host.
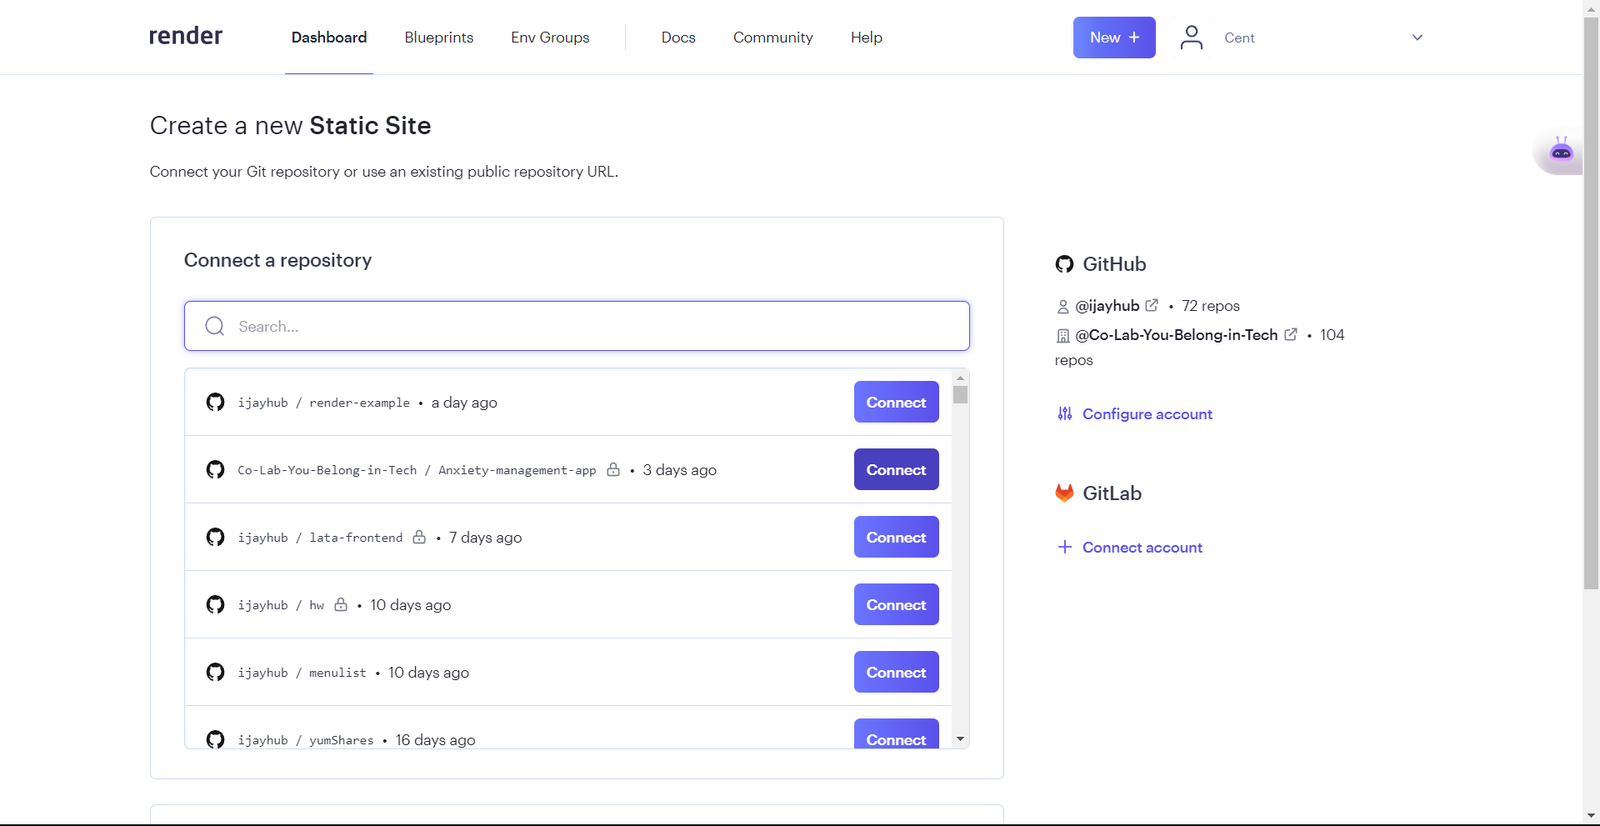
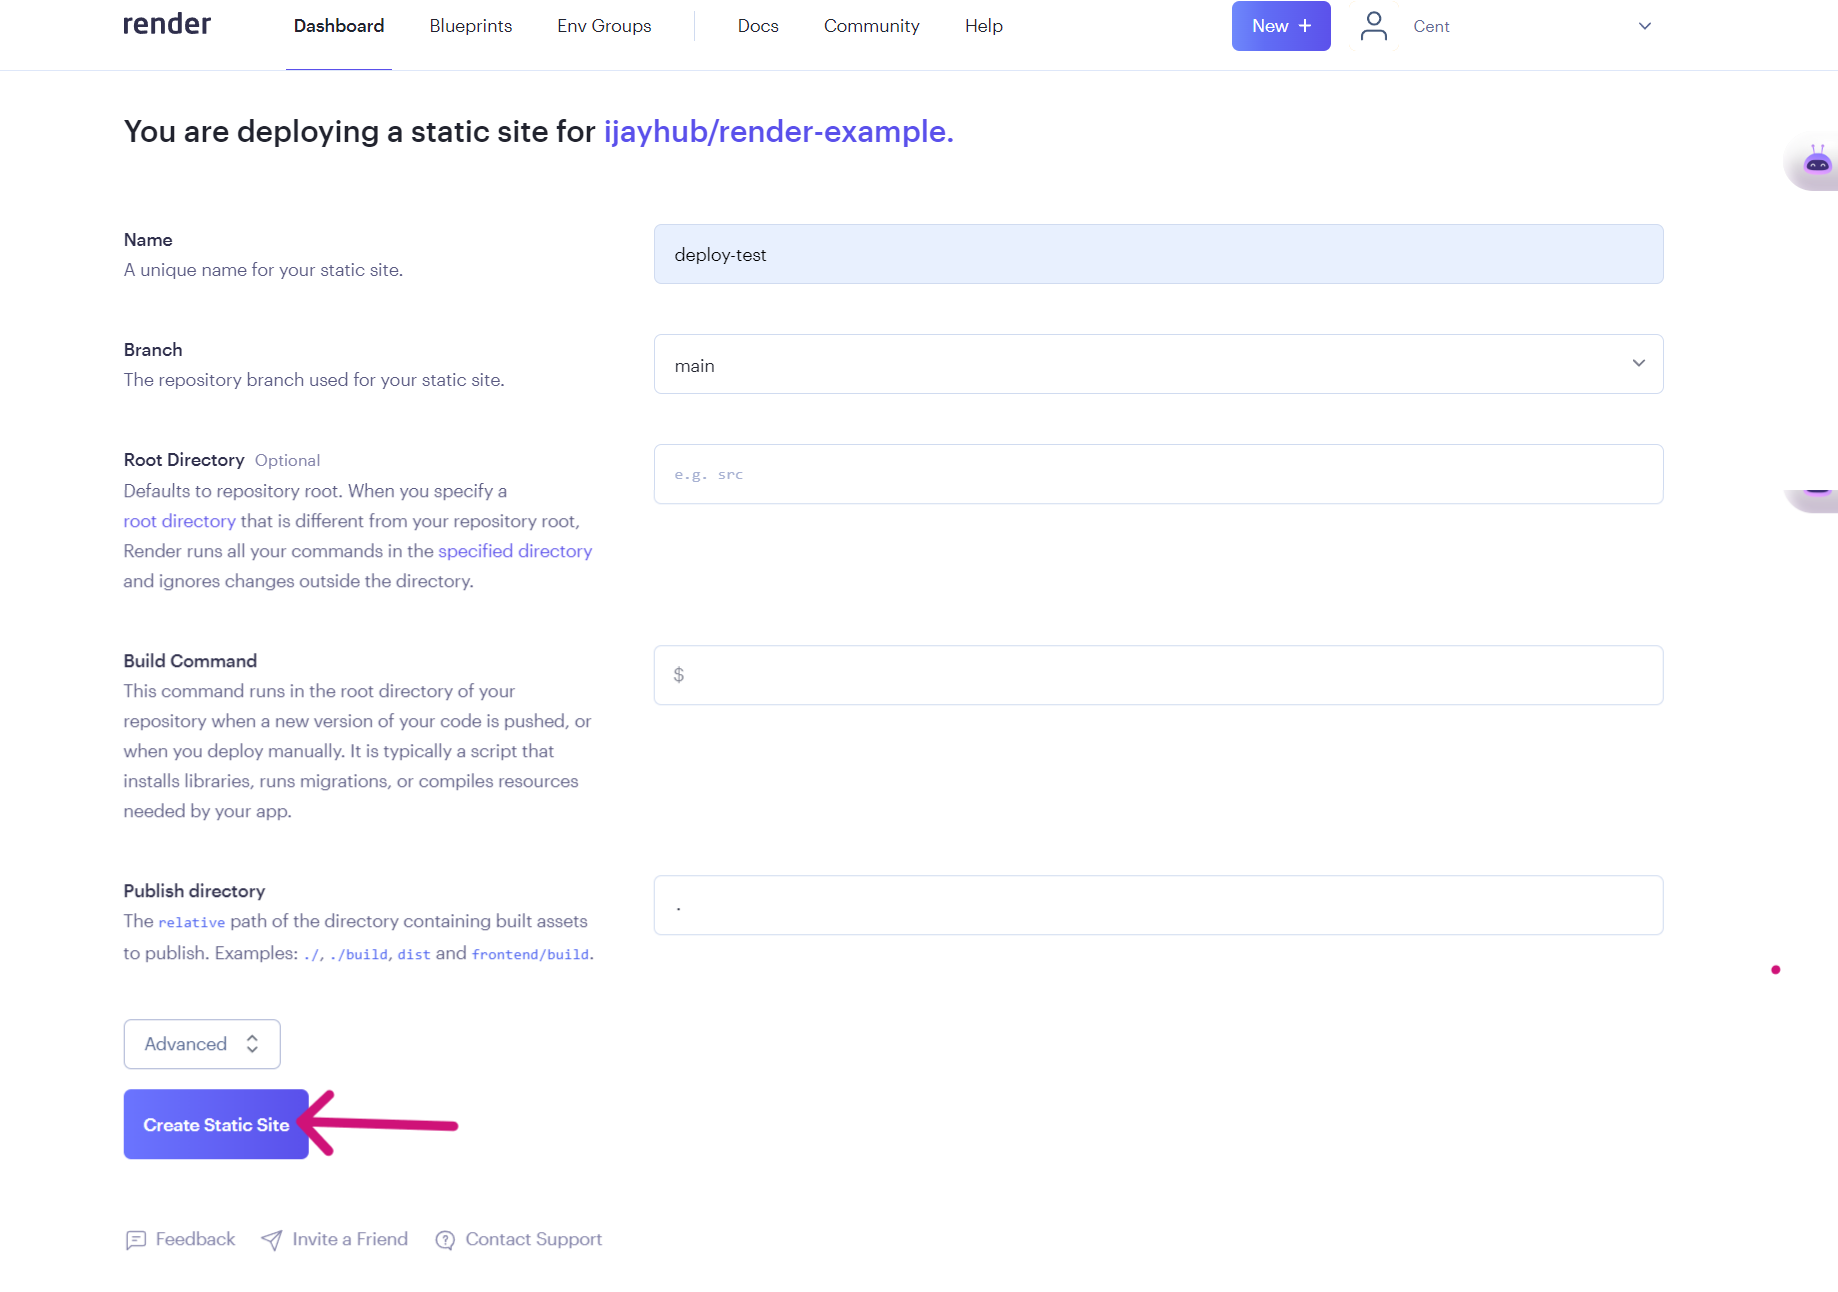
Step 7: After selecting the repository you wish to host, you will be directed to the deployment platform. There, you can provide the necessary information to host the application and click the “Create Static Site” button for it to deploy.
Here's what the final output should look like:

Pros of Deploying With Render
- Render has a free tier for hosting basic static websites.
- It provides a flexible price structure that ensures transparency and cost-effectiveness.
- It makes deployment easy. They provide an interface and connection with standard development tools and platforms. It also supports a wide range of programming languages, frameworks, and databases.
- It delivers a variety of integrated features that improve the hosting experience.
- It has good customer service support.
Cons of Deploying With Render
- Render specialises in static websites, Docker containers, and serverless functions.
- For more complex/bigger applications, there's a paid plan. You'll need to go through their price structure and understand the charges related to your usage.
- There is a learning curve, especially for newcomers to the platform.
How to Deploy a Website or App with Surge
This friendly platform and tool make it quick and easy to deploy static websites online.
Deploying your static files to surge.sh is easy using the command-line interface (CLI).
This command-line interface (CLI) streamlines the process of hosting and distributing your online projects.
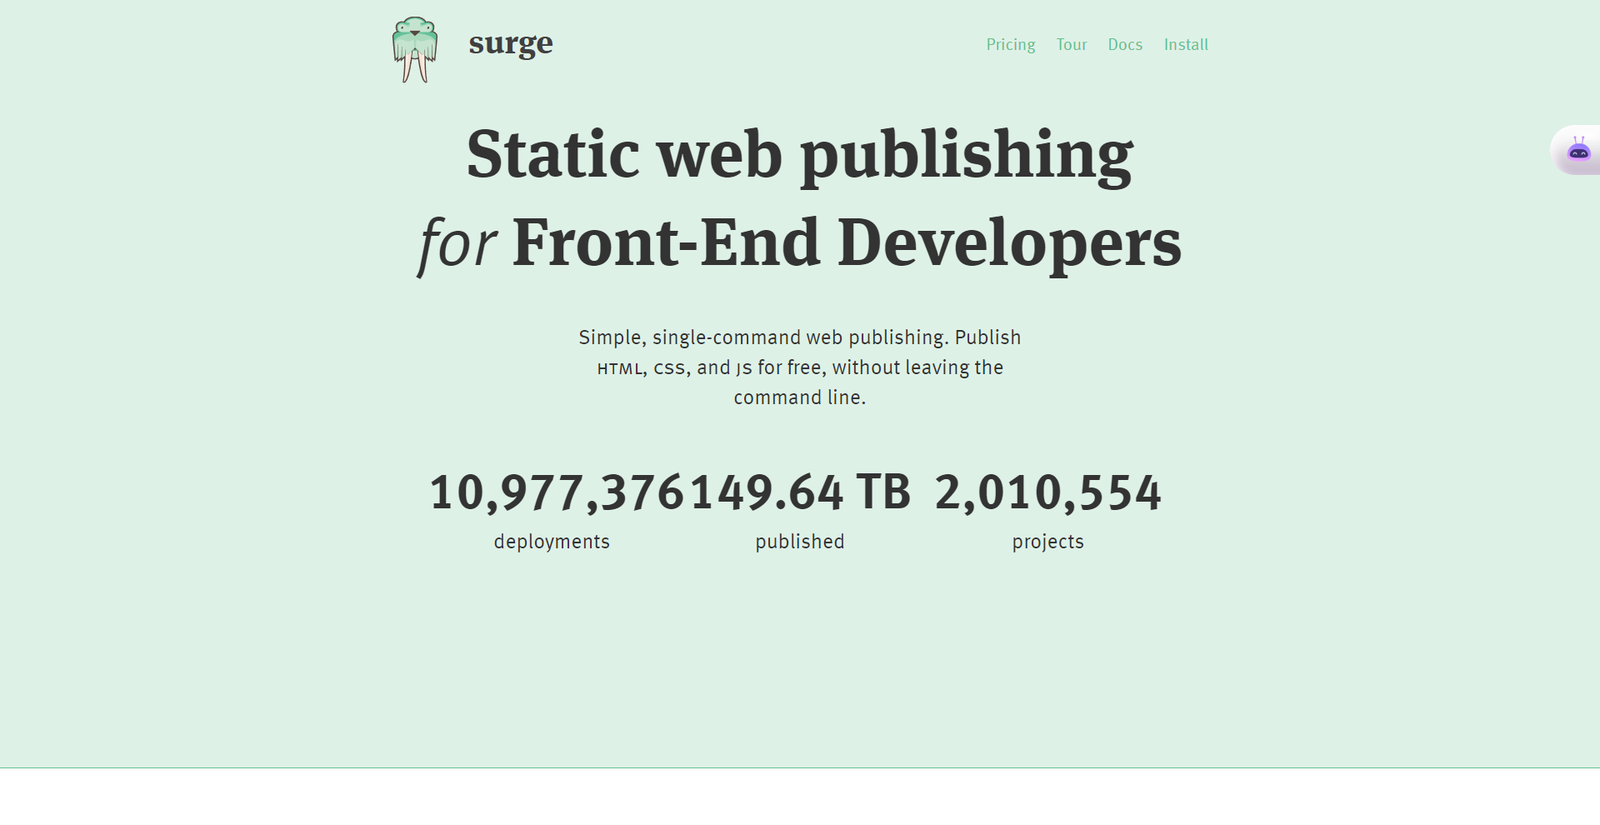
Steps to Deploy Your Site Using Surge
First, in the terminal of your project, type the command npm i -g surge.
Then type the command surge.
And that's it! You can deploy your app without logging in into your GitHub account.
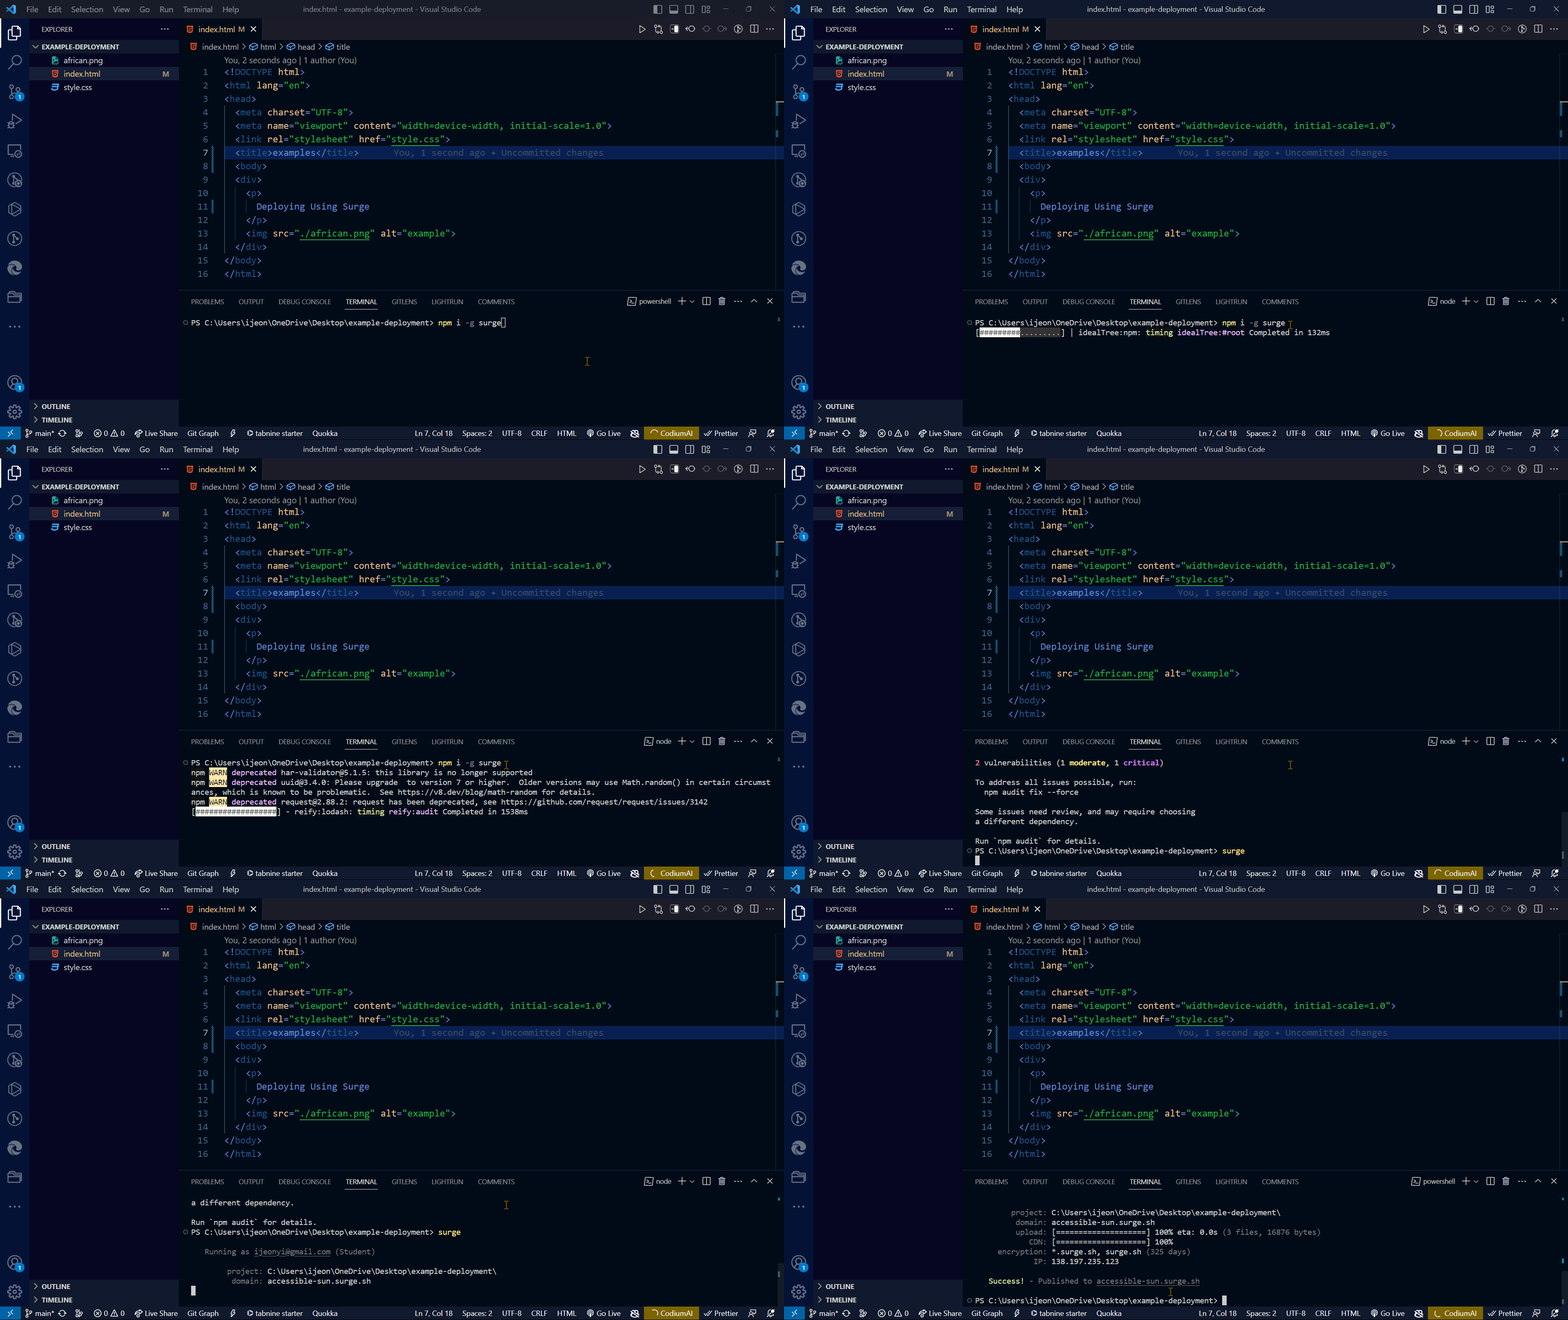
To see what you have deployed, first copy the successful link in the terminal. Then paste it into your browser. You should see something like this:

Like I mentioned before, Surge doesn't need extra code. You can easily deploy your app right from your editor's terminal by typing the command surge.
Pros of Deploying with Surge
- Easy to Use: Surge provides a simple deployment for static websites.
- Fast Deployment: It has a quick deployment time.
- Custom Domains: It allows you to use your domain name for your website.
- SSL Support: It provides free SSL certificates.
- Support for Single-Page Applications (SPAs): It's well-suited for deploying single-page applications.
Cons of Deploying with Surge
- Limited Functions: Surge is designed for static websites.
- No Custom Server Configurations: It streamlines the deployment process by abstracting away server configurations.
- Premium Features: This platform offers free hosting for basic usage, but you'll have to pay for more features.
How to Deploy a Website or App with Vercel
Vercel is a hosting and deployment platform that specializes in modern web applications.
It is particularly well-suited for single-page applications, serverless operations, and static websites. It integrates with popular frameworks like Next.js and Gatsby.js, making deployments fast and simple.
Steps to Deploy Your Site Using Vercel
First, ensure that you have deployed your work or code from your editor to your GitHub account.
Then open a new browser tab and navigate to Vercel’s website.

Head to the Vercel website and click the “Sign up” button on the homepage.
- Sign up using your GitHub account and follow the steps to grant Vercel access to your GitHub account. If you already have a Vercel account, click the “Login” button and enter your login information.
- After signing up or logging in, Vercel will request access to specific information from your GitHub account. Review the required permissions and permit Vercel to proceed.
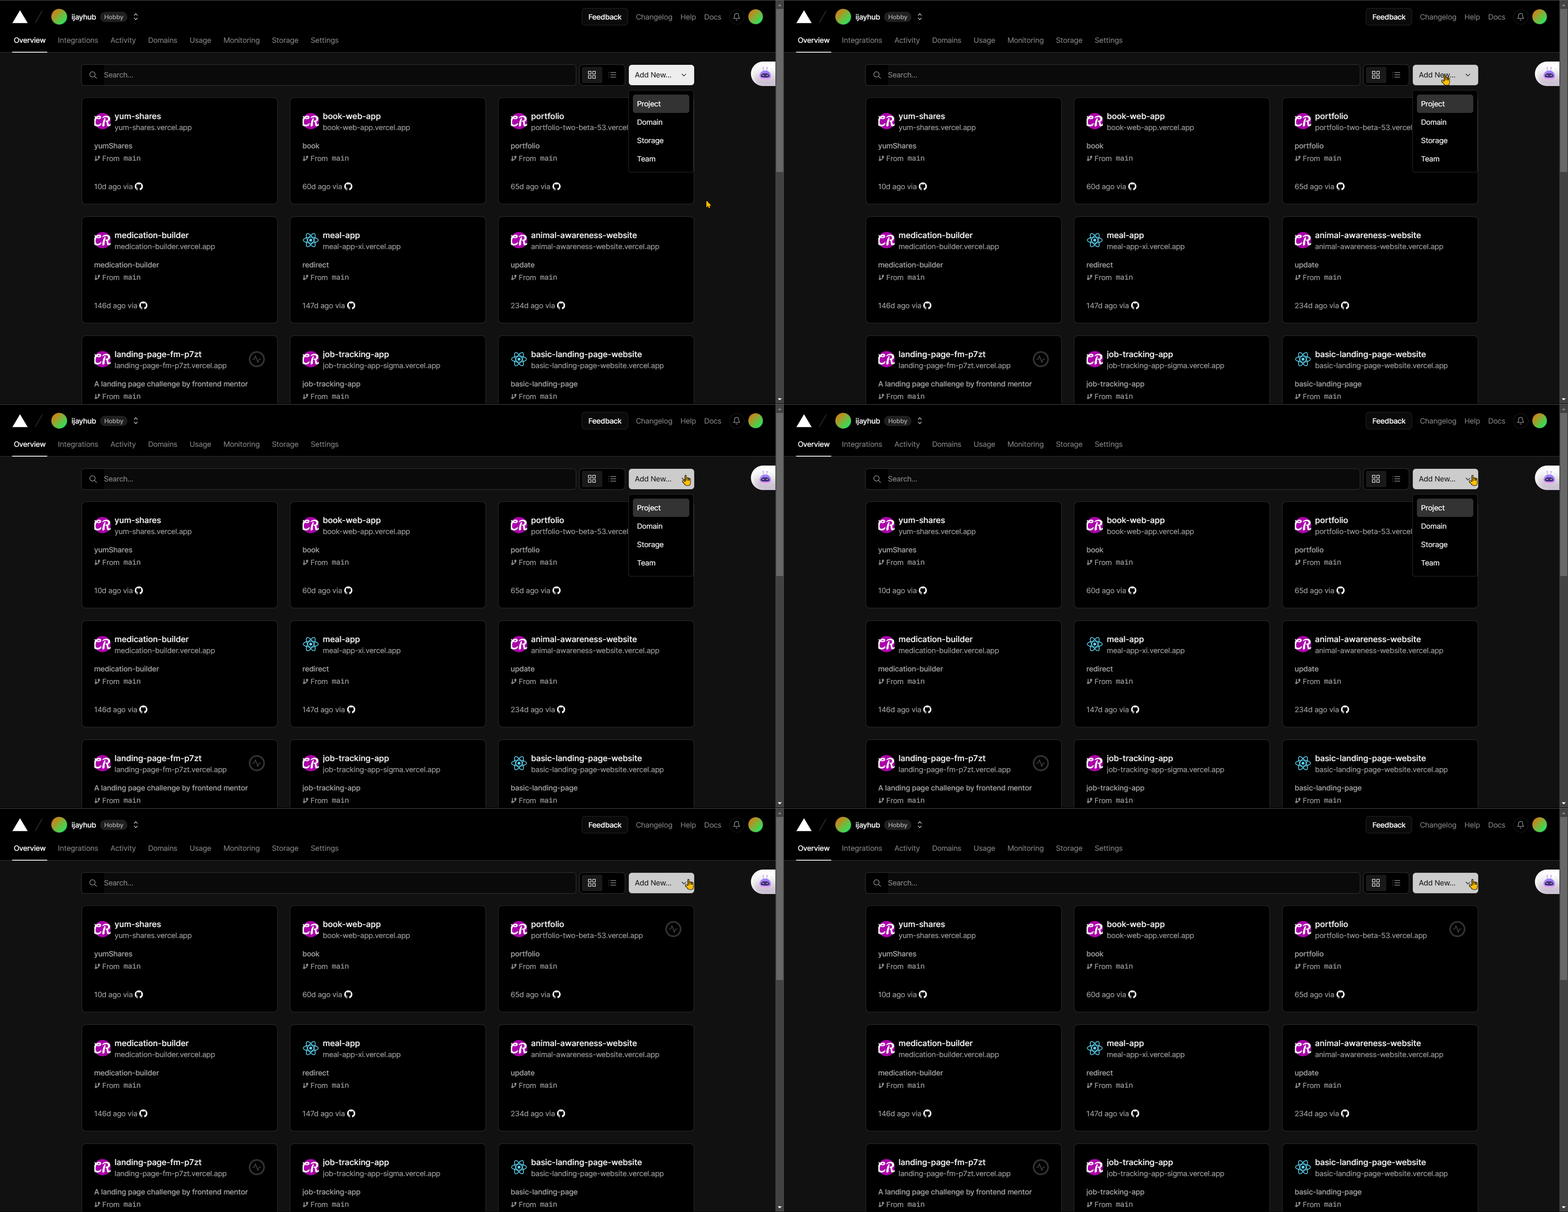
Next, click on “Add New…” on the Vercel dashboard. This action will reveal a drop-down menu. From the menu, select “Project,” which will navigate you to the next page.
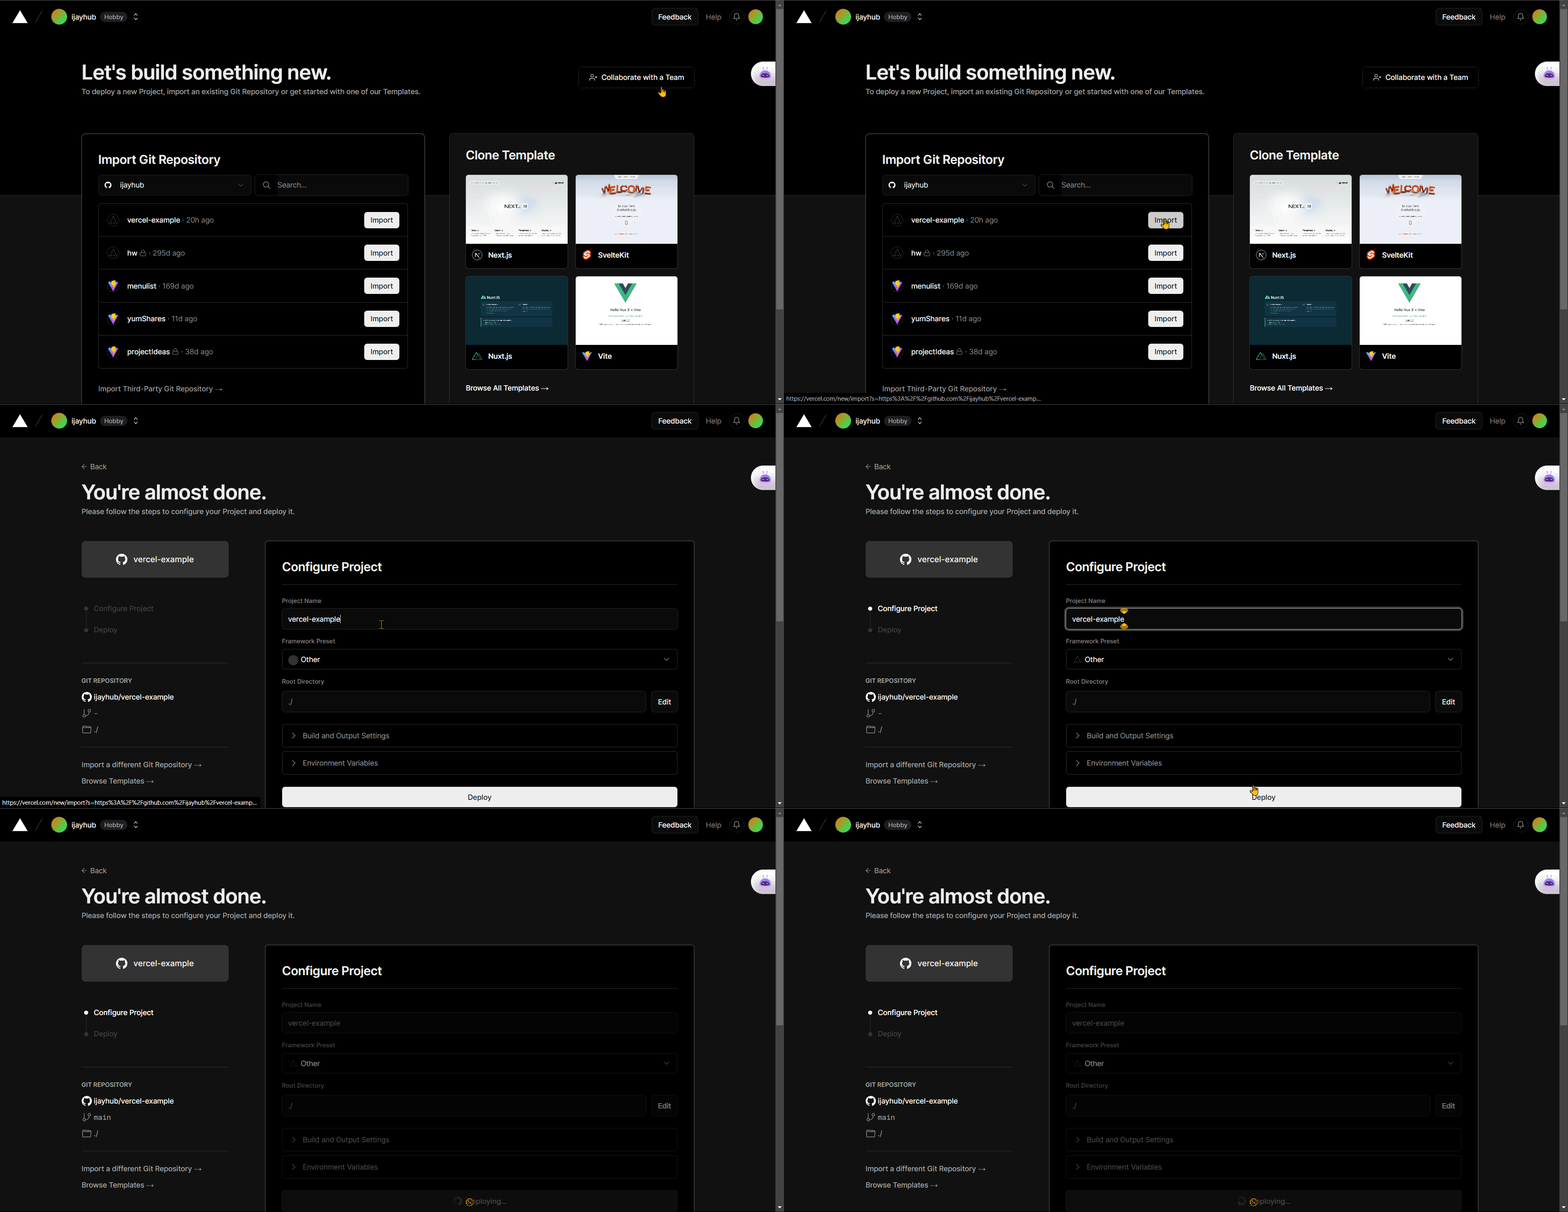
On the next page, you will import your repository for deployment.
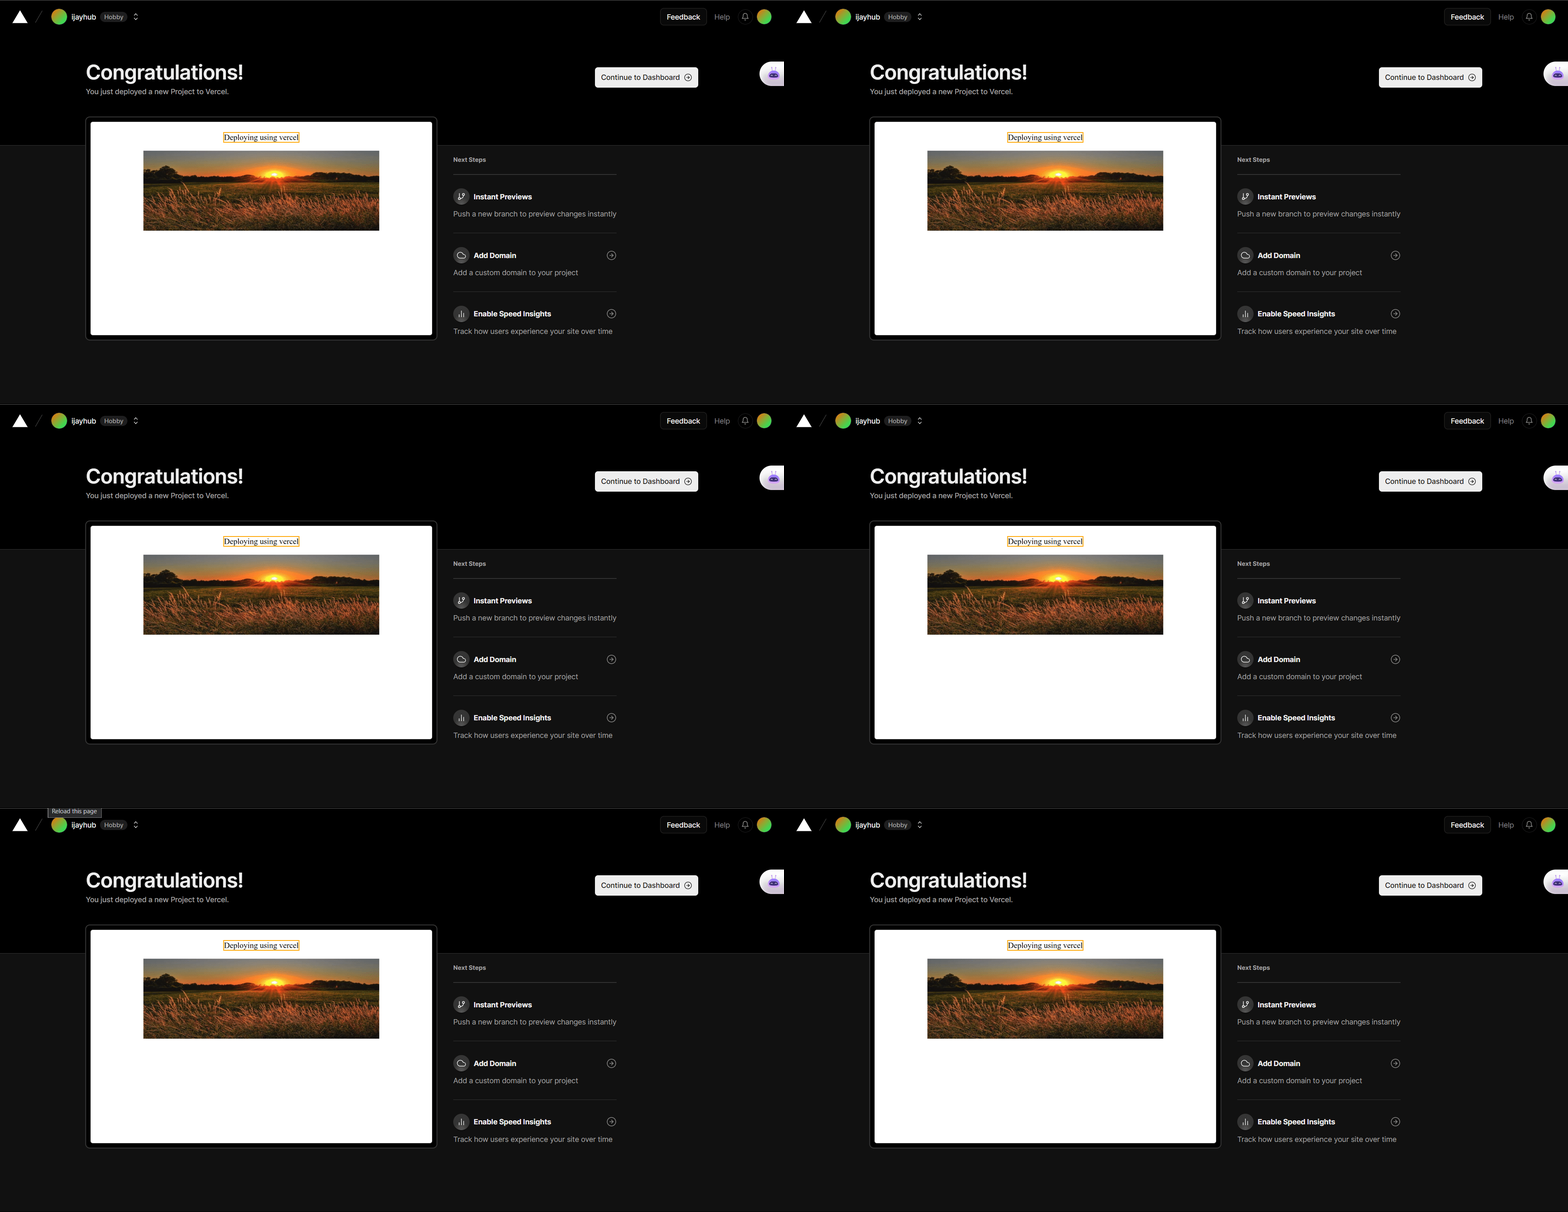
Here's what the final output should look like:
When deploying your application to Vercel, you may encounter some errors, often caused by routing issues.
To fix this:
- Create a file under the root of your application called
vercel.json. - Inside the file, write the following code:
vercel.json
{ "rewrites": [{ "source": "/(.*)", "destination": "/" }] }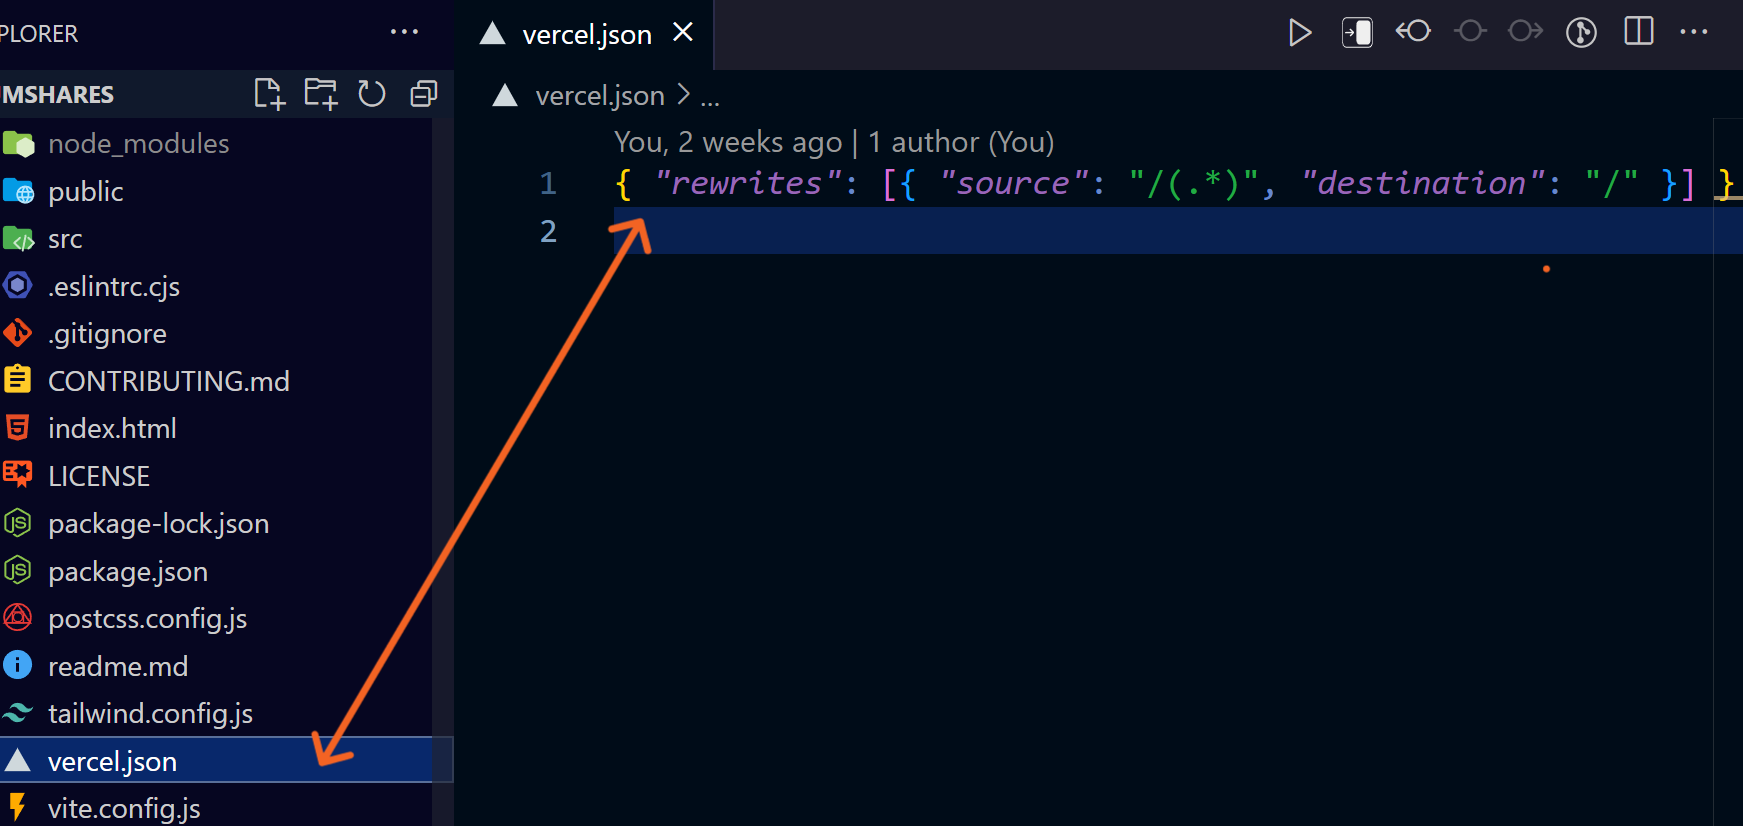
Pros of Deploying With Vercel
- Collaboration: Vercel offers tools for effective teamwork, access control, and cooperative deployments.
- Simple Deployment: it simplifies delivering your web apps with ease.
- Preview Deployments: it allows you to share and review changes before they go live. This promotes collaboration and ensures a smooth and efficient workflow.
- Scalability and Performance: It still guarantees great performance even with a large number of people using it.
- Git Integration: it makes Git integration easy.
Cons of Deploying With Vercel
- If you are new to Vercel, you must understand how to deploy and configure your application. Reading Vercel’s documentation can help you get up to speed.
- Vercel is great for small to medium-sized projects, but it may not be the best fit for large-scale applications with complex backend needs. In such cases, developers may need a hosting solution that offers more customization and scalability.
How to Deploy a Website or App with GitHub Pages
GitHub Pages is a straightforward and cost-free hosting service. You can use it to host static web pages or documentation.
You can publish your site using GitHub Pages by submitting your code to a GitHub account and setting up a repository. Let's go through the process now.
Steps to Deploy Your Site Using GitHub Pages
To use GitHub Pages to host your website, follow these simple steps:
First, go to GitHub's website.

Then create a GitHub repository. If you don’t have a GitHub account, you'll need to click on “sign up”, or just click “sign in” if you already have an account.

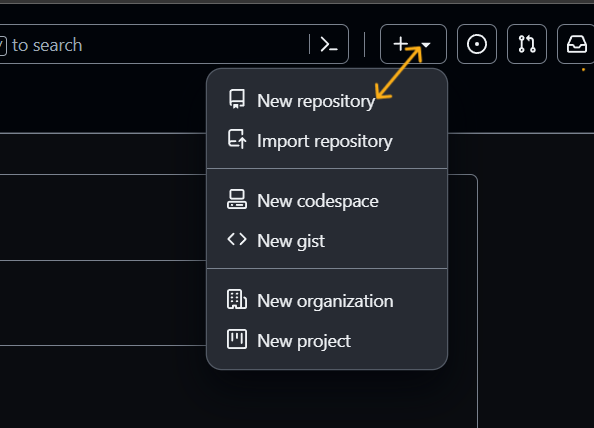
Create a new repository by clicking the New button in the upper-right corner of your GitHub profile.
Give your repository a name that reflects your website.
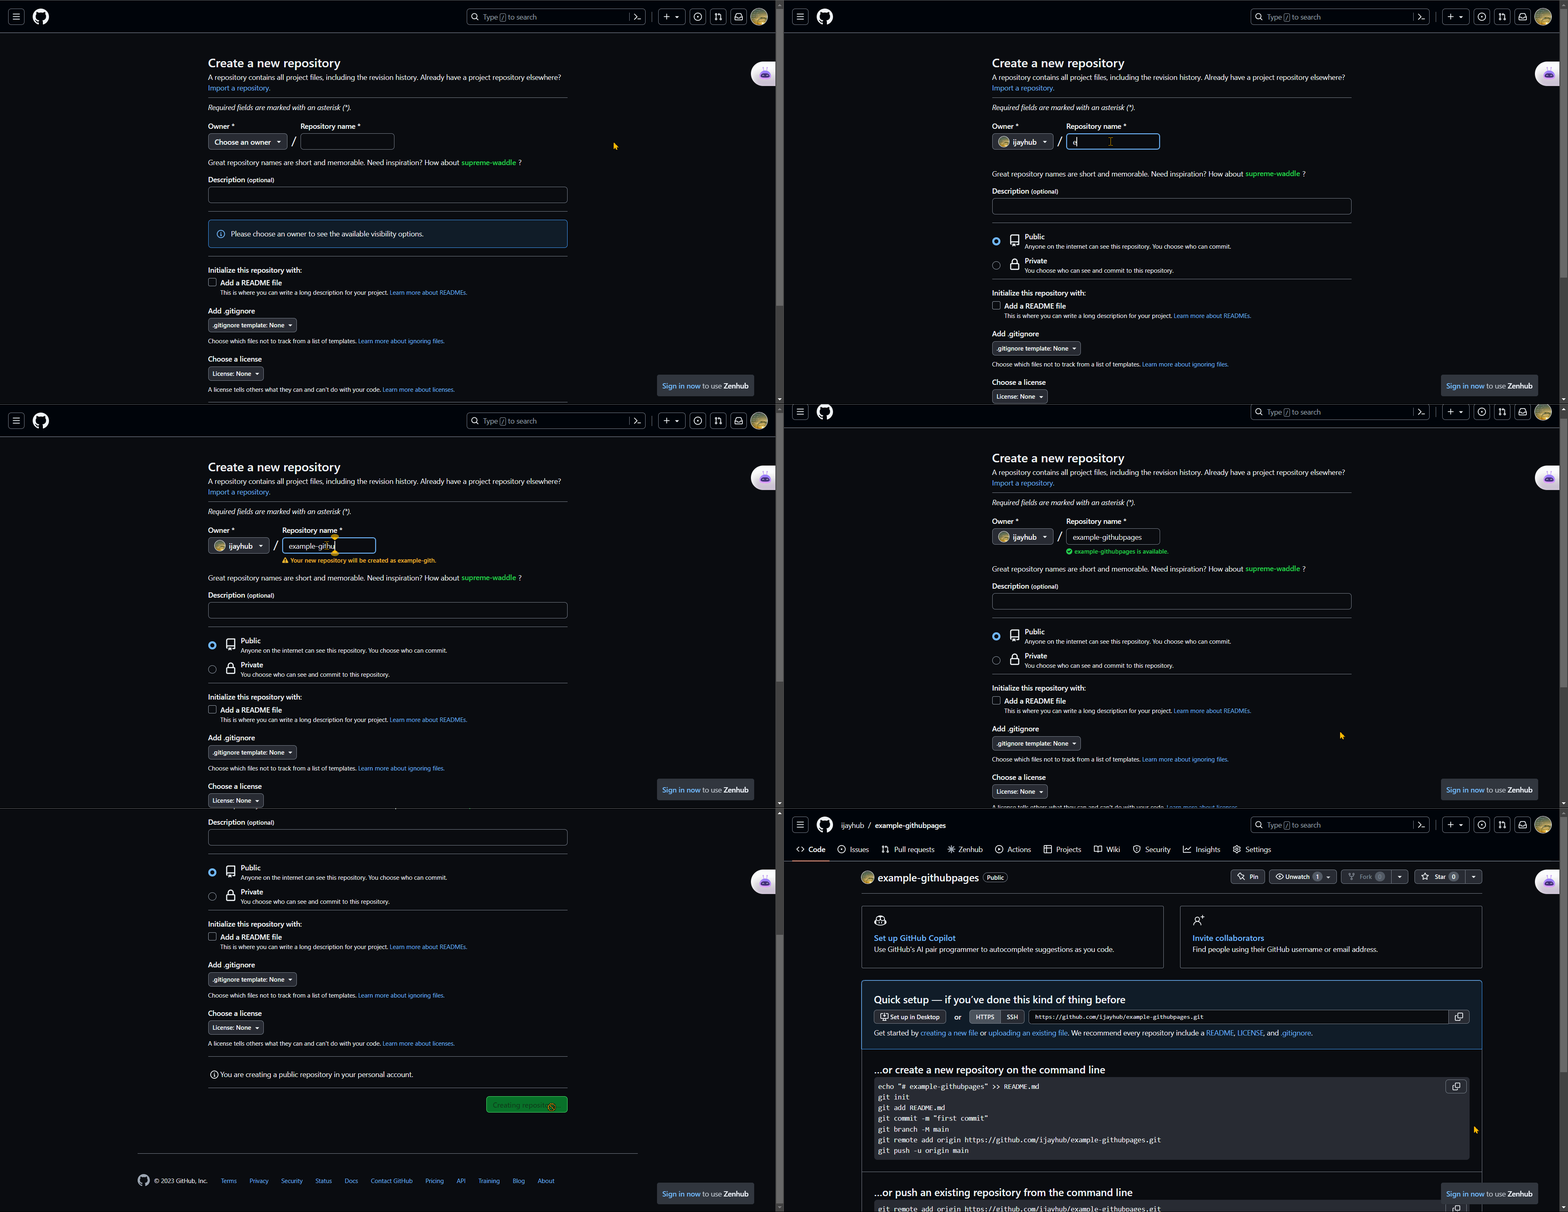
Once you have finished the previous step, go back to your Editor. Copy the generated code and paste it into your editor.

The code in the image above is generated when creating a new repository.
Go to the settings page of the newly created repository.
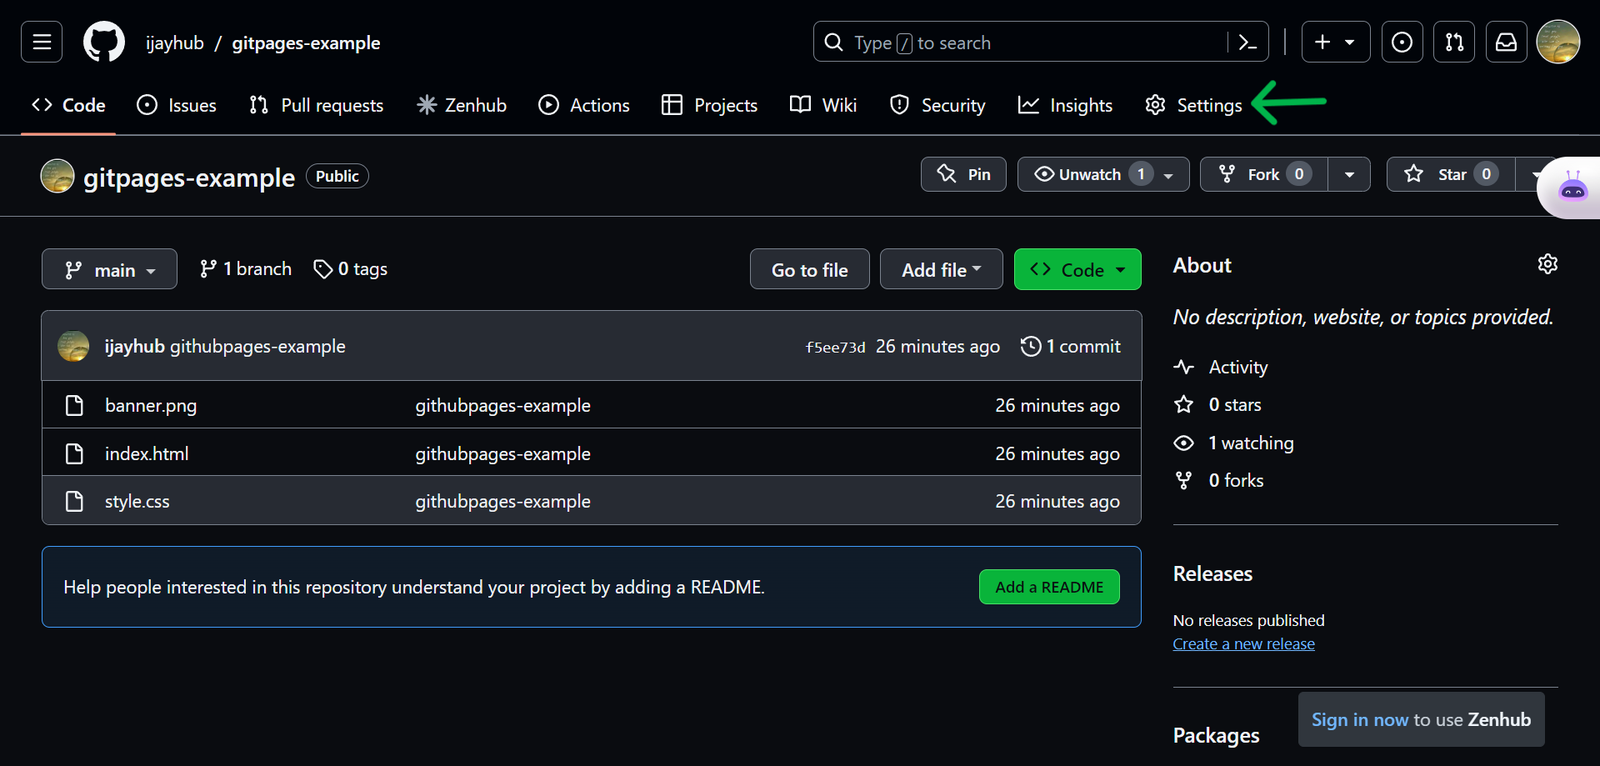
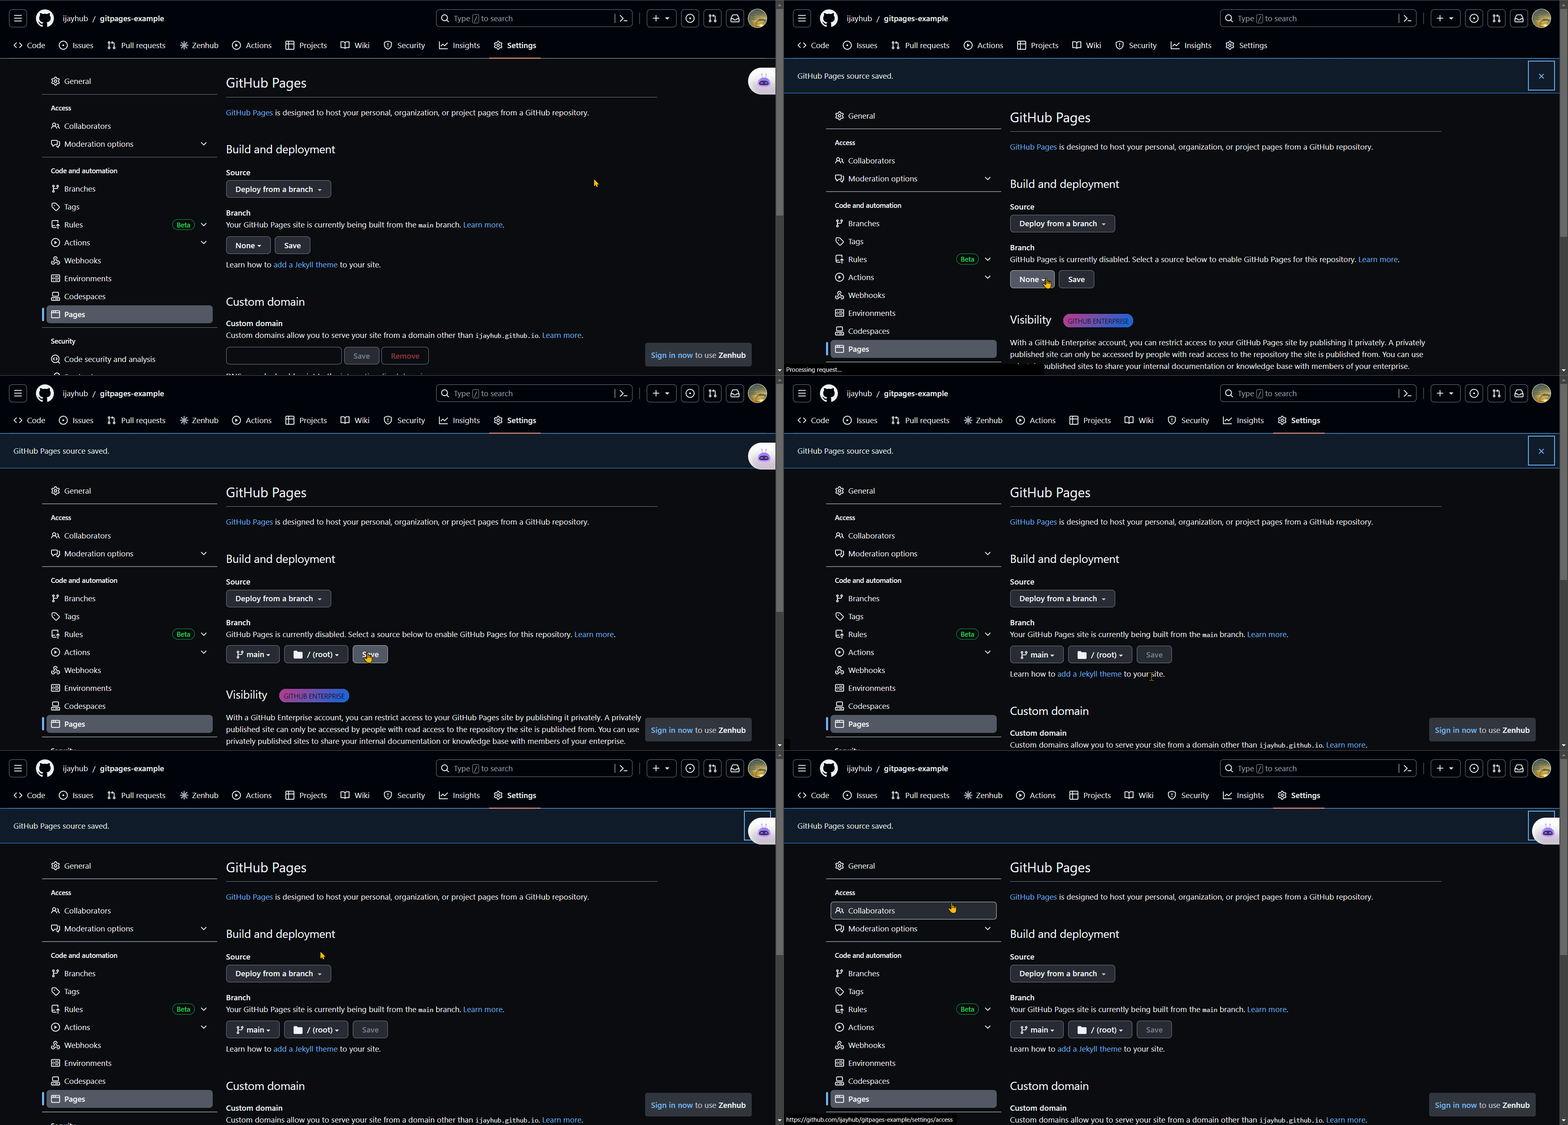
Click on the settings option to redirect to the settings section. Locate and click on “Pages” in the left-hand side menu.
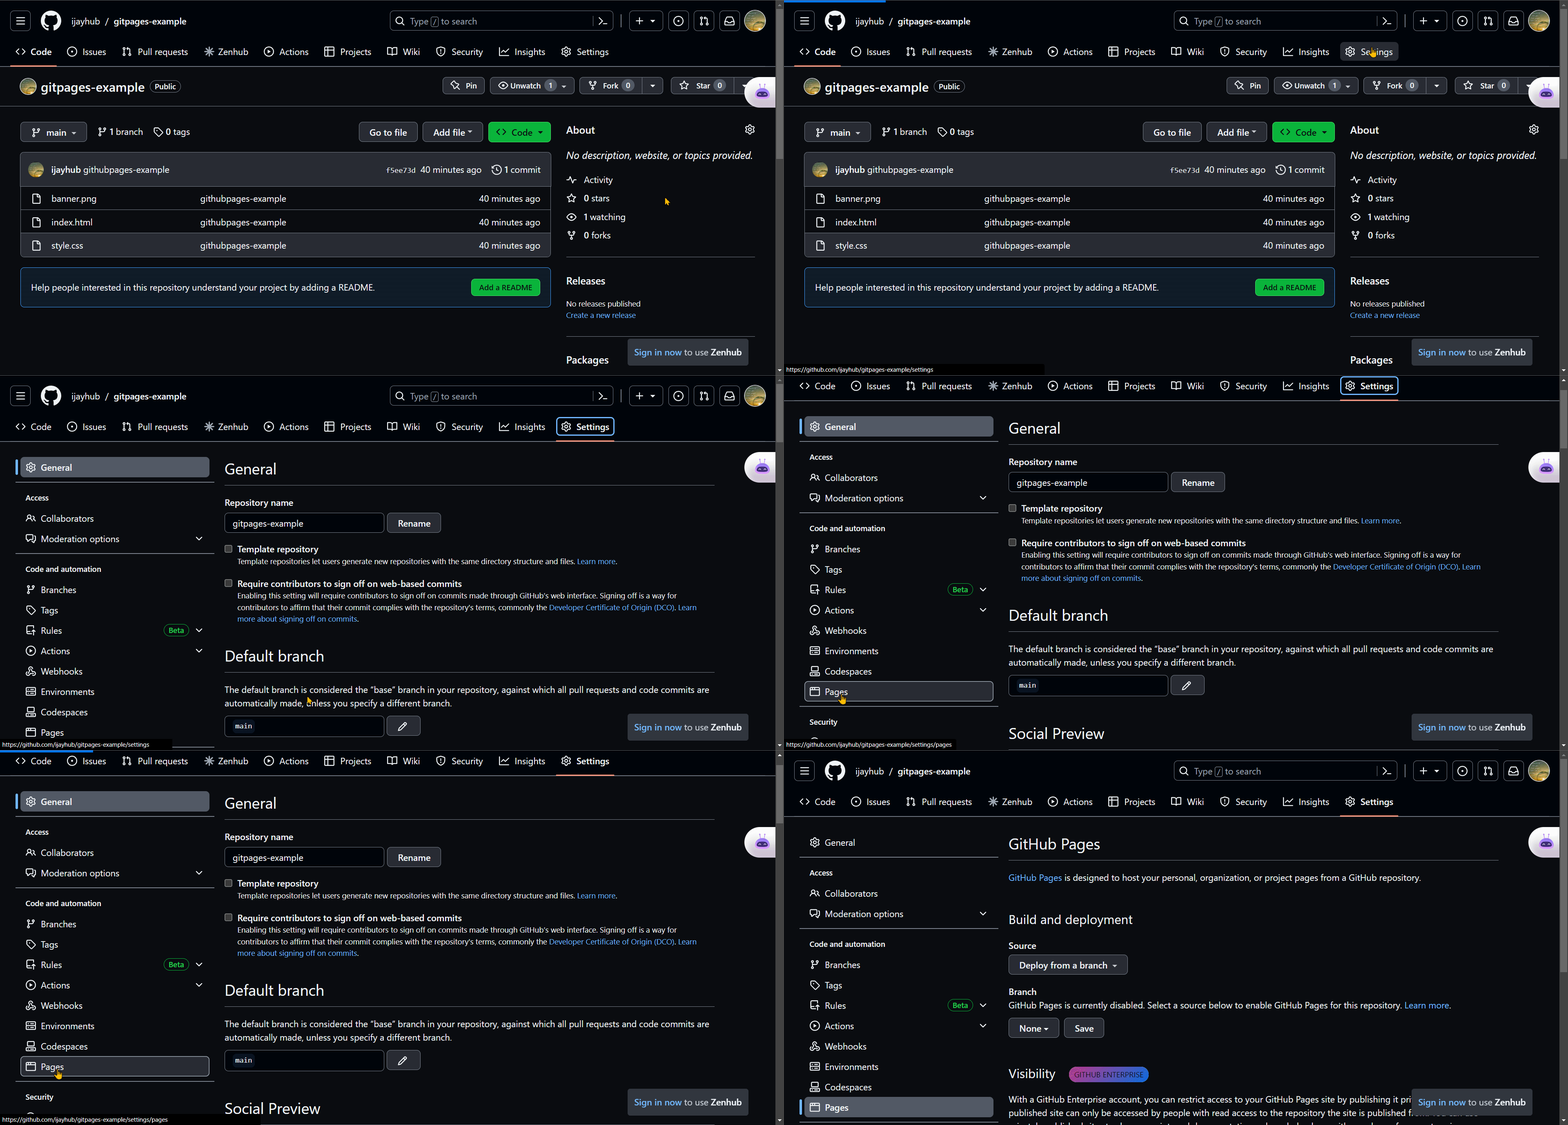
To access GitHub Pages, click on the “Pages” section. Once you’re on the GitHub Pages section, click in the drop-down menu and choose either the “master” or “main” branch. Remember to save your selection.
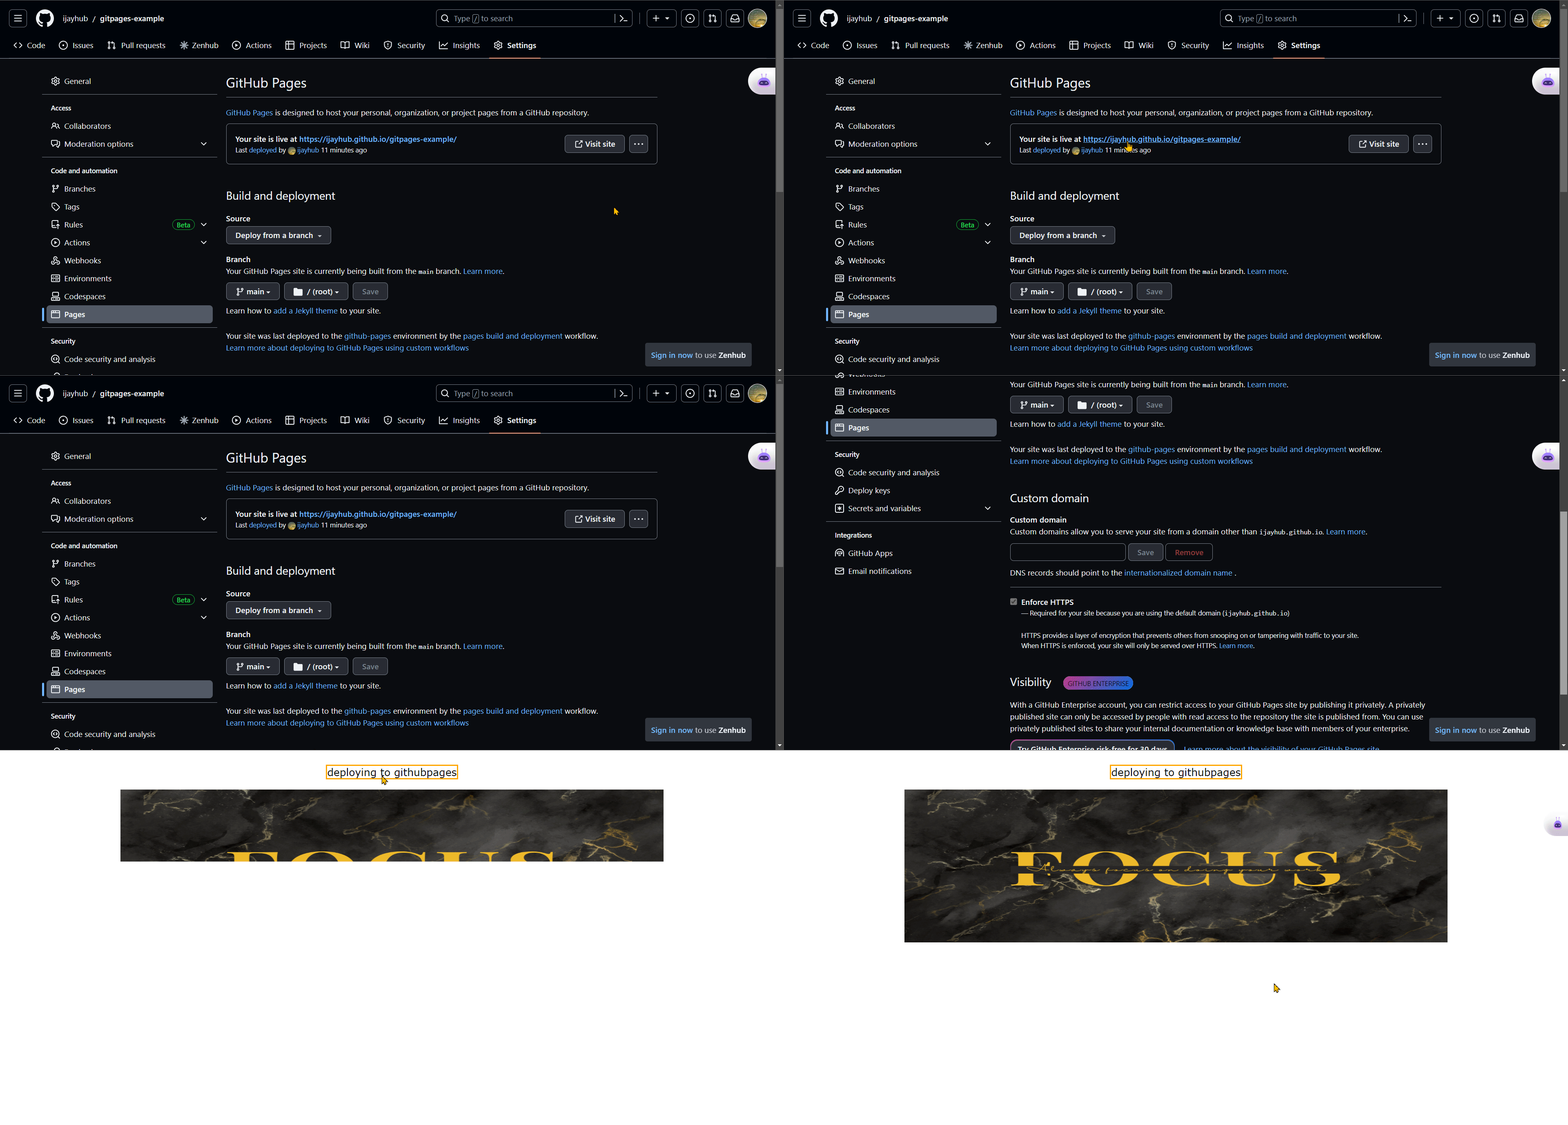
Refresh the page to find the link leading to your published website.
Pros of Deploying With GitHub Pages
- GitHub Pages are simple to set up – and you can build your website there.
- It's free.
- GitHub’s version control system makes it simple to keep track of changes and work with others.
- GitHub Pages updates your website’s code whenever you make changes to it.
- It offers collaboration on projects with other developers.
- It ensures your website is safe through
HTTPS(Hyper Text Transfer Protocol) encryption.
Cons of Deploying With GitHub Pages
While GitHub Pages offer many advantages, there are a few considerations to keep in mind:
- If your website becomes too large due to file size, this can cause some performance issues.
- GitHub Pages may only support simple functions.
- Understanding Git, the version control system used by GitHub, is essential for managing your website’s code.
How to Deploy a Website or App with Netlify
Netlify integrates with Git repositories and works well with static web pages and single-page apps.
Steps to Deploy Your Site Using Netlify
First, you'll need to make sure that you have deployed your work or code from your editor to your GitHub account.
Then, open a new browser tab and navigate to the Netlify website.

Head to the Netlify website and click the “Sign up” button on the homepage.
- Create an account by signing up with your GitHub, GitLab, or Bitbucket credentials.
- Select the GitHub option and follow the steps to grant Netlify access to your GitHub account.
- If you already have a Netlify account, click the “Login” button and enter your login information. After signing up or logging in, Netlify will request access to specific information from your GitHub account. Review the required permissions and permit Netlify to proceed.
Once you have finished registering, go to the dashboard where you will host your repository.
Netlify has two ways to host your project:
- Drag-n-drop
- Importing the source code from your repository to the site.
Using the Drag-n-Drop feature:
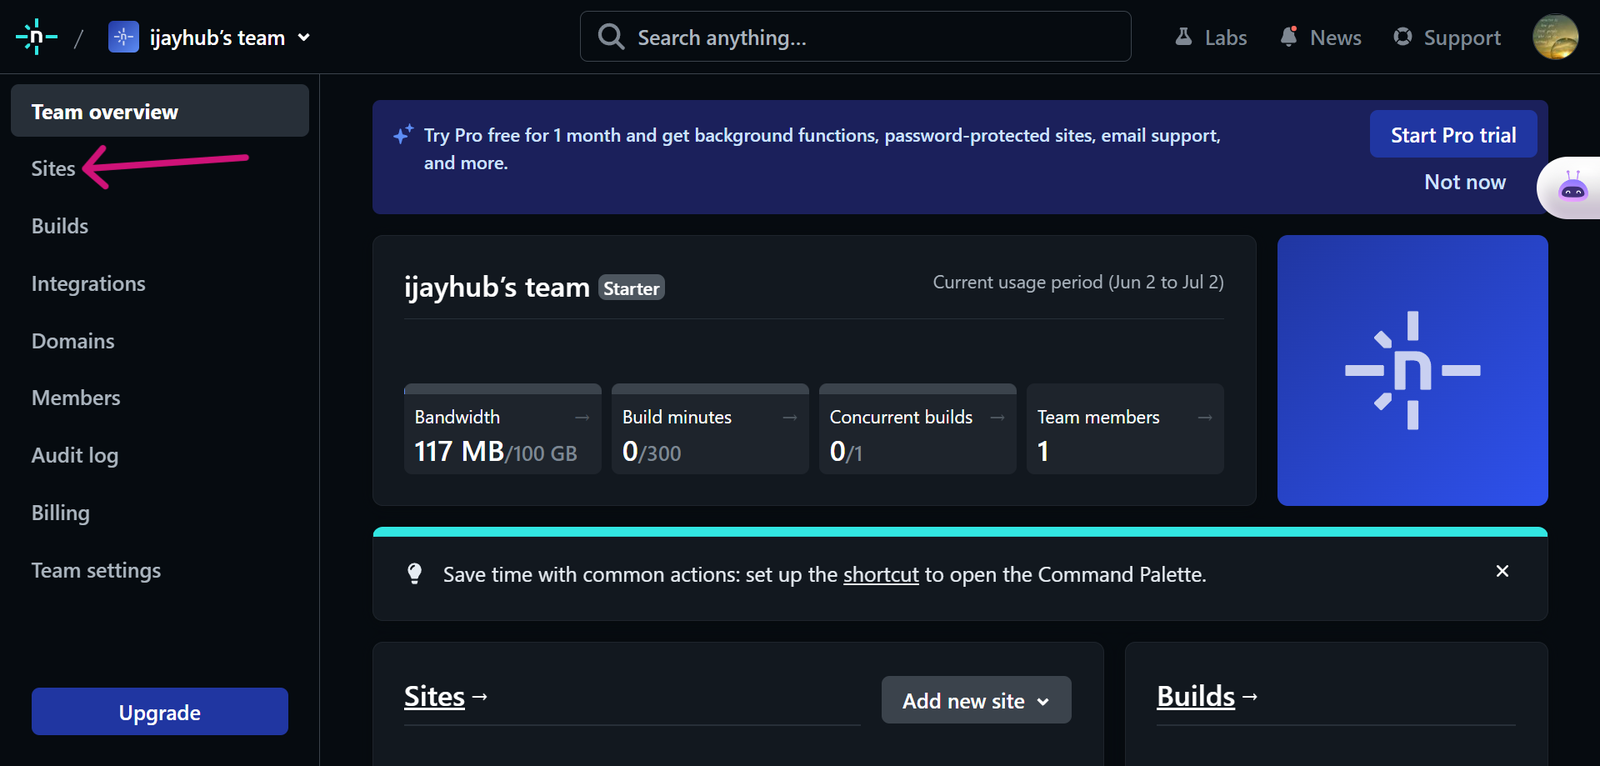
Once you have logged in, navigate to the left-hand side of the dashboard and select the “site” option.
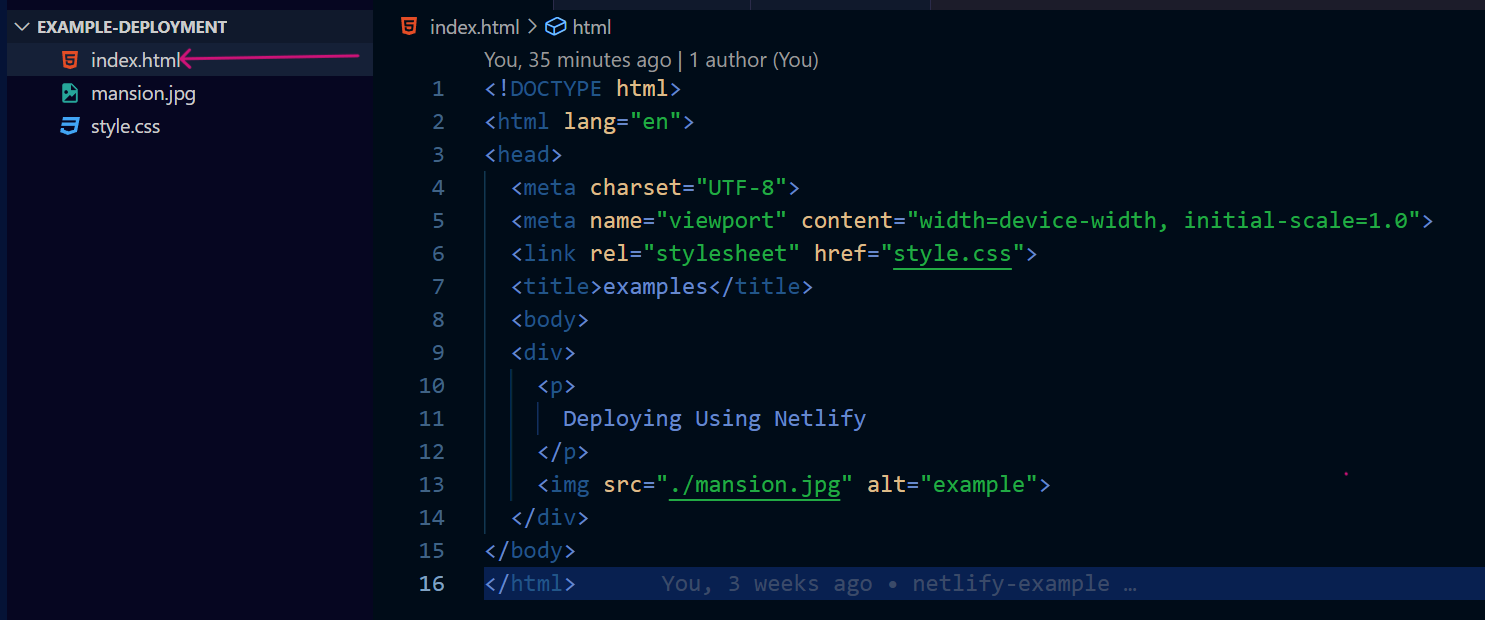
Before deploying your project, it’s important to include an “index.html” file. Netlify recognizes this file as the main folder for hosting your project.
Go back to the website click on “site” and scroll down, you will see the drag-n-drop zone where you can drag and drop your file or you upload the folder.

By using this feature your project will be deployed.
Importing the source code from your repository to the site:
First, upload your code to GitHub.
Then access the Netlify dashboard.
To access the option (drop-down) menu, click on “Add New Site”. Select “Import existing project.”
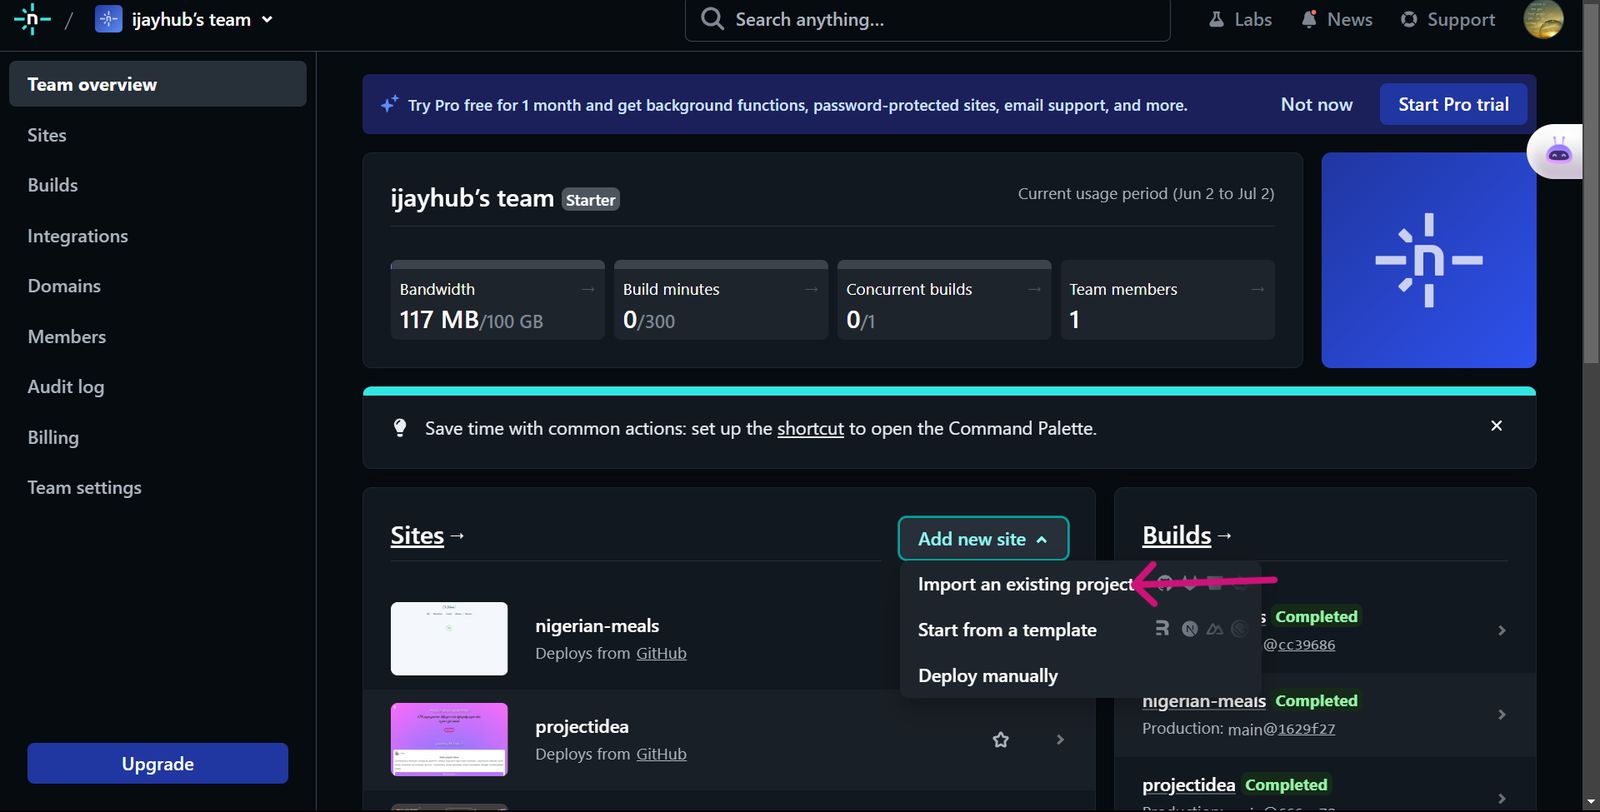
When you click on “Import existing project,” the system will direct you to a new page. Then you can import your repository from your GitHub account or any other storage account where you stored your source code.
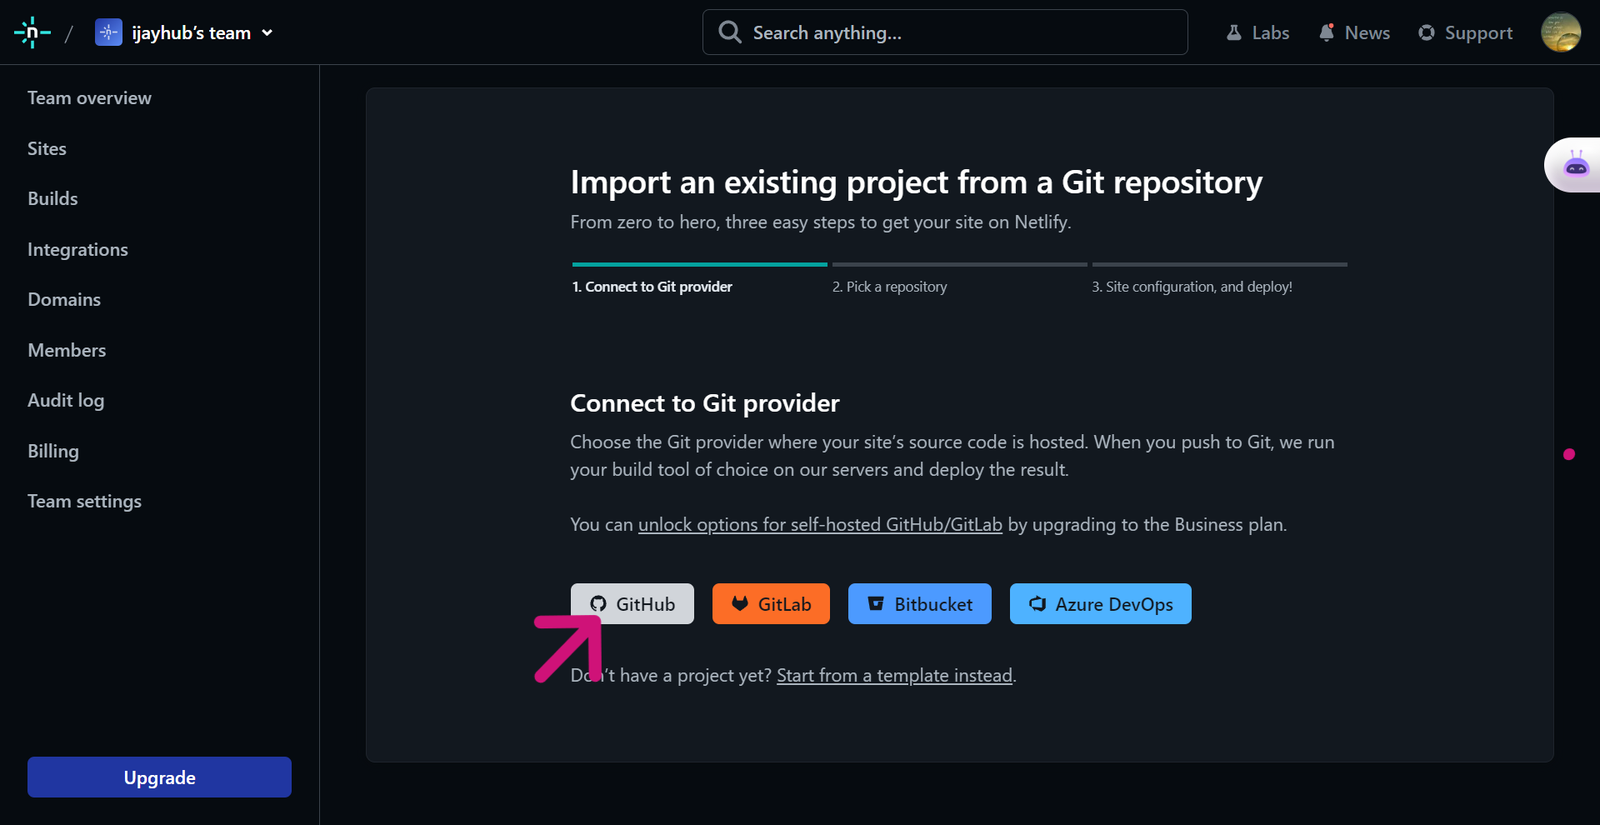
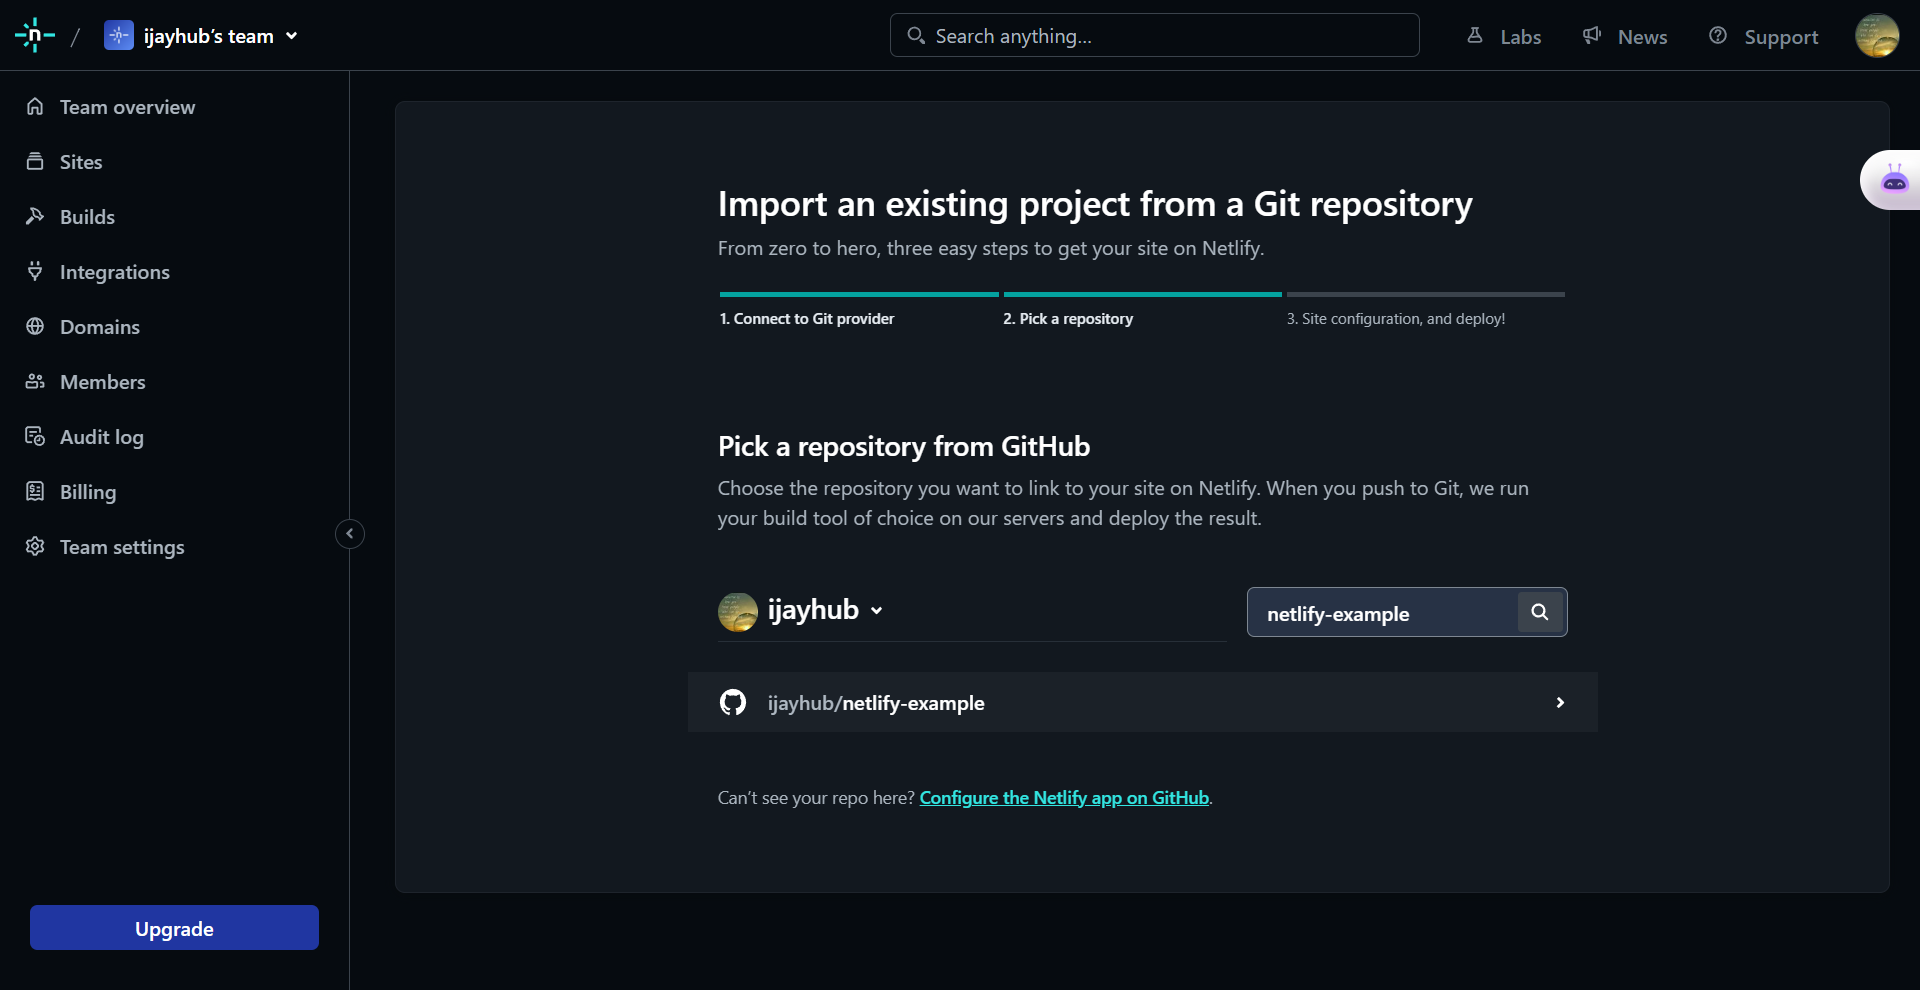
When you click on this button, it will navigate you to the next page where you can choose the desired repository from the available options.
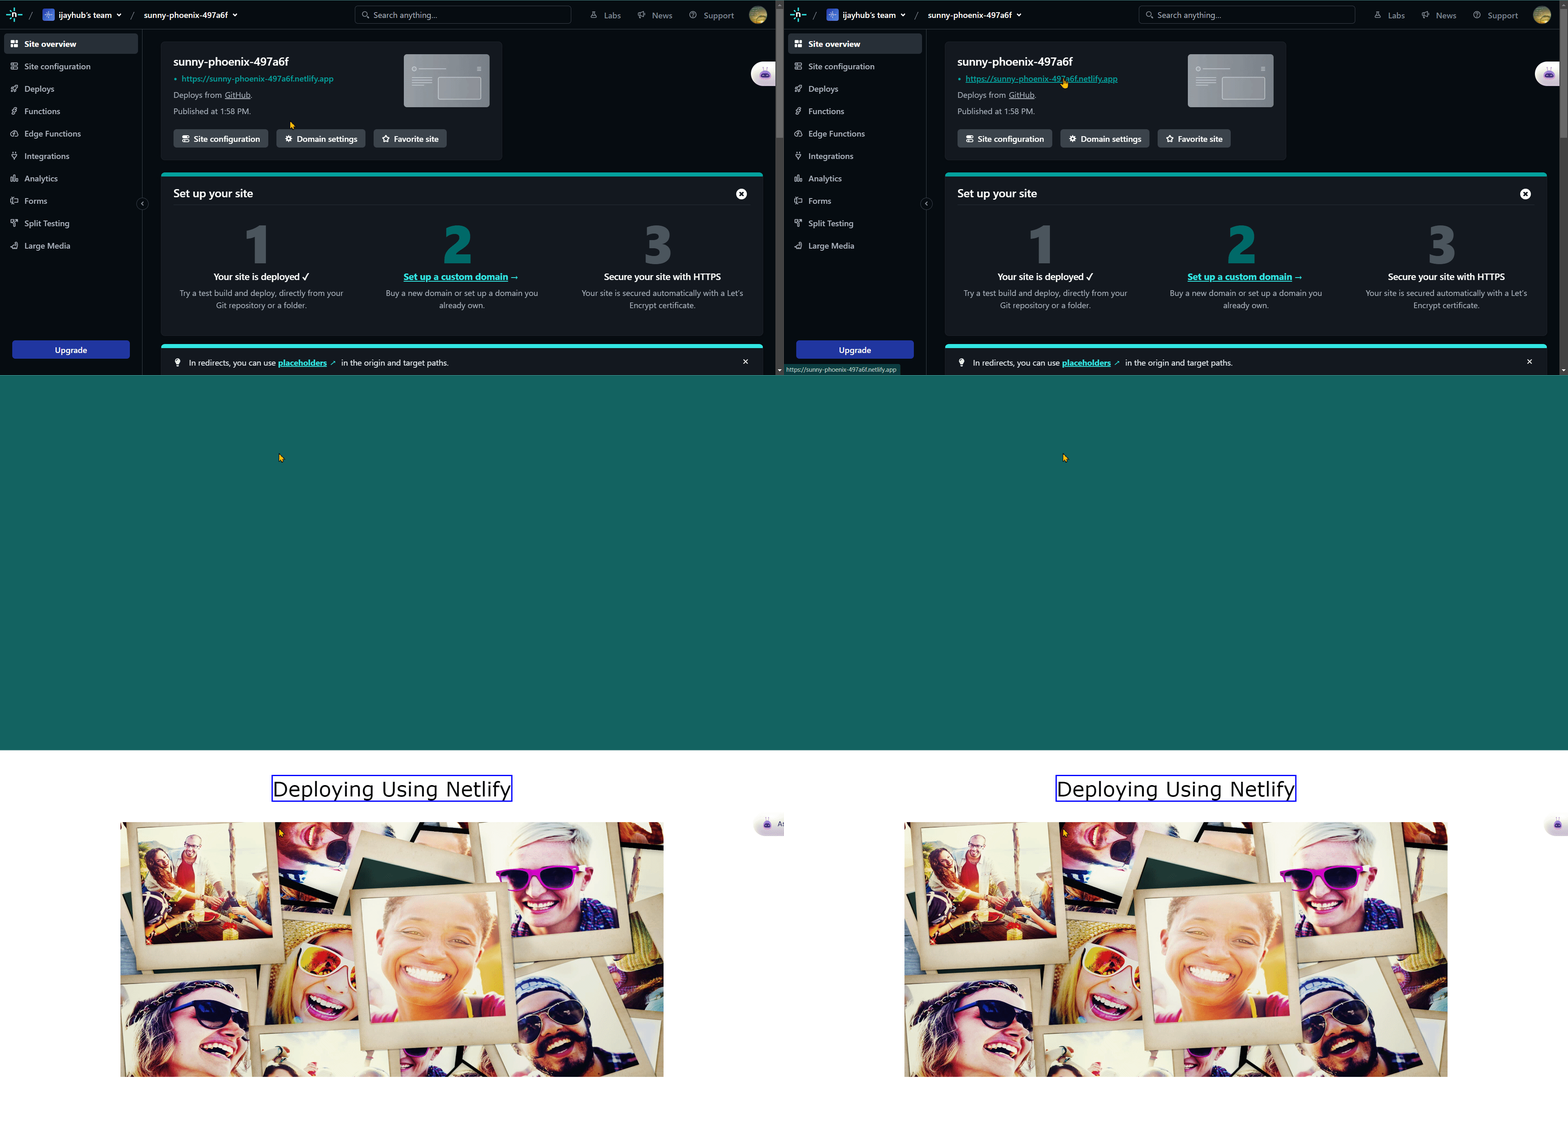
After selecting the repository, the next step is configuring and deploying your site.
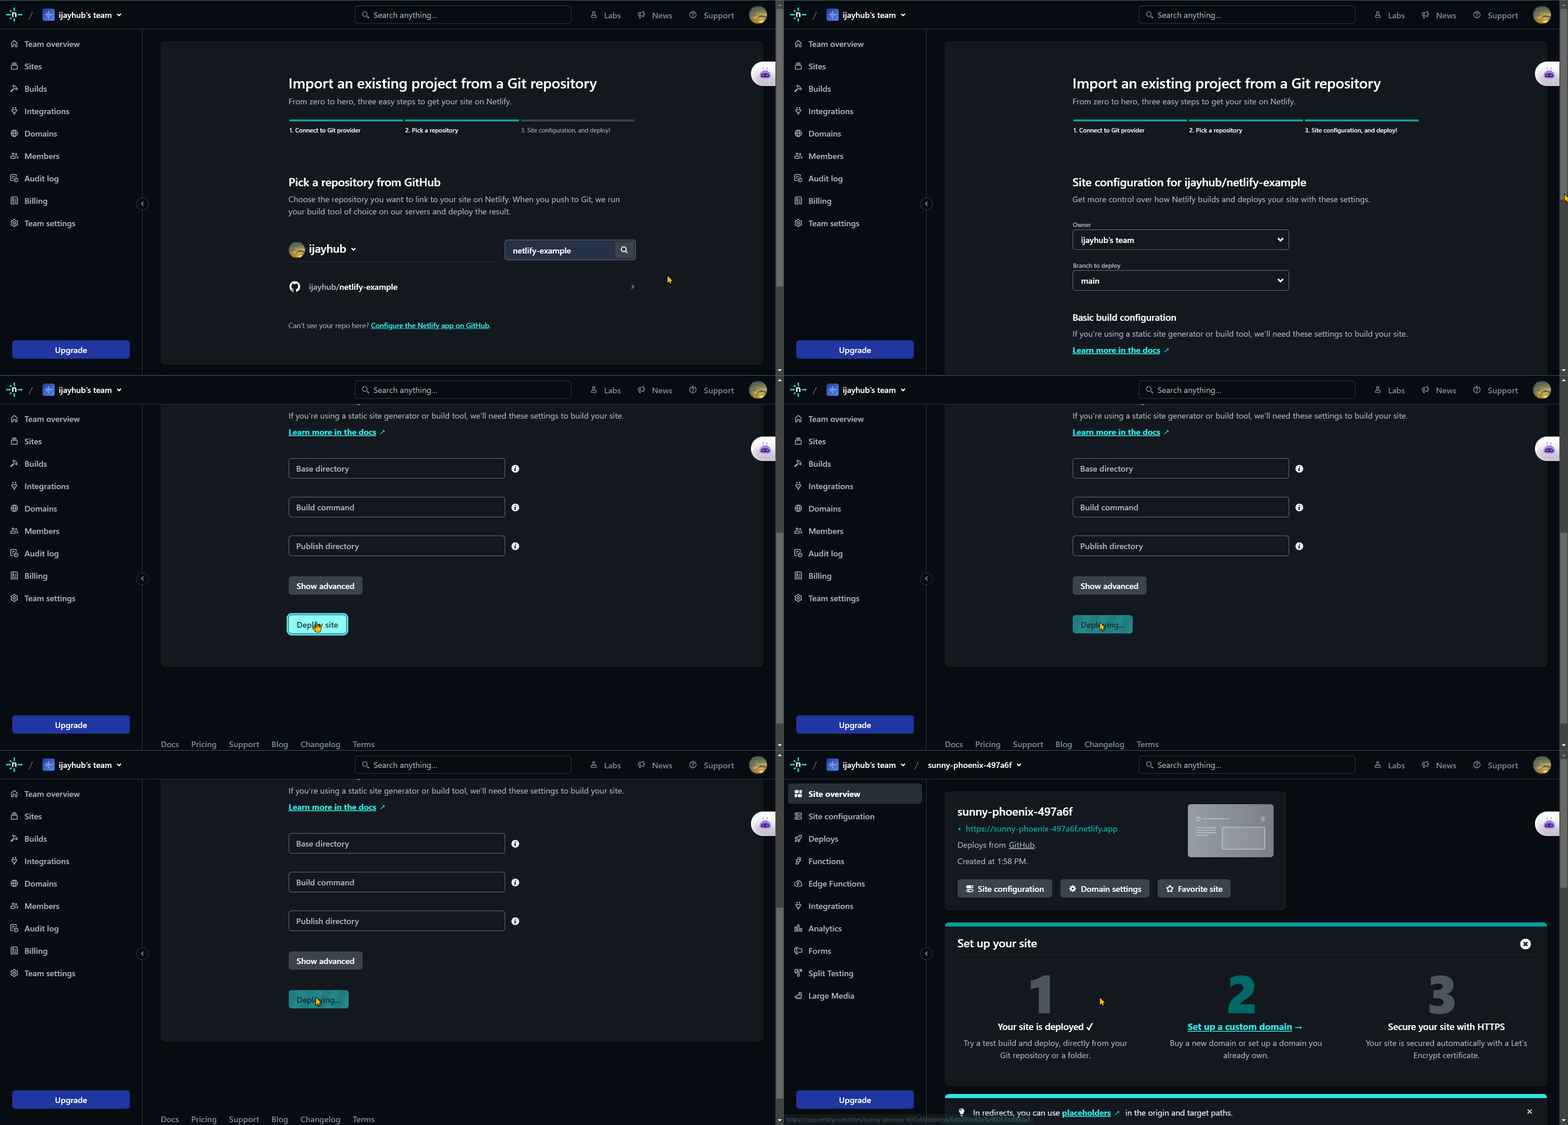
Here's the result:
When deploying your application to Netlify, you may encounter errors, often caused by routing issues.
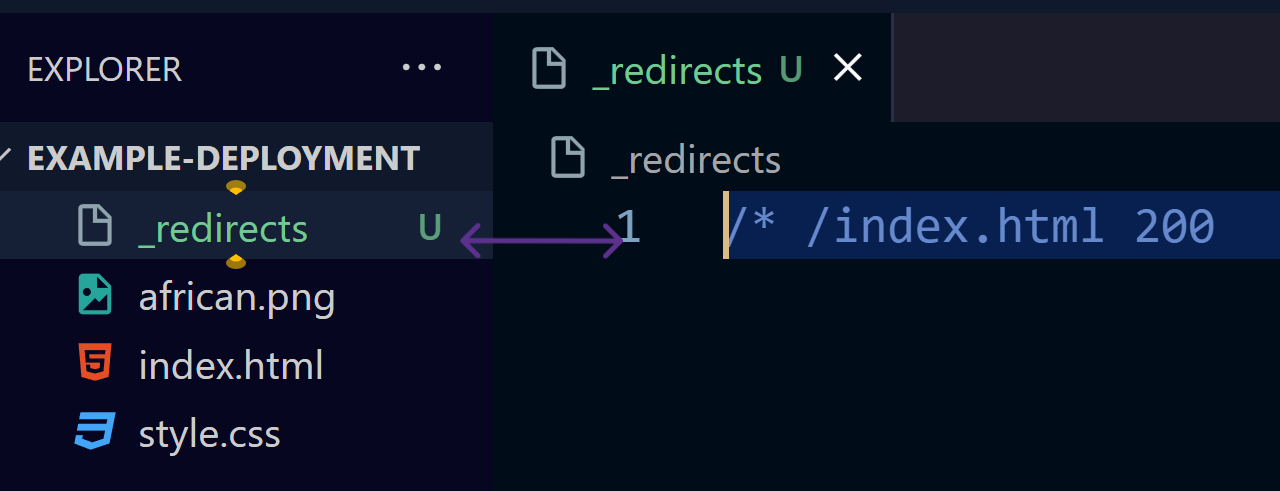
To fix this:
Create a file called _redirects, and inside write the following code:
_redirect file
/* /index.html 200Example
Pros of Deploying with Netlify
- Form handling capabilities: Netlify makes handling forms on your websites easy. It has a simple API that allows you to collect and process form submissions. It also integrates with popular form providers like Zapier, Mailchimp, and Slack.
- It’s easy to configure custom domains for your websites: it makes it simple to manage your website’s domain and security. It also ensures that your websites are secure with
HTTPS. - Web Hosting: Netlify helps you host your websites and applications. It offers static site hosting, allowing you to deploy
HTML,CSS, andJavaScriptfiles straight from a Git repository or by drag-and-drop. - Simple Deployment: it makes deploying your website or web app straightforward. When you connect your repository, it will deploy any changes you make.
- Continuous Deployment: When you make updates to your source code, Netlify builds and publishes your website for you. This ensures that your website always reflects the latest changes you’ve made.
Cons of Deploying With Netlify
- Project size: This hosting platform is an excellent choice for small to medium-sized projects. But you should explore other hosting and deployment options as your website or app grows.
- Limited Backend Capabilities: Netlify prioritizes front-end development and static websites. Although it does have some backend functions, it may not be the best option for projects that need complex server-side processing.
Conclusion
In conclusion, deploying an application is crucial so that users can access it and others can see your work. User-friendly deployment methods offer significant benefits, including collaboration, efficiency, simplicity, and reliability.
Here's a quick review of what we've covered here:
- Render offers a simple interface, affordable pricing, and built-in features.
- Surge offers fast deployment speeds, making deploying static websites a breeze.
- Vercel is an expert in creating cutting-edge web apps with scalability and preview deployments.
- If you’re looking for an easy-to-use option, consider GitHub Pages. It provides several advantages, including simplicity, free hosting, version control, and
HTTPSencryption. But, it has limited functionality and technological limitations for more sophisticated applications. - Netlify is a user-friendly platform that's great for quickly deploying static websites and web apps. It's perfect for projects that want easy setup, automatic deployment, and modern development features
What you choose will depend on the particular needs and objectives of your application and the technical know-how of the developers working on it.
And if you want to improve your Git skills, you can read this Git Command article.
If you found this tutorial helpful, please share it with fellow developers who may also find it interesting. You can also stay updated on my latest projects by following me on Twitter and LinkedIn.

