By Luke Miller
One night in June, 2017 I stumbled across a website called freecodecamp.org. I was a teacher at the time who was looking for a career change. But I assumed being a programmer was out of my reach.
After all, I didn’t consider myself a math whiz, never went to school for computer science, and felt I was too old to get into coding.
Thankfully, freeCodeCamp helped me take my first steps toward becoming a developer, and I soon shed each of those self-limiting thoughts.
Now, as a Samsung software engineer and three-time certified AWS developer, I look back at those nights and weekends I spent working through the freeCodeCamp curriculum and see them as a major contributor to my successful work transition and my accomplishments as a programmer.
With my teacher-heart still present, though, I wrote this post to encourage other freeCodeCamp students to continue with their learning as well as to supplement their freeCodeCamp curriculum.
Familiarity with cloud computing, like AWS, Azure, or Google Cloud, is an increasingly present requirement in job postings.
This post will give any newbie who is still working through freeCodeCamp’s curriculum a simple introduction into the vast world of cloud computing. I'll show you how to take one of your freeCodeCamp front end projects and deploy it on AWS in a variety of ways.
Enjoy, and thank you freeCodeCamp!
Prerequisites
The point of this post is to extend your learning from the Front End Development Libraries Projects portion of the freeCodeCamp curriculum by deploying them to AWS.
So the prerequisites are:
- finish one of the Front End Libraries Project challenges
- have an AWS account (go here to sign up)
Why Deploy Your Project to AWS?
As you work through the freeCodeCamp curriculum and you finish your Front End Libraries Projects, you submit those projects via CodePen where freeCodeCamp has a series of unit tests to verify that you correctly completed their user stories.
Confetti falls, you see some inspirational phrase, and you’re probably very proud of your project. You might even want to share that accomplishment with your friends and family.
Sure, you could share your CodePen link with them, but in the real world when a company finishes a project they don’t make it available via CodePen – they deploy it. So, let’s do that too!
Just a quick note: when I say “deploy”, I mean taking your code from a local environment (your computer, or the freeCodeCamp or CodePen editors) and putting it on a server. That server, which is just another computer, is networked in such a way for the world to access your site.
If you wanted to, you could set up a pc in your home and do the proper networking for it to serve your project to the world. Or, you could subscribe to a hosting company for them to serve your website for you.
There are a variety of approaches to deploy code, but one very popular method is to use a cloud computing platform like Amazon Web Services (AWS). More on that next.
What is AWS? A Brief Intro to the Cloud
Amazon Web Services (AWS) offers a “cloud computing platform”. That’s a little jargon with a lot packed into it. Let’s unpack.
AWS has services ranging from simply storing files, running servers, converting speech to text or text to speech, machine learning, private cloud networks, and about 200+ other services.
The basic idea behind cloud computing is to gain on-demand IT resources. The alternative, like we talked about earlier, is for you to own those IT resources.
There are a number of benefits to using a cloud computing platform instead of owning, one of the main ones being the cost savings.
Imagine trying to pay for all the physical IT resources that it would take to run the 200+ services AWS offers. That upfront cost is something most companies cannot afford, and fewer could pay for the engineers to configure.
Also, since the resources are on-demand, cloud platforms allows you to launch resources much faster than an IT department could.
In short, with a cloud computing platform like AWS you save on cost and deployment time, plus many more benefits not the least of which is security. Needless to say, cloud computing is the new sexy approach to IT and AWS is leading the pack.
Why does this matter to you? If you intend to pursue a career in development, regardless of your focus (backend, frontend, web technologies, mobile apps, gaming, desktop applications, and so on) you will find that many job postings include a reference to cloud compute platform experience.
So the more you can become familiar with one, like AWS, the more you’ll separate yourself from other candidates.
How to Deploy your freeCodeCamp Project with AWS S3
What is AWS S3?
Throughout this post we’ll deploy your freeCodeCamp front end project using various services on AWS.
Our first approach is through the AWS service called S3. S3 stands for Simple Storage Solution. As you might have guessed from that name, the service lets you simply store stuff, more specifically objects.
You can find tutorials and courses on S3 that are hours and days long. On the surface though, it’s just a place where you can store objects. Objects can be things like image files, video files, even HTML, CSS, and JavaScript files.
As you dive deeper into S3, you’ll learn that S3 allows you to do a lot of things to and with those objects. But for our project, we just want to learn how to store objects and look at a single one of those deeper features – using S3 as a website hosting service.
Thats right, AWS S3 is a service we can use to deploy a website.
How to Get Your Project Ready for Deployment
Throughout this post, I’ll be using the Random Quote Machine project. I am using the code from the example provided in the instructions.
We need to take your CSS, HTML, and JS code from CodePen and put them into their own separate files in a text editor.
Open Your IDE (for example, Visual Studio Code)
In the CodePen environment, CodePen links your CSS to your HTML code, as well as your JS file to your HTML. We need to account for this before we deploy to S3, so we are going to test locally first.
Open your editor of choice, and create a new directory (folder) to hold your three CodePen files. I called mine random-quote-machine. Next, create three new files:
- index.html
- styles.css
- main.js
 Three empty files: main.js, styles.css, and index.html
Go ahead and copy your CodePen HTML file into index.html, CodePen JS file into main.js, and CodePen CSS file into styles.css.
Check your tags
CodePen does not require the <body> tag, but it’s good practice to add that. Make sure your HTML content has one. Look back at your fCC curriculum if you don’t remember where these go.
Add and
You will now need to link your styles.css and main.js to your index.html, since CodePen no longer does it for you.
Above your <body> opening tag, add <link rel="stylesheet" href="style.css" /> which will make your css in styles.css take effect.
Below your <body> closing tag add <script src="main.js"></script> which will link your JavaScript in main.js file accessibly to index.html.
Verify that Your Site Still Works Locally
It’s time to test that our code is working. Open a web browser, and then type ctrl+o to select a local file to display in the browser. Navigate to your folder with our three files, and then double click on index.html to open it.
If everything is working, great! It wasn’t for me though. The code I used had SASS styling, which I needed to make some adjustments to.
If you imported any libraries via CodePen, those would need to be imported, likely through the CDN. A simple Google search for those libraries’ documentation should help you to find out how to import them.
Make whatever changes you find necessary to get your project in working order, but remember, the purpose of this exercise is to learn about deploying a website on AWS S3. So if you’re getting bogged down with something small but the site mostly works, continue on with this tutorial to keep the momentum going and then at a later time resolve whatever CSS or JS issues you have.
Once your site works locally, even if not 100% to your liking, let's get into AWS.
How to Work with the S3 Management Console
After logging into AWS, in the top search bar type “S3” and then select the option that says “S3”, not “S3 Glacier”.
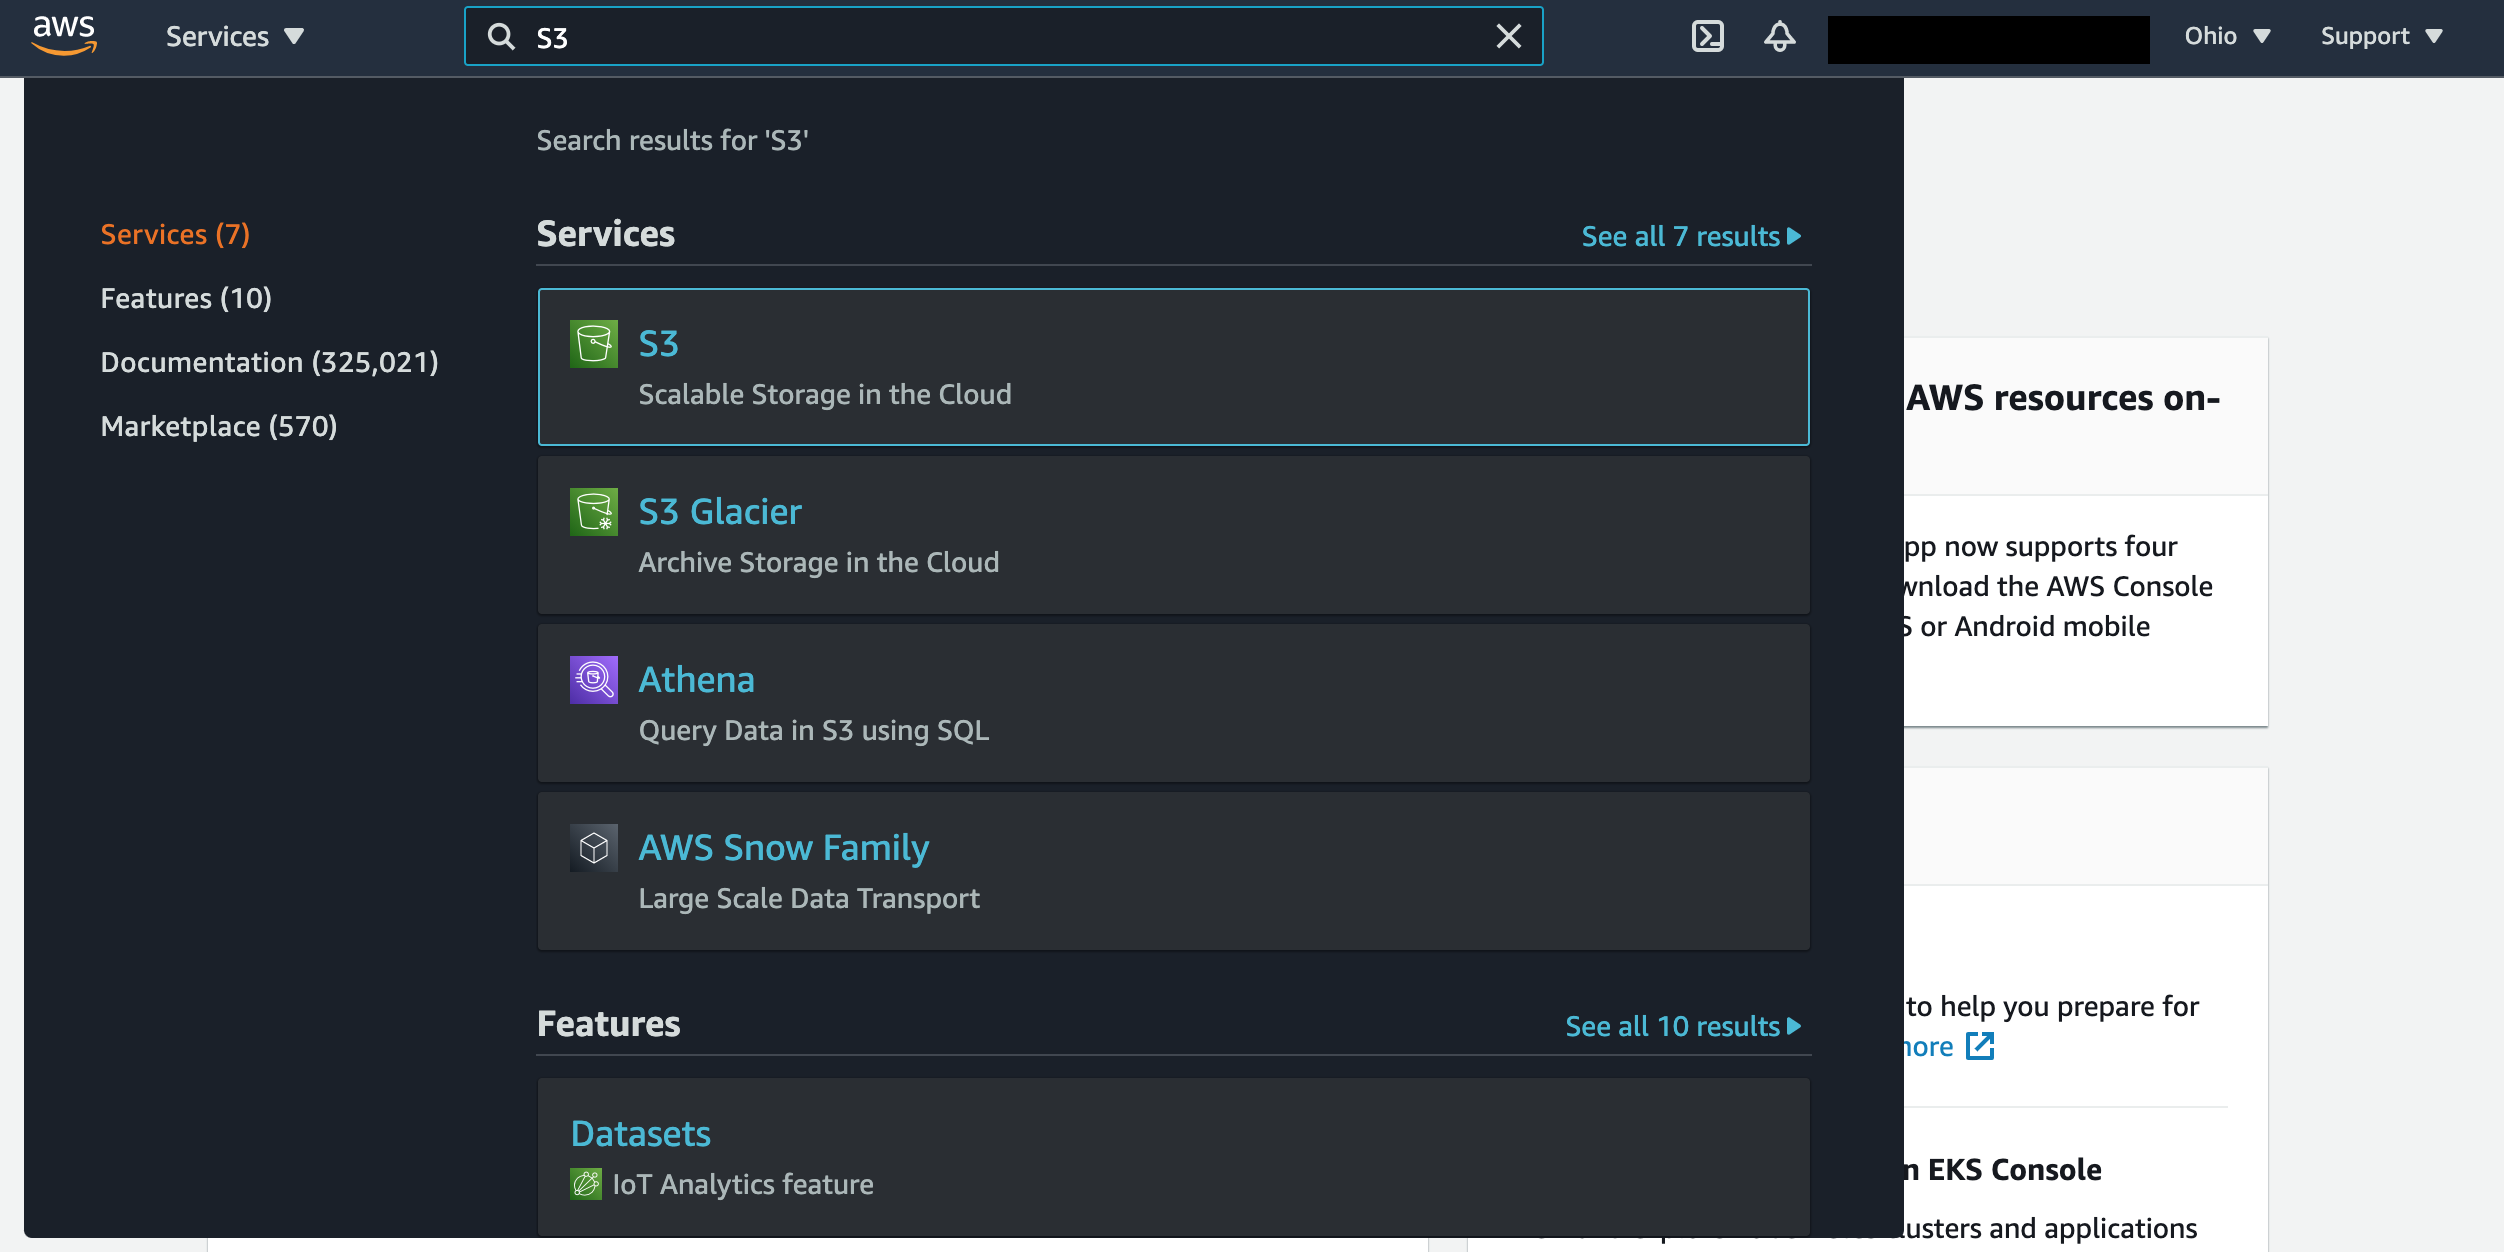 Searching for S3 in the AWS Management Console
Alternatively, instead of the search bar you could expand the “Services” dropdown and enjoy looking at all the AWS service offerings. Either way, let’s click on S3.
You should now see the S3 Management Console. Something like this…
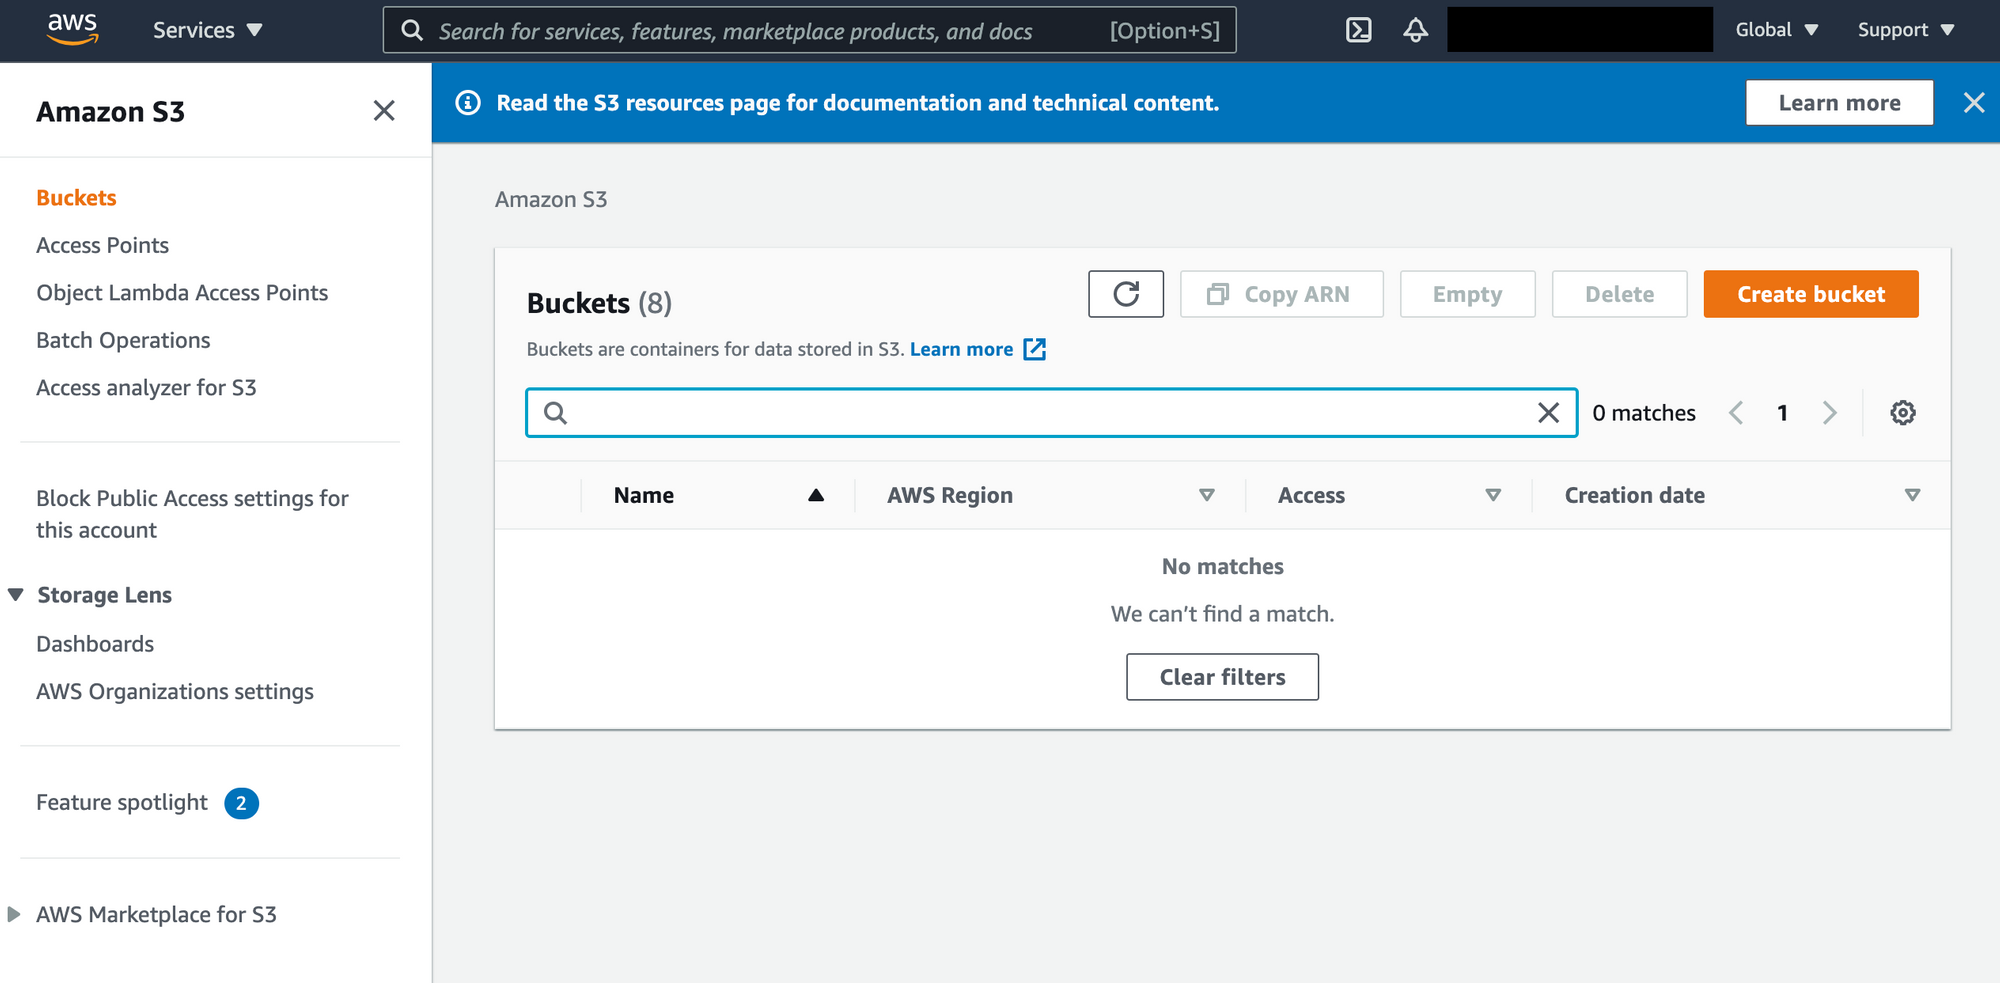 The S3 Management Console
This is what AWS calls the Management Console. It’s the website interface to interact with AWS and create resources and services.
There is a Management Console for all of the AWS services, but this console is not the only way you can interact with AWS. There is also a CLI (command line interface), which allows you to script to AWS what you would like to do.
Instead of clicking on buttons, in the CLI you type what you would otherwise have clicked on (though less verbosely). We are going to stick with the console for now.
Here you can view all of your S3 buckets. S3 is composed of buckets, and a bucket is basically a big container where we get to put files. Think of a bucket as a drive on your computer (like your C: drive). It technically isn’t – it’s a method for routing in S3 – but for now it’s fine to see the bucket in this way.
Create Your S3 Bucket
Click on the Create bucket. Then, enter a unique name for your bucket (no spaces allowed).
The name of your buckets must be globally unique. So, if you try to create one named test, there is probably someone in the world who used that already so it won’t be available.
 Entering my new S3 bucket name
After inputting your bucket’s name, scroll down to the section called Block Public Access settings for this bucket. We want to uncheck the Block all public access checkbox, and then further down check to acknowledge the warning box that appears.
 Your settings should match this
Security and permissions in AWS is a lengthy topic, but, as you can see by the warning, you typically do not want to unblock public access to your files.
In our case, we want our website’s visitors’ web browsers to be able to access our index.html file so that they can see our project.
There are other methods we could use to unblock access to our bucket’s content, but for now this is sufficient for our goal of introducing you to S3 and deploying a project on AWS.
Scroll down to the bottom of the form. Click the Create bucket button at the bottom. If your name was unique, you just made your first AWS S3 bucket, congrats!
It’s pretty amazing to stop and think that in that short amount of time, AWS just made space available for you in their network to store an unlimited amount of data. That’s right, unlimited!
Although the maximum size for a single object in your bucket is 5 terabytes (good luck hitting that), your new bucket can hold as much as you want in it.
Upload Your Files to Your Bucket
Next, back in the S3 console view, click on the link to your newly created S3 bucket. Once inside, we want to click on the Upload button. Select your three files (index.html, styles.css, and main.js).
After you see their names show up in the list of items about to be uploaded, scroll down to the bottom of the upload form.
Expand the Additional upload options, and then scroll down to the Access control list (ACL). Check the Read boxes for Everyone (public access), and then check the acknowledgement box that appears underneath, just like when we created our bucket.
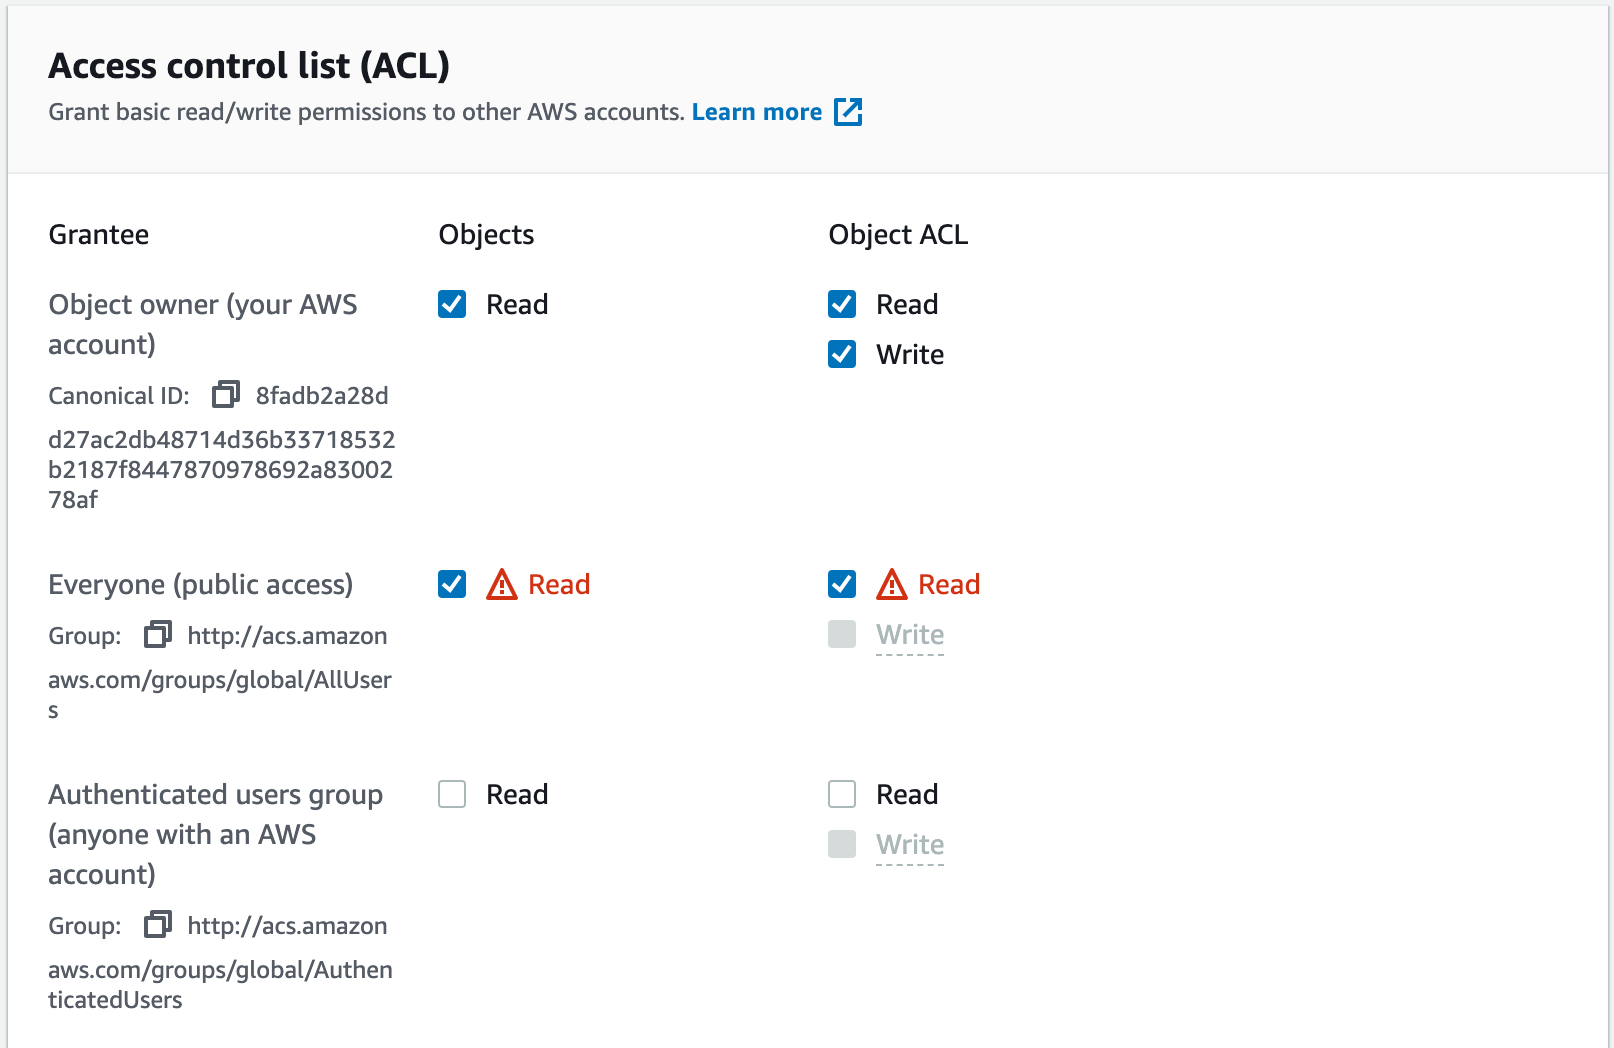 Your selections should look like this
Scroll down the rest of the way and click the Upload button.
Enable Hosting on the S3 Bucket
Now we have our S3 bucket, we have our files, we have them publicly accessible, but we’re not quite done.
S3 buckets by default are not configured to be treated like web servers. Most of the time companies want the contents of S3 buckets kept private (like hospitals storing medical records, or banks saving financial statements). To make the bucket act like a web server, providing us with a URL to access our files, we need to adjust a setting.
Back at your bucket’s main menu view, click on the Properties tab.
 Select the Properties tab
Scroll down to the bottom until you find Static website hosting, and click the Edit button. Set Static website hosting to Enable, and then in the Index document and Error document type index.html. Then click the Save changes button.
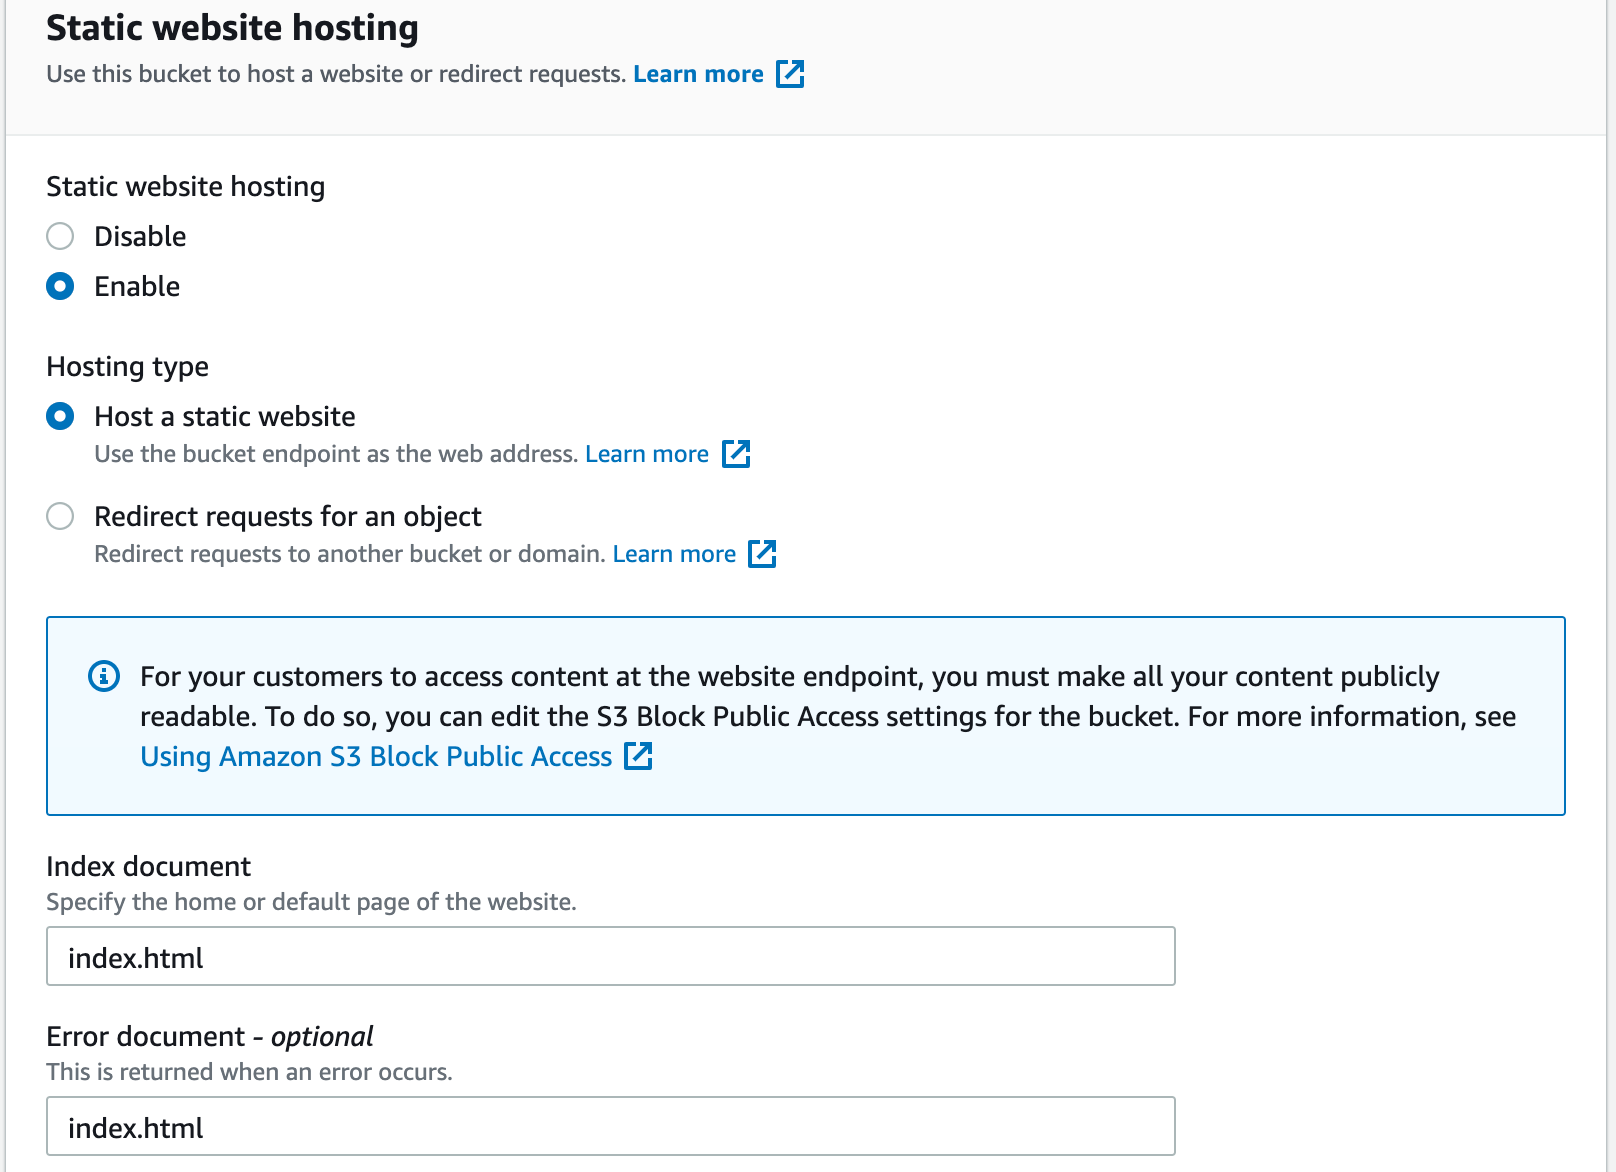 Your selections should match this
You’ll return to the Properties tab of your bucket. Scroll back down to the Static website hosting section, and there you’ll find a link.
Reading that URL you’ll notice the name of your bucket is in it. By typing index.html in the two fields during the configuration, we told AWS that when this bucket’s URL is opened to use the index.html page to load.
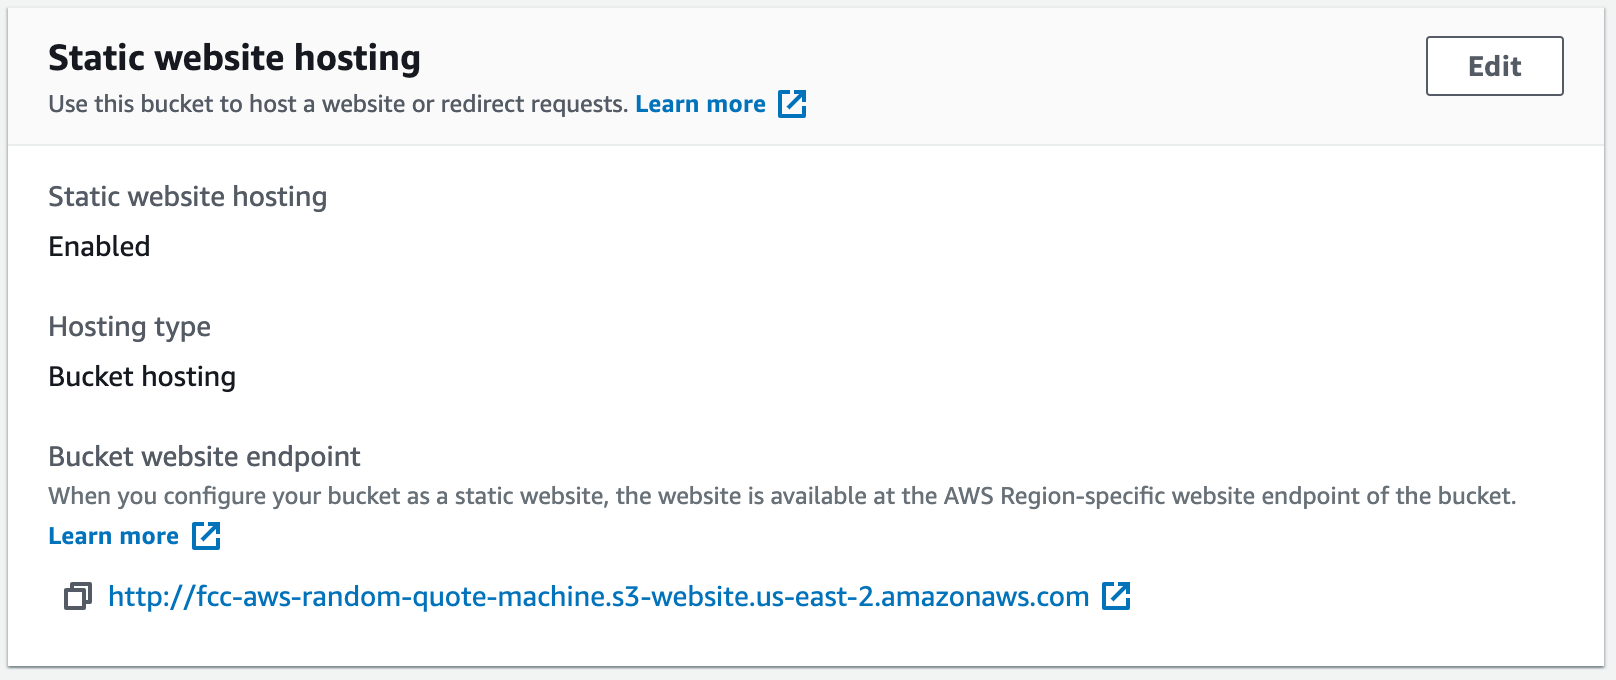 You should see your bucket’s website endpoint now
If you click on that link, your project should now be viewable.
Troubleshooting
If your site worked locally, but is not working when you open the S3 website endpoint link, there are a few common problems to try and resolve.
First, make sure you selected the same files that worked locally. Reopen the local files in a web browser to make sure they work. If it works locally but not through S3, try re-uploading them and ensure you select the same files.
Next, go to your bucket’s Permissions tab and make sure you have the Block all public access set to Off.
Lastly, delete your files you uploaded, and re-upload them, ensuring that you select the Read checkboxes described above, as well as the acknowledgement box.
If you are still having problems, feel free to comment with your issue and I’ll be happy to help. Don’t get too discouraged either. AWS can take a while to learn so go easy on yourself if things aren’t falling into place the first time.
You Did It!
Now, instead of sharing a CodePen URL to your friends and family, you have your very own S3 bucket website endpoint to share.
Granted, it’s still not your own personalized domain, but hey, it’s still cool to know you just deployed a website the same way thousands of businesses do.
You’ve now not only learned the front end skills associated with freeCodeCamp’s Front End Libraries Projects, but you also took your first steps into cloud computing with a deployment of a website. You should be very proud!
More on S3
Configuring an S3 bucket to be a website endpoint is just one of many ways to use S3. We could also use S3 to store data that we want to pull into an application. For example, the quotes on our Random Quote Machine could be stored in S3 as a JSON file, and then our front end could request them.
That might seem like an odd adjustment to make when they could just be listed in our main.js file. But if we had other apps that needed access to those quotes then S3 could act as a central repository for them.
This is in fact the most popular way to use S3, as a data store for applications. We could also use the Glacier option of S3 to archive objects that we don’t anticipate accessing frequently, which would save us money from the standard S3 bucket configuration.
One last idea, though not the last way to use S3, is that we could save logs from a running application to an S3 bucket so that if there was a bug we could inspect those logs to help identify the source of the problem.
Whatever the use case, the concept of S3 is the same: we are storing objects in a bucket and those objects have permission settings to determine who can view, edit, or delete them (remember, we set our files to be publicly readable).
Next Up!
As stated before, AWS has hundreds of services, which means there are sometimes multiple ways to do a job. We walked through one way to host a site, but there are two more worth noting that will help you gain more exposure to AWS as a whole.
How to Deploy your freeCodeCamp Project with AWS Elastic Beanstalk
Now we're going to learn more about the AWS cloud platform services and see an alternative way to deploy your code so you can experience more that AWS has to offer.
Specifically, we are going to get an introduction into several of the core AWS services and resources: EC2s, Load Balancers, Auto Scaling Groups, and Security Groups.
Wow, that’s a lot of topics to cover. In the first part above, we only looked at S3 – how are we going to learn about all these other services?
Well, thankfully AWS offers a service called Elastic Beanstalk which bootstraps the deployment process for web applications. By deploying your freeCodeCamp project via Elastic Beanstalk you can quickly gain experience with these core AWS services and resources.
 We will use the AWS service called Elastic Beanstalk to deploy
Before We Jump Back into AWS
We discussed in Part 1 that to “deploy” code means to configure a computer in a way to serve the project and make it accessible to visitors. The nice thing about cloud computing platforms is that the configuration of that server can be done for us if we want.
Consider our S3 deployment for a second. Our files were stored on a machine owned by AWS, and AWS took care of configuring that computer to serve the index.html page and give us an endpoint for viewing the project.
Aside from telling S3 the name of our index.html file, we did none of that configuration and yet we still walked away with a deployed project and an endpoint to view it.
When we use Elastic Beanstalk, it will similarly include AWS handling a lot of configuration for us. But this time we are also going to do a bit of configuring ourselves.
By doing this, we will see an alternative and very popular method for deploying a web application. This time, we will add code that “serves” the index.html but we’ll let AWS handle the launching of the hardware and giving us an endpoint to view our project.
Let’s Configure!
We are going to add some code to our project to serve our index.html. Remember, S3 did this behind the scenes for us.
I have created a Git repository for you to clone or download and use for this tutorial. If you’re familiar with Git, then feel free to clone the repo and jump ahead to Paste Your Code. But if you’re not familiar with Git, then follow the instructions for downloading this repo.
Download the Repo
- Go to https://github.com/dalumiller/fcc-to-aws-part2
- Click on the green Code dropdown menu and then select Download Zip
- Unzip/extract the files from the zipped download
Paste Your Code
In the newly downloaded/cloned folder (which I'll refer to as fcc-to-aws-part2 folder), we want to paste your index.html, main.js, and styles.css files that we uploaded to S3.
In the fcc-to-aws-part2 folder, there is another folder named public which has empty index.html, main.js, and styles.css files. Go ahead and paste your code into those.
After pasting, let’s confirm everything is working so far.
Open a new browser tab, and then type ctrl+o and navigate to fcc-to-aws-part2/public/index.html. Open index.html in that new tab. Your app should be running now.
If it is not, stop and make sure you pasted the correct code into the correct .html, .js, and .css files. Also, make sure you’re using that same code that worked during your S3 deployment.
With that working, we are now ready to discuss what this extra stuff is in the fcc-to-aws-part2 folder. Make sure you do not make any changes to any files other than the index.html, main.js, and styles.css.
Configuration with Node.js & Express.js
Remember I said we were going to do some configuration this time? Node.js (aka Node) and Express.js are what we’re using to accomplish that configuration.
freeCodeCamp has a tutorial on Node and Express, so if you’d like to pause and go through that feel free. But I’ll also provide a brief introduction explaining why and how we are using Node and Express.
Why Use Node?

Node.js is a JavaScript runtime for server-side applications. That is a lot of jargon, so let’s break it down a bit.
“Node is a JavaScript runtime” – a runtime, in the world of programming, is an execution model. In other words, it is a process that implements how to execute code. So, Node, is a process that implements how to execute JavaScript code.
When we have JavaScript code like this:
console.log("Hello World")
Node knows what to do with that code.
“…for server-side applications”- remember that we are trying to deploy our code to be served by a server, and that a server is just a computer. Also, note that a server is different from a client, and in the case of a website the client is the web browser.
When you open your project in a web browser, the browser handles reading the index.html, main.js, and styles.css files. That’s right, the browser (client) knows how to read and execute JavaScript code, so that when it sees console.log("Hello World") it knows what to do.
Our main.js file is JavaScript code that is being run client-side, by the browser. But, Node is for server-side JavaScript. So, your browser knows how to run that JavaScript code, but how does the computer that serves our website know how to run JavaScript? Node.
 JavaScript can run on the client (ie: web browser) and server
So, all together, “Node is a JavaScript runtime for server-side applications” means that Node is a process for implementing how to execute JavaScript code on a server, as opposed to a client like a web browser.
Without Node, the computer/server does not know how to run JavaScript code.
Why Use Express?
 Expres.js a web application framework for Node.js
While Node gives us the server-side runtime, which is that environment where we can run JavaScript code, Express gives us a framework for serving web applications.
When we deployed via S3, we told S3 the file name we wanted served (index.html). Now, Express will be where we configure what file we want served.
If we had a website with different routes (ie: www.example.com/home, /media, /about, /contact), then we might have different HTML files for each of those pages. We would use Express to manage serving those pages if the web browser requested them.
For example, when the web browser requested www.example.com/contact, Express would get that request from the browser and respond with contact.html.
app.js
Now we know that Node is what lets us run JavaScript code on the server and Express is handling our requests from the browser. So let’s look in fcc-to-aws-part2 at our app.js file and read it line by line to understand what we’ve added to our project.
First…
const express = require("express");
This declares a variable called express, and then the = sign means we are assigning it a value. But what’s this require(“express”)?
The require function is just a function Node is aware of, and when Node sees it then Node will look for a folder in the node_modules folder by the same name. You have this node_modules folder in your fcc-to-aws-part2 folder.
Once Node finds express inside the node_modules folder, it will import the code from the express folder and assign it to the variable we declared. This lets us use the code that comes from the express folder without having to write it ourselves. This importing code into our code is the concept of modules.
A module is just a bundle of code. It could be one line long or much longer. Therefore, a NODE_module (emphasis added to node) is a bundle of code that can run in the Node runtime. We are using, or require-ing, the express module.
The express module is the Express.js web application framework we discussed earlier.
I won’t got into how to add modules to the node_modules folder, but for now know that by declaring the variable express and using the require(“express”) syntax, we are bringing in that Express.js framework and making it accessible via the variable we assigned it to.
There was a lot packed into those previous four paragraphs, I recommend slowing down and reading it again to make sure you really got it!
Next up…
const path = require("path");
Ah! This should look familiar now. We are bringing in another module, this time the path module. We’re assigning it to the path variable.
You might have noticed a pattern that the variable name we use matches the module name. It doesn’t have to be that way. We could assign the path module to the foobar variable. But it makes more sense to name it what it is.
What does the path module do? It is a module (just a bundle of code) that lets us work with file and folder paths. This way we can use a JavaScript syntax that Node understands in order to access files/folders on our server. That will come in handy when we want to reference where index.html is located in our project.
Alright, moving on…
const app = express();
Express, again? That’s right. The first time we were just importing the module, now we are using it.
To use the Express framework we have to instantiate it, meaning we have to run this express function, express(), and now we’re assigning it to the app variable.
“Whoa, but Luke, why not have this line of code right after the earlier express line of code?”
Good question. It is a common pattern to import (or use require()) all the modules you’ll need at the top of your code, and then use them after you’re done importing.
Now for the big banana…
app.use(express.static(path.join(__dirname, "public")));
Whoa there! Let’s break this apart a little.
First, we are calling a function, the app.use() function. This is telling our Express application that we want to USE another function in our app. Makes sense.
The function we are telling Express that we want run is the express.static() function being called inside of the .use() function parameter. So, app.use() is telling Express we want to use some code in the app, and specifically here we are wanting to USE express.static(path.join(__dirname, “public”)).
Now, express.static() is an Express function which we can use since it’s part of the module that we imported and assigned to the express variable.
The .static() function handles serving static files. I hope your ears perked up and eyes opened wide! I’ll say it again. The .static() function handles SERVING static files. Serving!
Remember, in this deployment approach we are handling a bit more of the configuration to SERVE our project. Here is the Express function that we are using to say, “I want to serve some static files”. Static files means our index.html file.
So, app.use() was saying, “Hey, I want to run some code for this app inside my function parameter”. Specifically we want to run express.static() which says, “I want to deliver static files, like an index.html”, and then its function parameter tells us where to find those static files.
So let’s look at path.join(__dirname, “public”) to understand how it’s telling us where our static files are.
Earlier we imported the path module to be able to access files in our server/computer.
Well, we want to access the index.html file, which is the public folder. We use the path function .join() to say, “hey, from our current directory (or, folder), go to the public folder to find the files I want”. That will return the index.html, main.js, and styles.css to the express.static(), which will return to the app.use() function that is handling what files to serve (SERVE!) our visitors.
All together now!
app.use() = “when the browser requests the app, I want to run express.static()"
express.static() = “I am going to deliver some static files and they are located here…"
path.join(__dirname, “public”) = “grab the files in the public folder”
Yay! We did it! We configured out Express app running in the Node runtime to deliver the index.html, main.js, and styles.css files when someone visits our site.
But wait…there’s more:
const port = 8080;
app.listen(port);
Remember that the app variable is our instance of the Express framework. The .listen() function is the app telling the computer, “hey, any requests made on port 8080, bring them my way!”
Ports and sockets are a more advanced topic, so we won’t get into it now. But just know that a computer/server has many ports, which are like access points, and we are configuring Node/Express app to only listen to one access point, 8080.
Lastly…
console.log("listening on port: " + port);
This is standard practice for Express apps, where we are just logging out on the computer what port we’re running. It gives us some verification that the Express application works.
Great job! That was a lot of code to walk through.
Now, if you’re familiar enough with how to navigate via a terminal, we can test this Express app locally on our computer before moving on to AWS. Ensuring it works locally before we go to AWS will help us in case we have errors in AWS because we’ll know the errors can’t be related to our Express app not working.
How to Test Our Node/Express.js App
If you open the package.json file, you’ll see a “scripts” section. This package.json file is metadata for our Node application, and it also can contain configurable commands to run in the “scripts” section.
I’ve included the “start” script, which runs the app.js file in the Node environment, which in turn runs our Express.js code we just discussed. This “start” script is how we run our project.
To test this out, in your terminal navigate to our fcc-to-aws-part2 folder, enter npm start to start the app.
 Terminal command to run our app
After running that command, you should immediately see our console.log() message informing us that the app is running on port 8080.
 You should see the “listening on port: 8080” message to know it’s running
Now, to view your project, open a web browser and enter localhost:8080 in your address bar and click Enter. You should now see your project running!
If you don’t, make sure you are using the correct index.html, main.js, and styles.css files, and that you didn’t alter any of the code from fcc-to-aws-part2.
Woohoo!
Alright, now we have configured Node and Express to serve our project. Our local computer is acting as the server at the moment, but we want anyone in the world to be able to view our project and they can’t do that via our localhost:8080 address.
So, we are going to use AWS to host a server for us, put our app on it, and then let AWS manage the configuration necessary to generate the URL endpoint for the world to access. That’s where the AWS service called Elastic Beanstalk comes into play. Let’s get to it!
Go to AWS Elastic Beanstalk
After logging into your AWS account, search for the Elastic Beanstalk service in the top search bar. Once there, click the Create Application button.
 The Main Console page for AWS Elastic Beanstalk
Next we’ll add the name for our Elastic Beanstalk application.
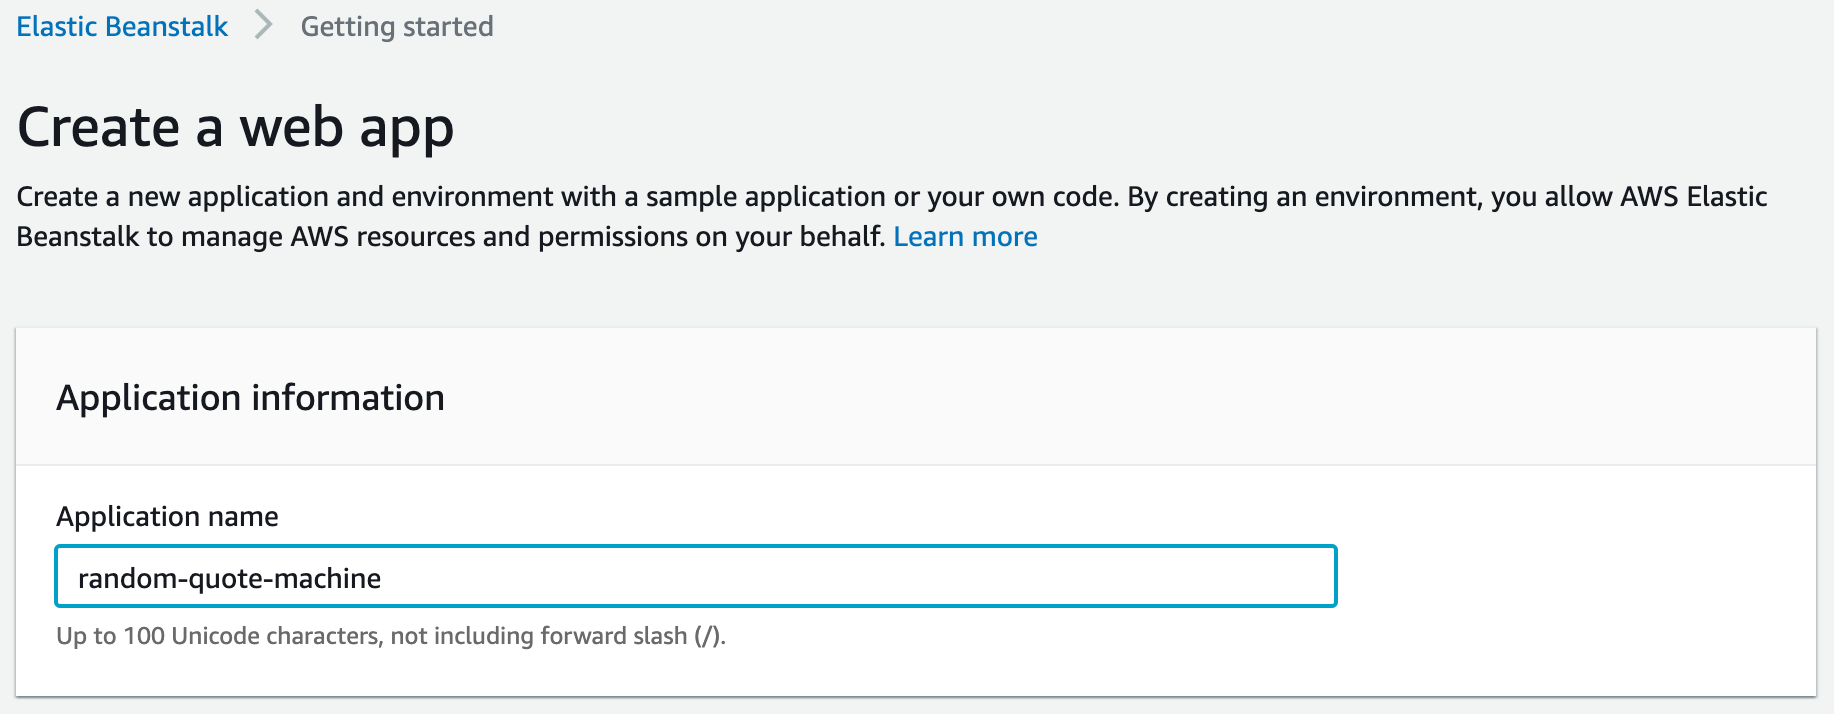 Enter your desired application name
Skip the Tags section, and let’s enter information for the Platform and Application Code sections.
Our Platform is Node.js, the Platform Branch is Node.js 14 running on 64bit Amazon Linux 2 (that’s telling us what kind of server is running Node), and Platform Version is whatever AWS recommends. Then for Application code, we are going to upload our code.
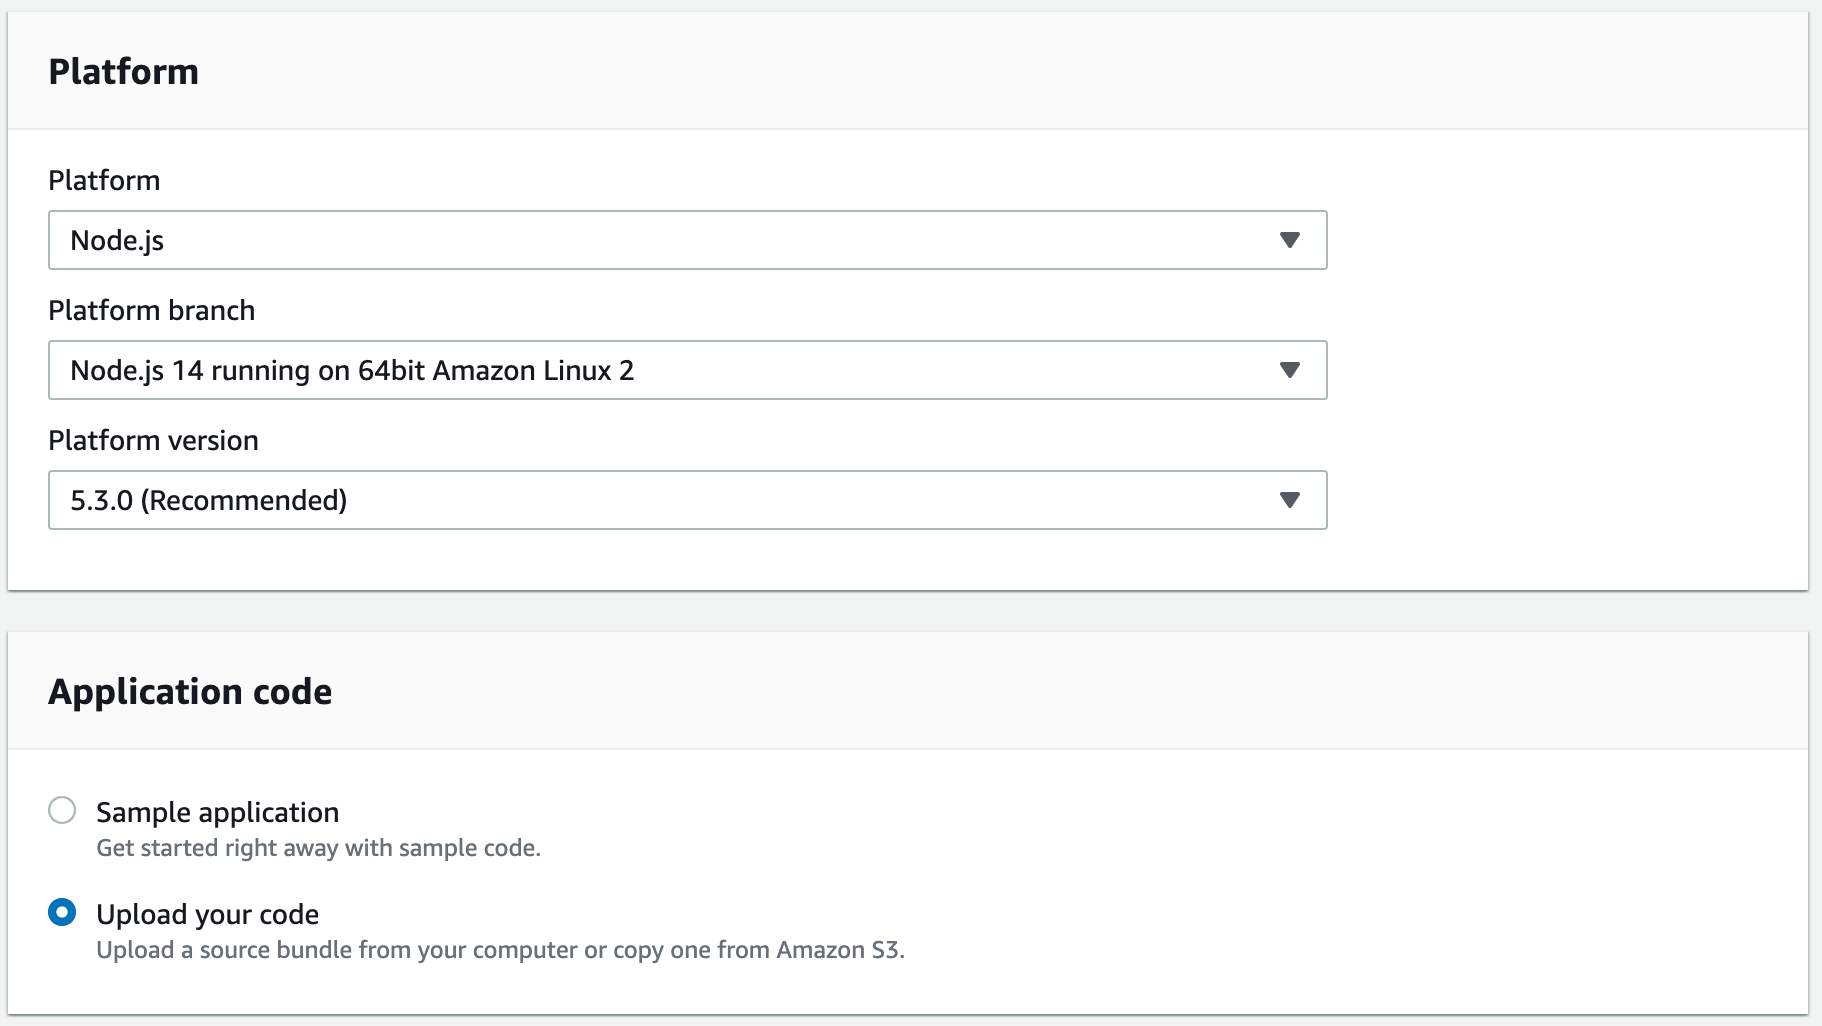 Our settings for the Elastic Beanstalk app
Click the Create Application button.
Upload And Deploy
Before we click the Upload and Deploy button, we need to zip our project. Open the fcc-to-aws-part2 folder, and select all of the files in it and zip them up. DO NOT zip the fcc-to-aws-part2 folder itself – that won’t work.
 The contents of fcc-to-aws-part2 zipped together, not fcc-to-aws-part2 zipped
Now, with your files zipped, click the Upload and Deploy button in your Elastic Beanstalk environment. Select your zipped file.
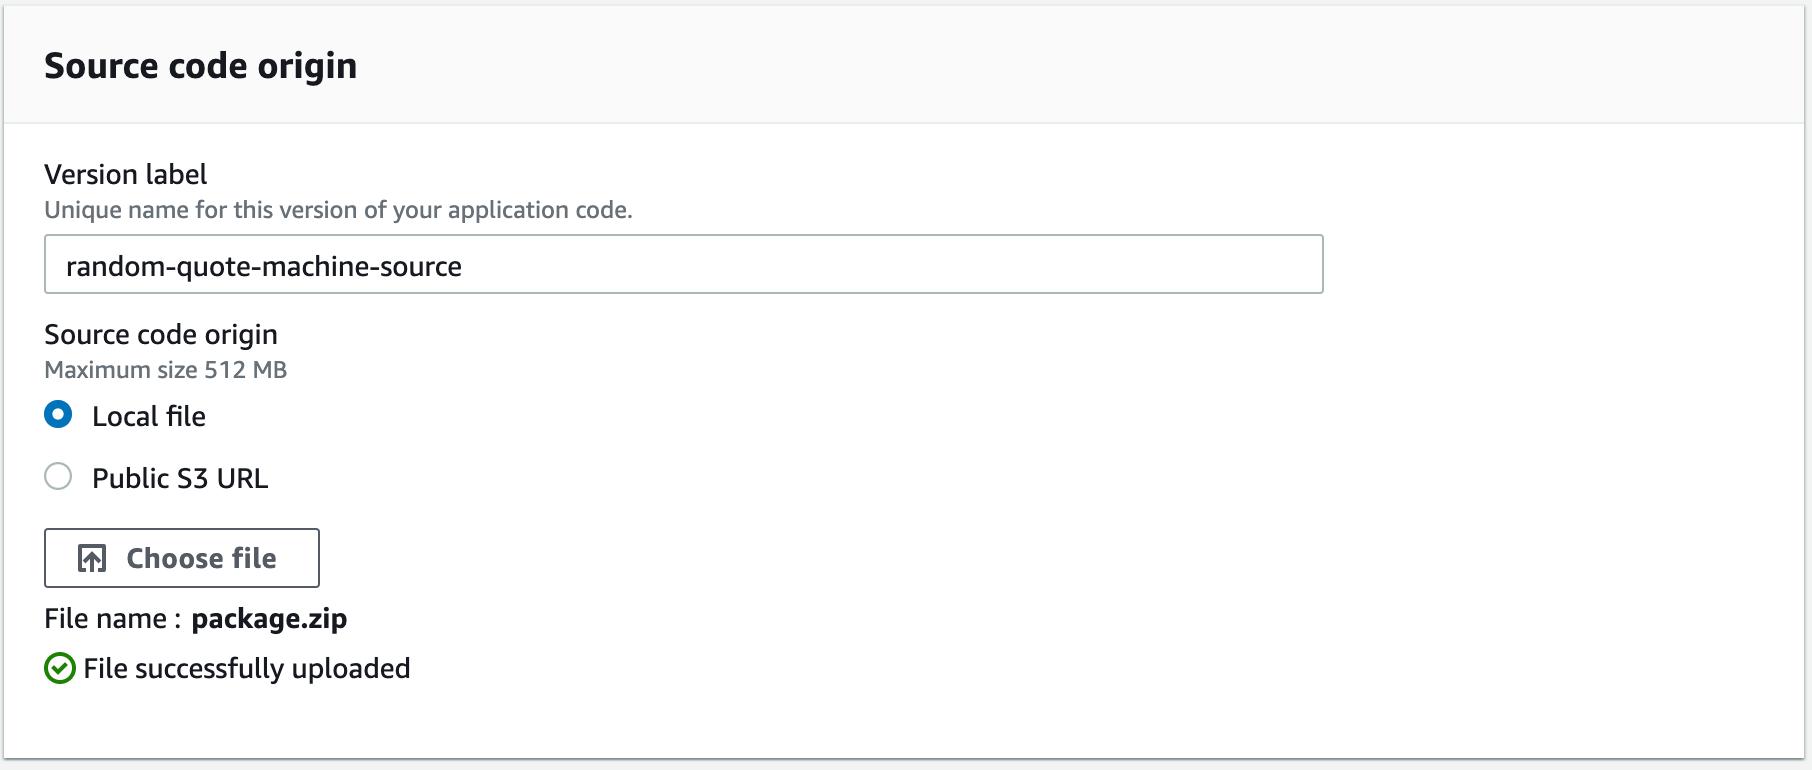 Upload your zipped project
After uploading your code, a black box will appear giving us a series of logs which are the steps being taken to launch the Elastic Beanstalk application. Revel in the fact that with each log entry, that is a configuration we did not have to do.
 The start of our logs
Once it finishes, you’ll be navigated to the main view of your app. You’ll see your environment has a Health status that is probably red at the start.
Do not be alarmed by this. AWS is now going through the configuration process that we don’t want to do, namely the launching of the server, the creation of the URL endpoint, and then running our app. It takes a few minutes for that to finish.
This is when Elastic Beanstalk is doing all of that configuration for us that makes cloud computing platforms so handy!
Notice at the top that you already have a URL endpoint given to you. Once the Health improves you should be able to open that link to see your project.
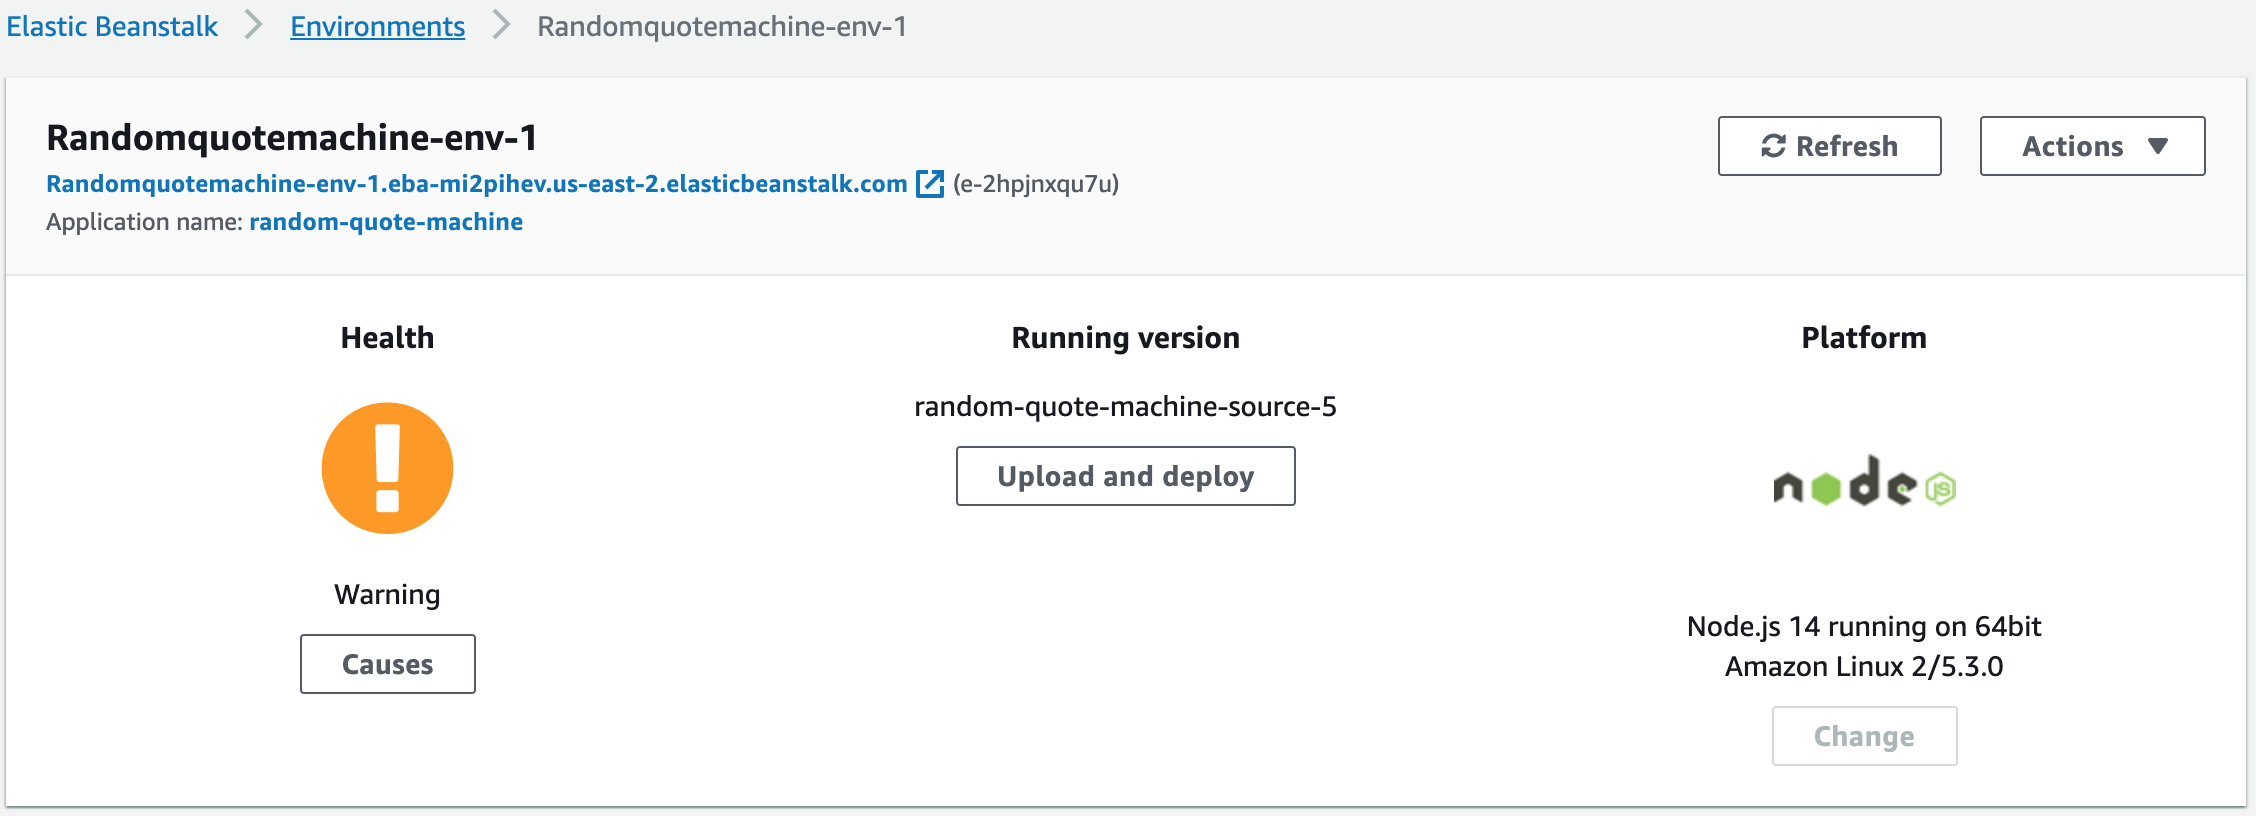 Your url can be found here (under Randomquotemachine-env-1)
If your health status never changes to orange and then green, then something is wrong. The best thing to do is re-download the fcc-to-aws-part2, paste your code in, and then re-zip the contents of fcc-to-aws-part2, not the fcc-to-aws-part2 folder itself, and upload it again to Elastic Beanstalk.
Once the health status improves, you should be able to open the link and see your project. More importantly, anyone in the world can now see your project with that link!
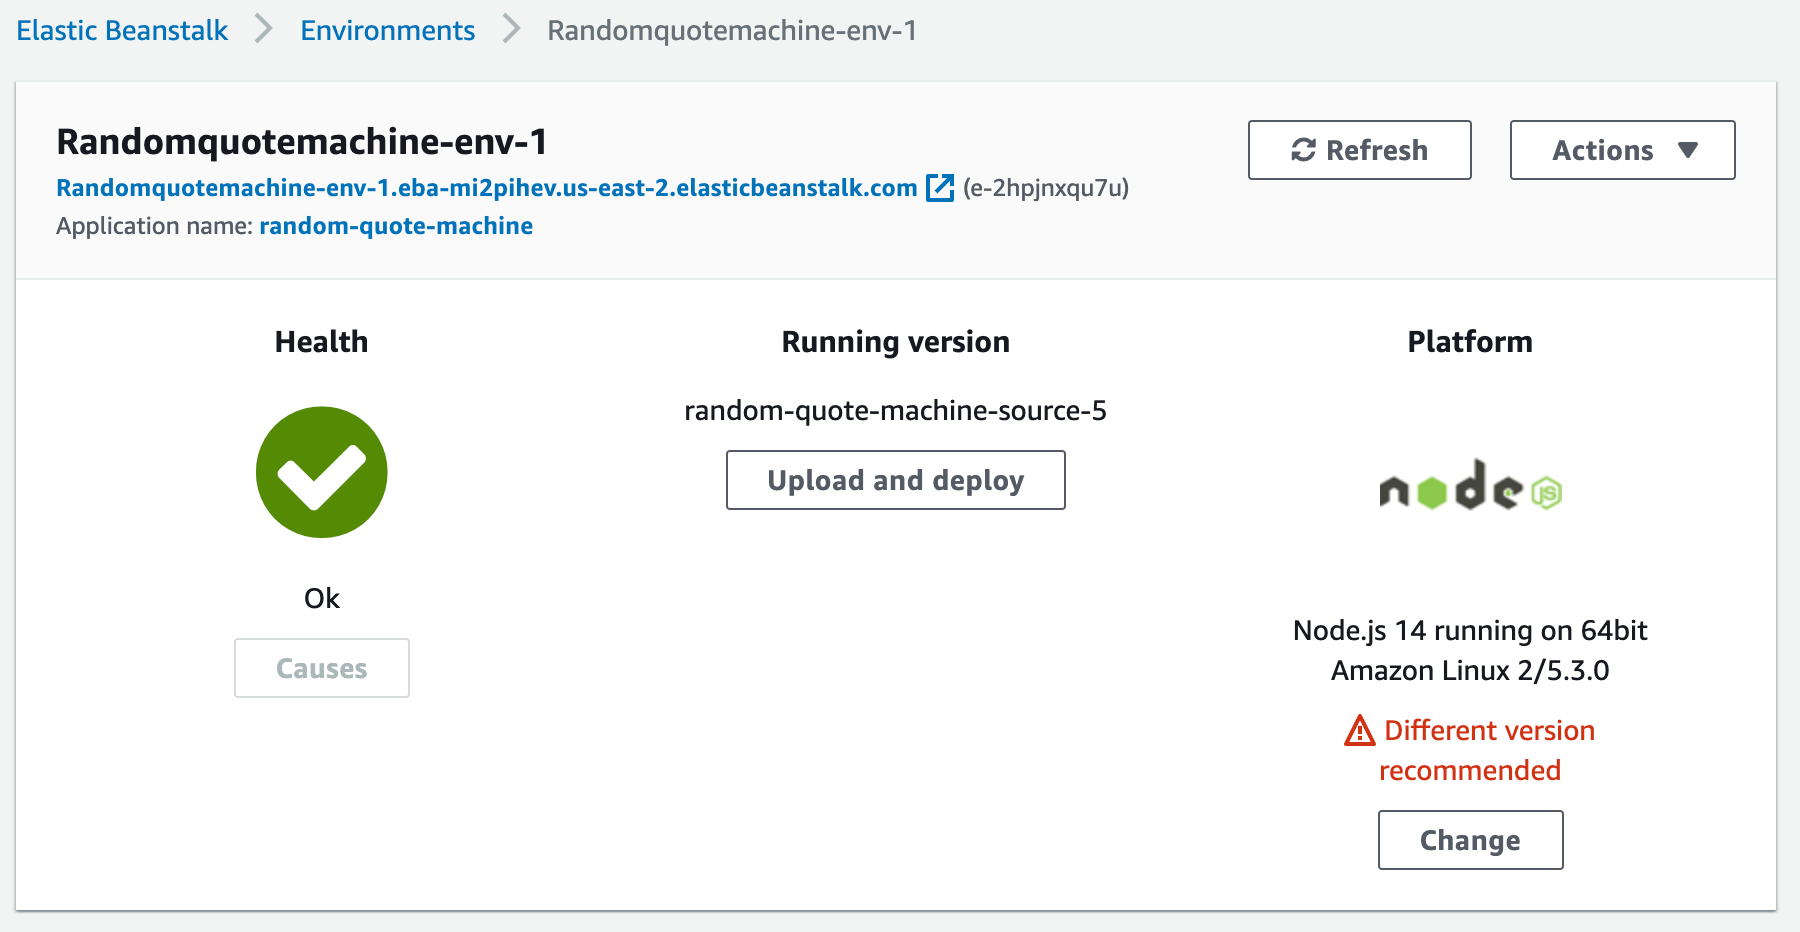 A healthy app, time to go check it out!
You Did It!
Congratulations!
I know this was a longer and more detailed process than the S3 deployment, but you did it.
We took on doing some of the configuration ourselves this time by creating a Node/Express app to serve our static files, but we still let AWS handle creating and configuring the server, its environment, and the endpoint for us to run our project on and view.
Even with our time spent going through the Express code, the amount time it took to deploy this project is minimal since AWS is automating so much for us.
We didn’t have to take the time to buy a server, install programs onto it, set up a URL endpoint for it, or install our project onto it. That’s the benefit of cloud computing platforms like AWS.
NOTICE: Be sure to stop or terminate your EC2 Instance, or delete your Elastic Beanstalk Application when you’re done with it. If you do not, you’l be charged for however long your application runs.
The Underlying Services of Elastic Beanstalk
I mentioned at the start of this section that the beauty of Elastic Beanstalk is that by using this service we actually get an introduction to many services: EC2, Load Balancers, Auto Scaling Groups, and even Cloud Watch.
Below is a brief explanation of those to further your learning about AWS and its services.
To get a better visual to see some of the depth of configuration Elastic Beanstalk did for us, navigate to the Configurations link and scroll through the page.
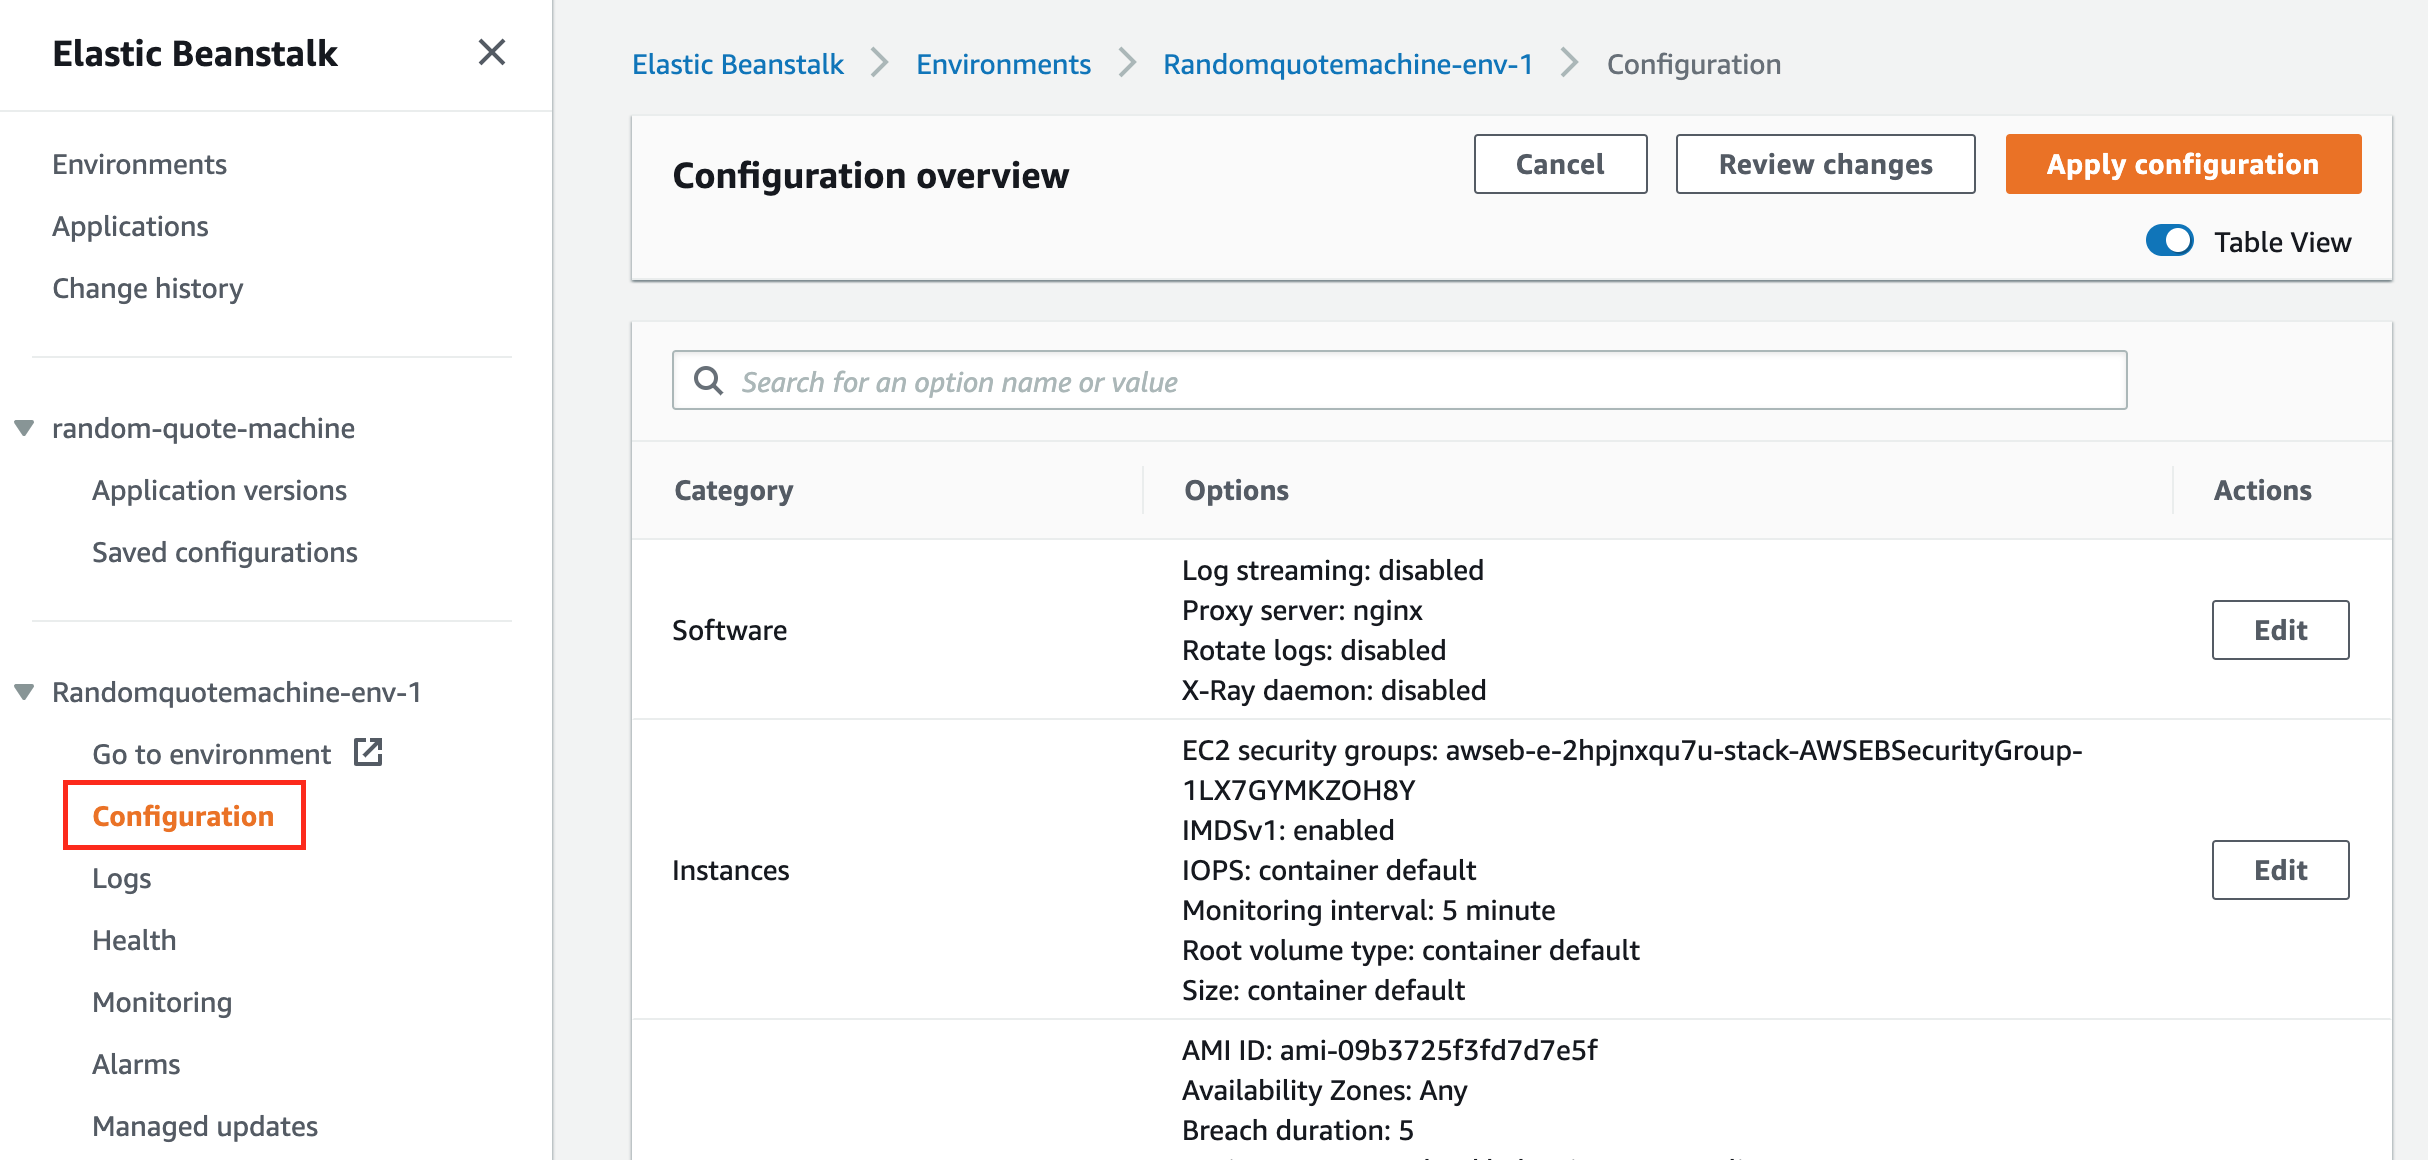 An overview of the configurations Elastic Beanstalk does for us
EC2
In the Configuration Overview there is a category called Instances.
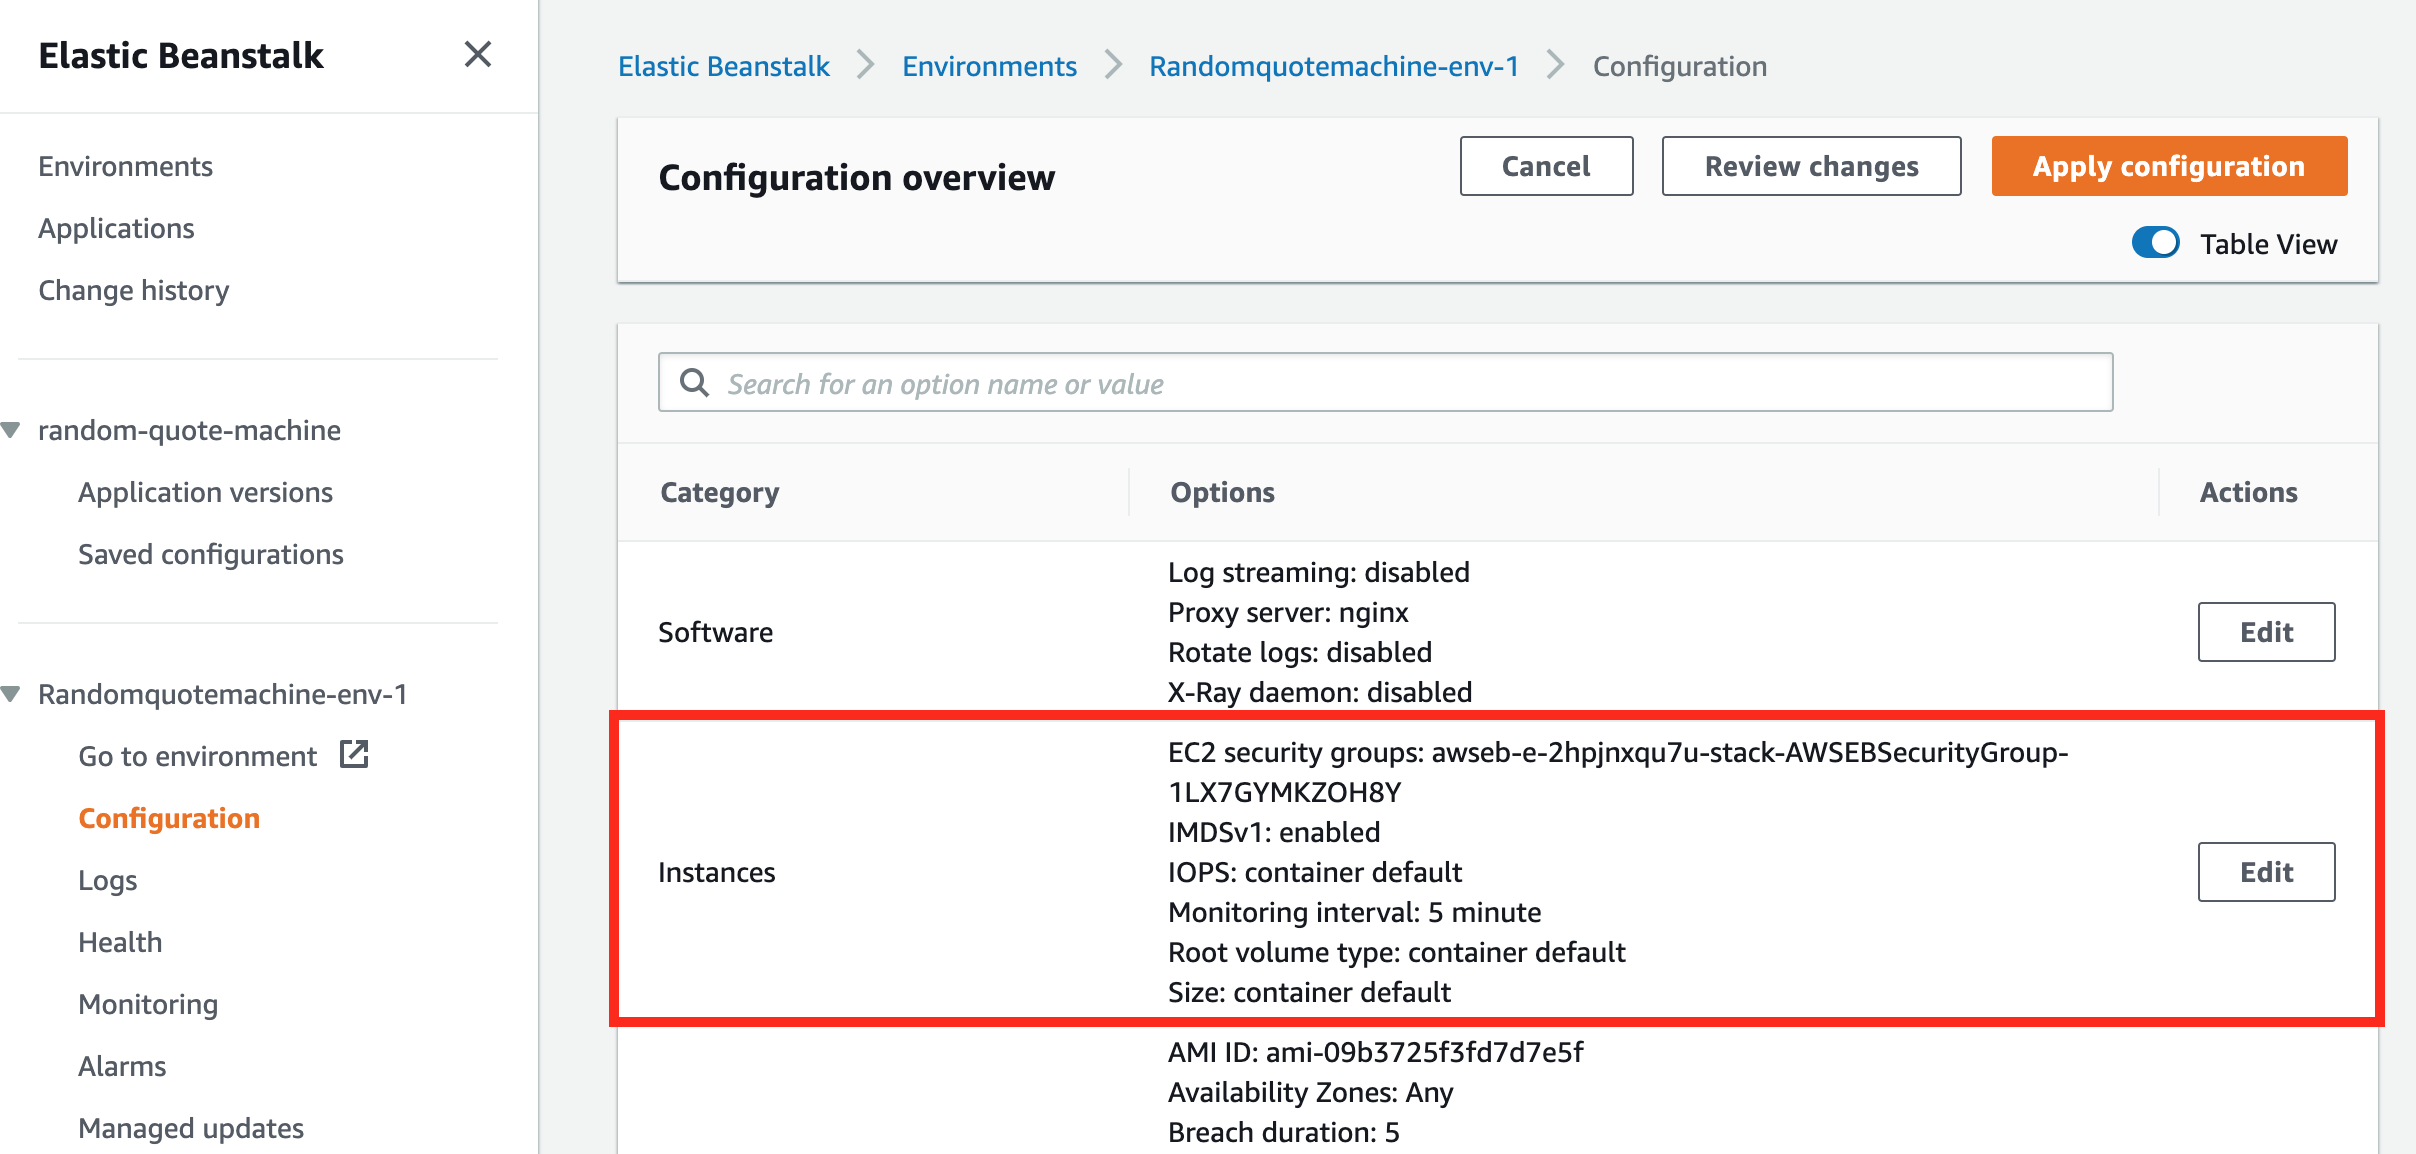 The Instances configuration category
Instances is another word used for server, or computer. Remember that we’re deploying our code to a server, well AWS calls those servers Instances, and more specifically they’re called EC2 Instances.
EC2, short for Elastic Computer Container, is a service by AWS that lets you launch EC2 Instances very quickly. We can “spin up” a server quickly using EC2 and put whatever we want on it.
In our case, Elastic Beanstalk ran the EC2 service for us and started an EC2 Instance for our application to be hosted on.
If you still have your Elastic Beanstalk app running we can go look at your EC2 Instance. At the top of your screen, in the AWS search bar, enter EC2 and click enter.
You should see that you have one instance running, like this…
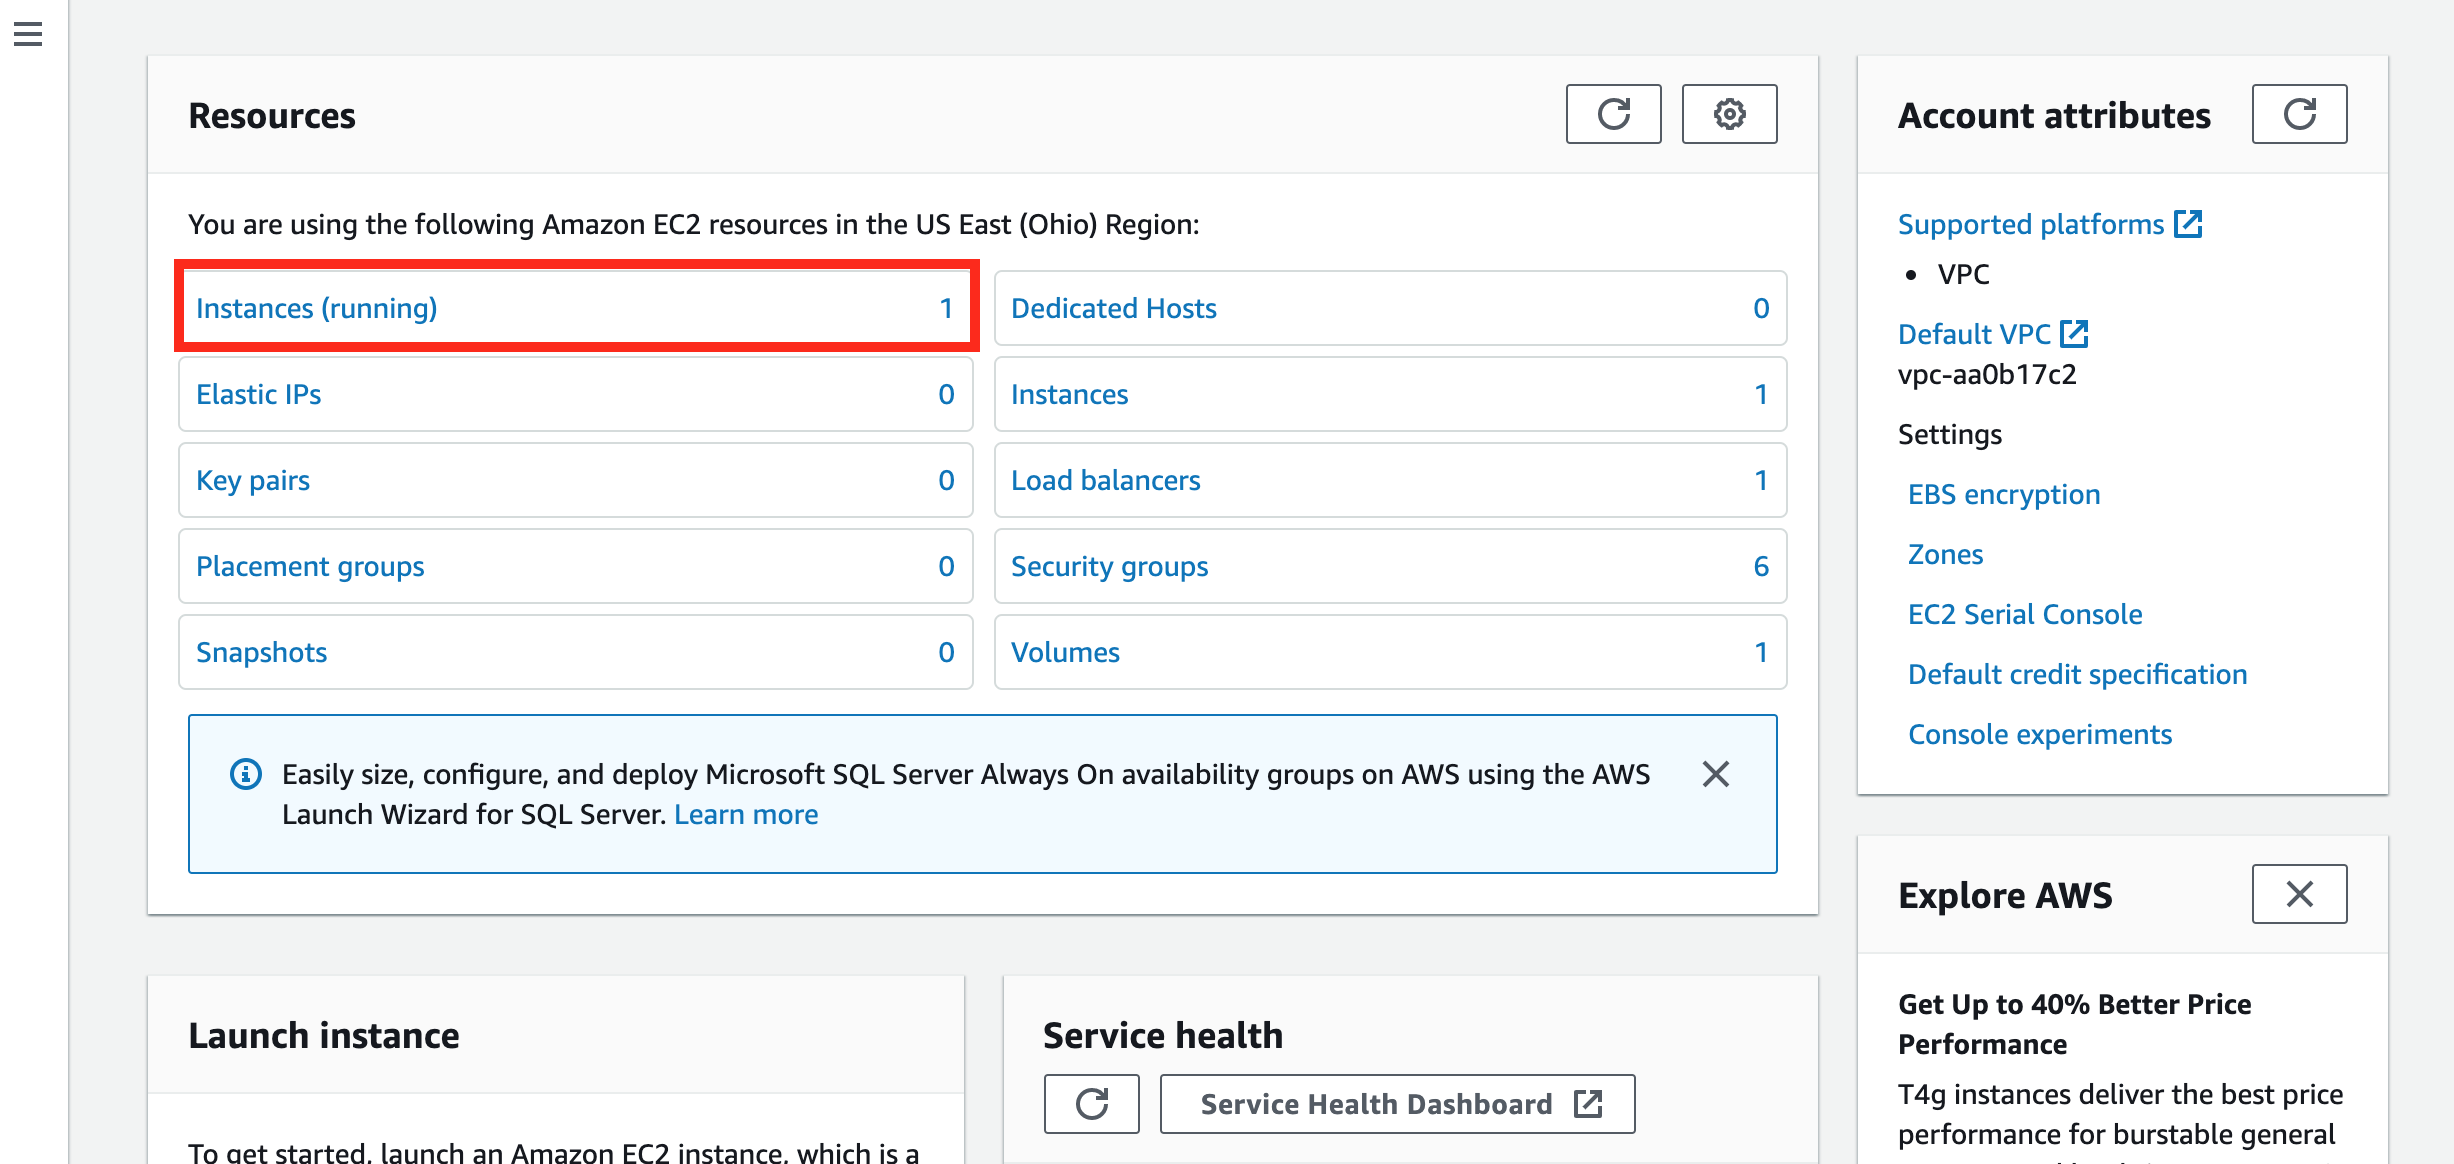 Your EC2 Management Console
If you click on the Instances (running) link you’ll get to look at the specifics of the EC2 instance. This EC2, again, is just a computer running in some AWS site that has your code on it. The EC2 was launched by Elastic Beanstalk for us.
Load Balancer
Not only did the Elastic Beanstalk create an EC2 Instance for us, it also created a Load Balancer for us. In the EC2 Management Console, on the left navigation panel scroll down to Load Balancers and click the link to see the one made for you.
A load balancer’s purpose is to distribute incoming traffic across multiple targets. That target in our case is an EC2, but we only have one running, so a load balancer is not all that useful at the moment.
Let’s pretend for a moment that our app went viral and we had tens of thousands of people trying to access the endpoint Elastic Beanstalk gave us. That single EC2 Instance would be overwhelmed with traffic. Requests would timeout, visitors would get frustrated, and our site would suffer since we don’t have enough EC2s to handle the load.
But! If we DID have more EC2 Instances running, each with our project deployed on it, we’d be able to handle going viral.
Though there is a problem that arises from having mulitple EC2s. We need each EC2 instance to be reachable by that same Elastic Beanstalk endpoint, and that’s tricky networking.
That’s where the Load Balancer comes in. It provides a single access point for our Elastic Beanstalk to target, and the Load Balancer then handles keeping traffic organized between the different EC2s and the Beanstalk.
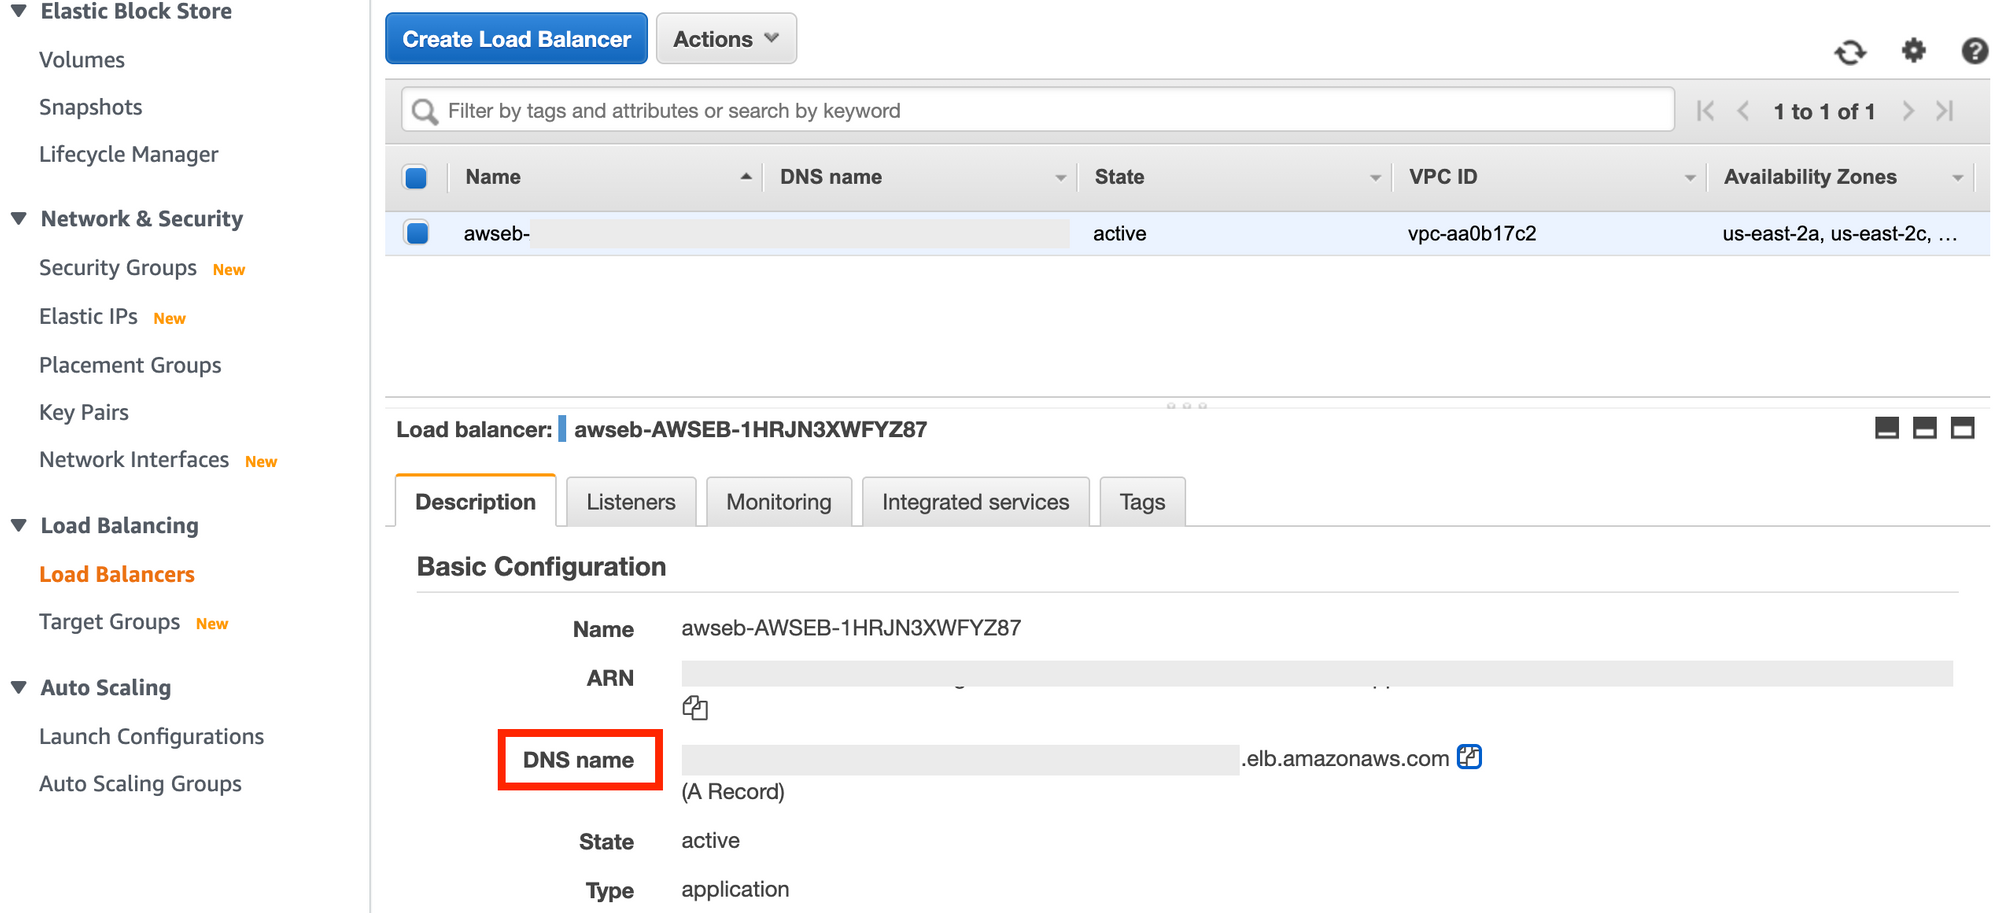
If you look at your Load Balancers Basic Configuration, you’ll see a DNS Name, which looks a lot like the Elastic Beanstalk endpoint. If you open it, your app should run. That’s because the Elastic Beanstalk endpoint actually points to this endpoint which is able to balance traffic among multiple endpoints.
 Load Balancer view in the EC2 Management Console
Now, you might be wondering “Luke, how do I get more EC2s to launch so that I can capitalize on this sweet load balancing action?” Glad you asked! The answer is Auto Scaling Groups!
Auto Scaling Group
As the name suggests, this AWS service automatically scales a group of EC2 Instances based on a set of criteria. We currently have only one EC2 Instance running that our Load Balancer targets, but an Auto Scaling Group has configurable thresholds to determine when to add or remove instances.
To see your Auto Scaling Group, in your EC2 Mangement Console’s left-side navigation scroll down towards the bottom until you find Auto Scaling Group and click on the checkbox next to the single Auto Scaling Group listed.
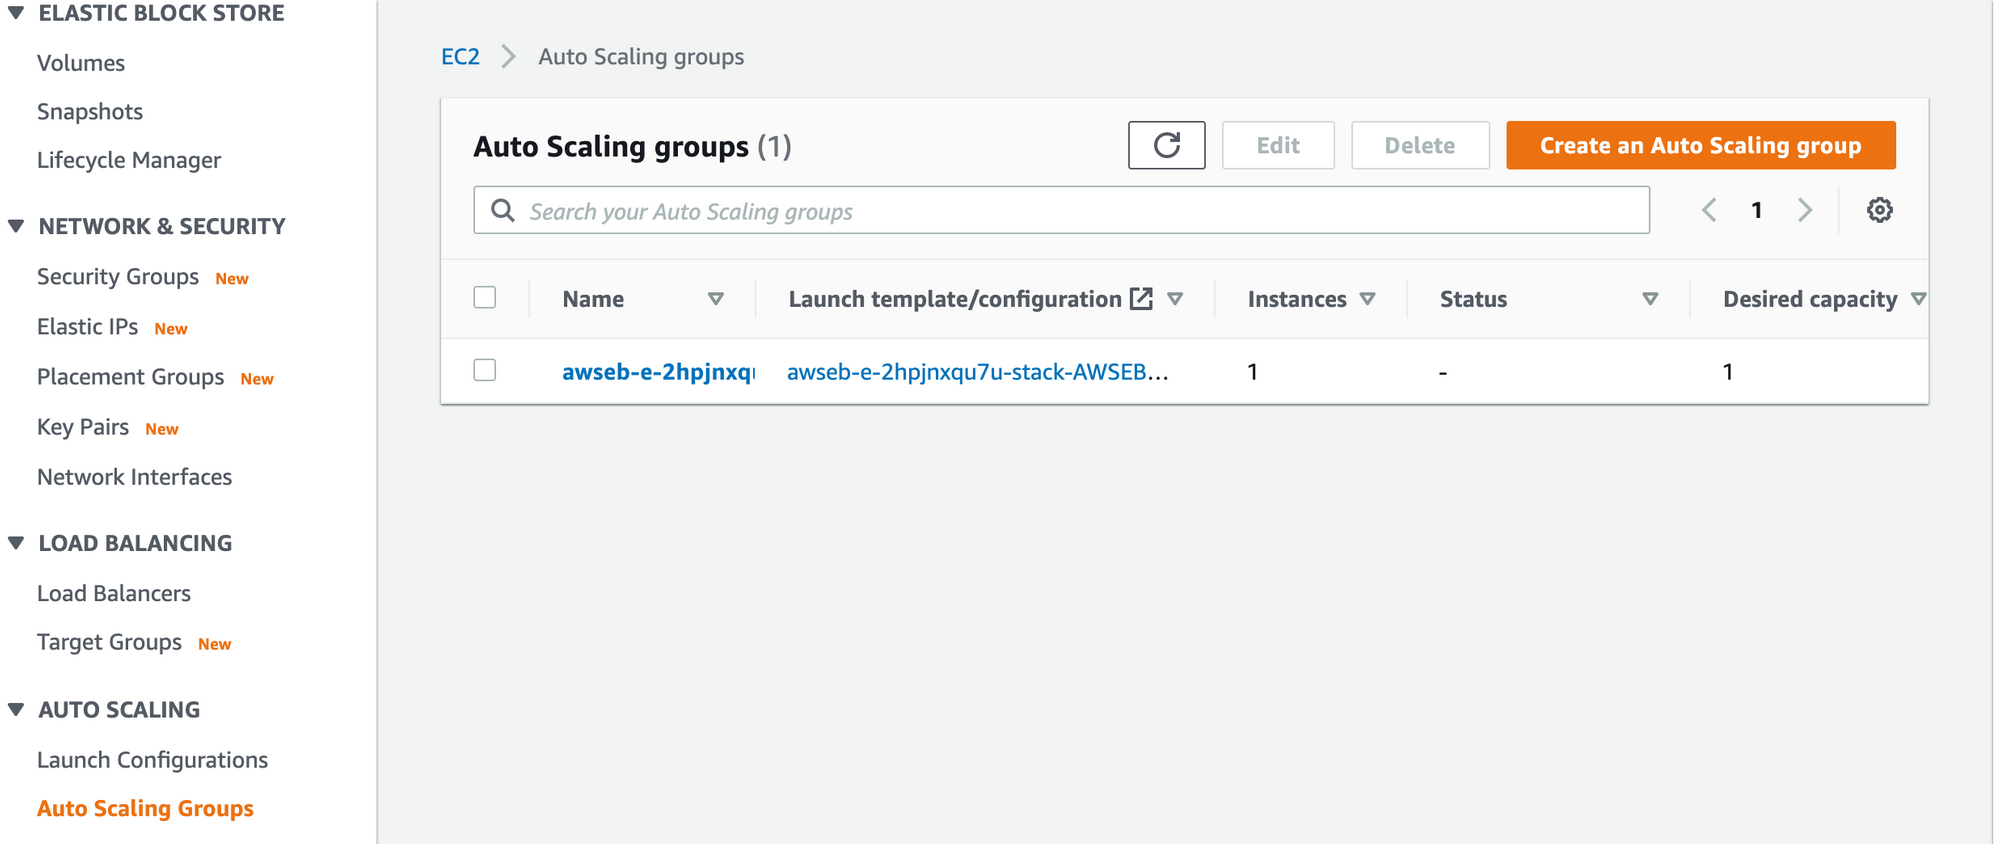 Auto Scaling Groups list in your EC2 Management Console
Feel free to peruse the various details found in the tabs, but I want to point out a few details.
First, click on the Details tab, and look at the Desired, Minimum, Maximum Capacity settings. It should default to 1, 1, and 4 respectively. These values are configurable and they're our way of telling AWS how many EC2 Instances we want running.
Since EC2 Instances cost money to run, companies want to fine tune how often new ones are added or removed. Ours says that we only want one running, minimum of one instance running, and four at maximum. If you edit the desired value to 2 you’ll see that a new instance will launch.
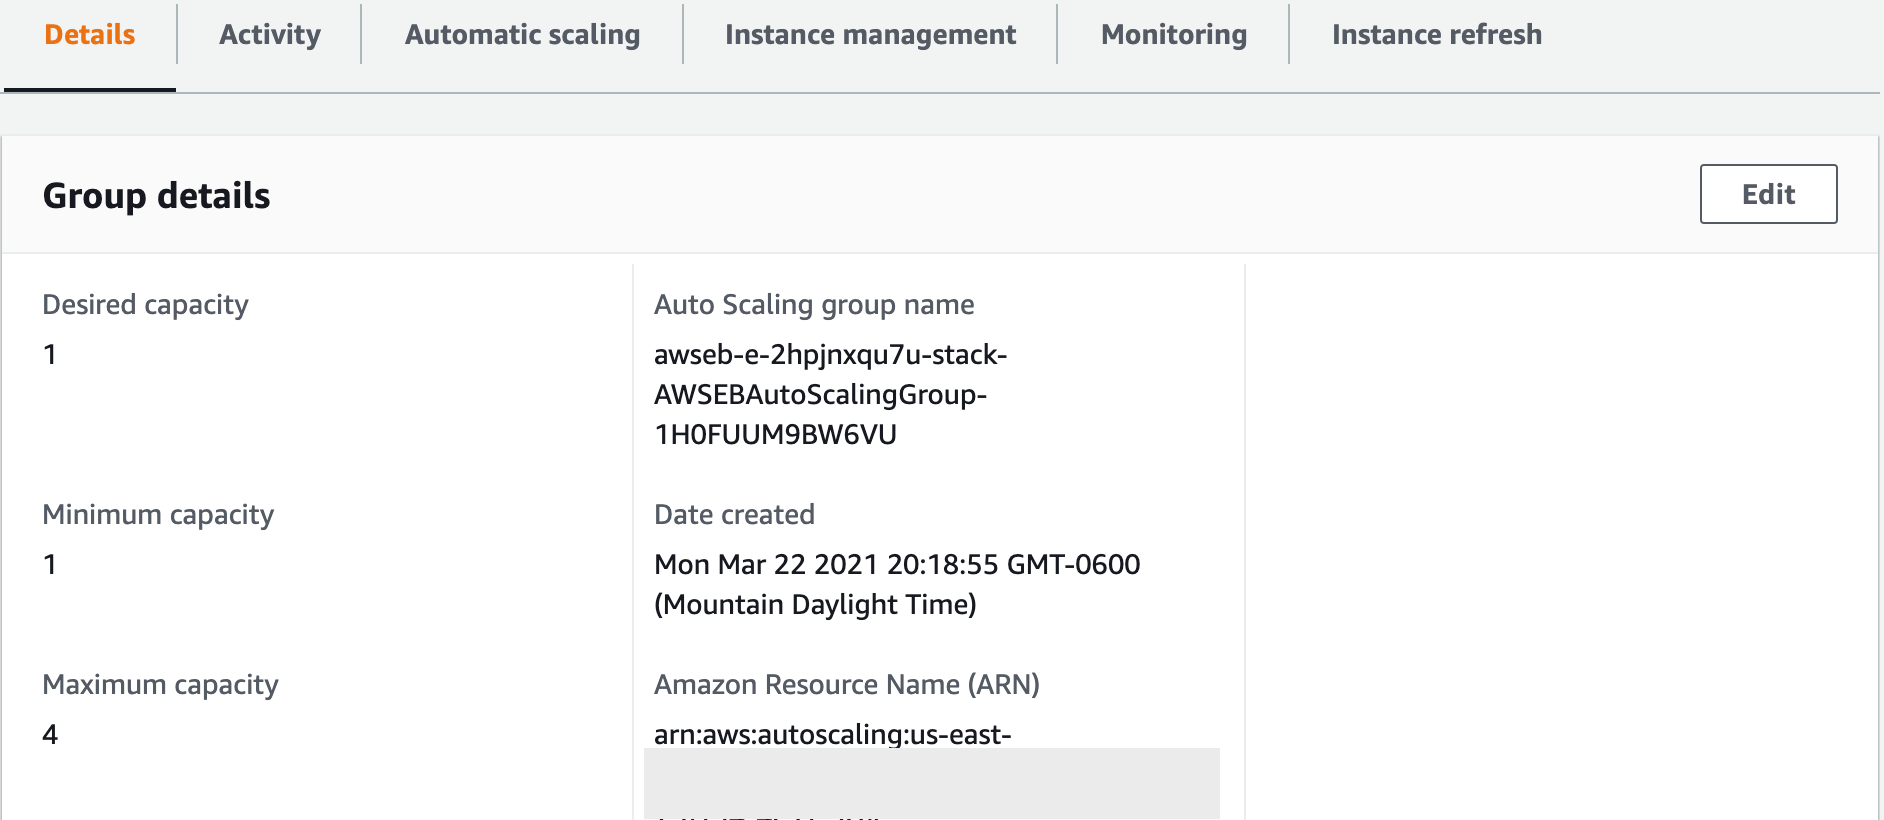 Our Auto Scaling Group capacity settings
But how does Auto Scaling Group know when to add/remove instances? Click on the Automatic Scaling tab to see our current configuration for determining when to add/remove instances.
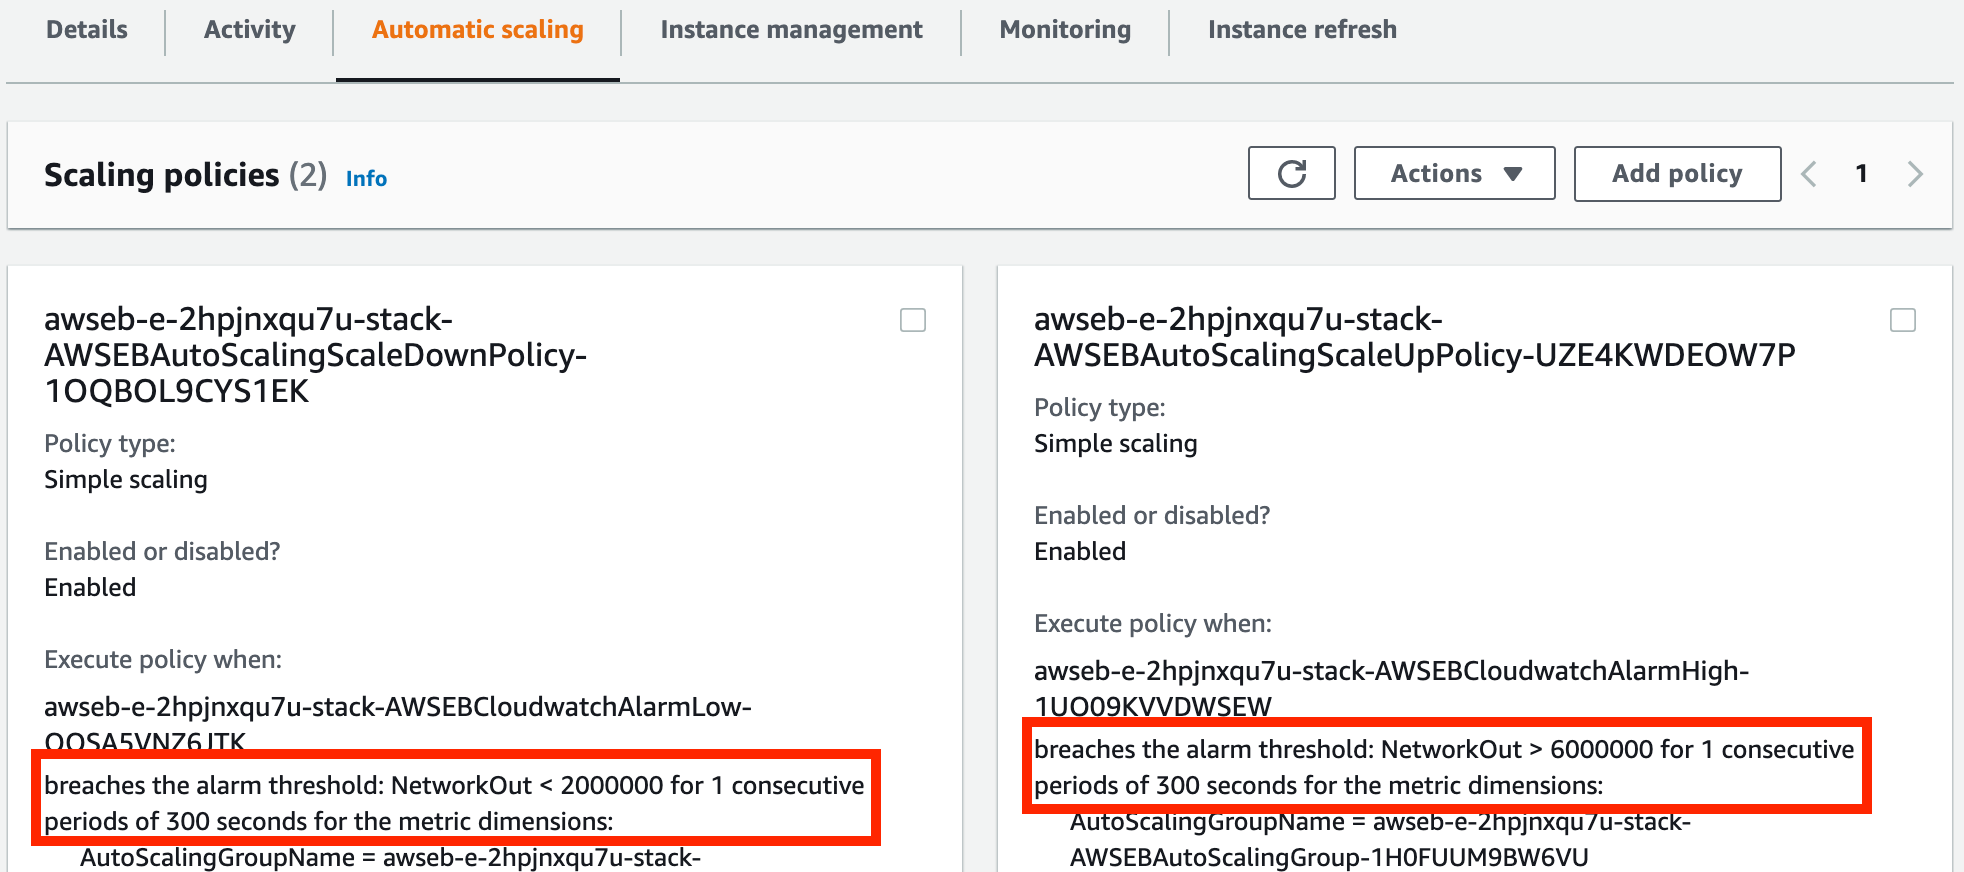 Threshold settings for our Auto Scaling Group
Here we have two policies: one for scaling in and one for scaling out. I’ve highlighted the current threshold that needs to be hit in order for either to be triggered.
What this says is “if there is a network issue on an EC2 Instance for more than one five minute period, add an EC2 if we haven’t hit our maximum capacity” and “if there are no network issues for five minutes, remove an EC2 if we haven’t already hit our desired capacity.”
And just like that, our application can grow/reduce based on our configurations of the Auto Scaling Group. Our application can now handle the additional load of going viral!
But, one last question: how does the Auto Scaling Group know about our EC2 network errors? Enter, CloudWatch.
CloudWatch
If you click on the Monitoring tab in your Auto Scaling Group, you’ll see links that will take you to CloudWatch. Once in the CloudWatch Management Console, you’ll see a variety of AWS services and resources listed and their associated metrics.
Browsing through the list you’ll find EC2 and Auto Scaling Group, and monitoring details for each. Where did all of these metrics come from? AWS provides them for your automatically, along with this helpful dashboard, allowing us to do some pretty cool dynamic networking and programming based on individual metrics or a composite, such as Auto Scaling.
The Auto Scaling Group we have has access to these metrics, and watches the NetworkOut metric of our EC2 Instances to determine if a scaling in/out action should occur.
Just another example of the leverage we gain from a cloud computing platform.
ElasticBeanstalk Deployment Recap
We took a look at a second method for deploying an application: Elastic Beanstalk. Compared to our S3 deployment, this route required us to add more code for configuring the serving of our index.html.
We used Express.js, a Node.js web application framework, to serve our front end, and then uploaded our newly updated project to Elastic Beanstalk. This in turn launched a myriad of AWS resources and services for us.
We learned about EC2, Load Balancer, Auto Scaling Group, and CloudWatch, and how they work together to deliver our project by a globally accessible url endpoint.
There are even more settings, services, and resources Elastic Beanstalk configuring and provisioned for us that we did not discuss, but for now you’ve gained a good first step into the benefits of a cloud hosting provider and a few of the key AWS services.
How to Deploy Your freeCodeCamp Project with AWS Lambda
For our final part of this post, we are going to deploy our code to a serverless environment. Serverless infrastructures are becoming increasingly popular and preferred over a dedicated on-premise server or even a hosted server (like EC2).
Not only is the serverless route more cost-effective, it lends itself to a different software architectural approach: microservices.
To gain an introduction into the serverless world, we are going to deploy our code via AWS’s serverless service called Lambda and another AWS service, API Gateway. Let’s get started!
What is Serverless?!
Say, what?! This whole time we’ve been talking about servers delivering our code when the web browser requests it, so what’s serverless mean?
To start off, it doesn’t mean there is no server. There has to be one, since a server is a computer and we need our program running on a computer.
So, serverless doesn’t mean no-server. It means you and I, the code deployers, do not ever see the server and have no configurations to set for that server. The server belongs to AWS, and it just runs our code without us doing anything else.
Serverless means that for you and me in all practicality there is no server, but in reality there is.
Sounds pretty simple, right? It is! We have no server to configure, AWS has the server and handles everything. We just hand over the code.
You might be asking yourself, how is that different from EC2? Good question.
There's Less Configuration
Do you remember all the configuration options that we could mess with on Elastic Beanstalk, and in the EC2 management console, and the Auto Scaling Group, and the Load Balancer?
 Some of the Elastic Beanstalk configurations available to us
Then, Elastic Beanstalk created more resources all with their own configurations, like the Load Balancer and Auto Scaling Group.
Well, as nice as it is that we can configure those, it can also be a pain to setup. More importantly, it takes more time to setup, which takes us away from time spent developing our actual application.
With a Lambda (an AWS serverless service), we just say, “hey, we want a Node.js environment to run our code“, and then after that there is no more configurations to make about the server itself. We can get back to writing more code.
It's Cheaper
Also, that EC2 is costing us money for as long as it runs. Now it’s simple to terminate or temporarily stop to save us money, and is usually cheaper than purchasing your own physical server – but it still costs money at all times of the day that it’s running, even if no one is trying to reach your website.
So, what if there was an option that only charged us a fee for the time the code ran? That’s serverless!
With AWS Lambda, we have our code able to be run at any time, it’s sitting on a server. But it only runs our program when asked for and we are only paying for those times it runs. The cost savings are huge.
Microservice Architecture
Because most programs have been written and deployed onto a server to run, all the code for that application has been bundled together so that that server could access and run the entire application. That makes sense!
But, if you have a way to run code with a serverless approach, which only runs that code asked for, you could break up that one application into many applications. That breaking apart an application into smaller sub-applications is the idea of microservices.
One of the main benefits of a microservice approach is the update process. If we have a monolithic application (one that is all bundled together on an EC2), and need to update one small piece of code, then we have to redeploy the entire application, which may mean service interruptions.
Alternatively, a microservice approach means we only update the minor-application of the whole that deals with that small piece of code. This is a less abrupt approach to deployment, and one of the primary benefits of a microservice approach that AWS Lambda allows us to do.
I should note that serverless has its own drawbacks as well. For starters, if you have a microservice architecture via serverless, then the integration of those microservices to talk to each other requires extra work that a monolithic application doesn’t have to deal with.
That being said, it’s an approach that is massively popular and growing in use, so it’s worth your knowing.
Disclaimer: Now, technically Part 1’s use of S3 was a serverless deployment, but typically when people discuss serverless and AWS they’re talking about Lambda.
How to Get Started with AWS Lambda
So, Lambdas allow us to execute code without worrying about server configuration or cost. That’s it. They run on a server owned by AWS, configured by AWS, managed by AWS, and never seen by us.
For the most part, all we control and care about is the function. This is what’s referred to as function as a service in cloud computing. It lets us focus on code without needing to think about the complexities of infrastructure.
So now that we know that Lambdas are just functions running on an AWS server that we don’t have to configure, let’s get started with ours.
How to Create Our Lambda
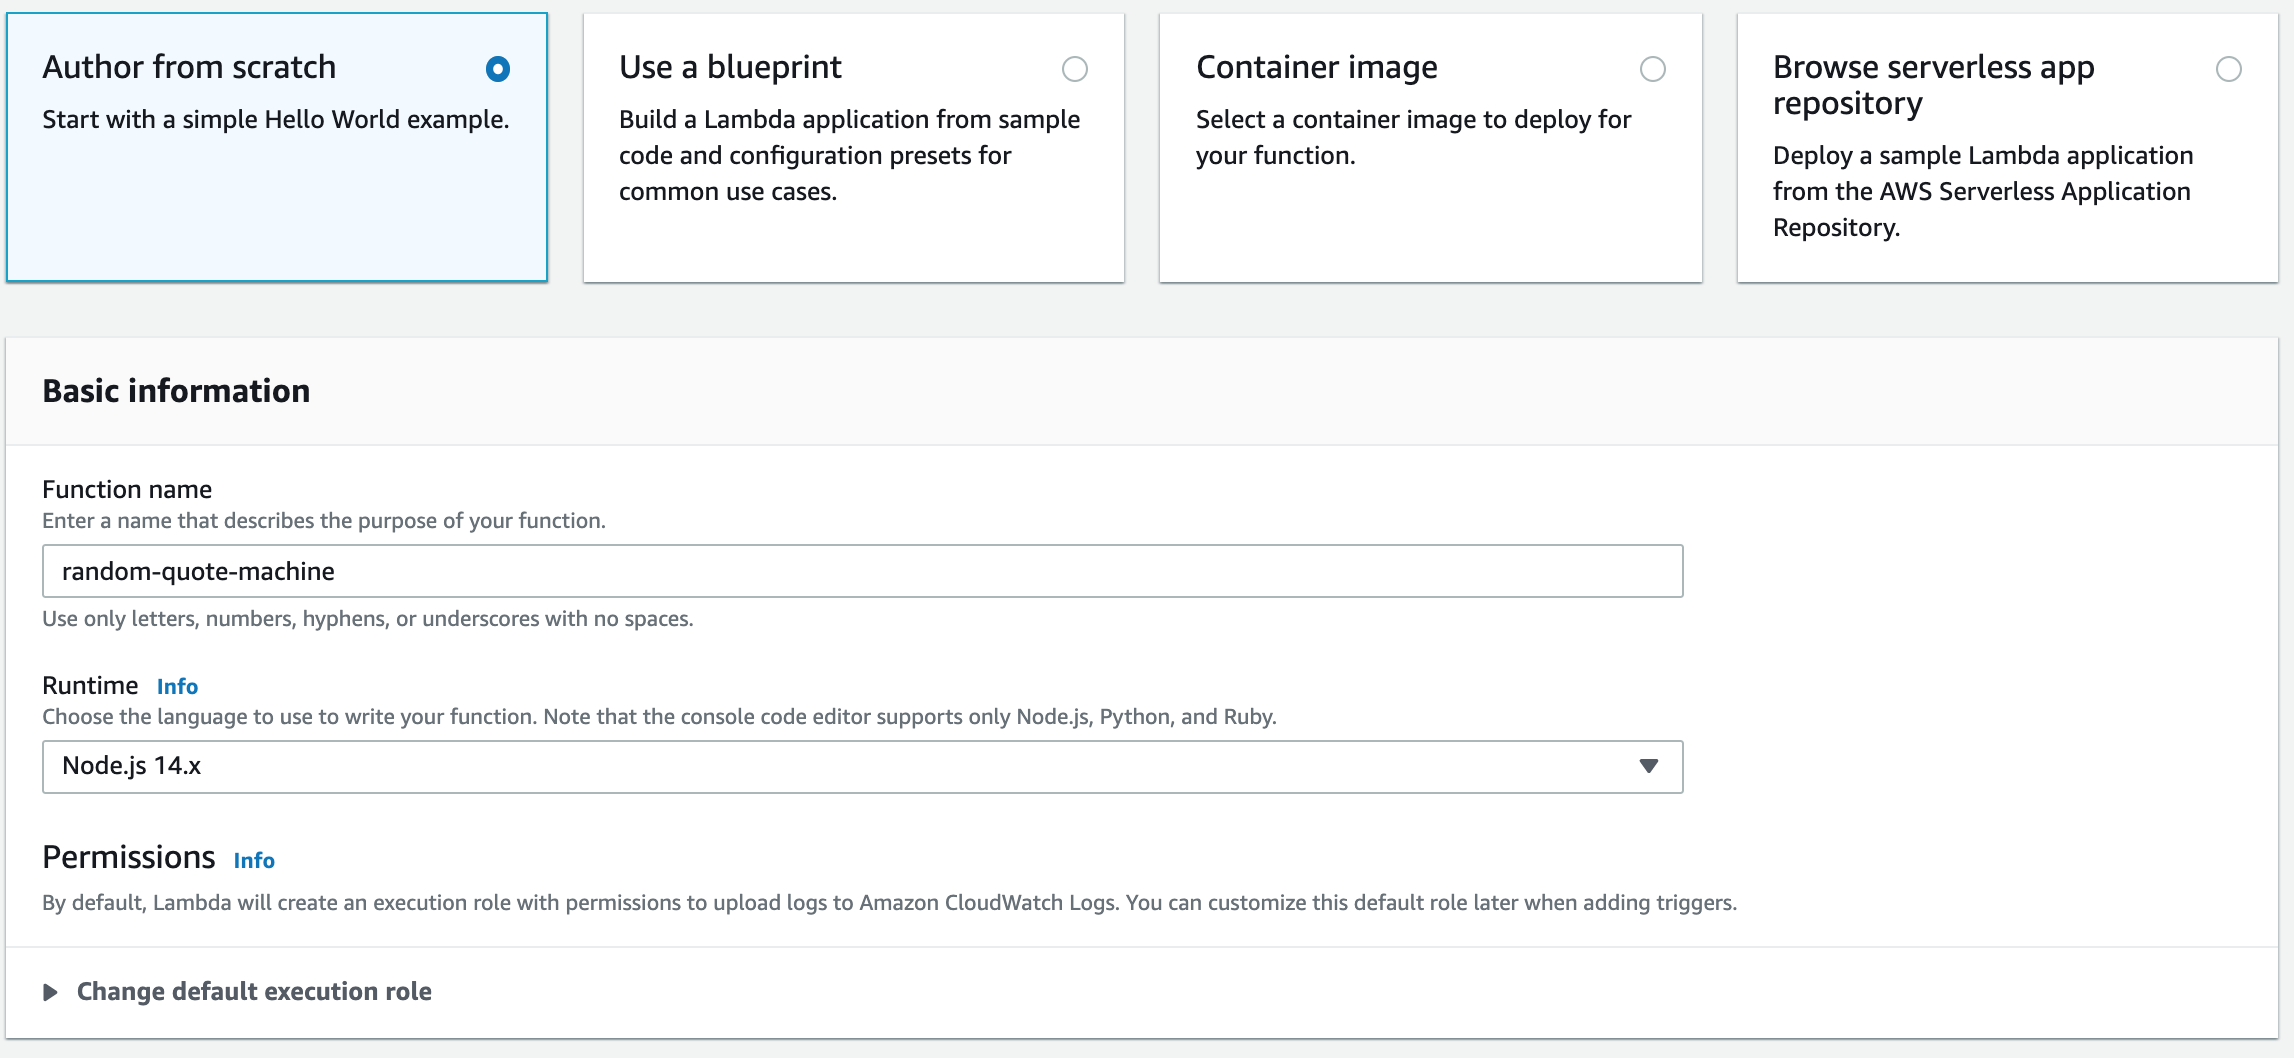
Head over to the AWS Lambda Management Console. Click on the Create Function button. On the next screen, we are going to keep the Author from scratch selection, enter our function’s name (aka, the name for our Lambda), and then select the Node.js 14.x runtime.
That’s all we need to do for now, go ahead and click the Create Function button in the bottom right.
 Our screen when creating our Lambda function
The next screen that loads will be our console for managing a Lambda. If you scroll down a bit you’ll find an embedded code editor and file system. A directory (aka folder) with the name of your Lambda is already there along with an index.js file. Click File and create a new file called index.html.
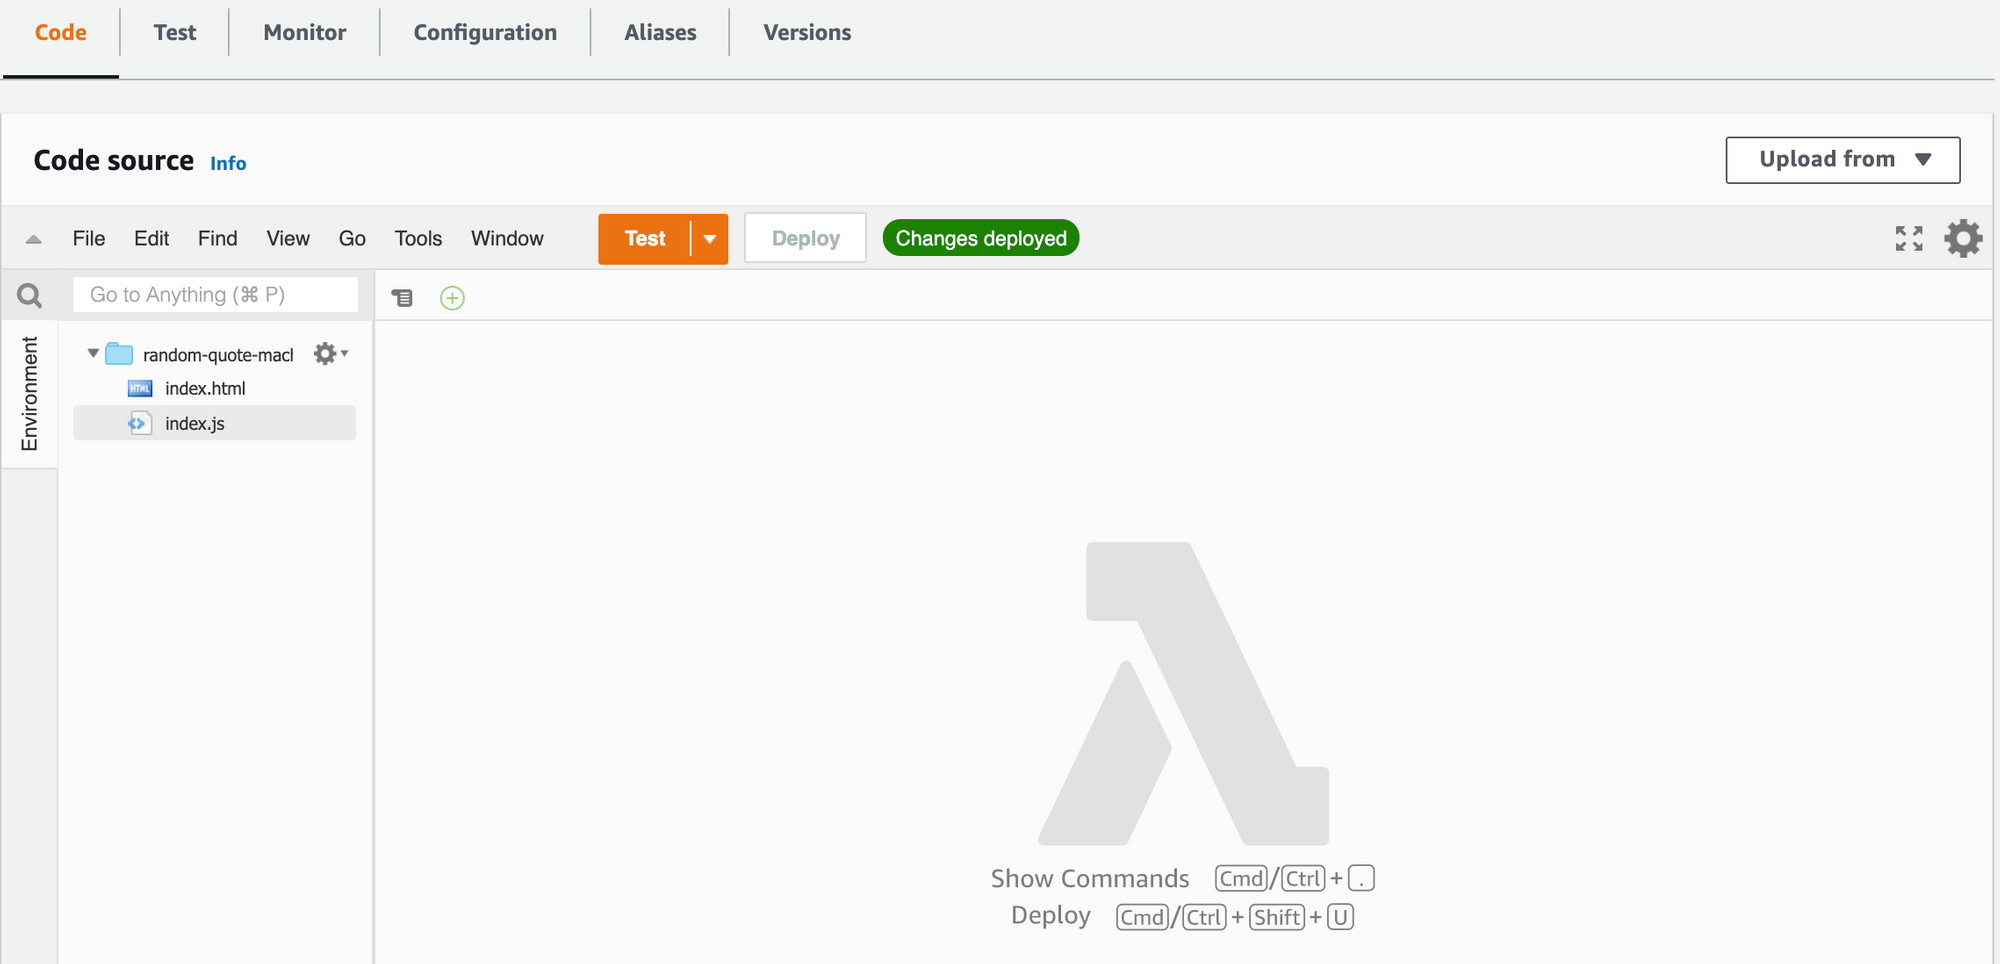 You should have an index.js and index.html files
Adjust Your Project’s Code
Due to the nature of this deployment, we need to adjust our code a little bit. Instead of using the <link href="styles.css" /> tag and the <script src="main.js"></script> tag in our freeCodeCamp project’s index.html that links our .css and .js code to our HTML code, we are going to add them directly into the HTML file.
If we don’t do this, then when we try to open our app, it will look for those files at a different URL route than we want.
To change the code to work for us in Lambda, do the following:
- Replace the
<link href="styles.css"/>line in your index.html file with<style></style>(this should be right above your<body>opening tag) - Open your
styles.cssfile, copy all of the CSS, and paste it between the two<style>tags (like<style> _your pasted code_). - Do the same thing with our
main.js– remove thesrc="main.js"inside the opening<script>tag. - Open your main.js file, copy all of your JS code, and paste it between the two
<script>tags at the bottom of our index.html file (ie:<script> _your main.js code_