

You've built your Machine Learning model with 99% accuracy and now you are ecstatic. You are like yaaaaaaaaay! My model performed well.
Then you paused and you were like – now what?
Well first, you might have thought of uploading your code to GitHub and showing people your Jupyter notebook file. It comprises those gorgeous-looking visualizations you created using Seaborn, those extremely powerful ensemble models, and how they are able to pass their evaluation metrics and so on.
But then you noticed that no one is interacting with it.
Well, my friend, why not try deploying the model as a web app so that non-techies can interact with the model, too? Because only programmers like you will likely understand that first approach.
There are several methods for deploying your model, but we will focus on one of them in this article: using Gradio. I can tell you're excited. Well, relax and enjoy, because this is going to be an exciting ride.
Prerequisites
Before beginning this journey, I assume you have the following knowledge:
You know how to create a user-defined function in Python
You can build and fit an ML model
Your environment is all set up
What is Gradio?
Gradio is a free and open-source Python library that allows you to develop an easy-to-use customizable component demo for your machine learning model that anyone can use anywhere.
Gradio integrates with the most popular Python libraries, including Scikit-learn, PyTorch, NumPy, seaborn, pandas, Tensor Flow, and others.
One of its advantages is that it allows you to interact with the web app you are currently developing in your Jupyter or Colab notebook. It has a lot of unique features that can help you construct a web app that users can interact with.
How to Install Gradio
To use Gradio, we must first install its library on our local PC. So go to your Conda PowerShell or terminal and run the following command. If you are using Google Colab you can also type the following:
pip install gradio
We now have Gradio installed on our local PC. Let's go through some of the fundamentals of Gradio so we can become acquainted with the library.
To begin, we must import the library into our notebook or IDE, whichever you are using. We can do this by typing the following command:
import gradio as gr
How to Create Your First Web App
In this tutorial, we'll create an example greeting app to familiarize ourselves with the fundamentals of Gradio.
To do so, we'll need to write a greeting function because Gradio works with Python user defined functions. As a result, our greeting function looks like this:
def greet_user(name):
    return "Hello " + name + " Welcome to Gradio!😎"
We now need to deploy the Python function on Gradio so that it can act as a web app. To do this, we type:
app =  gr.Interface(fn = greet_user, inputs="text", outputs="text")
app.launch()
Let’s walk through and have a grok about what is going on in the above code before we run it.
gr.Interface: This attribute serves as the bedrock of anything in Gradio. It is the user interface that displays all the components that will be shown on the web.
The parameter fn: This is the Python function you created and want to provide to Gradio.
The inputs parameter: These are the components that you wish to pass into the function that you created, such as words, images, numbers, audio, and so on. In our case, the function we created required text, so we entered it into the inputs parameters.
The output parameter: This is a parameter that allows you to display the component on the interface that you want to see. Because the function we created in this example needs to display text, we supply the text component to the outputs parameter.
app.launch is used to launch the app. You should have something like this when you run the above code:
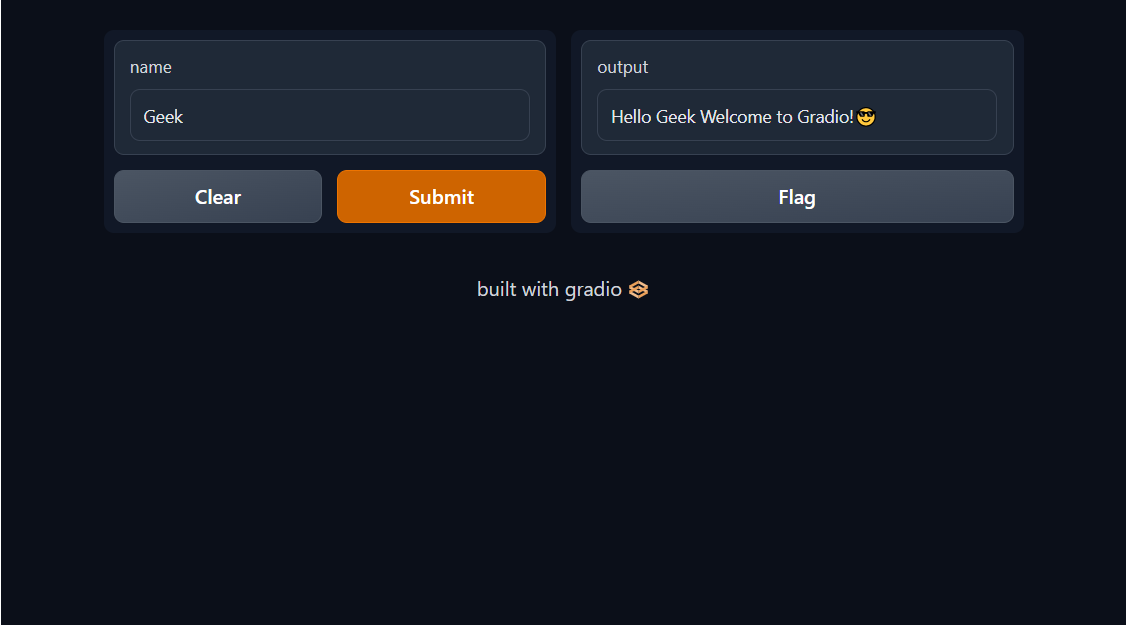
Once the Gradio interface comes up, just type your name and hit submit. Then it outputs the result in the function we created above. Now that we are done with that, let’s go over one more thing in Gradio before we learn how to deploy our model.
We will create a Gradio app that can accept two inputs and provides one output. This app just asks for your name and a value and then outputs your names as well as multiples of the value you entered. To do that just type the below code:
def return_multiple(name, number):
    result = "Hi {}! 😎. The Mulitple of {} is {}".format(name, number, round(number**2, 2))
    return result

app = gr.Interface(fn = return_multiple, inputs=["text", gr.Slider(0, 50)], outputs="text")
app.launch()

Now that we’ve done that let’s quickly go through some of the things we did here that you might not be familiar with.
Input Parameter: In the input parameter we created a list that involves two components, the text and the slider. The slider is also one of Gradio's attributes that returns a float value when you slide across a given range. We used this because in the function we created we are expecting a text and a value.
We have to order the component in the input parameter the way our attributes are ordered in the function we created above. That is, text first before the number. So what we are expecting for the output is actually a string. We just did some formatting in the above function.
Now that we’ve familiarized ourselves with some of the basics of Gradio, let’s create a model that we will deploy.
How to Deploy a Machine Learning Model on Gradio
In this section, I will use a classification model that I've previously trained and saved in a pickle file.
When you create a model that takes a long time to train, the most effective approach to deal with it is to save it in a pickle file once it is finished training so that you don't have to go through the stress of training the model again.
If you want to save a model as a pickle file, let me show you how you can do that. First import the pickle library and then type the code below. Let’s say I just want to fit a model like this:
import pickle
from sklearn.ensemble import RandomForestClassifier
clf = RandomForestClassifier(random_state=42)
clf.fit(X_train, y_train)

# If you've fitted the model just type this to save it: Remember to change the file name
with open("filename.pkl", "wb") as f:
pickle.dump(clf, f)
Now if you wish to load it you can type the following code as well:
with open("filename.pkl", "rb") as f:
    clf  = pickle.load(f)
Now that we’ve understood that, let’s create a function that we will be able to pass into Gradio so that it can make the predictions.
def make_prediction(age, employment_status, bank_name, account_balance):
    with open("filename.pkl", "rb") as f:
        clf  = pickle.load(f)
        preds = clf.predict([[age, employment_status, bank_name, account_balance]])
    if preds == 1:
            return "You are eligible for the loan"
    return "You are not eligible for the loan"

#Create the input component for Gradio since we are expecting 4 inputs

age_input = gr.Number(label = "Enter the Age of the Individual")
employment_input = gr.Number(label= "Enter Employement Status {1:For Employed, 2: For Unemployed}")
bank_input = gr.Textbox(label = "Enter Bank Name")
account_input = gr.Number(label = "Enter your account Balance:")
# We create the output
output = gr.Textbox()


app = gr.Interface(fn = make_prediction, inputs=[age_input, employment_input, bank_input, account_input], outputs=output)
app.launch()

So let’s unwrap what we have above:
We'll start at the point where we created the input component. You can choose to create the component in the gr.Interface, but in the following code, I built it directly outside of the gr.Interface and then provided the variable into the gr.Interface.
So, if you want to make a component that receives numbers, use gr.Number, and then from the output variable I created, you can pass text as we did earlier in our first app (the " text" string is shorthand for textbox if you don't want to declare the attribute explicitly).
Also I used the label parameter in each component so that the user will know what to do. We are already familiar with the other code mentioned above. And now that we've done that our model is deployed. 🎉🎉😎🥳🥳.
Conclusion
Thank you for reading this tutorial. We covered a lot in this article. Just remember that learning Gradio does not stop here – you can check out more on their website. They have pretty intuitive documentation on how you can create your web app.
Thanks once again for reading. If you enjoyed this article, you can support me by following me on LinkedIn or Twitter. Gracias, and happy deployment😀