
Drawing from code can be fun for many reasons. You can generate art that follows a certain logic. You can create animations by moving only parts of an image. And you can even build up a whole game as I covered in this tutorial.
In my last article, we focused on the basics of drawing. Now, let's see a concrete example and explore how to use JavaScript to draw a Gorilla.
You don't need to have any prerequisites for this tutorial. Even if you missed the basics, you can start right away. We are only going to have some simple HTML and a plain JavaScript file that you can run directly in the browser.
By the end, you'll know how to draw a gorilla with JS.
Table of Contents:
- How to Define a Canvas
- How to Turn the Coordinate System Upside Down
- How to Draw the Body of the Gorilla
- How to Draw the Legs of the gorilla
- How to Draw the Arms of the Gorilla
- How to Draw the Face of the Gorilla
- Next Steps
How to Define a Canvas
To draw our gorilla, first let's define a simple HTML file with a Canvas element. Then we'll see how to access it from JavaScript.
In the HTML file, in the header, we'll add our JavaScript file. Note that I’m using the defer keyword to make sure the script only executes once the rest of the document is parsed.
In the body, we'll add a canvas element. We set its size to 500 x 500 and set an ID.
<!DOCTYPE html>
<html lang="en">
  <head>
    <meta charset="utf-8" />
    <title>Gorilla</title>
    <script src="index.js" defer></script>
  </head>
  <body>
    <canvas id="gorilla" width="500" height="500"></canvas>
  </body>
</html>
Then, let's create a JavaScript file. In this file, we'll first get the canvas element by ID. Then, we'll get the rendering context of the canvas element. This is a built-in API with many methods and properties that we can use to draw on the canvas.
// The canvas element and its drawing context
const canvas = document.getElementById("gorilla");
const ctx = canvas.getContext("2d");

. . .
Before we get to drawing, first let's make our life easier by turning the coordinate system upside down.
How to Turn the Coordinate System Upside Down
When we use canvas, we have a coordinate system with the origin at the top-left corner of the canvas that grows to the right and downwards. This is aligned with how websites work in general. Things go from left to right and top to bottom.
This is the default, but we can change it.
 The gorilla with and without transforming and scaling the coordinate system
In our case, it is more convenient to go from the bottom to the top. Then the gorilla can stand at the bottom, and we don’t have to figure out where the bottom of the canvas is.
We can use the translate method to shift the entire coordinate system to the bottom-middle of the canvas. We'll move the coordinate system down along the Y-axis by the size of the canvas, and to the right along the X-axis by half the size of the canvas.
Once we do this, the Y-coordinate is still growing downwards. We can flip it using the scale method. Setting a negative number for the vertical direction will flip the entire coordinate system upside down.
// The canvas element and its drawing context
const canvas = document.getElementById("gorilla");
const ctx = canvas.getContext("2d");

ctx.translate(250, 500);
ctx.scale(1, -1);

. . .
We have to do this before we paint anything on the canvas because the translate and scale methods do not actually move anything that's already on the canvas. But anything we paint after these method calls will be painted according to this new coordinate system.
How to Draw the Gorilla
Now let's look into drawing the gorilla. We'll break this down into multiple steps. First, we'll draw the body, then the legs, the arms, and finally the face of the gorilla.
 We'll draw the gorilla in multiple steps
How to draw the body of the gorilla
We'll draw the body of the gorilla as a path. Paths start with the beginPath method and end with either calling the fill or the stroke method – or both.
In between, we'll build the path by calling path-building methods. In this case, to build up the body of the gorilla we'll use the moveTo and a bunch of lineTo methods.
 The body of the gorilla. The image shows the path we're filling.
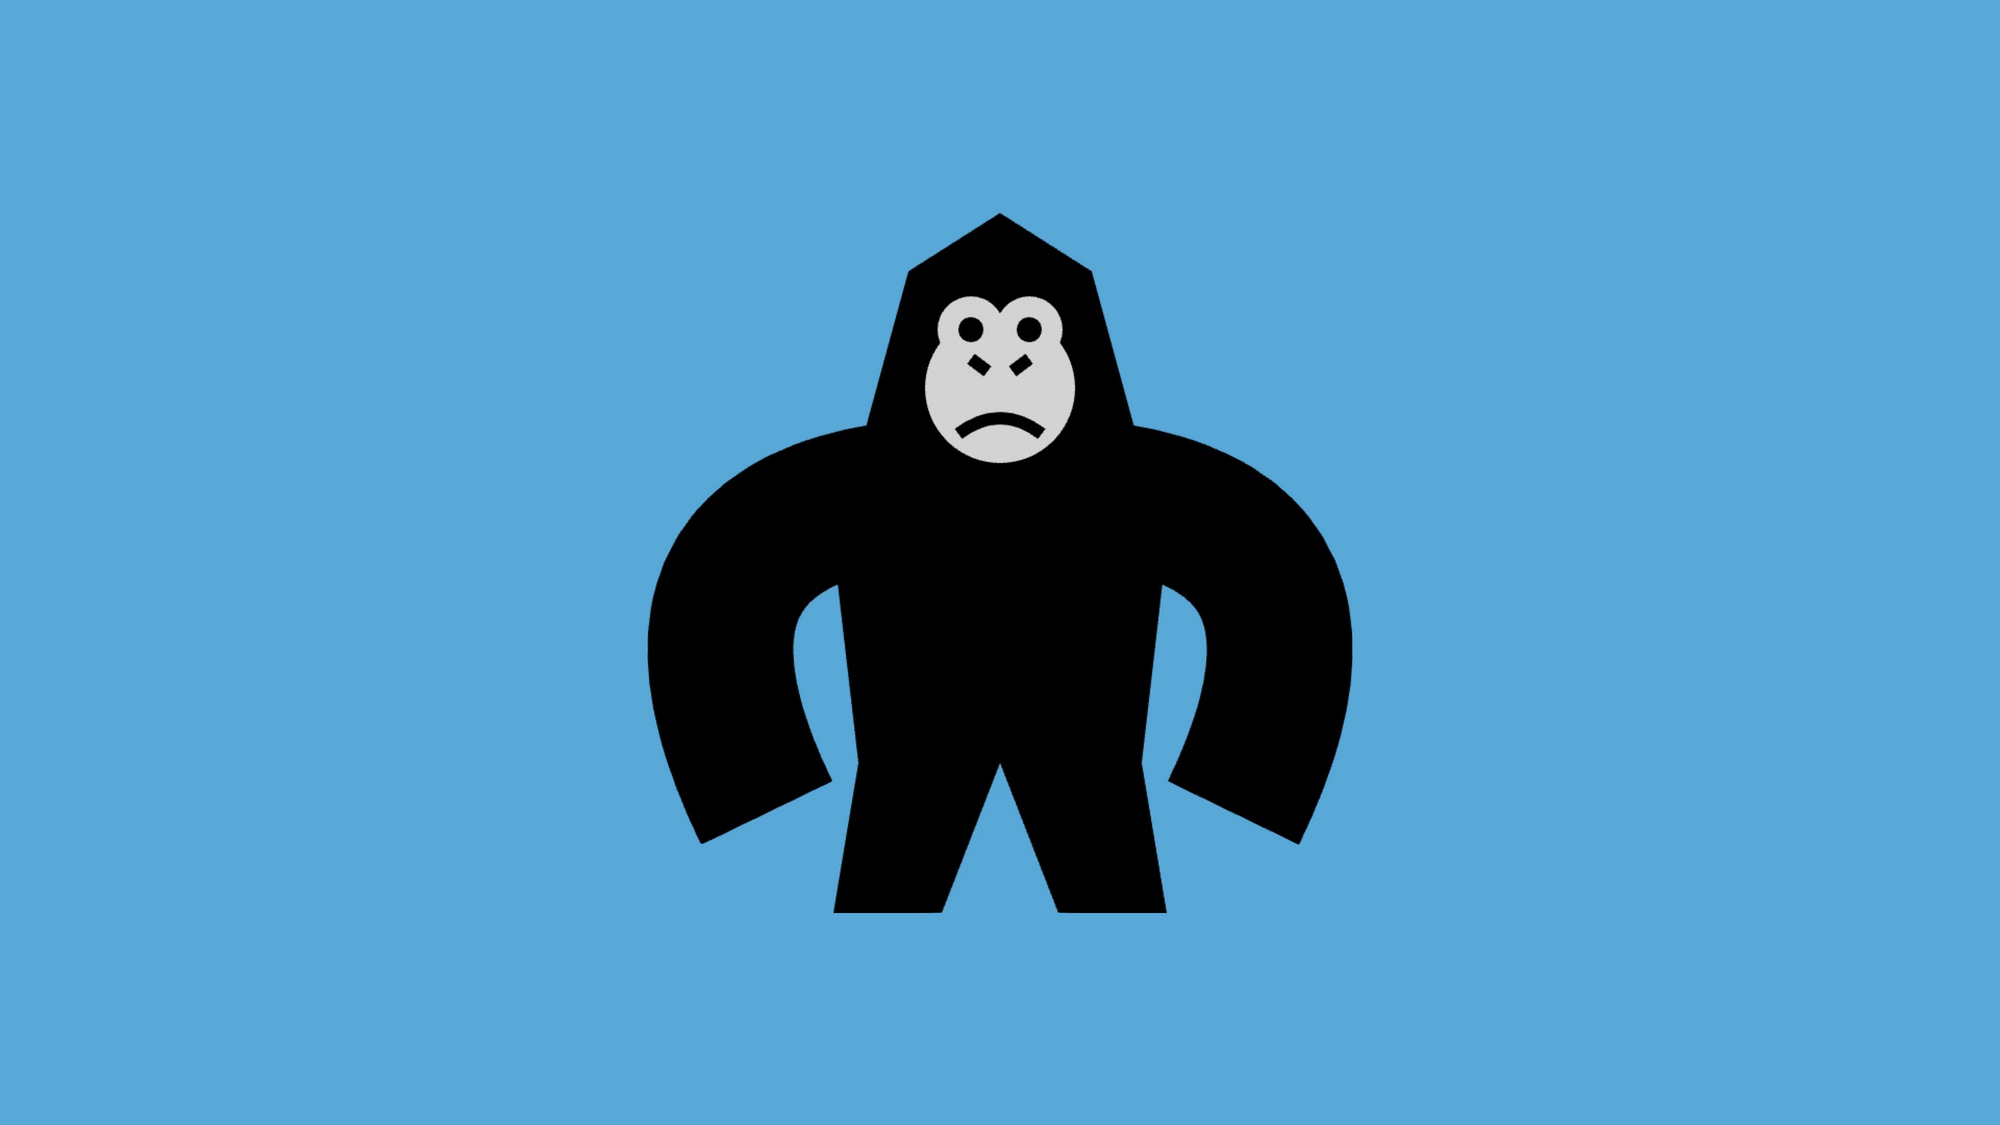
We'll set the fill style to black, and then we'll begin a path. Move to a starting position and then draw straight lines to draw the silhouette of the gorilla. Once we're finished, we'll fill the shape with the fill method.
. . .

ctx.fillStyle = "black";

// Draw the Body of the Gorilla
ctx.beginPath();
ctx.moveTo(-68, 72);
ctx.lineTo(-80, 176);

ctx.lineTo(-44, 308);
ctx.lineTo(0, 336);
ctx.lineTo(+44, 308);

ctx.lineTo(+80, 176);
ctx.lineTo(+68, 72);
ctx.fill();

. . .
In case you are wondering how I came up with these coordinates, I actually started with an initial sketch with pen and paper. I tried to estimate the coordinates, tried them with code, and then adjusted them until they started getting the right shape. Of course, you might have other methods as well.
How to draw the legs of the gorilla
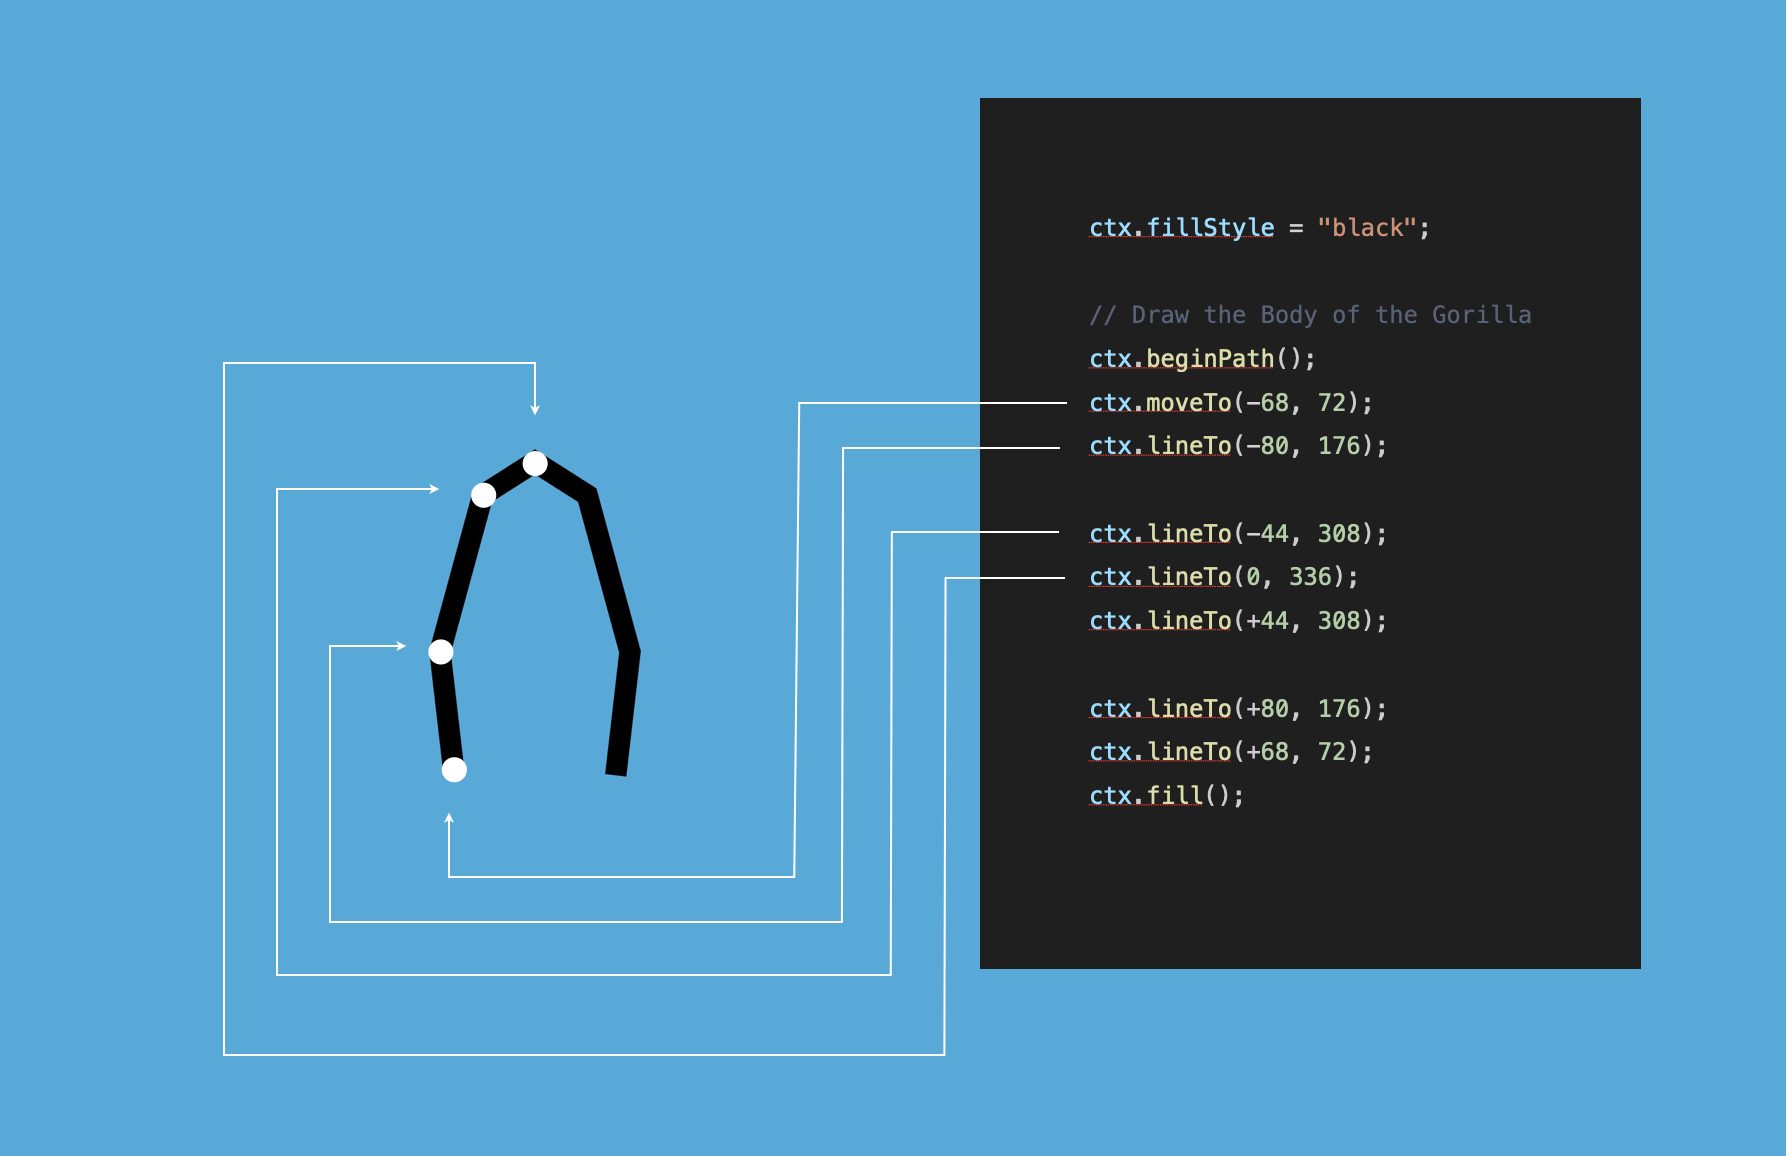
We'll draw the legs the same way. We could even continue the same path we used before, but it might be easier to see what's happening if we break this down into separate paths.
 Drawing the legs as two separate paths
. . .

// Draw the Left Leg
ctx.beginPath();
ctx.moveTo(0, 72);
ctx.lineTo(-28, 0);
ctx.lineTo(-80, 0);
ctx.lineTo(-68, 72);
ctx.fill();

// Draw the Right Leg
ctx.beginPath();
ctx.moveTo(0, 72);
ctx.lineTo(+28, 0);
ctx.lineTo(+80, 0);
ctx.lineTo(+68, 72);
ctx.fill();

. . .
The fill color in this case is also going to be black. Why? Because that's what we set the fillStyle property to, the last time we set its value. Every path that follows this statement will use this color until we change its value.
How to draw the arms of the gorilla
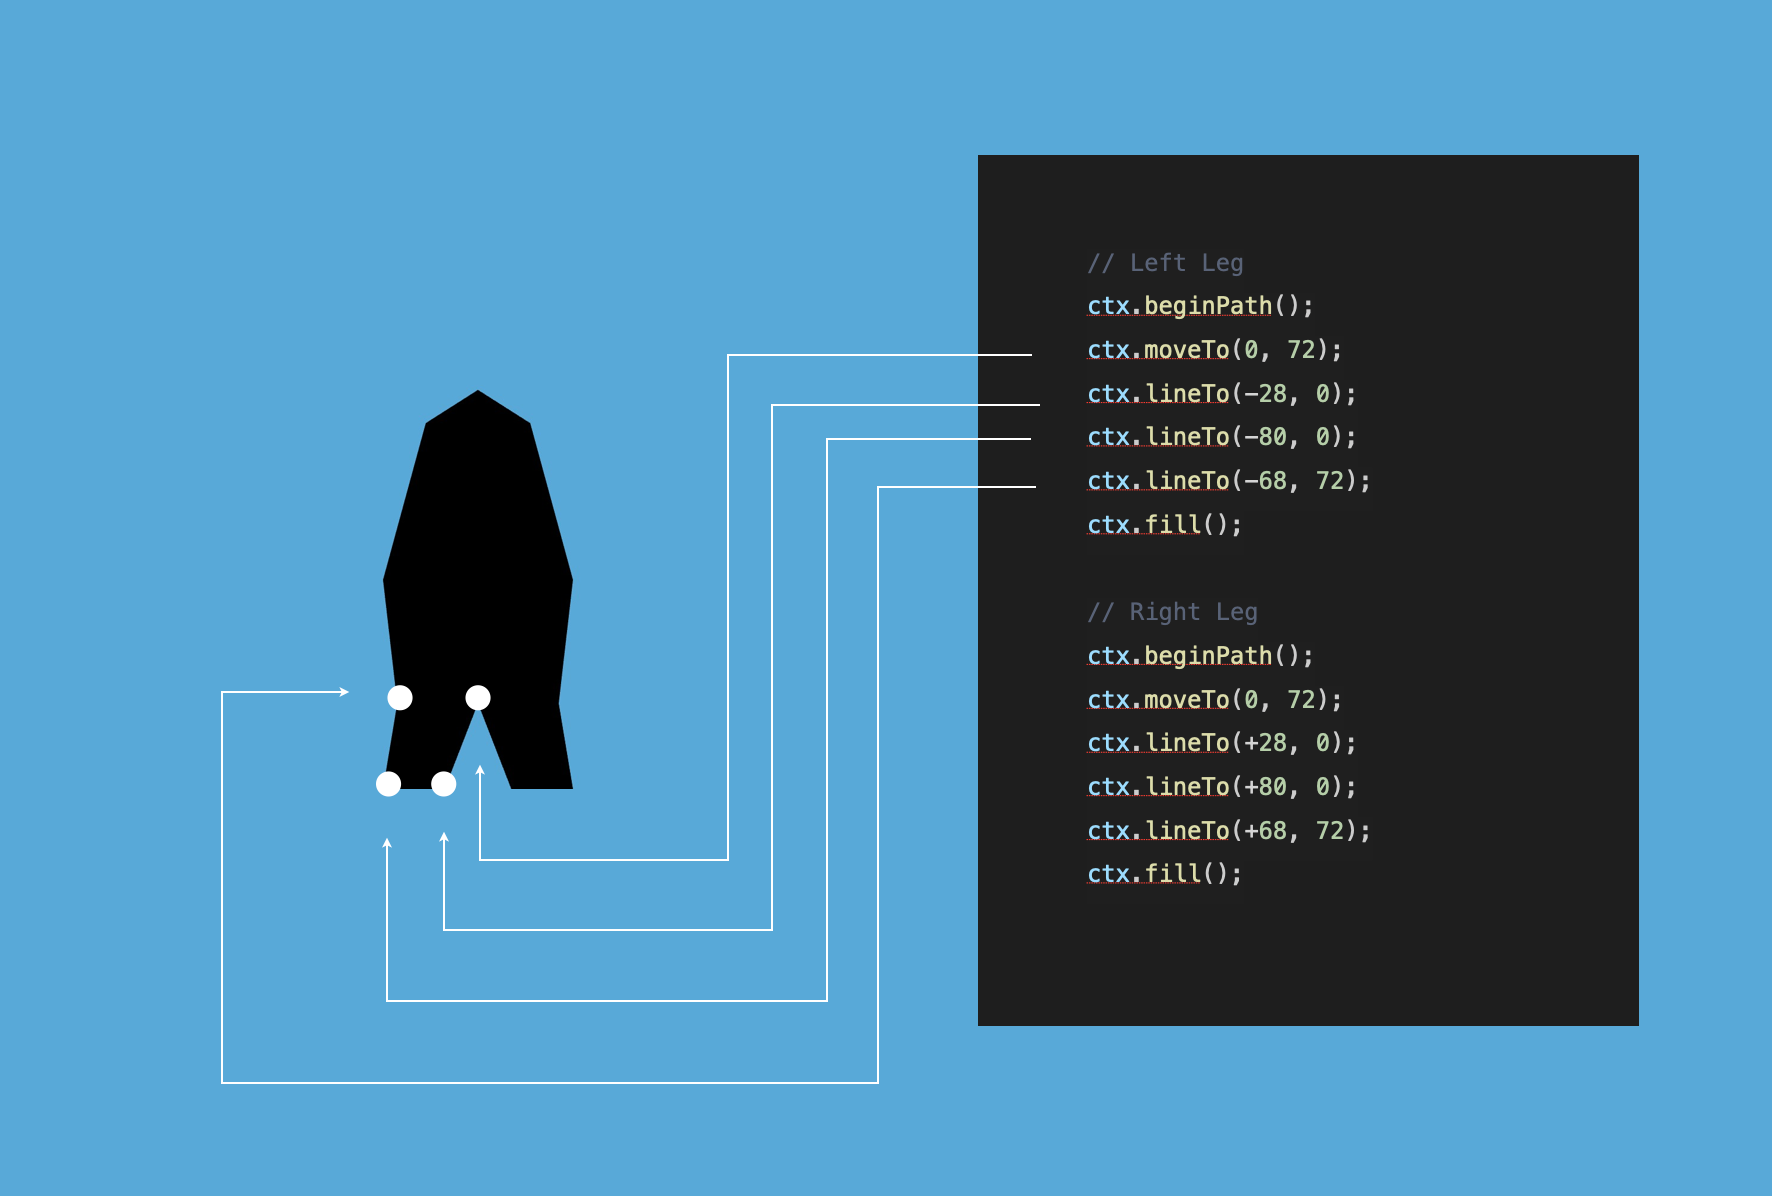
While the body and the legs are relatively simple parts of the gorilla, the arms are a bit more complicated. We'll draw them as a curve.
 Drawing the arms as a curve
Let’s start with the left arm. The main part of this is actually only two lines of code. We'll use the moveTo method to move to the shoulder of the gorilla, then from there, we'll draw the arm as a quadratic curve with the quadraticCurveTo method.
A quadratic curve is a simple curve with one control point. As the curve goes from the starting point (which we'll set with moveTo), the curve bends towards this control point (set as the first two arguments of the quadraticCurveTo method) as it reaches its end position (set as the last two arguments).
. . .

ctx.strokeStyle = "black";
ctx.lineWidth = 70;

// Draw the Left Arm
ctx.beginPath();
ctx.moveTo(-56, 200);
ctx.quadraticCurveTo(-176, 180, -112, 48);
ctx.stroke();

// Draw the Right Arm
ctx.beginPath();
ctx.moveTo(+56, 200);
ctx.quadraticCurveTo(+176, 180, +112, 48);
ctx.stroke();

. . .
We'll draw the hands as strokes. Instead of ending the path with the fill method, we'll use the stroke method.
We'll also set up the styling differently. Instead of using the fillStyle property, here we'll set the color with strokeStyle and give thickness to the arms with the lineWidth property.
Drawing the right arm is the same, except the horizontal coordinates are flipped. The negative numbers have a positive sign now.
As a result, our gorillas should start to gain shape. They still don’t have a face, but we have the whole silhouette now.
How to draw the face of the gorilla
The face of the gorilla comes together from multiple different parts. First, we'll draw the facial mask with three circles.
 We draw the facial mask as three circles
Unfortunately, we don’t have a simple fill circle method, as we have in the case of rectangles. We have to draw an arc instead.
An arc method can be called as part of a path. We'll start each circle with the beginPath method and end with the fill method.
. . .

ctx.fillStyle = "lightgray";

// Draw the Facial Mask
ctx.beginPath();
ctx.arc(0, 252, 36, 0, 2 * Math.PI);
ctx.fill();

ctx.beginPath();
ctx.arc(-14, 280, 16, 0, 2 * Math.PI);
ctx.fill();

ctx.beginPath();
ctx.arc(+14, 280, 16, 0, 2 * Math.PI);
ctx.fill();

. . .
The arc method has a lot of properties. This might look a bit scary, but we only need to focus on the first 3 when drawing circles:
- The first two arguments are
xandy, the center coordinates of the arc. - The third argument is the
radius. - Then the last two arguments are the
startAngleand theendAngleof the arc in radians. Because here we want to have a full circle and not an arc, we'll start with 0 and end at a full circle. A full circle in radians is two times Pi.
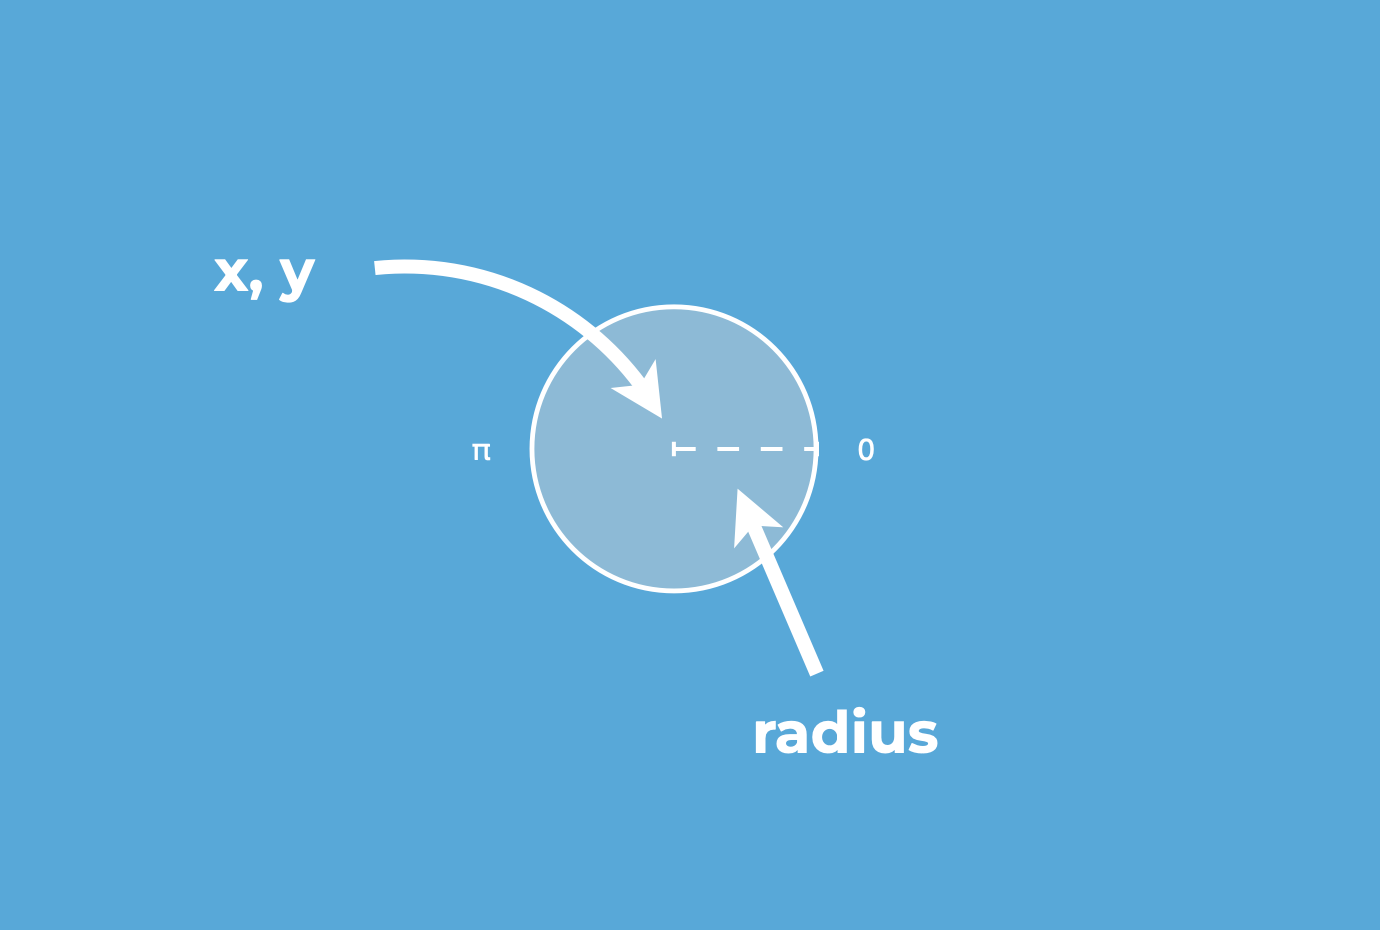
If these last two properties are confusing, don't worry about it. What's important is that when we draw circles, they are always 0 and 2 * Math.Pi.
 We draw the eyes, the nostrils, and the mouth
Then we draw the eyes of the gorilla as two other circles. Here the center coordinates of the circles are the same as the bigger gray circles around them. Only their radius and their fill color are different.
. . .

ctx.fillStyle = "black";

// Draw the Left Eye
ctx.beginPath();
ctx.arc(-14, 280, 6, 0, 2 * Math.PI);
ctx.fill();

// Draw the Right Eye
ctx.beginPath();
ctx.arc(+14, 280, 6, 0, 2 * Math.PI);
ctx.fill();

. . .
Then for the nose, we'll draw two short lines as nostrils. They are part of the same path, and we'll call the moveTo method in between to get from one side to the other. Before calling stroke at the end of this path, we'll update the lineWidth property.
. . .

ctx.lineWidth = 6;

// Draw the Nostrils
ctx.beginPath();
ctx.moveTo(-14, 266);
ctx.lineTo(-6, 260);

ctx.moveTo(14, 266);
ctx.lineTo(+6, 260);
ctx.stroke();

. . .
And finally, we'll also add a path for the mouth. This could be part of the same path as the nose, because it has the same line width and color, but might be clearer to have them separate.
. . .

// Draw the Mouth
ctx.beginPath();
ctx.moveTo(-20, 230);
ctx.quadraticCurveTo(0, 245, 20, 230);
ctx.stroke();
Let's draw another quadratic curve. This is similar to the one we used for the arms. The start and endpoint of this curve are on the same level, but the control point is a bit higher so the middle of the mouth is higher than the two sides.
Next Steps
Now that we have a basic gorilla, what can we do with it? We can build a whole game around it. In this JavaScript Game Tutorial we rebuild the 1991 classic game, Gorillas.
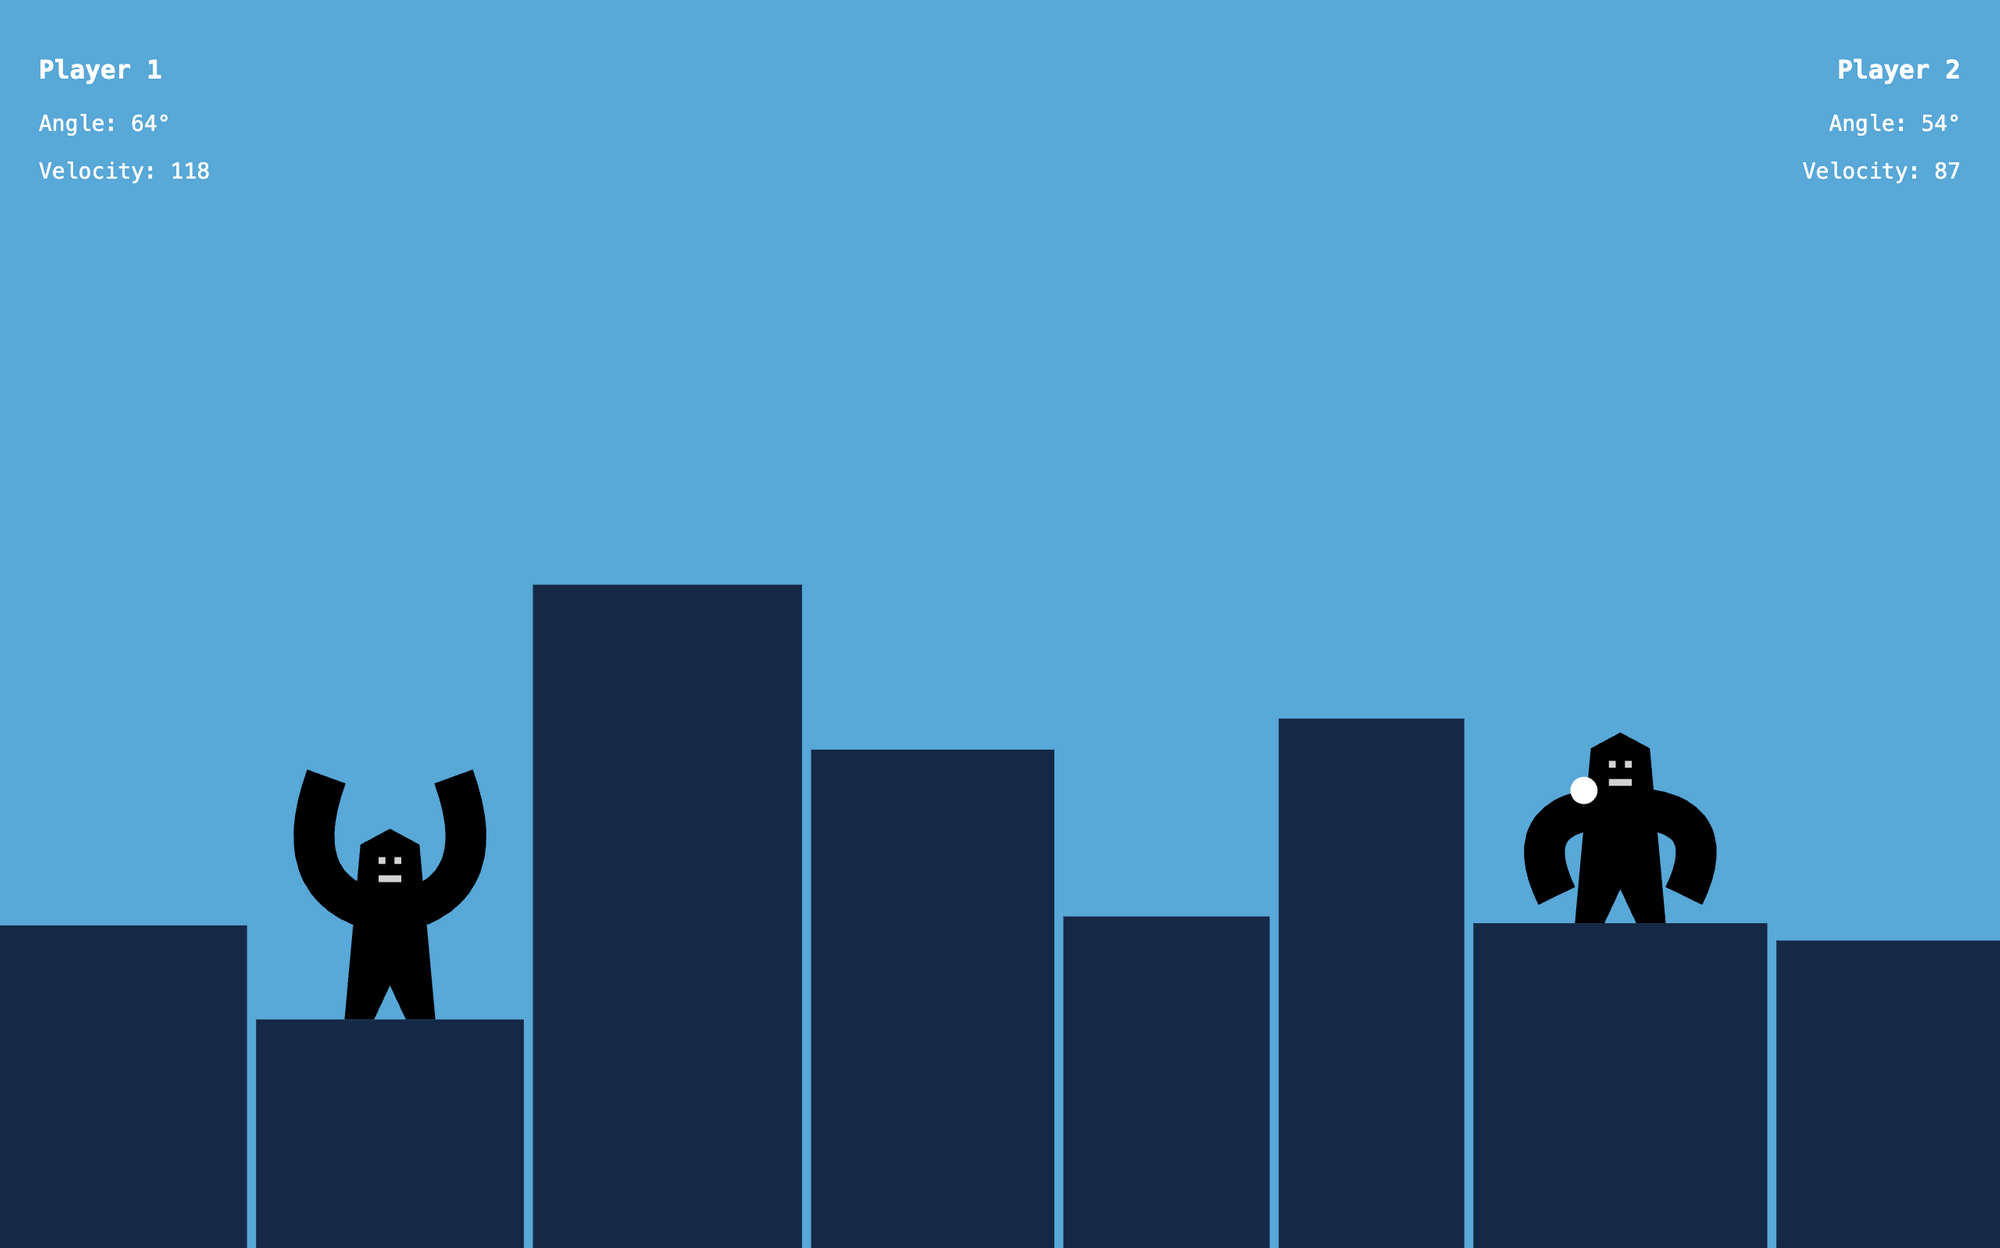 Screenshot from the JavaScript Game Tutorial
For a deep dive, read the full tutorial where we build up a complete game with plain JavaScript. In this tutorial, we not only cover how to draw the gorillas and the city skyline but also implement the whole game logic. From event handling, through the animation loop, to hit detection.
For even more, you can also watch the extended tutorial on YouTube. In the YouTube version, we also cover how to make the buildings destructible, how to animate the hand of the gorilla to follow the drag movement while aiming, have nicer graphics, and we add AI logic, so you can play against the computer.
Check it out to learn more:
You can subscribe to my channel for more JavaScript game development tutorials: