
OCR is a valuable tool that you can use to extract text from images. But the OCR you are using may not work as intended for your specific needs. In such situations, fine-tuning your OCR engine is the way to go.
In this tutorial, I will show you how to fine-tune EasyOCR, a free, open-source OCR engine that you can use with Python.
Table of Contents
- Prerequisites
- How to Install Required Packages
- How to Clone the Git repository
- How to Get a Dataset
- How to Generate your Synthetic Dataset
- Convert the dataset to lmdb format
- How to Retrieve a Pre-trained OCR Model
- How to Run the fine-tuning
- How to Run Inference with your Fine-tuned Model
- A Qualitative Test of Performance
- Quantitative Test of Performance
- Conclusion
Prerequisites
- Basic knowledge of Python.
- Basic knowledge of how to use the terminal
How to Install Required Packages
First off, let's install the required pip packages. I recommend making a virtual environment for this, though it is not required.
Run the commands below, one line at a time:
pip install fire
pip install lmdb
pip install opencv-python
pip install natsort
pip install nltk
You also need to install PyTorch from this website (choose your specifications and copy the pip install command. The command below is for my specifications). You can choose either the GPU version or the CPU version. The difference is that running the fine-tuning process will be slower on the CPU.
pip install torch torchvision torchaudio --index-url https://download.pytorch.org/whl/cu118
How to Clone the Git Repository
You''ll need a Git repository that will help you run the fine-tuning. Clone this Git repo with the command below:
git clone https://github.com/clovaai/deep-text-recognition-benchmark
The deep-text-recognition-benchmark Github repo will give us some useful files for fine-tuning the EasyOCR model. Note that some of the terminal commands used in this article were taken from the repository and then adapted to my needs, so the repository is worth a read.
I would like to add a note here that Clova AI on Git has a lot of good repositories that have been of immense help to me, so feel free to check out other interesting repositories that they have.
Another interesting repo they have is the Donut model repo, and I have written an article on fine-tuning the Donut model that you should check out.
How to Get a Dataset
Before you can fine-tune your OCR, you'll need a dataset. You can either download a dataset or make one yourself.
Since I want my OCR to be particularly good at scanning supermarket receipts, I will make a dataset of items you can find in the supermarket, but feel free to make a dataset from whatever data you need your OCR to be good at. For this section, I made use of this GitHub page.
If you want to learn how to generate your own dataset, you can go to the next section right away, but if you want a simpler solution then you can use one of the options below:
Option 1 – Use my dummy dataset:
If you want to have this step as simple as possible (recommended if you are just testing), you can download a dummy dataset. I have made and uploaded one to this Google Drive (download the whole folder).
Option 2 – Download a dataset
If you want a larger dataset, you can download a dataset from this Dropbox page by downloading the data_lmdb_release.zip file (note that it is a bit over 18GB in size).
How to Generate your Synthetic Dataset
If you want a cooler approach to creating your own dataset, you can follow along with this section. I originally wrote about it in this Medium article.
For this section, you should use a separate Python file.
The great thing about a synthetic dataset is that you don't need any labor-intensive labeling, as you are creating the images based on provided textual descriptions. This means that you have both the input to the model (the image) and the label (the text of the images), the two components needed to fine-tune an AI model.
 Make synthetic images like this by following this section
Clone the Synthetic Generation Repo
First, you have to clone this synthetic data generation repository to be able to create synthetic data. To clone it, open a new folder, and run this command:
git clone https://github.com/Belval/TextRecognitionDataGenerator.git
This repository allows you to create images from a given text description. You will then have the dataset you need: images, and a txt file stating the text on the images (the label).
Create a File to Generate the Synthetic Data
Now create a new file called generate_synth_data.py, and add the code below to import the useful packages:
from trdg.generators import (
    GeneratorFromStrings,
)
from tqdm.auto import tqdm
import os
import pandas as pd
import numpy as np
import random
To run them, you need these pip installations (run one line at a time in the terminal). Note that a specific Pillow version is needed (you will get an error if you have the newest Pillow version):
pip install trdg
pip install pandas
pip install Pillow==9.5.0
Next, define some hyperparameters (set them to whatever values you prefer):
NUM_IMAGES_TO_SAVE = 10
NUM_PRICES_TO_GENERATE = 10000
Now you need a large dataset with words you want to have on the images you create. Since I want my OCR to be good at reading supermarket receipts, I used Openfoodfacts, which is a website that contains a lot of supermarket items.
To make it as simple as possible, you can use the CSV file on this Google Drive page (just download it and place it in your folder).
Note that you can make use of any other data, instead of using mine. If you want to use your own data, all you need is a list of strings, which you can feed into the generator to create images.
Here's how you can read the CSV file containing supermarket items:
# helper funcs and data to generate images
df = pd.read_csv("openfoodfacts_export_csv.csv", on_bad_lines='skip', sep='\t', low_memory=True)
df[["product_name_nb", "generic_name_nb", "brands"]]
all_words = df[["product_name_nb", "generic_name_nb", "brands"]].to_numpy().flatten()
Here I am loading in my own data, but the code will look different if you are using your own data.
Here's how you can filter the data:
# ignore np nan
num_before = len(all_words)
all_words = [x for x in all_words if str(x) != 'nan']
after_nan_filter = len(all_words)
print("removed: ", num_before - after_nan_filter, "words because of nan values")
all_words = list(set(all_words))
print("Removed", len(all_words), "duplicates")
print("Current number of words: ", len(all_words))
Note that I am always printing the amount of words removed in the filtering process. This is good practice, as it lets you have a better overview of the size and quality of your dataset.
I also want to have a price on the images, so I am randomly generating some prices with the code below:
#randomly generate 2 digits between 0-99
number_strings = []
for i in range(len(all_words)*9//10): #90 percent of all words
 digits = np.random.randint(1, 100, 4)
 before_comma = f"{str(digits[0])}" #before comma is just given as 1 digit if 0-9
 after_comma = f"{str(digits[1])}" if len(str(digits[1])) == 2 else f"0{str(digits[1])}"
 number_string = f"{before_comma},{after_comma}"
 number_strings.append(number_string)

#then create 10 percent of the words with price between 100-999
for i in range(len(all_words)*1//10): #90 percent of all words
 before_comma = np.random.randint(100, 999, 1)
 after_comma = np.random.randint(1, 99, 1)
 after_comma = f"{str(after_comma[0])}" if len(str(after_comma[0])) == 2 else f"0{str(after_comma[0])}"
 number_string = f"{str(before_comma[0])},{str(after_comma)}"
 number_strings.append(number_string)
The code below randomly combines the supermarket items with the prices:
#now given word list and number list, get all combinations
all_combinations = []
for word in tqdm(all_words):
 for number in random.sample(number_strings, 20): #only need 20 prices per product for example
  for num_tabs in [1]:
   combined_string = word + "    "*num_tabs + number
   all_combinations.append(combined_string)
Use the repository you cloned earlier to create the images from the list of strings we have created:
#generate the images
generator = GeneratorFromStrings(
    random.sample(all_combinations, 10000),

    # uncomment the lines below for some image augmentation options
    # blur=6,
    # random_blur=True,
    # random_skew=True,
    # skewing_angle=20,
    # background_type=1,
    # text_color="red",
)
There are a lot of options for generating the data, which you can read more about here. Some examples are: changing the background, adding blur, and adding skewing. You can try this out by uncommenting some of the lines in the code snippet above.
Then save the images from the generator to a specific format:
# save images from generator
# if output folder doesnt exist, create it
if not os.path.exists('output'):
    os.makedirs('output')
#if labels.txt doesnt exist, create it
if not os.path.exists('output/labels.txt'):
    f = open("output/labels.txt", "w")
    f.close()

#open txt file
current_index = len(os.listdir('output')) - 1 #all images minus the labels file
f = open("output/labels.txt", "a")

for counter, (img, lbl) in tqdm(enumerate(generator), total = NUM_IMAGES_TO_SAVE):
    if (counter >= NUM_IMAGES_TO_SAVE):
        break
    # img.show()
    #save pillow image
    img.save(f'output/image{current_index}.png')
    f.write(f'image{current_index}.png {lbl}\n')
    current_index += 1
    # Do something with the pillow images here.
f.close()
Generate the Synthetic Data
You can run the generate_synth_data.py file you created with this command in the terminal:
python generate_synth_data.py
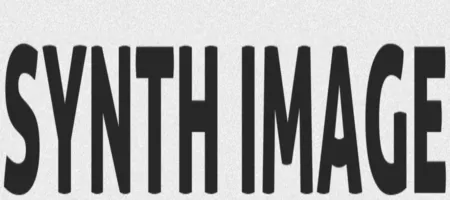
You should see an image similar to the one below (you may have a different text, in your output folder):
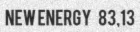 This image was synthetically generated
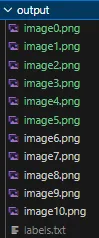
Your images will be organized in the order in the image below, where the .png files are your images, and the labels.txt file contains the text in each image. This allows you to use the dataset for fine-tuning.
 The output folder structure from running the code above.
Congrats, you can now make your own synthetic dataset. Since you now have both an image and the text of that image in a labels.txt file, you can use this to fine-tune an OCR engine, which I will talk more about below.
How to Convert the Dataset to LMDB Format
LMDB stands for Lightning Memory-Mapped Database Manager and is essentially an encoding you can use for your dataset to train AI models.
You can read more about it on the LMDB docs. After you have created your dataset, you should have a folder with your images, and the labels for all the images (the text in the images) in a labels.txt file.
Your folder should look similar to the image below, and should be inside the deep-text-recognition folder:
 How the folder for your dataset should look before converting to LMDB format
NOTE: Make sure you have at least 10 images in your folder. You may get an error when running the training script later in the tutorial if you have fewer images.
You have to make some changes in the create_lmdb_dataset.py file in the deep-text-recognition-benchmark folder:
Set the map_size variable to a lower value — I was getting a disk memory error with the previous value. I set the new value for map_size to 1073741824, as can be seen below:
# OLD LINE
# ...
env = lmdb.open(outputPath, map_size=1099511627776)
# ...

# NEW LINE
# ...
env = lmdb.open(outputPath, map_size=1073741824)
# ...
I also got an error with the utf encoding, so I removed the utf-8 encoding when opening the gtFile. The new line then looks like this:
# OLD LINE
# ...
with open(gtFile, 'r', encoding='utf-8') as data:
# ...

# NEW LINE
# ...
with open(gtFile, 'r') as data:
# ...
Lastly, I changed the way imagePath was read:
# OLD LINE
# ...
imagePath, label = datalist[i].strip('\n').split('\t')
# ...

# NEW LINES
# ...
imagePath, label = datalist[i].strip('\n').split('.png')
imagePath += '.png'
# ...
The create_lmdb_dataset.py file should look like this (code from this Git repo, with the changes above applied):
import fire
import os
import lmdb
import cv2

import numpy as np


def checkImageIsValid(imageBin):
    if imageBin is None:
        return False
    imageBuf = np.frombuffer(imageBin, dtype=np.uint8)
    img = cv2.imdecode(imageBuf, cv2.IMREAD_GRAYSCALE)
    imgH, imgW = img.shape[0], img.shape[1]
    if imgH * imgW == 0:
        return False
    return True


def writeCache(env, cache):
    with env.begin(write=True) as txn:
        for k, v in cache.items():
            txn.put(k, v)


def createDataset(inputPath, gtFile, outputPath, checkValid=True):
    """
    Create LMDB dataset for training and evaluation.
    ARGS:
        inputPath  : input folder path where starts imagePath
        outputPath : LMDB output path
        gtFile     : list of image path and label
        checkValid : if true, check the validity of every image
    """
    os.makedirs(outputPath, exist_ok=True)
    env = lmdb.open(outputPath, map_size=1073741824) #TODO Changed map size
    cache = {}
    cnt = 1

    with open(gtFile, 'r') as data: #TODO removed utf-8 encoding here since I have norwegian letters
        datalist = data.readlines()

    nSamples = len(datalist)
    print(nSamples)
    for i in range(nSamples):
        #TODO changed the way imagePath is found as well to match my usecase
        imagePath, label = datalist[i].strip('\n').split('.png')
        imagePath += '.png'

        # imagePath, label = datalist[i].strip('\n').split('\t')
        imagePath = os.path.join(inputPath, imagePath)

        # # only use alphanumeric data
        # if re.search('[^a-zA-Z0-9]', label):
        #     continue

        if not os.path.exists(imagePath):
            print('%s does not exist' % imagePath)
            continue
        with open(imagePath, 'rb') as f:
            imageBin = f.read()
        if checkValid:
            try:
                if not checkImageIsValid(imageBin):
                    print('%s is not a valid image' % imagePath)
                    continue
            except:
                print('error occured', i)
                with open(outputPath + '/error_image_log.txt', 'a') as log:
                    log.write('%s-th image data occured error\n' % str(i))
                continue

        imageKey = 'image-%09d'.encode() % cnt
        labelKey = 'label-%09d'.encode() % cnt
        cache[imageKey] = imageBin
        cache[labelKey] = label.encode()

        if cnt % 1000 == 0:
            writeCache(env, cache)
            cache = {}
            print('Written %d / %d' % (cnt, nSamples))
        cnt += 1
    nSamples = cnt-1
    cache['num-samples'.encode()] = str(nSamples).encode()
    writeCache(env, cache)
    print('Created dataset with %d samples' % nSamples)


if __name__ == '__main__':
    fire.Fire(createDataset)
Next, move the folder over to the deep-text-recognition-benchmark folder (the Git repo you cloned). Then run the following command in the terminal:
python .\create_lmdb_dataset.py <data folder name> <path to labels.txt in data folder> <output folder for your lmdb dataset>
Where:
<data folder name>is the name of your folder with images andlabels.txt(outputin my case)<path to labels.txt>is the<data folder name>+ thelabels.txt(so.\output\labels.tx_t_in my case)<output folder for your lmdb dataset>is the name of a folder that will be created for your dataset converted to LMDB format (I called it.\lmbd_output)
For me, this was the command (make sure to run this command inside the deep-text-recognition-benchmark folder):
python .\create_lmdb_dataset.py .\output .\output\labels.txt .\lmbd_output
Now, you should have a new folder, like the image below, in your deep-text-recognition-benchmark folder.
 How the folder for your lmdb converted data should look
NOTE: Running the command on an existing folder does not overwrite the existing folder. Make sure you either delete a folder or give the lmdb_output a new name (this was something I struggled with for a while, so hopefully, this will help you avoid that error).
How to Retrieve a Pre-trained OCR Model
Next, you need a pre-trained OCR model that you can fine-tune with your dataset. For this, you can go to this Dropbox website and download the TPS-ResNet-BiLSTM-Attn.pth model.
Place the model in your deep-text-recognition-benchmark folder (I know this looks a bit shady, but this is the part of the instructions in the deep-text-recognition-benchmark repository. The Dropbox is not mine, and I am linking it here because it is linked in the Git repo text-recognition-benchmark)
How to Run the Fine-tuning
If you run on CPU (this can be ignored if you are using GPU), you'll likely get an error that says: "RuntimeError: Attempting to deserialize object on a CUDA device but torch.cuda.is_available() is False".
This can be fixed by changing lines 85 and 87 in the train.py file:
# OLD LINES
# ...
if opt.FT:
    model.load_state_dict(torch.load(opt.saved_model), strict=False)
else:
    model.load_state_dict(torch.load(opt.saved_model))
# ...


# NEW LINES (change to this if you are using CPU)
#
if opt.FT:
    model.load_state_dict(torch.load(opt.saved_model,map_location='cpu'), strict=False)
else:
    model.load_state_dict(torch.load(opt.saved_model,map_location='cpu'))
# ...
Finally, you can then run the fine-tuning. To do that, you can use the command below in the terminal:
python train.py --train_data lmdb_output --valid_data lmdb_output --select_data "/" --batch_ratio 1.0 --Transformation TPS --FeatureExtraction ResNet --SequenceModeling BiLSTM --Prediction Attn --batch_size 2 --data_filtering_off --workers 0 --batch_max_length 80 --num_iter 10 --valInterval 5 --saved_model TPS-ResNet-BiLSTM-Attn.pth
Some notes on the command:
data_filtering_offis set toTrue(you only have to use the flag, not give it a variable). I did not usedata_filteringbecause I'll have no samples to train on if filtering was enabled.- Workers were to set to 0 to avoid errors. I think this has something to do with multi-GPU settings, and this is also referred to in the
train.pyfile in the deep-text-recognition-benchmark folder. batch_max_lengthis the maximum length of any text in the training dataset. If you are using a different dataset, feel free to change this variable. Make sure this variable is as large as the longest string you are using in your dataset, or you'll get an error.- For this tutorial, I use
train_dataandvalid_datato refer to the same folder. In practice, I would create one folder with a training dataset, and one for a validation dataset and refer to those instead. - I set
num_iterto 10 so you can make sure it works. Naturally, this variable must be set much higher when running the actual fine-tuning of a model. saved_modelis an optional parameter. If you don’t set it, you will train a model from scratch. You probably don't want that (as this will require a lot of training), so set thesaved_modelflag to the existing model you downloaded from Dropbox.
How to Run Inference with your Fine-tuned Model
After you have fine-tuned your model, you'd want to run inference with it. To do this, you can use the command below:
python demo.py --Transformation TPS --FeatureExtraction ResNet --SequenceModeling BiLSTM --Prediction Attn --image_folder <path to images to test on> --saved_model <path to model to use>
Where:
<path to images to test on>is a folder consisting of PNG images you want to test on. For me, this was output<path to model to use>is the path to the saved model from your fine-tuning. For me, this was .\saved_models\TPS-ResNet-BiLSTM-Attn-Seed1111\best_accuracy.pth (the fine-tuning saves the fine-tuned model in asaved_modelsfolder)
Here's the command that I used:
python demo.py --Transformation TPS --FeatureExtraction ResNet --SequenceModeling BiLSTM --Prediction Attn --image_folder output --saved_model .\saved_models\TPS-ResNet-BiLSTM-Attn-Seed1111\best_accuracy.pth
The command simply outputs the model's prediction and confidence score for each image in the <path to images to test on> folder, so you can check the performance of the model by looking at the images yourself to see if the model made the right prediction. This is a qualitative test of the performance of the model.
A Qualitative Test of Performance
To see if the fine-tuning worked, I will do a qualitative test of the performance by testing the original model against my fine-tuned model on 10 specific words and numbers.
The words I tested are shown below (merged vertically into one image). I had to make it a bit difficult for the model by adding skewed and blurred texts.
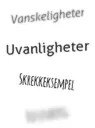 Self-made images merged with [https://products.aspose.app/pdf/merger/png-to-png](https://products.aspose.app/pdf/merger/png-to-png" rel="noopener ugc nofollow). The words from top to bottom are: “vanskeligheter”, “uvanligheter”, “skrekkeksempel”, “rosenborg”
Considering that I want my OCR to read Norwegian supermarket receipts, I added some Norwegian words (the words are taken from http://openfoodfacts.com/, you can read more about it in this article).
Hopefully, my fine-tuned model should perform better on these words, as the original OCR model is not used to seeing Norwegian words. My fine-tuned model has been trained on some Norwegian words.
The texts in each image are:
- image0 -> vanskeligheter
- image1 -> uvanligheter
- image2 -> skrekkeksempel
- image3 -> rosenborg
Results for the original model (not fine-tuned):
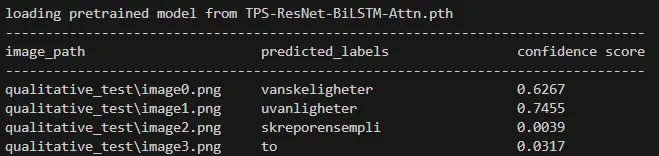 Results for the original model (not fine-tuned) on a qualitative test. You can see the model struggles quite a bit
Results for fine-tuned model:
 Results for the fine-tuned model. You can see the model achieves perfect accuracy because of the fine-tuning.
As you can see, the fine-tuning has worked, and the fine-tuned model achieves perfect results in this qualitative example.
To interpret your results qualitatively, you should grab a sample of documents that are representative for the full dataset and manually compare the OCR output and the ground truth. This will give you a feel of how well the model is performing, as you can see how often it makes errors.
You should note that you often cannot expect perfect results from the fine-tuned OCR engine, and you can therefore use the qualitative analysis to determine specific errors the model is making.
This could, for example, be the model having difficulties recognizing certain characters. If this is the case, you can train the model on more examples of those characters to further increase the performance of your model.
Quantitative Test of Performance
If you want a more quantitative test, you can either look at the validation results that show up during fine-tuning, or you can use the command below:
python test.py --eval_data <path to test data set in lmdb format> --Transformation TPS --FeatureExtraction ResNet --SequenceModeling BiLSTM --Prediction Attn --saved_model <path to model to test> --batch_max_length 70 --workers 0 --batch_size 2 --data_filtering_off
Where:
<path to test data set in lmdb format>is the path to the folder containing the test data in LMDB format. For me, this was:lmdb_norwegian_data_test<path to model to test>is the path to the model you want to test its performance of. For me, this was:saved_models/TPS-ResNet-BiLSTM-Attn-Seed1111/best_accuracy.pth.
The command I used was therefore:
python test.py --eval_data lmdb_norwegian_data_test --Transformation TPS --FeatureExtraction ResNet --SequenceModeling BiLSTM --Prediction Attn --saved_model saved_models/TPS-ResNet-BiLSTM-Attn-Seed1111/best_accuracy.pth --batch_max_length 70 --workers 0 --batch_size 2 --data_filtering_off
This will output accuracy in percentage, so a number between 0 and 100, which is the accuracy the OCR model achieves on your test dataset.
In my experience, the model you downloaded from Dropbox needs a bit of training. At first, the model will make inaccurate predictions, but if you let it train for 30 minutes or so you should start seeing some improvements.
I then ran the test.py on the 4 images I showed above and got the results in the images below: with the old (not fine-tuned) model to on top and the new fine-tuned model below.
Results from the old model:
 Result for the old model, which acieves an accuracy of 50%.
Results from the fine-tuned model:
 Result for the new fine-tuned model which achieves an accuracy of 100%, which indicates the fine-tuning worked
You can see that the new fine-tuned model performs better with a accuracy of 100 percent.
Conclusion
Congrats, you can now fine-tune your OCR model. To make a significant impact on a larger model and generalize it, you probably have to make a larger dataset. You can learn about that in this tutorial, and then let the model train for a while.
In the end, the OCR model will hopefully perform better for your specific use case.
This tutorial was originally written part by part on my Medium, you can check out each part here:
- Generating a synthetic fine-tuning dataset for an OCR engine
- How to Fine-tune EasyOCR to achieve better OCR performance
If you are interested and want to learn more about similar topics, you can find me on:
Cover image: Use OCR to read documents. Image made with DALL-E. OpenAI. (2023). ChatGPT (Large language model) https://chat.openai.com.