

I think it's safe to say that the vast majority of professionals depend on the internet these days.
So being denied access to the internet when you are trying to mine nuggets of valuable information from your go-to web sites can be quite an ordeal. Especially when you are under pressure to complete a piece of urgently required work.
One particularly unwelcome cause of being denied access to the internet is the “DNS Server Not Responding” error. It’s like that old fable where a troll sits under a bridge and says “You shall not pass!”, or something about gobbling up those that wish to cross the bridge.
I’m happy to tell you that you should be able to defeat the troll and cross the bridge to internet access joy by following the simple trouble shooting steps discussed in this article.
What is the "DNS Server Not Responding" Error?
The “DNS Server Not Responding” error is a fairly common issue and is generally easy to fix. There are many reasons why this issue may occur. But fundamentally it is caused because the DNS server that is contacted during the processes of loading a web page is unable to find the site that contains the web page that you have requested.
This article explores what may have triggered this issue to occur and how you may go about fixing the issue.
Firstly, I think it is a good idea to gain at least a basic understanding of the “DNS Server Not Responding” error. To do this, let’s first understand DNS.
DNS stands for Domain Name System. A simple explanation of DNS is that it is a decentralised storage of human readable internet addresses, like the ones with which you will almost certainly be familiar (for example www.amazon.com or www.netlix.com).
The DNS maps these human readable URLs to their appropriate IP (Internet Protocol) addresses.
IP addresses are much less human readable, but are essential for the inner workings of the internet. IP addresses uniquely identify computers on the internet. The IP address associated with the URL, www.netflix.com, might for example, look like this, 69.53.224.255.
It is clearly easier for you to remember “www.netflix.com", rather than a string of numbers delimited by full stops, when you wish to access your favourite content on Netflix. So the DNS facilitates this for you, so that you don’t have to remember or manually lookup unfriendly strings of numeric data every time you wish to access a web site.
The common analogy to explain DSN is a telephone directory. Basically, as you would look up a telephone number using the name of the person you wish to call in a telephone directory, a similar look up is performed when you type in the URL (like www.amazon.com) of the web site you wish to view within your browser.
Thankfully you don’t have to manually look up the corresponding IP address for www.amazon.com, as this is performed behind the scenes for you automatically.
So the appropriate IP address is retrieved automatically every time you type in a URL into your browser. This IP address is then used to contact the appropriate server that hosts the relevant web site associated with the URL you have entered into your browser.
When the “DNS Server Not Responding” error occurs, this means that the decentralised naming systems responsible for automatically looking up the appropriate IP address based on the relevant hostname that you entered into you browser fails to respond.
There are many reasons why this error occurs, but fortunately there are also many solutions available to you to fix the issue.
An easy solution may be to simply change the web browser you are using or even simpler still, simply restart your computer. Yup, simply turning it off and then turning it on again could fix the issue.
However, if you are not so lucky and the problem still persists, don’t despair – there are many steps that you can take to find out the cause of the issue and subsequently fix it.
In this article you will learn a number of possible solutions to the “DNS Server Not Responding” error.
How to Fix "DNS Serger Not Responding"
Below, I've listed out the ways that you can try using to fix the “DNS Server Not Responding” error. The subsequent sections of this article provide details on each of these methods:
- Use a Different Web Browser
- Try Accessing a Web Site with a Different Device
- Restart your Router
- Investigate Possible Network Issues
- Manually Set your DNS Server
- Clear the DNS Cache
- Disable Internet Protocol Version 6
- Temporarily Deactivate your Firewall and Disable your Antivirus Software
- Reset your DNS Settings
- Update the Network Adapter Driver
- Disable all Network Connections Except the Connection you are Using to Access the Internet
- Restart your Computer in Safe Mode
Use a Different Web Browser
A potential solution to the “DNS Server not Responding” issue that's really simple is to try accessing the relevant website using a different browser.
If, for example, you are using Microsoft Edge or Mozilla Firefox as your browser at the time that the issue occurs, try using a different browser like Google Chrome to access the relevant website.
If using a different browser solves the problem, then make the browser that works your default browser. But if the issue still persists, then we at least know that the browser you have been using is not the source of the issue and our investigation into finding a solution to the DNS Server not Responding” issue must continue…
Try Accessing a Website With a Different Device
Try to use a different device connected to your home network to access the website you were trying to access when you received the error.
For example, use Wi-Fi from your mobile phone to access the relevant web site. If the issue persists, you know that the issue isn’t just with your primary device and the problem may have something to do with your router.
Restart Your Router
The “DNS Server not Responding” issue may occur simply due to data traffic. It may be that simply restarting your router can fix this issue.
You can restart your router by pressing the power button on your router. You can then unplug your router's power cable. Wait for about 30 seconds then plug your router into the power outlet again and press the power button to restart it.
Investigate Possible Network Issues
Running network diagnostics may point to network issues as the root cause of the issue.
Running Network Diagnostic is very simple on a Windows 10 OS. You can do this by following these steps:
- Open Control Panel. One way to do this is press the Windows Key + R to activate the “Run” box, then type “control” in the text box presented in the “Run” box and hit the enter key.

- Select the Network and Internet option presented within the Control Panel window.
- Click the Network and Sharing Center option from within the “Network and Internet” window.
- Click the Troubleshoot problems option presented under the "Change your network settings” heading within the “Network and Sharing Center” window.
- Click Additional troubleshooters -> Internet Connections -> Run the troubleshooter

The next step is to wait for the troubleshooter task to finish. If you are presented with any error messages, simply follow the steps on how to fix the relevant network issue.
Manually Set Your DNS Server
The source of your issue may be that your DNS server is down. In this case you’ll be pleased to know that you are able to manually change your DNS server.
You can change your DNS server to, for example, Googles Public DNS or CloudFlare’s public DNS. To change your DNS server, follow these steps:
- Invoke your Control Panel. One way to invoke your Control Panel is to activate your Start Menu and search for the Control Panel.
- In the Control Panel window click the Network and Internet option.
- In the Network and Internet window, click the Network and Sharing Center option.
- On the Network and Sharing Center window click on your active connection. For example, click the “ethernet” option if this is the connection currently being used or click the “Wi-Fi” option if it is clear that this is your active connection.
- In the dialog box that is presented to you, click the “Properties” button.
- In the dialog presented to you, you’ll see a list is presented under the “The connection uses the following items” heading.
- In this list, select the list item labelled “Internet protocol version 4 (TCP/IPv4)” then click the “Properties” button.

- You will be presented with another dialog box where you’ll see two fields. One will be labelled “Preferred DNS Server”, and the other which is directly under this field will be labelled “Alternate DNS Server”.
- First click the Use the following DNS server addresses radio button.
- To use Googles Public DNS server, enter 8.8.8.8 in the field labelled “Preferred DNS Server” and enter 8.8.4.4 into the field labelled “Alternate DNS Server”.

- You are also able to use CloudFlare’s DNS server for the same purpose. CloudFlare’s DNS address is simply 1.1.1.1
- Once you have entered your desired DNS server settings, ensure that the “Validate settings upon exit” checkbox is checked.
- Click the “OK” button to save your new DNS server settings.
- Restart your computer.
Clear the DNS Cache
You are able to flush the DNS cache which may resolve the “DNS Server not Responding” issue. This action will clear IP addresses and other DNS related data from your cache.
You can clear the DNS cache by running a command using your command prompt.
One way to invoke the command prompt is to press Window Key + R to invoke the “Run” box. Type “cmd” within the “Run” box and press shift+ctrl+enter to run the command prompt as an administrator.

At the command prompt, type in the following command: “ipconfig /flushdns” and them press the enter key. If the command has executed successfully, you'll see the appropriate message in the command window.
Disable Internet Protocol Version 6
At the time of writing this article, Internet Protocol Version 6 is the latest version of the internet protocol. Disabling the Internet Protocol Version 6 will not have detrimental effects on your computer’s operations, but it's been known to fix the “DNS Server not Responding” issue.
To disable the Internet Protocol version 6 on a Windows 10 operating system, just follow these steps:
- Go to Control Panel -> Network and Internet -> Network and Sharing Center
- Click on the relevant connection, for example “Wi-Fi”
- Click the “Properties” button on the dialog that is presented to you.
- In the list presented under the “This connection uses the following items” heading, uncheck the item labelled “Internet Protocol Version 6 (TCP/IPv6)”.

- Press the “OK button”
Temporarily Deactivate your Firewall and Disable Antivirus
If your firewall is Defender, you can follow these steps to disable it:
- To open control panel, press Windows Key + R to activate the “Run” box, then type “control” in the text box presented in the “Run” box and hit the enter key.
- In the top right hand text box, type in “win”

- An option labelled "Windows Defender Firewall” should appear in the search results. Click the “Windows Defender Firewall” option.
- Click the “Allow an app or feature through Windows Defender Firewall” option.

- Click the “Change settings” button.

- From the list presented to you within the dialog box that has just been invoked, find the browser that you are using, for example Google Chrome. Then make sure that both the private and public checkboxes next to the relevant item are checked.

- Once you've done this, try to access the relevant website using the relevant browser and see if the issue has been fixed.
There is a chance that your firewall was preventing you from accessing external data through your browser.
Note that it is not recommended to leave your operating system unprotected by reliable antivirus software indefinitely. Disabling your antivirus software in this instance is only recommended for testing if the relevant antivirus software is the cause of the “DNS Server not Responding” issue.
To temporarily turn off Microsoft Defender antivirus protection, follow these steps:
- Select Start and then type in "Windows Security” in order to search for the relevant application.
- Select Windows Security App from the search results.
- Go to Virus & Threat Protection.
- Under Virus & threat protection settings select Manage settings.
- Switch Real-time protection off.

Attempt to access the relevant website through the relevant browser to test if the “DNS Server not Responding” issue still occurs.
Reset DNS Settings
To reset your DNS Settings, follow these steps:
- Run the command prompt as an administrator. To do this activate the “Run” box by pressing Windows key + R.
- In the run box type “cmd” and press shift + ctrl + enter
- Type the following commands in the command prompt. After entering each command press the enter key, so that each command is run individually.
ipconfig /registerdns
ipconfig /release
Ipconfig /renew
netsh winsock reset

Once you have run these commands, close the command prompt and restart your computer.
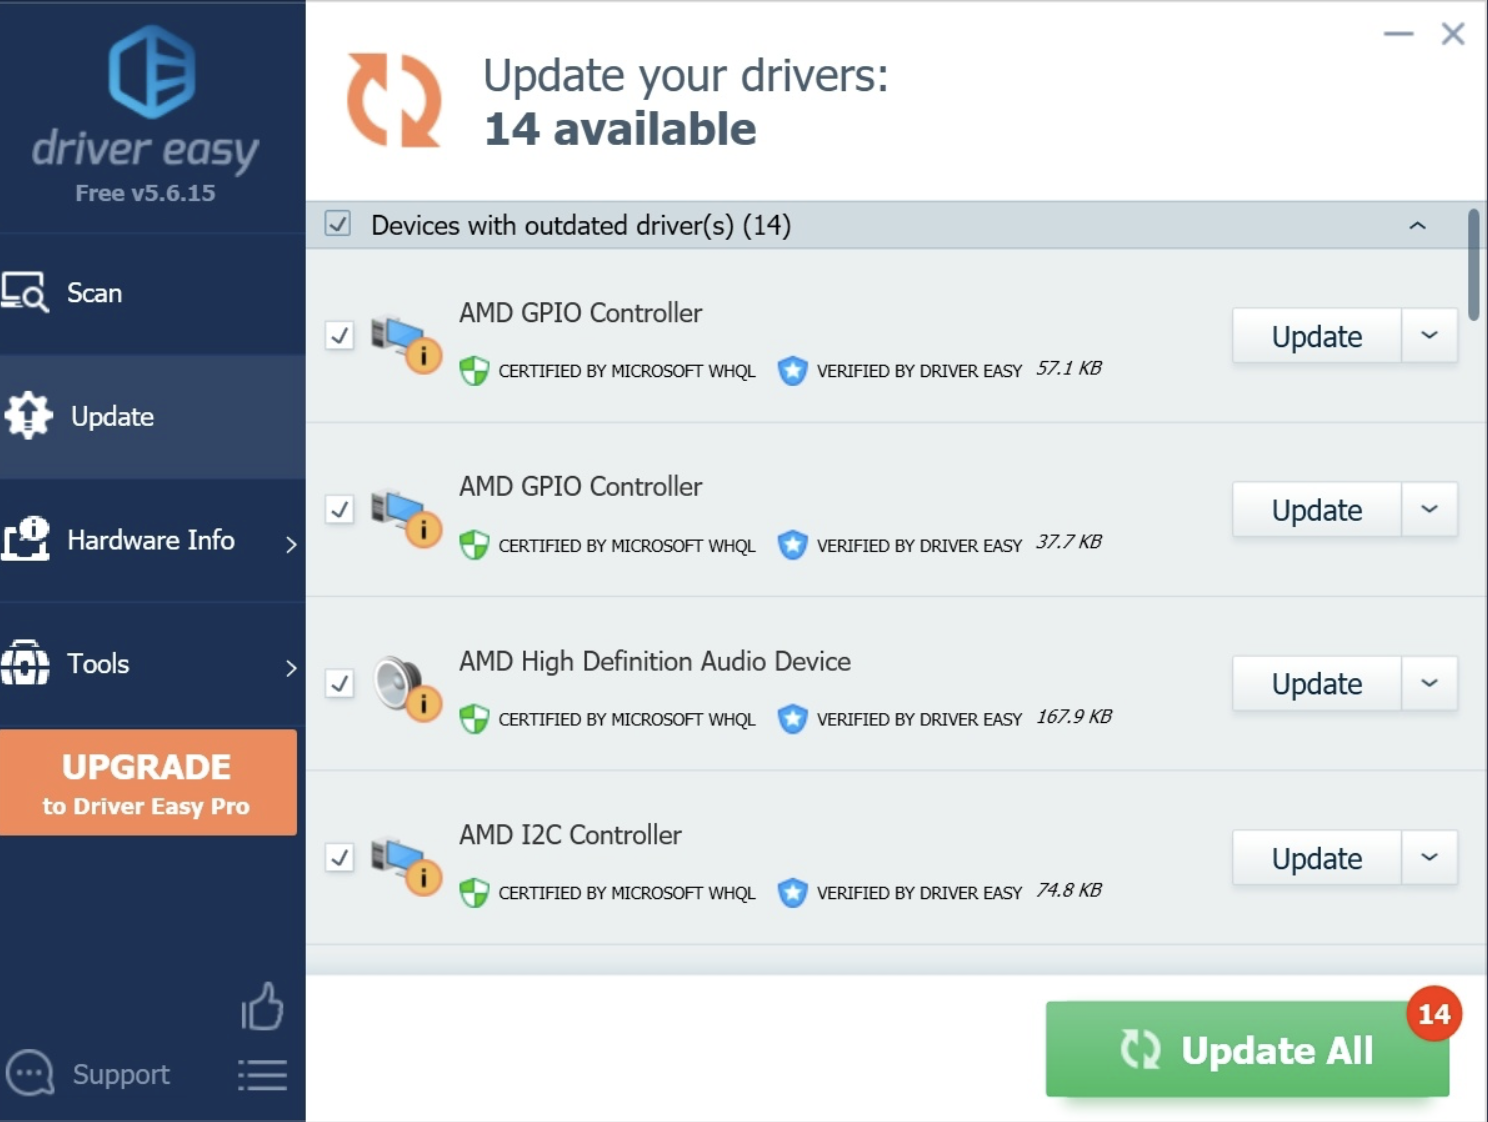
Update the Network Adapter Driver
You can manually update your network adapter driver, but it is much easier to automate this task.
You can automate this through the use of free software like “Driver Easy” (https://www.drivereasy.com/download-free-version/). Simply download the free version of this software.
Make sure that before you run the free version of the Driver Easy software that you create a system restore point. This provides you with insurance, so in the unlikely event that you encounter a nasty surprise that adversely effects your computer, that you are able to return your Windows OS back to the state that it was in before you ran the Driver Easy software and encountered an unexpected issue.
To use the Driver Easy software, follow these steps:
- Run the software
- Click the “Scan Now” button
- Press the “Update” button next to any outdated drivers.
Disable all Network Connections Except for the Connection that you are Using
Disabling the additional network connections you may have setup on your computer (other than, for example, the Wi-Fi connection that you are using to access the internet) might fix the “DNS Server not Responding” issue.
To disable the relevant network connection, follow these steps:
- Firstly you must access your Network Connections. To access your Network Connections, press Windows Key + R to invoke the “Run” box
- In the “Run” box type in “ncpa.cpl” and press enter.
- Right click the relevant network connection and select “Disable” from the relevant context menu. Repeat this action until all connections except for the Wi-Fi connection you are using are disabled.

Restart your Computer in Safe Mode
When you start your computer in Safe Mode, this means the Windows operating system loads with a limited set of drivers and files. This can help you diagnose what is causing your “DNS Server not Responding” issue through a process of illumination (as it were).
So to start your PC in Safe Mode, follow these steps:
- Press the Windows Key + I to open Settings.
- Select Update & Security -> Recovery
- Under Advanced startup, select Restart Now
- Once your PC has startup to the “Choose an option” screen, select Troubleshoot -> Advanced options -> Startup Settings -> Restart
- Once your PC has restarted you’ll see a list of options
- Select 5 or press F5 for Safe Mode with Networking.
Try to access the web site that resulted in you getting the “DNS Server not Responding” issue. If the problem does not occur in safe mode this means that additional software may be the cause of the issue.
You can uninstall any additional software from your PC, one by one, and then test to see if the issue still occurs. If the issue does not occur after uninstalling particular software, this means that it is likely that this software was interfering with your internet access.
Conclusion
The “DNS Server not Responding” issue is relatively common and thankfully it is also relatively easy to fix.
It can be incredibly inconvenient to be denied access to the internet but hopefully the potential solutions outlined in this article will help you to once again have access to your favorite web sites.