

Software testing is an important part of the software development process. You run tests at different stages of the software development life cycle, and you'll want to make sure that you have good test coverage.
Here are some key reasons for writing software tests:
Testing prevents you from introducing breaking changes to your codebase in the future. In other words, the tests you write now might save you from your own self in the future.
Testing makes sure that the product you build meets the required specification.
Well tested code gives you more confidence about the quality of your code.
Testing reduces the likelihood that you have code in your codebase with unknown behavior which might become a source of errors.
Testing makes it easier to maintain your code. You cannot tell how changing a small section of your codebase might affect the entire codebase if you don't have a high code coverage.
In this article, you will learn how to generate a code coverage report using codecov and gitHub actions.
What is code coverage?
Code coverage is a metric which helps you know how much of your source code has been tested. There are a number of tools which you can use to generate code coverage reports. These tools include:
Most code coverage anysis tools use a set of metrics for reporting code coverage anysis. These metrics include:
Function coverage The number of declared functions that have been invoked after running your test suites.
Statement coverage The number of statements that have been executed after running the test suites.
Branch coverage How much of the branch code, such as
ifcode blocks, have been executed.Condition coverage The number of boolean sub-expressions that have been tested for
trueandfalsevalues.Line coverage Lines of code that have been tested.
In this article, we'll focus primarily on how to use codecov and gitHub actions to generate a code coverage report for a Node project.
Why is code coverage important?
Good code coverage gives you confidence about the code you are shipping, especially if your tests are robust and well-thought out.
When you write tests to increase your code coverage, it is more likely you will detect bugs and fix them before shipping to production.
What is Codecov?
Codecov is a tool you can use to generate coverage reports for your projects. You can upload code coverage data generated in your local file system to codecov and easily visualize the coverage report on different charts.
In this article, though, you are going to use GitHub actions so that the processes of generating coverage reports and uploading them to codecov is automated.
You can integrate codecov as part of your continuous integration workflow. Codecov is capable of making pull request comments and much more. These comments will help other developers know how merging their pull request will affect the code coverage without leaving their GitHub UI.
You can also display a badge showing the coverage report on your GitHub repository for all the collaborators of your project to see. You just have to integrate codecov into your continuous integration workflow.
You can read more about all the other features codecov offers in the documentation.
Hpw tp create a project and generate a coverage report
In the steps below, you are going to create a simple Node project and generate a codecov coverage report for it.
Prerequisites
You need to have the following installed on your machine to be able to run the commands in the next subsections.
Step 1: Create a directory and navigate to it
In this step you are going to create a directory called learn-test-coverage and then navigate to it. You can give the directory a different name if you wish, provided it is a meaningful name.
Run the following commands in the terminal:
mkdir learn-test-coverage
cd learn-test-coverage
In the next step, you are going to initalize the project.
Step 2: Initialize the project
In this step you are going to initialize the project by running the command below in the terminal:
npm init --yes
Successfully running the above command will create a package.json file at the root of your project directory.
In the next step, you are going to install jest as a development dependency.
Step 3: Install Jest as a dependency
In this step, you are going to install jest as a development dependency. Jest is a simple JavaScript testing framework which usually works out of the box in Node with minimal setup.
Run the command below in the terminal:
npm install --save-dev jest
After successfully running the above command, you should be able to see the node_modules directory and package-lock.json file created at the root of your project directory. You should also be able to see Jest installed as a development dependency in the package.json file.
In the next step you will initialize a git repository in your project.
Step 4: Initialize a Git repository
In this step you are going to intialize a git repository in your project by running the command below:
git init
Create a .gitignore file at the root of the project directory and add the following code to it. This will ignore node_modules file so that it is not committed to the remote repository later.
/node_modules
In the next step we will declare a simple function and write a test for it.
Step 5: Declare a function and write a test for it
In this step, you will declare a simple function called sum in the sum.js file. This function takes two parameters and returns their sum. You will also write tests for your code in the sum.test.js file.
Run the command below in the terminal:
touch sum.js sum.test.js
You should be able to see the two files created in your project. Copy and paste the code below in sum.js:
function sum(num1, num2) {
  return num1 + num2;
}

module.exports = sum;
Similarly, copy and paste the code below in sum.test.js:
const sum = require("./sum");

test("adds 1 + 2 to equal 3", () => {
  expect(sum(1, 2)).toBe(3);
});
Change the value of the "test" property in your package.json to "jest --coverage" so that the value of the "scripts" property looks like this:
{
    "test": "jest --coverage"
}
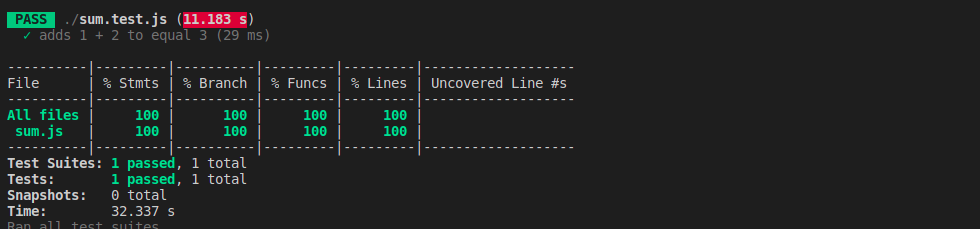
In the terminal run npm test to run your test. After the test completes, you should be able to see the code coverage summary in the terminal and a coverage directory generated.
Here's what I see in my terminal:
You can also view the summary in the browser by opening the index.html file inside the coverage/lcov-report folder. You should be able to see the following:
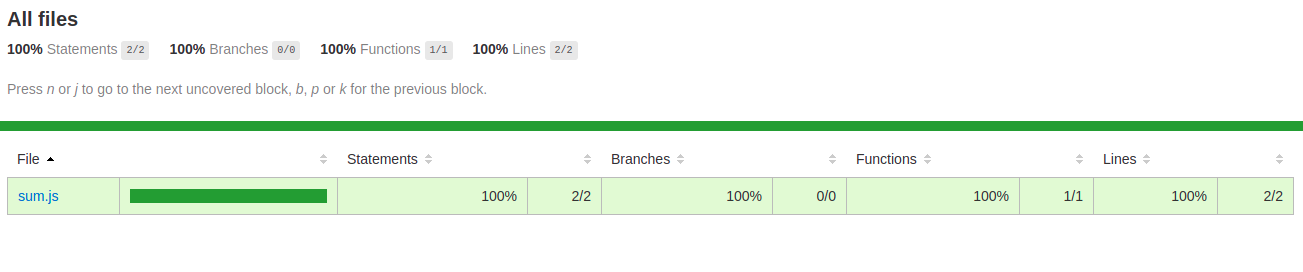
You are able to generate the coverage report because Jest comes bundled with istanbul. Make sure you delete the coverage file, as you don't need it since we'll automate the process using GitHub actions.
You should be able to identify which metrics istanbul uses to generate coverage report (the metrics I mentioned at the beginning of the articl).
In the next step we'll add GitHub actions' Continuous Integration to our project.
Step 6: Add GitHub actions' continuous integration workflow
In this step you will add GitHub actions' continuous integration workflow to your project so that codecov will automatically generate a report on creating a pull request.
Create a .github file at the root of your project folder. Inside the .github folder, create a workflows folder. Then inside workflows create a codecov.yml file. The file doesn't need to be named codecov. You can give it any name you like.
Copy and paste the code below inside your codecov.yml file.
This is the workflow configuration file. It will run your test when the two events push and pull_request occur. You can read more about YAML syntax and gitHub actions to understand the contents of the file below.
name: Running Code Coverage

on: [push, pull_request]

jobs:
  build:

    runs-on: ubuntu-latest

    strategy:
      matrix:
        node-version: [12.x, 13.x, 14.x, 15.x]

    steps:
    - name: Checkout repository
      uses: actions/checkout@v2
      with:
        fetch-depth: 2

    - name: Set up Node.js ${{ matrix.node-version }}
      uses: actions/setup-node@v1
      with:
        node-version: ${{ matrix.node-version }}

    - name: Install dependencies
      run: npm install

    - name: Run tests
      run: npm run test

    - name: Upload coverage to Codecov
      uses: codecov/codecov-action@v1
The last step is responsible for uploading the coverage report to codecov in the above configuration file.
In the next step, you are going to create a repository on GitHub and push your project to it
Step 7: Create a repository on GitHub and push your changes to it
In this step, you are going to create a repository on gitHub and push your changes to it.
Navigate to GitHub. Create an empty repository and name it learn-test-coverage.
At the root of your project directory on your machine, run the following commands to initialize your project repository and commit your changes.
git add .
git commit -m "Initial commit"
You can then add the remote repository you created above to your local repository using the command below:
git remote add origin <Remote repository>
Finally, you can push your changes to your remote repository using the command below:
git push origin master
In the next step, we are going to link our GitHub repository to codecov. This makes sure that our coverage data is automatically uploaded whenever we create a pull request so that a report is generated.
Step 8: Link your remote repository to codecov
In this step you are going to link your repository to codecov. But you need to sign up first.
Codecov allows you to sign up with your GitHub account in just a couple of minutes. You can then select the GitHub repository you want to link on the codecov dashboard.
After selecting the repository, you will be redirected to a page with a token. You don't need this token for public repositories.
For private repositories, you will need to add it to your GitHub secrets and then add the following at the bottom of your workflow configuration file so that it looks like this:
- name: Upload coverage to Codecov
    uses: codecov/codecov-action@v1
    with:
        token: ${{ secrets.YOUR_SECRET_TOKEN }}
Step 9: Test your continuous integration workflow
In this step, you are going to test your continuous integration workflow.
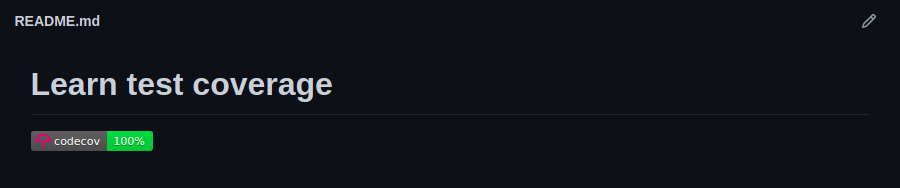
Create a README.md file at the root of your project. Copy and paste the codecov badge on your codecov dashboard under the settings tab in your README.md file. This is what the badges look like.
![]()
Commit and push the changes to GitHub. You should be able to see the code coverage indicated on your badge after the CI workflow run completes.
You can also view the coverage report on your codecov dashboard. Try creating a pull request to see what happens.
For more insights on what else you can do, check out the Codecov documentation.
If you get stuck, you can also check out my project on GitHub.
How does codecov generate its coverage report?
Codecov uses the terms hit, partial and miss to describe the code coverage in your project. Coverage is the ratio of hits to the sum of hits, partials and misses.
If the code is described as a hit, it means that the source code was executed by the test suite.
If it is described as partial, it indicates that the source code was not fully executed by the test suite. There are remaining branches that were not executed.
A miss indicates that the source code was not executed by the test suite.
A code base that has 5 lines executed by tests out of 12 total lines will receive a coverage ratio of 41% (rounding down) - Codecov documentation
That is how you integrate codecov as part of your contnuous integration workflow. If you want to explore more features, you can check out the Codecov documentation.
Conclusion
In this article we looked at how you can integrate codecov as part of your continuous integration workflow.
Increasing code coverage will help you in so many ways. But having higher code coverage just for the sake of it can get you into trouble if your tests are not robust and well thought out.
Code coverage analysis tools are just tools meant to make your work easier. But you shouldn't substitute them for code reviews. A tool is only as good as its user.