
By Kavita Ganesan
The idea behind Word2Vec is pretty simple. We’re making an assumption that the meaning of a word can be inferred by the company it keeps. This is analogous to the saying, “show me your friends, and I’ll tell who you are.”
If you have two words that have very similar neighbors (meaning: the context in which its used is about the same), then these words are probably quite similar in meaning or are at least related. For example, the words shocked, appalled, and astonished are usually used in a similar context.
Using this underlying assumption, you can use Word2Vec to surface similar concepts, find unrelated concepts, compute similarity between two words, and more!
Down to business
In this tutorial, you will learn how to use the Gensim implementation of Word2Vec and actually get it to work. I’ve long heard complaints about poor performance in general, but it really is a combination of two things: (1) your input data and (2) your parameter settings.
Note that the training algorithms in the Gensim package were actually ported from the original Word2Vec implementation by Google and extended with additional functionality.
Imports and logging
First, we start with our imports and get logging established:
# imports needed and loggingimport gzipimport gensim import logging
logging.basicConfig(format=’%(asctime)s : %(levelname)s : %(message)s’, level=logging.INFO)
Dataset
Our next task is finding a really good dataset. The secret to getting Word2Vec really working for you is to have lots and lots of text data in the relevant domain. For example, if your goal is to build a sentiment lexicon, then using a dataset from the medical domain or even Wikipedia may not be effective. So, choose your dataset wisely.
For this tutorial, I am going to use data from the OpinRank dataset from some of my Ph.D work. This dataset has full user reviews of cars and hotels. I have specifically gathered all of the hotel reviews into one big file which is about 97 MB compressed and 229 MB uncompressed. We will use the compressed file for this tutorial. Each line in this file represents a hotel review.
Now, let’s take a closer look at this data below by printing the first line.
You should see the following:
b"Oct 12 2009 \tNice trendy hotel location not too bad.\tI stayed in this hotel for one night. As this is a fairly new place some of the taxi drivers did not know where it was and/or did not want to drive there. Once I have eventually arrived at the hotel, I was very pleasantly surprised with the decor of the lobby/ground floor area. It was very stylish and modern. I found the reception's staff geeting me with 'Aloha' a bit out of place, but I guess they are briefed to say that to keep up the coroporate image.As I have a Starwood Preferred Guest member, I was given a small gift upon-check in. It was only a couple of fridge magnets in a gift box, but nevertheless a nice gesture.My room was nice and roomy, there are tea and coffee facilities in each room and you get two complimentary bottles of water plus some toiletries by 'bliss'.The location is not great. It is at the last metro stop and you then need to take a taxi, but if you are not planning on going to see the historic sites in Beijing, then you will be ok.I chose to have some breakfast in the hotel, which was really tasty and there was a good selection of dishes. There are a couple of computers to use in the communal area, as well as a pool table. There is also a small swimming pool and a gym area.I would definitely stay in this hotel again, but only if I did not plan to travel to central Beijing, as it can take a long time. The location is ok if you plan to do a lot of shopping, as there is a big shopping centre just few minutes away from the hotel and there are plenty of eating options around, including restaurants that serve a dog meat!\t\r\n"
You can see that this is a pretty good, full review with lots of words and that’s what we want. We have approximately 255,000 such reviews in this dataset.
To avoid confusion, the Gensim’s Word2Vec tutorial says that you need to pass a sequence of sentences as the input to Word2Vec. However, you can actually pass in a whole review as a sentence (that is, a much larger size of text) if you have a lot of data and it should not make much of a difference. In the end, all we are using the dataset for is to get all neighboring words for a given target word.
Read files into a list
Now that we’ve had a sneak peak of our dataset, we can read it into a list so that we can pass this on to the Word2Vec model. Notice in the code below that I am directly reading the compressed file. I’m also doing a mild pre-processing of the reviews using gensim.utils.simple_preprocess (line). This does some basic pre-processing such as tokenization, lowercasing, and so on and returns back a list of tokens (words). Documentation of this pre-processing method can be found on the official Gensim documentation site.
Training the Word2Vec model
Training the model is fairly straightforward. You just instantiate Word2Vec and pass the reviews that we read in the previous step. So, we are essentially passing on a list of lists, where each list within the main list contains a set of tokens from a user review. Word2Vec uses all these tokens to internally create a vocabulary. And by vocabulary, I mean a set of unique words.
After building the vocabulary, we just need to call train(...) to start training the Word2Vec model. Behind the scenes we are actually training a simple neural network with a single hidden layer. But we are actually not going to use the neural network after training. Instead, the goal is to learn the weights of the hidden layer. These weights are essentially the word vectors that we’re trying to learn.
Training on the Word2Vec OpinRank dataset takes about 10–15 minutes. so please be patient while running your code on this dataset
The fun part — some results!

Let’s get to the fun stuff already! Since we trained on user reviews, it would be nice to see similarity on some adjectives. This first example shows a simple look up of words similar to the word ‘dirty’. All we need to do here is to call the most_similar function and provide the word ‘dirty’ as the positive example. This returns the top 10 similar words.
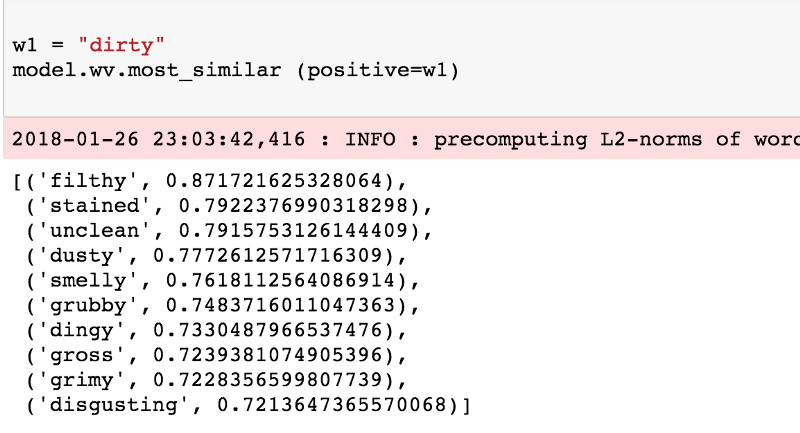 Words similar to ‘dirty’
Ooh, that looks pretty good. Let’s look at more.
Similar to polite:
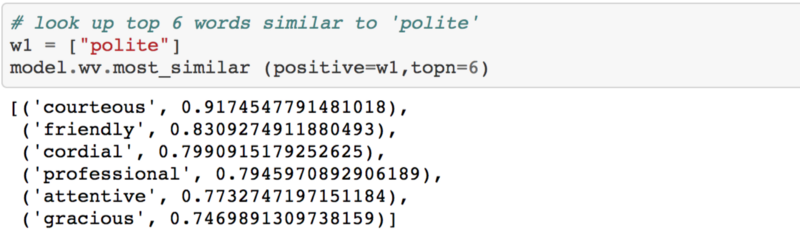 Words similar to ‘polite’
Similar to france:
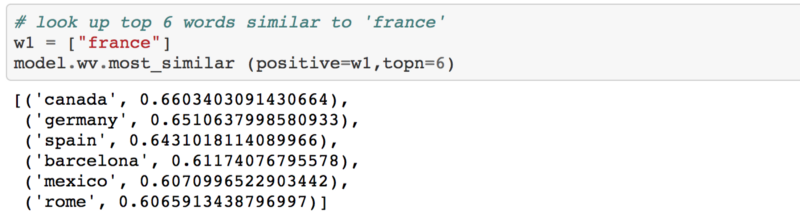 Words similar to “France”
Similar to shocked:
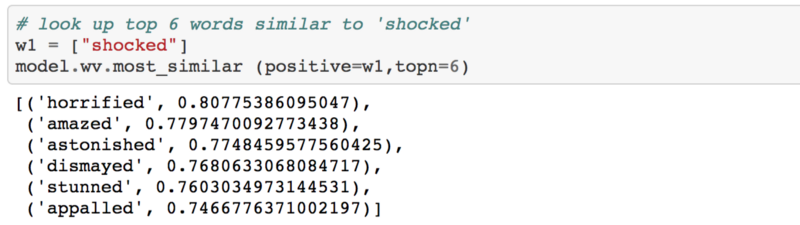 Words similar to “shocked”
Overall, the results actually make sense. All of the related words tend to be used in the same context for the given query word.
Now you could even use Word2Vec to compute similarity between two words in the vocabulary by invoking the similarity(...) function and passing in the relevant words.
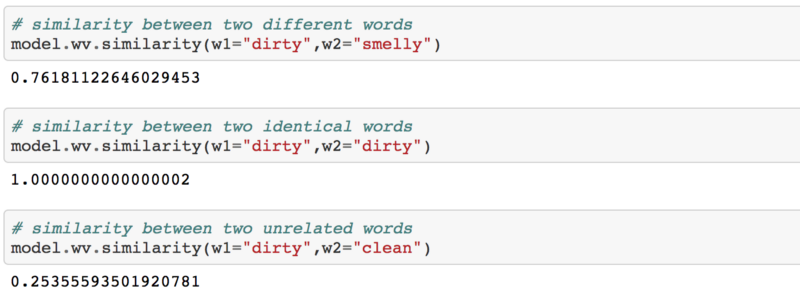 Compute similarity between two words in the vocabulary
Under the hood, the above three snippets compute the cosine similarity between the two specified words using word vectors of each. From the scores above, it makes sense that dirty is highly similar to smelly but dirty is dissimilar to clean. If you do a similarity between two identical words, the score will be 1.0 as the range of the cosine similarity score will always be between [0.0-1.0]. You can read more about cosine similarity scoring here.
You will find more examples of how you could use Word2Vec in my Jupyter Notebook.
A closer look at the parameter settings

To train the model earlier, we had to set some parameters. Now, let’s try to understand what some of them mean. For reference, this is the command that we used to train the model.
model = gensim.models.Word2Vec (documents, size=150, window=10, min_count=2, workers=10)
size
The size of the dense vector that is to represent each token or word. If you have very limited data, then size should be a much smaller value. If you have lots of data, its good to experiment with various sizes. A value of 100–150 has worked well for me for similarity lookups.
window
The maximum distance between the target word and its neighboring word. If your neighbor’s position is greater than the maximum window width to the left or the right, then some neighbors are not considered as being related to the target word. In theory, a smaller window should give you terms that are more related. If you have lots of data, then the window size should not matter too much, as long as its not overly narrow or overly broad. If you are not too sure about this, just use the default value.
min_count
Minimium frequency count of words. The model would ignore words that do not statisfy the min_count. Extremely infrequent words are usually unimportant, so its best to get rid of those. Unless your dataset is really tiny, this does not really affect the model.
workers
How many threads to use behind the scenes?
When should you use Word2Vec?
There are many application scenarios for Word2Vec. Imagine if you need to build a sentiment lexicon. Training a Word2Vec model on large amounts of user reviews helps you achieve that. You have a lexicon for not just sentiment, but for most words in the vocabulary.
Beyond raw unstructured text data, you could also use Word2Vec for more structured data. For example, if you had tags for a million StackOverflow questions and answers, you could find related tags and recommend those for exploration. You can do this by treating each set of co-occuring tags as a “sentence” and train a Word2Vec model on this data. Granted, you still need a large number of examples to make it work.
Source code
To use this tutorial’s Jupyter Notebook, you can go to my GitHub repo and follow the instructions on how to get the notebook running locally. I plan to upload the pre-trained vectors which could be used for your own work.
_To follow Kavita’s article via email, please subscribe to her blog._
This article was originally published at kavita-ganesan.com