
By Darryl Pargeter
One of the most basic debugging tools in JavaScript is console.log(). The console comes with several other useful methods that can add to a developer’s debugging toolkit.
You can use the console to perform some of the following tasks:
- Output a timer to help with simple benchmarking
- Output a table to display an array or object in an easy-to-read format
- Apply color and other styling options to the output with CSS
The Console Object
The console object gives you access to the browser’s console. It lets you output strings, arrays, and objects that help debug your code. The console is part of the window object, and is supplied by the Browser Object Model (BOM).
We can get access to the console in one of two ways:
window.console.log('This works')console.log('So does this')
The second option is basically a reference to the former, so we’ll use the latter to save keystrokes.
One quick note about the BOM: it does not have a set standard, so each browser implements it in slightly different ways. I tested all of my examples in both Chrome and Firefox, but your output may appear differently depending on your browser.
Outputting text
The most common element of the console object is console.log. For most scenarios, you’ll use it to get the job done.
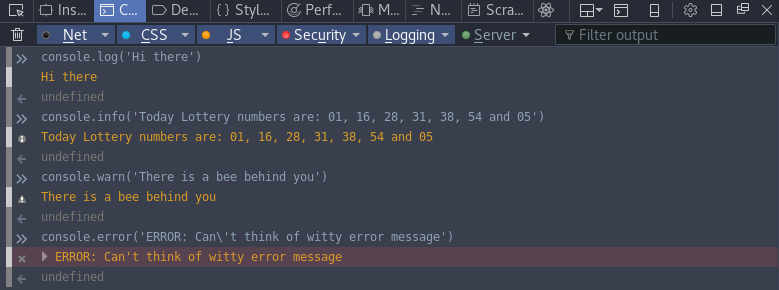
There are four different ways of outputting a message to the console:
loginfowarnerror
All four work the same way. All you do is pass one or more arguments to the selected method. It then displays a different icon to indicate its logging level. In the examples below, you can see the difference between an info-level log and a warning/error-level log.
You may have noticed the error log message - it’s more showy than the others. It displays both a red background and a stack trace, where info and warn do not. Though warn does have a yellow background in Chrome.
These visual differences help when you need to identify any errors or warnings in the console at a quick glance. You would want to make sure that they are removed for production-ready apps, unless they are there to warn other developers that they are doing something wrong with your code.
String Substitutions
This technique uses a placeholder in a string that is replaced by the other argument(s) you pass to the method. For example:
Input: console.log('string %s', 'substitutions')
Output: string substitutions
The %s is the placeholder for the second argument 'substitutions' that comes after the comma. Any strings, integers, or arrays will be converted to a string and will replace the %s. If you pass an object, it will display [object Object].
If you want to pass an object, you need to use %o or %O instead of %s.
console.log('this is an object %o', { obj: { obj2: 'hello' }})

Numbers
String substitution can be used with integers and floating-point values by using:
%ior%dfor integers,%ffor floating-points.
Input: console.log('int: %d, floating-point: %f', 1, 1.5)
Output: int: 1, floating-point: 1.500000
Floats can be formatted to display only one digit after the decimal point by using %.1f. You can do %.nf to display n amount of digits after the decimal.
If we formatted the above example to display one digit after the decimal point for the floating-point number, it would look like this:
Input: console.log('int: %d, floating-point: %.1f', 1, 1.5)
Output:int: 1, floating-point: 1.5
Formatting specifiers
%s| replaces an element with a string%(d|i)| replaces an element with an integer%f| replaces an element with a float%(o|O)| element is displayed as an object.%c| Applies the provided CSS
String Templates
With the advent of ES6, template literals are an alternative to substitutions or concatenation. They use backticks (`) instead of quotation marks, and variables go inside${}`:
const a = 'substitutions';
console.log(`bear: ${a}`);
// bear: substitutions
Objects display as [object Object] in template literals, so you’ll need to use substitution with %o or %O to see the details, or log it separately by itself.
Using substitutions or templates creates code that’s easier to read compared to using string concatenation: console.log('hello' + str + '!');.
Pretty color interlude!
Now it is time for something a bit more fun and colorful!
It is time to make our console pop with different colors with string substitutions.
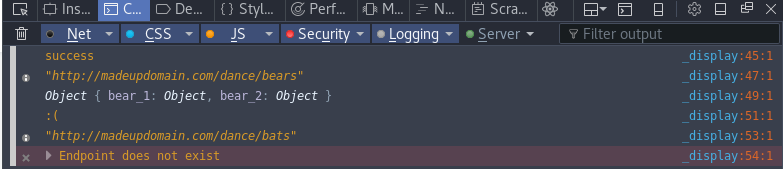
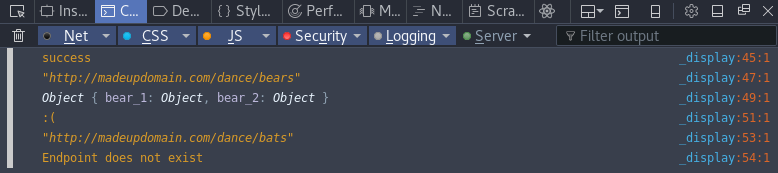
I will be using a mocked Ajax example that give us both a success (in green) and failure (in red) to display. Here’s the output and code:

const success = [ 'background: green', 'color: white', 'display: block', 'text-align: center'].join(';');
const failure = [ 'background: red', 'color: white', 'display: block', 'text-align: center'].join(';');
console.info('%c /dancing/bears was Successful!', success);console.log({data: { name: 'Bob', age: 'unknown'}}); // "mocked" data response
console.error('%c /dancing/bats failed!', failure);console.log('/dancing/bats Does not exist');
You apply CSS rules in the string substitution with the %c placeholder.
console.error('%c /dancing/bats failed!', failure);
Then place your CSS elements as a string argument and you can have CSS-styled logs. You can add more than one %c into the string as well.
console.log('%cred %cblue %cwhite','color:red;','color:blue;', 'color: white;')
This will output the words ‘red’, ‘blue’ and ‘white’ in their respected colors.
There are quite a few CSS properties supported by the console. I would recommend experimenting to see what works and what doesn’t. Again, your results may vary depending on your browser.
Other available methods
Here are a few other available console methods. Note that some items below have not had their APIs standardized, so there may be incompatibilities between the browsers. The examples were created with Firefox 51.0.1.
Assert()
Assert takes two arguments — if the first argument evaluates to a falsy value, then it displays the second argument.
let isTrue = false;
console.assert(isTrue, 'This will display');
isTrue = true;
console.assert(isTrue, 'This will not');
If the assertion is false, it outputs to the console. It’s displayed as an error-level log as mentioned above, giving you both a red error message and a stack trace.
Dir()
The dir method displays an interactive list of the object passed to it.
console.dir(document.body);
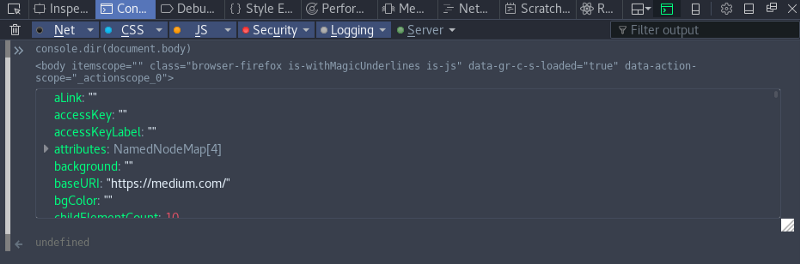
Ultimately, dir only saves one or two clicks. If you need to inspect an object from an API response, then displaying it in this structured way can save you some time.
Table()
The table method displays an array or object as a table.
console.table(['Javascript', 'PHP', 'Perl', 'C++']);

The array’s indices or object property names come under the left-hand index column. Then the values are displayed in the right-hand column.
const superhero = { firstname: 'Peter', lastname: 'Parker',}console.table(superhero);

Note for Chrome users: This was brought to my attention by a co-worker but the above examples of the table method don’t seem to work in Chrome. You can work around this issue by placing any items into an array of arrays or an array of objects:
console.table([['Javascript', 'PHP', 'Perl', 'C++']]);
const superhero = { firstname: 'Peter', lastname: 'Parker',}console.table([superhero]);
Group()
console.group() is made up of at least a minimum of three console calls, and is probably the method that requires the most typing to use. But it’s also one of the most useful (especially for developers using Redux Logger).
A somewhat basic call looks like this:
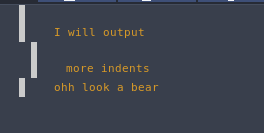
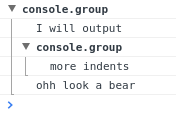
console.group();console.log('I will output');console.group();console.log('more indents')console.groupEnd();console.log('ohh look a bear');console.groupEnd();
This will output multiple levels and will display differently depending on your browser.
Firefox shows an indented list:
Chrome shows them in the style of an object:
Each call to console.group() will start a new group, or create a new level if it’s called inside a group. Each time you call console.groupEnd() it will end the current group or level and move back up one level.
I find the Chrome output style is easier to read since it looks more like a collapsible object.
You can pass group a header argument that will be displayed over console.group:
console.group('Header');
You can display the group as collapsed from the outset if you call console.groupCollapsed(). Based on my experience, this seems to work only in Chrome.
Time()
The time method, like the group method above, comes in two parts.
A method to start the timer and a method to end it.
Once the timer has finished, it will output the total runtime in milliseconds.
To start the timer, you use console.time('id for timer') and to end the timer you use console.timeEnd('id for timer') . You can have up to 10,000 timers running simultaneously.
The output will look a bit like this timer: 0.57ms
It is very useful when you need to do a quick bit of benchmarking.
Conclusion
There we have it, a bit of a deeper look into the console object and some of the other methods that come with it. These methods are great tools to have available when you need to debug code.
There are a couple of methods that I have not talked about as their API is still changing. You can read more about them or the console in general on the MDN Web API page and its living spec page.