
Two-Factor Authentication, or 2FA, is like having an extra lock on the door to your online accounts. Instead of just using a password, 2FA adds another layer of security. It's a bit like needing both a key and a special code to open a vault.
Think of it as a shield for your accounts. Passwords can sometimes be guessed or stolen, but with 2FA, even if someone gets your password, they'd still need that extra code or device to get in. It's an extra step that makes your accounts much harder for hackers to break into.
So, let's explore how to set up this extra layer of protection using PyOTP and Google Authenticator in your Flask app.
Table of Contents:
- Overview of PyOTP and Google Authenticator
- Two-Factor Authentication Workflow in Our Application
- Prerequisites
- Get Your Tools Ready
- How to Set Up the Project
- How to Create Blueprints for Accounts and Core
- How to Create a User Model
- How to Add Flask-Login
- How to Add Templates and Static Files
- How to Create the Homepage
- How to Implement User Registration
- [How to Implement User Login](#
How to Implement User Login
) - How to Log Out the Users
- How to Add the Setup 2FA Page
- How to Add a 2FA Verification Page
- How to Run the Completed App for the First Time
- Wrapping Up
Overview of PyOTP and Google Authenticator
PyOTP is a Python library that's incredibly handy for generating Time-based One-Time Passwords (TOTP) and HMAC-based One-Time Passwords (HOTP). Its primary role revolves around creating these unique, time-sensitive codes that add an extra layer of security to user accounts.
By integrating PyOTP into your Flask application, you can easily implement Two-Factor Authentication (2FA) by generating and verifying these OTPs.
If you're new to PyOTP or would like a refresher on its functionalities, I recommend reviewing my previous guide on PyOTP. This understanding will be beneficial as we get into the integration of PyOTP within your Flask application for Two-Factor Authentication (2FA).
Google Authenticator, on the other hand, stands out as one of the most widely used OTP generator apps available. It functions as a secure platform for generating time-based OTPs, compatible with various services and applications supporting 2FA. Users can easily set up Google Authenticator on their devices to generate these time-sensitive codes, adding an extra level of security to their accounts.
Two-Factor Authentication Workflow in Our Application
Here's a breakdown of the flow of two-factor authentication in our application:
- Registration with 2FA Setup: When users sign up on our website, they're prompted to set up an extra layer of security—2FA. This involves scanning a QR code using an authenticator app, such as Google Authenticator, to link their account securely.
- Login Initiation: When users return to log in, they start by entering their usual email/username and password combo to access their account.
- Extra Security Check: Before granting access, our website throws in an additional hurdle: users need to provide an OTP (One-Time Password) displayed on their authenticator app. This ensures they're not just entering the password but also confirming their identity with a unique, time-sensitive code.
- Validation and Authorization: The user inputs the received OTP into our platform. The system then double-checks this OTP against the expected code, validating the information. If the OTP matches, it's like handing over the secret handshake, granting the user access to their account.
This seamless back-and-forth between passwords, authenticator apps, and unique codes ensures that only the rightful account owner can access the precious content behind the digital doors of your website.
If you also enjoy visual learning, here's a fancy video showing how the app does its thing.
Now, let's get to some coding!
Prerequisites
Before you get started with the tutorial, make sure you have the following requirements satisfied:
- Working knowledge of Python
- Python 3.8+ installed on your system
- Basic knowledge of Flask and Flask Blueprints
- Knowledge of basic authentication in Flask (optional)
Get Your Tools Ready
You'll need a few external libraries for this project. Let's learn more about them and install them one by one.
But before we install them, let's create a virtual environment and activate it.
First, start with creating the project directory and navigating to it like this:
mkdir flask-two-factor-auth
ccd flask-two-factor-auth
We are going to create a virtual environment using venv. Python now ships with a pre-installed venv library. So, to create a virtual environment, you can use the below command:
python -m venv env
The above command will create a virtual environment named env. Now, we need to activate the environment using this command:
source env/Scripts/activate
To verify if the environment has been activated or not, you can see (env) in your terminal. Now, we can install the libraries.
- Flask is a simple, easy-to-use microframework for Python that helps you build scalable and secure web applications.
- Flask-Login provides user session management for Flask. It handles the common tasks of logging in, logging out, and remembering your users’ sessions over extended periods of time.
- Flask-Bcrypt is a Flask extension that provides bcrypt hashing utilities for your application.
- Flask-WTF is a simple integration of Flask and WTForms that helps you create forms in Flask.
- Flask-Migrate is an extension that handles SQLAlchemy database migrations for Flask applications using Alembic. The database operations are made available through the Flask command-line interface.
- Flask-SQLAlchemy is an extension for Flask that adds support for SQLAlchemy to your application. It helps you simplify things using SQLAlchemy with Flask by giving you useful defaults and extra helpers that make it easier to perform common tasks.
- PyOTP helps you generate OTPs using Time-based OTP (TOTP) and HMAC-based OTP (HOTP) algorithms effortlessly.
- QRCode helps you generate QR Codes in Python
- Python Decouple helps you use environment variables in your Python project.
To install the above-mentioned libraries all in one go, run the following command:
pip install Flask Flask-Login Flask-Bcrypt Flask-WTF FLask-Migrate Flask-SQLAlchemy pyotp qrcode python-decouple
How to Set Up the Project
Let’s start by creating a src directory:
mkdir src
The first file will be the __init__.py file for the project:
from decouple import config
from flask import Flask
from flask_bcrypt import Bcrypt
from flask_migrate import Migrate
from flask_sqlalchemy import SQLAlchemy

app = Flask(__name__)
app.config.from_object(config("APP_SETTINGS"))

bcrypt = Bcrypt(app)
db = SQLAlchemy(app)
migrate = Migrate(app, db)

# Registering blueprints
from src.accounts.views import accounts_bp
from src.core.views import core_bp

app.register_blueprint(accounts_bp)
app.register_blueprint(core_bp)
In the above script, we created a Flask app called app . We use the __name__ argument to indicate the app's module or package so that Flask knows where to find other files such as templates. We also set the configuration of the app using an environment variable called APP_SETTINGS. We'll export it later.
To use Flask-Bcrypt, Flask-SQLAlchemy, and Flask-Migrate in our application, we just need to create objects of the Bcrypt, SQLAlchemy and Migrate classes from the flask_bcrypt, flask_sqlalchemy and, flask_migrate libraries, respectively.
We've also registered blueprints called accounts_bp and core_bp in the application. We'll define them later in the tutorial.
In the root directory of the project (that is, outside the src directory), create a file called config.py. We'll store the configurations for the project in this file. Within the file, add the following content:
from decouple import config

DATABASE_URI = config("DATABASE_URL")
if DATABASE_URI.startswith("postgres://"):
    DATABASE_URI = DATABASE_URI.replace("postgres://", "postgresql://", 1)


class Config(object):
    DEBUG = False
    TESTING = False
    CSRF_ENABLED = True
    SECRET_KEY = config("SECRET_KEY", default="guess-me")
    SQLALCHEMY_DATABASE_URI = DATABASE_URI
    SQLALCHEMY_TRACK_MODIFICATIONS = False
    BCRYPT_LOG_ROUNDS = 13
    WTF_CSRF_ENABLED = True
    DEBUG_TB_ENABLED = False
    DEBUG_TB_INTERCEPT_REDIRECTS = False
    APP_NAME = config("APP_NAME")


class DevelopmentConfig(Config):
    DEVELOPMENT = True
    DEBUG = True
    WTF_CSRF_ENABLED = False
    DEBUG_TB_ENABLED = True


class TestingConfig(Config):
    TESTING = True
    DEBUG = True
    SQLALCHEMY_DATABASE_URI = "sqlite:///testdb.sqlite"
    BCRYPT_LOG_ROUNDS = 1
    WTF_CSRF_ENABLED = False


class ProductionConfig(Config):
    DEBUG = False
    DEBUG_TB_ENABLED = False
In the above script, we have created a Config class and defined various attributes inside that. Also, we have created different child classes (as per different stages of development) that inherit the Config class.
Notice that we're using a few environment variables like SECRET_KEY, DATABASE_URL, and APP_NAME. Create a file named .env in the root directory and add the following content there:
export SECRET_KEY=fdkjshfhjsdfdskfdsfdcbsjdkfdsdf
export DEBUG=True
export APP_SETTINGS=config.DevelopmentConfig
export DATABASE_URL=sqlite:///db.sqlite
export FLASK_APP=src
export FLASK_DEBUG=1
export APP_NAME="Flask User Authentication App"
Apart from the SECRET_KEY , DATABASE_URL and APP_NAME, we've also exported APP_SETTINGS, DEBUG, FLASK_APP, and FLASK_DEBUG.
The APP_SETTINGS refers to one of the classes we created in the config.py file. We set it to the current stage of the project.
The value of FLASK_APP is the name of the package we have created. Since the app is in the development stage, you can set the values of DEBUG and FLASK_DEBUG to True and 1, respectively.
Run the following command to export all the environment variables from the .env file:
source .env
Next, we'll create a CLI application of the app so that we can later add custom commands if required.
Create a manage.py file in the root directory of the application and add the following code:
from flask.cli import FlaskGroup

from src import app

cli = FlaskGroup(app)


if __name__ == "__main__":
    cli()
Now, your basic application is ready. You can run it using the following command:
python manage.py run
Your file structure should look like below as of now:
flask-two-factor-auth/
├── src/
│   └── __init__.py
├── .env
├── config.py
└── manage.py
How to Create Blueprints for Accounts and Core
As mentioned earlier, you'll use the concepts of blueprints in the project. Let's create two blueprints – accounts_bp and core_bp – in this section.
First create a directory called accounts like this:
mkdir accounts
cd accounts
Next, add an empty __init__.py file to covert it into a Python package. Now, create a views.py file inside the package where you'll store all your routes related to user authentication.
touch __init__.py views.py
Add the following code inside the views.py file:
from flask import Blueprint

accounts_bp = Blueprint("accounts", __name__)
In the above script, you have created a blueprint called accounts_bp for the accounts package.
Similarly, you can create a core package in the root directory, and add a views.py file.
mkdir core
cd core
touch __init__.py views.py
Now, add the following code inside the views.py file:
from flask import Blueprint

core_bp = Blueprint("core", __name__)
Note: If you're new to Flask Blueprints, make sure you go through this tutorial to learn more about how it works.
Now, your file structure should look like what you see below:
flask-two-factor-auth/
├── src/
│   ├── accounts/
│   │   ├── __init__.py
│   │   └── views.py
│   ├── core/
│   │   ├── __init__.py
│   │   └── views.py
│   └── __init__.py
├── .env
├── config.py
└── manage.py
How to Create a User Model
Let's create a models.py file inside the accounts package.
touch src/accounts/models.py
Inside the models.py file, add the following code:
from datetime import datetime

import pyotp
from flask_login import UserMixin

from src import bcrypt, db
from config import Config


class User(db.Model):

    __tablename__ = "users"

    id = db.Column(db.Integer, primary_key=True)
    username = db.Column(db.String, unique=True, nullable=False)
    password = db.Column(db.String, nullable=False)
    created_at = db.Column(db.DateTime, nullable=False)
    is_two_factor_authentication_enabled = db.Column(
        db.Boolean, nullable=False, default=False)
    secret_token = db.Column(db.String, unique=True)

    def __init__(self, username, password):
        self.username = username
        self.password = bcrypt.generate_password_hash(password)
        self.created_at = datetime.now()
        self.secret_token = pyotp.random_base32()

    def get_authentication_setup_uri(self):
        return pyotp.totp.TOTP(self.secret_token).provisioning_uri(
            name=self.username, issuer_name=Config.APP_NAME)

    def is_otp_valid(self, user_otp):
        totp = pyotp.parse_uri(self.get_authentication_setup_uri())
        return totp.verify(user_otp)

    def __repr__(self):
        return f"<user {self.username}>"
In the above code, you created a User model by inheriting the db.Model class. The User model consists of the following fields:
id: stores the primary key for theuserstableusername: stores the username of the userpassword: stores the hashed password of the usercreated_at: stores the timestamp when the user was createdis_two_factor_authentication_enabled: boolean flag that stores whether the user has activated two-factor authentication. Default value isFalse.secret_token: stores a unique token generated for each user, essential for implementing two-factor authentication.
The constructor initializes the User object upon instantiation by accepting username and password parameters. It hashes the provided password using bcrypt.generate_password_hash(password), records the current timestamp as the created_at value, and generates a unique secret_token using pyotp.random_base32() for 2FA setup.
The get_authentication_setup_uri() method generates a setup URI used by authenticator apps like Google Authenticator. It constructs a URI containing the user's username and the application's name (Config.APP_NAME) necessary for setting up two-factor authentication. The basic format of the URI is:
otpauth://totp/Example:alice@google.com?secret=JBSWY3DPEHPK3PXP&issuer=Example
where, alice@google.com is the username of the user and Example is the application's name.
Next up, the is_otp_valid() method verifies the one-time password (OTP) entered by the user during login. It parses the setup URI generated earlier, checks the validity of the provided OTP (user_otp), and returns True if the OTP matches, ensuring secure authentication.
Finally, the __repr__ method provides a string representation of the User object, displaying the associated username when an instance of the class is printed or represented as a string.
How to Add Flask-Login
The most important part of Flask-Login is the LoginManager class that lets your application and Flask-Login work together.
In the src/__init__.py file, add the following code:
from decouple import config
from flask import Flask
from flask_login import LoginManager # Add this line
from flask_migrate import Migrate
from flask_sqlalchemy import SQLAlchemy

app = Flask(__name__)
app.config.from_object(config("APP_SETTINGS"))

login_manager = LoginManager() # Add this line
login_manager.init_app(app) # Add this line
db = SQLAlchemy(app)
migrate = Migrate(app, db)

# Registering blueprints
from src.accounts.views import accounts_bp
from src.core.views import core_bp

app.register_blueprint(accounts_bp)
app.register_blueprint(core_bp)
In the above script, we created and initialized the login manager in our app.
Next, we need to provide a user_loader callback. This callback is used to reload the user object from the user ID stored in the session. It should take the ID of a user, and return the corresponding user object.
from src.accounts.models import User

@login_manager.user_loader
def load_user(user_id):
    return User.query.filter(User.id == int(user_id)).first()
The User model should implement the following properties and methods:
is_authenticated: This property returns True if the user is authenticated.is_active: This property returns True if this is an active user (the account is activated)is_anonymous: This property returns True if this is an anonymous user (actual users return False).get_id(): This method returns a string that uniquely identifies this user, and can be used to load the user from theuser_loadercallback.
Now, we don't need to implement these explicitly. Instead, the Flask-Login provides a UserMixin class that contains the default implementations for all of these properties and methods. We just need to inherit it in the following way:
from datetime import datetime

from flask_login import UserMixin # Add this line

from src import bcrypt, db


class User(UserMixin, db.Model): # Change this line
    ....
We can also customize the default login process in the src/__init__.py file.
The name of the login view can be set as LoginManager.login_view. The value refers to the function name that will handle the login process.
login_manager.login_view = "accounts.login"
To customize the message category, set LoginManager.login_message_category:
login_manager.login_message_category = "danger"
How to Add Templates and Static Files
Let's create a CSS file called styles.css inside the src/static folder:
.error {
  color: red;
  margin-bottom: 5px;
  text-align: center;
}

a {
  text-decoration: none;
}
Let's also create the basic templates inside the src/templates folder. Create a _base.html file and add the following code:
<!DOCTYPE html>
<html lang="en">
  <head>
    <meta charset="utf-8">
    <title>Two Factor Authentication</title>
    <!-- meta -->
    <meta name="description" content="">
    <meta name="author" content="">
    <meta name="viewport" content="width=device-width,initial-scale=1">
    <!-- styles -->
    <!-- CSS only -->
    <link href="https://cdn.jsdelivr.net/npm/bootstrap@5.3.2/dist/css/bootstrap.min.css" rel="stylesheet" integrity="sha384-T3c6CoIi6uLrA9TneNEoa7RxnatzjcDSCmG1MXxSR1GAsXEV/Dwwykc2MPK8M2HN" crossorigin="anonymous">
    <link rel="stylesheet" href="{{url_for('static', filename="styles.css")}}">
    {% block css %}{% endblock %}
  </head>
  <body>

    {% include "navigation.html" %}

    <div class="container">

      <br>

      <!-- messages -->
      {% with messages = get_flashed_messages(with_categories=true) %}
      {% if messages %}
      <div class="row">
        <div class="col-md-4"></div>
        <div class="col-md-4">
          {% for category, message in messages %}
          <div class="alert alert-{{ category }} alert-dismissible fade show" role="alert">
           {{message}}
           <button type="button" class="btn-close" data-bs-dismiss="alert" aria-label="Close"></button>
          </div>
          {% endfor %}
        </div>
        <div class="col-md-4"></div>
      </div>
      {% endif %}
      {% endwith %}

      <!-- child template -->
      {% block content %}{% endblock %}

    </div>

    <!-- scripts -->
    <script src="https://code.jquery.com/jquery-3.7.1.min.js" integrity="sha256-/JqT3SQfawRcv/BIHPThkBvs0OEvtFFmqPF/lYI/Cxo=" crossorigin="anonymous"></script>
    <!-- JavaScript Bundle with Popper -->
    <script src="https://cdn.jsdelivr.net/npm/@popperjs/core@2.11.8/dist/umd/popper.min.js" integrity="sha384-I7E8VVD/ismYTF4hNIPjVp/Zjvgyol6VFvRkX/vR+Vc4jQkC+hVqc2pM8ODewa9r" crossorigin="anonymous"></script>
    <script src="https://cdn.jsdelivr.net/npm/bootstrap@5.3.2/dist/js/bootstrap.min.js" integrity="sha384-BBtl+eGJRgqQAUMxJ7pMwbEyER4l1g+O15P+16Ep7Q9Q+zqX6gSbd85u4mG4QzX+" crossorigin="anonymous"></script>
    {% block js %}{% endblock %}
  </body>
</html>
The _base.html is the parent HTML file that will be inherited by the other templates. We have added Bootstrap 5 support in the above file. We are also making use of Flask Flashes to show Bootstrap alerts in the app.
Let's also create a navigation.html file that contains the navbar of the app:
<!-- Navigation -->
<nav class="navbar bg-dark navbar-expand-lg bg-body-tertiary p-3" data-bs-theme="dark">
  <div class="container-fluid">
    <a class="navbar-brand" href="{{ url_for('core.home') }}">Two-Factor Authentication App</a>
    <button class="navbar-toggler" type="button" data-bs-toggle="collapse" data-bs-target="#navbarSupportedContent" aria-controls="navbarSupportedContent" aria-expanded="false" aria-label="Toggle navigation">
      <span class="navbar-toggler-icon"></span>
    </button>
    <div class="collapse navbar-collapse" id="navbarSupportedContent">
      {% if current_user.is_authenticated %}
      <a href="{{ url_for('accounts.logout') }}"><button type="button" class="btn btn-danger me-2">Logout</button></a>
      {% endif %}
    </div>
  </div>
</nav>
Note that we have not yet created the views used above.
How to Create the Homepage
In this section, we'll first create a view function for the homepage inside the core/views.py file. Add the following code there:
from flask import Blueprint, render_template
from flask_login import login_required

core_bp = Blueprint("core", __name__)


@core_bp.route("/")
@login_required
def home():
    return render_template("core/index.html")
Notice that we have used the blueprint to add the route. We also added a @login_required middleware to prevent access for unauthenticated users.
Next, let's create an index.html file inside the templates/core folder, and add the following code:
{% extends "_base.html" %}
{% block content %}

<h1 class="text-center">Welcome {{current_user.username}}!</h1>

{% endblock %}
The HTML page will just have a welcome message for authenticated users.
Your file structure as of now should look like below:
flask-two-factor-auth/
├── src/
│   ├── accounts/
│   │   ├── __init__.py
│   │   └── views.py
│   ├── core/
│   │   ├── __init__.py
│   │   └── views.py
│   ├── static/
│   │   └── styles.css
│   ├── templates/
│   │   ├── core/
│   │   │   └── index.html
│   │   ├── _base.html
│   │   └── navigation.html
│   └── __init__.py
├── .env
├── config.py
└── manage.py
How to Implement User Registration
First of all, we'll create a registration form using Flask-WTF. Create a forms.py file inside the accounts package and add the following code:
from flask_wtf import FlaskForm
from wtforms import EmailField, PasswordField
from wtforms.validators import DataRequired, Email, EqualTo, Length

from src.accounts.models import User


class RegisterForm(FlaskForm):
    username = StringField(
        "Username", validators=[DataRequired(), Length(min=6, max=40)]
    )
    password = PasswordField(
        "Password", validators=[DataRequired(), Length(min=6, max=25)]
    )
    confirm = PasswordField(
        "Repeat password",
        validators=[
            DataRequired(),
            EqualTo("password", message="Passwords must match."),
        ],
    )

    def validate(self, extra_validators):
        initial_validation = super(RegisterForm, self).validate(extra_validators)
        if not initial_validation:
            return False
        user = User.query.filter_by(username=self.username.data).first()
        if user:
            self.username.errors.append("Username already registered")
            return False
        if self.password.data != self.confirm.data:
            self.password.errors.append("Passwords must match")
            return False
        return True
The RegisterForm extends the FlaskForm class and contains three fields – username, password, and confirm. We have added different validators such as DataRequired, Length, Email, and EqualTo to the respective fields.
We also defined a validate() method which is automatically called when the form is submitted.
Inside the method, we first perform the initial validation provided by FlaskForm. If that is successful, we perform our custom validation such as checking whether user is already registered, and matching the password with the confirmed password. If there are any errors, we append the error message in the respective fields.
Now, let's use this form inside the HTML file. Create an accounts directory inside the templates folder and add a new file called register.html inside it. Add the following code:
{% extends "_base.html" %}

{% block content %}

<div class="row">
  <div class="col-md-4"></div>
  <div class="col-md-4">
    <main class="form-signin w-100 m-auto">
      <form role="form" method="post" action="">
        {{ form.csrf_token }}
        <h1 class="h3 mb-3 fw-normal text-center">Please register</h1>

        <div class="form-floating">
          {{ form.username(placeholder="username", class="form-control mb-2") }}
          {{ form.username.label }}
            {% if form.username.errors %}
              {% for error in form.username.errors %}
                <div class="alert alert-danger" role="alert">
                  {{ error }}
                </div>
              {% endfor %}
            {% endif %}
        </div>
        <div class="form-floating">
          {{ form.password(placeholder="password", class="form-control mb-2") }}
          {{ form.password.label }}
            {% if form.password.errors %}
              {% for error in form.password.errors %}
                <div class="alert alert-danger" role="alert">
                  {{ error }}
                </div>
              {% endfor %}
            {% endif %}
        </div>
        <div class="form-floating">
          {{ form.confirm(placeholder="Confirm Password", class="form-control mb-2") }}
          {{ form.confirm.label }}
            {% if form.confirm.errors %}
              {% for error in form.confirm.errors %}
                <div class="alert alert-danger" role="alert">
                  {{ error }}
                </div>
              {% endfor %}
            {% endif %}
        </div>
        <button class="w-100 btn btn-lg btn-primary" type="submit">Sign up</button>
        <p class="text-center mt-3">Already registered? <a href="{{ url_for('accounts.login') }}">Login now</a></p>
      </form>
    </main>
  </div>
  <div class="col-md-4"></div>
</div>

{% endblock %}
In the above Jinja template, we make use of the form that we created, and add relevant error handling logic checks for validation errors in each field. Users can submit the form by clicking the "Sign up" button, and a link below the form allows already registered users to navigate to the login page for authentication.
Next, let's use this form in the views.py to create a function to handle the registration process.
from .forms import RegisterForm
from src.accounts.models import User
from src import db, bcrypt
from flask_login import current_user
from flask import Blueprint, flash, redirect, render_template, request, url_for

accounts_bp = Blueprint("accounts", __name__)

HOME_URL = "core.home"
SETUP_2FA_URL = "accounts.setup_two_factor_auth"
VERIFY_2FA_URL = "accounts.verify_two_factor_auth"

@accounts_bp.route("/register", methods=["GET", "POST"])
def register():
    if current_user.is_authenticated:
        if current_user.is_two_factor_authentication_enabled:
            flash("You are already registered.", "info")
            return redirect(url_for(HOME_URL))
        else:
            flash("You have not enabled 2-Factor Authentication. Please enable first to login.", "info")
            return redirect(url_for(SETUP_2FA_URL))
    form = RegisterForm(request.form)
    if form.validate_on_submit():
        try:
            user = User(username=form.username.data, password=form.password.data)
            db.session.add(user)
            db.session.commit()

            login_user(user)
            flash("You are registered. You have to enable 2-Factor Authentication first to login.", "success")

            return redirect(url_for(SETUP_2FA_URL))
        except Exception:
            db.session.rollback()
            flash("Registration failed. Please try again.", "danger")

    return render_template("accounts/register.html", form=form)
The route begins by checking if the current user is already authenticated. If so, it verifies whether 2FA is enabled for the user. If 2FA is already enabled, a message informs the user that they're already registered, redirecting them to the home URL. However, if the user is authenticated but 2FA is not enabled, a flash message prompts the user to enable 2FA first before logging in, redirecting them to the 2FA setup URL.
If the user is not authenticated or has not yet registered 2FA, the code initializes a registration form and proceeds to validate the form data on submission. Upon successful form validation, we create a new User object with the provided username and password and save it to the database.
Upon successful user registration, the newly registered user is logged in. A success message flashes, notifying the user of successful registration and prompting them to enable 2FA before logging in. Subsequently, the user is redirected to the 2FA setup URL to enable 2FA.
How to Implement User Login
First, let's create a login form in the accounts/forms.py file:
class LoginForm(FlaskForm):
    username = StringField("Username", validators=[DataRequired()])
    password = PasswordField("Password", validators=[DataRequired()])
The form is similar to the registration form but it has only two fields – username and password.
Now, let's use this form inside new HTML file called login.html created inside the templates/accounts directory. Add the following code:
{% extends "_base.html" %}

{% block content %}

<div class="row">
  <div class="col-md-4"></div>
  <div class="col-md-4">
    <main class="form-signin w-100 m-auto">
      <form role="form" method="post" action="">
        {{ form.csrf_token }}
        <h1 class="h3 mb-3 fw-normal text-center">Please sign in</h1>

        <div class="form-floating">
          {{ form.username(placeholder="username", class="form-control mb-2") }}
          {{ form.username.label }}
            {% if form.username.errors %}
              {% for error in form.username.errors %}
              <div class="alert alert-danger" role="alert">
                {{ error }}
              </div>
              {% endfor %}
            {% endif %}
        </div>
        <div class="form-floating">
          {{ form.password(placeholder="password", class="form-control mb-2") }}
          {{ form.password.label }}
            {% if form.password.errors %}
              {% for error in form.password.errors %}
                <div class="alert alert-danger" role="alert">
                  {{ error }}
                </div>
              {% endfor %}
            {% endif %}
        </div>
        <button class="w-100 btn btn-lg btn-primary" type="submit">Sign in</button>
        <p class="text-center mt-3">New User? <a href="{{ url_for('accounts.register') }}">Register now</a></p>
      </form>
    </main>
  </div>
  <div class="col-md-4"></div>
</div>

{% endblock %}
The above HTML file is also similar to the register.html file but with just two fields for the username and password.
Next, let's create a view function to handle the login process inside the accounts/views.py file:
from .forms import LoginForm, RegisterForm

@accounts_bp.route("/login", methods=["GET", "POST"])
def login():
    if current_user.is_authenticated:
        if current_user.is_two_factor_authentication_enabled:
            flash("You are already logged in.", "info")
            return redirect(url_for(HOME_URL))
        else:
            flash("You have not enabled 2-Factor Authentication. Please enable first to login.", "info")
            return redirect(url_for(SETUP_2FA_URL))

    form = LoginForm(request.form)
    if form.validate_on_submit():
        user = User.query.filter_by(username=form.username.data).first()
        if user and bcrypt.check_password_hash(user.password, request.form["password"]):
            login_user(user)
            if not current_user.is_two_factor_authentication_enabled:
                flash(
                    "You have not enabled 2-Factor Authentication. Please enable first to login.", "info")
                return redirect(url_for(SETUP_2FA_URL))
            return redirect(url_for(VERIFY_2FA_URL))
        elif not user:
            flash("You are not registered. Please register.", "danger")
        else:
            flash("Invalid username and/or password.", "danger")
    return render_template("accounts/login.html", form=form)
The route starts by checking if the current user is already authenticated. If the user is authenticated and 2FA is enabled, a message informs the user they're already logged in, redirecting them to the home URL. If the user is authenticated but 2FA isn't enabled, a flash message prompts the user to enable 2FA before logging in, redirecting them to the 2FA setup URL.
If the user isn't authenticated, the code initializes a login form and validates the form data upon submission. Upon successful validation, it queries the database to find a user matching the provided username. If the user exists and the password matches the hashed password stored in the database, the user is logged in.
Additionally, if 2FA isn't enabled for the current user after successful login, a flash message prompts the user to enable 2FA before proceeding, redirecting them to the 2FA setup URL. If the login is successful and 2FA is enabled, the user is redirected to the 2FA verification URL.
If the user isn't registered, a flash message informs them to register. If there's a mismatch in the provided username or password, another flash message notifies the user of invalid credentials.
How to Log Out the Users
Logging out the user is a very simple process. You just need to create a view function for it inside the accounts/views.py file:
from flask_login import login_required, login_user, logout_user


@accounts_bp.route("/logout")
@login_required
def logout():
    logout_user()
    flash("You were logged out.", "success")
    return redirect(url_for("accounts.login"))
The Flask-Login library contains a logout_user method that removes the user from the session. We used the @login_required decorator so that only authenticated users can logout.
How to Add the Setup 2FA Page
Up until now, we have been redirecting the users to the setup 2FA page whenever the 2FA is not enabled in their accounts, but we haven't implemented it yet. Let's do that in this section.
Let's start with the route for the page:
from src.utils import get_b64encoded_qr_image

@accounts_bp.route("/setup-2fa")
@login_required
def setup_two_factor_auth():
    secret = current_user.secret_token
    uri = current_user.get_authentication_setup_uri()
    base64_qr_image = get_b64encoded_qr_image(uri)
    return render_template("accounts/setup-2fa.html", secret=secret, qr_image=base64_qr_image)
The route, created inside accounts/views.py, ensures that only authenticated users can access it using the @login_required decorator.
Upon accessing this route, the function retrieves the current user's secret_token for 2FA setup and generates a URI through current_user.get_authentication_setup_uri() to configure an authenticator app like Google Authenticator.
It also uses get_b64encoded_qr_image(uri) to obtain a Base64-encoded QR code image representing this setup URI. We will define it below.
Finally, it renders the setup-2fa.html template, passing the user's secret_token and the Base64-encoded QR image to the template for users to scan it.
Next, create a utils.py file in the src directory and add the following code to generate the QR:
from io import BytesIO
import qrcode
from base64 import b64encode


def get_b64encoded_qr_image(data):
    print(data)
    qr = qrcode.QRCode(version=1, box_size=10, border=5)
    qr.add_data(data)
    qr.make(fit=True)
    img = qr.make_image(fill_color='black', back_color='white')
    buffered = BytesIO()
    img.save(buffered)
    return b64encode(buffered.getvalue()).decode("utf-8")
Remember the qrcode library we installed in the beginning of the tutorial? This is where we're going to use it.
Upon receiving data as input, representing the content to be embedded within the QR code, the function initializes a QRCode object using the qrcode library. It adds the provided data to this QR code instance and generates the QR code. The code then converts this QR code into an image representation.
Using a BytesIO object, it stores this image in memory. The function proceeds to encode the content of this in-memory buffer, representing the QR code image, into Base64 format. Finally, it returns this Base64-encoded string, encapsulating the QR code image, ready for transmission or display in various applications.
Next, let's create the setup-2fa.html page inside the templates/accounts folder, and add the following content:
{% extends "_base.html" %}

{% block content %}

<div class="row">
  <div class="col-md-4"></div>
  <div class="col-md-4">
    <main class="form-signin w-100 m-auto">
      <form role="form">
        <h5>Instructions!</h5>
          <ul>
            <li>Download <a href="https://play.google.com/store/apps/details?id=com.google.android.apps.authenticator2&hl=en&gl=US" target="_blank">Google Authenticator</a> on your mobile.</li>
            <li>Set up a new authenticator.</li>
            <li>Once you have scanned the QR, please click <a href="{{ url_for('accounts.verify_two_factor_auth') }}">here.</li>
          </ul>
          <div class="text-center">
            <img src="data:image/png;base64, {{ qr_image }}" alt="Secret Token" style="width:200px;height:200px"/>
          </div>
        <div class="form-group">
          <label for="secret">Secret Token</label>
          <input type="text" class="form-control" id="secret" value="{{ secret }}" readonly>
        </div>
        <div class="text-center mt-2">
          <button type="button" class="btn btn-primary" onclick="copySecret()">
            Copy Secret
          </button>
        </div>
        <p class="mt-4 text-center">
          Once you have scanned the QR, please click <a href="{{ url_for('accounts.verify_two_factor_auth') }}">here</a>.
        </p>
      </form>
    </main>
  </div>
  <div class="col-md-4"></div>
</div>

{% endblock %}

{% block js %}
<script>
    function copySecret() {
    var copyText = document.getElementById("secret");
    copyText.select();
    copyText.setSelectionRange(0, 99999); /*For mobile devices*/
    document.execCommand("copy");
    alert("Successfully copied TOTP secret token!");
  }
</script>
{% endblock %}
We add some instructions in the page for the users to follow. These instructions provide clear steps for users to enable 2FA: directing them to download the Google Authenticator app via a link, guiding the setup process within the app, and prompting users to proceed by clicking a link after scanning the displayed QR code.
Displaying the QR code is central to the setup process. The template embeds the QR code image using an <img> tag with its source set to a Base64-encoded string ({{ qr_image }}). This image represents the secret key essential for 2FA setup.
We also show the secret key in read-only mode, allowing users to view the key without being able to modify it. We have added a copy button to make it easier for the users to copy the key.
Moreover, we have added a link to the 2FA verification page guiding users to proceed with the setup process after scanning the QR code. We will implement this functionality in the next section.
Here's how your page looks right now:
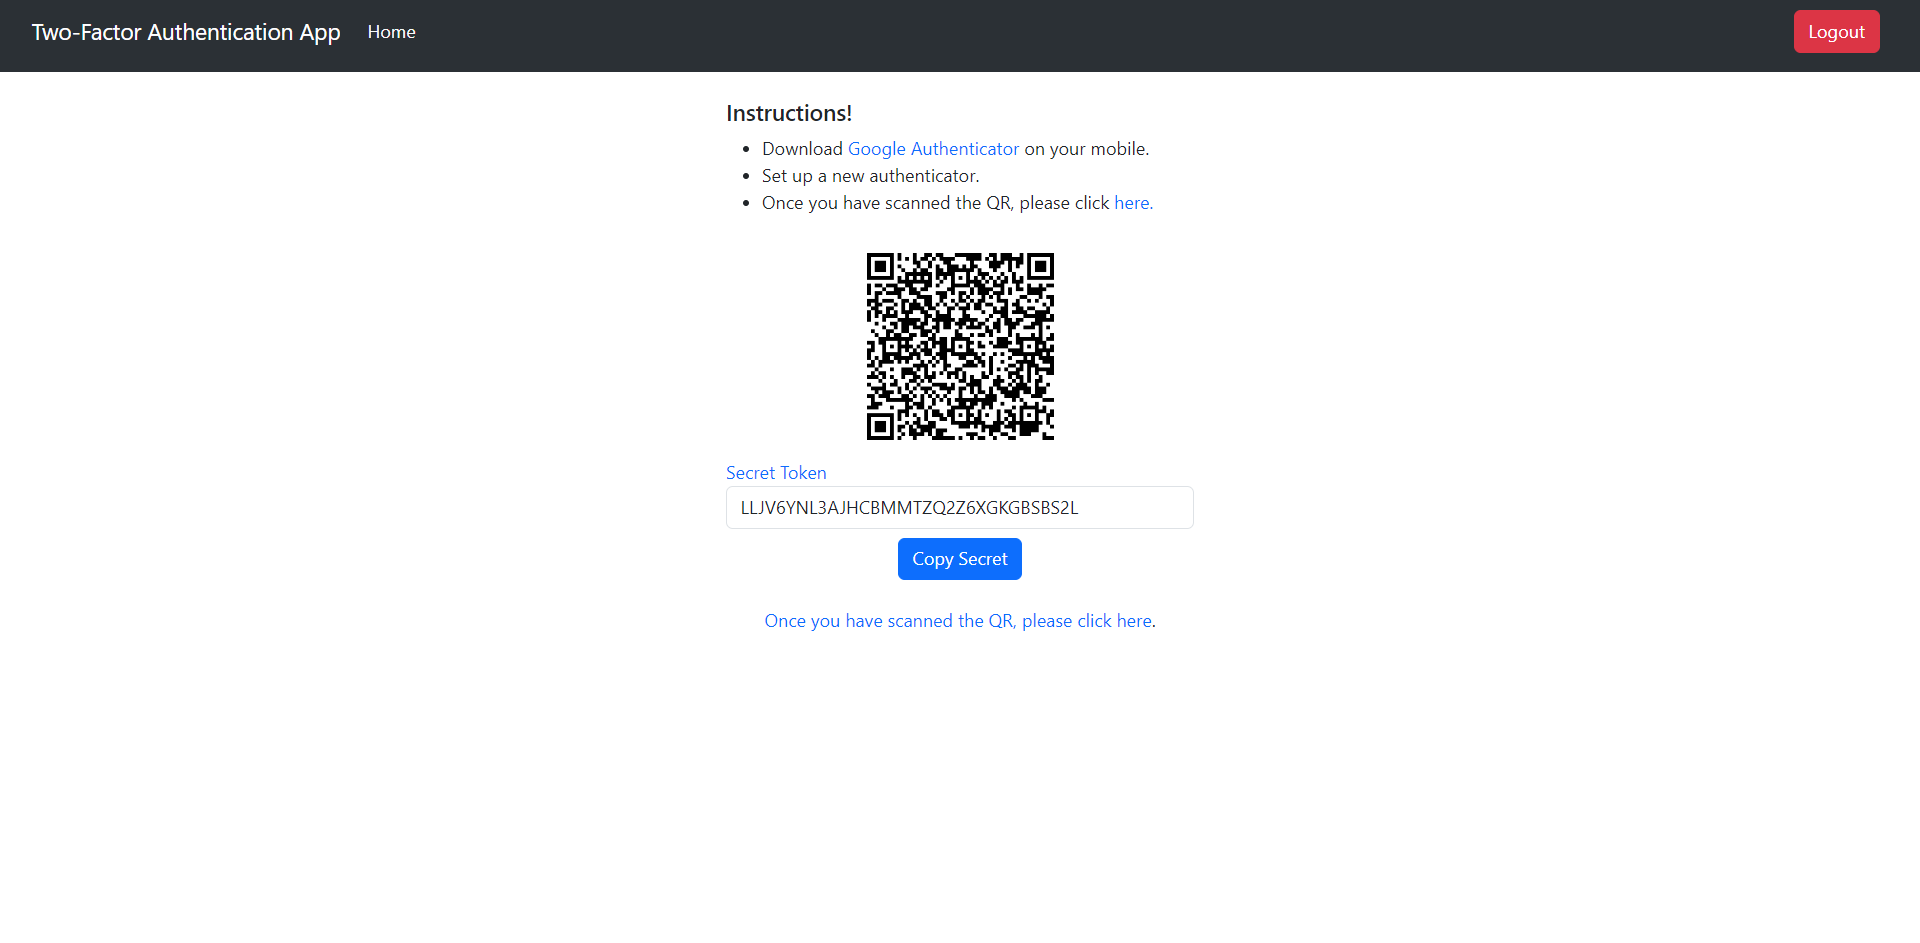 2FA Setup Page
How to Add a 2FA Verification Page
In this section, let's implement the 2FA verification. To start with, we will require an OTP form where users can enter their OTP. Add the following content in the accounts/forms.py file:
class TwoFactorForm(FlaskForm):
    otp = StringField('Enter OTP', validators=[
                      InputRequired(), Length(min=6, max=6)])
The TwoFactorForm contains just one field (otp) to get the OTP from the users.
Now, let's use this form in the verify-2fa.html file inside the templates/accounts folder:
{% extends "_base.html" %}

{% block content %}

<div class="row">
  <div class="col-md-4"></div>
  <div class="col-md-4">
    <main class="form-signin w-100 m-auto">
      <form role="form" method="post" action="">
        {{ form.csrf_token }}
        <h1 class="h3 mb-3 fw-normal text-center">Enter OTP</h1>

        <div class="form-floating">
          {{ form.otp(placeholder="OTP", class="form-control mb-2") }}
          {{ form.otp.label }}
            {% if form.otp.errors %}
              {% for error in form.otp.errors %}
              <div class="alert alert-danger" role="alert">
                {{ error }}
              </div>
              {% endfor %}
            {% endif %}
        </div>
        <button class="w-100 btn btn-lg btn-primary" type="submit">Verify</button>
      </form>
    </main>
  </div>
  <div class="col-md-4"></div>
</div>

{% endblock %}
The Jinja template essentially contains a form with one field for OTP and a verify button.
Let's create the route which handles the submission of this form inside the accounts/views.py file:
@accounts_bp.route("/verify-2fa", methods=["GET", "POST"])
@login_required
def verify_two_factor_auth():
    form = TwoFactorForm(request.form)
    if form.validate_on_submit():
        if current_user.is_otp_valid(form.otp.data):
            if current_user.is_two_factor_authentication_enabled:
                flash("2FA verification successful. You are logged in!", "success")
                return redirect(url_for(HOME_URL))
            else:
                try:
                    current_user.is_two_factor_authentication_enabled = True
                    db.session.commit()
                    flash("2FA setup successful. You are logged in!", "success")
                    return redirect(url_for(HOME_URL))
                except Exception:
                    db.session.rollback()
                    flash("2FA setup failed. Please try again.", "danger")
                    return redirect(url_for(VERIFY_2FA_URL))
        else:
            flash("Invalid OTP. Please try again.", "danger")
            return redirect(url_for(VERIFY_2FA_URL))
    else:
        if not current_user.is_two_factor_authentication_enabled:
            flash(
                "You have not enabled 2-Factor Authentication. Please enable it first.", "info")
        return render_template("accounts/verify-2fa.html", form=form)
The route starts by initializing a form (TwoFactorForm) meant for 2FA verification using the data obtained from the request. Upon form submission, the code proceeds with several conditional checks to validate the OTP entered by the user.
Once the form has been successfully submitted and validated, the code verifies the authenticity of the OTP using current_user.is_otp_valid(form.otp.data), which checks if the entered OTP is valid for the current user. If the OTP is valid, the code executes the following logic:
- If the provided OTP is valid and 2FA is already enabled for the user, a success message is flashed indicating successful 2FA verification, and the user is redirected to the home URL.
- If the OTP is valid but 2FA isn't enabled for the user, it attempts to enable 2FA for that user. Upon successful activation, a success message flashes, and the user is redirected to the home URL.
Furthermore, if the OTP entered by the user is invalid, the code flashes an error message indicating an invalid OTP and redirects the user back to the 2FA verification URL to retry the verification process.
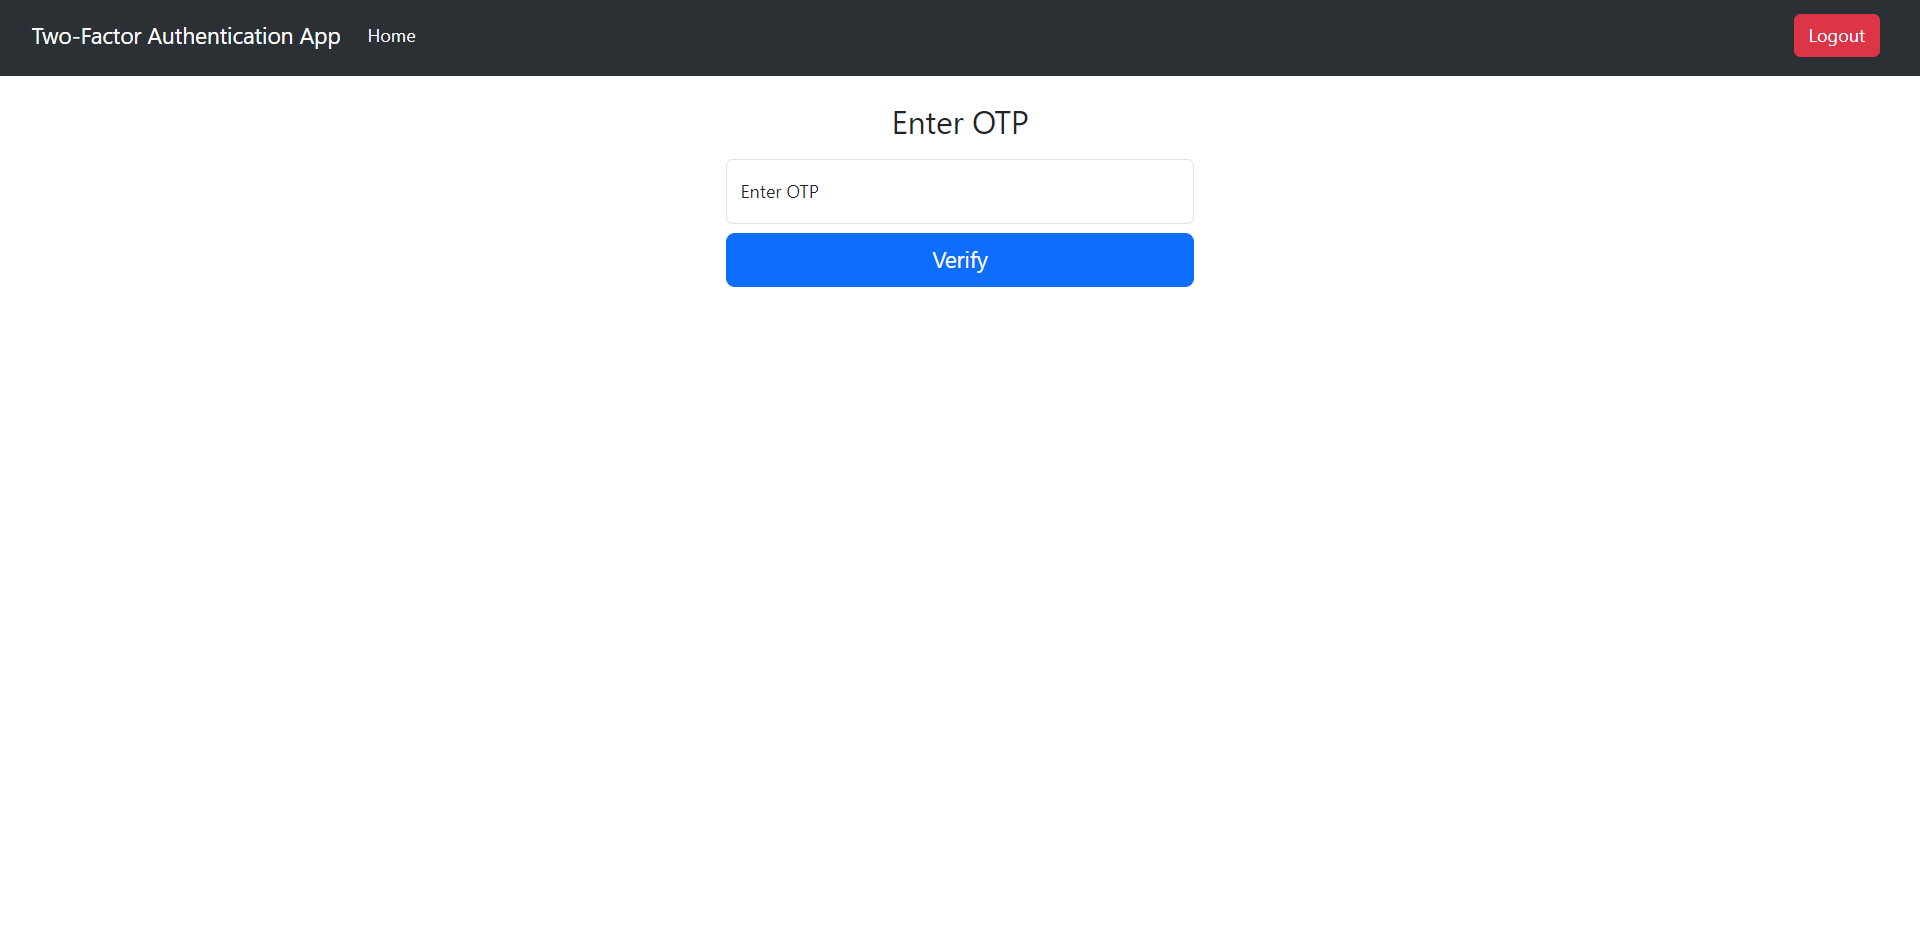 2FA Verification Page
With this, we have completed the implementation of all the features! 🎉
How to Run the Completed App for the First Time
Now that our application is ready, you can first migrate the database, and then run the app.
To initialize the database (create a migration repository), use the command:
flask db init
To migrate the database changes, use the command:
flask db migrate
To apply the migrations, use the command:
flask db upgrade
Since this is the first time we're running our app, you'll need to run all the above commands. Later, whenever you make changes to the database, you'll just need to run the last two commands.
After that, you can run your application using the command:
python manage.py run
Since we have completed the development, here's how your file structure should look like:
flask-two-factor-auth/
├── migrations/
├── src/
│   ├── accounts/
│   │   ├── __init__.py
│   │   ├── forms.py
│   │   ├── models.py
│   │   └── views.py
│   ├── core/
│   │   ├── __init__.py
│   │   └── views.py
│   ├── static/
│   │   └── styles.css
│   ├── templates/
│   │   ├── accounts/
│   │   │   ├── login.html
│   │   │   ├── register.html
│   │   │   ├── setup-2fa.html
│   │   │   └── verify-2fa.html
│   │   ├── core/
│   │   │   └── index.html
│   │   ├── _base.html
│   │   └── navigation.html
│   ├── __init__.py
│   └── utils.py
├── .env
├── config.py
└── manage.py
Wrapping up
In this tutorial, you learned how to set up two-factor authentication in your Flask app using PyOTP.
Here's the link to the GitHub repository. Feel free to check it out whenever you're stuck.
Here are some other tutorials I wrote about authentication, email verification, and OTPs that you might enjoy:
- How to Set Up Basic User Authentication in a Flask App
- How to Set Up Email Verification in a Flask App
- How To Generate OTPs Using PyOTP in Python
Thank you for reading. I hope you found this article useful. You can follow me on Twitter.