![How to Install Docker on Ubuntu 18.04 [Guide for both CE and EE]](https://www.freecodecamp.org/news/content/images/size/w2000/2020/06/Docker-CE--1-.png)
By Marcelo Costa
Back in 2017, Docker introduced two different versions of its platform: Docker-CE and Docker-EE. But do you know their differences?
Docker CE (Community Edition) is the classical OSS (Open Source Software) Docker Engine. Includes the full Docker platform and is great for developers and DIY ops teams starting to build container apps.
If you are an avid developer like I am, you've probably been using Docker for a while. And I would say that most likely this is the version you've worked with, simply because it's free!
Docker EE, on the other hand, is a premium version of CE. It comes with all CE capabilities plus many enterprise level features.
Anything that comes with premium is not free right? So it goes from $750/month basic plan to $2000/month advanced plan. Anyway the prices are on par with what you would expect from enterprise products.
Please get in touch with their sales team to check the most up-to-date prices.
Docker CE vs EE - the Details
Let's do a quick comparison between Docker EE and Docker CE interest over time:
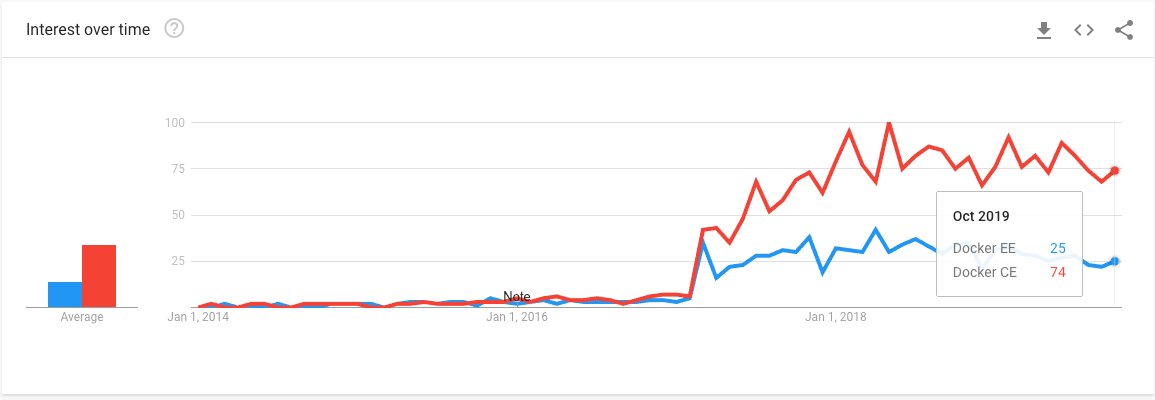
Now Docker EE vs Docker CE vs Docker:

From my experience, users who are searching for just Docker are looking for the CE edition. This shows us that Docker EE is used much less. But I'm certain that there are robust use cases where it makes sense to use it.
Since I'm an open source enthusiast all my experience comes from using the Docker CE edition, so writing this article was a wonderful experience getting to play with Docker EE.
After that quick introduction, let's get our hands dirty.

Prepare the Ubuntu 18.04 machine
As the first step, we will get the soil ready by running some common commands.
All the commands will be executed on a fresh Ubuntu 18.04 machine, and this time I've chosen Google Cloud Platform as the demonstrating environment.
Create the Virtual Machine
Let's start by creating a fresh VM using Ubuntu 18.04 image:
gcloud compute instances create ubuntu-fcc-demo \
--zone=us-central1-c \
--machine-type=n1-standard-1 \
--image=ubuntu-minimal-1804-bionic-v20200703a \
--image-project=ubuntu-os-cloud \
--boot-disk-size=10GB \
--boot-disk-type=pd-standard
Now connect to it using ssh:
gcloud compute ssh ubuntu-fcc-demo --zone=us-central1-c
Set up commons dependencies:
sudo apt-get update

sudo apt-get install \
   apt-transport-https \
   ca-certificates \
   curl \
   gnupg-agent \
   software-properties-common
Install Docker CE on Ubuntu 18.04
Install from https://get.docker.com
The install script lets you quickly install the latest Docker-CE releases on the supported linux distros. I don't recommend depending on this script for deployment to production systems. From docker-install:
curl -sSL https://get.docker.com/ | sh
The beauty of this command is that it will check your linux distro and run the right instructions to get Docker CE running for you.
You can test that everything is OK by running:
sudo docker run hello-world

# output
Hello from Docker!
This message shows that your installation appears to be working correctly.

Install from Docker repository
This one has more step, but is the recommended approach from Docker's official docs (we even check their GPG key fingerprint).
First, add Docker’s official GPG key:
curl -fsSL https://download.docker.com/linux/ubuntu/gpg \
| sudo apt-key add -
Then verify the key's fingerprint:
sudo apt-key fingerprint 0EBFCD88
Look for the fingerprint 9DC8 5822 9FC7 DD38 854A E2D8 8D81 803C 0EBF CD88. This makes sure the key has not been tempered with.
Next, set up a docker stable repository:
sudo add-apt-repository \
   "deb [arch=amd64] https://download.docker.com/linux/ubuntu \
   $(lsb_release -cs) \
   stable"
The $(lsb_release -cs) command returns the Ubuntu distribution. In our case we used bionic.
Now install Docker Engine:
 sudo apt-get update
 sudo apt-get install docker-ce docker-ce-cli containerd.io
And test that everything is OK by running:
sudo docker run hello-world

# output
Hello from Docker!
This message shows that your installation appears to be working correctly.

Instructions based on docs.docker.com.
Install Docker EE on Ubuntu 18.04
Install using Mirantis Launchpad CLI
To work with Docker EE you need a trial/purchased version. Docker disabled the option to get a trial subscription on their website, and now you need to contact their sales team to get a trial account.
Looking around I found out that, since Mirantis acquired Docker Enterprise, the way to get a Docker EE trial account has changed. You need to go to the Mirantis website and, after applying, you can download it right away.
At the time of this writing the installer is currently beta software. If there's a different way to install Docker EE, please get in touch. I would love to improve this article!
The Mirantis Launchpad CLI tool ("launchpad") is the new, better way to evaluate and experience Docker Enterprise (check out launchpad GitHub).
Download Launchpad CLI
Start by Downloading Launchpad. For Ubuntu 18.04 I used the launchpad-darwin-x64 version.
If you didn't download it from the Virtual Machine, here's a command to upload it to it:
gcloud compute scp launchpad-linux-x64 ubuntu-fcc-demo:~/launchpad \
  --zone=us-central1-c
Next, verify the installation:
# Give it writting permission
chmod +x launchpad

# Verify the installation
./launchpad version

# output
version: 0.12.0
commit: 4492884
Then register your user:
launchpad register
The information provided via registration is used to assign evaluation licenses and for providing assistance for the usage of the product.
Next, set up your cluster.yaml config.
This step was the one that took the most time for me. You need to set up 3 machines:
- Admin machine: The one where you are executing the launchpad command.
- Worker machine: Will be running your workloads.
- Manager machine: Contains the admin dashboard, where you have access to many configs and metrics.
They did a great job with the Go launchpad binary. The tricky parts are within the infrastructure setup. Fortunately they already have some terraform scripts to help with it.
Since at the time of this writing there was no option for GCP, I had to setup the infrastructure manually. The Admin machine connects to the Worker and Manager nodes to setup many steps, so make sure you have the ssh keys correctly set up.
The ssh keys step took me some time to figure out, and I even opened an issue in their repo, but then I quickly solved it. So if you have a similar issue, make sure you check it out.
There's a really detailed documentation about each attribute you can use in the config file.
Now it's time to bootstrap your cluster.
Once you have the cluster.yaml config set up, you can run the apply command:
launchpad --debug apply
You should see something like this:
Running phase: Install Docker EE Engine on the hosts

This is where I can say that they did a really good job abstracting all the setup steps.
There are 37 steps that the Go launchpad binary executes.
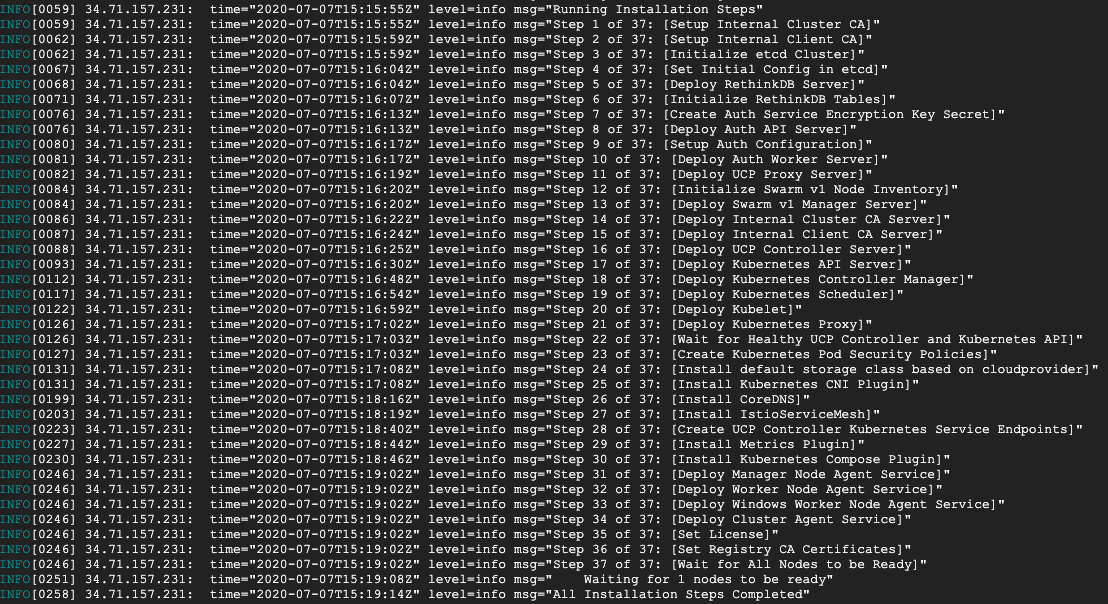
At the end you should see a message like this:
INFO[0021] ==> Running phase: UCP cluster info
INFO[0021] Cluster is now configured. You can access your cluster admin UI at: https://34.71.157.231 \
INFO[0021] You can also download the admin client bundle with the following command: launchpad download-bundle --username <username> --password <password>
Now, to test that everything is OK, go into the cluster admin UI:
 Admin login UI
After logging in, you are presented the cluster admin UI:
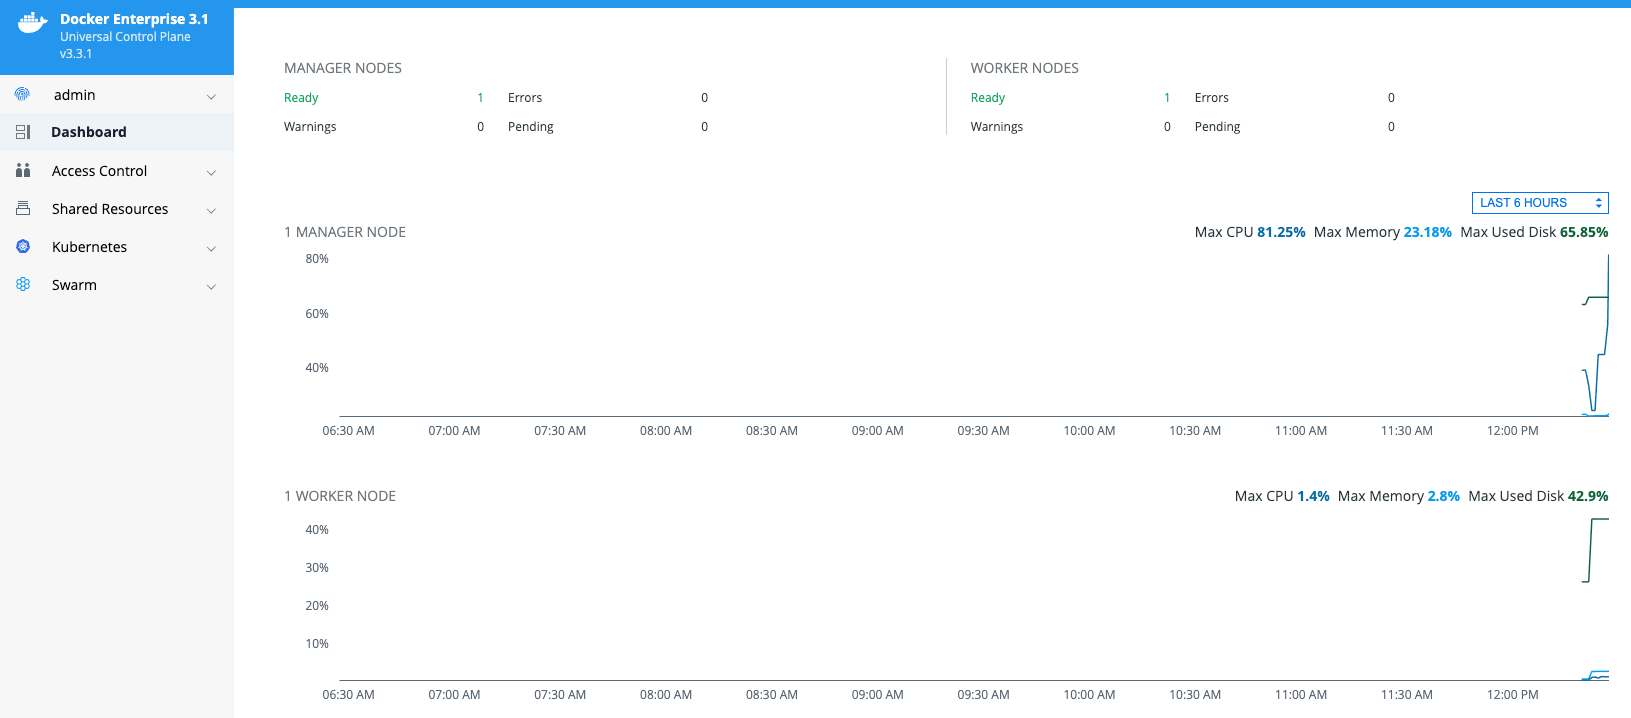 Admin dashboard
I played a little with some of its features, and overall they are great. They provide easy to usage Access Controls and Certified Docker images.
These instructions are based on this getting-started guide.
Wrapping up**
In this article we saw how to set up Docker on Ubuntu 18.04 for both CE and EE versions.
And since Mirantis has acquired Docker Enterprise, we found out that Launchpad is the latest way for customers looking to try out Docker Enterprise licenses.
Overall the developer/deployment experience is really good, since almost all steps to get an environment ready for Docker EE are automated. And Docker seems to be looking to increasingly automate this process, so that is really nice!
- Illustrations from Icons8
If you found this helpful, or wish to challenge or extend anything raised here, feel free to contact me on Twitter or Linkedin. Let's connect!