
By Tyler Jackson
I’ve been working with Wordpress since it’s proliferation as a content management system. I hardly get excited when clients or co-workers mention it anymore. I’ve “found the light” in more robust frameworks and learned much more about the different parts of custom web applications.
So, in an effort to rejuvenate my passion for Wordpress, I’ve started looking at different ways to implement the framework. One of those ways is to separate the front-end from the back-end and avoid some of the pain points of using the Wordpress Template Tags and theming system. Let’s take a look.
Monolithic vs. Distributed Apps
Wordpress is a monolithic framework, meaning the different parts of the framework (database, file storage, presentation structure & asset files, business logic files) are all packaged together. This is a large part of why Wordpress is so easy to get up and running. Install MAMP, copy over the latest Wordpress files, create a database, and change the wp-config.php file. Good to go.
We are going to go against the monolithic convention and break this Wordpress site up into two different parts: front-end and back-end, presentation and administration.
We are going to use Wordpress for the data administration of our app and leverage a plugin to help with the creation and management of attributes (fields) for our custom post type. For the presentation side of things, we are going to forego a theme entirely and consume API endpoints from an Express.js application.
Example
In this example, we are going to build a simple product listing. The idea is that you already have a website powered by Wordpress, and would like to manage a list of products for sale through the same interface. But you want to create a completely different website for the store.
Wordpress API
Since version 4.7, Wordpress is automatically exposing your published posts (and other data) via its REST API, presented in a JSON format. If you’ve developed a website using Wordpress 4.7+, simply add /wp-json to the root URL and marvel at the wall of text that’s returned.
With this API automatically integrated into the Wordpress installation, a lot of the work of a distributed application is already done for us. API creation can be a roadblock when getting started with this new way of thinking about applications. Wordpress has created a fantastic, basic API for consuming our data any way we prefer.
At this point, I would only be cluttering the internet by writing a tutorial on how to locally install Wordpress. So instead, I’m going to point you towards a trusted source on the subject.
No matter what path you take to get a Wordpress instance up and running, you should be able to access it via http://localhost or some other URL. Once we have a URL, let’s do a quick test to make sure we have data coming back. I prefer a tool like Postman, but we’ll keep it simple and visit the following URL in our browser (changing the URL accordingly, of course).
http://localhost/mysite/wp-json
This should return a list of all the available endpoints for your Wordpress installation’s REST API.
But for real, Postman…
Postman
_Postman is the only complete API development environment, for API developers, used by more than 5 million developers…_www.getpostman.com
Custom Post Types
Since Wordpress limits us to two data types (Posts & Pages) we are going to need to create a custom post type for our Products. This will create a clear separation from the Product posts and any other posts we have.
There are a number of different ways to create custom post types. Here, we are going to create a single file Wordpress Plugin to register the Products post type.
<?php/*Plugin Name: Product Custom Post Type*/
function create_product_cpt() { $labels = array( 'name' => __( 'Products', 'Post Type General Name', 'products' ), 'singular_name' => __( 'Product', 'Post Type Singular Name', 'products' ), 'menu_name' => __( 'Products', 'products' ), 'name_admin_bar' => __( 'Product', 'products' ), 'archives' => __( 'Product Archives', 'products' ), 'attributes' => __( 'Product Attributes', 'products' ), 'parent_item_colon' => __( 'Parent Product:', 'products' ), 'all_items' => __( 'All Products', 'products' ), 'add_new_item' => __( 'Add New Product', 'products' ), 'add_new' => __( 'Add New', 'products' ), 'new_item' => __( 'New Product', 'products' ), 'edit_item' => __( 'Edit Product', 'products' ), 'update_item' => __( 'Update Product', 'products' ), 'view_item' => __( 'View Product', 'products' ), 'view_items' => __( 'View Products', 'products' ), 'search_items' => __( 'Search Product', 'products' ), 'not_found' => __( 'Not found', 'products' ), 'not_found_in_trash' => __( 'Not found in Trash', 'products' ), 'featured_image' => __( 'Featured Image', 'products' ), 'set_featured_image' => __( 'Set featured image', 'products' ), 'remove_featured_image' => __( 'Remove featured image', 'products' ), 'use_featured_image' => __( 'Use as featured image', 'products' ), 'insert_into_item' => __( 'Insert into Product', 'products' ), 'uploaded_to_this_item' => __( 'Uploaded to this Product', 'products' ), 'items_list' => __( 'Products list', 'products' ), 'items_list_navigation' => __( 'Products list navigation', 'products' ), 'filter_items_list' => __( 'Filter Products list', 'products' ), );
$args = array( 'label' => __( 'Product', 'products' ), 'description' => __( '', 'products' ), 'labels' => $labels, 'menu_icon' => 'dashicons-products', 'supports' => array('title', 'editor', 'excerpt', 'thumbnail'), 'taxonomies' => array('products'), 'public' => true, 'show_ui' => true, 'show_in_menu' => true, 'menu_position' => 5, 'show_in_admin_bar' => true, 'show_in_nav_menus' => true, 'can_export' => true, 'has_archive' => true, 'hierarchical' => false, 'exclude_from_search' => false, 'show_in_rest' => true, 'rest_base' => 'products', 'publicly_queryable' => true, 'capability_type' => 'post', );
register_post_type( "product", $args );}%>
While long-winded, this is pretty standard code for creating a custom post type in Wordpress. Two things to note in our $args array:
'show_in_rest' => true makes the custom post type accessible via the REST API'rest_base' => 'products' sets the name we use to access Products via the REST API endpoints
Once you have your custom post type showing in the Wordpress admin, let’s make sure we can get a response via the API (you’ll need to create a product so it doesn’t return empty).
http://localhost/mysite/wp-json/wp/v2/products
And here’s what we get…
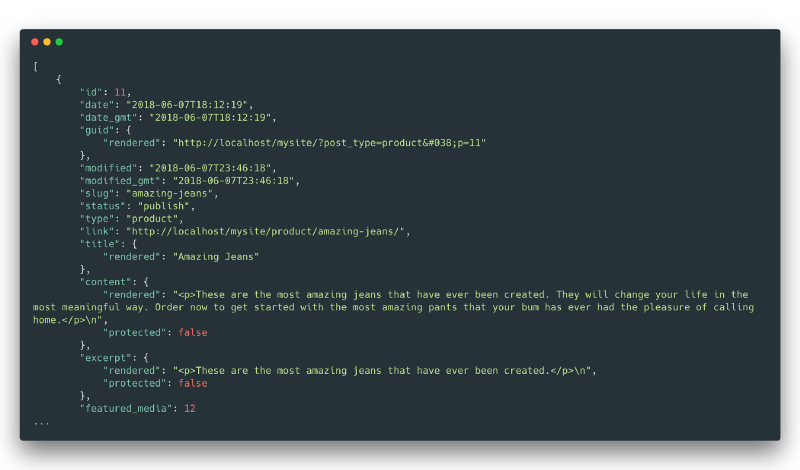
Sweet!
Advanced Custom Fields
I try to limit my usage of plugins as much as possible, but I’ll make an exception for Advanced Custom Fields (ACF). ACF takes all the work out of creating and managing custom fields for post types. Head to your Plugins page, search for Advanced Custom Fields then click “Install” & “Activate”. All done.
It would also be redundant for me to walk you through creating a Field Group using Advanced Custom Fields, so I’ll let their documentation walk you through it if you don’t know how.
Let’s create a Field Group called “Product Meta” and add fields for “Normal Price”, “Discount Price” and “Inventory Quantity” and position them in the sidebar area.
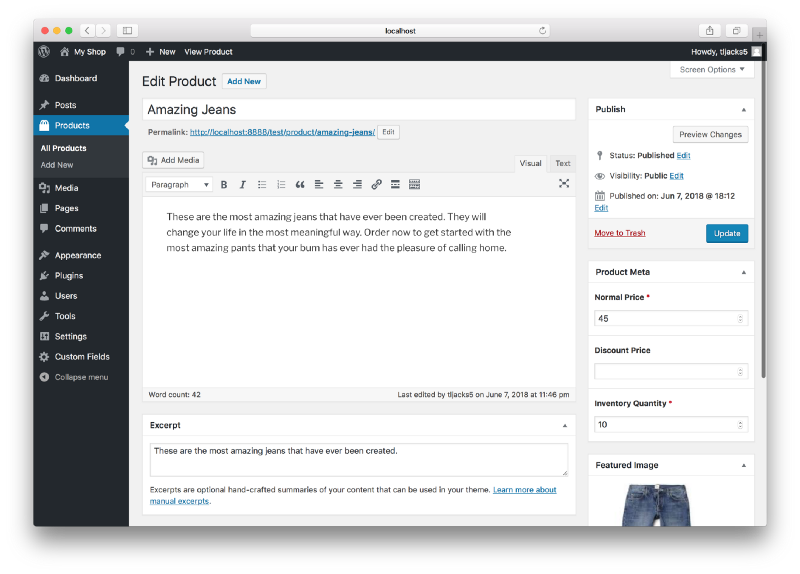
Good.
Now comes the tricky part. The fields we just created through ACF aren’t exposed via the REST API by default. We will have to leverage add_filter and rest_prepare_{$post_type} to add the custom field values to the JSON response. Here, I’ve simply added this bit of code to the bottom of our custom post type plugin file for the sake of brevity.
function my_rest_prepare_post($data, $post, $request) { $_data = $data->data; $fields = get_fields($post->ID);
foreach ($fields as $key => $value){ $_data[$key] = get_field($key, $post->ID); }
$data->data = $_data; return $data;}
add_filter("rest_prepare_product", 'my_rest_prepare_post', 10, 3);
Thanks to Cody Sand for the tidbit above.
Express.js
Our Express.js app will provide us a framework for consuming the Wordpress API and presenting products in our store website. Since we are simply consuming an API, we could use any framework of our choosing. Vue.js. Angular. Backbone. React. Rails. Django. Middleman. Jekyll. The front-end world is your oyster.
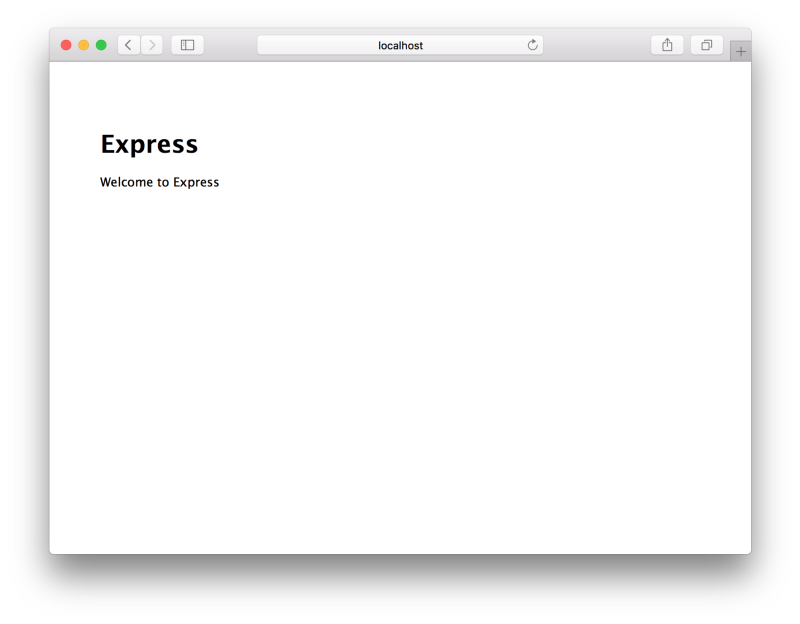
I’ll assume you already have Node.js installed. If you don’t, it’s dead simple. Let’s start a new Express.js app.
npm install -g express-generator nodemonexpress --css=sass --view=jade --git mystorecd mystorenpm install --save request request-promise && npm install
Here, we are using the Express Generator package to generate a skeleton for our Express app. We’ll also be using SASS for stylesheets and Jade Template Engine. Choose whatever you’re comfortable with. Nodemon will restart our app automatically for us when a file changes, and the Request library will help us make HTTP requests to the Wordpress API. Let’s serve up our Express app:
nodemon
Now, when we pull up http://localhost:3000 we should see our Express app running.
Alright, now let’s pull in our products.
var express = require('express');var router = express.Router();const rp = require('request-promise');
/* GET index page. */router.get('/', function(req, res, next) { rp({uri: 'http://127.0.0.1:8888/test/wp-json/wp/v2/products', json: true}) .then((response) => { console.log(response); res.render('index', {products: response}); }) .catch((err) => { console.log(err); });});
module.exports = router;
In our index.js route file, let’s include the Request-Promise library then make a call to the products endpoint within our root route (/).
If the request is successful, then we render our index view. If there’s an error with the request, we simply log it. Now, the view…
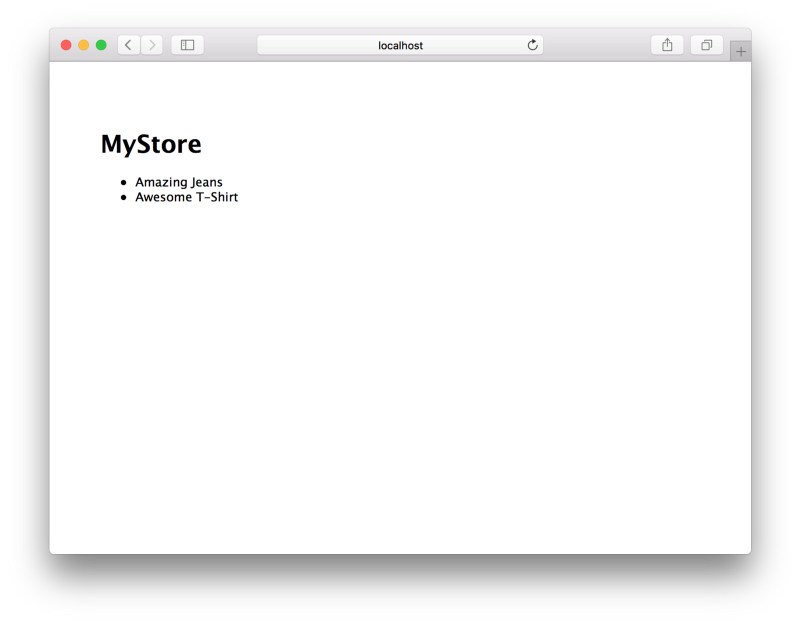
extends layout
block content h1 MyStore ul each product in products li product.title.rendered product.price
Using Jade, we will simply list the products out. Ok, let’s check out our store site.
? There’s your prize. I’ll leave it up to you to continue down the Express road and figure out how to get product listing and index pages working.
Beyond
This is a fairly simple example of how distributed apps work using Wordpress. We could have continued to separate the app into even more parts by integrating a CDN for media storage or moving the database to a separate server. We also didn’t cover authentication for the Wordpress API which is something you would absolutely need in production.
From here, you could implement Stripe or another payment processor and have a fully functional store site. I hope this has inspired some of you to leverage Wordpress in different ways and continue using one of the most ubiquitous CMS solutions out there. Happy coding!