

There might be times when a website has data you want to analyze but the site doesn't expose an API for accessing those data.
To get the data, you'll have to resort to web scraping.
In this article, I'll go over how to scrape websites with Node.js and Cheerio.
Before we start, you should be aware that there are some legal and ethical issues you should consider before scraping a site. It's your responsibility to make sure that it's okay to scrape a site before doing so.
The sites used in the examples throughout this article all allow scraping, so feel free to follow along.
Prerequisites
Here are some things you'll need for this tutorial:
You need to have Node.js installed. If you don't have Node, just make sure you download it for your system from the Node.js downloads page
You need to have a text editor like VSCode or Atom installed on your machine
You should have at least a basic understanding of JavaScript, Node.js, and the Document Object Model (DOM). But you can still follow along even if you are a total beginner with these technologies. Feel free to ask questions on the freeCodeCamp forum if you get stuck
What is Web Scraping?
Web scraping is the process of extracting data from a web page. Though you can do web scraping manually, the term usually refers to automated data extraction from websites - Wikipedia.
What is Cheerio?
Cheerio is a tool for parsing HTML and XML in Node.js, and is very popular with over 23k stars on GitHub.
It is fast, flexible, and easy to use. Since it implements a subset of JQuery, it's easy to start using Cheerio if you're already familiar with JQuery.
According to the documentation, Cheerio parses markup and provides an API for manipulating the resulting data structure but does not interpret the result like a web browser.
The major difference between cheerio and a web browser is that cheerio does not produce visual rendering, load CSS, load external resources or execute JavaScript. It simply parses markup and provides an API for manipulating the resulting data structure. That explains why it is also very fast - cheerio documentation.
If you want to use cheerio for scraping a web page, you need to first fetch the markup using packages like axios or node-fetch among others.
How to Scrape a Web Page in Node Using Cheerio
In this section, you will learn how to scrape a web page using cheerio. It is important to point out that before scraping a website, make sure you have permission to do so – or you might find yourself violating terms of service, breaching copyright, or violating privacy.
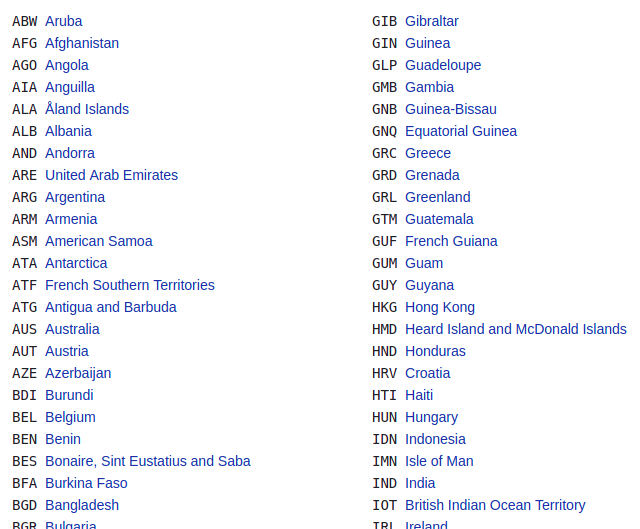
In this example, we will scrape the ISO 3166-1 alpha-3 codes for all countries and other jurisdictions as listed on this Wikipedia page. It is under the Current codes section of the ISO 3166-1 alpha-3 page.
This is what the list of countries/jurisdictions and their corresponding codes look like:
You can follow the steps below to scrape the data in the above list.
Step 1 - Create a Working Directory
In this step, you will create a directory for your project by running the command below on the terminal. The command will create a directory called learn-cheerio. You can give it a different name if you wish.
mkdir learn-cheerio
You should be able to see a folder named learn-cheerio created after successfully running the above command.
In the next step, you will open the directory you have just created in your favorite text editor and initialize the project.
Step 2 - Initialize the Project
In this step, you will navigate to your project directory and initialize the project. Open the directory you created in the previous step in your favorite text editor and initialize the project by running the command below.
npm init -y
Successfully running the above command will create a package.json file at the root of your project directory.
In the next step, you will install project dependencies.
Step 3 - Install Dependencies
In this step, you will install project dependencies by running the command below. This will take a couple of minutes, so just be patient.
npm i axios cheerio pretty
Successfully running the above command will register three dependencies in the package.json file under the dependencies field. The first dependency is axios, the second is cheerio, and the third is pretty.
axios is a very popular http client which works in node and in the browser. We need it because cheerio is a markup parser.
For cheerio to parse the markup and scrape the data you need, we need to use axios for fetching the markup from the website. You can use another HTTP client to fetch the markup if you wish. It doesn't necessarily have to be axios.
pretty is npm package for beautifying the markup so that it is readable when printed on the terminal.
In the next section, you will inspect the markup you will scrape data from.
Step 4 - Inspect the Web Page You Want to Scrape
Before you scrape data from a web page, it is very important to understand the HTML structure of the page.
In this step, you will inspect the HTML structure of the web page you are going to scrape data from.
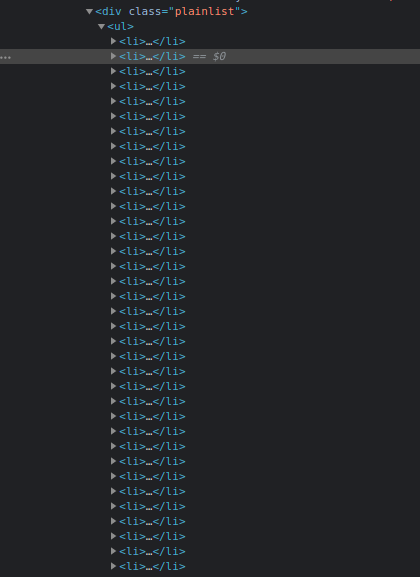
Navigate to ISO 3166-1 alpha-3 codes page on Wikipedia. Under the "Current codes" section, there is a list of countries and their corresponding codes. You can open the DevTools by pressing the key combination CTRL + SHIFT + I on chrome or right-click and then select "Inspect" option.
This is what the list looks like for me in chrome DevTools:
In the next section, you will write code for scraping the web page.
Step 5 - Write the Code to Scrape the Data
In this section, you will write code for scraping the data we are interested in. Start by running the command below which will create the app.js file.
touch app.js
Successfully running the above command will create an app.js file at the root of the project directory.
Like any other Node package, you must first require axios, cheerio, and pretty before you start using them. You can do so by adding the code below at the top of the app.js file you have just created.
const axios = require("axios");
const cheerio = require("cheerio");
const pretty = require("pretty");
Before we write code for scraping our data, we need to learn the basics of cheerio. We'll parse the markup below and try manipulating the resulting data structure. This will help us learn cheerio syntax and its most common methods.
The markup below is the ul element containing our li elements.
const markup = `
<ul class="fruits">
  <li class="fruits__mango"> Mango </li>
  <li class="fruits__apple"> Apple </li>
</ul>
`;
Add the above variable declaration to the app.js file
How to Load Markup in Cheerio
You can load markup in cheerio using the cheerio.load method. The method takes the markup as an argument. It also takes two more optional arguments. You can read more about them in the documentation if you are interested.
Below, we are passing the first and the only required argument and storing the returned value in the $ variable. We are using the $ variable because of cheerio's similarity to Jquery. You can use a different variable name if you wish.
Add the code below to your app.js file:
const $ = cheerio.load(markup);
console.log(pretty($.html()));
If you now execute the code in your app.js file by running the command node app.js on the terminal, you should be able to see the markup on the terminal. This is what I see on my terminal:

How to Select an Element in Cheerio
Cheerio supports most of the common CSS selectors such as the class, id, and element selectors among others. In the code below, we are selecting the element with class fruits__mango and then logging the selected element to the console. Add the code below to your app.js file.
const mango = $(".fruits__mango");
console.log(mango.html()); // Mango
The above lines of code will log the text Mango on the terminal if you execute app.js using the command node app.js.
How to Get the Attribute of an Element in Cheerio
You can also select an element and get a specific attribute such as the class, id, or all the attributes and their corresponding values.
Add the code below to your app.js file:
const apple = $(".fruits__apple");
console.log(apple.attr("class")); //fruits__apple
The above code will log fruits__apple on the terminal. fruits__apple is the class of the selected element.
How to Loop Through a List of Elements in Cheerio
Cheerio provides the .each method for looping through several selected elements.
Below, we are selecting all the li elements and looping through them using the .each method. We log the text content of each list item on the terminal.
Add the code below to your app.js file.
const listItems = $("li");
console.log(listItems.length); // 2
listItems.each(function (idx, el) {
  console.log($(el).text());
});
// Mango
// Apple
The above code will log 2, which is the length of the list items, and the text Mango and Apple on the terminal after executing the code in app.js.
How to Append or Prepend an Element to a Markup in Cheerio
Cheerio provides a method for appending or prepending an element to a markup.
The append method will add the element passed as an argument after the last child of the selected element. On the other hand, prepend will add the passed element before the first child of the selected element.
Add the code below to your app.js file:
const ul = $("ul");
ul.append("<li>Banana</li>");
ul.prepend("<li>Pineapple</li>");
console.log(pretty($.html()));
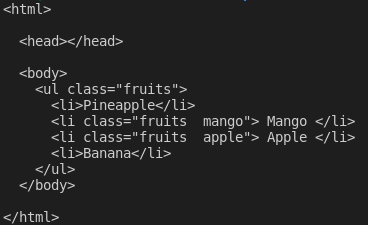
After appending and prepending elements to the markup, this is what I see when I log $.html() on the terminal:
Those are the basics of cheerio that can get you started with web scraping.
To scrape the data we described at the beginning of this article from Wikipedia, copy and paste the code below in the app.js file:
// Loading the dependencies. We don't need pretty
// because we shall not log html to the terminal
const axios = require("axios");
const cheerio = require("cheerio");
const fs = require("fs");

// URL of the page we want to scrape
const url = "https://en.wikipedia.org/wiki/ISO_3166-1_alpha-3";

// Async function which scrapes the data
async function scrapeData() {
  try {
    // Fetch HTML of the page we want to scrape
    const { data } = await axios.get(url);
    // Load HTML we fetched in the previous line
    const $ = cheerio.load(data);
    // Select all the list items in plainlist class
    const listItems = $(".plainlist ul li");
    // Stores data for all countries
    const countries = [];
    // Use .each method to loop through the li we selected
    listItems.each((idx, el) => {
      // Object holding data for each country/jurisdiction
      const country = { name: "", iso3: "" };
      // Select the text content of a and span elements
      // Store the textcontent in the above object
      country.name = $(el).children("a").text();
      country.iso3 = $(el).children("span").text();
      // Populate countries array with country data
      countries.push(country);
    });
    // Logs countries array to the console
    console.dir(countries);
    // Write countries array in countries.json file
    fs.writeFile("coutries.json", JSON.stringify(countries, null, 2), (err) => {
      if (err) {
        console.error(err);
        return;
      }
      console.log("Successfully written data to file");
    });
  } catch (err) {
    console.error(err);
  }
}
// Invoke the above function
scrapeData();
Do you understand what is happening by reading the code? If not, I'll go into some detail now. I have also made comments on each line of code to help you understand.
In the above code, we require all the dependencies at the top of the app.js file and then we declared the scrapeData function. Inside the function, the markup is fetched using axios. The fetched HTML of the page we need to scrape is then loaded in cheerio.
The list of countries/jurisdictions and their corresponding iso3 codes are nested in a div element with a class of plainlist. The li elements are selected and then we loop through them using the .each method. The data for each country is scraped and stored in an array.
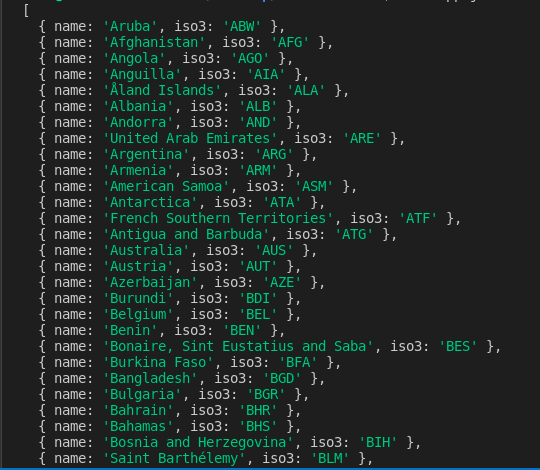
After running the code above using the command node app.js, the scraped data is written to the countries.json file and printed on the terminal. This is part of what I see on my terminal:
Conclusion
Thank you for reading this article and reaching the end! We have covered the basics of web scraping using cheerio. You can head over to the cheerio documentation if you want to dive deeper and fully understand how it works.
Feel free to ask questions on the freeCodeCamp forum if there is anything you don't understand in this article.
Finally, remember to consider the ethical concerns as you learn web scraping.