By Dillion Megida
When you want to style an element with CSS, you first have to "select" it. In this article, I'll show you seven (7) ways in which you can do that.
Here's the syntax for styling elements in CSS:
selector {
  /* styles here */
}
You have the selector that "targets" the element(s) you want to style, then you have an open curly brace. After the brace, you have your styles using different CSS properties, and you close it with a closing curly brace.
There are numerous ways to target elements. You can call these methods Selector Types.
Here is a video with examples on Ways to Select Elements to Style in CSS if you prefer that.
Here are seven selector types in CSS.
1. How to Use the Universal Selector (*) in CSS
The Universal Selector, asterisk (*), allows you to select ALL elements of any type for styling. Here is an example:
* {
  border: 1px solid black;
}
Let's say we use this style for the following HTML:
<body>
    <h1>CSS styles</h1>
    <p>How to apply styles</p>
    <div>
        <img width="20px" height="20px" src="https://www.freecodecamp.org/news/content/images/size/w150/2022/03/deee.jpg" />
    </div>
</body>
Here is the result:
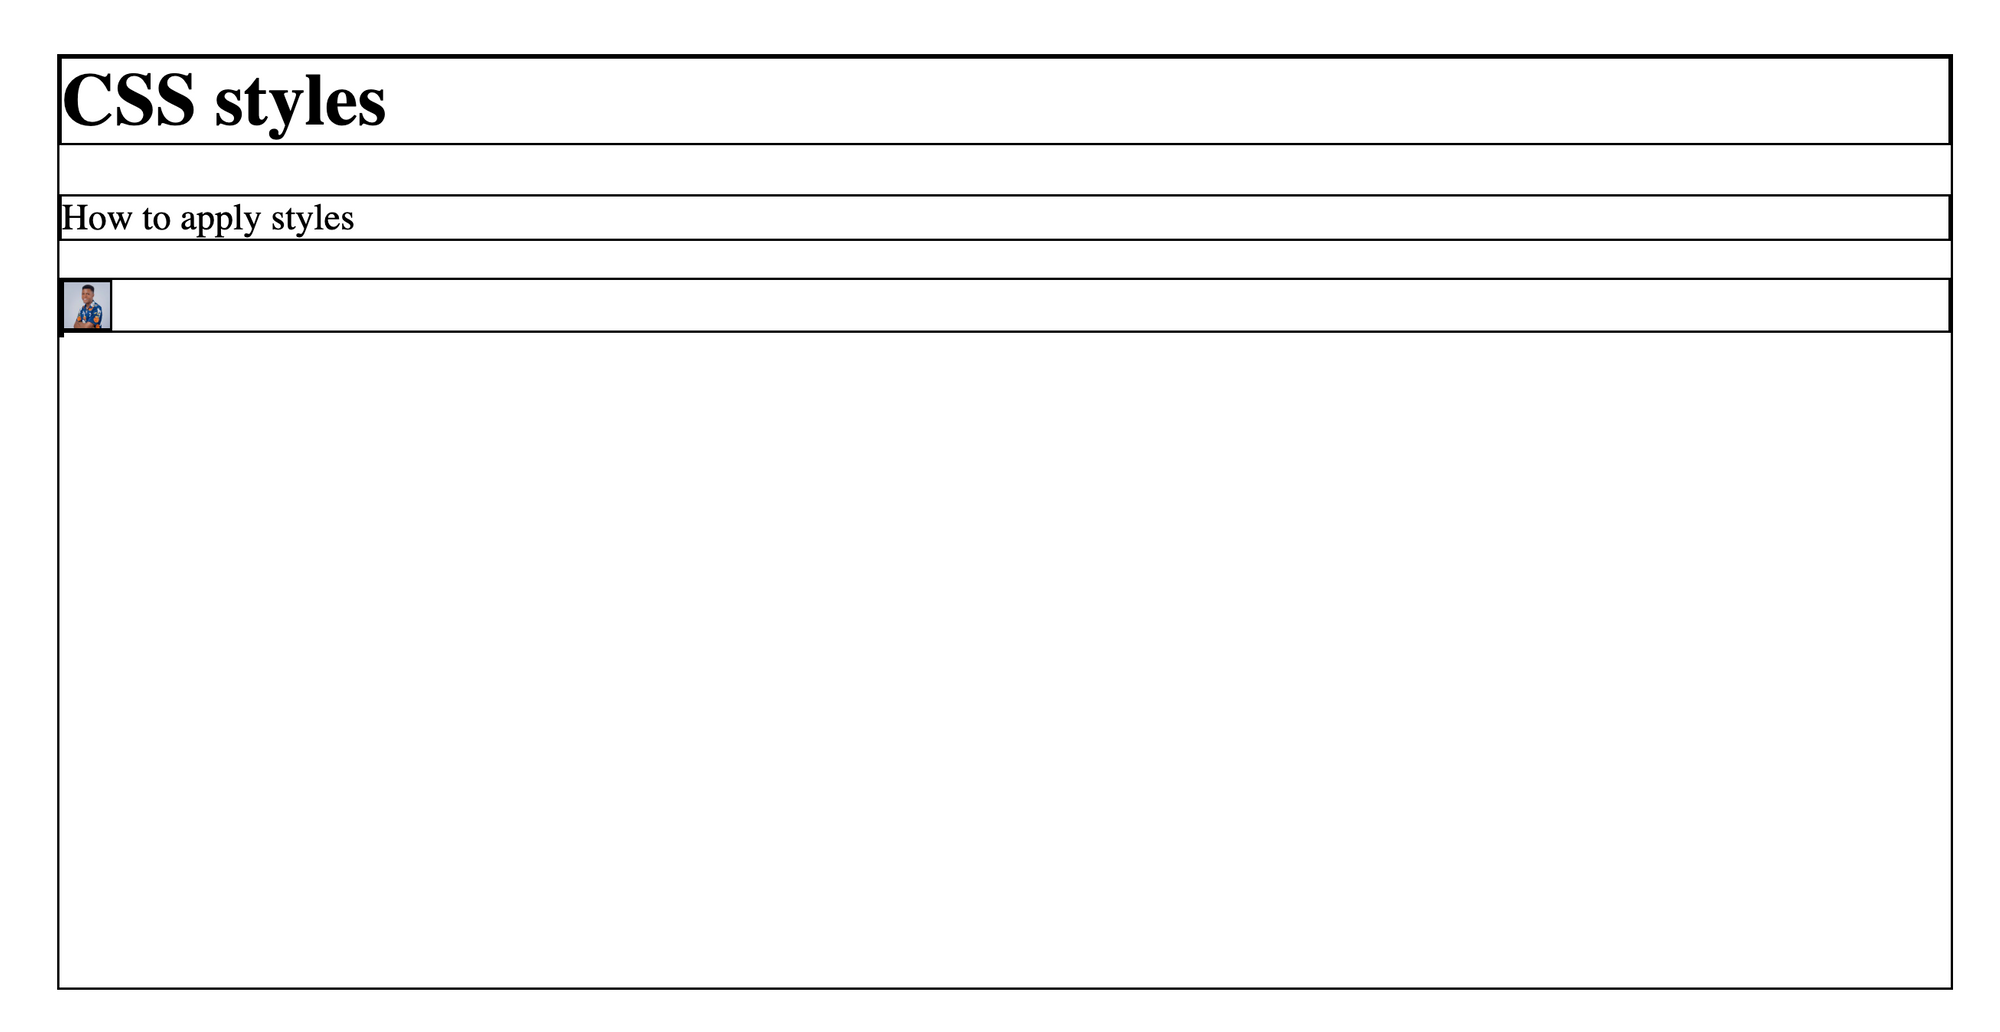
You can see that the body, h1, p, div, and img elements all have the border of 1px solid black because we used the universal selector.
2. How to Style Elements by Tag Name in CSS
You can also select elements for styling by using their tag names. Here's an example:
p {
  color: red;
}

img {
  width: 100px;
  height: 100px;
}
These style declarations applies a color of red to all p elements and a width and height of 200px to all img elements.
Here's how the style above works with this HTML:
<span>I am a span</span>
<p>There is a span above me</p>
<img src="https://www.freecodecamp.org/news/content/images/size/w150/2022/03/deee.jpg" />
The result:

You can see that the span is not styled – only the img and the p are.
3. How to Style Classes in CSS
Elements accept different attributes (also called properties), including classes. You can target an element based on the class you have specified on it. Here is an example:
<div class="container">
    <h2>Hello</h2>
</div>

<div>
    <h2>How are you</h2>
</div>
There are two divs here, but only one has a class attribute with the container value. You can style the one with the class using a period (.) then the class like this:
div {
  border: 1px solid purple;
}

.container {
  border-width: 20px;
}
Here's the result:
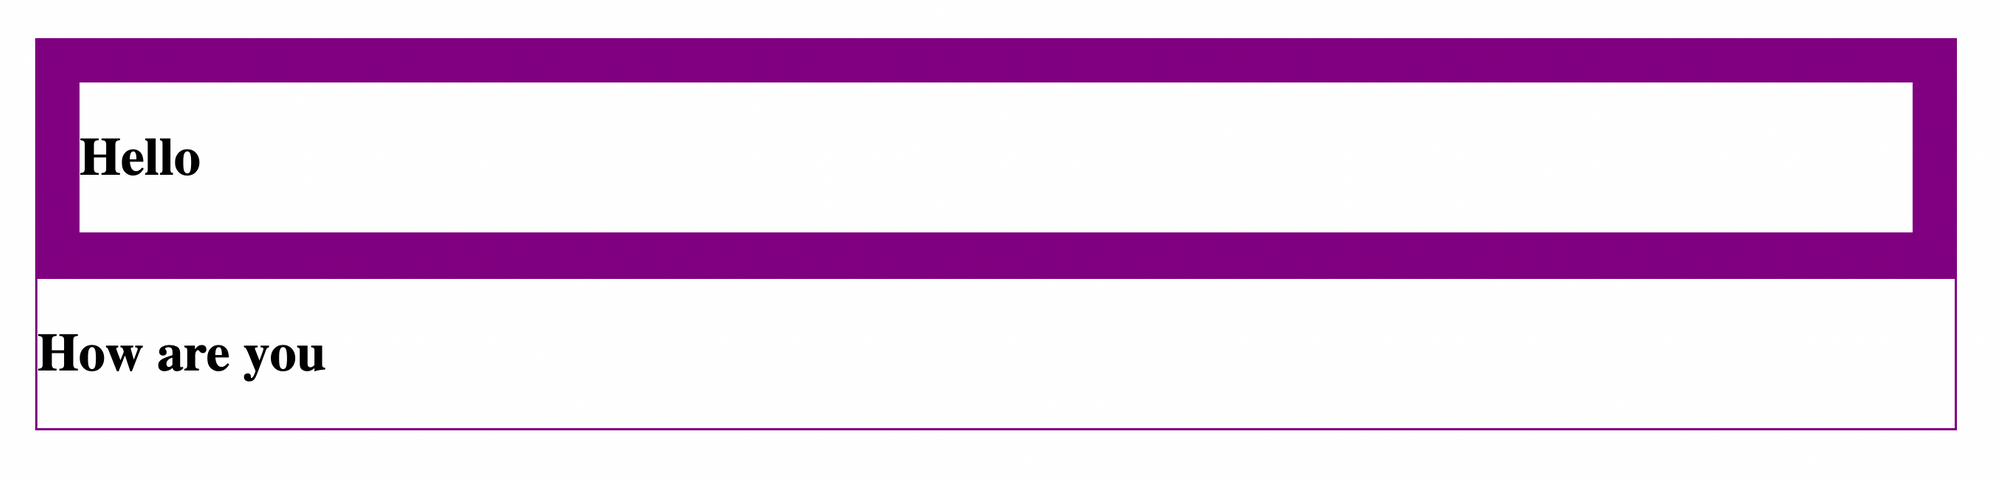
From the CSS, we specified that all div elements should have a border of 1px solid purple. But for the element with a container class, you can see from the result that it has a border-width of 20px.
4. How to Style Ids in CSS
Similar to the class attribute, you can specify an id on an element which you can target from CSS for styling.
Here is an example:
<div class="container">
    <h2>Hello</h2>
</div>

<div id="container">
    <h2>How are you</h2>
</div>
You can target the id element here by using a hash (#) and then the id like this:
#container {
  border-left: 10px solid blue;
}
Here's the result:

Using the element (whether it's a div, p, or any type) with the container id, we applied styles to only the second div element.
Unlike classes, however, ids must be unique. Two or more elements cannot have the same id as that would cause unexpected behaviors.
5. How to Style Other Attributes in CSS
We've seen how to target class and id attributes. What if you wanted to target other attributes? Well you can; using square brackets ([attr]). How does that work?
Let's see an example:
<a href="#">
    Some link
</a>

<p href="https://google.com">
    A paragraph link
</p>
In this example, we have two elements: an a tag and a p tag. To style both elements, you can use their tag names directly:
p, a {
  color: red;
}
The comma allows you to apply styles to multiple selectors at once.
But another way you can style both elements is using their attributes. They both have a href attribute.
Just keep in mind that the href attribute is not supported in p tags though. I'm just using it to illustrate an example.
Here's how you can use the href attribute to style both elements:
[href] {
  color: red;
}
This CSS will match all elements with the href attribute.
Here's the result:

Both elements have the href attribute and so they are selected for our styles. Here, we used the href attribute without a value. You can also specify a value to be specific about your target like this:
[href="#"] {
  color: red;
}
Here's the result:

Only the a tag has the href attribute with the # value so that is the only element that matches our styles, as you can see from the image above.
6. How to Use Pseudo-Classes in CSS
Pseudo-classes are selector types that allow you to select elements in a particular state. To name a few, here are some supported states:
hover(when the mouse floats over an element)disabled(when an element such as an input or button is disabled)required(when a form element is required)
And many more you can find in the Pseudo-classes MDN Documentation.
You can apply styles when elements are in these states. You select the state by using a colon (:) followed by the state. Here is an example:
<!DOCTYPE html>
<button>
    Hover me
</button>
The <!DOCTYPE html> line is important to specify that it is HTML5 so the pseudo classes can work.
And here's the CSS:
:hover {
  background-color: black;
  color: white;
}
This CSS would apply these styles to any element you hover over. Here's the result":

The image on the left is without the hover state. On the right, you can see the styles applied to the body and the button because we're hovering over them.
By hovering over the button, you are also hovering over the body because the button is a child of the body.
7. How to Use the Pseudo Element Selector in CSS
Pseudo-elements (different from Pseudo Classes) are used to select a "specific part of an element". Not the whole element – just a part. And you can also use them to add pseudo (artificial) elements to an existing element.
Here's a detailed article on Pseudo elements vs Pseudo-classes in CSS
Here are some supported pseudo-element selectors:
selection: the highlighted part of an elementfirst-line: the first line of a paragraphplaceholder: the placeholder text of an input element
And many more you can find in the MDN Pseudo Elements Documentation.
To apply styles using a pseudo-element selector, you use double colons (::) followed by the pseudo-element. Here's an example:
<!DOCTYPE html>
<input placeholder="Enter some text" />
And here's the CSS for this HTML:
input {
  color: blue;
}

::placeholder {
  color: red;
  font-style: italic;
}

The ::placeholder pseudo-element selector styles the "placeholder part" of all form elements. As you can see in the example above, the input element itself has a color style of blue but the placeholder part has different styling.
Wrapping up
In this article, I've shown you seven ways in which you can target elements you want to style. We've seen:
- the universal selector, for selecting all elements
- tag names for selecting elements that match a tag name
- classes for selecting elements with a class attribute
- ids for selecting an element with an id attribute
- attributes for selecting elements that have an attribute with or without a specified value
- pseudo-classes for selecting elements in a specific state
- pseudo-elements for selecting specific parts of an element
You can also combine these selectors to be more specific about the element you want to target. You do this using Combinators.
Combinators allow you to use multiple selectors to target elements based on the relationship between the elements that match the selectors. Here's an article I wrote about combinators if you want to learn more.
To give you a quick preview – combinators are used between multiple selector types, and they allow you to style elements based on the relationship they have with other elements.
Thank you for reading!